1
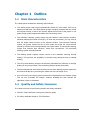
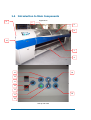
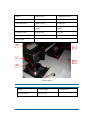
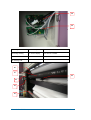
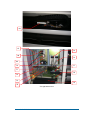
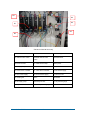
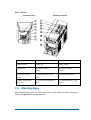
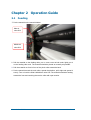
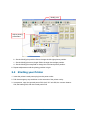
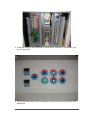
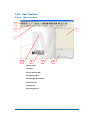
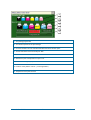
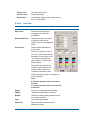
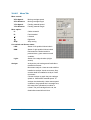
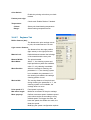
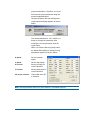
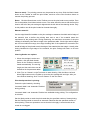
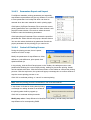
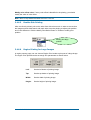
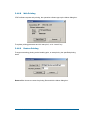
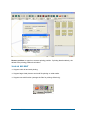
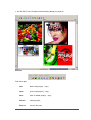
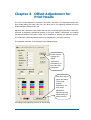
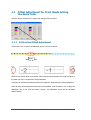
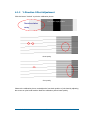
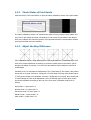
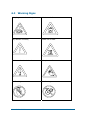
User Manual Table of Contents CHAPTER 1 OUTLINE ................................................................................ 1 1.1 MAIN CHARACTERISTICS ........................................................................................ 1 1.2 QUALITY AND SAFETY INSURANCE .......................................................................... 1 1.3 SPECIFICATIONS .................................................................................................... 2 1.4 INTRODUCTION TO MAIN COMPONENTS ................................................................... 4 1.5 WARNING SIGNS .................................................................................................. 13 CHAPTER 2 OPERATION GUIDE............................................................. 14 2.1 FEEDING ............................................................................................................. 14 2.2 STARTING YOUR PRINTER..................................................................................... 16 2.3 INK FILLING PROCEDURE...................................................................................... 18 2.4 PRINTING CONTROL PROCESS ............................................................................. 18 2.5 REMOVING MATERIAL........................................................................................... 18 2.6 SHUTTING DOWN ................................................................................................. 18 CHAPTER 3 USE OF CONTROL SOFTWARE ......................................... 19 3.1 OBJECTIVES ........................................................................................................ 19 3.2 FUNCTIONS ......................................................................................................... 19 3.3 EXECUTION ENVIRONMENT................................................................................... 20 3.4 OPERATION ......................................................................................................... 20 3.4.1 Hardware Installation and Initialization.............................................................. 20 3.4.2 RIP Software Installation ................................................................................... 20 3.4.3 Control Software Installation.............................................................................. 20 3.4.4 User Interface .................................................................................................... 25 3.4.4.1 Main Interface ............................................................................................ 25 3.4.4.2 File Tab ...................................................................................................... 31 3.4.4.3 Option Tab.................................................................................................. 32 JetSet 3.2P Printer i User Manual 3.4.4.4 Para Tab..................................................................................................... 33 3.4.4.5 Move Tab.................................................................................................... 34 3.4.4.6 Aux Tab ...................................................................................................... 35 3.4.4.7 Engineer Tab .............................................................................................. 36 3.4.5 Modify Parameters in Printing ........................................................................... 38 3.4.6 Operation Introduction ....................................................................................... 38 3.5 3.4.6.1 Printing Document...................................................................................... 38 3.4.6.2 Select Print Parameters ............................................................................. 38 3.4.6.3 Parameters Export and Import................................................................... 40 3.4.6.4 Control of Printing Process ........................................................................ 40 3.4.6.5 Double-Side Printing .................................................................................. 41 3.4.6.6 Region Printing for Large Images .............................................................. 41 3.4.6.7 Multi-file Printing......................................................................................... 42 3.4.6.8 Web Printing............................................................................................... 43 3.4.6.9 Restore Printing ......................................................................................... 43 3.4.6.10 RIP EDIT .................................................................................................... 44 ERROR AND WARNING CODES .............................................................................. 48 CHAPTER 4 4.1 OFFSET ADJUSTMENT FOR PRINT HEADS..................... 49 OFFSET ADJUSTMENT FOR PRINT HEADS JETTING THE SAME COLOR ..................... 50 4.1.1 X-Direction Offset Adjustment ........................................................................... 50 4.1.2 Y-Direction Offset Adjustment............................................................................ 51 4.2 COLOR OFFSET ADJUSTMENT .............................................................................. 52 4.2.1 Check Status of Print Heads.............................................................................. 53 4.2.2 Adjust the Step Difference ................................................................................. 53 4.2.3 X & Y Direction Color Offset (Color Offset)........................................................ 54 4.2.4 Bi-Difference (Return Difference) ...................................................................... 55 Matan JetSet 3.2P Printer ii User Manual CHAPTER 5 5.1 MAINTENANCE.................................................................... 57 MAINTENANCE SPECIFICATIONS ............................................................................ 57 5.1.1 Preparations before Start................................................................................... 57 5.1.2 Maintenance in Printing..................................................................................... 57 5.1.3 Shut Down for Maintenance .............................................................................. 58 5.2 5.1.3.1 Daily Maintenance ..................................................................................... 58 5.1.3.2 Weekly Maintenance.................................................................................. 58 5.1.3.3 Monthly Maintenance................................................................................. 58 5.1.3.4 Quarterly Maintenance .............................................................................. 59 5.1.3.5 Annual Maintenance .................................................................................. 59 MAINTENANCE OF PRINT HEAD ............................................................................. 59 5.2.1 Installation of Print Head ................................................................................... 59 5.2.2 Disassembling Print Head ................................................................................. 59 5.2.3 Basic Maintenance Knowledge of Print Head ................................................... 60 5.2.4 How to Fill the Print Head with Ink .................................................................... 60 5.2.5 Cleaning Print Head during Working ................................................................. 60 5.2.6 Protecting Print Heads during Work Stoppage (suitable for stoppage of several days).................................................................................................................. 60 5.3 INK SUPPLY SYSTEM MAINTENANCE...................................................................... 61 5.3.1 Cleaning the Ink Supply System ....................................................................... 61 5.3.2 Adding Ink.......................................................................................................... 61 5.4 CONSIDERATIONS OF INK USAGE .......................................................................... 62 CHAPTER 6 APPENDIX............................................................................ 63 6.1 ERROR AND WARNING CODES OF CONTROL SOFTWARE ........................................ 63 6.2 SOFTWARE INSTALLATION LIST ............................................................................. 65 6.3 WARNING SIGNS .................................................................................................. 66 Matan JetSet 3.2P Printer iii User Manual Chapter 1 Outline 1.1 Main Characteristics The JetSet printer includes the following main features: ♦ The JetSet printer uses long life piezoelectric Hitachi E1 print heads, fixed on an aluminum metal base. The JetSet printer is highly causticity resistant and can control the ink point exactly, so that it can correctly adjust the fine color of the picture. It can produce high quality images with brilliant and conforming colors. ♦ The automatic cleaning system keeps the print heads in best working condition, efficiently keeping the heads from drying. To clean the print heads, you only need to click the Wash Heads function in the software window. The automatic cleaning system can greatly extend the life of print heads and avoid the inconvenience caused by frequent removal and washing of the print heads. The automatic cleaning system thus ensures high efficiency, safety and convenience. The automatic cleaning system is liquid protected. ♦ The feeding system employs tension control on the materials, ensuring smooth feeding. This prevents the possibility of pictures being destroyed due to material sticking. ♦ The LM (Linear Motion) carriage rail effectively eliminates the influence of carriage shaking on the print precision, thus increasing the print quality observably. ♦ The first inkbottle and second ink tank level sensor auto-alarming system supervises the ink level all the time, preventing the waste due to the shortage of ink. ♦ An inner warm-up and drying system ensures the ink dissolves in the medium quickly. This not only increases the images’ outdoors durability but also extends the application scope of substrates. 1.2 Quality and Safety Insurance The JetSet conforms to the following Quality and Safety standards: ♦ ISO9001: 2000 certificate, insuring the product’s quality. ♦ CE safety certificate issued by TÜV Rhineland. Matan JetSet 3.2P Printer 1 User Manual 1.3 Specifications Printing technology: Piezo, bi-direction printing Print head set: Hitachi, 96 nozzles, 12 print heads (2 heads * 6 colors) Color: 6 colors: C, M, Y, K, LC, LM. (4-colors printing is also possible) Resolution: 600DPI * Printing size: Max printing width: 2.5 m (3.2m) Max material width: 2.6 m (3.4m) Max material length: 50 m/roll Material thickness: 0.15-1.0 mm Machine description: Dimensions: 1. 69m(H) * 4.35/5.05m(W) * 0.83m(D) Weight: 942/1200 KG Feeding system: Roll to roll with tension control Heating system: Pre-heating, post-heating, cooling fan and carriage-heating Ink supply system: Auto-continuous supply and negative pressure Material types: Flexible materials with banner and flex, self-adhesive vinyl, mesh and textiles, etc. Printing mode: Three Pass (3 Pass); Normal (6 Pass); Enhanced (8 Pass); Master (12 Pass); Ultra (16 Pass) Production capacity: Ink and solvent: Mode Three Pass 73 m²/h Normal 37 m²/h Ultra 14 m²/h Matan Ink The ink and solvent conform to EU’s & US regulations. For further details refer to MSDS on Matan's web site. Matan JetSet 3.2P Printer 2 User Manual Software description: Image file format: The system support PostScriptR3TM; Accept all available file format, including EPS, TIFF (CMYK mode), JPG (RGB mode) etc. RIP operating system: Work station configuration: Scanvec Photo Print server Ver. 4.0 (Windows XP) 40GB hard disk, 512MB memory, P4 2.48G CPU, 10/100M Ethernet The above configuration may change in future upgrades. Operating system: Windows XP Environment requirements: Power range: 230V AC±10V 50HZ 15A/23A Maximum power: 3.5/5.3KW Operating temperature: 20 - 29 °C Non-operating temperature: 0 - 50 °C Operating humidity: 40 - 60% RH (Not condensing) Non-operating humidity: 10 - 80% RH (Not condensing) Installation altitude: 2000 m or less Operating noise: 70dB(A) or less Safety certifications: CE Certification. IEC/EN 60204 Guarantee: According to Matan warranty policy. See the Warranty documents. Matan JetSet 3.2P Printer 3 User Manual 1.4 Introduction to Main Components Appearance 2 5 6 8 10 7 9 15 16 14 11 12 13 19 17 18 Left-up side view Matan JetSet 3.2P Printer 4 User Manual * Monitor 2.Left box body * Left emergency stop * Vacuum adjust 5. Front top 6.Right front door 7.Secondary drying 8.Right box body 9.Cooling fans 10.Left box body 11.Pre-heating temperature 12.Drying temperature controller controller 13. AUX dryer SW 14.Tension SW 15.HV SW 16.Drying fan SW 17.Start SW 18.Platform vacuum SW 19.Lighting SW 20 23 21 24 22 Left box inside Note: ‘SW’ = Switch 20.LSN 21. X-axis reducer 23.Y-axis reducer 24.Y-axis motor Matan JetSet 3.2P Printer 5 22.x-axis motor User Manual 38 37 36 26 27 35 28 34 29 33 25 32 30 31 39 25.Servo card 26.Main power SW 27.X-axis SW 28.Y-axis SW 29.Tension SW 30.Heating SW 31.Contactor 32.Relay 33.Pre-heating relay 34.Drying relay 35. Capacitor(s) 36.Relay 37.Tension adjustor 38.Secondary drying relay 39.Line connect shelf Matan JetSet 3.2P Printer 6 User Manual 40 45 41 42 43 44 Platform 46 47 Carriage cleaning position Matan JetSet 3.2P Printer 7 User Manual 48 49 Carriage cleaning position 40.Line railway 41.Cable chain 42.Timing Belt 43.Printing platform 44.Lighting 45.Encoder Strip 46.Cleaning system 47.Carriage 48.Cleaning pump 49. Waste ink tank Matan JetSet 3.2P Printer 8 User Manual Carriage 50 52 51 53 54 Carriage front 56 55 57 Carriage back Matan JetSet 3.2P Printer 9 User Manual 58 59 50.Carriage PCB 51.Secondary ink tank 52. Print head 53.Carriage heating 54. Vacuum display 55. Vacuum controller 56. Ink connect PCB 57. I/O card 58 Ink card PCB 59. Cleaning PCB 60 61 62 63 64 65 Matan JetSet 3.2P Printer 10 User Manual 66 67 72 68 73 69 70 77 71 78 74 75 79 76 The right electric box Matan JetSet 3.2P Printer 11 User Manual 80 83 84 81 85 82 The back of the left box body 60.Main rubber roller 61.Pressure Roller 62.Pinch Supporter 63. Side Air valve switch 64.Middle Side Air valve 65.Media holder switch 66.Linear encoder 67. Cable terminal strip 68.PC power 69. Relay (SSR) 70. Filter 71.AC24 transformer 72.X-Axis servo controller 73. Y-Axis servo controller 74.40V Power supply 75.24V Power supply 76.12V/5V Power supply 77.Tension motor 78. Cooling fan 79.PC 80.Ink filter 81.Ink supply pump 82.Primary ink tank 83. Air pressure gauge 84.Air pressure valve 85.Main air pressure gauge Matan JetSet 3.2P Printer 12 User Manual Servo controller Controller cover Outside connector 1.Battery base 2.Battery connector (CON1) 3.Monitor 4.Button MODE 5.Button UP 6.Botton DOWN 7.Botton SET 8.I/O signal connector 9.I/O signal connector (CN1A) (CN1B) 10.Encoder connector 11.Communication connector 12.Electrification indicator (CN2) (CN3) 13.Main circuit terminal 14.Control circuit terminal base 15.Protecting grounding (PE) base (TE1) (TE2) terminal 1.5 Warning Signs Before operating the printer you must read the warning sign stickers located on the printer. Please see Appendix 3 Warning sign table. Matan JetSet 3.2P Printer 13 User Manual Chapter 2 Operation Guide 2.1 Feeding 1. Put the material on the material holder. Side air valve SW Middle air valve SW 2. Pull the material on the feeding roller, put on cover cores at both ends, lightly put it on the feeding roller rack. The material should be placed as centrally as possible. 3. Pull the material out from in front of the pinch roller toward the back. 4. Put the material around the main roller, spread the platform, pull it tight and spread it evenly. Turn on both the Side & Middle air valve SW. The material should be feeding toward the front and reaching the tension roller with open tension. Matan JetSet 3.2P Printer 14 User Manual Note: If inducing material is to be added, do not stick two pieces onto the printer. Instead, stick one piece on the ground and then feed it, making sure the stuck part is not pressed between the pinch rollers. To print on mesh, perform the following steps before feeding: 1. Turn off printer and remove the top platform board. 2. Close the ventilated cover and check if the waste ink tube is well connected. 3. Turn on printer. 4. The rest of the printing process is the same as normal printing. To print double-face, perform the following steps: 1. Choose the right material. 2. Install the material and mark its installation position, then turn on the power and print. During the printing process, the best method is to choose center printing. 3. After printing, use the drying icon to dry the printed media. 4. Next, feed the printed material on its other side. Make sure the installation position is the same as you marked in “Step 2” 5. Choose mirror print. If the printing position is not right, adjust the position as follows: a. Click the “Modify print” button. The Modify Print Position dialog box appears: Matan JetSet 3.2P Printer 15 User Manual Modify print Adjust printing parameters b. Set the Modify print position field to change the left-right picture position. c. Set the Modify print move length field to change the carriage position. d. Set the Modify print step field to change the front-back picture position. 6. Repeat adjustments until the printing position is right. 2.2 Starting your Printer 1. Insert the printer's main power plug into the power outlet. 2. Pull the emergency stop switches on the two ends of the printer out/up. 3. In sequence, open the general power SW, the X & Y axis SW, the vacuum cleaner SW, the heating SW, and the control power SW. Matan JetSet 3.2P Printer 16 User Manual 4. Press down the start button and the PC power button. After the PC has started, open the HV power SW. 5. Turn on the tension SW, the vacuum adjustor, cooling fan SW, the AUX dryer and the lighting SW. Matan JetSet 3.2P Printer 17 User Manual 6. Start the software operation system. 2.3 Ink Filling Procedure 1. Before filling the ink, first clean the ink bucket with solvent. 2. Switch on the control power. 3. Before connecting the print head with the tube, flush every outlet with solvent to ensure the elimination of scraps in the tubes. 4. Connect the print head, push solvent into the print heads. 5. Add ink into the ink containers and let it flow continuously until the ink displaces the solvent. For more information on the print heads, refer to Chapter 5, Maintenance of Print Head. 2.4 Printing Control Process 1. During the printing process, do not open the platform cover or the cleaning position cover; do not turn off the HV power SW, main power supply, or the X & Y axis SW otherwise the print process will be terminated. 2. During the printing process, if anything unexpected occurs, push the emergency stop SW to terminate the process. 3. Do not modify the parameters of the motor during the printing process. For more on Printing Control, refer to Chapter 3, Use of Control Software. 2.5 Removing Material 1. Loosen tension. 2. Cut the material off the printer (be sure not to scrape the machine). 2.6 Shutting Down 1. Set the HV power SW to OFF. 2. Close the control software. 3. Shut down the PC. 4. In order, turn off all the following: control power, heating, vacuum pump, X & Y axis controller, and general power. 5. Protect the print heads (refer to Chapter 5, Maintenance of Print Head). Matan JetSet 3.2P Printer 18 User Manual Chapter 3 Use of Control Software 3.1 Objectives This User Manual explains how to use Matan’s JetSet printer software, and provides useful reference assistance to our customers. ♦ Multi-copy printing: print the same image on several copies in landscape orientation. ♦ Region printing: choose one region of a picture to print. ♦ Normal printing: define the scope before printing, no matter whether it is a blank area or an image. 3.2 Functions ♦ Support 600x360dpi with 4/6 colors printing in RIP format. ♦ Support print modes of Test, Draft, Normal, Enhanced, Master, and Ultra. ♦ Freely set enable or disenable for each color. ♦ Provide three levels of print speed and five levels of feed speed. The whole printing process can be configured dynamically. ♦ Various print solutions including single direction, mirror, and double strike print. ♦ Smart print with white space skips in X and Y-axis directions, and with automatic drying after printing. ♦ Special print modes including multi-copy print, region print, and separate print. ♦ Automatic edge searching (including multiple materials), cleaning in printing, and flash jet. ♦ Enable the printing of footnotes, print parameters, user remarks, and date. ♦ Modify offset parameter, material feeding speed, and printing position, during the printing. ♦ Support batch print and copy configuration. ♦ Automatic print head maintenance during printing breaks. Matan JetSet 3.2P Printer 19 User Manual ♦ Select head set and print color bar to check the status of the print head. ♦ Recover and resume printing after an unexpected break. ♦ Automatic cleaning system and liquid protection. ♦ Support multi-file print, restore print, and files auto division print. 3.3 Execution Environment ♦ Operating system: WINDOWS XP. ♦ Driver for PCI image card. ♦ CPU: P4 2.4 GHz or above. ♦ Memory: 256MB or above. ♦ Network: 10/100M Ethernet adapter. ♦ Hard disk: 40 GB. 3.4 3.4.1 Operation Hardware Installation and Initialization Insert the image card into the PCI slot of your PC. Install driver and application programs. As both are pre-configured with default parameters, you can start printing right after this is completed. 3.4.2 RIP Software Installation The extension of the output file is *.prn or *.prt The RIP file is exported by RIP software “PPS4” For its usage, refer to the User Manual on Installation DISK2 (see Appendix 2). 3.4.3 Control Software Installation Put the installation disk into the CD-ROM drive and perform the following steps to install the control software: 1. Proceed to directory \install of the disk and run the setup.exe file to start the installation wizard. Matan JetSet 3.2P Printer 20 User Manual 2. When you see the Welcome screen, click the ‘Next’ button to continue. Matan JetSet 3.2P Printer 21 User Manual 3. Select the Destination Folder for the installation. 4. Click the Next button to keep the default Program Folder name. Matan JetSet 3.2P Printer 22 User Manual 5. The installation program will now copy the hardware drivers and control software to the Destination Folder. Note: If there is an error in the hardware driver installation, the following Install dialogue box pops up. You must then install the hardware driver manually after the installation of the software. 6. After finishing the installation, you must reboot the PC so that the driver will be available. Matan JetSet 3.2P Printer 23 User Manual Matan JetSet 3.2P Printer 24 User Manual 3.4.4 User Interface 3.4.4.1 Main Interface 1 2 4 3 5 6 7 8 1.Menu items 2.Toolbar 3.Print settings bar 4.Property pages 5.Job image information 6.Job preview 7.Status bar 8.Printing job list Matan JetSet 3.2P Printer 25 User Manual ♦ Menu: File Open Select a file Add Task Add the selected file to the printing job list Add and Print Add the selected file to the printing job list, then print the file Delete Delete the current RIP file from the printing job list Exit Exit the application Print Reset Reset the position of the print carriage Measure Get the edge position and width of material Print Stop Printing actions Pause Continue Multi-file Print Print many files pieced together with no printing gap Restore Print Option Init Printer Initialize printer action Move Stop Move Left Move Right Moving carriage and feeding material Move Up Move Down Wash Heads Clean the print heads Modify Print Position Modify print position for printing Export Parameter File Save parameters Matan JetSet 3.2P Printer 26 User Manual Import Parameter File Load parameters Tools Turn On Cleaner Turn on/off cleaner for cleaning print heads Turn Off Cleaner Protect Heads Enable flash jet to protect print heads Screen Keyboard Show/hide PC keyboard View View Control Page Show/hide property pages Fit view Zoom Out Preview actions Zoom In Refresh Status view Show print head state Help About Matan Print Matan JetSet 3.2P Printer Software version description 27 User Manual ♦ Toolbar: 1 2 3 4 5 6 7 8 9 10 11 12 13 14 15 1.View Control Page Show/hide property pages 2.Open File Add a file to the list of print jobs 16 17 18 19 20 21 3.Start Print 4.Print Pause Printing operations 5.Print Continue 6.Print Stop 7.Reset Reset the position of the print carriage 8.Measure Get the edge and width of the material 9.Modify Print Position Modify print position in printing, used for double-side printing 10.Move Left Move the print carriage from right to left 11.Move Right Move the print carriage from left to right 12.Move Stop Stop moving 13.Move Up Collecting material 14.Move Down Feeding material 15.Wash Heads Clean print heads 16.Protect Heads Enable press ink to protect heads K.C.M.Y.LC.LM 17.Liquid Protection 18.Dryer After printing, dry automatically 19.Screen Keyboard Popup the screen keyboard 20.RIP EDIT Support multi-files: file edit DPI transit web print 21.About Software version description Matan JetSet 3.2P Printer 28 User Manual ♦ Print settings bar: Set frequently used settings such as: print speed, print mode, ink quantity, and material’s margin. Operation of Toolbar: Click the Open File button to add files to the printing jobs list. Select the file to be printed, and click the Start Print button to start the operation. Print Mode: Select the print mode There are six modes: Three Pass, Draft, Normal, Enhanced, Master and Ultra. Print Speed: Define the print speed Print Align: The printing position of the image on the material Left: left side align Right: right side align Center: middle position align Align mode is only used for edge checking. Ink: Ink density adjustment Zero Pos: Distance between the cleaning device and the right limited switch Margin: Define the blank margin (refers to the distance between the left edge of material the starting position of printing) Print Color Bar: Enable Print Color Bar use in printing Browse: Add all RIP files under specified directory to the printing jobs list ♦ Status bar: Shows the printing progress bar [1], and the absolute position of the print carriage [2]. 1 2 Matan JetSet 3.2P Printer 29 3 User Manual 4 5 6 7 8 9 1. The printing progress bar 2. The absolute position of the print carriage 3. Click the ball button and the “INK&ALARM STATUS VIEW” window opens 4. The ink level status of the Secondary Ink Tank 5. The ink level status of the Main Ink Tank 6. Whether the print head protector is open or not 7. Whether the emergency stop is on or not 8. Pressure of the platform vacuum (future application ) 9. Temperature of the print head set Matan JetSet 3.2P Printer 30 User Manual 3.4.4.2 File Tab This displays the printing jobs list. Click the Toolbar’s Open File button or the Print settings bar Browse button to add RIP files to the printing jobs list. Click your right mouse button on the printing jobs list and you see the following menu items: Print: Print the selected job Move task ahead: Move the selected job upward Move task back: Move the selected job downward Delete task: Delete the selected job Delete all tasks: Clear the printing jobs list Matan JetSet 3.2P Printer 31 User Manual 3.4.4.3 Option Tab Print mode Normal: Print using the standard predefined print parameters. MultiCopy: Print multiple copies. Region: Print only the selected region of the image. Multi copy: Column: Number of copies to be printed vertically. Interval: Interval length between copies in the column. Row: Number of copies to be printed horizontally. Distance: Distance between copies in the row. Region: Left: Left edge of the selected region to be printed. Top: Top edge of the selected region to be printed. Width: Width of the selected region to be printed. Height: Height of the selected region to be printed. Color Bar: Width: Width of each color. Distance: Distance to the printed area. Protect head: Wash period: Head cleaning frequency during printing. Count: The number of times to wash during cleaning. Flash Jet Period: Frequency of flash jet during printing. Use the [All] group heads: Choose which group of print heads to use; if not chosen, both sets [All] are used by default. Print Select: Single dir print: Single-direction print. Direction: Left: Single-direction print from left to right. Right: Single-direction print from right to left. Matan JetSet 3.2P Printer 32 User Manual Mirror print: Print the image mirror. Double strike: Double strike print. Smart print: Automatically skip the white space area at the X, Y-axis location. 3.4.4.4 Para Tab Note: Please refer to Chapter 4, Offset Adjustment for Print Head. Step offset: Adjust the step difference according to the different possibilities. Return difference: Position difference as a result of printing under various speeds, which can be adjusted online. Color offset: Position offset adjustment of the jet head. Refer to the position offset of two rows of print heads at both directions of X-axis and Y-axis. ” ” refers to the rightward offset, while”” refers to the leftward offset. The offset value defines the number of dots after the print startup position defined by command, where the actual printing operation begins. It is applied to color registration. Note: X direction position offset: Use dot as the unit. Y direction position offset: Use 1/48 dot as the unit Adjust: Pops up the offset adjustment dialog. Update: Updates the parameters in printing. Default: Click this to set all offset parameters from the software defaults. Clear: Clear all the parameters. Advanced: Pops up the print head horizontal adjustment dialog. Matan JetSet 3.2P Printer 33 User Manual 3.4.4.5 Move Tab Move control: X Dir Speed: Moving carriage speed X Dir Distance: Moving carriage length Y Dir Speed: Feeding material speed Y Dir Distance: Feeding material length Move option: U: Collect material D: Feed material : Leftward : Stop: Rightward Stop moving Line switch and Sensor status: LSN: Status of left position limited switch RSN: Status of right position limited switch Red means the limited switch is pressed down; green means normal condition. Light: Status of the edge checker (a light sensor) Analyze: Analyze the print carriage and feed/collect material movement Movement analysis: Linear encoder shall be installed to analyze X-axis movement; Stop encoder shall be installed to analyze Y-axis movement. Choose Analyze to graph the print carriage speed vs. feed/collect material speed. To analyze the relationship: Under same speed conditions, the graphed line is a straight one; this means the operational condition is normal. The print carriage line is red; the feed/collect material line is blue. Matan JetSet 3.2P Printer 34 User Manual 3.4.4.6 Aux Tab Control Measure media before starting: Measure material to identify edge when starting the program Measure media before printing: Measure material before printing Cleaning before printing: Clean print heads when starting the program Enable cleaning in printing: Automatically wash during printing Enable purge ink in cleaning: Auto purge ink during cleaning Reset before printing: Reset the position before printing Enable drying: Set up drying after printing, or cancel auto-drying. Control drying when not printing Enable Footer: Print footnote of image at the end of the job File Name: Include file name in the footnote Size: Include file size in the footnote Date: Include print date in the footnote Comment: Remarks made by the user Distance: Distance between footnote and printed image Font: Set the Font type of the footnote Generate bitmap of per head: Select this item while printing and you get bitmaps of every pass of memory. Bitmaps are in the folder ‘D:\Bitmaps’ Matan JetSet 3.2P Printer 35 User Manual Color Switch: Enable the printing colors that you check marked Feather pass edge: Check mark ‘Enable Feather’ if desired Temperature: Critical: Select print head heating temperature Range: Select heating temperature area 3.4.4.7 Engineer Tab Buffer distance (dot): The distance the print carriage moves to print; the measurement is in dots Light sensor distance: The distance from the edge position (light sensor) to the right print head Material Left: Default distance between the left edge of the material and the zero point Material Width: The printer breadth Wash Mode: When “1”, the cleaning system and liquid protection system are available; when “0”, only cleaning is available Wash Position: When the carriage is cleaning, the parameter is “1”, the cleaning system is not available, the parameter is “0”, the cleaning is available, the carriage cleaning position is zero Wash width: The moving distance of the print head during cleaning; the parameter is “1”, the cleaning system is not available, the carriage does not move Print speed of Y: Feed speed in printing Max move length: Maximum movement of the print carriage Move property: Defines movement speed. Hardware speed pulse value can be set according to every defined speed. The bigger the value, the lower the speed, the smaller the value, the faster the speed. Modifying the system configuration requires Matan JetSet 3.2P Printer 36 User Manual proper authorization. Therefore, one must first insert the proper password using the process explained below: Click the Engineer Tab and the Engineer Login password dialog appears as shown below: The default password is ‘TW’. Click the >> button to change the password. After entering the correct password, click the Login button. When you click the Move property button, the Speed Table dialog for setting moving parameters appears as shown below: X speed: Set the carriage speed Y speed: Set the step speed X Convert: Moving carriage for convert direction Y Convert: Moving feed-roller for convert direction LR sensor convert: Check LSN and LSP in software. Note: These parameters should only be modified by a qualified engineer. Matan JetSet 3.2P Printer 37 User Manual 3.4.5 Modify Parameters in Printing This operation is used to offset the position of printed images in printing. You can adjust any parameters on this page and use the ‘Update’ button to modify parameters online. When you click the ‘Update’ button, the TeckwinPrint dialog appears to verify that you really want to modify the online parameters. If you click the left button, it updates the online parameters at the next pass. Click the right button if you do not want to update the online parameters. 3.4.6 3.4.6.1 Operation Introduction Printing Document Two options: 1. Choose the RIP file. Click the Open File button on the Toolbar to open the file. Now that the Start Print button is active, just click it to begin printing. The print parameters should be the same as last time. (Use default values for the first time printing). 2. Use the browse button on the operation panel to choose an RIP files folder. When you select the folder and click the ‘OK’ button, it displays all the image files in that RIP folder on the bar of image list in main interface. Then you can select the image file to print. 3.4.6.2 Select Print Parameters Print Mode: The mode for printing: 3 pass , Draft, Normal, Enhanced, Master and Ultra. The ink quantity control 3, 4, 6, 8, 12, and 16 pass. Print Speed: The speed of print head in printing can be modified online. Print Color Bar: If it is selected, six color bars with colors of C, M, Y, K, LC, and LM will be printed on the blank margin of printed image. The Print Color Bar can also prevent the nozzle from being clogged. If the printed image only displays part of six colors, the Print Color Bar can greatly improve printing quality. Matan JetSet 3.2P Printer 38 User Manual Pause to wash: The printing process may be paused at any time. Click the Wash Heads button on the Toolbar to wash the print heads, and then on the Print Continue button to resume the printing process. Reset: Click the Reset button on the Toolbar to move the print head to zero position. Zero Pos is the position from limited switch to zero. The value should be set so that the first print head on the left of the print carriage is aligned with the left side of the cleaning device. Only in this position can all the print heads be cleaned thoroughly. Measure material: Use the edge identifier installed on the print carriage to measure the width and left edge of the material, then to define the printing area and to see if the material meets the requirement of the printing task. During measuring, the maximum movement of the print carriage is defined by Max Move Length in the parameter table. If both right and left edges are not found within this range, then edge checking fails. If the operation is successful, the actual left edge of the printed area is the edge of the material plus the margin. Usually, after having identified the right edge of the material, the print carriage will return to its zero position. Cleaning Heads: two options 1. When the carriage is at the zero position, click the Wash Heads button on the Toolbar to wash the heads automatically. The moving length and the wash times can all be defined in the parameter table. 2. Click ‘Turn on Cleaner’ on the Tool menu to start cleaning. Click the Move Left and Move Right buttons on the Toolbar to move the print carriage left and right. After you have finished cleaning, click ‘Turn off Cleaner’ on the Tool menu. Print head protection in printing: Protect the print heads by choosing ‘Automatic Wash’ and ‘Automatic FlashJet’ during printing. ‘Automatic Wash’ and ‘Automatic FlashJet’ are available during printing. The configuration is as below: Set the Wash period to wash the print heads after the specified number of times printing. Set the FlashJet period to execute an automatic FlashJet after the specified number of times printing. These two operations ensure that the ink supply is normal and that the nozzle is not clogged. Matan JetSet 3.2P Printer 39 User Manual 3.4.6.3 Parameters Export and Import For different materials, printing parameters and especially step difference parameters may be very different. It is useful to store parameters in a backup file which can then be restored when the same material is used in printing again. Click Option (O)/Export Parameter File to store the current printing parameters into a specified file. When clicked, it will popup a browse window. You can then select the exact location to store the backed up parameters. Click Option/Import Parameter File to restore the specified parameter file. When clicked it will popup a browse window. You can then select the backed up parameter file with the proper parameters for the printing job you need to do. 3.4.6.4 Control of Printing Process During the printing process, there is pause, continue and force to stop. Modify the parameters of step difference, offset difference, color difference, print speed, feed speed and flash jet. In the printing, click the Print Pause button on the Toolbar, the carriage moves to zero position after finishing the current PASS printing, waiting for the resume printing. Heads can be washed at this time. Click the Resume button on the Toolbar to continue the printing process. Click the stop button, the system will popup a message box to confirm whether to stop the current printing process or not. Click “Ok” to terminate printing, or “cancel” to resume printing. Note: Once the printing process is terminated, it can never be resumed. If stop button is clicked on during batch printing, a message box asking whether to terminate all the printing tasks shall be popped up. Click “Ok” to terminate all the print tasks. Modify step value: If step difference is identified in the printing, should modify the value of step difference for corresponding PASS. Matan JetSet 3.2P Printer 40 User Manual Modify color offset value: If every color offset is identified in the printing, you should modify the value of color offset. Note: Value of step difference takes the unit of 1/10 dot. 3.4.6.5 Double-Side Printing After one face is printed, print on the other face with mirror mode. In order to ensure that the images on both sides match with each other, stop the printing to adjust print position and Y-axis difference. Click the Modify Print Status button on Toolbar to modify print position. Modify print align position 3.4.6.6 Region Printing for Large Images In region property page, we can choose ‘Region Print’ mode to print part of a large image. The region to be printed can be set trough four parameters as shown below. Left: Set the left border of printing image. Top: Set the top border of printing image. Width: Set the width of printing image. Height: Set the height of printing image. Matan JetSet 3.2P Printer 41 User Manual 3.4.6.7 Multi-file Printing To support no gap multifile printing: Select “Multi-file Print” in the “Print” menu, and a dialog box pops up. Note: Request files width equality. Printing information Adding files Remove the files in the list Chang the printing files gradation in list Edit printed files and hit “print” key, to start to print. Matan JetSet 3.2P Printer 42 User Manual 3.4.6.8 Web Printing If RIP software request web printing, the operation software pop-up the below dialog box. To replace printing parameter and hit “start print”, or hit ”cancel” key. 3.4.6.9 Restore Printing To support restoring printing at the breaking print, or start print by the specified printing times. Restore file: choose to renew the printing files and hit the below dialog box. Matan JetSet 3.2P Printer 43 User Manual Restore position: to appoint to restorer printing position. If printing break suddenly, the default is the printing position that broken. 3.4.6.10 RIP EDIT ♦ Support multi roll and web printing. ♦ Support large sized pictures and multi file printing on wide media . ♦ Support auto edit function (arrange the files for printing effectively). Matan JetSet 3.2P Printer 44 User Manual 1. Hit "RIP EDIT" in the Toolbar and the following dialog box pops-up: Function: From left to right: New: New a edit project(*.twp); Open: open a edit project(*.twp); Save: save an edited project(*.twp); Refresh: refresh project; Zoom in: zoom in the view; Matan JetSet 3.2P Printer 45 User Manual Fit view: fit to view; Zoom out: zoom out view; Material: enact view; Insert: input the printing file; Delete: delete the printing file; Print: print edited file Restore: restore edit window Operate: 1. Material: enact material Auto enact material amount and edge position by material sensor or manual enactment. Height: edit high. Margin: file margin on the material X Dis: edit file transverse distance Y Dis: edit file lengthways distance Overlap: auto enact file overlap 2. Input printed file Matan JetSet 3.2P Printer 46 User Manual a. Hit “insert” and from the following dialog box, choose RIP files. b. Drag and drop files in the main dialog box. 3. Print: printed edit files. The following dialog box pops up. ♦ Choose TCP/IP for web printing. With Web printing ♦ Choose “File” for making file print With making file print If choose TCP/IP and pop-up the below dialog box, Enact IP address and hit “OK” key. Note: IP address is the printer itself. Matan JetSet 3.2P Printer 47 User Manual 3.5 Error and Warning Codes All the errors, warnings and notifications during software application shall be displayed in the popup message box. Error information includes: the error occurring time, error code and caused reasons. See the following chart as an example: Please see the Appendix 1 for Error and warning codes Matan JetSet 3.2P Printer 48 User Manual Chapter 4 Offset Adjustment for Print Heads The Color Offset Adjustment consists of two parts. One part is for adjusting between the print heads jetting the same color ink; the other part is for adjusting between the print heads jetting the different color ink. Adjusting the Y-Direction Color Offset between the print heads jetting the same color ink is achieved by adjusting mechanical position of the print heads. Furthermore, the optimal mechanical position of the print heads can be acquired by printing the calibration picture. The other color-offset adjustment must be accomplished by using the software. The operation interface of the software is the following figure. Click the button to popup the dialog “Adjustment Parameters” for the color offset adjustment Click the button to popup the dialog “Print-Head Position Adjustment” for color offset adjustment between the print heads jetting the same color ink. According to the following process go step by step. Matan JetSet 3.2P Printer 49 User Manual 4.1 Offset Adjustment for Print Heads Jetting the Same Color Click the button “Advanced” to popup the dialog shown as below. 4.1.1 X-Direction Offset Adjustment Click button “Left” to print the calibration picture. Shown as below. Amplify Observe the vertical lines in red circles. Select the best superposition one. Add the figure of the best one to the Left direction offset parameter. According to the above-mentioned method to adjust the Right direction offset parameters. When all color-offset adjustment has been accomplished, click the button “OK” to apply the calibration. But if you click the button “Cancel”, the calibration result will be cancelled without saving. Matan JetSet 3.2P Printer 50 User Manual 4.1.2 Y-Direction Offset Adjustment Click the button “Vertical” to print the calibration picture. Two heads superposition Nozzles status array Good quality Poor quality Observe the calibration picture, and adjust the front-back position of print head by adjusting the screws on print head bracket. Make the calibration picture better quality. Matan JetSet 3.2P Printer 51 User Manual Back orientation Print head bracket Left orientation screw Right orientation Adjust the Back & Right orientation screw to set the front-back position of print head Adjust the Left & Right orientation screw to set the right-and-left gradient position of print head. 4.2 Color Offset Adjustment Click button “adjust”, will popup the dialog for the color offset adjustment. Shown as below. Matan JetSet 3.2P Printer 52 User Manual 4.2.1 Check Status of Print Heads Click the button “Print Head Status” to print the status calibration picture of the print heads. Nozzles status array The status calibration picture can represent the status of every nozzle of print heads, and every line of the oblique line area corresponds to one nozzle of print head. If the oblique lines of the oblique line area are imperfect, this represents that the correspondent nozzles have been blocked and need cleaning. 4.2.2 Adjust the Step Difference Print calibration chart by using different print mode to get different Y PASS step figure with each chart, make adjustment accordingly to reach the quality with no bifurcation. (When the figure is added or reduced 1 unit, then the step distance will be added or reduced to 0.003528mm Generally, first is to complete the adjustment of the Y Pass step by Test mode, if the printed charts are not in good continuum, it means the Y PASS Step is too big, then should reduce it; if the printed charts are overlapped, it means Y PASS Step is too small, then should add it. After finishing the Test mode adjustment, the Y PASS step figure of other print modes should be calculated according to the one of the Test mode, calculation method is as follows: Draft mode = 3 pass mode / 4 Normal mode = 3 pass mode / 6 Enhanced mode = 3 pass mode / 8 Master mode = 3 pass mode / 12 Ultra mode = 3 pass mode / 16 Matan JetSet 3.2P Printer 53 User Manual 4.2.3 X & Y Direction Color Offset (Color Offset) Choose item “<-Left”, and click the button “Color Offset” to print calibration picture. Amplify Adjusting method (Take example for Cyan color offset): X offset: Choose a black vertical line overlapping with cyan vertical line. Read and add the number in the rectangular to its colors offset parameter. Y offset: Choose a black horizontal line overlapping with cyan horizontal line. Read and add the number in the rectangular to its colors offset parameter. Matan JetSet 3.2P Printer 54 User Manual 4.2.4 Bi-Difference (Return Difference) Black block Amplify Printing direction Different carriage speed has different Bi-Difference parameter, so it is necessary to print the calibration picture under different print speed. When the upper black block and the lower black block are not in superposition, read the difference figure and correct the Bi-Difference with different carriage speed. ♦ When the upper block is at the right of the lower block. Add the read figure to original parameter. Matan JetSet 3.2P Printer 55 User Manual ♦ When the upper block is at the left of the lower block. Reduce the read figure to original parameter. ♦ How to mark Bi-difference (example) 3 Feeding direction → ↓ 400 350 300 250 200 150 100 Mark line 2 1 Calipers line Choose the caliper line which overlap with mark line. From here we get the third digit as 1, the second digit as 3 From here we get first digit as 1 From the chart, get the result that Bi-difference need to be reduced as: (1*100)+(3*10)+1=13. Matan JetSet 3.2P Printer 56 User Manual Chapter 5 Maintenance 5.1 Maintenance Specifications Proper maintenance is crucial to the operation of the machine. These maintenance specifications illustrate maintenance at different levels of detail. We suggest copying the specifications and pasting them on the printer or somewhere near it to enable them to be seen clearly by all operating personnel. 5.1.1 Preparations before Start 1. Check the printer input power. 2. Clean the print head, clean roller, and printing platform. Remove anything superfluous from the surface of the platform. 3. Check the liquid level of the first ink tank. 4. Switch on the general power supply, turn on the computer power, then the servo motor and then the heating. 5. Turn on emergency stop switches at both ends of the machine. 6. Check whether moving parts work normally, moving without blockage. After software starts, operate and check X-Axis, Y-Axis, cleaner, limited SWs, and emergency stops. 7. Tension value should be 55V; maximum is 70V. 8. Turn on the HV voltage SW, select the menu print/flash jet. 9. Check room temperature (200C to 290C) and humidity (40-80%). 5.1.2 Maintenance in Printing 1. Before printing, clean the print heads to enable smooth jetting. Clean print heads after finishing each job. (See cleaning method for print heads). 2. Check around the machine during normal printing: a. There should be no irrelevant articles on the platform of the machine. b. Touch the heating board with your hand to ensure heating temperature is normal. (Note: when moving the print carriage do not touch the pre-heating board with your hands). c. Listen while the machine is printing. If you hear any strange sound, stop the machine and find out the reason. Matan JetSet 3.2P Printer 57 User Manual d. If there is any strange smell or you smell something burning, stop the machine and check it. e. Check operational parameters: tension, heating values. 5.1.3 Shut Down for Maintenance 1. Protect print heads (see Maintenance of Print Head). 2. Clean the printer with solvent. . 3. Push emergency stop SW. 5.1.3.1 Daily Maintenance 1. Check and empty the waste ink tank (located under the cleaning system.) 5.1.3.2 Weekly Maintenance 1. Dismantle carriage cover; use solvent to clean bottom of the cover. 2. Add lubricating grease to the rail, add oil to bell rail. 3. Set roller movement to 500mm before cleaning. Make sure feeding roller rotates freely, use special rubber roller solvent PMA to clean roller. When done, use dry air gun to blow dry. 4. Use PMA to clean dirt on the surface of roller, ensure there is no relative shift between material and roller and keep the roller clean. 5.1.3.3 Monthly Maintenance 1. Clean the second ink tank on carriage. 2. Check and tighten fixed bolts on transmission shaft coupling and motor shaft coupling 3. Check fixed screws of carriage and straight-line rail, check synchronous belt, if it is loosened, tight it up again. 4. Check 6 outer hex head screws of Y shaft coupling. 5. Check screws on Y-Axis plank. 6. Check clamping screws on X-Axis motor, screw down bolt in the hole of crust, then extend socket head screw into the hole, fasten the clamping bolt). 7. Check all cooling fans and motors. 8. Tidy up hard disk space of the computer, check for viruses. 9. Use air gun (air must be dry) to remove dust from the power supply box, electric control board, and various electric boards. Matan JetSet 3.2P Printer 58 User Manual 10. Use petroleum based lubricating grease to lubricate the carriage rail on the printer Avoid dripping grease under the rail. 11. Use solvent to clean vacuum surface and movable contact face to ensure its flexible movement upward and downward. 5.1.3.4 Quarterly Maintenance 1. Check and test heater, 15 minutes after setting temperature, use temperature multi-meter to check whether temperatures on left, middle and right of preheating and drying heating system exceed 10OC or whether there is evident temperature difference by touch with hand. 2. Remove dust from the printer including inside of left and right boxes. 3. Replace ink filter. 5.1.3.5 Annual Maintenance 1. Level inspection of rail and printing platform (may contact our company). 2. Check entire machine for bolt loosening. 5.2 5.2.1 Maintenance of Print Head Installation of Print Head 1. Remove the print head protector and use a one time syringe to inject solvent into the print head to clean it up. (Note: don’t push the syringe in too much; better to see solvent being slowly exuded from the print head. If you push the syringe too much, the print head might be damaged, and this damage is irreversible). 2. Use two M3 x 10mm screws to affix the print head to the print head holder. 3. Insert the print head assembly (print head affixed to the print head holder in previous step) into the print head groove of the print carriage; use three M3 x 10mm screws to fix the print head holder in place. 4. Insert the ink tube and its protection at the interface and then connect the print head cable. 5.2.2 Disassembling Print Head 1. Switch off the HV power supply and power for ink supply control, then reduce the vacuum value to zero and remove all the ink. 2. Pull the ink tube out of the print head cable. 3. Remove screws and take the print head holder off the print carriage. 4. Remove the print head from the print head holder. Matan JetSet 3.2P Printer 59 User Manual 5. Inject solvent into the print head, clean the print head, and cover with the print head protector. 5.2.3 Basic Maintenance Knowledge of Print Head ♦ In normal operation, open print head protection function in software, If the printer does not work over 30 minutes, protect the print head with print head cover. ♦ Under normal cleaning conditions, if print head clog could not be eliminated, remove the print head and soak it in solvent. ♦ Before storing the print head, be sure to inject solvent into it for cleaning, install protector, seal the interface by rubber tube, then wrap it with clean paper and store it after sealing. If the print head is to be mailed, it should have anti-vibration packaging. ♦ If printer stops overnight without working, inject several syringes of solvent from top tube of print head. After cleaning, cover the print head again. Cover cleaning paper and protection film on the protection board and fill a little solvent into protection film. ♦ Always use solvent to clean where absorbed ink can be cleaned. 5.2.4 How to Fill the Print Head with Ink After secondary tank is filled, ink pump will be stopped. 1. Connect the print head and the secondary tank with the ink tube. 2. First stop an ink tube, inject air to the secondary tank air hole by syringes, then the ink will fill into the print head from another ink tube. 3. After the air empties, change another tube. 4. Then fill ink into other print head one by one. 5.2.5 Cleaning Print Head during Working ♦ If the print head was found dry and clogged, you can use the way of ink filling to inject the ink to the print head to clean. ♦ If the print head still has problem after above, we can disconnect the interface in the ink tube and use the syringe with solvent to clean the print head, then connecting the interface of the tube and filling ink to the print head. 5.2.6 Protecting Print Heads during Work Stoppage (suitable for stoppage of several days) 1. Close computer and all power supply SWs. Matan JetSet 3.2P Printer 60 User Manual 2. After ink is completely discharged from each secondary tank, use syringe to inject solvent into tank from air hole on top of the tank, inject one syringe of solvent to every ink tank. 3. Place two or three cleaning paper with some solvent clouding, then use PE film and cover the print head. 4. Automatic cleaning function of print head: a. Do not use unauthorized cleaning wiper to clean the surface of print heads. b. To clean with the function of machine’s own software. c. You can choose automatic cleaning, or half-automatic cleaning and opening suction function, then move carriage left and right, clean the print heads one by one. d. In printing process, set one cleaning after several automatic go and back working, generally we suggest to clean dark image once within 10 times and 30 times at the most for tint colors. Keep the surface of the print heads humid with ink or solvent. The surface of a print head set must be protected by cellophane paper, film, or polythene packing material to prevent dryness. To prevent damage to the print heads as much as possible you must: 1. Only use authorized printing ink, solvent, and cleaning wiper. 2. Clean and package the print heads whenever printer idle time exceeds half an hour. 5.3 5.3.1 Ink Supply System Maintenance Cleaning the Ink Supply System ♦ Discharge ink from the ink tank and fill it with solvent. ♦ Make printing ink flow out naturally without closing the power supply of the ink supply system until the ink discharged is mainly solvent. ♦ Turn on liquid protection in software. 5.3.2 Adding Ink ♦ Before the first adding of ink, use solvent to clean the ink tank. ♦ Keep the power supply of the ink supply system on, the same as when cleaning the ink supply system. ♦ Before connecting print head tubes, release some solvent at each outlet to ensure no residue is left in the tubes. Matan JetSet 3.2P Printer 61 User Manual ♦ Clean the inside of the print heads with solvent. ♦ Add ink in the tank to enable automatic continuous ink supply until ink substitutes for the solvent. 5.4 Considerations of Ink Usage ♦ Storage temperature of ink is 10-40°C. ♦ Do not shake ink tanks in process of storage and usage. ♦ Carefully read instructions before using ink. ♦ Treat waste ink according to local rules. ♦ Ink tank is not re-collectable. ♦ Emergency measures for ink touching: – Ink enters eyes, wash by using plenty of water. – Skin with ink: use soap and water to clean. – Eating ink by mistake will not lead to vomiting. Matan JetSet 3.2P Printer 62 User Manual Chapter 6 Appendix 6.1 Error and Warning Codes of Control Software Code Comment -1 Be printing! -2 Rip file can't be read! -3 The Liquid-Protected switch isn’t normal -5 Motor or Linear-Encoder isn't work! -6 The phase of Linear-Encoder is reverse! -19 Any image file can't be found! -21 Footnote Error! -31 Edge error: Edge sensor maybe damaged if not found materials! -32 Only right edge is found! -100 The value of one or more offset parameters is minus! -101 The print position is out of border! -102 The image width is larger than the maximum width of printer! -103 Material width is too small! -104 Material width is smaller than the left border value of material! -105 Print speed is invalid! -106 Margin value is minus! -107 Group of print head is invalid! -108 The emergency switch is pressed down! -109 Invalid mode! -110 The left value of selected area is out of border when Region printing! -111 The width of selected area is out of border when Region printing! -201 Print parameter is invalid! Matan JetSet 3.2P Printer 63 User Manual -204 The operation of importing is invalid when printing! -301 The rip file isn’t supported! -302: The rip file can’t be read! -601 Busy, please retry later! 2 File can't be loaded! 11 Failed to create preview! 119 The configuration file of moving isn’t exist! 999 Failed to create bitmap file, Access denied! 1002 Login information. 1009 The result about measure material. -72 The Liquid Protected Device failed! -73 The waste ink tank is overflow! -74 The liquid protection device incurred unknown error! If you have fixed the faults, please click the button 'Retry' to continue to check! Or else, click the button 'Cancel' to end the current liquid protection! -75 The cleaning device incurred unknown error! If you have fixed the faults, please click the button 'Retry' to continue check! Or else, click the button 'Cancel' to end the current washing! Matan JetSet 3.2P Printer 64 User Manual 6.2 Software Installation List ♦ Software installed in printer's PC a. Operating system: WINDOWS XP b. PCI Image card driver c. Control software ♦ Installation CD in machine Disk 1 Control software installation Folder List: Disk1:\ Installations> Software installation Disk1:\ Drivers> Driver for PCI Image card Network card driver Display driver Disk1:\ UserManuals> User manuals Disk 2 RIP software installation Disk 3 Operating system: Windows XP with Microsoft license Matan JetSet 3.2P Printer 65 User Manual 6.3 Warning Signs Keep fingers out of machinery Watch out for fire Pay attention for safety Watch our for heat Watch out for electric shock Keep hands off No Touching No Rotating Matan JetSet 3.2P Printer 66 User Manual No Flame Matan JetSet 3.2P Printer See manual before operating 67 User Manual