1
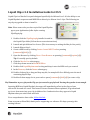
Liquid Clips v1.0 Installation Guide for OS X Liquid Clips is a Max for Live patch designed specifically for Ableton Live 9. It’s the ability to use Liquid Rhythm’s sequencer and MIDI Effects directly in Ableton Live 9 clips. The following is a step-‐by-‐step guide on how to install it: Note: Please ensure that you have copied the Liquid Rhythm app to your Applications folder before running ClipsPlugin.pkg. 1. Double-‐click the ClipsPlugin.pkg installer located in the Liquid Clips folder (follow the on-‐screen instructions). 2. Launch and quit Ableton Live 9 once. (This is necessary to writing the Max for Live patch) 3. Launch Ableton Live 9. 4. Create a MIDI track by clicking Create > Insert MIDI Track or pressing [command]+[shift]+[T]. 5. Open the Browser by clicking View > Show Browser or pressing [command]+[option]+[B]. Tip: It’s usually open by default. 6. Click the Max for Live subcategory. 7. Click drop-‐down arrow in Max MIDI Effect. 8. Double-‐click LiquidRhythm.amxd or drag and drop it onto the MIDI track you created. 9. In the Browser, click the Drums subcategory. 10. Double-click any kit or drag and drop any kit, for example Kit-Core 808.adg, onto the track containing Liquid Clips. 11. Double-‐click an empty slot in your track or press [command]+[shift]+[M] to create a clip. Hey! Remember to press play on the Clip you just created to get playback. Pressing the spacebar is not enough. Inputting MIDI into Liquid Rhythm’s Arranger will immediately reflect in the clip you have selected in Live and vice versa. This feature is better illustrated than explained, so go ahead and try it out: draw notes into your clip in Ableton Live 9 and notice how they appear in Liquid Rhythm when you switch back and forth. For a comprehensive demo video, follow this link. From everyone at WaveDNA, thank you for supporting our software. We hope you enjoy this exciting feature! Liquid Clips v1.0 Installation Guide for Windows Liquid Clips is a Max for Live patch designed specifically for Ableton Live 9. It’s the ability to use Liquid Rhythm’s sequencer and MIDI Effects directly in Ableton Live 9 clips. The following is a step-‐by-‐step guide on how to install it: Note: Presently, Liquid Clips is only supported on the 32-‐bit version of Ableton Live 9. 1. Navigate to your downloads folder and double-‐click LiquidRhythm.exe. 2. Follow the steps in the installation wizard, including selecting the destination folder and configuring shortcuts. 3. When the installer is done, click Finish. 4. Launch and quit Ableton Live 9 once. (This is necessary to writing the Max for Live patch) 5. Launch Ableton Live 9. 6. Create a MIDI track by clicking Create > Insert MIDI Track or pressing [ctrl]+[shift]+[T]. 7. Open the Browser by clicking View > Show Browser or pressing [ctrl]+[option]+[B]. Tip: It’s usually open by default. 8. Click the Max for Live subcategory. 9. Click drop-‐down arrow in Max MIDI Effect. 10. Double-‐click LiquidRhythm.amxd or drag and drop it onto the MIDI track you created. 11. In the Browser, click the Drums subcategory. 12. Double-‐click or drag and drop any kit, for example Kit-‐Core 808.adg, onto the track containing Liquid Clips. 13. Doublea click an empty slot in your track or press [ctrl]+[shift]+[M] to create a clip. Hey! Remember to press play on the Clip you just created to get playback. Inputting MIDI into Liquid Rhythm’s Arranger will immediately reflect in the clip you have selected in Live and vice versa. This feature is better illustrated than explained, so go ahead and try it out: draw notes into your clip in Ableton Live 9 and notice how they appear in Liquid Rhythm when you switch back and forth. For a comprehensive demo video, follow this link. From everyone at WaveDNA, thank you for supporting our software. We hope you enjoy this exciting feature!