1
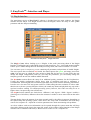
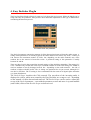
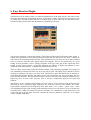
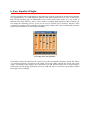
EasyTools ™
VERSION 1.01
USER’S MANUAL
Algorithmix® Software License Agreement
ALGORITHMIX® LICENSE AGREEMENT
LICENSE: Algorithmix® grants you a non-exclusive, non-transferable copyright license subject to
the terms of this Agreement. You may copy the software and materials associated with this agreement
(“Materials”) onto a single computer for your personal noncommercial use. You may not distribute
this Software Package, nor sell any part of the Materials to any other party. You will not reverse
engineer, decompile, modify, or disassemble the Materials.
OWNERSHIP AND COPYRIGHT OF MATERIALS: Title to the Materials and all copies thereof
remains with Algorithmix®. The Materials are copyrighted and are protected by German laws and
international treaty provisions. You will not remove the copyright notice from the Materials. You
agree to prevent any unauthorised copying of the Materials. Except as expressly provided herein,
Algorithmix® does not grant any expressed or implied right to you under Algorithmix® copyrights
or trademarks.
LIMITATION OF LIABILITY: THE MATERIALS ARE PROVIDED “AS IS” WITHOUT ANY
EXPRESSED OR IMPLIED WARRANTY OF ANY KIND, INCLUDING WARRANTIES OF
MERCHANTABILITY,
NONINFRINGEMENT
OF
THIRD-PARTY
INTELLECTUAL
PROPERTY, OR FITNESS FOR ANY PARTICULAR PURPOSE. IN NO EVENT SHALL
ALGORITHMIX® BE LIABLE FOR ANY DAMAGES WHATSOEVER (INCLUDING,
WITHOUT LIMITATION, DAMAGES FOR LOSS OF PROFITS, BUSINESS INTERRUPTION,
LOSS OF INFORMATION) ARISING OUT OF THE USE OF OR INABILITY TO USE THE
MATERIALS, EVEN IF ALGORITHMIX HAS BEEN ADVISED OF THE POSSIBILITY OF
SUCH DAMAGES. BECAUSE SOME JURISDICTIONS PROHIBIT THE EXCLUSION OR
LIMITATION OF LIABILITY FOR CONSEQUENTIAL OR INCIDENTAL DAMAGES, THE
ABOVE LIMITATION MAY NOT APPLY TO YOU.
TERMINATION OF THIS LICENSE: Algorithmix® may terminate this license at any time if you
are in breach of the terms of this Agreement. Upon termination, you will immediately destroy the
Materials.
ENTIRE AGREEMENT: This Agreement constitutes the entire agreement between the parties and
supersedes any prior or contemporaneous oral or written agreements. By installing EasyTools™ on
your computer, you are bound by this agreement.
APPLICABLE LAWS: Any claim arising under or relating to this Agreement shall be governed by the
laws of the Federal Republic of Germany, without regard to conflict of law principles. You may not
export the Materials in violation of applicable export laws and regulations.
EasyTools™ is made by Algorithmix® GmbH, Germany.
Copyright ©1997-2001 by Algorithmix® GmbH. All rights reserved.
All products and company names are trademarks or registered trademarks of their respective holders.
Design and specifications are subject to change without notice.
1. Introduction to EasyTools ™
1.1 Welcome
Thank you for purchasing EasyTools™, a set of very easy to use audio restoration PlugIns for the PC.
With EasyTools™ it is possible to effectively remove disturbing clicks and unwanted noise from old
vinyl records or tapes already during the recording process.
The big challenge during the development of EasyTools™ was to create a program which allows
achieving maximum results with minimal effort in parameter setup.
Algorithmix®, October 2001
1.2 Installation
The trial version of EasyTools™ is delivered as one self-extracting file. If you open the file, an
installation program starts that will guide you through the setup process. During the setup, you may
specify an installation path for the software.
The trial version of EasyTools™ can be used for a period of two weeks or 50 individual starts of each
PlugIn. Before using the EasyTools™ trial PlugIns, you need to register them via the internet. This
means, that you need a connection to the internet from the PC you want to test the trial version on.
During the two weeks trial period, you may purchase the PlugIns at any time by visiting our homepage
at http://www.algorithmix.com/home/index_products5.htm or by clicking on “Algorithmix” in the
about dialog of any of the PlugIns. After the trial period has expired, the PlugIns will no longer work
and you need to purchase them for an extended use. We strongly recommend not to set back your
system time when using the trial version, since this will cause the PlugIns to expire immediately.
The full version of EasyTools™ is delivered in separate installation files – before installing any of the
PlugIns, you need to install the EasyTools™-player, which loads the individual PlugIns and connects
to the Audiograbber. During installation, you will need to supply a name / key combination, that you
get in the order email of your purchase. After successful installation of the EasyTools™-player, you
may install the PlugIns, also supplying name and key exactly as received.
1.3 Technical Support
Before you send us an email concerning any troubles, please try to read related chapters in the
operating manual.
You can order our new products online with a credit card 24 hours a day, 7 days a week, 52 weeks a
year. For your safety, the credit card data is transferred only via a secure server. After ordering online
you will receive your software within minutes to the e-mail address you entered.
If you’d like to order new PlugIns, share your experiences, or send us suggestions concerning new
developments, choose one of the e-mail addresses:
- Information
- Support
- Sales
- Job Opportunities
Algorithmix®, October 2001
[email protected]
[email protected]
[email protected]
[email protected]
2. EasyToolsTM - Interface and Player
2.1 PlugIn Interface
The stand-alone version of EasyTools™ software is devided into two main windows, the PlugIn
interface and the Player. The PlugIn interface hosts the PlugIns, allows the setup of some global
parameter and does the preset handling.
Screenshot of EasyToolsTM PlugIn interface.
The PlugIn Center allows loading up to 6 PlugIns in the audio processing chain of the PlugIn
Interface. The PlugIns can be individually bypassed with check-box “use”, closed and opened with the
button “open” without taking them out from the processing chain, and removed with the “X” button.
You can store up to six temporary presets containing all parameters and positions of loaded PlugIns.
The active preset slots are marked red, loaded, but unused preset slots green, and empty preset slots
white. You may store or reload the active presets to hard disk for later use. If your preset does not
change the PlugIn configuration (order etc.), but only the parameters, you can usually change the
temporary presets in real time without audible distortion.
The Resolution section allows the setup of an additional quality parameter for the EasyDenoiser.
Usually the default configuration shown above (freq to maximum and time to minimum) is
recommended. Increasing the time resolution (right fader) may result in better denoising performance,
but also uses a lot more CPU and system resources. When setting the time resolution to values other
than lowest on slower systems (PII-300 or below), the sound may stutter and playback may stop with a
cpu-load overflow warning. For offline-processing (store), however, this value can safely be set to
higher values, but processing time will increase.
The Output section contains two check-boxes “difference” and “bypass”. While “bypass” enables a
global bypass of all effects, difference shows the amount of crackles or noise removed from the audio
stream.
The cpu display shows the amount of cpu time currently used by the effects in percent. Depending on
the system setup and operating system, values above 70% may result in difficulties like audio drop
outs or slow response etc.. Adjust the resolution parameter time when encountering such problems.
An About window with version information can be opened through the system menu that will drop
down after clicking on the icon in the upper left corner of the window. Most functions of the PlugIn
interface can be controlled with hotkeys. Please refer to section 2.3 for a complete list.
2. EasyToolsTM - Interface and Player
2.2 Player
The Player loads a file and controls the playback as well as offline processing (store) and some simple
editing functions.
Screenshot of EasyToolsTM Player.
A new file can be loaded through a file selection dialog that pops up after clicking the Load button.
Playback starts immediately and can be controlled with three buttons at the lower left corner (stop /
play / rewind) as well as by clicking with the left mouse button in the waveform display and setting
the red playback cursor to the desired position.
An area can be selected by holding the right mouse button in the waveform display. The area can be
cleared with a single right click in an unselected part of the waveform or by pressing “/” (see section
2.3 for complete list of hotkeys).
If loop is enabled, playback is looped within the selected area or the whole file if no area is selected.
This can be used for a very accurate set up of the PlugIn parameter.
Store writes the selected area or, in case no area is selected, the whole file to disk applying all effects
and settings from the PlugIn interface.
Cut destructively cuts out the selected area from the file, allowing adjustments to the file start or end.
Split splits the file at the current play position (red cursor). A dialog pops up for further settings.
•
•
•
•
•
•
waveform display – use the left mouse button to position cursor, use the right mouse button
to select an area (double click right to maximize the selected area)
scrollbar – click on the left/right edge or in the middle to zoom or to move the waveform, use
double click to maximize
status bar – displays file information
playback control – start / stop playback, rewind file, loop selected area or the whole file
processing control – load file, store area or whole file if no area is selected
edit control – cut selected area, split file at the current cursor position
2. EasyToolsTM - Interface and Player
2.3 Hotkey table
To speed up tasks if intensively working with EasyTools™ a hotkey (keyboard shortcut) list has been
implemented. The definition below works for the EasyTools™ PlugIn interface and the player. It may,
however, not work with the PlugIn interface AlgoCtrl, depending on the host application.
1 to 6
F1 - F6
x
→
→
→
→
→
difference
select PlugIn slot 1 to 6
toggle selected PlugIn
activate Preset 1 to 6
toggle all PlugIn windows
b
→
`
→
=
→
shift F1 –F6 →
space
o
e
s
→
→
→
→
start / stop playback
load new file
store block or whole file
split file at cursor
backspace
l
c
\
d
→
→
→
→
bypass
bypass selected PlugIn
remove selected PlugIn
store current configuration
in Presets 1 to 6
rewind to begin of block / file
toggle loop mode
cut block
clear block
3. PlugIn Interface
The PlugIn interface AlgoCtrl is very similar to the EasyTools™ PlugIn interface, except that it
connects to the Audiograbber software and does not include an own player. Loading PlugIns and
parameter setup is exactly like for the EasyTools™ PlugIn interface described in section 2.1.
Screenshot of the PlugIn interface AlgoCtrl.
The PlugIn Center allows loading up to 6 PlugIns in the audio processing chain of the PlugIn
Interface. The PlugIns can be individually bypassed with check-box “use”, closed and opened with the
button “open” without taking them out from the processing chain, and removed with the “X” button.
You can store up to six temporary presets containing all parameters and positions of loaded PlugIns.
The active preset slots are marked red, loaded, but unused preset slots green, and empty preset slots
white. You may store or reload the active presets to hard disk for later use. If your preset does not
change the PlugIn configuration (order etc.), but only the parameters, you can usually change the
temporary presets in real time without audible distortion.
The Resolution section allows the setup of an additional quality parameter for the EasyDenoiser.
Usually the default configuration shown above (freq to maximum and time to minimum) is
recommended. Increasing the time resolution (right fader) may result in better denoising performance,
but also uses a lot more CPU and system resources. When setting the time resolution to values other
than lowest on slower systems (PII-300 or below), the sound may stutter, Audiograbber may hang and
playback may stop with a cpu-load overflow warning.
The Output section contains two check-boxes “difference” and “bypass”. While “bypass” enables a
global bypass of all effects, difference shows the amount of crackles or noise removed from the input
audio stream.
The cpu display shows the amount of cpu time currently used by the effects in percent. Depending on
the system setup and operating system, values above 70% may result in difficulties like audio drop
outs or slow response etc.. Adjust the resolution parameter time when encountering such problems.
4. Easy Declicker PlugIn
The Easy Declicker PlugIn effectively removes clicks from old vinyl records. While the PlugIn can be
setup with only one parameter, three profiles allow additional adjustments to the type of disturbances
used during the detection process.
Screenshot of the Easy Declicker.
The Declick parameter controls the amount of clicks detected and removed from the audio stream. A
setting of this parameter to 0 virtually bypasses the effect and does not remove any clicks. A setting to
100 removes the maximum number of clicks, but, depending on the audio material, may cause
artefacts due to the removal of non-click events. A preferred setting of this parameter is usually
between 50 and 80.
There are three Profiles that control the internal settings of the declicking algorithm. The setting LP1
is for a standard vinyl record and works up to a medium amount of clicks. The setting LP2 should be
used on medium to heavily damaged records, but – depending on the audio material – the risk of
artefacts is higher with this profile. The 45 setting was optimised for 45 rpm records, although LP1
can also be used here. The 45 setting is also recommended for the removal of digital spikes and other
very short disturbances.
The Declick Scope visualises the Click removal. The waveform of the incoming audio is
displayed in yellow, while areas treated by the Easy Declicker are orange to red – depending
on the amount of clicks detected and removed. The Declick Scope can be used to control the
set up of the Declick parameter – start with the parameter at zero and move it up until audible
(and visible) clicks on the Declick Scope are drawn in red.
5. Easy Denoiser PlugIn
The Denoiser can be used to remove or reduce broadband noise in the audio stream. The source of the
noise does not matter for the denoising process, so tape noise, surface noise from vinyl records as well
as analog noise from the sound card can be treated. Setup is done with only one parameter and a
selection of three profiles allow the adjustment to a defined type of noise.
Screenshot of the Easy Denoiser
The Denoise parameter controls the amount of noise detected and removed from the audio stream. A
setting of this parameter to 0 virtually bypasses the effect and does not remove any noise. A setting to
100 removes the maximum amount of noise. This parameter has to be set up in a way, that unwanted
noise is removed, while the audio signal itself passes through. There is no general rule of a good
setting for this parameter, since it strongly depends on the type and gain of the signal and noise
treated. In most cases, however, at least the following rule applies: as higher the amount of noise
contained in the audiostream is, as higher this parameter has to be set.
There are three Profiles that control the internal settings of the denoising algorithm. The setting LP
was optimised for surface noise from a lp or 45 rpm vinyl record. The setting Tape1 should be used to
clean tape recordings with only a low noise level. This profile is quite flat and the risk of artefacts is
lower than with the other profiles. The setting Tape2 was provided for very noisy recordings, but also
works for hum and buzz. This profile allows noise removal even if the source material contains a very
high noise level. In these cases, however, there is always a compromise between less noise and
artefacts.
The Denoise Scope visualises the procedure of noise removal. The spectrum of the audio after the
denoising process is displayed. High frequencies are at the top, low are at the bottom. The colour
represents the amplitude of each frequency in the order black – red – yellow – green – blue – white
(low amplitude to high). With a setting of the parameter Denoise to 0, the Denoise Scope will show the
incoming audio. When increasing the Denoise parameter, low amplitudes at high frequencies (red
areas at the top) will fade more and more. Increase the Denoise parameter, until noise is no longer
visible at higher frequencies.
6. Easy Equalizer PlugIn
The Easy Equalizer allows adjustments to the frequency spectrum of the audio stream passing through.
It is implemented as a 5-band graphical equalizer with centre frequencies at 63, 250, 1k, 4k and 16
kHz. Beside mastering type of adjustments to the overall sound of the audio, it is very useful in
addition to the Easy Denoiser, since it can be used to re-amplify high frequencies that eventually got
lost during the denoising process. It can also be used to equalise tape recordings, that have been
recorded using Dolby ® noise reduction, but played back without (this is the recommended procedure
when using our Denoiser to clean audio from tapes).
Screenshot of the Easy Equalizer
Each slider controls the individual cut / boost-level of the corresponding frequency band. This allows
very accurate frequency corrections to the signal. The master slider controls the overall gain of the
signal. All readings of the displays above the slider are in dB. When boosting one or more frequency
bands, make sure the output signal does not excess 0 dB and clips. Use the master gain slider to adjust
the output level accordingly.
7. Checklist
Below are a few hints for successful recording and mastering analog tapes and records. For further
information, please also check our FAQ and the other resources on our internet server:
http://www.algorithmix.com
http://www.algorithmix.de .
•
When recording vinyl records to the PC, you need a preamp in-between the record player and
the sound card. The microphone input of the sound card cannot be used, since a proper phono
preamp does not only boost the signal, but also applies a frequency and phase correction to it.
The easiest way is to connect the sound card line-in with the rec-out of a HiFi set, that
includes a phono preamp. Another possibility is to use an external phono preamp, like offered
by TerraTec®: www.terratec.net
www.terratec.de .
•
For transferring tapes to the PC, the tape recorder can be directly plugged into the sound card
line-in. It is also possible, to connect the rec-out of a HiFi set to the sound card. Doing this, all
equipment connected to the HiFi set can be recorded. Tapes should be transferred without
DOLBY® noisereduction enabled, even if they were recorded using DOLBY®. The digital
denoising processing algorithms used in the Easy Denoiser PlugIn usually do a much better
job than the old analog technique used by DOLBY® A, B or C decoding. The deviations at
higher frequencies resulting from the Dolby® encoding can easily be adjusted using the Easy
Equalizer.
•
When recording analog material that should be treated with the Easy Declicker or Easy
Denoiser at a later time, never store them in a compressed format like mp3 to save disk space.
All audio compression techniques like MP3, AC3, AAC, ATRAC and others use psycho
acoustic modelling to “remove” information from the audio material that cannot be recognised
by the human ear. If, e.g., you compress material containing a large audible click, approx. 20
ms after the click cannot be heard well and can safely be encoded very poor. If, however, you
remove the click later (e.g., with the Easy Declicker), you will hear the poorly encoded audio
part with many artefacts that were covered by the click before. Since there is no physical way
to restore information that has been removed, there is no way to bring back the original audio
here.
Algorithmix®, October 2001