1
Manufacturing
Inventory Management
with Manufacturing Processing, Job Shop Integration, Bar Coding and Sales Analysis
Part #105
User Manual
Version 7.3
Information in this document is subject to change without notice and does not represent a commitment on
the part of Data Pro Accounting Software, Inc. The software described in this document is furnished under
a license agreement or nondisclosure agreement. The software may be used or copied only in accordance
with the terms of those agreements. The purchaser may make one copy of this software for backup
purposes. No part of this manual or other materials included with the package, may be reproduced or
transmitted in any form or by any means electronic or mechanical, including photocopying and recording
for any purpose, other than the purchaser’s personal use, without the written permission of Data Pro
Accounting Software, Inc.
© 1985-2008 Data Pro Accounting Software, Inc.
Data Pro Accounting Software is a trademark of Data Pro Accounting Software, Inc.
No investigation was made into the common-law trademark rights of any word. Every effort was made to
capitalize or highlight, in some manner, any word with current registrations.
All companies, products, addresses, and persons contained herein are intended to be completely fictitious
and are designed solely to document and exemplify the use of Data Pro Accounting Software, Inc.’s
products.
Page i
This page intentionally left blank.
Page ii
TABLE OF CONTENTS
Description
Page
CHAPTER 1 INTRODUCTION ............................................................................................... 1-1
SPECIAL DESIGN NOTES................................................................................................................1-1
MANUFACTURING ...........................................................................................................................1-2
PROJECTING MATERIAL USAGE ................................................................................................1-2
NORMAL COSTING METHODS .....................................................................................................1-3
CHANGING COSTING METHODS.................................................................................................1-4
SERIALIZED AND LOT INVENTORIES .......................................................................................1-4
Serialized Inventory........................................................................................................................................... 1-4
Lot Inventory ..................................................................................................................................................... 1-5
WAREHOUSE TRACKING...............................................................................................................1-6
Multi-Location Inventory Tracking ................................................................................................................... 1-6
Multi-Warehouse Inventory Tracking ............................................................................................................... 1-7
UNIT OF MEASURE CONVERSION ..............................................................................................1-7
HISTORICAL INFORMATION........................................................................................................1-8
SYSTEM INTEGRATION..................................................................................................................1-8
Integration w/Job Cost Main Module ................................................................................................................ 1-8
Integration w/General Ledger............................................................................................................................ 1-9
Integration w/Accounts Payable ........................................................................................................................ 1-9
Integration w/Purchase Order Entry .................................................................................................................. 1-9
Integration w/Accounts Receivable ................................................................................................................. 1-10
Integration w/Sales Order Entry ...................................................................................................................... 1-10
Integration w/Point of Sale .............................................................................................................................. 1-10
DATA FILE DESCRIPTIONS .........................................................................................................1-10
PREPRINTED FORMS.....................................................................................................................1-12
MASKED FIELDS .............................................................................................................................1-12
BAR CODE READER .......................................................................................................................1-12
TRANSACTION PROCESSING FLOWCHARTS........................................................................1-13
CHAPTER 2 SET UP AND MAINTENANCE ........................................................................ 2-1
GENERAL OVERVIEW.....................................................................................................................2-1
NAVIGATION TOOLS.......................................................................................................................2-5
SET UP INVENTORY ITEMS...........................................................................................................2-6
Inquiry Mode (IM0100)..................................................................................................................................... 2-8
Add Mode (IM0401).......................................................................................................................................... 2-9
Special Cases: .................................................................................................................................................. 2-15
Change Mode (IM0402) .................................................................................................................................. 2-27
Delete Mode (IM0403) .................................................................................................................................... 2-27
Copy Mode (IM0404)...................................................................................................................................... 2-28
IMPORT INVENTORY ITEMS (IM0601) .....................................................................................2-28
Fixed Length ASCII Files................................................................................................................................ 2-30
Variable Length ASCII Files ........................................................................................................................... 2-30
Comma Delimited *.PRN Files ....................................................................................................................... 2-30
File Import Modules Overview........................................................................................................................ 2-31
Sample Import Inventory Items File ................................................................................................................ 2-33
IMPORT BILL OF MATERIALS (IM0605) ..................................................................................2-39
Fixed Length ASCII Files................................................................................................................................ 2-40
Variable Length ASCII Files ........................................................................................................................... 2-40
Comma Delimited *.PRN Files ....................................................................................................................... 2-40
File Import Modules Overview........................................................................................................................ 2-41
Sample Import Bill of Materials File ............................................................................................................... 2-43
RENAME IM ITEM NUMBER (IM0450).......................................................................................2-45
SET UP INITIAL COST LAYERS (M0426)...................................................................................2-47
Page iii
TABLE OF CONTENTS (continued)
Description
Page
To Add a New Cost Layer:............................................................................................................. 2-49
To Change an Existing Cost Layer:................................................................................................ 2-49
To Delete an Existing Cost Layer:.................................................................................................. 2-49
To View Sold Serial Number Items or Lot Items: .......................................................................... 2-50
ENTER NEW PHYSICAL QUANTITIES (IM0406) .....................................................................2-50
Inventory Shrinkage Report (IM0209) ............................................................................................................ 2-51
UPDATE BOOK VALUE AFTER A COUNT (IM0407)...............................................................2-55
IMPORT PHYSICAL COUNTS (IMJ0603) ...................................................................................2-56
Fixed Length ASCII Files................................................................................................................................ 2-58
Variable Length ASCII Files ........................................................................................................................... 2-58
Comma Delimited *.PRN Files ....................................................................................................................... 2-58
File Import Modules Overview........................................................................................................................ 2-59
Sample Import Physical Counts File ............................................................................................................... 2-61
IMPLEMENT PRICE CHANGES (IM0412)..................................................................................2-63
IMPORT PRICE TABLE (IM0604).................................................................................................2-64
Fixed Length ASCII Files................................................................................................................................ 2-66
Variable Length ASCII Files ........................................................................................................................... 2-66
Comma Delimited *.PRN Files ....................................................................................................................... 2-66
File Import Modules Overview........................................................................................................................ 2-67
Sample Import Price Tables File ..................................................................................................................... 2-69
SET UP PRICE PLANS ....................................................................................................................2-71
Add Mode (IM0421)........................................................................................................................................ 2-72
Change Mode (IM0422) .................................................................................................................................. 2-76
Delete Mode (IM0423) .................................................................................................................................... 2-76
Copy Mode (IM0424)...................................................................................................................................... 2-76
SET UP INVENTORY LOCATIONS..............................................................................................2-77
Add Mode (IM0801)........................................................................................................................................ 2-78
Change Mode (IM0802) .................................................................................................................................. 2-80
Delete Mode (IM0803) .................................................................................................................................... 2-81
Copy Mode (IM0804)...................................................................................................................................... 2-81
INVENTORY CONFIGURATION (IM0408).................................................................................2-81
Master Configuration....................................................................................................................................... 2-82
Price Levels ..................................................................................................................................................... 2-84
Bar Codes ........................................................................................................................................................ 2-86
Manufacturing ................................................................................................................................................. 2-87
System Integration ........................................................................................................................................... 2-90
MAINTAIN INVENTORY FILES (IM0410) ..................................................................................2-92
START NEW YEAR’S FILES (IM0411).........................................................................................2-93
MAKE COMPLETE DATA BACKUPS .........................................................................................2-95
CHAPTER 3 ENTER TRANSACTIONS ................................................................................. 3-1
RECORD PURCHASE ORDERS (IM0101) .....................................................................................3-1
RECORD RECEIPTS (IM0102).........................................................................................................3-3
RECORD SALES ORDERS (IM0103) ..............................................................................................3-4
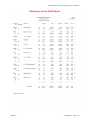
RECORD WITHDRAWALS (IM0104).............................................................................................3-6
RECORD RETURNS (IM0105)..........................................................................................................3-8
RECORD INVENTORY TRANSFERS (IM0106)............................................................................3-9
RECORD INTER-COMPANY TRANSFERS (IM0107) ...............................................................3-11
RECORD ASSEMBLY PRODUCTIONS (IM0131) ......................................................................3-13
RECORD DISASSEMBLY (IM0132) ..............................................................................................3-16
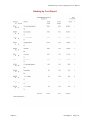
TRANSFER TO A PROJECT (IM0121) .........................................................................................3-19
TRANSFER FROM A PROJECT (IM0122)...................................................................................3-21
Page iv
TABLE OF CONTENTS (continued)
Description
Page
IMPORT TRANSACTIONS (IM0602)............................................................................................3-24
Fixed Length ASCII Files................................................................................................................................ 3-25
Variable Length ASCII Files ........................................................................................................................... 3-25
Comma Delimited *.PRN Files ....................................................................................................................... 3-25
File Import Modules Overview........................................................................................................................ 3-26
Sample Import Transactions File..................................................................................................................... 3-28
CHAPTER 4 PRINT REPORTS............................................................................................... 4-1
STANDARD FEATURES FOR REPORTS ......................................................................................4-1
CTRL+O (Output Options)................................................................................................................................ 4-1
Font Attributes................................................................................................................................................... 4-2
Report Print Options .......................................................................................................................................... 4-2
Displayed Report Options.................................................................................................................................. 4-3
Range of Orders................................................................................................................................................. 4-3
Data Record Retrieval........................................................................................................................................ 4-3
Report Sorting Preference.................................................................................................................................. 4-3
Masking (Wildcards) ......................................................................................................................................... 4-4
Period to Report On ........................................................................................................................................... 4-4
Cancel the Print Job ........................................................................................................................................... 4-4
MANUFACTURING REPORTS .......................................................................................................4-4
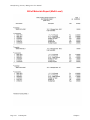
Bill of Materials Report (IM0231)..................................................................................................................... 4-5
Production Trends Report (IM0232) ............................................................................................................... 4-12
Components Used Report (IM0233)................................................................................................................ 4-14
Enter Projected Usage Amounts (IM0234)...................................................................................................... 4-16
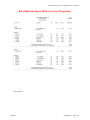
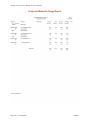
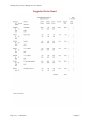
Projected Materials Usage Report (IM0235) ................................................................................................... 4-18
“Where Used” Report (IM0236)...................................................................................................................... 4-21
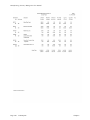
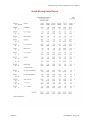
SALES and PURCHASES REPORTS.............................................................................................4-23
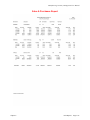
Sales and Purchases Report (IM0201)............................................................................................................. 4-24
Detailed Transactions Report (IM0202) .......................................................................................................... 4-26
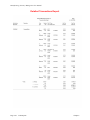
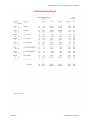
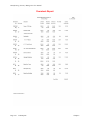
Profit Summary Report (IM0203) ................................................................................................................... 4-30
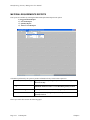
MATERIAL REQUIREMENTS REPORTS ..................................................................................4-32
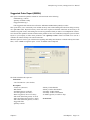
Suggested Order Report (IM0204) .................................................................................................................. 4-33
Overstock Report (IM0205) ............................................................................................................................ 4-35
Quantity Report (IM0206)............................................................................................................................... 4-37
Turnover Trend Report (IM0221).................................................................................................................... 4-41
ANALYTICAL REPORTS ...............................................................................................................4-43
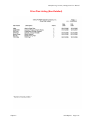
Quick Moving Items ((IM0207) ...................................................................................................................... 4-43
Slow Moving Items (IM0208) ......................................................................................................................... 4-46
Inventory Shrinkage Report (IM0209) ............................................................................................................ 4-48
Ranking By Gross Profit (IM0210) ................................................................................................................. 4-51
Ranking By Cost (IM0211) ............................................................................................................................. 4-54
Inventory Value Summary (IM0212) .............................................................................................................. 4-56
PRICE LISTS .....................................................................................................................................4-58
Price Lists (IM0213)........................................................................................................................................ 4-58
Individual Price Labels (IM0214).................................................................................................................... 4-61
Price Labels (IM0215)..................................................................................................................................... 4-62
Bar Code Master Sheet (IM0222).................................................................................................................... 4-64
Print Bar Code Printer Labels (IM0223) ......................................................................................................... 4-66
Bar Code Setup ........................................................................................................................................ 4-67
MAINTENANCE REPORTS ...........................................................................................................4-71
Inventory Listing (IM0216) ............................................................................................................................. 4-71
Inventory Detail Report (IM0217)................................................................................................................... 4-74
Cost Layer Report (IM0218) ........................................................................................................................... 4-78
Page v
TABLE OF CONTENTS (continued)
Description
Page
INVENTORY COUNT SHEETS (IM0219) ................................................................................................... 4-80
Bin Labels (IM0220) ....................................................................................................................................... 4-82
Price Plan Listing (IM0425) ..............................................................................................................4-84
CHAPTER 5 PERFORM
ANALYTICAL GRAPHS ............................................................ 5-1
For Windows: ................................................................................................................................... 5-1
SALES, COS & PURCHASES BY ITEM (IM0301) ........................................................................5-1
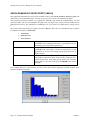
GRAPH QUICK MOVING ITEMS (IM0302)..................................................................................5-2
GRAPH SLOW MOVING ITEMS (IM0303) ...................................................................................5-3
GRAPH RANKING BY GROSS PROFIT (IM0304) .......................................................................5-4
GRAPH RANKING BY COST (IM0305)..........................................................................................5-5
INDEX............................................................................................................................................ 1
Page vi
Manufacturing Inventory Management User Manual
CHAPTER 1
INTRODUCTION
A simplified definition of Inventory Management is the tracking of materials used for the production and/or sales
of a company's goods or services. These materials can be raw materials, finished goods or, in some cases, labor. To
further understand this definition, we must examine the term “tracking” and understand why this tracking is
necessary. Basically, tracking refers to the accurate measurement of all purchases, internal production, and
withdrawal of materials.
The costing and quantity of each transaction is essential to good inventory management. This information provides
management with an important element of the company's profitability. Expanding on the idea of increasing
profitability, we are presented with another important aspect of inventory management, matching actual materials on
hand with requirements of materials needed for production and sales. Success in this area offers increased
profitability through reduced inventory “carrying” costs.
Ultimately, successful inventory management depends upon the ability of the individuals making the management
decisions. The Manufacturing Inventory Management module is designed not only to handle your financial
tracking requirements, but also to provide you with the analytical management reports and graphs necessary for you
to make sound business decisions.
SPECIAL DESIGN NOTES
The Manufacturing Inventory Management module is designed to conform to your business needs, rather than
requiring your business to conform to its data processing needs. You have the ability to customize many of the
screen prompts, calculations and reporting specifications to your particular needs. All of these special features are
described in detail in this chapter and Chapter 2, “Perform Set Up and Maintenance,” however, one system
configuration item is so important that it merits immediate discussion.
This feature is the inventory item number configuration. Once established, the item number configuration cannot be
changed without the complete re-entry of all inventory items. Recognizing that different industries have various
conventions for classifying and organizing inventory, the system allows you to configure the format of your
inventory item numbering. The overall number may be from 1 to 20 characters (alpha/numeric) and consist of up to
4 components.
Each component is user definable and can consist of some or all of the 20 maximum characters available for the
item number. The item number component can be any classification or category in which you wish to subdivide
your inventory. For instance, if your company distributes garments, you may wish to have the following
components:
•
Manufacturer
•
Style
•
Color
•
Size
If your company manufactures water pipes, you might set up the following components:
•
Type
•
Diameter
•
Length
If your company has a simple product line, you could specify only one component: Item Number. Once you have
established the format of your part number components, every time you select an inventory item, the system will ask
you to enter the item number in its appropriate component order.
Chapter 1
Introduction
Page 1-1
Manufacturing Inventory Management User Manual
For instance, using the first example above, you would be prompted to enter the 1) Manufacturer, then 2) Style,
then 3) Color, and finally 4) Size, when selecting an inventory item. In addition, all reports and several options
allow you to select the inclusion of specific inventory items based on an item number “mask,” which is formatted in
component order.
Specific instructions for the set up of the part number components is found in Chapter 2.
MANUFACTURING
The Manufacturing Inventory Management module not only provides you with the normal inventory features but
also offers a complete, multi-level, manufacturing process with advanced material requirements reporting.
Essential to the understanding of the manufacturing process are the following definitions:
Assembly
Any inventory item that is manufactured. This includes finished goods, which
are completely manufactured, and sub-assemblies that are manufactured, but are
also used in the manufacturing of other items.
Component
Any inventory item that is used in the manufacturing of another item. This
includes sub-assemblies and raw materials.
By-Product
Any inventory item which is created during the manufacture of an assembly.
Bill of Materials
These are the list of components that are required to manufacture an assembly.
By-products may also be included in this list.
There are two modes of manufacturing:
•
Production
•
Disassembly
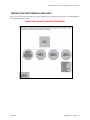
Production
Production is the manufacture of an assembly. During this process, the quantity
and cost information is increased in the assembly inventory, while the quantity
and cost is decreased in the component inventory for all items on the assembly's
bill of materials. In other words, you construct an assembly from the
components listed on its bill of materials.
In addition, all by-products listed on the bill of materials will be added to your
inventory at the time of manufacture.
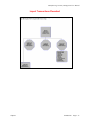
Disassembly
Disassembly is the reverse of the manufacturing process. It reduces the
assembly inventory while adding back the components to inventory. Byproducts are also reduced at the time of disassembly.
PROJECTING MATERIAL USAGE
The Manufacturing Inventory Management module provides several trend analysis and quantity reports that are
helpful in projecting material requirements. However, one report in particular, the “Projected Materials Usage
Report” allows you to utilize “what if” modeling to determine sales and manufacturing needs.
This report takes projected material requirements, based on your sales projections, and calculates manufacturing
needs based on current stock levels. It also provides you with re-order requirements based on the manufacturing
needs calculated above.
The sales projections used as the basis for this report may be based on current unfilled customer orders, your
management projections, or a combination of the two.
Page 1-2
Introduction
Chapter 1
Manufacturing Inventory Management User Manual
NORMAL COSTING METHODS
The Manufacturing Inventory Management module supports five different costing methods. They are:
•
LIFO - Last In First Out
•
FIFO - First In First Out
•
Average
•
Latest Unit Cost
•
Standard Cost
•
Serial Number
•
Lot Number
•
Fixed O/H
The following describes the different costing methods:
LIFO & FIFO
These costing methods group inventory into separate quantities based on unit
cost. These “layers” of different costs accumulate over time as your purchase
price of inventory changes. Each time a receipt of inventory is recorded into the
system at a new cost, a new cost layer is added. As you record withdrawals, the
LIFO method removes inventory from the last layer first. FIFO removes
inventory from the earliest layer first.
Average
Average Costing is the default method utilized by the system. This costing
method provides a weighted average unit cost for your inventory. The unit cost
is recalculated after each receipt. The formula for this calculation is:
Unit Cost =
(current total cost + total cost of receipt) divided by (current total quantity +
total quantity received)
Latest Unit Cost
This costing method calculates the value of your inventory based on the unit
cost of the last receipt. In other words, after each receipt, total cost is
recalculated as:
Total Cost =
(quantity received + total current quantity) x (unit cost of last receipt).
Standard Cost
This method uses a predefined unit cost for all inventory items. No matter what
the actual cost of a receipt, the inventory will always be valued at the predefined
unit cost that you establish during inventory item addition or changes. At
month's end, a comparison between actual inventory costs and standard costs
are normally calculated and posted to a “Standard Variance” account. (See
your accountant for details.)
Serial Number
This costing method records an individual serialized inventory item into each
cost layer. These “layers” of individual items are established when receipts of
inventory are recorded and Serial Number(s) are assigned for the quantities
received. This assignment is on an individual, item by item basis. Costs are also
based on individual items.
As you record withdrawals, the system will prompt the user for the Serial
Number(s) being withdrawn. All transactions are updated to the Inventory
transaction file in detail for reporting and historical purposes.
Chapter 1
Introduction
Page 1-3
Manufacturing Inventory Management User Manual
Lot Number
This costing method records “lots” of inventory items into individual cost
layers. These “layers” of items are established when receipts of inventory are
recorded and a Lot Number is assigned for the quantities received. This
assignment is on a user defined basis. Lot Numbers represent a “likeness” in
items. Costs are also based on individual cost layers.
As you record withdrawals, the system will prompt the user for the Lot
Number(s) being withdrawn. All transactions are updated to the Inventory
transaction file in detail for reporting and historical purposes.
Fixed O/H
This costing method records “fixed overhead” into a single cost layer. This
may be used to transfer or incorporate an additional cost or fixed overhead for a
project or service. There are no quantities maintained and the cost layer has no
value that affects the balance sheet in the General Ledger.
NOTE
Any time you record a withdrawal or transfer which exceeds the quantity on
hand, your inventory program will NOT allow a negative quantity to be
recorded in your cost layers. Instead, zero quantity will be displayed as onhand and the field named “Quantities to Adjust” will reflect the negative
quantity.
After you make the adjustment for the over-withdrawal through some type on
inventory receipt, you should execute one of the “Cost of Sale Adjustments”
options.
CHANGING COSTING METHODS
The inventory costing method is defined by “inventory item.” When you add inventory items to the system, you
will be prompted for a costing method as one of the required data items. Once your inventory is set up, you should
not change the costing method. However, if you must change the method, these steps should be followed:
1.
Backup your inventory data files.
2.
Print the complete “Cost Layer Report.”
3.
Zero each cost layer in the “Set Up Initial Cost Layers,” “Delete Cost Layers” option.
4.
Manually recalculate cost for each item based on the new costing method.
5.
Change costing method, then input the new cost layer information in the “Set Up Initial Cost Layers,”
“Enter New Cost Layers” option.
6.
Print the “Cost Layer Report” to verify that all costs have been adjusted properly.
7.
Make any adjustments necessary to the balance sheet by way of journal entry in the General Ledger.
SERIALIZED AND LOT INVENTORIES
This section will discuss two commonly used costing methods of inventory control.
Serialized Inventory
Serialized Inventory is a costing method normally associated with inventory items that require tracking for recall or
warranty purposes. The optimal use of this costing method requires you to track the purchase and sale of each
individual serialized item in stock. All Serial Number type inventory items will have purchase and sales information
recorded automatically at the time the transaction is entered into the system. The purchase information, recorded
from the Accounts Payable or Purchase Order modules, includes the date of purchase, the vendor number, the
vendor's invoice number and the unit cost.
Page 1-4
Introduction
Chapter 1
Manufacturing Inventory Management User Manual
The sales information, recorded from the Accounts Receivable, Sales Order Entry or Point of Sale modules, includes
the date sold, the customer number, the sales invoice number and the sales price. This information can be obtained
from the Inventory Detailed Transaction Report. The Detailed Transaction Report may be run using a “mask” on the
Serial Number. This will filter out all other transactions so that only those transactions matching the Serial Number
entered will be presented on the report.
Conceptually, there is only one part number created for a product which requires Serial Number assignment. This is
your main part number. When you set up your inventory, you will need to establish your initial cost layers for each
individual serialized item for that product.
When you add new cost layers to a Serial Number type inventory item, the system will prompt you for additional
information about each individual Serial Number that you assign. This information includes the Serial Number
assignment, unit cost, an additional description line, a bin number, a warranty flag and two lines of comments. Once
your initial inventory is set up, normal daily processing will continue to prompt you for this additional information
whenever the system recognizes the purchase of a serialized item. At the time of recording receipts of inventory, the
system will request the Serial Numbers being added to your stock. When you sell a serialized item, the system will
request the Serial Numbers being withdrawn from your stock.
Serialized items can be flagged as “warranty” items. When these items are received into stock, they should be
recorded as having a warranty. There are comment lines available to describe the type of warranty or any other
pertinent information about this individual item. If an item is flagged as a “warranty” item, the system will retain all
purchase and sales information about that individual item. This information can be viewed from the “View Sold
Serial/Lot Data” option in Set Up Initial Cost Layers.
Lot Inventory
Lot Inventory is a costing method normally associated with inventory items that are grouped together, having a
“likeness” which would categorize them as a “lot.”
Unlike Serialized Items, Lot Number items can be stored with multiple quantities. For example, you received four
(4) cases of red paint which was manufactured at two different plants. The manufacturer has marked on the cases the
Lot Numbers so that the paint can be sold in quantity with the same dye match. You can record the receipt of this
stock on two separate line items, two cases with Lot Number “123” and two cases with Lot Number “789.”
During the set up of Inventory Items, a “cost label” can be assigned to describe or distinguish the lots to be entered
for the item. For example, you may have a shoe store, which carries boots. The boots can be stored as lots with the
label “Style/Color/Sz.” The store may also carry accessories for boots, such as anklets or taps, which may only
require a cost label of “Style/Color.” Each “lot” inventory item can have a different cost label.
All Lot Number type inventory items will have purchase and sales information recorded automatically at the time
the transaction is entered into the system. The purchase information, recorded from the Accounts Payable or
Purchase Order modules, includes the date of purchase, the vendor number, the vendor's invoice number and the unit
cost.
Each lot or group of items should be recorded as separate line items so that the system can distinguish the difference
between groups within a specific inventory item number. The sales information, recorded from the Accounts
Receivable, Order Entry or Point of Sale modules, includes the date sold, the customer number, the sales invoice
number and the sales price.
When a sale is entered, the system will request the user to enter or select the “lot” to withdraw the items from. If
there is not a sufficient amount in that particular lot, the system will prompt the user to select another lot to
withdraw from. The system will continue to prompt for additional lot numbers until the quantity sold has been
sufficed.
This information can be obtained from the Inventory Detailed Transaction Report. The Detailed Transaction Report
may be run using a “mask” on the Lot Number. This will filter out all other transactions so that only those
transactions matching the Lot Number entered will be presented on the report. Conceptually, there is only one part
number created for a product that requires Lot Number assignment. This is your main part number. When you set up
your inventory, you will need to establish your initial cost layers for each lot for that product.
Chapter 1
Introduction
Page 1-5
Manufacturing Inventory Management User Manual
When you add new cost layers to a Lot Number type inventory item, the system will prompt you for additional
information about each Lot Number that you assign. This information includes the Lot Number assignment, unit
cost, an additional description line, a bin number, a warranty flag and two lines of comments.
Once your initial inventory is set up, normal daily processing will continue to prompt you for this additional
information whenever the system recognizes the purchase of a lot item. At the time of recording receipts of
inventory, the system will request the Lot Numbers being added to your stock. You will have the option to add to an
existing lot or add a new lot for this inventory item number. When you sell a lot item, the system will request the Lot
Number being withdrawn from your stock.
Lot Number items can be flagged as “warranty” items. When these items are received into stock, they should be
recorded as having a warranty. There are comment lines available to describe the type of warranty or any other
pertinent information about this individual item. If an item is flagged as a “warranty” item, the system will retain
all purchase and sales information about that lot. This information can be viewed from the “View Sold Serial/Lot
Data” option in Set Up Initial Cost Layers.
WAREHOUSE TRACKING
The system also allows you to track inventory across several stores, warehouses, or other locations. This section will
discuss two different methods of tracking inventory information, Multi-Location Inventory Tracking and MultiWarehouse Inventory Tracking.
Multi-Location Inventory Tracking
Inventory can be maintained on a multi-location basis, as well as be easily transferred between warehouses using the
“Record Inter-Company Transfers” option. Multi-Location Inventory tracking is a method of tracking and
distributing inventories from multiple locations.
Conceptually, each location will have its own company set up including a minimum of the General Ledger and
Manufacturing Inventory Management modules. Each location may, in fact, run all modules, including Payroll. This
will facilitate the requirement to track the “Due To/Due From” entries that are created when the inventories are
transferred from the one location to another.
The following procedures may be very helpful, too, in utilizing this feature:
1.
Establish the locations in the “Set up Inventory Locations” option. During the set up of each location, you
will be asked for the company number, a description of the location, and the Inventory Data Path. You will
also be asked for the AP and AR accounts which will be used for the “Due To/Due From” entries that are
created, as well as whether this company's inventory files will allow a direct update.
Inventory can only be transferred from the originating location to the destination location. The location
requesting the inventory can not “take” inventory from the source location. However, Inquiries may be
performed to view the on-hand and available quantities of any location, central or individual site.
2.
Inventory transfers of stock from one location to another can be recorded through the “Record InterCompany Transfers” option. Inventory will be transferred out of the source company's inventory, to arrive
at a per unit cost that will be received into the destination company's inventory.
The system will create all the accounting entries necessary for both sides of the transaction. It will decrease
(credit) the inventory and increase (debit) a Receivable account in the source location's General Ledger. In
the destination location's General Ledger, it will show an increase (debit) in Inventory and an Increase
(credit) in a Payable account.
Audit Trails will be printed to verify the transfer procedure for the transaction. The source company's audit
will show the inventory withdrawn, while the destination company's audit report will show the receipt of
the inventory. All transfer information will be stored in the inventory transaction files in both companies.
The Inventory Detailed Transaction Report may be run to access this information at a later date.
Page 1-6
Introduction
Chapter 1
Manufacturing Inventory Management User Manual
Multi-Warehouse Inventory Tracking
Inventory can be maintained on a multi-warehouse basis, as well as be easily transferred between warehouses using
the “Record Transfers” option. This is true for all inventory costing methods except for the case of Serialized or Lot
Numbered items. These costing methods can not be used to their full advantage in conjunction with Multi-Location
Inventory Tracking.
The following procedures may be very helpful, too, in utilizing this feature:
1.
Establish the location as one of the Lot Numbers assigned to a specific inventory item. The inventory item
will need to be classified as a “Lot Number” costing method. The “cost label” can then describe the
warehouse location. For example, the cost label may be “Warehouse No.” or “Truck Number” or “Store
Number.”
2.
When adding the inventory for the warehouses, you will add Lots to each inventory item to define the
inventories being stored at each location. Use the “Enter Initial Cost Layers” option to add the warehouse
information as a lot number.
For example, you may have two trucks (Numbers 101 and 105) which store inventory. Each inventory item
will need to be classified as a Lot Number costing method. You will then add a Lot Number 101 and 105
for each inventory item. These lot numbers will then store the quantities stocked on each truck.
Inventory transfers of stock from one location to another can be recorded through the “Record Transfers”
option. Inventory will be transferred out of the one item's lot number, to arrive at a per unit cost that will be
received into the destination item's lot number.
When printing inventory reports you may include the inventory for all locations, groups of locations, or a
single location. This reporting flexibility is handled by the report “mask” for Serial/Lot Number.
Every time you print an inventory report you can specify a Serial/Lot Number mask to include only the
inventory items within a certain location. This masking concept is explained in more detail in your System
Administrator manual.
UNIT OF MEASURE CONVERSION
The Manufacturing Inventory Management system allows for the conversion of multiple units of measure. This will
facilitate the need to store inventory in a “stocking unit of measure,” while being able to receive and sell it in
different units of measure. The “stocking unit of measure” will be the smallest level of stocking (usually each). On
each individual inventory item, you can define up to ten (10) different unit of measure conversions.
Each of the unit of measure conversions will define a four (4) character (alpha/numeric) unit of measure identifier, a
multiplying factor and a price level. Pricing Levels can also be defined by implementing special Price Plans. You
may set up a Price Plan to correspond with an individual unit of measure, such as “dozens.” Include in that price
plan, all inventory items that would have a unit of measure of “dozens.” The pricing established in that Price Plan
should be pricing based on “dozens.”
All Price Plans set up and used as described above, will override the Price Level set up on the Unit of Measure
conversion table. These price plans are “special price plans” and should not be assigned to any customer. When
inventory is being received either through Accounts Payable or Purchase Order modules and an inventory item has a
unit of measure conversion defined, the system will prompt the user for the unit of measure to receive by.
A “pop-up” window will appear with the available unit of measures defined for that inventory item. When the unit
of measure is selected, the system will retrieve the multiplying factor and calculate the quantities being received and
update the inventory files with the lowest level of stock (stocking unit of measure). Likewise, when you are selling
inventory, you will receive the opportunity to choose the unit of measure in which to sell the inventory item. By
using the multiplying factor the system can calculate the quantities required at the lowest level and withdraw them
for the sale of merchandise.
Chapter 1
Introduction
Page 1-7
Manufacturing Inventory Management User Manual
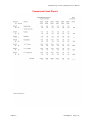
HISTORICAL INFORMATION
Historical information is tracked for each inventory item in two different ways:
•
Accounting Period for Purchases, Sales and Cost of Sales
•
Transaction Detail
These two kinds of historical tracking are the basis for a number of the management reports and graphs in the
system.
Accounting Period
Transaction Detail
First, summary information is maintained by accounting period for purchases
and sales. This information consists of the following:
•
Quantity purchased
•
Dollar value of purchases
•
Quantity sold (withdrawn)
•
Dollar sales
•
Dollar value of goods sold (cost of sales)
The second type of historical information maintained by the system is the
transaction detail. Every transaction that affects an inventory item is printed on
a transaction register.
SYSTEM INTEGRATION
This section includes a brief overview of how the Inventory system integrates with various other accounting
modules. These modules include; Job Cost Main Module, General Ledger, Accounts Payable, Purchase Order
Entry, Accounts Receivable, Sales Order Entry and Point of Sale. Job Cost Main Module and the General
Ledger modules are the only modules which Inventory directly updates.
All other modules either update Inventory or directly access the inventory files to retrieve necessary information.
Integration w/Job Cost Main Module
The Job Cost Main Module allows the transfer of inventory items to and from the Inventory module. The option to
transfer items “to” a specific job or project removes inventory quantities on hand and increases “costs” to that
project based on the costing method set up in the Inventory Master Configuration.
Likewise, the option to transfer items “from” a specific job or project increases inventory quantities on hand and
decreases “costs” to that project. This can be used for removing items that are not actually used on a job/project or
this can be the mechanism to “transfer” inventory items that have been assembled or manufactured as a job back to
the finished good inventory. Once received back into inventory as a finished good, the new item(s) may be
processed just like any other inventory item.
Page 1-8
Introduction
Chapter 1
Manufacturing Inventory Management User Manual
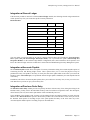
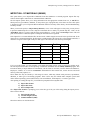
Integration w/General Ledger
If the Inventory module is interactive with the General Ledger module, the following General Ledger transactions
will be posted every time you execute the specific inventory transaction.
IM Transaction:
DEBIT
CREDIT
RECORD A WITHDRAWAL
Cost of Sales Account
X
Asset Account
X
RECORD A RETURN
Cost of Sales Account
X
Asset Account
X
Source Asset Account
Destination Asset Account
X
X
UPDATE BOOK AFTER PHYSICAL COUNT
Asset Account
Shrinkage Account
X
X
You may update your general ledger at any time by entering General Ledger and executing the “Post Integration
Files” option. (See your General Ledger manual for details.) Or, if you choose the option “Automatically Post
Integration Modules” in the General Ledger Master Configuration, these same transactions will be posted in real
time to the General Ledger each time a transaction is entered into the Manufacturing Inventory Management system.
Integration w/Accounts Payable
The Accounts Payable module allows the update of inventory information during the Accounts Payable options of
Vouchering Invoices and Writing Single Checks. These options allow you to record the physical receipt of
purchased inventory. The update to inventory is exactly the same as the update which occurs when you execute the
Inventory option “Record Receipts;” except that the General Ledger update is handled by Accounts Payable instead
of Inventory.
In addition, both of these Accounts Payable options allow you to add a new inventory item, in case you receive new
stock that has not yet been set up in your inventory files.
Integration w/Purchase Order Entry
The Purchase Order Entry module provides two primary interfaces with Inventory. First, during the writing of the
Purchase Order, you may retrieve the individual inventory items for inclusion on a purchase order. The description,
unit of measure, unit cost, and vendor's part number will be automatically retrieved.
Upon validation of the purchase order, inventory will be updated for the new amount on-order in exactly the same
manner as the “Record Purchases” option in the Inventory module. The second interface occurs when you execute
the Purchase Order option of recording receipts. This option updates Inventory in the exact same way as the
Accounts Payable module option of recording receipts as described above.
Chapter 1
Introduction
Page 1-9
Manufacturing Inventory Management User Manual
Integration w/Accounts Receivable
The Accounts Receivable interface is somewhat of a two way street; however, Accounts Receivable does all the
work. When writing or recording invoices and other transactions in Accounts Receivable, the inventory item's
default sales code, descriptions, unit of measure, costs, and price tables are retrieved. The sales code, costs and
prices are used to update the Accounts Receivable sales journal and historical files. The other information is printed
on the invoice for billing description purposes. The update performed in Inventory upon validation of these
transactions is identical to the Inventory option of “Record Withdrawals,” except that the General Ledger update is
handled by Accounts Receivable.
Integration w/Sales Order Entry
The Sales Order Entry module provides two primary interfaces with Inventory. First, during the writing of the
Sales Order, you may retrieve the individual inventory items for inclusion on a sales order. The description, unit of
measure, price table, and sales code will be automatically retrieved. Upon validation of the sales order, inventory
will be updated for the new quantity reserved to ship in exactly the same manner as the “Record Sales Orders”
option in the Inventory module. The second interface occurs when you execute the Sales Order option of recording
shipments. The update performed in Inventory upon validation of these transactions is identical to the Inventory
option of “Record Withdrawals,” except that the General Ledger update is handled by Accounts Receivable.
Integration w/Point of Sale
The Point of Sale module integrates with Inventory in exactly the same manner as Accounts Receivable. When
recording a sale in Point of Sale, the inventory item's default sales code, descriptions, unit of measure, costs, and
price tables are retrieved. The sales code, costs and prices are used to update the Point of Sale sales journal and
historical files. The other information is printed on the invoice for billing description purposes.
The update performed in Inventory upon validation of these transactions is identical to the Inventory option of
“Record Withdrawals,” except that the General Ledger update is handled by Point of Sale.
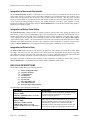
DATA FILE DESCRIPTIONS
The Inventory module utilizes the following data files:
1)
2)
3)
4)
5)
6)
7)
8)
9)
Master Configuration File
Inventory Item File
Transaction File
Assembly File
Cost Layer File
Location File
Price Plan Master File
Price Plan Detail File
General Ledger Integration File
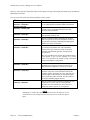
The following is a brief description of these files:
File Name
Description
Master Configuration File
(filetype: IM00)
(filename: coIM0.dbf, where “co” is the
company number).
Inventory Item File
(filetype: IM01)
(filenames: coIM1dy.dbf and
coIM1dy.mdx, where “co” is the
company number and “dy” is the fiscal
year).
This file contains certain configuration information such
as your item number components, costing method,
systems to integrate with, etc.
Page 1-10
Introduction
This yearly file contains all information that is pertinent
to each individual inventory item such as quantities on
hand and prices. Because it is a dated file, all YTD
information will be cleared when the option to Start New
Year's Files is run. However, all quantity amounts and
Chapter 1
Manufacturing Inventory Management User Manual
File Name
Description
cost layers will remain in place from one year to the next.
This file automatically records the Last Received Date,
Received Quantity, and Last Received Unit Cost. These
fields are automatically updated whenever a receipt
transaction is posted and are displayed in the Cost
Window of the Item Inquiry option.
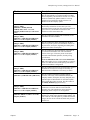
Transaction File
(filetype: IM02)
(filenames: coIM2dy.dbf and
coIM2dy.mdx, where “co” is the
company number and “dy” is the fiscal
year).
Assembly File
(filetype: IM03)
(filenames: coIM3.dbf and coIM3.mdx,
where “co” is the company number).
Price Plan Master File
(filetype: IM04)
(filenames: coIM4.dbf and coIM4.mdx,
where “co” is the company number).
This yearly file is used to maintain transaction detail for
all Inventory transactions for the entire year. The
information stored in this file varies between transaction
types; however, all information entered for each
transaction will be stored in this file.
Price Plan Detail File
(filetype: IM05)
(filenames: coIM5.dbf and coIM5.mdx,
where “co” is the company number).
This file contains the detail information of the plans set
up in the Price Plan Master File. This information
consists of the type of inventory items involved, the
minimum and maximum quantities, and the pricing
specifications.
The Price Plan Master File and the Price Plan Detail
File work together to give you the capability of a pricing
matrix over and above the normal pricing conventions
defined in the Master Configuration.
Cost Layer File
(filetype: IM06)
(filenames: coIM6.dbf and coIM6.mdx,
where “co” is the company number.)
Location File
(filenames: sysIM7.dbf and sysIM7.mdx.)
This file contains all cost layers for all inventory items. It
maintains the cost layers as receipts of inventory are
added and when withdrawals of inventory are taken.
U/M File
(filetype: IM08)
(filenames: coIM8.dbf and coIM8.mdx,
where “co” is the company number.)
This file contains all the information regarding the Unit
of Measure Conversion table for each individual
inventory item. This includes the unit of measures,
multiplying factors and price level assignment.
General Ledger Integration File
(filename: IM2GL.co, where “co” is the
company number).
If you are processing interactive with General Ledger, all
transactions, which require General Ledger updates, will
post to this file. Once the update is performed in General
Ledger, this file will be cleared and made ready for new
transactions.
Chapter 1
This file contains the complete bill of materials for all
assemblies and sub-assemblies.
This file contains the master information on the Price
Plans set up in the system. This information consists of
the plan name, description, beginning and ending dates,
and the active status of each plan.
This file contains information regarding multiple
locations of inventory. This information includes the
company number, description, inventory data path, and
general ledger account numbers for Accounts Payable
and Accounts Receivable accounts. This file resides in
the Infinity POWER program directory.
Introduction
Page 1-11
Manufacturing Inventory Management User Manual
PREPRINTED FORMS
The Manufacturing Inventory Management module utilizes no special preprinted forms. The system will print to
peel-away labels for Price Labels and Bin Labels. The size label used for the Price Label utilizing Bar Code Printing
is:
1” X 3 1/2”
The size label used for the Price Label utilizing standard formatting is:
1” X 3 1/2”
The size label used for the Bin Label is:
2” X 3 1/2”
MASKED FIELDS
This following field can be “Masked” when generating reports from the system:
Inventory Item Number
On the Detailed Transaction Report and the Cost Layer Report you can mask on the following field in addition to
the Inventory Item Number.
Serial/Lot Number
BAR CODE READER
This section discusses the usage of Bar Code Readers with the Manufacturing Inventory Management module.
The Manufacturing Inventory Management system provides you with the ability to print Bar Code Price Labels that
can be recognized by the system with an approved bar code reader.
The format of the label is as follows:
1) Normal user readable text which contains the Item Description.
2) Normal user readable text which includes the Item's Part Number and Price.
3) Encoded Inventory Item Number.
When using the bar code reader with Accounts Receivable, Accounts Payable, Sales Order Entry, Purchase
Order Entry, and Manufacturing Inventory Management, pass the bar scanner over the item number. The
scanner may pass in a left to right, or a right to left direction, but it must be kept at about a 45 degree vertical angle
to the bar code.
You may use the bar code entry method any time you are prompted by the system to enter the inventory item
number. The bar code scanner should be configured to automatically perform a carriage return after scanning the
code. Keep in mind that the Inventory Item Number is coded as one (1) field of text. This means that the modules
involved should be configured to “Default to IM,” because the Item Number segmentation is not supported.
Page 1-12
Introduction
Chapter 1
Manufacturing Inventory Management User Manual
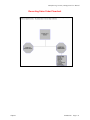
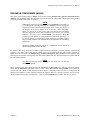
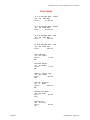
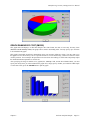
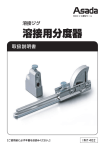
TRANSACTION PROCESSING FLOWCHARTS
This section covers the processing flow for the different types of transaction processing in the Manufacturing
Inventory Management system.
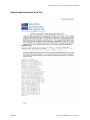
Record Assembly Production Flowchart
Chapter 1
Introduction
Page 1-13
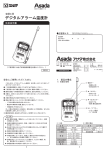
Manufacturing Inventory Management User Manual
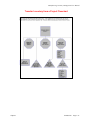
Record Disassembly Production Flowchart
Page 1-14
Introduction
Chapter 1
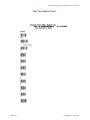
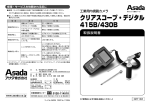
Manufacturing Inventory Management User Manual
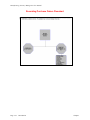
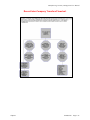
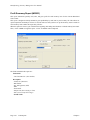
Physical Count Updates Flowchart
Chapter 1
Introduction
Page 1-15
Manufacturing Inventory Management User Manual
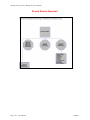
Update Physical Count Flowchart
Page 1-16
Introduction
Chapter 1
Manufacturing Inventory Management User Manual
Import Transactions Flowchart
Chapter 1
Introduction
Page 1-17
Manufacturing Inventory Management User Manual
Recording Purchase Orders Flowchart
Page 1-18
Introduction
Chapter 1
Manufacturing Inventory Management User Manual
Record Receipts Flowchart
Chapter 1
Introduction
Page 1-19
Manufacturing Inventory Management User Manual
Record Returns Flowchart
Page 1-20
Introduction
Chapter 1
Manufacturing Inventory Management User Manual
Recording Sales Order Flowchart
Chapter 1
Introduction
Page 1-21
Manufacturing Inventory Management User Manual
Record Withdrawals Flowchart
Page 1-22
Introduction
Chapter 1
Manufacturing Inventory Management User Manual
Transfer Inventory from a Project Flowchart
Chapter 1
Introduction
Page 1-23
Manufacturing Inventory Management User Manual
Transfer Inventory to a Project Flowchart
Page 1-24
Introduction
Chapter 1
Manufacturing Inventory Management User Manual
Record Inter-Company Transfers Flowchart
Chapter 1
Introduction
Page 1-25
Manufacturing Inventory Management User Manual
Record Inventory Transfers Flowchart
Page 1-26
Introduction
Chapter 1
Manufacturing Inventory Management User Manual
CHAPTER 2 SET UP AND MAINTENANCE
This chapter will provide you with a step-by-step procedure for the initial set up and maintenance of your Inventory
files. This section also discusses the routine maintenance associated with maintaining the Inventory data files. These
options include setting up and changing the attributes of your inventory items, the set up of the bill of materials, an
option to maintain your inventory files, an option to “import” items from other computer systems, and how to begin
the new year's files.
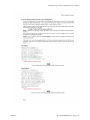
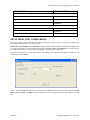
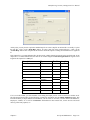
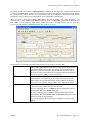
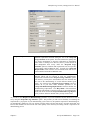
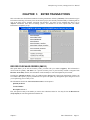
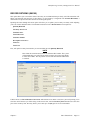
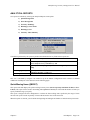
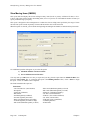
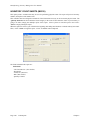
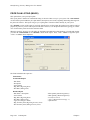
When you select this menu option, a complete list of choices will be displayed as shown on the following screen:
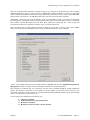
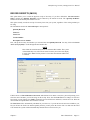
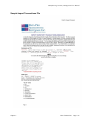
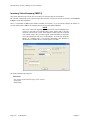
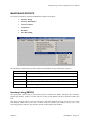
GENERAL OVERVIEW
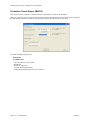
Once you have installed your module(s) and reviewed the System Overview, (Chapter 1), you are ready to set up
your master Manufacturing Inventory Management files from scratch. Select the “Systems” option from the Menu
Bar. Then, select the “System Administrator” option. Then, select the “Start up from Scratch” menu option as
shown on the following screen.
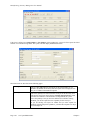
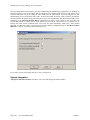
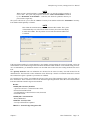
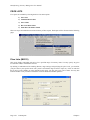
“Start Up From Scratch” is utilized to set up your initial Manufacturing Inventory Management and any other
integrated accounting module data files for a particular company. This procedure is performed only once.
Thereafter, your data files may be packed or re-indexed through the Manufacturing Inventory Management option
“Maintain Inventory Management Files.”
Chapter 2
Set Up and Maintenance
Page 2-1
Manufacturing Inventory Management User Manual
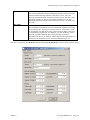
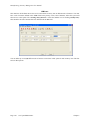
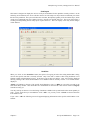
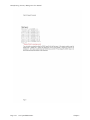
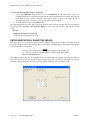
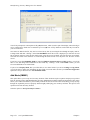
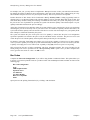
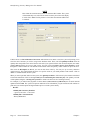
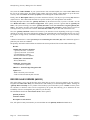
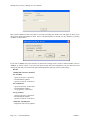
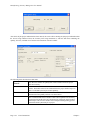
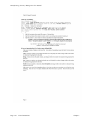
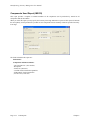
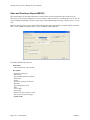
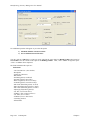
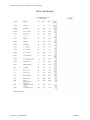
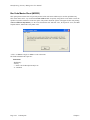
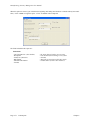
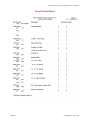
Once this option is selected, the following screen will appear showing a listing of all accounting modules that have
been installed on your computer system.
Page 2-2
Set Up and Maintenance
Chapter 2
Manufacturing Inventory Management User Manual
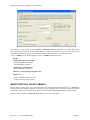
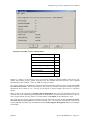
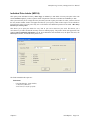
This is an automated utility designed to simplify the process of creating all of the data files for each accounting
module throughout the system. Users may choose to “Select All” accounting modules by <clicking> on this button
which will check all modules and make them ready for processing. Otherwise, you may <click> on the “Clear All”
button to undo your selections. The “Invert” button will reverse the order of all current selections.
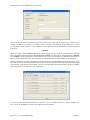
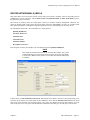
Additionally, you may use your mouse to manually <click> on each module to <click> it on or off to be included in
the startup process. Remember, modules such as Purchase Order require Accounts Payable to function. Sales Order
Entry requires Accounts Receivable and Time Sheet Entry requires the Payroll data files. Point of Sale and
Accounts Receivable share common files which is why it is so noted on the screen.
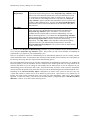
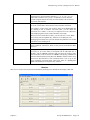
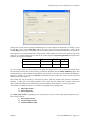
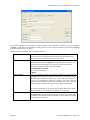
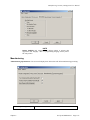
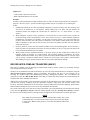
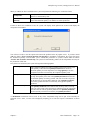
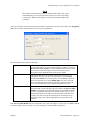
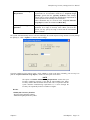
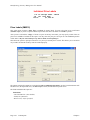
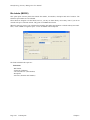
This step must be done for each company for which you intend to process data. To begin, <click> on the “Start”
button. The following screen illustrates how the screen will change when the process is completed.
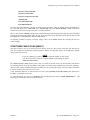
<Click> on the “Close” button when done and then return to “Systems” and select the “Manufacturing Inventory
Management” module to continue with the configuration functions to be described from here.
This procedure is performed only once. Thereafter, your files can be modified through the normal maintenance
options. The Inventory system allows you the ability to custom configure your inventory item structure; the size,
description, report titles, sorting methods, etc. Careful consideration and preplanning should be given when deciding
on how you will identify your inventory items,
Your inventory item configuration will affect the way:
1) Reports are printed.
2) What information is reported and printed.
3) How data is classified.
4) How data is retrieved (sorted, searched, masked).
Chapter 2
Set Up and Maintenance
Page 2-3
Manufacturing Inventory Management User Manual
Each one of the sub-menu options that follow in this chapter will step you through your Initial Set Up and Routine
Maintenance Procedures.
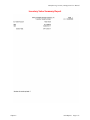
Once you select this option, the following data files will be created:
File Name
Description
Master Configuration File
(Filename: coIM0.dbf)
This file contains your Master Configuration, Price
Level, and Integration with other modules information.
Inventory Item File
(Filename: coIM1dy.dbf)
This file contains the information for your Company,
Current Year's Cost & Historical Information and
Inventory Item information.
Assembly File
(Filename: coIM3.dbf)
This file contains the bill of materials information for
each assembly inventory item.
Price Plan Master File
(Filename: coIM4.dbf)
This file contains the master information on the Price
Plans set up in the system. This information consists of
the plan name, description, beginning and ending dates,
and the active status of each plan.
Price Plan Detail File
(Filename: coIM5.dbf)
This file contains the detail information of the plans set
up in the Price Plan Master File. This information
consists of the type of inventory items involved, the
minimum and maximum quantities, and the pricing
specifications.
The price plan Master File and the Price Plan Detail File
work together to give you the capability of a pricing
matrix over and above the normal pricing conventions
defined in the Master Configuration.
Cost Layer File
(Filename: coIM6.dbf)
This file contains all cost layers for all inventory items. It
maintains the cost layers as receipts of inventory are
added and when withdrawals of inventory are made.
Location File
(Filename: sysIM7.dbf )
This file contains information regarding multiple
locations of inventory. This information includes the
company number, description, inventory data path, and
general ledger account numbers for Accounts Payable
and Accounts Receivable accounts. This file resides in
the Infinity POWER program directory.
U/M File
(filename: coIM8.dbf)
This file contains all the information regarding the Unit
of Measure Conversion table for each individual
inventory item. This includes the unit of measures,
multiplying factors and price level assignment.
NOTE
Attempting to execute this option after these files have already been set up
will result in an error message that will not permit you to execute this option
again.
Page 2-4
Set Up and Maintenance
Chapter 2
Manufacturing Inventory Management User Manual
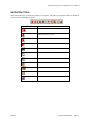
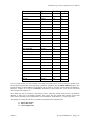
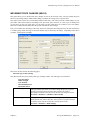
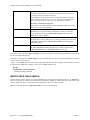
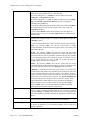
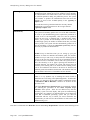
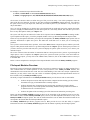
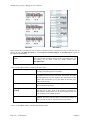
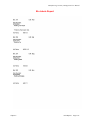
NAVIGATION TOOLS
Within this module there are numerous references to navigation. The following navigation buttons are defined for
reference when used through this chapter.
Navigation Button
Function
Selects the first record.
Selects the previous record.
Selects the next record.
Selects the last record.
Scroll view. Selects a specific record from a list.
Creates a record.
Modifies the current record.
Deletes the current record.
Creates a record based on the current record.
Maintains notes for this record.
Displays record timestamp information.
Chapter 2
Set Up and Maintenance
Page 2-5
Manufacturing Inventory Management User Manual
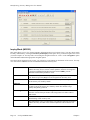
SET UP INVENTORY ITEMS
This section discusses the ways to set up, change, delete, and copy inventory items. It also covers how to “import”
new items from other accounting systems and print the Inventory Detail Report, which is used to verify all
information input into the inventory files.
You may add “notes” to any Inventory Item that may be viewed on the screen for additional information or
planning. This may be done when viewing an inquiry, adding a new item, changing an existing item or copying an
item.
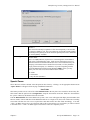
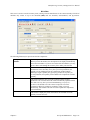
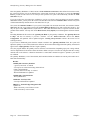
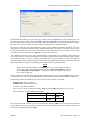
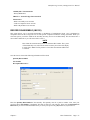
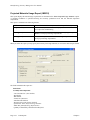
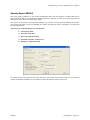
By <clicking> on the Note Pad Button, a screen will appear that will allow you to add or review free-form notes. If
you are adding a new record, navigation is not required. <Click> on the “Create a New Record” button or choose
the “Operation” option from the Menu Bar and then “Add.” A screen will appear with the current date and time.
Page 2-6
Set Up and Maintenance
Chapter 2
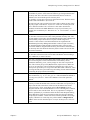
Manufacturing Inventory Management User Manual
You will be prompted for a description of fifty (50) characters which is used as part of the display when selecting to
review existing notes. Each note recorded has up to ten (10) lines of fifty characters each which may be used for
your free-form notes.
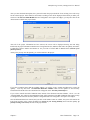
Once notes are added to the file, they can be reviewed at any time by accessing the item through an inquiry mode or
a change mode and then <clicking> on the Note Pad Button. Once this screen is displayed you will have the tool
bar navigation options to select the first detail record, select the next record detail, select the previous record detail,
select the last record in the detail list or search through the detail records. You may then view the notes for this
record.
If you have set up User-Definable Fields in either the Windows Character-based or UNIX products, you will be
able to view and change data information in these fields. By <clicking> on the “User Fields” button, you will
access an additional screen of data fields. If you are in an Inquiry Mode, then you will be able to view these fields.
If you are in a Change or Copy Mode, you will be able to modify the information in these fields.
You must make sure that your General Configuration options are set up to allow access to User-Definable Fields
and that you have run Item #1 below “Convert Data Pro file to match data dictionary.” This option is located
under “Productivity Tools” on the “Systems Menu.” This will ensure that your data files are in sync with any new
fields you have added to the system.
Chapter 2
Set Up and Maintenance
Page 2-7
Manufacturing Inventory Management User Manual
Inquiry Mode (IM0100)
This option allows you to view assorted summary information about your inventory items. You may check certain
inventory information by selecting the Inventory Item Inquiry menu option. First, you must navigate to the record
you wish to inquire on. You may find a record using the navigation tool bar or <click> on the “Navigation” option
on the Menu Bar and then the appropriate navigation option.
Once the item has appeared on the screen, you will notice several buttons on the bottom of the screen. You may
view each of these additional screens of information about this inventory item.
Re-Order
This button allows you to view the primary and secondary vendors associated
with this inventory item, as well as re-order quantities, lead time for integration
to the Invertech Manufacturing Requirements Product (MRP); plus the
minimum and maximum quantities to stock.
Price Table
This button allows you to view the pricing that was assigned for this inventory
item. There are up to ten (10) price levels assigned to an inventory item.
Historical
This button allows you to view the summarized history of sales and purchases
for the current year, month by month.
Manufact
This button allows you to view the summarized manufacturing history of this
inventory item for the current year, month by month. This includes usage
quantity and quantity produced.
View Image
This button only allows access if an image file name has been defined in the
“Internet” section of this part number. This image must be in either a JPG or
BMP format.
Bill of Mat
This button allows you to view the “Bill of Materials” associated with the
manufacturing of this inventory item.
Internet
This button allows you to view the image, text, audio and video files associated
with this inventory item that will be used in conjunction with an internet web
site.
Page 2-8
Set Up and Maintenance
Chapter 2
Manufacturing Inventory Management User Manual
Cost Layers
This button allows you to view all cost layers for this particular inventory item.
Serial/Lot
This button allows you to view “Serial Number” or “Lot Number”
information for a selected inventory item. A scrolling screen will appear with all
available Serial Number or Lot Number items. When you select one of the
displayed items and <click> on “OK,” a screen will appear with additional
information about that specific Serial Number or Lot Number. This information
includes an additional description, Serial Number or Lot Number, quantity onhand, the bin number, warranty flag setting and two fifty (50) character
comment lines.
Location
This button displays the Multi-Location inventory inquiry. This information
includes the On-Hand and Available Quantities of all inventory locations for
each defined location for this inventory item.
Costs
This button allows you to view the total cost and average unit cost of the item.
This feature is set this way for security purposes.
Add Mode (IM0401)
This option allows you to set up new inventory items. Several screens will be used, taking you step-by-step through
the sequential process of properly and thoroughly identifying your inventory items. This process will repeat itself for
each inventory item. After initial set up, all cost and historical information should be input through “Enter
Transactions” in order to maintain an audit trail.
If you are adding a new record, navigation is not required. <Click> on the “Create a New Record” button or choose
the “Operation” option from the Menu Bar and then “Add.”
Chapter 2
Set Up and Maintenance
Page 2-9
Manufacturing Inventory Management User Manual
Enter the inventory item number in the format that you initially set up in the Master Information (e.g., the default
configuration is shown below.)
1) Category
2) Class
3) Item
4) Location
NOTE
If you add new inventory items in the old year after performing “Year End
Procedures,” the new inventory items added will not appear in the new year.
This is because the inventory item file was already created during Year End
Procedures. To alleviate this problem, simply change your system date to the
New Year, and re-enter the new inventory items and pertinent costs, pricing
and quantity information.
The following is an explanation of each of the data items required for a new inventory item:
Item Description
There are four (4) lines available for your inventory item description. Each line
consists of thirty (30) characters (alpha/numeric) including spaces. All lines of
the description will print on all reports except in one instance. If a line of
description (except for the first line) is preceded with a single asterisk (*), that
line will not print on any external documents generated by the system, (e.g.,
Price Labels, Price Lists, or documents printed by other modules, such as
Invoices, Packing Lists, etc.). In this way, certain information can be part of the
file, but remain for internal use only.
Category
This is a ten (10) character (alpha/numeric field) that will identify the category
of this inventory item. This field can be used for informational purposes or it
may be used to categorize items for specific sort routines for Internet related
access of inventory items.
Bin No.
This ten (10) character (alpha/numeric) field identifies the location number of
items stored in bins.
Unit Wgt.
This ten (10) character field specifies the quantity of weight associated with this
particular item number. It is used in conjunction with the Sales Order Entry
system for Bill of Ladings.
Cost Method
Costing Methods are defined for each individual inventory item. The default
costing method which appears automatically will be the costing method set up
in the Inventory Master Configuration. There are eight (8) costing methods to
choose from. They are:
1) LIFO
2) FIFO
3) Average
4) Latest
5) Standard
6) Serial Number
7) Lot Number
8) Fixed O/H
Careful consideration of the way your business operates is highly suggested
before this selection is made. Refer to Chapter 1, Normal Costing Methods for
more information on each of these inventory costing methods. Once you have
selected the costing method here and have begun to receive additional inventory
items into stock, you cannot just switch costing methods. Make sure to check
with your accountant or CPA prior to making any changes of this nature to your
accounting files.
Page 2-10
Set Up and Maintenance
Chapter 2
Manufacturing Inventory Management User Manual
Cost Label
This data item is a fifteen (15) character (alpha/numeric) field which will only
be available if you have selected the Lot Number type costing method for this
inventory item. The Cost Label is used to define the structure of the Lot
Numbers to be used with this specific inventory item.
For example, you may have a shoe store which carries boots. The boots can be
stored as lots with the label “Style/Color/Sz.”
The store may also carry accessories for boots, such as, anklets or taps, which
may only require a cost label of “Style/Color.” Each “lot” inventory item can
have a different cost label. The “cost label” is also used to describe the
warehouse location in the Multi-Warehouse set up of your inventory. For
example, the cost label may be “Warehouse No.” or “Truck Number” or “Store
Number.”
Asset
This is the account number used to update the General Ledger module to reflect
any increases or decreases in the value of this particular inventory item. This
account number is also used to print the Manufacturing Inventory Management
Value Summary Report which does not require General Ledger to be
interactive. This account is used when transactions are originated in the
Manufacturing Inventory Management module or when receipts of inventory
are entered through Accounts Payable or Purchase Order. If the Accounts
Receivable module is integrated with Inventory, the AR Sales code defined on
the Inventory Item will dictate the Inventory Asset account to be used for sale
and return transactions.
COS
This is the account number used to update the General Ledger module to reflect
any increases or decreases in the Cost of Sales calculations when recording a
sale, withdrawal, or return of an item.
Sls Code
This code is used by the Accounts Receivable module to group sales of items
into various categories of sales. This determines total sales by various
breakdowns defined by you or you may simply use one code to represent all
sales. This code may be up to ten (10) characters (alpha/numeric). Make sure
that if you are interactive with Accounts Receivable that any codes you use
when you set up Inventory are set up in Accounts Receivable. Otherwise, when
invoicing and such, the system will always be looking for near matches instead
of assuming the proper number immediately.
U/M
This is a four (4) character (alpha/numeric) field that will identify the count
value of that item; (e.g., ea., lb., doz., gal., etc.). This will define the default or
“stocking unit of measure” if the Unit of Measure Conversion options are
utilized.
Job Cost Code
This is the default Cost Code used to transfer the cost of inventory into a job.
You may override this default code at the time of allocation to a specific job or
project, but the code entered here will be used as the default value for the
system. You may <click> on the Down Arrow (F2 by default) if you are
integrated with the Job Cost Main Module to review a scrolling list of valid list
of Cost Codes to enter into this field. This is very important to configure in
advance, particularly if you intend to utilize the Sales Order Proposal Writing
feature that allows quotes to be converted into Jobs once the quote has been
accepted by the customer. If these line items on the Proposal have been setup
properly with their Cost Code setup, they will be added as “Budgeted Cost
Codes” on the new Job when the option “Transfer SO Proposals to Job Cost”
is run.
Chapter 2
Set Up and Maintenance
Page 2-11
Manufacturing Inventory Management User Manual
Alternate SKU
Allows you to enter the alternate SKU number for your inventory item. In
transactions where you must enter an item number, you have the option of
entering this alternate SKU number. The system will pull up the corresponding
item number. Note: The file position is saved after the Alternate SKU index is
searched.
Alternate Part
Numbers
If your inventory includes similar products from different vendors, you may
assign separate inventory numbers to them. Quite often, when one vendor's
product is not available, an alternative vendor's product can be substituted. With
this feature, you have the ability to quickly reference these alternative part
numbers. A twenty (20) character (alpha/numeric) field is provided. If this
feature is not applicable to your inventory, ignore these fields or use them for
miscellaneous descriptions.
QUANTITIES
Information is entered here only once in the “Add” mode. Thereafter, all
activity to that item will be updated and reflected automatically in these fields.
Last Count
Last Count: Default : 0
This is the count value as of your last physical inventory count. After executing
the “Update Book to Physical Count,” discussed later, this quantity will be
zeroed out.
NOTE: This is not the amount of beginning inventory quantity that is on-hand.
This field is used by the Physical Count Procedure. To define the beginning
quantity and unit cost for this item, reference the “Set Up Initial Cost Layers”
option.
On-Order
Default: 0
This number reflects the quantity of product you currently have on order. This
field is updated when you either “Enter Purchase Orders” or “Record
Receipts.”
Reserved to Ship
Default: 0
This number reflects the quantity of product you have committed to pending
Sales Orders. Any number entered here will alter the quantity available for this
item. This field is automatically updated by either the option to “Record Sales
Orders,” from the Sales Order module when a sales order is added or changed
with a quantity for this item or if the “Auto-Reserve Bill of Materials” switch in
the Master Configuration is turned “on.” If it is, this quantity will also include
the quantity required for the manufacturing of the finished good items which
have been placed on customer Sales Orders.
Qty. to Adjust
Default: 0
This field is used by the system to reflect any discrepancies which may occur
during processing (e.g., if you were to make a withdrawal or a transfer of goods
greater than the quantity on hand.) The quantity difference would be displayed
here. This is a management-by-exception auditing tool. It serves as a flag to
inform you that an exception has occurred. The system does not attempt to
analyze or correct this exception, (due to the uniqueness of each business) but
instead, provides this field for your individual attention. You must manually
zero this field only after you have determined the cause of the adjustment
quantity, and have made the necessary accounting adjustments. If you are
interactive with Accounts Receivable or Point of Sale, this field can be cleared
when the option to “Record COS Adjustments” is performed. This field is
extremely important to watch. Therefore, it is highly recommended that the
Inventory Quantity Report, with the criteria selection to include only those
items with a “Quantity to Adjust,” be run at least on a weekly basis to stay on
top of any potential problems with overselling of inventory items.
Page 2-12
Set Up and Maintenance
Chapter 2
Manufacturing Inventory Management User Manual
On-Hand
Default: 0
This field is automatically calculated and displayed by the system based on the
transactions and initial setup quantities posted to the system. This is the
perpetual “Quantity On-Hand” field for each inventory item. Therefore, when
performing an inquiry on an item, this would be the field to be viewed to
immediately determine what the current amount of inventory is on-hand at any
given time.
Req. Manf.
Default: 0
This field (Required for Manufacturing) is automatically updated by following
the procedures in the “Enter Projected Usage Amounts” menu option. There
are two different ways that the Inventory system can track, display, and report
the manufacturing requirements. As a manager, you must decide how you are
deploying your Bill of Materials processing system and you must be
comfortable with the way in which you want to determine the requirements you
will need for sub-assemblies of items used in the Manufacturing cycle.
First there is a field under the “Re-Order” button called “Proj. Requirements” as shown on the following screen.
Chapter 2
Set Up and Maintenance
Page 2-13
Manufacturing Inventory Management User Manual
Projected
Requirements
This field is used in the calculation of an item’s Projected Bill of Material
requirements amounts during the use of the “Projected Usage Amounts” menu
options. This field contains the quantity that you need to manufacture to meet
the requirements of outstanding sales orders or stocking levels. However, the
key to this function is that management must overtly utilize the “Projected
Usage Amounts” option to calculate what requirements exist for a specific subassembly or Bill of Materials item. Typically, this “Projected Requirements”
field would be used for Finish Goods and not for sub-assemblies and/or Bill of
Materials items.
Req. Manf.
This field is the calculated quantity of the sub-assembly or raw material which
will be required to meet the manufacturing requirements calculated in the
“Projected Usage Amounts” option. For instance, you may have subassemblies and raw materials that are used in the manufacturing of several
different finished good items. You could use the “Projected Usage Amounts”
option to transfer all of your Sales Order backorder quantities to the “Projected
Manufacturing Requirements” and then calculate the manufacturing
requirements. The “Req. Manf.” field would then contain the total quantity
required to meet all of your manufacturing needs and will be used in the
“Projected Materials Usage Report” to let you know what raw material items
you may need to order.
As you can see, the “Require for Manufacturing” quantities of your sub-assemblies and raw materials will only be
set by using the “Projected Usage Amounts” option. This provides you with a lot of flexibility in calculating the
requirements as you prepare for your manufacturing cycles.
However, the quantities required for manufacturing are not automatically updated as users are entering customer
orders and the Sales Order, Accounts Receivable, and Point of Sale modules will not warn the user if the quantity of
the Inventory Item being entered is required for the manufacturing process.
The second method that the Inventory System has of maintaining the manufacturing requirements is by updating the
Reserved Quantity of the sub-assemblies and raw materials as the finished good items are being entered on the
customer Sales Order. If you are selling the sub-assembly and raw material items as well as using them in your
manufacturing process and need the Sales Order, Accounts Receivable, and Point of Sale systems to dynamically
warn the users that the quantity being entered has been reserved for manufacturing then this method should be used.
Depending on the Advanced Security Object configuration you define in the system for each user, they may
override and continue to sell the item or not be allowed to proceed at all. This becomes a very dynamic way of
tracking the needs of Bill of Material items verses using the other methodology which uses a more planned
approach. To utilize this feature, you must have the Inventory Master Configuration option “Auto-Reserve Bill of
Materials” <clicked> on as shown on the following screen:
Page 2-14
Set Up and Maintenance
Chapter 2
Manufacturing Inventory Management User Manual
Available
Default: 0
This field will constantly be updated to reflect the total quantity of an item that
is currently available to sell. The system takes into account the current Quantity
On-Hand plus the Quantity On-Order minus the Quantity Reserved to determine
the current Quantity Available.
Manuf. Type
Default: Blank
This is a ten (10) character (alpha/numeric) field designed to accommodate a
wide variety of manufacturing codes. Each user may define their own set of
definitions which can tell them whether this item is to be manufactured by the
company, sub-contracted out to another firm to be made, or if they should be
buying it from a third party (i.e. distributor). If you are integrating with the
Invertech Manufacturing Requirements Planning (MRP) system, you may
define your own codes or use the standard codes as follows:
M = Make
S = Subcontract
P = Buy this Part (Purchase)
Special Cases:
These data items will have default values. Respond to these items by <clicking> on the appropriate button and an
“Option Window” will appear for the keying of additional information.
User Fields:
This button provides access to all of the “User Defined Fields” that may have been created for the Inventory file.
This assumes that the option in the “Configuration” setup has been turned on and new fields have been added to
the system. Otherwise, this button will not be accessible.
If “User Defined Fields” have been added to the system, a new screen will appear and display the total number that
has been added. If more fields have been added than what fits on a single screen, the screen will become a scrolling
screen that will allow the user to move up and down and make entries into these fields accordingly. You must
<click> on “Save” this screen to save all entries made to this screen and store you work before you will be returned
to the main screen. <Click> on “Save” again to ensure these entries are completely saved.
Chapter 2
Set Up and Maintenance
Page 2-15
Manufacturing Inventory Management User Manual
User Defined information entered into these fields is accessible by the Infinity POWER Report Writer and
POWERServer module for web applications.
Re-Order:
The Vendor Information required by this screen includes the Vendor # or your primary source for acquiring this
inventory item. If your system is integrated with Accounts Payable, the vendor numbers should match in both
programs. This field is ten (10) characters (alpha/numeric) in length. This field must be completed in order to
transfer a sales order into a purchase order.
Page 2-16
Set Up and Maintenance
Chapter 2
Manufacturing Inventory Management User Manual
Vendor Item #
A twenty (20) character (alpha/numeric) field identifying the number
assigned to that particular item by its vendor. This number will be used by
the Purchase Order Entry module, if interactive, and if a form that utilizes
the vendor's item number has been selected. This would allow you to issue
purchase orders to vendors with their items numbers printed on them for
their ease of recognition and uniformity. The numbers maintained in your
inventory module do not have to conform to those of your vendors.
Other Vendor and
Vendor Item Number
Minimum/Maximum
Quantities to Stock
These are used for alternative sources for this item.
Projected Requirements
A special analytical quantity used for the material requirement reporting
based on manufacturing. Normally this field will be updated automatically
by the option to “Enter Projected Usage Amounts.” Fields are ten (10)
characters (numeric only) in length. The system will round to the nearest
number if you enter a number larger than seven digits. This is typically
used for Finished Goods and not sub-assemblies or Bill of Material items.
Lead Time
A numeric field with two additional decimal places for use with third party
Manufacturing Requirements Planning (MRP) products such as the
Invertech MRP software. Users may define lead times in terms of hours,
days, weeks months or years depending on what makes sense for each item.
This is a field that is not currently used within Infinity POWER for
reporting calculations.
Price Table
If you set up the default factor information for your entire inventory
system, (using the “Inventory Configuration, Price Levels” option), the
information to be entered on this screen would only be the Retail Price or
Price Level #1; or the Base Price or Price Level #6.
You would then <click> on the “Reset Prices” button. The system will
automatically calculate all the prices for that item based on the factors set
up. In the configuration, if you set up price level 10 as “last cost” then the
system will pick up this cost when entering an item on a purchase order and
ignore the cost in the cost layers.
Chapter 2
These are the limits that you determine are best for your particular
inventory “turnover.” The minimum may be set up to reflect the quantity
established to get the price break you have based on all of your pricing
factors on. The maximum is designed to keep excess inventory amounts to
a minimum. These two fields are essential to printing the Suggested Order
Report and Overstock Report, respectively.
Set Up and Maintenance
Page 2-17
Manufacturing Inventory Management User Manual
If you want to override the default factors set up in the Master Configuration, you may do it here on an item by item
basis. You may also use this option to do “What If” calculations of prices by changing the factors around and then
<clicking> on the “Reset Prices” button to recalculate the prices. <Clicking> on the “Reset Factors” button will
restore the Master default factors when you are done.
If you are utilizing the Unit of Measure Conversion procedures, the selling price will be based on the Price Level
defined for each unit of measure in the Unit of Measure Conversion table.
Costs:
This screen is used to display the average cost of this item and the current total value of the item in stock. This is
based on the total quantity on hand times the price paid for those quantities regardless of the costing method in
effect for this item. An average cost is then calculated based on total value divided by the number of quantities in
stock. The following screen shows how this would appear.
Page 2-18
Set Up and Maintenance
Chapter 2
Manufacturing Inventory Management User Manual
Additionally, the lower portion of the screen displays the “Last Received Date,” “Last Received Quantity,” and
the “Last Received Unit Cost.” This provides the user an instant lookup ability to see the last time this item was
purchased, how much was purchased and what was paid for the item. This avoids having to run reports to determine
whether certain items should be kept, discontinued or re-ordered. All three of these fields are automatically updated
each time a “receipt” transaction is posted in the system for this item.
Remember this item is an Advanced Security object and can be defined for users to see or not on a user by user
basis or by groups. This allows management the flexibility to control who has access to viewing cost and who
doesn’t.
Historical:
This screen is used to enter any historical information pertaining to the movement and profit of that item. The three
areas of input are:
•
Purchases
•
Sales (as expressed in dollars and quantities)
•
Cost of Sales
Purchases
For each period (month) of the accounting cycle, you would enter the total
dollar amount spent on purchasing that item and then the quantity of items
that amount represents.
Sales
For each period (month) of the accounting cycle, you would enter the total
dollar amount of Sales for that item and then the quantity of items that
amount represents.
Cost of Sales
For each period (month) of the accounting cycle, you would enter the total
dollar amount of Cost of Goods Sold for that item to allow the system to
determine the gross profit per item for that period.
NOTE
Historical information is only input during the initial setup process. The
system will automatically update this information as transactions are posted to
the system.
Chapter 2
Set Up and Maintenance
Page 2-19
Manufacturing Inventory Management User Manual
U/M Conv:
This data item will facilitate the need to receive and sell this inventory item at different units of measure. You must
have a unit of measure defined in the “U/M” field on the primary screen, Unit of Measure, before the system will
allow access to this option. The “stocking unit of measure” will be the smallest level of stocking (usually each).
This should be the unit of measure that was defined in the “U/M” field.
You can define up to ten (10) different unit of measure conversions in this option for this inventory item. The four
areas of data input are:
Page 2-20
Set Up and Maintenance
Chapter 2
Manufacturing Inventory Management User Manual
U/M
Mult. Factor
Each of the unit of measure conversions will define a four (4) character
(alpha/numeric) unit of measure identifier (e.g., ea., lb., doz., gal., etc.).
These units of measure will “pop up” on data entry screens when the
system recognizes that the inventory item selected has a unit of measure
conversion table defined.
The multiplying factor is the number used to calculate the quantities being
received or sold when a unit of measure conversion table is defined.
For example, you may stock your inventory at the lowest level (each), but
by defining a unit of measure conversion table, you can define the
conversion for a “case.” A case may be comprised of twelve (12) items.
The multiplying factor for the “case” should be twelve (12).
Price Level
Price Plan
When you receive items into inventory, you can enter one (1) case. When
the inventory files are updated, they will show twelve (12) each. The
multiplying factor allows the system to calculate the quantities received and
sold at the lowest stocking level.
This data item will allow you to define the Price Level for each individual
Unit of Measure Conversion. These are the price levels defined in Data
Item #23.
Pricing Levels can also be defined by implementing special “Price Plans.”
You may set up a Price Plan to correspond with an individual unit of
measure, such as “dozens.” Include in that price plan, all inventory items
that would have a unit of measure of “dozens.” The pricing established in
that Price Plan should be pricing based on “dozens.” All Price Plans set up
and used as described above, will override the Price Level set up on the
Unit of Measure conversion table. These price plans are “special price
plans” and should not be assigned to any customer.
Manufact:
This screen is used to enter any historical information pertaining to the manufacture and usage of that item.
Chapter 2
Set Up and Maintenance
Page 2-21
Manufacturing Inventory Management User Manual
The two areas of input are:
User Quantity
For each period (month) of the accounting cycle, you would enter the total
quantity of this item used in production (producing other items).
Quantity Produced
For each period (month) of the accounting cycle, you would enter the total
quantity of this item, which was produced (manufactured). These fields
will be automatically updated every time you record manufacturing.
View Image
This screen is used to show the image of the Inventory Item based on the name of the image file you defined under
the “Internet” button. Once you select the “Internet” button, there are four choices and it is the “image file” that
is required to be defined so that the picture or graphic can be displayed when this option is selected. This file must
be stored as a “JPG” or “BMP” image file. Keep in mind, when using the “View Image” feature the best results
for image display would be 186 X 265 pixels. A sample is shown below of what is possible. These images may also
be used interactively with the Infinity COMMERCE tools that are included as a standard feature of the System
Administrator module which drive all of the Data Pro e-commerce solutions.
Page 2-22
Set Up and Maintenance
Chapter 2
Manufacturing Inventory Management User Manual
Bill of Mat:
This screen is used to enter all inventory items, which go into the manufacture of the current assembly. This bill of
materials may consist of up to one thousand (1000) total raw materials, sub-assemblies, and by-products.
The following fields may be input for each of the components:
Component Item
Number
Each component on the bill of materials must be an existing inventory item.
When you enter the number, the description will be displayed immediately
below the item number. If you are not certain of the item number, you may
press TAB to scroll through the inventory file to make your selection.
Quantity
This field indicates the quantity of this component, which goes into the
manufacture of this assembly. Every time you record production, this
quantity will be withdrawn from the component's on-hand quantity.
Entering a negative quantity may specify by-products. Every time you
record production, this quantity will be added to the component's on-hand
quantity.
Unit Cost
This field contains the unit cost of this component at the last time
production was recorded. This field will be automatically updated with the
new unit cost every time you record manufacturing (except for byproducts). The default cost is the current average unit cost of the
component. When a by-product is produced or when you record
disassembly, this amount is the unit cost used to update the component's
cost information.
Total Cost
This field is a display only field, which shows the extended cost of the
quantity times the unit cost.
Chapter 2
Set Up and Maintenance
Page 2-23
Manufacturing Inventory Management User Manual
Internet:
These fields allow you to specify the filenames, which contain the marketing text, graphic images, audio clips and
video clips for use when presenting your Inventory Items internally or on an Internet Web Site.
Marketing Text
Filename
This field is used for a marketing text filename up to twenty (20) characters
(alpha/numeric) to define a text or html type file to be used in conjunction
with display mechanisms on an Internet Web site. Keep in mind, when in
the UNIX operating system, filenames are case sensitive.
Item Image Filename
This field is used for an image filename up to twenty (20) characters
(alpha/numeric) to define image file to be used in conjunction with display
mechanisms on your local pc or an Internet Web site. Keep in mind, when
in the UNIX operating system, filenames are case sensitive. To utilize the
“View Image” feature on the Inventory Item, the image file must be in a
JPG or BMP format. The entire path name to where the image resides must
be included in this field. The default directory would be the Infinity
POWER program directory unless otherwise defined. You may use the
“Browse” button to look for and select the image file. Keep in mind, when
using the “View Image” feature the best results for image display would be
186 X 265 pixels.
Audio Filename
This field is used for an audio filename up to twenty (20) characters
(alpha/numeric) to define any type of audio file to be used in conjunction
with audio mechanisms on an Internet Web site. Keep in mind, when in the
UNIX operating system, filenames are case sensitive.
Video Filename
This field is used for a video filename up to twenty (20) characters
(alpha/numeric) to define any type of video file to be used in conjunction
with display mechanisms on an Internet Web site. Keep in mind, when in
the UNIX operating system, filenames are case sensitive.
Page 2-24
Set Up and Maintenance
Chapter 2
Manufacturing Inventory Management User Manual
Cost Layers
This button is designed to display the various cost layers accumulated for the quantities currently on hand. As the
following screen illustrates, the screen will show Item # for each unique cost layer based on a different price when
that item was purchased. The system will show the Cost Date, Description, Quantity of the item at that layer, which
vendor it was purchased from, the Vendor’s Invoice #, the unit cost and the total cost. The screen will become a
scrolling screen depending on how many layers of prices there are. This is an inquiry screen only and no changes
will be allowed.
Serial/Lot
When you <click> on the “Serial/Lot” button, the system is first going to look at the costing method that is being
used for the specific item that is currently selected. Only if the item is coded as either using Serialized or Lot
Number tracking will this button be active. If the item is one of these two choices, a new screen will be displayed
showing a listing of the various Serial Numbers or Lot Numbers that are currently in stock. Two columns will be
displayed.
“Status” will indicate to the user if the specific Serial Number or Lot # is “RES” or reserved by an order in the
Sales Order Entry module. This means there are commitments for the item but it has not been removed (shipped)
from the inventory yet.
You may scroll up or down to review the listing of numbers available in the system based on the current quantity in
stock. <Click> on the item you want and then <click> “OK.” Or, you may <click> “Cancel” to return to the main
item number screen.
If you <click> “OK” the following screen will appear displaying information on the specific Serial Number or Lot
Number.
Chapter 2
Set Up and Maintenance
Page 2-25
Manufacturing Inventory Management User Manual
This would include various information entered at the time of its receipt such as which bin it is located in, any
warranty information, or comments. For Serialized Items, obviously, the quantity on hand would be one. For Lot
#’s, the quantity can be variable. <Click> “OK” to exit this option to select another number or return to the main
item screen.
Location
When you <click> on the “Location” button, the system is going to look at all of the various inventory files that
have been defined in the menu option “Set Up Inventory Locations” to determine the current quantities “on-hand”
and “available” for the current item at each location on the screen. You must have pre-defined these locations in
advance for this option to function. The description of each location and its company number is also displayed.
Further, you must use the same item number across all locations for correct matching to occur in the system. If you
have done, users have an instant lookup at what inventory levels are available at all locations throughout the related
store locations or warehouses in the company’s system. The following screen illustrates how stock can be instantly
checked at four locations with one <click> of the mouse.
Once you have entered all the information for each item, <click> on “Save” and you are ready to input the next
item. <Click> on “Cancel” to exit the screen without saving any changes.
Page 2-26
Set Up and Maintenance
Chapter 2
Manufacturing Inventory Management User Manual
Results:
coIM1dy.dbf - Inventory Item File
- All Item Information is set up
- Cost Information is updated
- Historical Information is updated
coIM3.dbf - Assembly File
- Bill of Materials is Set Up
Change Mode (IM0402)
This option allows you to change all information for any inventory item. After initial set up, all cost and historical
information should be input through “Enter Transactions” in order to maintain an audit trail. If you have made any
mistakes during this set up process, you may return to the “Change Inventory Items” option to change any
information you have already entered.
First, you must navigate to the record you wish to change. You may find a record using the navigation tool bar or
<click> on the “Navigation” option on the Menu Bar and then the appropriate navigation option. If you are
changing a record, <click> on the “Modify the Current Record” button or choose the “Operation” option from the
Menu Bar and then “Change.” Make the changes required and <click> on the “Save” button to save your changes
or <click> on the “Cancel” button to cancel the changes made.
Keep in mind that changes made through this option to any of the cost layers in terms of quantities or dollar amounts
do not print an audit trail or update any transaction registers. This is not how you would enter new quantities into
the system. A password is highly recommended for this option.
Results:
coIM1dy.dbf - Inventory Item File
- Item Information is updated
- Cost Information is updated
- Historical Information is updated
coIM3.dbf - Assembly File
- Bill of Materials is Updated
Delete Mode (IM0403)
This option allows you to delete inventory items. NOTE: You cannot delete an item which has a quantity on hand.
If you delete an item that has YTD sales or purchases information, it will distort some of your reports. This option
allows you to delete items you may have entered by mistake, or no longer want. Select the menu option “Delete
Inventory Items” and enter the item number you wish to delete.
First, you must navigate to the record you wish to delete. You may find a record using the navigation tool bar or
<click> on the “Navigation” option on the Menu Bar and then the appropriate navigation option. This option allows
you to delete accounts that you may have entered by mistake, or you no longer want. <Click> on the “Delete the
Current Record” button or choose the “Operation” option from the Menu Bar and then “Delete.” This will place
you into the “Delete” mode, then <click> on “Save” to validate your deletion of this record.
Make sure this is what you want to do, because once an item is deleted, it can not be retrieved.
Results:
coIM1dy.dbf - Inventory Item File
- Item Information is marked for Deletion
coIM3.dbf - Assembly File
- Bill of Materials is marked for Deletion
Chapter 2
Set Up and Maintenance
Page 2-27
Manufacturing Inventory Management User Manual
Copy Mode (IM0404)
This option allows you to set up new inventory items by copying existing ones. This option is very helpful in setting
up multiple locations or in renumbering your inventory items.
Using this option, the system provides a quick method of setting up items that are very similar. Many items may
only vary by color, size, or any other variable. The rest of the information relevant to these items may be exactly the
same. You are able to quickly create and enter new items into the file. This option will also save a considerable
amount of re-keying of the same information when setting up the same items for multiple locations or when
assigning new numbers to old inventory items.
First, you must navigate to the record you wish to copy from. You may find a record using the navigation tool bar or
<click> on the “Navigation” option on the Menu Bar and then the appropriate navigation option. <Click> on the
“Create a Record Based on the Current Record” button or choose the “Operation” option from the Menu Bar and
then “Copy.”
You will notice all the information, except for item number, will be copied to a new record. Enter the new item
number for this record. At this point, you may choose to edit any of the information or <click> on the “Save”
button to validate, which will then add it to the file.
Results:
coIM1dy.dbf - Inventory Item File
- All Item Information is set up
- Cost Information is updated
- Historical Information is updated
coIM3.dbf - Assembly File
- Bill of Materials is Set Up
IMPORT INVENTORY ITEMS (IM0601)
The File Import options allow you to bring information into the appropriate modules from text, or ASCII files.
Word processors, spreadsheets, databases, or many other types of programs may create these text files. This option
is designed to allow you to import Inventory Items directly into the Inventory module.
At this point, you may choose to print the standard map file or create a map file on the hard drive to modify. To print
the map file, <click> on the “Print Map” button. To create a map file in the program directory, <click> on the
“Create Map” button. This will print out the format in which this option is looking for information to be organized
in.
NOTE
When importing inventory items, items having quotes in the description will
NOT import. Prior to performing this option, change the quotes to a different
character, such as single quotes.
If the import file is a comma delimited file, the data can be variable length. If the import file is a fixed length ASCII
file, it must have a logical record length of 440 bytes. Both types of files must have the following field lengths.
Page 2-28
Description
Type
Position Length
Action #
CHAR
1
1
Item #
STRING
2
20
Main Desc.
STRING
22
50
Add. Desc. 1
STRING
52
30
Add. Desc. 2
STRING
82
30
Add. Desc. 3
STRING
112
30
Set Up and Maintenance
Chapter 2
Manufacturing Inventory Management User Manual
Description
Type
Position Length
U/M
STRING
142
4
Bin #
STRING
146
10
GL Asset
STRING
156
20
GL COS
STRING
176
20
AR Sales Code
STRING
196
5
JC Cost Code
STRING
201
10
Alt. Part 1
STRING
211
20
Alt. Part 2
STRING
231
20
Vendor 1
STRING
251
10
Vendor 1 Part
STRING
261
20
Vendor 2
STRING
281
10
Vendor 2 Part
STRING
291
20
Min. Stock Qty.
DOUBLE
311
10
Max. Stock Qty.
DOUBLE
321
10
Min. Order Qty.
DOUBLE
331
10
Retail
DOUBLE
341
10
Retail – 10%
DOUBLE
351
10
Retail -20%
DOUBLE
361
10
Retail – 25%
DOUBLE
371
10
Retail – 30%
DOUBLE
381
10
Qty. 1
DOUBLE
391
10
Qty. 3
DOUBLE
401
10
Qty. 5
DOUBLE
411
10
Qty. 10
DOUBLE
421
10
Qty. 50
DOUBLE
431
10
If it is not in this format, you will encounter errors during the import process or not be allowed to continue at all.
The File Import features allow for the importing of “text” file information into the Infinity POWER program. This
includes the ability to import Master File information, such as Charts of Accounts, Customer Names and Addresses,
Employees, Vendors, etc. as well as “transaction” information for those master files, such as invoices and credit
memos, journal entry updates, etc.
These “text” files may be created by a wide range of sources, which may include word processors, spreadsheets,
databases, or other types of accounting programs. These sources may also include other computer systems that
utilize different operating systems and functions, such as mainframes, minicomputers, or various types of PCs.
After printing or creating the map file, you will then be prompted for three (3) data items.
1) Import File Format
2) Import File Name
3) Process Import File
Chapter 2
Set Up and Maintenance
Page 2-29
Manufacturing Inventory Management User Manual
The “Import File Format” is prompting you to select the type of file you will be using during the import process.
There are three choices:
1)
2)
3)
Fixed Length (ASCII)
Variable Length (ASCII)
Comma Delimited (.PRN)
These three choices are described below.
Fixed Length ASCII Files
Fixed Length ASCII “text” Files are those files in which each data field starts on a specific number of characters
from the start of each record. There should be no separators between data fields and each record should be the exact
same length. The program recognizes each record by the number of characters that is expected per record. There is
no Carriage Return/Line Feed sequence necessary to separate records.
For example:
1
11125 Cash In Bank - Can 1 0
1
68500 Lodging Expense
0
0
0
0
0
0
0
0
0
0
0
0
12 0 100 200 300 400 500 600 700 800 900 1000 1100 1200
Variable Length ASCII Files
Variable Length ASCII “text” Files are those files in which each data field starts on a specific number of characters
from the start of each record and each record is separated by a Carriage Return/Line Feed sequence {CR}{LF}.
There should be no separators between data fields. The program recognizes each record by the Carriage Return/Line
Feed sequence, which allows for other data to be in the file.
For example:
1
11125 Cash In Bank - Can 1 0
1
68500 Lodging Expense
0
0
0
0
0
0
0
0
0
0
0
0 {CR}{LF}
12 0 100 200 300 400 500 600 700 800 900 1000 1100 1200 {CR}{LF}
Comma Delimited *.PRN Files
Comma Delimited *.PRN “text” files are those files in which text type data fields are enclosed in double quotes (“),
and all data fields are separated by commas (,). The text files must contain the information for one record on a single
line of the file. Each line, or record, must be terminated by a Carriage Return/Line Feed sequence {CR}{LF}.
For example, a transaction import should look like this:
1,"11125","Cash In Bank - Can",1,0,0,0,0,0,0,0,0,0,0,0,0,0,0{CR}{LF}
1,"68500","Lodging
Expense",12,0,100,200,300,400,500,600,700,800,900,1000,1100,1200{CR}{LF}
<Click> on one of the three choices to define the type of file you will be using. You will be prompted to enter the
name of the file to be imported. You may use any name consistent with Windows naming structures. You will have
the option to browse for your import file, which may be located anywhere on your hard drive or any network you
may be attached to.
Next, you will be prompted as to whether the system should print an audit trail first before starting the import
process. It is highly recommended that you <click> on this option. It is selected by default. This will allow you to
see if there are any discrepancies within your “import” file.
Page 2-30
Set Up and Maintenance
Chapter 2
Manufacturing Inventory Management User Manual
The system will first print an audit trail of what will be imported into the Infinity POWER accounting module.
Upon completion of this report, you will be prompted whether or not to go ahead and process the import of data.
If there are any discrepancies that make your import file incompatible, the Infinity POWER import options will not
allow the information to update the system. This audit trail would then serve to assist you in correcting any
problems.
Once you have answered these three questions, <click> on the “Start” button to begin the process and the system
will begin to either print the audit trail first or go ahead and perform the “import” process based upon your answer.
If you have chosen to print the audit trail, the system will display the printer option screen for you to choose your
method of output.
The screen will then reflect the number of transactions that have been posted to the system as it goes through the
import process. Once it completes the “import” process, the system will return you to the screen and if there are
additional files to import, you may <click> on the “Next” button, otherwise, <click> on the “Close” button to return
you to the Menu Bar.
Below is a more comprehensive description of how Import Modules work within the Infinity POWER.
File Import Modules Overview
Because the concept of transferring information from one system or program to another via “text” interface files is
more technical than the normal operation of most word processors or the Infinity POWER modules, this
documentation must assume that the reader has some understanding of the terms and concepts explained here.
Otherwise, you may want to work with your reseller or consultant regarding the actual implementation and use of
these modules with your Infinity POWER programs.
The ability to import information into the Infinity POWER modules provides the user with several benefits.
•
It allows the rapid conversion and setup from other computer based accounting systems, without
the manual re-keying of information that is normally required.
•
It allows the batch entry of transactions processed in other specialized or custom software
programs. This may even include updates from Infinity modules running at different locations or
on different network or UNIX fileservers.
•
It allows the update of the accounting system files from remote transaction processing sites.
Please note that the Infinity POWER programs do allow for the exportation of all accounting reports to text files.
The formats of these standard Infinity POWER reports, however, are not compatible with the use of any of the
Infinity POWER File Import options. The order in which information is sent to “text” files and their format do not
correspond to the formats that the File Import Modules require.
The Infinity POWER Report Writer program, however, does provide the user with this ability to organize
information from the various Infinity POWER programs into the formats required by the File Import options. The
text files that contain the information to be imported must be in one of three forms:
1) Fixed Length ASCII Records
2) Variable length ASCII Records
3) Comma Delimited Text
These three types of files are discussed earlier in this section. For all three types of text files, the format of the data
must be accurate for the import options to read the correct information. Each field, or data item, must be in the
correct order across the line, or record, and in the correct format depending on the type of text file.
Each of the import options allow you to print a transaction journal as the import is being performed. This provides
an audit trail of the information being updated into your data files. This report will also indicate if the import of a
record was not performed due to errors encountered in the importation process.
Some of the import file structures allow you to specify “action numbers.” These “action numbers” tell the system
whether you want the information being imported to be added, changed, or deleted. The action numbers are listed
below.
Chapter 2
Set Up and Maintenance
Page 2-31
Manufacturing Inventory Management User Manual
1 = Add Record to file
2 = Change record in file
3 = Delete record in file
4 = Add record if it doesn't exist, otherwise change it
Some of the transaction import file structures require a field called “Cont? (0=NO, 1=YES).” This field indicates to
the import programs whether or not the transaction is continued in the next record. For example, in the Accounts
Receivable Transaction import, there may be several lines of detail on an invoice that is being imported. Each line
should be placed in a separate record of the text file with a “1” for YES to indicate that the transaction is continued.
The last line should contain a “0” for NO indicating the end of the transaction.
For each transaction-related import, there are certain fields that are required and used by the system to verify the
validity of the information being imported. These fields are marked in the field definition section with a asterisk (*).
For each type of import that you wish to perform, the import text file must contain all of the fields specified for that
particular import option. Any text fields that are blank will overwrite existing fields in the data files. Also, numeric
fields that are blank will be considered as zero.
To allow the import of only a subset of the import structure, you must have a custom “MAP” file created. This will
allow you, for example, to only update the retail price in Inventory without affecting, or requiring, any other fields.
You may obtain or create custom import “MAP” files one of two ways. You may first <click> on the “Create
Map” button at the point in the program when you have selected the “import” option. The result is to produce a
“XXXXXX.map” file in the program directory. The “Xs” in this file name represent the actual name of the Infinity
POWER option within the program (e.g., GL0603.MAP).
The “XXXXXX.map” file is used by the import option to override the default layout of the import transaction file.
By using file editing tools such as EDIT under DOS, Notepad under Windows or “vi” under UNIX, you may create
a customized import record layout. Whenever a “XXXXXX.map” file is created, it overrides the default predefined
import record layout.
Items can be deleted entirely from the record layout file or moved from one position to another. If a field is not
specified in an import file, that field may be deleted from the record layout file.
NOTE
“Key Value” fields must be present in the import file and cannot be deleted
from the record layout file. “Key Value” fields are those fields that are
designated with an asterisk (*) in the documented import record layouts. You
may also have customized “MAP” files created for you by calling the Data
Pro Support Services group at 727-803-1550.
Page 2-32
Set Up and Maintenance
Chapter 2
Manufacturing Inventory Management User Manual
Sample Import Inventory Items File
Chapter 2
Set Up and Maintenance
Page 2-33
Manufacturing Inventory Management User Manual
Page 2-34
Set Up and Maintenance
Chapter 2
Manufacturing Inventory Management User Manual
Chapter 2
Set Up and Maintenance
Page 2-35
Manufacturing Inventory Management User Manual
Page 2-36
Set Up and Maintenance
Chapter 2
Manufacturing Inventory Management User Manual
Chapter 2
Set Up and Maintenance
Page 2-37
Manufacturing Inventory Management User Manual
Page 2-38
Set Up and Maintenance
Chapter 2
Manufacturing Inventory Management User Manual
IMPORT BILL OF MATERIALS (IM0605)
This option allows you to import Bill of Materials from other databases or external programs. Import files may
either be fixed length or ASCII files or comma delimited *.PRN files.
The File Import options allow you to bring information into the appropriate modules from text, or ASCII files.
Word processors, spreadsheets, databases, or many other types of programs may create these text files. This option
is designed to allow you to import the Bill of Materials detail for Inventory Items directly into the Manufacturing
Inventory module.
When you select the option to “Import Bill of Materials,” a new screen will appear. At this point, you may choose
to print the standard map file or create a map file on the hard drive to modify. To print the map file, <click> on the
“Print Map” button. To create a map file in the program directory, <click> on the “Create Map” button. This will
print out the format in which this option is looking for information to be organized.
If the import file is a comma-delimited file, the data can be variable length, but must be in the specified order. If the
import file is a comma-delimited file, the data can be variable length. If the import file is a fixed length ASCII file, it
must have a logical record length of 71 bytes. Both types of files must have the following field lengths.
Description
Type
Position Length
Action #
CHAR
1
1
Item #
STRING
2
20
Line #
INT
22
5
Sub Item #
STRING
27
20
Quantity
DOUBLE
47
10
Total Cost
DOUBLE
57
15
If it is not in this format, you will encounter errors during the import process or not be allowed to continue at all.
The File Import features allow for the importing of “text” file information into the Infinity POWER program. This
includes the ability to import Master File information, such as Charts of Accounts, Customer Names and Addresses,
Employees, Vendors, etc. as well as “transaction” information for those master files, such as invoices and credit
memos, journal entry updates, etc.
These “text” files may be created by a wide range of sources, which may include word processors, spreadsheets,
databases, or other types of accounting programs. These sources may also include other computer systems that
utilize different operating systems and functions, such as mainframes, minicomputers, or various types of PCs.
After printing or creating the map file, you will then be prompted for three (3) data items.
1) Import File Format
2) Import File Name
3) Process Import File
The “Import File Format” is prompting you to select the type of file you will be using during the import process.
There are three choices:
1) Fixed Length (ASCII)
2) Variable Length (ASCII)
3) Comma Delimited (.PRN)
These three choices are described below.
Chapter 2
Set Up and Maintenance
Page 2-39
Manufacturing Inventory Management User Manual
Fixed Length ASCII Files
Fixed Length ASCII “text” Files are those files in which each data field starts on a specific number of characters
from the start of each record. There should be no separators between data fields and each record should be the exact
same length. The program recognizes each record by the number of characters that is expected per record. There is
no Carriage Return/Line Feed sequence necessary to separate records.
For example:
1
11125 Cash In Bank - Can 1 0
1
68500 Lodging Expense
0
0
0
0
0
0
0
0
0
0
0
0
12 0 100 200 300 400 500 600 700 800 900 1000 1100 1200
Variable Length ASCII Files
Variable Length ASCII “text” Files are those files in which each data field starts on a specific number of characters
from the start of each record and each record is separated by a Carriage Return/Line Feed sequence {CR}{LF}.
There should be no separators between data fields. The program recognizes each record by the Carriage Return/Line
Feed sequence, which allows for other data to be in the file.
For example:
1
11125 Cash In Bank - Can
1 0
0
0
0
0
0
0
0
0
0
0
0
0 {CR}{LF}
1
68500 Lodging Expense
12 0 100 200 300 400 500 600 700 800 900 1000 1100 1200 {CR}{LF}
Comma Delimited *.PRN Files
Comma Delimited *.PRN “text” files are those files in which text type data fields are enclosed in double quotes (“),
and all data fields are separated by commas (,). The text files must contain the information for one record on a single
line of the file. Each line, or record, must be terminated by a Carriage Return/Line Feed sequence {CR}{LF}.
For example, a transaction import should look like this:
1,"11125","Cash In Bank - Can",1,0,0,0,0,0,0,0,0,0,0,0,0,0,0{CR}{LF}
1,"68500","Lodging Expense",12,0,100,200,300,400,500,600,700,800,900,1000,1100,1200{CR}{LF}
<Click> on one of the three choices to define the type of file you will be using. You will be prompted to enter the
name of the file to be imported. You may use any name consistent with Windows naming structures. You will have
the option to browse for your import file, which may be located anywhere on your hard drive or any network you
may be attached to.
Next, you will be prompted as to whether the system should print an audit trail first before starting the import
process. It is highly recommended that you <click> on this option. It is selected by default. This will allow you to
see if there are any discrepancies within your “import” file.
The system will first print an audit trail of what will be imported into the Infinity POWER accounting module.
Upon completion of this report, you will be prompted whether or not to go ahead and process the import of data.
If there are any discrepancies that make your import file incompatible, the Infinity POWER import options will not
allow the information to update the system. This audit trail would then serve to assist you in correcting any
problems.
Once you have answered these three questions, <click> on the “Start” button to begin the process and the system
will begin to either print the audit trail first or go ahead and perform the “import” process based upon your answer.
If you have chosen to print the audit trail, the system will display the printer option screen for you to choose your
method of output.
The screen will then reflect the number of transactions that have been posted to the system as it goes through the
import process. Once it completes the “import” process, the system will return you to the screen and if there are
Page 2-40
Set Up and Maintenance
Chapter 2
Manufacturing Inventory Management User Manual
additional files to import, you may <click> on the “Next” button, otherwise, <click> on the “Close” button to return
you to the Menu Bar.
Below is a more comprehensive description of how Import Modules work within the Infinity POWER.
File Import Modules Overview
Because the concept of transferring information from one system or program to another via “text” interface files is
more technical than the normal operation of most word processors or the Infinity POWER modules, this
documentation must assume that the reader has some understanding of the terms and concepts explained here.
Otherwise, you may want to work with your reseller or consultant regarding the actual implementation and use of
these modules with your Infinity POWER programs.
The ability to import information into the Infinity POWER modules provides the user with several benefits.
•
It allows the rapid conversion and setup from other computer based accounting systems, without
the manual re-keying of information that is normally required.
•
It allows the batch entry of transactions processed in other specialized or custom software
programs. This may even include updates from Infinity modules running at different locations or
on different network or UNIX fileservers.
•
It allows the update of the accounting system files from remote transaction processing sites.
Please note that the Infinity POWER programs do allow for the exportation of all accounting reports to text files.
The formats of these standard Infinity POWER reports, however, are not compatible with the use of any of the
Infinity POWER File Import options. The order in which information is sent to “text” files and their format do not
correspond to the formats that the File Import Modules require.
The Infinity POWER Report Writer program, however, does provide the user with this ability to organize
information from the various Infinity POWER programs into the formats required by the File Import options. The
text files that contain the information to be imported must be in one of three forms:
1) Fixed Length ASCII Records
2) Variable length ASCII Records
3) Comma Delimited Text
These three types of files are discussed earlier in this section. For all three types of text files, the format of the data
must be accurate for the import options to read the correct information. Each field, or data item, must be in the
correct order across the line, or record, and in the correct format depending on the type of text file.
Each of the import options allow you to print a transaction journal as the import is being performed. This provides
an audit trail of the information being updated into your data files. This report will also indicate if the import of a
record was not performed due to errors encountered in the importation process.
Some of the import file structures allow you to specify “action numbers.” These “action numbers” tell the system
whether you want the information being imported to be added, changed, or deleted. The action numbers are listed
below.
1 = Add Record to file
2 = Change record in file
3 = Delete record in file
4 = Add record if it doesn't exist, otherwise change it
Some of the transaction import file structures require a field called “Cont? (0=NO, 1=YES).” This field indicates to
the import programs whether or not the transaction is continued in the next record. For example, in the Accounts
Receivable Transaction import, there may be several lines of detail on an invoice that is being imported. Each line
should be placed in a separate record of the text file with a “1” for YES to indicate that the transaction is continued.
The last line should contain a “0” for NO indicating the end of the transaction.
For each transaction-related import, there are certain fields that are required and used by the system to verify the
validity of the information being imported. These fields are marked in the field definition section with a asterisk (*).
Chapter 2
Set Up and Maintenance
Page 2-41
Manufacturing Inventory Management User Manual
For each type of import that you wish to perform, the import text file must contain all of the fields specified for that
particular import option. Any text fields that are blank will overwrite existing fields in the data files. Also, numeric
fields that are blank will be considered as zero.
To allow the import of only a subset of the import structure, you must have a custom “MAP” file created. This will
allow you, for example, to only update the retail price in Inventory without affecting, or requiring, any other fields.
You may obtain or create custom import “MAP” files one of two ways. You may first <click> on the “Create
Map” button at the point in the program when you have selected the “import” option. The result is to produce a
“XXXXXX.map” file in the program directory. The “Xs” in this file name represent the actual name of the Infinity
POWER option within the program (e.g., GL0603.MAP).
The “XXXXXX.map” file is used by the import option to override the default layout of the import transaction file.
By using file editing tools such as EDIT under DOS, Notepad under Windows or “vi” under UNIX, you may create
a customized import record layout. Whenever a “XXXXXX.map” file is created, it overrides the default predefined
import record layout.
Items can be deleted entirely from the record layout file or moved from one position to another. If a field is not
specified in an import file, that field may be deleted from the record layout file.
NOTE
“Key Value” fields must be present in the import file and cannot be deleted
from the record layout file. “Key Value” fields are those fields that are
designated with an asterisk (*) in the documented import record layouts. You
may also have customized “MAP” files created for you by calling the Data
Pro Support Services group at 727-803-1550.
Page 2-42
Set Up and Maintenance
Chapter 2
Manufacturing Inventory Management User Manual
Sample Import Bill of Materials File
Chapter 2
Set Up and Maintenance
Page 2-43
Manufacturing Inventory Management User Manual
Page 2-44
Set Up and Maintenance
Chapter 2
Manufacturing Inventory Management User Manual
RENAME IM ITEM NUMBER (IM0450)
This option was designed to allow a “Single” user to modify existing Manufacturing Inventory Management Item
Numbers in all applicable fields. The following pages will describe the changes that will take place during normal
processing when this menu option is executed.
NOTE
Although this option will perform a series of “record locks” as necessary as
it goes through all of the integrated files as it “renames” all of the appropriate
transactions, records, and notes attached to the master records, this function is
not designed to be run by multiple users at one time. More importantly,
before you proceed to use this option, make sure that all other accounting
users are logged out of the entire accounting system before you proceed.
Otherwise, users may receive “record locked” error messages during the
processing of this function or during their normal transaction processing. If
they do not read the screen and follow proper instructions, incomplete updates
may occur and invalidate your intended efforts and jeopardize new accounting
transactions.
ALWAYS MAKE SURE TO HAVE A COMPLETE DATA BACKUP
PRIOR TO RUNNING THIS OPTION!
For instance, many users may desire to rename a single item number which has a great deal of history or transactions
posted to it over time. This would only be possible with a special function like this with a unique capability to
update all of the files where the Manufacturing Inventory Management Item Number has been updated. The
following section provides a listing of the files that will be updated once this menu option has been selected and the
account numbers defined.
NOTE
You MUST perform the Rename function for each fiscal year you want the
rename to be applied.
When you choose this menu option and enter the Old Item # and New Item #, the following screen will appear:
Notice that the Old Item # field allows users to <click> on the Down Arrow (F2 by default) to select from the
existing Item File. Keep in mind that the Inventory Master Configuration allows the user to configure the 20
character item number in various sequences and call the segments whatever is desired. Therefore, the screen may
display slightly different titles as shown below. They are still “item numbers” no matter what they are called.
Chapter 2
Set Up and Maintenance
Page 2-45
Manufacturing Inventory Management User Manual
Once selected, you may then enter the new Item Number in which you want to convert. The section of the screen
below will display a “Processing Log” of the various files in all of the related accounting modules and the number
of records in each file that have been affected by the change.
When done, the screen will state “Processing Completed” and you may <click> on the “Close” button to return to
the menu.
The following files will be updated with the new information:
MODULE/FILES
FIELDS MODIFIED
ACCOUNTS RECEIVABLE
AR04 (xxxAR4dy.dbf) Accounts Receivable Detail Transaction
File
AR10 (xxxARA.dbf) Accounts Receivable Cycle Invoice File
IMNUM
ITEMNO
MANUFACTURING INVENTORY MANAGEMENT
IM01 (xxxIM1dy.dbf) Inventory Item Master File
NUM
IM02 (xxxIM2dy.dbf) Inventory Transaction File
NUM
IM03 (xxxIM3.dbf) Inventory Assembly File
NUM
SUBNUM
IM05(xxxIM5.dbf) Inventory Price Plan File
BEGITEM
ENDITEM
IM06 (xxxIM6.dbf) Inventory Cost Layer File
NUM
IM08 (xxxIM8.dbf) Inventory U/M File
NUM
Page 2-46
Set Up and Maintenance
Chapter 2
Manufacturing Inventory Management User Manual
MODULE/FILES
FIELDS MODIFIED
PURCHASE ORDER
PO02 (xxxPO2dy.dbf) Purchase Order Detail File
IMNUM
PO03 (xxxPO3.dbf) Purchase Order Temp File
ITEMNUM
PO04 (xxxPO4.dbf) Purchase Order Batch File
ITEMNUM
SALES ORDER ENTRY
SO02 (xxxSO2dy.dbf) Sales Order Detail File
IMNUM
SO03 (xxxSO3.dbf) Sales Order Work File
ITEMNUM
SO04 (xxxSO4.dbf) Sales Order Pick Ticket Work File
IMNUM
SET UP INITIAL COST LAYERS (M0426)
This option is used to create your initial cost layers for all of your inventory items. Cost Layers are determined by
the costing method defined on each inventory item.
LIFO, FIFO, Serial Number and Lot Number costing methods will allow multiple cost layers to be added. There
is no limit to the number of cost layers added in this option. Average, Latest and Standard allow a single cost layer
to be added. This cost layer will contain the total quantity of items for this inventory item.
The system will prompt you to enter the inventory item number you will be adding cost layers for. Enter the item
number and press the TAB key.
<Click> on the “Set Up” button and a screen will appear for additional data entry. If the item is defined as a LIFO,
FIFO, Average, Latest, or Standard costing method, the system will require a cost layer date, quantity, and unit
cost.
Chapter 2
Set Up and Maintenance
Page 2-47
Manufacturing Inventory Management User Manual
If the item is defined as a Serial Number or Lot Number costing method, the system will first request the Serial
Number or Lot Number being added. The system will then display additional data items.
These data items are described on the following pages:
Description
This is a thirty (30) character description for this Serial Number or Lot
Number. By default, the Inventory Item description will be displayed. This
may be overridden with another description.
Quantity
This is the quantity to be entered for this cost layer for this inventory item.
This must be the lowest unit of measure (stocking unit of measure). If this
item has been defined as a Serial Number costing method, the system
forces the quantity as one (1). For items defined as Lot Number costing
methods, you will be required to enter a quantity for this cost layer.
If you are entering cost layers for “Lots” and you want separate lot
numbers entered with specific quantities, you must add a separate cost layer
for each unique lot.
Page 2-48
Set Up and Maintenance
Chapter 2
Manufacturing Inventory Management User Manual
Unit Cost
This is the unit cost for this cost layer for this inventory item. This unit cost
must be based on the lowest unit of measure (stocking unit of measure).
The system will use the calculation of “Quantity X Unit Cost” for the
value of this cost layer.
Bin #
This is a ten (10) character bin number for this Serial Number or Lot
Number to identify where the item(s) will be stored.
Comments
There are two, fifty (50) character lines for additional comments for this
Serial Number or Lot Number. They may be used to describe the type of
warranty or any other pertinent information about this item.
Warranty Y/N
This checkbox defines whether or not this Serial Number or Lot Number
has a warranty. If you <click> “on” this checkbox, this item will not be
removed from the files after it has been sold. All information about this
item can be viewed through the “View Sold Serial/Lot # Items.”
Purchase Date
This field is used to record the Date of Purchase. This information may be
necessary for future tracking or recall.
Vendor Invoice #
This field is used to record the Vendor’s invoice number. This information
may be necessary for future tracking or recall.
Vendor #
This field is used to enter the Vendor Number where this item was
originally purchased. You may <click> the Down Arrow (F2 by default)
to access the Accounts Payable Vendor scroll search screen, if you are
integrated with the Accounts Payable module. Once you select a vendor,
the vendor’s name will be displayed just below this field.
Sale Date
This field is used to record the Date of Sale. This information may be
necessary for future tracking or recall.
Customer Invoice #
This field is used to record the Customer’s invoice number. This
information may be necessary for future tracking or recall.
Customer #
This field is used to enter the Customer Number of the customer who
purchased this item. You may <click> the Down Arrow (F2 by default) to
access the Accounts Receivable Customer scroll search screen, if you are
integrated with the Accounts Receivable module. Once you select a
customer, the customer’s name will be displayed just below this field.
Sale Price
This is the price of the item sold.
To Add a New Cost Layer:
1.
<Click> the New button and certain data items will default on the screen. These include description,
quantity, purchase date and sales date. You may override any of these default fields, except for quantity.
2.
When you have finished completing the rest of the fields of data for this item, <click> on the Save button
to add this information to the file.
To Change an Existing Cost Layer:
1.
<Click> on the Change button.
2.
Make any necessary adjustments and then <click> on the Save button to update your changes to the file.
To Delete an Existing Cost Layer:
1.
<Click> on the Delete button.
Chapter 2
Set Up and Maintenance
Page 2-49
Manufacturing Inventory Management User Manual
To View Sold Serial Number Items or Lot Items:
1.
<Click> the View Sold checkbox, then <click> on the Select button. This option allows you to view
information that may be regarded as pertinent, after the sale of merchandise has been made. This will only
be available for those inventory items that have a Serial Number or press F2 to change the sort to
description, bin number, or category. You may also mask on the item number.
2.
To exit this option, <click> on the Close button.
This option should only be used to input your initial inventory values. Once all inventory items are accounted for,
you should run the “Inventory Value Summary Report” to verify your total inventory value with the General
Ledger.
Results:
coIM6.dbf - Inventory Cost Layer File
- All Item Cost Layer Information is set up
ENTER NEW PHYSICAL QUANTITIES (IM0406)
This option allows you to change the physical inventory quantities after a physical count has been taken. Entry of
the physical quantities may be done automatically by item number or alphabetically by description and bin number,
if set up in the Master Configuration.
NOTE
All of the following procedures for Performing Physical Count & Update for
the current year should be completed prior to performing the option “Start
Files for a New Fiscal Year.”
After taking a physical count of your on-hand inventory, this option updates the quantity information for each item.
The system will ask for the range of items to update and then ask for the new physical count quantity of each item
within the range specified. This provides a very quick method of updating your system after a count.
Page 2-50
Set Up and Maintenance
Chapter 2
Manufacturing Inventory Management User Manual
Please keep in mind that this option should not be used until at least one cost layer has been established in the master
file. This option does not ask for any costs and therefore cannot update the value of the inventory otherwise. If there
is a discrepancy between the physical count quantity and the book quantity, these differences will appear in the
Inventory Shrinkage Report.
Any differences between the physical count quantity and the book quantity will be handled in the following manner:
All reductions will be handled as if it were a normal withdrawal from inventory. All costing methods would use
their normal methods to determine the value of the inventory reduction.
Any increases will be posted to the “Quantity to Adjust” field unless you request the system to make Automatic
Adjustments Based on Last Cost. You should always instruct the system to make automatic adjustments.
When you “Print Inventory Shrinkage” or “Update Book Value After Count,” the system will prompt you to make
automatic adjustments based on the item's last cost. If you answer (Y)es, the system will determine the last cost of
the item based on the costing method defined on the inventory item and use that as the value for any increases in
stock.
For any other adjustments that must be made, use the “Setup Inventory Items” menu option. This is the only option
that will allow these kinds of changes without affecting any sales or cost of sales journals.
When this option is selected, the system will prompt you for a beginning and ending inventory item number and will
allow you to mask those items you wish to be included. <Click> on the “Start” button and the system will allow
you to enter the quantity for each individual item within the range selected. If you have defined multiple units of
measure, the system will also prompt you to enter the various amounts based on these methods as well. Enter the
new quantity and then <click> on the “Update” button or if the quantity showing is correct you may <click> on the
“Ignore” button to go to the next item.
Remember as a cross check, the system is not going to show the user the current quantity on hand so as not to
influence the physical counts being made by staff. Only the counts made should be entered into this option. The
differences shown on the “Inventory Shrinkage Report” will illustrate the variances for you to determine where
inaccuracies or recounts may be required.
Results:
coIM1dy.dbf - Inventory Item File
- Changes Last Count Amount
Inventory Shrinkage Report (IM0209)
This report displays the total inventory shrinkage in dollars and quantity based on a comparison of the on-hand book
quantity to physical quantity entered through the “Enter New Physical Quantities” option. A summary by General
Ledger account number will also be printed.
This report is valuable in evaluating the quantity and dollar value of inventory shrinkage after a physical count. If
there is an “x” in the “Adj.” column, it means that your physical count showed more inventory than your book did.
The Inventory Shrinkage General Ledger Summary gives you an itemized listing of shrinkage dollars by General
Ledger account number on a second page.
If you are interactive with General Ledger module, a batch file containing this information will exist for you to
update to your General Ledger system. Even if you do not have the General Ledger program, you will still be able to
print this report.
When this option is selected, you will define the beginning and ending Item Numbers to include and any item mask.
You may also check off the “Auto Adjust” box. When you “Print Inventory Shrinkage Report” or “Update Book
Value After Count,” the system will prompt you to make automatic adjustments based on the item's last cost. If you
answer (Y)es, the system will determine the last cost of the item based on the costing method defined in the Master
Configuration and use that as the value for any increases in stock. For any other adjustments that must be made, use
the “Change Inventory Items” menu option. This is the only option that will allow these kinds of changes without
affecting any sales or cost of sales journals.
Chapter 2
Set Up and Maintenance
Page 2-51
Manufacturing Inventory Management User Manual
<Click> “Start” to begin the report. <Click> on “Close” when completed.
The fields included in this report are:
Field Name:
-
Cat./Class/Part/Loc. (Item Number)
- Description
- U/M (Unit of Measure)
- On-Hand Quantity
- Last Count Quantity
- Shrinkage Quantity
- Shrinkage Value
- Adj. (Adjustment Required)
- G/L Asset Account
- Total Value
- Grand Total:
Page 2-52
Set Up and Maintenance
Chapter 2
Manufacturing Inventory Management User Manual
Inventory Shrinkage Report
Chapter 2
Set Up and Maintenance
Page 2-53
Manufacturing Inventory Management User Manual
Page 2-54
Set Up and Maintenance
Chapter 2
Manufacturing Inventory Management User Manual
UPDATE BOOK VALUE AFTER A COUNT (IM0407)
This option allows you to update your book inventory quantities to be the same as your physical quantities entered
after a physical count. The net change in the inventory value will be summarized by General Ledger account
number.
After inputting the physical quantities after an inventory count, and before execution of this option, we suggest you
print out the “Shrinkage Report” in order to keep a record of the differences per item. You are now ready to execute
this option. The calculation it performs is:
Quantity On-Hand minus the Last Count Quantity equals the Shrinkage Amount. If the Shrinkage Amount is not
equal to zero, then one of the two following updates will occur: If the Shrinkage amount is a positive quantity, this
reflects a decrease in your inventory. The system will automatically make a withdrawal using the costing method
defined on the inventory item for that quantity difference.
If, however, the Shrinkage amount is a negative quantity, this reflects an increase in your inventory. Any increases
will be posted to the “Quantity to Adjust” field unless you request the system to make “Automatic Adjustments
Based on Last Cost.” You should always instruct the system to make automatic adjustments. If you <click> “on”
the checkbox, the system will determine the last cost of the item based on the costing method defined on the
inventory item and use that as the value for any increases in stock.
If the inventory item has a negative quantity (an increase in your inventory), and the item is a Serial Number or Lot
Number costing method, the system will prompt you for the new Serial Numbers or Lot Numbers to add to the
inventory stock. If the inventory item has a positive quantity (an decrease in your inventory), and the item is a
Serial Number or Lot Number costing method, the system will prompt you to select existing Serial Numbers or Lot
Numbers to remove from the inventory stock.
If you are integrated with the General Ledger system, a journal entry will be posted to your General Ledger
Integration File reflecting the Shrinkage amount, if applicable. If not, you will have a summarized print out by
account number to work with.
Example:
This example will basically step you through how the system handles the Book to Physical update:
Example 1:
Quantity On-Hand
+ Last Count
50
-30
= 20
The system will make a withdrawal of 20 items using the normal cost method.
Example 2:
Quantity On-hand
+ Last Count
20
-25
= -5
The system would put a “+5” in the “Quantity to Adjust” field. You now have the option of how you want to
handle this overage in your books. The positive amount is calculated because a negative shrinkage amount is
actually a positive number.
When you select this option, you will be prompted to enter a Beginning and Ending Item Number to define the range
of items to include in this update. You may also define the Item Mask which allows you to only include a smaller
segment of items out of the larger defined group.
Chapter 2
Set Up and Maintenance
Page 2-55
Manufacturing Inventory Management User Manual
As an option, you may choose to make “Automatic Adjustments Based on Last Cost.” The Update Book Value
after a Count will increase the item's on-hand quantity. It will also determine the item's last cost, based on the
costing method defined for that specific inventory item and use that as the value of any increases to stock.
<Click> on Start to begin. When completed, <click> on Close to return to the menu.
Results:
coIM1dy.dbf - Inventory Item File
- On Hand Quantities are updated
- Cost Information is updated
coIM2dy.dbf - Transaction File
- History Maintained (optional)
IM2GL.co - General Ledger Integration File
Updates are:
- Debit to Shrinkage Expense Account
- Credit to Inventory Asset Account
IMPORT PHYSICAL COUNTS (IMJ0603)
The File Import options allow you to bring information into the appropriate modules from text, or ASCII files.
Word processors, spreadsheets, databases, or many other types of programs may create these text files. This option
is designed to allow you to import Inventory Physical Counts directly into the Manufacturing Inventory module.
When you select the option to “Import Inventory Items,” a new screen will appear.
Page 2-56
Set Up and Maintenance
Chapter 2
Manufacturing Inventory Management User Manual
At this point, you may choose to print the standard map file or create a map file on the hard drive to modify. To print
the map file, <click> on the “Print Map” button. To create a map file in the program directory, <click> on the
“Create Map” button. This will print out the format in which this option is looking for information to be organized.
If the import file is a comma-delimited file, the data can be variable length, but must be in the specified order. If the
import file is a comma-delimited file, the data can be variable length. The Fixed Length ASCII file logical record
length for this import file is 30 bytes.
Description
Type
Position Length
Item #
STRING
1
20
Last Count Qt.
DOUBLE
21
10
If it is not in this format, you will encounter errors during the import process or not be allowed to continue at all.
The File Import features allow for the importing of “text” file information into the Infinity POWER program. This
includes the ability to import Master File information, such as Charts of Accounts, Customer Names and Addresses,
Employees, Vendors, etc. as well as “transaction” information for those master files, such as invoices and credit
memos, journal entry updates, etc.
These “text” files may be created by a wide range of sources, which may include word processors, spreadsheets,
databases, or other types of accounting programs. These sources may also include other computer systems that
utilize different operating systems and functions, such as mainframes, minicomputers, or various types of PCs.
After printing or creating the map file, you will then be prompted for three (3) data items.
1) Import File Format
2) Import File Name
3) Process Import File
The “Import File Format” is prompting you to select the type of file you will be using during the import process.
There are three choices:
1) Fixed Length (ASCII)
2) Variable Length (ASCII)
3) Comma Delimited (.PRN)
Chapter 2
Set Up and Maintenance
Page 2-57
Manufacturing Inventory Management User Manual
Fixed Length ASCII Files
Fixed Length ASCII “text” Files are those files in which each data field starts on a specific number of characters
from the start of each record. There should be no separators between data fields and each record should be the exact
same length. The program recognizes each record by the number of characters that is expected per record. There is
no Carriage Return/Line Feed sequence necessary to separate records.
For example:
1
11125 Cash In Bank - Can 1 0
1
68500 Lodging Expense
0
0
0
0
0
0
0
0
0
0
0
0
12 0 100 200 300 400 500 600 700 800 900 1000 1100 1200
Variable Length ASCII Files
Variable Length ASCII “text” Files are those files in which each data field starts on a specific number of characters
from the start of each record and each record is separated by a Carriage Return/Line Feed sequence {CR}{LF}.
There should be no separators between data fields. The program recognizes each record by the Carriage Return/Line
Feed sequence, which allows for other data to be in the file.
For example:
1
11125 Cash In Bank - Can 1 0
1
68500 Lodging Expense
0
0
0
0
0
0
0
0
0
0
0
0 {CR}{LF}
12 0 100 200 300 400 500 600 700 800 900 1000 1100 1200 {CR}{LF}
Comma Delimited *.PRN Files
Comma Delimited *.PRN “text” files are those files in which text type data fields are enclosed in double quotes (“),
and all data fields are separated by commas (,). The text files must contain the information for one record on a single
line of the file. Each line, or record, must be terminated by a Carriage Return/Line Feed sequence {CR}{LF}.
For example, a transaction import should look like this:
1,"11125","Cash In Bank - Can",1,0,0,0,0,0,0,0,0,0,0,0,0,0,0{CR}{LF}
1,"68500","Lodging Expense",12,0,100,200,300,400,500,600,700,800,900,1000,1100,1200{CR}{LF}
<Click> on one of the three choices to define the type of file you will be using. You will be prompted to enter the
name of the file to be imported. You may use any name consistent with Windows naming structures. You will have
the option to browse for your import file, which may be located anywhere on your hard drive or any network you
may be attached to.
Next, you will be prompted as to whether the system should print an audit trail first before starting the import
process. It is highly recommended that you <click> on this option. It is selected by default. This will allow you to
see if there are any discrepancies within your “import” file.
The system will first print an audit trail of what will be imported into the Infinity POWER accounting module.
Upon completion of this report, you will be prompted whether or not to go ahead and process the import of data.
If there are any discrepancies that make your import file incompatible, the Infinity POWER import options will not
allow the information to update the system. This audit trail would then serve to assist you in correcting any
problems.
Once you have answered these three questions, <click> on the “Start” button to begin the process and the system
will begin to either print the audit trail first or go ahead and perform the “import” process based upon your answer.
If you have chosen to print the audit trail, the system will display the printer option screen for you to choose your
method of output.
Page 2-58
Set Up and Maintenance
Chapter 2
Manufacturing Inventory Management User Manual
The screen will then reflect the number of transactions that have been posted to the system as it goes through the
import process. Once it completes the “import” process, the system will return you to the screen and if there are
additional files to import, you may <click> on the “Next” button, otherwise, <click> on the “Close” button to return
you to the Menu Bar.
Below is a more comprehensive description of how Import Modules work within the Infinity POWER.
File Import Modules Overview
Because the concept of transferring information from one system or program to another via “text” interface files is
more technical than the normal operation of most word processors or the Infinity POWER modules, this
documentation must assume that the reader has some understanding of the terms and concepts explained here.
Otherwise, you may want to work with your reseller or consultant regarding the actual implementation and use of
these modules with your Infinity POWER programs.
The ability to import information into the Infinity POWER modules provides the user with several benefits.
•
It allows the rapid conversion and setup from other computer based accounting systems, without
the manual re-keying of information that is normally required.
•
It allows the batch entry of transactions processed in other specialized or custom software
programs. This may even include updates from Infinity modules running at different locations or
on different network or UNIX fileservers.
•
It allows the update of the accounting system files from remote transaction processing sites.
Please note that the Infinity POWER programs do allow for the exportation of all accounting reports to text files.
The formats of these standard Infinity POWER reports, however, are not compatible with the use of any of the
Infinity POWER File Import options. The order in which information is sent to “text” files and their format do not
correspond to the formats that the File Import Modules require.
The Infinity POWER Report Writer program, however, does provide the user with this ability to organize
information from the various Infinity POWER programs into the formats required by the File Import options. The
text files that contain the information to be imported must be in one of three forms:
1) Fixed Length ASCII Records
2) Variable length ASCII Records
3) Comma Delimited Text
These three types of files are discussed earlier in this section. For all three types of text files, the format of the data
must be accurate for the import options to read the correct information. Each field, or data item, must be in the
correct order across the line, or record, and in the correct format depending on the type of text file.
Each of the import options allow you to print a transaction journal as the import is being performed. This provides
an audit trail of the information being updated into your data files. This report will also indicate if the import of a
record was not performed due to errors encountered in the importation process.
Some of the import file structures allow you to specify “action numbers.” These “action numbers” tell the system
whether you want the information being imported to be added, changed, or deleted. The action numbers are listed
below.
1 = Add Record to file
2 = Change record in file
3 = Delete record in file
4 = Add record if it doesn't exist, otherwise change it
Chapter 2
Set Up and Maintenance
Page 2-59
Manufacturing Inventory Management User Manual
Some of the transaction import file structures require a field called “Cont? (0=NO, 1=YES).” This field indicates to
the import programs whether or not the transaction is continued in the next record. For example, in the Accounts
Receivable Transaction import, there may be several lines of detail on an invoice that is being imported. Each line
should be placed in a separate record of the text file with a “1” for YES to indicate that the transaction is continued.
The last line should contain a “0” for NO indicating the end of the transaction.
For each transaction-related import, there are certain fields that are required and used by the system to verify the
validity of the information being imported. These fields are marked in the field definition section with a asterisk (*).
For each type of import that you wish to perform, the import text file must contain all of the fields specified for that
particular import option. Any text fields that are blank will overwrite existing fields in the data files. Also, numeric
fields that are blank will be considered as zero.
To allow the import of only a subset of the import structure, you must have a custom “MAP” file created. This will
allow you, for example, to only update the retail price in Inventory without affecting, or requiring, any other fields.
You may obtain or create custom import “MAP” files one of two ways. You may first <click> on the “Create
Map” button at the point in the program when you have selected the “import” option. The result is to produce a
“XXXXXX.map” file in the program directory. The “Xs” in this file name represent the actual name of the Infinity
POWER option within the program (e.g., GL0601.MAP).
The “XXXXXX.map” file is used by the import option to override the default layout of the import transaction file.
By using file editing tools such as EDIT under DOS, Notepad under Windows or “vi” under UNIX, you may create
a customized import record layout. Whenever a “XXXXXX.map” file is created, it overrides the default predefined
import record layout.
Items can be deleted entirely from the record layout file or moved from one position to another. If a field is not
specified in an import file, that field may be deleted from the record layout file.
NOTE: “Key Value” fields must be present in the import file and cannot be deleted from the record layout file.
“Key Value” fields are those fields that are designated with an asterisk (*) in the documented import record layouts.
You may also have customized “MAP” files created for you by calling the Data Pro Support Services group at
727-803-1550.
Page 2-60
Set Up and Maintenance
Chapter 2
Manufacturing Inventory Management User Manual
Sample Import Physical Counts File
Chapter 2
Set Up and Maintenance
Page 2-61
Manufacturing Inventory Management User Manual
Page 2-62
Set Up and Maintenance
Chapter 2
Manufacturing Inventory Management User Manual
IMPLEMENT PRICE CHANGES (IM0412)
This option allows you to quickly make price changes on some or all inventory items. You may change the prices
based on a percentage change, dollar amount change, or transfer the average cost to a specific price.
This option can be used to save a tremendous amount of data entry work when you need to make changes to your
price tables. This can be useful for such things as sale price items, price increases, etc. Also, if you are basing some
of your prices on your cost of the items, you can easily reset this “cost” price level whenever your costs change.
There are two data items that define how the system will make the price changes.
First you will define the valid range of Inventory Items to be affected by this change and uses an item mask if there
is a smaller group within the range of items that should only be affected by the change. Depending on the choice
you make, certain options will apply.
These items are discussed on the following pages.
Select the Type of Price Change
This data item tells the system exactly what type of change to make. The valid types are listed below.
Percent Changes
Dollar Changes
Cost Transfer
Reset Default Factors
Recalculate Prices
Percent Changes
This type tells the system that you want to change the price by a specific
percent. You will be allowed to enter either a positive or negative
percentage to indicate a price increase or decrease. The new price will be:
New Price = Old Price + (Old Price X Percent/100)
Dollar Changes
This type tells the system that you want to change the price by a specific
dollar amount. You will be allowed to enter a positive or negative amount
to indicate a price increase or decrease. The new price will be:
New Price = Old Price + Dollar Change
Chapter 2
Set Up and Maintenance
Page 2-63
Manufacturing Inventory Management User Manual
Cost Transfer
This type tells the system that you want the current average cost to be
placed in a specified price level. This is useful if you have set up some of
your price levels to be based on your cost.
For example, if you set up price level 1 as your cost, and then specify the
factor for levels 2 and up as 1.10, 1.15, etc. the system will calculate the
prices as cost plus 10%, cost plus 15%, etc. The new price will be:
New Price = Current Average Cost
If the item has no on-hand quantity, or the calculated average cost is zero,
the price level will not be changed.
Reset Default Factors
This type will tell the system to reset the price factors of the item to the
default factors set up in the Master Configuration. After you select this
type, you must select the type 5 (Recalculate Prices) before any of the
actual prices will be changed.
Recalculate Prices
This type tells the system to recalculate all of the prices for the item based
on the factors set up for each price level. This type performs the exact same
calculation as the option in “Add an Inventory Item” for setting up the
initial price tables.
Price Level to Change
This data item contains the price level that you want the system to change
(1 - 10). This data item will be skipped over if you have selected either
“Reset Default Factors” or “Recalculate Prices” as the type.
If you have selected the type “Percent Change,” the system will then ask you for the percentage that you want to
increase or decrease the price by.
If you have selected the type “Dollar Change,” the system will then ask you for the dollar amount that you want to
increase or decrease the price by.
<Click> on the “Start” button, and the system will perform the specified price changes. You will then be returned
to this screen for further price changes. <Click> on the “Close” button to exit.
Results:
coIM1dy.dbf - Inventory Item File
- Inventory Item Prices changed
IMPORT PRICE TABLE (IM0604)
The File Import options allow you to bring information into the appropriate modules from text, or ASCII files.
These text files may be created by word processors, spreadsheets, databases, or many other types of programs. This
option is designed to allow you to import Price Tables directly into the Inventory module.
When you select the option to “Import Price Tables,” a new screen will appear.
Page 2-64
Set Up and Maintenance
Chapter 2
Manufacturing Inventory Management User Manual
At this point, you may choose to print the standard map file or create a map file on the hard drive to modify. To print
the map file, <click> on the “Print Map” button. To create a map file in the program directory, <click> on the
“Create Map” button. This will print out the format in which this option is looking for information to be organized
in.
If the import file is a comma-delimited file, the data can be variable length, but must be in the specified order. If the
import file is a comma-delimited file, the data can be variable length. The Fixed Length ASCII file logical record
length for this import file is 120 bytes.
Description
Type
Position Length
Item #
STRING
1
20
Retail
DOUBLE
21
10
Retail – 10%
DOUBLE
31
10
Retail – 20%
DOUBLE
41
10
Retail – 25%
DOUBLE
51
10
Retail – 30%
DOUBLE
61
10
Qty. 1
DOUBLE
71
10
Qty. 3
DOUBLE
81
10
Qty. 5
DOUBLE
91
10
Qty. 10
DOUBLE
101
10
Qty. 50
DOUBLE
111
10
If it is not in this format, you will encounter errors during the import process or not be allowed to continue at all.
The File Import features allow for the importing of “text” file information into the Infinity POWER program. This
includes the ability to import Master File information, such as Charts of Accounts, Customer Names and Addresses,
Employees, Vendors, etc. as well as “transaction” information for those master files, such as invoices and credit
memos, journal entry updates, etc.
Chapter 2
Set Up and Maintenance
Page 2-65
Manufacturing Inventory Management User Manual
These “text” files may be created by a wide range of sources, which may include word processors, spreadsheets,
databases, or other types of accounting programs. These sources may also include other computer systems that
utilize different operating systems and functions, such as mainframes, minicomputers, or various types of PCs.
After printing or creating the map file, you will then be prompted for three (3) data items.
1) Import File Format
2) Import File Name
3) Process Import File
The “Import File Format” is prompting you to select the type of file you will be using during the import process.
There are three choices:
1) Fixed Length (ASCII)
2) Variable Length (ASCII)
3) Comma Delimited (.PRN)
Fixed Length ASCII Files
Fixed Length ASCII “text” Files are those files in which each data field starts on a specific number of characters
from the start of each record. There should be no separators between data fields and each record should be the exact
same length. The program recognizes each record by the number of characters that is expected per record. There is
no Carriage Return/Line Feed sequence necessary to separate records.
For example:
1
11125 Cash In Bank - Can 1 0
1
68500 Lodging Expense
0
0
0
0
0
0
0
0
0
0
0
0
12 0 100 200 300 400 500 600 700 800 900 1000 1100 1200
Variable Length ASCII Files
Variable Length ASCII “text” Files are those files in which each data field starts on a specific number of characters
from the start of each record and each record is separated by a Carriage Return/Line Feed sequence {CR}{LF}.
There should be no separators between data fields. The program recognizes each record by the Carriage Return/Line
Feed sequence, which allows for other data to be in the file.
For example:
1
11125 Cash In Bank - Can 1 0
1
68500 Lodging Expense
0
0
0
0
0
0
0
0
0
0
0
0 {CR}{LF}
12 0 100 200 300 400 500 600 700 800 900 1000 1100 1200 {CR}{LF}
Comma Delimited *.PRN Files
Comma Delimited *.PRN “text” files are those files in which text type data fields are enclosed in double quotes (“),
and all data fields are separated by commas (,). The text files must contain the information for one record on a single
line of the file. Each line, or record, must be terminated by a Carriage Return/Line Feed sequence {CR}{LF}.
For example, a transaction import should look like this:
1,"11125","Cash In Bank - Can",1,0,0,0,0,0,0,0,0,0,0,0,0,0,0{CR}{LF}
1,"68500","Lodging
Expense",12,0,100,200,300,400,500,600,700,800,900,1000,1100,1200{CR}{LF}
Page 2-66
Set Up and Maintenance
Chapter 2
Manufacturing Inventory Management User Manual
<Click> on one of the three choices to define the type of file you will be using. You will be prompted to enter the
name of the file to be imported. You may use any name consistent with Windows naming structures. You will have
the option to browse for your import file, which may be located anywhere on your hard drive or any network you
may be attached to.
Next, you will be prompted as to whether the system should print an audit trail first before starting the import
process. It is highly recommended that you <click> on this option. It is selected by default. This will allow you to
see if there are any discrepancies within your “import” file.
The system will first print an audit trail of what will be imported into the Infinity POWER accounting module.
Upon completion of this report, you will be prompted whether or not to go ahead and process the import of data.
If there are any discrepancies that make your import file incompatible, the Infinity POWER import options will not
allow the information to update the system. This audit trail would then serve to assist you in correcting any
problems.
Once you have answered these three questions, <click> on the “Start” button to begin the process and the system
will begin to either print the audit trail first or go ahead and perform the “import” process based upon your answer.
If you have chosen to print the audit trail, the system will display the printer option screen for you to choose your
method of output.
The screen will then reflect the number of transactions that have been posted to the system as it goes through the
import process. Once it completes the “import” process, the system will return you to the screen and if there are
additional files to import, you may <click> on the “Next” button, otherwise, <click> on the “Close” button to return
you to the Menu Bar.
Below is a more comprehensive description of how Import Modules work within the Infinity POWER programs.
File Import Modules Overview
Because the concept of transferring information from one system or program to another via “text” interface files is
more technical than the normal operation of most word processors or the Infinity POWER modules, this
documentation must assume that the reader has some understanding of the terms and concepts explained here.
Otherwise, you may want to work with your reseller or consultant regarding the actual implementation and use of
these modules with your Infinity POWER programs.
The ability to import information into the Infinity POWER modules provides the user with several benefits.
•
It allows the rapid conversion and setup from other computer based accounting systems, without
the manual re-keying of information that is normally required.
•
It allows the batch entry of transactions processed in other specialized or custom software
programs. This may even include updates from Infinity modules running at different locations or
on different network or UNIX fileservers.
•
It allows the update of the accounting system files from remote transaction processing sites.
Please note that the Infinity POWER programs do allow for the exportation of all accounting reports to text files.
The formats of these standard Infinity POWER reports, however, are not compatible with the use of any of the
Infinity POWER File Import options. The order in which information is sent to “text” files and their format do not
correspond to the formats that the File Import Modules require.
The Infinity POWER Report Writer program, however, does provide the user with this ability to organize
information from the various Infinity POWER programs into the formats required by the File Import options. The
text files that contain the information to be imported must be in one of three forms:
Chapter 2
1)
Fixed Length ASCII Records
2)
Variable length ASCII Records
3)
Comma Delimited Text
Set Up and Maintenance
Page 2-67
Manufacturing Inventory Management User Manual
These three types of files are discussed earlier in this section. For all three types of text files, the format of the data
must be accurate for the import options to read the correct information. Each field, or data item, must be in the
correct order across the line, or record, and in the correct format depending on the type of text file.
Each of the import options allow you to print a transaction journal as the import is being performed. This provides
an audit trail of the information being updated into your data files. This report will also indicate if the import of a
record was not performed due to errors encountered in the importation process.
Some of the import file structures allow you to specify “action numbers.” These “action numbers” tell the system
whether you want the information being imported to be added, changed, or deleted. The action numbers are listed
below.
1 = Add Record to file
2 = Change record in file
3 = Delete record in file
4 = Add record if it doesn't exist, otherwise change it
Some of the transaction import file structures require a field called “Cont? (0=NO, 1=YES).” This field indicates to
the import programs whether or not the transaction is continued in the next record. For example, in the Accounts
Receivable Transaction import, there may be several lines of detail on an invoice that is being imported. Each line
should be placed in a separate record of the text file with a “1” for YES to indicate that the transaction is continued.
The last line should contain a “0” for NO indicating the end of the transaction.
For each transaction-related import, there are certain fields that are required and used by the system to verify the
validity of the information being imported. These fields are marked in the field definition section with a asterisk (*).
For each type of import that you wish to perform, the import text file must contain all of the fields specified for that
particular import option. Any text fields that are blank will overwrite existing fields in the data files. Also, numeric
fields that are blank will be considered as zero.
To allow the import of only a subset of the import structure, you must have a custom “MAP” file created. This will
allow you, for example, to only update the retail price in Inventory without affecting, or requiring, any other fields.
You may obtain or create custom import “MAP” files one of two ways. You may first <click> on the “Create
Map” button at the point in the program when you have selected the “import” option. The result is to produce a
“XXXXXX.map” file in the program directory. The “Xs” in this file name represent the actual name of the Infinity
POWER option within the program (e.g., GL0601.MAP).
The “XXXXXX.map” file is used by the import option to override the default layout of the import transaction file.
By using file editing tools such as EDIT under DOS, Notepad under Windows or “vi” under UNIX, you may create
a customized import record layout. Whenever a “XXXXXX.map” file is created, it overrides the default predefined
import record layout.
Items can be deleted entirely from the record layout file or moved from one position to another. If a field is not
specified in an import file, that field may be deleted from the record layout file.
NOTE: “Key Value” fields must be present in the import file and cannot be deleted from the record layout file.
“Key Value” fields are those fields that are designated with an asterisk (*) in the documented import record layouts.
You may also have customized “MAP” files created for you by calling the Data Pro Support Services group at
727-803-1550.
Page 2-68
Set Up and Maintenance
Chapter 2
Manufacturing Inventory Management User Manual
Sample Import Price Tables File
Chapter 2
Set Up and Maintenance
Page 2-69
Manufacturing Inventory Management User Manual
Page 2-70
Set Up and Maintenance
Chapter 2
Manufacturing Inventory Management User Manual
SET UP PRICE PLANS
This section discusses how to set up customized price plans which may be used throughout the Accounts
Receivable, Order Entry, and Point of Sale modules. A discussion follows here on how to add, change, delete, and
copy Price Plans. These Price Plans may be modified at any time, but careful consideration should be made before
any changes are implemented. It also discusses how to print the Price Plan Listing Report, which is used to verify all
information input in the Price Plan files.
Price plans are used by the Accounts Receivable system to assign special Pricing Plans to specific customers. Each
Price Plan can be set up to encompass a single item, a range of items, or a group of items that have the same
“masking” structure.
Price Plans can be setup to set pricing for a specific type of customer. Some customers may only purchase items that
come by a specific type of unit of measure such as, the skid or pallet. You can set up special price plans to
incorporate a specific unit of measure pricing such as skid pricing.
You may add “notes” to any Price Plan that may be viewed on the screen for additional information or planning.
This may be done when viewing an inquiry, adding a new item, changing an existing item or copying an item.
By <clicking> on the Note Pad Button, a screen will appear that will allow you to add or review free-form notes. If
you are adding a new record, navigation is not required. <Click> on the “Create a New Record” button or choose
the “Operation” option from the Menu Bar and then “Add.” A screen will appear with the current date and time.
You will be prompted for a description of fifty (50) characters, which is used as part of the display when selecting to
review existing notes. Each note recorded has up to ten (10) lines of fifty characters each which may be used for
your free-form notes.
Once notes are added to the file, they can be reviewed at any time by accessing the item through an inquiry mode or
a change mode and then <clicking> on the Note Pad Button. Once this screen is displayed you will have the tool
bar navigation options to select the first detail record, select the next record detail, select the previous record detail,
select the last record in the detail list or search through the detail records. You may then view the notes for this
record.
Chapter 2
Set Up and Maintenance
Page 2-71
Manufacturing Inventory Management User Manual
If you have set up User-Definable Fields in either the Windows Character-based or UNIX products, you will be
able to view and change data information in these fields. By <clicking> on the “User Fields” button, you will
access an additional screen of data fields. If you are in an Inquiry Mode, then you will be able to view these fields.
If you are in a Change or Copy Mode, you will be able to modify the information in these fields. You must make
sure that your General Configuration options are set up to allow access to User-Definable Fields.
Add Mode (IM0421)
This option allows you to enter your new price plans. Price Plans enhance the functionality of inventory pricing.
Depending on the nature of your business, you may have the need to offer more extensive pricing variables than the
ten (10) defaults set up in the Manufacturing Inventory Master Configuration. Every plan can be activated or
inactivated at any time, and they may be assigned a beginning and ending date range to be active.
This “date range” can be used for promotions or seasonal pricing. Some companies have special pricing for certain
items for certain seasons of the year. “Price Plans” will allow the capability of setting a pricing structure for these
particular items, which includes a specific beginning and ending date range for every year.
On each Price Plan a minimum and maximum quantity is required to define the quantity breaks for pricing as well as
a specific pricing structure. There are several ways to calculate pricing in the Price Plans:
•
Specific Pricing
•
Pricing based on pre-defined price levels
•
A combination of pre-defined price levels and a percentage adjustment (which can be plus or
minus)
•
Specific Pricing based on units of measure
Each Price Plan has two hundred (200) detail lines that can be defined with various inventory items, ranges of
inventory items or groups of inventory items. Price Plans have a wide range of uses. In a Retail Point of Sale
environment, a price plan can be used for a special sale. In a Distribution Outlet, a Price Plan can be used for a
variety of multiple discounts based on the customer purchasing the merchandise.
Page 2-72
Set Up and Maintenance
Chapter 2
Manufacturing Inventory Management User Manual
The primary benefit of Price Plans is contract pricing. For example, a bid is proposed to a customer and a Proposal
is entered in the Order Entry module with special pricing provided to that customer. This pricing does not fall into
any general pricing category like the rest of the customer base. By establishing a custom Price Plan, manual
calculation or entry of custom prices is not required. The system handles it automatically.
When you select the menu option “Set Up Price Plans,” and you are adding a new record, navigation is not
required. <Click> on the “Create a New Record” button or choose the “Operation” option from the Menu Bar and
then “Add.” You may enter any alpha/numeric combination of up to ten (10) characters into this field. This
provides you with flexibility to define and describe price plans as you see fit.
The following is an explanation of the data items necessary for the set up of each Price Plan.
Description
This is a thirty (30) character (alpha/numeric) description of the Price Plan.
This will be displayed on the Price Plan Listing. If this Price Plan will be
utilizing a specific unit of measure pricing, then enter the unit of measure
description, exactly as it has been set up in the unit of measure descriptions
in between brackets ( (skid) ) anywhere on this line.
Active
This field determines whether or not this Price Plan is “activated.” Price
Plans that have been entered may be activated or inactivated at any time.
This could be due to promotional testing, market conditions, or anything
else. If you wish to activate this Price Plan, <click> “on” the checkbox.
Beginning Date
This field determines the beginning date this Price Plan will take effect.
There are several available answers to this data item.
a. Enter a beginning date, e.g., 010104, for the Price Plan to take effect on
that beginning day of that month of that year.
b. Enter a beginning date, e.g., 0101, for the Price Plan to take effect on
that beginning day of that month of this and any future years. This would
apply to seasonal pricing capabilities.
c. Leave the beginning date blank for the Price Plan to be in effect at all
times.
Chapter 2
Set Up and Maintenance
Page 2-73
Manufacturing Inventory Management User Manual
Ending Date
Type
This field determines the ending date this Price Plan will stop taking effect.
There are several available answers to this data item.
a. Enter an ending date, e.g., 013104, for the Price Plan to end on that
ending day of that month of that year.
b. Enter an ending date, e.g., 0131, for the Price Plan to end on that ending
day of that month of this and any future years. This would apply to
seasonal pricing capabilities.
c. Leave the ending date blank for the Price Plan to be in effect at all times.
If you have chosen to utilize the “b” category, then <click> “on” the
“Seasonal” checkbox.
<Click> on the “Details” button and a scrolling screen will appear on
which you may enter up to two hundred (200) detail lines of information to
this Price Plan.
This field determines whether this line item on the price plan will apply to a
specific item, a range of items, or a group of items that meet a specific
“masking” criteria.
<Click> on the pull down box to choose from the three (3) types available:
Item - By selecting “item,” this tells the system that the pricing
specification made on this detail line only applies to the one inventory item
specified on this line.
Range - By selecting “range,” this tells the system that the pricing
specification made on this detail line applies to the range of inventory items
specified on this line. This is particularly valuable in that you may virtually
use an unlimited number of items for this price plan. For instance, you may
give a special discount on a class or make of products. By using the
“range” option, one line can cover them all.
Mask - By selecting “mask,” this tells the system that the pricing
specification made on this detail line applies to a range of inventory items
specified on this line that also meet the “masking” criteria specified.
“Masking” is a mechanism used by the system to allow you to selectively
extract specific item numbers to be included as part of this price plan based
on their common characters within the inventory item number. Therefore,
when you initially set up inventory item numbers, you must code them in a
fashion that can be utilized for this function. The System Administrator
manual provides specific examples on how to utilize the masking feature.
Beginning/Ending Item
This is particularly valuable in that you may virtually use an unlimited
number of items for this price plan. Similar in concept to the “range,”
using a “mask” allows you to include items that are not in sequential
order, but share common item number characteristics.
If you have chosen the “Item” type, this field will prompt you for only the
item you want to include on this particular line item. If you have selected
either the “Range” or “Mask” types, respectively, you will be prompted to
enter the beginning item number and then the ending item number directly
below.
Minimum Qty
Enter the minimum quantity allowed for this price definition. If no quantity
is entered, all quantities will be accepted for this price definition.
Maximum Qty
Enter the maximum quantity allowed for this price definition. If no quantity
is entered, all quantities over the minimum quantity will be accepted for
this price definition.
Page 2-74
Set Up and Maintenance
Chapter 2
Manufacturing Inventory Management User Manual
<Click> on the pull down box and select one of the ten (10) default price
levels defined in the Master Configuration or select the additional price
level “Specific Price” or “None.” Keep in mind that you may use any of
the price levels available as the basis for other calculated prices. Therefore,
if you want to perform a discount off of the suggested retail price, use Price
Level 1. This assumes that Price Level 1 is defined as “retail price.”
Price Level
If you are trying to perform “cost plus” type pricing, pick the level you
have established as “cost” for this choice. If contract pricing is what is
necessary, then choose Option #12, “Specific Price” so that you may enter
the exact price you want in effect for this line item.
Adjustment %
Enter the percentage of adjustment to the price level selected. For an
increase to the price level selected, enter a (+) positive percentage (e.g., 10
for 10%). If you are trying to perform “cost plus” type of pricing, a
standard price level must be set up in the Inventory Master Configuration
as “cost.” A Price Plan then needs to be set up with “cost” as the price
level plus a percentage. A positive percentage would then be needed to
“add” to the “cost” price.
For a decrease to the price level selected, enter a (-) negative percentage
(e.g., -10 for -10%). For example, a price level may be predefined as
“Retail -10%,” and in a Price Plan you would like to define it as “Retail 15%.” A percentage of “-5.00%” would then be needed to reduce the
Retail price even further.
Specific Price
The specific price will only be available if Price Level 12 has been selected
as the price level for this detail line. Enter a specific price for this price
definition. This is very common with custom pricing unique to a specific
customer.
NOTE
You may have several price definitions with the same range of inventory
items, with different minimum and maximum quantities, as well as different
price levels. Remember that the first price definition that the criteria has met
will be used.
You may now repeat this process for the number of detail lines that you desire on a price plan by price plan basis. A
single Price Plan may have up to a maximum of two-hundred (200) detail lines. When you have entered all of the
detail lines for this price plan, <click> on the “Save” button to go to the initial screen. <Click> the “Save” button to
validate this price plan. You are now ready to input the next price plan or <click> on “Close” to exit this option.
Results:
coIM4.dbf - Price Plan Master File
- Price Plan is Added to File
coIM5.dbf - Price Plan Detail File
- Detail of Price Plan is Set Up
Chapter 2
Set Up and Maintenance
Page 2-75
Manufacturing Inventory Management User Manual
Change Mode (IM0422)
If you have made any mistakes during this set up process, you may return to the “Set Up Price Plans” option to
change any information you have already entered.
First, you must navigate to the record you wish to change. You may find a record using the navigation tool bar or
<click> on the “Navigation” option on the Menu Bar and then the appropriate navigation option. If you are
changing a record, <click> on the “Modify the Current Record” button or choose the “Operation” option from the
Menu Bar and then “Change.” Make the changes required and <click> on the “Save” button to save your changes
or <click> on the “Cancel” button to cancel the changes made.
Results:
coIM5.dbf - Price Plan Detail File
- Price Plan Information is updated
Delete Mode (IM0423)
This option allows you to delete price plans you may have entered by mistake or no longer want. First, you must
navigate to the record you wish to delete. You may find a record using the navigation tool bar or <click> on the
“Navigation” option on the Menu Bar and then the appropriate navigation option. <Click> on the “Delete the
Current Record” button or choose the “Operation” option from the Menu Bar and then “Delete.” This will place
you into the “Delete” mode, then <click> on “Save” to validate your deletion of this record.
“Press ENTER to delete the item above (ESC to exit).”
Make sure this is what you want to do, because once a price plan is deleted, it can not be retrieved.
Results:
coIM4.dbf - Price Plan Master File
- Price Plan is marked for Deletion
coIM5.dbf - Price Plan Detail File
- Price Plan Detail is marked for Deletion
Copy Mode (IM0424)
This option allows you to create new price plans by copying the information from existing ones. Using this option,
the system provides a quick method of setting up price plans that are very similar. Many price plans may only vary
slightly by customer, inventory items used, or many other variables. The rest of the information relevant to these
items may be exactly the same. By using the “Copy Price Plans” menu option, you are able to quickly create and
enter new price plans into the file.
First, you must navigate to the record you wish to copy from. You may find a record using the navigation tool bar or
<click> on the “Navigation” option on the Menu Bar and then the appropriate navigation option. <Click> on the
“Create a Record Based on the Current Record” button or choose the “Operation” option from the Menu Bar and
then “Copy.”
You will notice all the information, except for Price Plan number, will be copied to a new record. Enter the new
Price Plan number for this record. At this point you may choose to edit any of the information or <click> on the
“Save” button to validate, which will then add it to the file.
Results:
coIM4.dbf - Price Plan Master File
- A new Price Plan is added to the file
coIM5.dbf - Price Plan Detail File
- Detail Lines of New Price Plan is Set Up
Page 2-76
Set Up and Maintenance
Chapter 2
Manufacturing Inventory Management User Manual
SET UP INVENTORY LOCATIONS
Multi-Location Inventory tracking is a method of tracking and distributing inventories from a central location. This
is true for all inventory costing methods except for the case of Serialized or Lot Numbered items. These costing
methods can not be used to their full advantage in conjunction with Multi-Location Inventory Tracking.
Conceptually, each location will have its own company set up including the General Ledger and Manufacturing
Inventory Management modules. This will facilitate the requirement to track the Due To/Due From entries that are
created when the inventories are transferred from the central location to the individual site locations.
Once all of your locations are established in this option and inventory items are being tracked in each location, users
will have the ability to perform an on-line inquiry for each Inventory Item to easily determine what stock levels are
available at the various locations for the same item. This is a very convenient and powerful feature, but does require
that this setup be done first.
The following screen illustrates how a simple inquiry would look for one inventory item at multiple locations.
Remember, you may have as many locations as you desire.
You may add “notes” to any Inventory Location that may be viewed on the screen for additional information or
planning. This may be done when viewing an inquiry, adding a new item, changing an existing item or copying an
item.
By <clicking> on the Note Pad Button, a screen will appear that will allow you to add or review free-form notes. If
you are adding a new record, navigation is not required. <Click> on the “Create a New Record” button or choose
the “Operation” option from the Menu Bar and then “Add.” A screen will appear with the current date and time.
Chapter 2
Set Up and Maintenance
Page 2-77
Manufacturing Inventory Management User Manual
You will be prompted for a description of fifty (50) characters, which is used as part of the display when selecting to
review existing notes. Each note recorded has up to ten (10) lines of fifty characters each which may be used for
your free-form notes.
Once notes are added to the file, they can be reviewed at any time by accessing the item through an inquiry mode or
a change mode and then <clicking> on the Note Pad Button. Once this screen is displayed you will have the tool
bar navigation options to select the first detail record, select the next record detail, select the previous record detail,
select the last record in the detail list or search through the detail records. You may then view the notes for this
record.
If you have set up User-Definable Fields in either the Windows Character-based or UNIX products, you will be
able to view and change data information in these fields. By <clicking> on the “User Fields” button, you will
access an additional screen of data fields.
If you are in an Inquiry Mode, then you will be able to view these fields. If you are in a Change or Copy Mode,
you will be able to modify the information in these fields. You must make sure that your General Configuration
options are set up to allow access to User-Definable Fields.
Add Mode (IM0801)
This option allows you to set up new inventory locations. These locations require a separate company set up with at
least the General Ledger and Manufacturing Inventory Management modules loaded and operational. This option
allows you to add new locations to your inventory location file. Several screens will be used, taking you step-by-step
through the sequential process of properly and thoroughly identifying your inventory locations. This process will
repeat itself for each inventory location.
Select the option to “Set Up Inventory Locations.”
Page 2-78
Set Up and Maintenance
Chapter 2
Manufacturing Inventory Management User Manual
Enter the three (3) character (alpha/numeric) company number in the format that you initially set up in the “Create a
Company” option. Once this information is entered, the next screen will appear displaying the Location (Company
#) and five (5) data items to complete.
The following is an explanation of each of these data items:
Description
This field is a forty (40) character (alpha/numeric) description field. Use
this field to enter a description for this location. This description will be
used on the Inventory Item Inquiry and on some reports.
Inventory Data Path
This is a forty (40) character (alpha/numeric) field used to define the data
file path for this location (company #). It is possible that all companies do
not reside in the same data directory. This way, a data file path can be
defined for each new location set up. For example:
C:\POWER\DATA\CO123\
or it could be as simple as:
.\DATA\
This is a checkbox which will designate whether or not this location
(company #) will allow direct updates to the Inventory and General Ledger
data files when transfers are made. If you <click> “on” this checkbox, the
system will automatically update the Inventory data files with the
appropriate entries based on the transfers performed. It will also create the
General Ledger journal entries required to back up the transfers made.
Direct Update
AR Account
Chapter 2
If you don’t check this box, the system will only allow Inquires to be made
on this company. It will not allow any transfers to be performed.
This data item will determine the Accounts Receivable account to use for
the “Due From” transaction that occurs when a transfer is performed. This
is NOT the Accounts Receivable account that is used to track your normal
receivables from customers.
Set Up and Maintenance
Page 2-79
Manufacturing Inventory Management User Manual
It is highly recommended that you create “separate” Accounts Receivable accounts to track these special entries
which are considered Inter-Company transactions. You may add an Accounts Receivable account for each location
(company #) that you wish to perform transfers to. The system does NOT update any Accounts Receivable
Customers with these transactions.
The following explains the accounts receivable transactions the system will create when a transfer is performed.
Company INS - Source Company
Company ABC - Destination Company
A transfer of ten (10) Corner Blocks (Item # 10 601 78511) is made from the INS Company to the ABC Company.
The unit cost is $ 3.50 each.
Entries made in the INS General Ledger:
Account Description
Debit
Inventory
Credit
(35.00)
AR – Due From ABC
(35.00)
AP Account
This data item will determine the Accounts Payable account to use for the “Due To” transaction that occurs when a
transfer is performed. This is NOT the Accounts Payable account that is used to track your normal payables from
vendors.
It is highly recommended that you create “separate” Accounts Payable accounts to track these special entries which
are considered Intercompany transactions. You may add an Accounts Payable account for each location (company
#) that you wish to perform transfers to. The system does NOT update any Accounts Payable Vendors with these
transactions. The following explains the accounts payable transaction the system will create when a transfer is
performed. We will use the same scenario as on the previous page.
Entries made in the ABC General Ledger:
Account Description
Debit
Inventory
35.00
A/P – Due To INS
Credit
(35.00)
It is necessary to have the Accounts Payable account set up in both the Source and Destination companies. The
system will use the Accounts Payable account in the destination company.
Results:
sysIM7.dbf - Inventory Locations File
- Location Information is added
Change Mode (IM0802)
This option allows you to change all information for any location. After initial set up, all Intercompany transfers
should be input through “Record Intercompany Transfers.”
If you have made any mistakes during this set up process, you may return to the “Set Up Inventory Locations”
option to change any information you have already entered.
First, you must navigate to the record you wish to change. You may find a record using the navigation tool bar or
<click> on the “Navigation” option on the Menu Bar and then the appropriate navigation option. If you are
changing a record, <click> on the “Modify the Current Record” button or choose the “Operation” option from
the Menu Bar and then “Change.” Make the changes required and <click> on the “Save” button to save your
changes or <click> on the “Cancel” button to cancel the changes made.
Page 2-80
Set Up and Maintenance
Chapter 2
Manufacturing Inventory Management User Manual
Results:
sysIM7.dbf - Inventory Locations File
- Location Information is updated
Delete Mode (IM0803)
This option allows you to delete locations you may have entered by mistake, or no longer want. First, you must
navigate to the record you wish to delete. You may find a record using the navigation tool bar or <click> on the
“Navigation” option on the Menu Bar and then the appropriate navigation option. <Click> on the “Delete the
Current Record” button or choose the “Operation” option from the Menu Bar and then “Delete.” This will place
you into the “Delete” mode, then <click> on “Save” to validate your deletion of this record.
Make sure this is what you want to do, because once an item is deleted, it can not be retrieved.
Results:
sysIM7.dbf - Inventory Location File
- Location is deleted
Copy Mode (IM0804)
This option allows you to set up new locations by copying existing ones. This option is very helpful in setting up
multiple locations. Using this option, the system provides a quick method of setting up locations that are very
similar. Many locations may only vary by description. The rest of the information relevant to these items may be
exactly the same. By using the “Set Up Inventory Locations” menu option, you are able to quickly create and enter
new locations into the file.
First, you must navigate to the record you wish to copy from. You may find a record using the navigation tool bar or
<click> on the “Navigation” option on the Menu Bar and then the appropriate navigation option. <Click> on the
“Create a Record Based on the Current Record” button or choose the “Operation” option from the Menu Bar and
then “Copy.” You will notice all the information, except for Inventory Location number, will be copied to a new
record. Enter the new Inventory Location number for this record. At this point, you may choose to edit any of the
information or <click> on the “Save” button to validate, which will then add it to the file.
Results:
sysIM7.dbf - Inventory Location File
- Location Information is added
INVENTORY CONFIGURATION (IM0408)
This option allows you to change the standard inventory configuration. This includes changing the item number size
and description, price levels, quantity breaks, manufacturing specifications, and which systems you want to integrate
with.
A default configuration is already built into your Inventory module. However, you may prefer to change this
configuration to meet your company's specific requirements. If you do decide to assume the default values, please
review them carefully before you begin processing. After selecting this option, a screen will appear displaying the
following five choices below:
Chapter 2
•
Master Configuration
•
Price Levels
•
Bar Code
•
Manufacturing
•
System Integration
Set Up and Maintenance
Page 2-81
Manufacturing Inventory Management User Manual
As you proceed to select each option, enter all required or <click> on the “OK” button to assume the default
configuration.
Master Configuration
The Master Configuration screen will display with the data items necessary for configuring your inventory data files.
Item Categories
Category 1 Description
Category 2 Description
Category 3 Description
Category 4 Description
Complete:
4
4
10
2
Cat1/ Cat2/ Cat3/ Cat4
The inventory item number can be configured with a maximum of 20 characters (alpha/numeric) and broken into 4
components. You also have the ability to create your own item descriptions and their abbreviated form for report
headings. A maximum of twenty (20) characters is available for report headings.
Viewing the screen will illustrate the default values for the Item categories. All twenty characters are used, but you
may configure these groups in any way you prefer. If a space is desired to separate the components, add one more
character to the required length of each component. As you are changing the default settings, keep in mind the total
length of the Item Number can only be a maximum of twenty characters. If you try to change the first length to a
number that would throw the total over twenty characters, a warning message will appear at the bottom of the
screen.
To avoid this, start at Category 4 and moving up to Category 1, change all lengths to “0” and then proceed to set
them at the new lengths you desire. Sorting, searching and masking routines are very crucial for quick and accurate
reporting and retrieval of information. Designing your inventory item number is the key to utilizing these features to
your benefit. Please review these chapters in your System Administrator manual.
Page 2-82
Set Up and Maintenance
Chapter 2
Manufacturing Inventory Management User Manual
Weight Decimal (0-5)
This number is used to determine how many decimal places are necessary
for fractional weight quantities. For example, the use of percentage weights
(e.g., 1/4 pound or .25) for inventories, would dictate the use of two (2)
decimal places to the right. You may choose up to five (5) decimal places
for this item.
Reduce Reserved
Default: Off
This feature will reduce the “Reserved to Ship” quantity on an Inventory
Item when you select to “Record Withdrawals” directly from the
Manufacturing Inventory Management module. Normally, this reduction
would only occur if items were recorded as “shipped” in the Sales Order
Entry module.
Reduce On Order
Default: Off
This feature will reduce the “On-Order” quantity on an Inventory Item
when you select to “Record Receipts” directly from the Manufacturing
Inventory Management module. Normally, this reduction would only occur
if items were recorded as “received” in the Purchase Order Entry
module.
Default Cost Method
There are eight (8) costing methods to choose from. They are:
LIFO
FIFO
Average
Latest
Standard
Serial Number
Lot Number
Fixed O/H
This data item is the default cost method that you will use in your company.
Each inventory item will allow an override of this default costing method to
define a unique costing method. You may <click> on the Down Arrow (F2
by default) to scroll through the list of available choices for this option.
Unit Cost/Price Dec.
Select the number of places to the right of the decimal point you want your
Unit Cost and Sales Price dollar figures to extend and record. The default
setting is two places for unit dollar values as small as one penny. You may
choose up to five (5) decimal places for this item.
Quantity Decimal
This number is used to determine how many decimal places are necessary
for fractional inventory quantities. For example, the use of percentage
weights (e.g., 1/4 pound or .25) for inventories, would dictate the use of
two (2) decimal places to the right. You may choose up to five (5) decimal
places for this item.
Shrinkage Account
Default: 55100
This account number is primarily used when your Inventory module is
integrated with the General Ledger module. This number (taken from
G/L) must be specified in order for the Inventory module to automatically
create a batch file which will post the shrinkage dollar amounts calculated
when you perform an option called “Update Book Value After Count.”
This option determines any losses or gains after a physical inventory count.
Even if you are not interactive with the General Ledger module, you may
still get an account breakdown by assigning a General Ledger account
number here and printing the Inventory Shrinkage Report.
Chapter 2
Set Up and Maintenance
Page 2-83
Manufacturing Inventory Management User Manual
NOTE: You may choose to ignore all General Ledger related questions if
your system is not interactive with the General Ledger module. However, it
is suggested that this be done now even if the system is not currently
interactive with the General Ledger module. Otherwise, each item number
will have to be changed at a future point in time to make them function
properly with the General Ledger program.
AP Account
Default: 31100
This account number will be used to update the General Ledger, if you are
interactive with that module. This account number is used as the credit to
offset the debit to the Inventory Asset account when a receipt is recorded
through the Inventory module instead of through one of the integrated
modules such as Accounts Payable or Purchase Order Entry.
GL Journal Number
Default: 7
This number corresponds with the General Ledger default journal number
in the General Ledger module. All Inventory transactions will be posted to
this journal.
Price Levels
Price Level Descriptions, Quantity Breaks, and Default Discount/Markup Factors - Default: (Below)
Description
Factor
Qty Break
1) Retail
1.0000
0
2) Retail – 10%
0.9000
0
3) Retail – 20%
0.8000
0
4) Retail – 25
0.7500
0
5) Retail – 30%
0.7000
0
6) Qty. 1
1.0000
1
7) Qty. 3
0.9500
3
8) Qty. 5
0.9000
5
9) Qty. 10
0.8000
10
10) Qty. 50
0.7000
50
Each inventory item may utilize up to ten (10) different price levels. This provides you with maximum flexibility to
allow different prices to different customers and for different quantity breaks. This option allows you to change the
descriptions, default factors, and default quantity breaks, for each price level.
Page 2-84
Set Up and Maintenance
Chapter 2
Manufacturing Inventory Management User Manual
Changing the descriptions allows you to specify the name of different price levels relative to your specific business
needs. These descriptions may be as simple as “Price #1” to “Retail” and “Wholesale,” or “Quantity Levels.” The
descriptions entered here will be reflected throughout the system. All Price Lists, Item Inquiries, and Bin Labels will
be reflective of these descriptions. Type them in the exact format you want to see them printed out.
Additionally, you may place the caption “Last ^Cost” (where ^ means one space) in one of your price levels, and
that price level will be used as a cost for inventory items shipped on a return authorization.
NOTE
If you set up a price level 10 as “last cost” then the system will pick up this
cost when entering an item on a purchase order and ignore the cost in the cost
layers.
Placing an “*” anywhere within this Description field will cause the system not to display this pricing level on any
Inventory Item Inquiry throughout the accounting system. This will be useful if users are required to perform
Inquiries in front of the customer. Specific Price Levels can be omitted from the Inquiry Screen.
The “Factor” fields determine the price of an inventory item based on the factor specified. If a factor of “1.0” is
given to a price level, then it will assume the full price entered when you set up the actual price in “Set Up
Inventory Items.” This is the default value normally assigned to the first price level. There is no requirement to use
any price levels beyond the first price level if multiple layered pricing is not applicable to your business.
Price levels set up after the first price level normally utilize a factor amount either greater than or less than one (1.0)
depending on the nature of your business. If you wish to use price level #1 as a Retail price, then the following price
levels will normally be set a factor rate of less than 1.0 such as .80 to reflect a 20% discount from the Retail Price or
Price Level 1.
Many businesses utilize a “Cost Plus” type of pricing system. In this instance, all price levels after Price Level 1
will utilize factor rates of greater than 1.0, such as 2.0 to reflect Cost plus a 100% markup. Data Items #1 and #6 are
the two primary key fields to use as a guideline to base factors on. You may utilize both methods within the same
setup in this way.
Price Levels 1 to 5 may reflect pricing on a Retail less discounts basis while Price Level 6 may reflect cost and
levels 7 to 10 may reflect Cost Plus pricing. However, any price level may be used as a base for following factors.
Setting up these factors is very important to utilizing a very key feature in the Inventory module. Once all prices
have been established, any price changes may be altered on a system level to reflect increases or decreases in price.
Chapter 2
Set Up and Maintenance
Page 2-85
Manufacturing Inventory Management User Manual
For example, next year, you may choose to implement a 10% price increase or alter your entire discount structure.
By making the changes to Master System Configuration, each item can be altered easily without having to re-key
and recalculate each price level for every item in your inventory. That is why factors are so important.
Further discussion of this feature will be found under “Set Up Inventory Items.” Setting up quantity breaks to
calculate prices is an advanced feature used with this module as well as Accounts Receivable, Point of Sale, and
Sales Order Entry modules. During the recording of withdrawals in Inventory, the system will prompt you to enter
the price level to use. If quantities are specified, the system will check the quantity entered and compare it to your
quantity break table and assume the price accordingly.
At the time of entering invoices and sales orders, the system will allow you to enter the Price Level to be used when
calculating the price of an inventory item. If you select a Price Level that has a quantity amount entered here, the
system will check the quantity entered at the time of the invoice or sales order and compare it to your quantity break
table. That price will then be assumed by the system.
The system will assume the price of the price level if no quantity is entered into the price level configuration
specified. If quantities are entered in the price levels, the calculation used is as follows: The price level to be used
will be the price level with the quantity entered equal to and up to the next price level quantity.
For instance, in the table, found under Price Tables, price level #6 has a quantity of 1. Price level #7 has a quantity
of 3. If you enter a quantity of two (2), the system will automatically calculate price level #6 to be used. If you enter
a quantity of four (4), price level #7 will be used. A quantity of fifty (50), will receive price level 10 pricing.
This can speed up the entry of orders considerably with fewer calculation mistakes. The set up procedure for the
actual pricing of an item is performed in the “Set Up Inventory Items” option. Once you have completed this
screen, go to the next section or <click> on “OK” to save.
Bar Codes
Complete the “Bar Code Configuration” if you will be using the Bar Code Reader feature. This option allows you
to specify if you want to print Bar Codes on your Price Labels. The standard print formats available are listed on the
following page.
Bar Code Configuration
None
IBM Graphics Printer
Epson FX Series
T.I. 850 Series
T.I. 855 w/Module
HP Laser Compatible
Other
Specify the bar code printing format desired, by <clicking> “on” the button.
Page 2-86
Set Up and Maintenance
Chapter 2
Manufacturing Inventory Management User Manual
NOTE
Infinity POWER only supports Eltron (Zebra) printers or printers that
support the EPL language. EPL is a programming language used by Zebra
bar code printers.
Manufacturing
“Manufacturing Specifications.” The screen will display three choices that will affect manufacturing processing.
Turn Component Quantity
Chapter 2
Default Off
Set Up and Maintenance
Page 2-87
Manufacturing Inventory Management User Manual
Checking Off
Produce Sub-Assemblies
Automatically
The system will normally warn you if you try to produce a
manufactured item without the necessary quantities of raw materials
or sub-assemblies. This feature allows you to turn off the checking
of sufficient quantities during the production process. The system
will continue to produce the manufactured item and record the
quantity in excess of the on-hand quantity in the “Quantity to
Adjust” field.
You will then need to go back and make the necessary manual
adjustments to your items and remove the overages from the
“Quantity to Adjust” field.
Default Off
The system will normally produce one level of the Bill of Materials
at a time. If your manufacturing process requires the production of
several levels of sub-components, each level must be produced
before the next level, or finished item, is produced. This feature
allows you to produce all sub-assembly levels at one time. You
would simply specify the number of finished items that you would
like to produce. The system will then automatically produce all of
the sub-assemblies, at all levels (maximum of 20 levels), that are
necessary to produce the finished items.
NOTE: Keep in mind that when you are setting up your part
numbers for both raw materials and finished goods, the structure
should be set up in such a way to always have the finished goods at
the top of the parts list, then the next levels of assemblies followed
by the next levels of assemblies, and so forth. The system needs to
have this hierarchy to do its proper reporting and calculation of
required materials. For instance, the system will always place all
inventory items starting with a “1” before all items starting with a
“2.” A “2” would then come before a “5” and so on. Therefore, all
finished goods and assemblies should start with numbers that will
list out ahead of all lower level assemblies and raw materials.
Auto-Reserve Bill of Materials
- Default Off
There is a very dynamic way of tracking the needs of Bill of
Material items verses using a more planned approach. To utilize this
feature, you must have this Inventory Master Configuration option
“Auto-Reserve Bill of Materials” <clicked> on as shown on the
previous screen.
This field (Required for Manufacturing) is automatically updated
by following the procedures in the “Enter Projected Usage
Amounts” menu option. There are two different ways that the
Inventory system can track, display, and report the manufacturing
requirements. As a manager, you must decide how you are deploying
your Bill of Materials processing system and you must be
comfortable with the way in which you want to determine the
requirements you will need for sub-assemblies of items used in the
Manufacturing cycle.
First there is a field under the “Re-Order” button called “Proj. Requirements” as shown on the following screen.
Page 2-88
Set Up and Maintenance
Chapter 2
Manufacturing Inventory Management User Manual
Projected Requirements
This field is used in the calculation of an item’s Projected Bill of
Material requirements amounts during the use of the “Projected
Usage Amounts” menu options. This field contains the quantity that
you need to manufacture to meet the requirements of outstanding
sales orders or stocking levels. However, the key to this function is
that management must overtly utilize the “Projected Usage
Amounts” option to calculate what requirements exist for a specific
sub-assembly or Bill of Materials item. Typically, this “Projected
Requirements” field would be used for Finish Goods and not for
sub-assemblies and/or Bill of Materials items.
Req. Manf.
This field is the calculated quantity of the sub-assembly or raw
material which will be required to meet the manufacturing
requirements calculated in the “Projected Usage Amounts” option.
For instance, you may have sub-assemblies and raw materials that
are used in the manufacturing of several different finished good
items. You could use the “Projected Usage Amounts” option to
transfer all of your Sales Order backorder quantities to the
“Projected Manufacturing Requirements” and then calculate the
manufacturing requirements. The “Req. Manf.” field would then
contain the total quantity required to meet all of your manufacturing
needs and will be used in the “Projected Materials Usage Report”
to let you know what raw material items you may need to order.
As you can see, the “Require for Manufacturing” quantities of your sub-assemblies and raw materials will only be
set by using the “Projected Usage Amounts” option. This provides you with a lot of flexibility in calculating the
requirements as you prepare for your manufacturing cycles. However, the quantities required for manufacturing are
not automatically updated as users are entering customer orders and the Sales Order, Accounts Receivable, and
Point of Sale modules will not warn the user if the quantity of the Inventory Item being entered is required for the
manufacturing process.
Chapter 2
Set Up and Maintenance
Page 2-89
Manufacturing Inventory Management User Manual
The second method that the Inventory System has of maintaining the manufacturing requirements is by updating the
Reserved Quantity of the sub-assemblies and raw materials as the finished good items are being entered on the
customer Sales Order. If you are selling the sub-assembly and raw material items as well as using them in your
manufacturing process and need the Sales Order, Accounts Receivable, and Point of Sale systems to dynamically
warn the users that the quantity being entered has been reserved for manufacturing, then this method should be used.
Depending on the Advanced Security Object configuration you define in the system for each user, they may
override and continue to sell the item or not be allowed to proceed at all. This becomes a very dynamic way of
tracking the needs of Bill of Material items verses using the other methodology which uses a more planned
approach. To utilize this feature, you must have the Inventory Master Configuration option “Auto-Reserve Bill of
Materials” <clicked> on as shown on the following screen:
If you want to use the first method, then don’t <click> this option on.
System Integration
“Integration with Other Systems” will allow your system will integrate with other modules.
Page 2-90
Set Up and Maintenance
Chapter 2
Manufacturing Inventory Management User Manual
Integration with Other Systems - Default (Below)
General Ledger
N
Accounts Receivable
N
Accounts Payable
N
Job Cost
N
Customer Support Management
N
Point of Sale
Auto
Sales Order Entry
Auto
Purchase Order Entry
Auto
Indicate by <clicking> on the checkbox if your system will be integrating with these modules. These are the only
modules that Inventory actively updates. Integration with other modules means that Inventory will be updated
automatically by those modules. <Click> on “OK” to assume the default.
The system will, however, automatically configure this option based on the modules you select for the option “Start
New Files From Scratch.” Based on this selection, the system will determine what options should be integrated
automatically and set them for you. You may use this option to custom configure these choices in a different
manner.
When you turn on the integration to Customer Support Management, the system will automatically transfer any
serialized item to the Customer Support Management file along with the customer information for the item. This, of
course, requires that the inventory item have a costing method of “Serialized” for this integration to work.
The system will pick up the customer information from the integrated invoicing module (Accounts Receivable,
Sales Order Entry or Point of Sale) where the sale originated from. Once this item is automatically created by the
system, additional information may be maintained in the Customer Support Management module on each unique
serial number.
Chapter 2
Set Up and Maintenance
Page 2-91
Manufacturing Inventory Management User Manual
MAINTAIN INVENTORY FILES (IM0410)
This option includes both “Pack” and “Re-Index” utilities to manage your Inventory files after a hardware or media
failure or to remove any items marked for deletion from your data files. You should NOT rely on the “Pack” option
to replace backups. Your backup procedures should include daily backups and weekly off-site backups.
There are several situations in which the Pack option need be accessed.
•
Power (hardware) failure
•
Media Error (bad disk)
•
Remove records marked for deletion
You are then given the options to “Pack” or “Re-Index” that data file. Pack is a utility that physically removes any
deleted records from that data file. These procedures display a “Percentage of Completion” graph on the screen
while the files are being processed.
Re-Index is a utility to rebuild the index file. It is also run automatically at the end of a Pack procedure.
Before you execute the Pack option, check the file size of your Inventory files at the operating system level. The
system will sort the current “out of index” file into a new “indexed” file before deleting the old file.
If you do not have enough disk space available to perform this function, an error will be generated at the time the
system runs out of disk space. This, however, could be some time later, depending on the size of your data files. If
your data files are 2MB in combined size, you will need at least 2.2MB in additional free space before proceeding
with this option.
NOTE
This option will only re-organize undamaged data within your files.
Therefore, you should carefully audit all information after executing this
option and make any necessary adjustments to your data.
The following files are available for maintenance:
Inventory Item File
Inventory Cost Layer File
Page 2-92
Set Up and Maintenance
Chapter 2
Manufacturing Inventory Management User Manual
Inventory Transaction File
Inventory Location File
Inventory U/M Conversion File
Assembly File
Price Plan Master File
Price Plan Detail File
You may select individual files or all files for either of these procedures. There are buttons on the right hand side of
the screen that allow you to “Select All” files, “Unselect All” files, and “Invert Selection,” which selects those
files that were not selected in a previous pack or re-index condition.
There is also a button, “Details,” that provides pertinent information about that particular data file. This information
includes the directory path and file name, the type of file, the pattern of the filename structure and the total records
including those records marked for deletion in that data file.
To begin the procedure of a pack or re-index, simply <click> on the “Start” button, after selecting the files you
wish to manage.
START NEW YEAR’S FILES (IM0411)
This option creates a new set of inventory files for the new fiscal year. The previous year's files will still exist for
prior year comparison and historical reporting purposes. Before executing this option, you should make multiple
copies of the old year's files.
NOTE
If you are planning to perform a Physical Count & Update for the current
year, these procedures should be completed prior to performing the option
“Start New Year’s Files.”
The “Start New Year’s Files” option creates a new set of files for the new fiscal year. The Inventory Item file has
the potential of being very large, depending on the number of inventory items maintained in your system. Therefore,
make sure that you have adequate disk space available prior to executing this option. All Year-to-Date information
in the new Inventory Item File will be set to zero.
A new transaction detail file is created for the new year as well (provided you use this option). This option leaves
the Master Configuration File intact.
To select this option, you will go to “Systems” from the Menu Bar and select “System Administrator.” The
following screen illustrates where to locate this option.
Chapter 2
Set Up and Maintenance
Page 2-93
Manufacturing Inventory Management User Manual
Before selecting this option you should make several backups of the old year for archival purposes before starting
the new year. You must also be in the last fiscal period (month) of the year before you can execute this option.
Page 2-94
Set Up and Maintenance
Chapter 2
Manufacturing Inventory Management User Manual
If you are in any other period or month other than the last fiscal period of the year, the system will not allow the user
to select any modules to “Start New Year’s Files.” Therefore, if you are looking to create 2007 data files as the
new year, the old year is 2006 and your date should be set to a day in the last fiscal period of 2006. If you are
prepared to begin data files for the new fiscal year, you may choose the “Select All” button which will highlight all
Registered Systems. Or, you may choose the “Clear All” button to undo your choices. The “Invert” button
reverses the choices currently selected on the screen.
You may also take your mouse and <click> on each accounting module one by one to specify which module(s) to
select for this function. It is not uncommon for many users to be prepared to begin certain data files for the new
fiscal year such as General Ledger and Accounts Payable while holding back on certain modules such as the Sales
Order Entry module. This would allow users to continue processing orders in the prior fiscal year to allow
additional sales to get on the books or to complete orders prior to starting the new order file for the new year. Once
this file is started, only outstanding orders will be transferred to the new fiscal year.
General Ledger, however, is one module whereby users may create new data files for the new fiscal year and
continue to process in both the prior and new fiscal years and the same time. Once postings are made to the prior
fiscal year, the option to “Bring Balances Forward” into the new year is run to bring all adjusted balances current.
Select the module(s) to Start New Year’s Files for and <click> on the “Start” button. The program will create the
new year's data files. The system will show a message next to each module stating “System already started.” The
bottom of the screen will show “Processing Completed.”
<Click> on the “Close” button to return to the Menu Bar.
Because of the substantial changes made to the files, multiple copies for backup are highly recommended. It is also
recommended that a hard copy printout of the “Detailed Inventory Report” be made as an additional backup
procedure.
Results:
coIM1dy.dbf - Inventory Item File
- Creates the new year's data file and maintains the old year's historical data file.
coIM2dy.dbf - Transaction File
- Creates the new year's data file and maintains the old year's historical data file.
MAKE COMPLETE DATA BACKUPS
Make sure that you make complete data backups as you add more and more information to your system. The file
naming structure is designed to allow you to copy data files only; very quickly and easily. We strongly recommend
that the following backup procedures be followed to adequately protect your data files against any possible
problems. Experience has shown that “careless disregard” of making adequate backups can literally cost you
months of hard work and expense.
Any of the following problems could destroy all or part of your accounting information.
•
Hardware Failure of any kind (such as a hard disk failure)
•
Power Failure or Fluctuations
•
Improper Execution of certain operating system commands
•
Careless Handling of Data Disks or Tapes (such as copying files the wrong direction)
It is recommended that you make a backup of your data files on a daily basis. This does not mean for you to
continue copying over the same backup that you may have made the previous day. Instead you should consider the
following structure. Create five to seven daily backup sets of disks or tape cartridges, depending on your system.
The number will vary based on the number of days you “normally” work on your files.
Mark each set with the name of the day of the week that it is to be used for backup purposes. For instance, disk set
or tape #1 may read Monday, disk set or tape #2 may read Tuesday, etc. Only use these specific sets of disks or
tapes on the days that are designated. This would mean that they would not be used more than once a week.
Chapter 2
Set Up and Maintenance
Page 2-95
Manufacturing Inventory Management User Manual
Therefore, if a problem was to occur and you did not realize it immediately, you could at least go back as far as a
week to find your last set of valid data files. Of course the entries made during the last week may be lost, but that is
better than many months or years worth of input.
To go a step further, we recommend that you next make four additional sets of disks or tapes. These would be your
weekly master backups. Mark them accordingly with the week number (Week #1) and at the end of every week,
make a full backup of your data files. Though you may have a complete daily backup for each day of the week,
sometimes problems are not found within the week's time frame and all of those backups could be invalid. This way,
you could go back several weeks at a time to find your last set of valid files.
Next, you will want to go further and create a monthly master set of disks or tapes. You would mark them
accordingly with the name of the month of the year. At the end of every month, you would then make a complete
backup of your data files again. This allows you to then go back several months at a time, if necessary, to review
information or to print historically dated information.
Of course, the last set of files created should be the yearly set of files done at the end of each fiscal year for
archiving purposes. It is also highly recommended that all key master file reports, journals, agings, etc. be run at this
time for hard copy backup.
As an additional protection for those users with tape backup systems, it is still highly recommended that if you have
a floppy disk drive on your computer that a floppy disk backup be made occasionally (at least monthly) in case a
problem were to develop on the tape drive that you are using. Normally, you would not find out there is a problem
until you needed to restore information, and that may be too late.
This all may sound like a considerable amount of work and inconvenience, but consider the investment involved.
Depending on your business, you may have anywhere from one to several hundred people working on your
accounting processing. The largest true cost of a hardware failure or loss of information is not the loss of programs,
disks, or even computers. The largest cost is that of labor and management's time inputting your accounting
information. This can literally represent thousands of man-hours over time. This is a large investment that should be
safeguarded at all times.
These programs are designed for creating and generating accounting information. Unfortunately, they have limited
ability to protect the information created. That is entirely up to you, the user and manager, to protect your
investment. For further information on Backup Procedures and commands, refer to either your System
Administrator manual (under Combination Keys), or the documentation for your operating system.
Page 2-96
Set Up and Maintenance
Chapter 2
Manufacturing Inventory Management User Manual
This page intentionally left blank.
Chapter 2
Set Up and Maintenance
Page 2-97
Manufacturing Inventory Management User Manual
CHAPTER 3
ENTER TRANSACTIONS
This section discusses the different methods of entering transactions utilized by Inventory. These transaction types
include the transferring of inventory items to and from a project, the assembly and disassembly of finished goods as
well as the daily activity normally associated with Inventory. An option is also available that allows you to
“import” transactions from other accounting systems. You should not use these options until your master
information is completely set up.
RECORD PURCHASE ORDERS (IM0101)
This option allows you to enter all inventory orders you make with your vendors (suppliers). This information is
used to track the quantity “On Order” for a specific inventory item. If your Inventory module is integrated with
Purchase Order Entry module, this information would normally be created and updated by this module.
Tracking the “Quantity on Order” is key to sound Inventory Management. Unnecessary duplication of orders can
be avoided if this option is properly maintained. This option will update key management reports designed to assist
you in optimizing your inventory levels.
The information asked in the “Record Purchase Orders” menu option is:
Quantity Ordered
Vendor Number
Description or P.O. #
First, call up the inventory item number you want to enter a Purchase Order for. You may click on the Down Arrow
(F2 by default) to scroll through the Item Number file.
Chapter 3
Enter Transactions
Page 3-1
Manufacturing Inventory Management User Manual
NOTE
Enter either the actual Inventory Item # or Alternate SKU number. The system
will automatically cross reference the actual inventory item # and will display
it in this field. Note: The file position is saved after the Alternate SKU index
is searched.
If this item has a “Unit of Measure Conversion” table defined in its master record, the system will prompt you to
select the unit of measure you will be using on this Purchase Order. Then, enter the Quantity Ordered. Enter the
quantity that corresponds to the unit of measure selected. If your system interacts with Accounts Payable, the vendor
number must match the one set up in that system. You may click on the Down Arrow (F2 by default) to scroll
through the Vendor Number file. The default vendor number will be the primary vendor number set up for this item.
Then enter the Description or P.O. # you want to track these items by. You may use up to twenty characters
(alpha/numeric). This could include the name of a specific vendor or your usual purchase order number. Click on
“Save” to validate this PO into the system.
When you enter a purchase order into the system, the “Quantity On-Order” will increase by the amount ordered and
a historical transaction will be created (provided you are maintaining the transaction file). The quantity on-order
will be updated using the “stocking unit of measure” which is the lowest level of stocking inventory.
For example, if you ordered one (1) pallet of Corner Blocks (which consists of 100 blocks) the On-Order amount
updated would be 100. The system will print an audit trail of the information you just entered and will continue to
print until you exit this option and begin another option or exit the system entirely.
Results:
coIM1dy.dbf - Inventory Item File
- “Quantity On-Order” is increased
coIM2dy.dbf - Transaction File
- History Maintained
Page 3-2
Enter Transactions
Chapter 3
Manufacturing Inventory Management User Manual
RECORD RECEIPTS (IM0102)
This option allows you to record the physical receipt of inventory. If you have utilized the “Record Purchase
Orders” option, the “Quantity On-Order” will be reduced by the amount received. The “Quantity On-Hand”
amount will be increased by the amount received.
This option actually records the receipt of inventory items into your system, regardless of the costing method you
are using.
The information asked in the “Record Receipts” menu option is:
Quantity Received
Unit Cost
Total Cost
Vendor Number
Description or P.O. Number
First, call up the inventory item number you want and enter the Quantity Received. You may click on the Down
Arrow (F2 by default) to scroll through the Item Number file.
NOTE
Enter either the actual Inventory Item # or Alternate SKU number. The system
will automatically cross reference the actual inventory item # and will display
it in this field. Note: The file position is saved after the Alternate SKU index
is searched.
If this item has a “Unit of Measure Conversion” table defined in its master record, the system will prompt you to
select the unit of measure you will be using on this receipt. Next, enter the Unit Cost. If no changes in cost have
been made, you may simply press TAB to assume the last cost for this item. Otherwise, enter the new cost. Enter the
unit cost that corresponds to the unit of measure selected.
The Total Cost will be automatically calculated for you. However, if you do not have the unit cost available to you,
but you do have the Total Cost and the Quantity amount, you may enter “0” for the Unit Cost and enter the Total
Cost instead. The system will then automatically calculate the new Unit Cost for you.
Chapter 3
Enter Transactions
Page 3-3
Manufacturing Inventory Management User Manual
Next, enter the Vendor Number. If your system interacts with Accounts Payable, the vendor number must match
the one set up in that system. The default vendor number will be the primary vendor number set up for this item.
You may click on the Down Arrow (F2 by default) to scroll through the Vendor Number file.
Finally, enter the Description or P.O. # you want to track these items by. You may use up to twenty (20) characters
(alpha/numeric). This could include the name of a specific vendor or your usual purchase order number.
Recording Receipts first reduces the “Quantity On-Order” by the amount received, if you have <clicked> “on” the
box “Reduce On Order” in the Master Configuration. If the quantity received is greater than the “Quantity On
Order,” the system will simply zero out the “Quantity On-Order” field. (You cannot have a negative Quantity OnOrder). The quantity on-order will be updated using the “stocking unit of measure” which is the lowest level of
stocking inventory. If you elect not to use the “Enter Purchase Orders” option, this field will remain at zero.
Next, the “Quantity On-Hand” amount will increase by the amount received. Depending on the type of costing
method you are using, the system will take the quantity received and the unit cost and calculate the new cost. If you
are using the Average, Latest, or Standard Costing Methods, there will only be one costing layer for each inventory
item.
A historical transaction is created (provided you are maintaining the transaction file) and a transaction register is
printed as your entries are validated.
The Quantity and Total Purchase Dollars are added to the current period and Year-to-Date totals automatically.
Results:
coIM1dy.dbf - Inventory Item File
- “Quantity On-Order” is reduced
- “Quantity On-Hand” is increased
- Cost Information is updated
- Historical Information is updated
coIM2dy.dbf - Transaction File
- History Maintained
coIM6.dbf - Cost Layer File
- Cost Information is updated
IM2GL.co - General Ledger Integration File
Updates are:
- Debit to Inventory Asset Account
- Credit to Cash/Accounts Payable Account
RECORD SALES ORDERS (IM0103)
This option allows you to enter all inventory sales orders that you receive from your customers. If your system is
integrated with Sales Order Entry, this information would normally be created through that module. Tracking the
“Quantity Reserved to Ship” is a key feature of the Inventory system. This allows you to “commit” inventory items
for customers so that their orders will be recognized by the system, thus allowing you to determine the true
availability of items even though they may still be in your inventory.
The information asked in the “Record Sales Orders” menu option is:
Quantity Ordered
Customer Number
Description or Sales Order #
First, call up the inventory item number you want and then enter the Quantity Ordered in Data Item #1.
Page 3-4
Enter Transactions
Chapter 3
Manufacturing Inventory Management User Manual
NOTE
Enter either the actual Inventory Item # or Alternate SKU number. The system
will automatically cross reference the actual inventory item # and will display
it in this field. Note: The file position is saved after the Alternate SKU index
is searched.
Next, enter the Customer Number. If your system interacts with Accounts Receivable, the customer number must
match the one set up in that system. Next, enter the Customer Number. If your system interacts with Accounts
Receivable, the customer number must match the one set up in that system. You may click on the Down Arrow (F2
by default) to scroll through the Customer Number file.
Finally, enter the Description or Sales Order # you want to track these items by. You may use up to twenty (20)
characters (alpha/numeric). This could include the customer's name or his purchase order number. When you enter a
Sales Order into the system, the “Quantity Reserved to Ship” will increase by the amount ordered and a historical
transaction is created (provided you are maintaining the transaction file). The “Quantity Reserved to Ship” will be
updated using the “stocking unit of measure” which is the lowest level of stocking inventory.
For example, if you entered a sales order for one (1) pallet of Corner Blocks (which consists of 100 blocks) the
“Quantity Reserved to Ship” amount updated would be 100. The system will print an audit trail of the information
you just entered and will continue to print one until you exit this option and begin another option or exit the system
entirely.
There are two numbers calculated when using this option. “Quantity Reserved to Ship” - which equals the total
amount of sales orders in-house. “Quantity Available” - which is the difference between the “Quantity On Order”
plus the “Quantity On-Hand,” less the “Quantity Reserved to Ship.”
Results:
coIM1dy.dbf - Inventory Item File
- “Quantity Reserved to Ship” is increased
- “Quantity Available” is decreased
coIM2dy.dbf - Transaction File
- History Maintained
Chapter 3
Enter Transactions
Page 3-5
Manufacturing Inventory Management User Manual
Page 3-6
Enter Transactions
Chapter 3
Manufacturing Inventory Management User Manual
RECORD WITHDRAWALS (IM0104)
This option allows you to record the removal of items from your inventory. Normally, sales are the primary form of
withdrawals. If you are interactive with the Point of Sale, Accounts Receivable, or Sales Order Entry systems,
this option may not be necessary.
The removal of inventory items on a timely basis is the key to accurate inventory management. Otherwise, any
reports or inquiries made to the system will not accurately reflect the “true picture” of where you currently stand.
This option will update key management reports designed to assist you in optimizing your inventory levels.
The information asked in the “Record Withdrawals” menu option is:
Quantity Withdrawn
Inventory Price Level
Unit Sales Price
Total Sales Price
Customer Number
Description or Invoice #
First call up the inventory item number you want and then enter the Quantity Withdrawn.
NOTE
Enter either the actual Inventory Item # or Alternate SKU number. The system
will automatically cross reference the actual inventory item # and will display
it in this field. Note: The file position is saved after the Alternate SKU index
is searched.
If this item has a “Unit of Measure Conversion” table defined in its master record, the system will prompt you to
select the unit of measure you will be using on this withdrawal. Next, enter the Inventory Price Level to use as the
sales prices of the inventory item. Inventory allows you to enter up to 10 price levels for each company. You may
click on the price level. The system will automatically calculate the unit sales price from the price level selected.
Chapter 3
Enter Transactions
Page 3-7
Manufacturing Inventory Management User Manual
Enter the Quantity Withdrawn. If this item has a “Unit of Measure Conversion” table defined in its master record,
the system will use the price level defined for the selected unit of measure for Unit Price. Or, enter the Unit Sales
Price if you did not enter a Price Level in the previous question. The system will automatically calculate the Total
Sales Price for you.
If you do not have the Unit Sales Price available to you, but you do have the Total Sales Price and the Quantity
Withdrawn amount, you may enter “0” for the Unit Sales Price and enter the Total Sales Price instead. The system
will then automatically calculate the new Unit Sales Price for you.
Next, enter the Customer Number. If your system is integrated with Accounts Receivable, the Customer Number
must match the one set up in that system. Enter the Description or Invoice # you want to track these items by. You
may use up to twenty (20) characters (alpha/numeric). This could include the name of a specific customer or their
purchase order number. You may click on the Down Arrow (F2 by default) to scroll through the Customer Number
file.
Recording Withdrawals first reduces the “Quantity On-Hand” by the quantity withdrawn. The “Quantity Reserved
to Ship” will also be reduced, if you have <clicked> “on” the “Reduce Reserved” field in the Master
Configuration. All quantities will be updated using the “stocking unit of measure” which is the lowest level of
stocking inventory.
If you record a withdrawal greater than the amount recorded in the “Quantity On-Hand” field, the system will
adjust the quantity to zero. In this situation, the difference between the amount shipped and the quantity on hand will
appear in the “Adjust Quantity” field as a negative quantity.
Next, the program deducts the quantity and cost from the cost information. Depending upon your costing method,
unit cost adjustments will be made to either the LIFO or FIFO cost layers. The unit cost using the other three costing
methods will not be affected. A historical transaction is created and a transaction register is printed as your entries
are validated.
The Quantity Withdrawn, Cost of Goods Sold, and Total Sales Dollars are added to the current period and Year-toDate totals automatically.
Results:
coIM1dy.dbf - Inventory Item File
- “Quantity On-Hand” is reduced
- Cost Layers are reduced when using either LIFO or
FIFO Costing Methods
- “Quantity Reserved to Ship” is reduced
- Historical Information is updated
coIM2dy.dbf - Transaction File
- History Maintained
coIM6.dbf - Cost Layer File
- Cost Layer Information is updated
IM2GL.co - General Ledger Integration File
Updates are:
- Debit to Inventory Cost of Sales Account
- Credit to Inventory Asset Account
Page 3-8
Enter Transactions
Chapter 3
Manufacturing Inventory Management User Manual
RECORD RETURNS (IM0105)
This option allows you to record the return of inventory to stock that had been previously sold. This transaction will
adjust your historical sales and cost of sales figures. If your Inventory is integrated with Accounts Receivable, a
credit memo will perform the same function as executing this option.
Inputting all returns through this menu option will allow you to update your inventory accurately while adjusting
your Cost of Sales and Sales totals. The information asked for in the “Record Returns” menu option is:
Quantity Returned
Inventory Price Level
Unit Sales Price
Total Sales Price
Customer Number
Description or Invoice #
Unit Cost
Total Cost
First, call up the inventory item number you want and then enter the Quantity Returned.
NOTE
Enter either the actual Inventory Item # or Alternate SKU number. The system
will automatically cross reference the actual inventory item # and will display
it in this field. Note: The file position is saved after the Alternate SKU index
is searched.
If this item has a “Unit of Measure Conversion” table defined in its master record, the system will prompt you to
select the unit of measure you will be using on this return. Next, enter the Inventory Price Level to use as the sales
price of the inventory item. Inventory allows you to enter up to ten (10) price levels for each module.
Chapter 3
Enter Transactions
Page 3-9
Manufacturing Inventory Management User Manual
Click on the price level. The system will automatically calculate the unit sales price from the price level entered. If
this item has a “Unit of Measure Conversion” table defined in its master record, the system will use the price level
defined for the selected unit of measure.
Enter the Unit Sales Price if you did not enter a Price Level in the previous question. The system will automatically
calculate the Total Sales Price for you. If you do not have the Unit Sales Price available to you, but you do have the
Total Sales Price and the Quantity Returned amount, you may enter “0” for the Unit Sales Price and enter the Total
Sales Price instead. The system will then automatically calculate the new Unit Sales Price for you.
Next, enter the Customer Number. If your system is integrated with Accounts Receivable, the Customer Number
must match the one set up in that system. You may click on the Down Arrow (F2 by default) to scroll through the
Customer Number file. Enter the Description or Invoice or Credit Memo # you want to track these items by. You
may use up to twenty (20) characters (alpha/numeric). This could include the name of a specific customer or your
return authorization number.
Enter the Unit Cost of the item being returned to stock. This tells the system how to accurately value the
merchandise. The Total Cost in will be calculated for you automatically. If you do not have the Unit Cost available
to you, but you do have the Total Cost and the Quantity Returned amount, you may enter “0” for the Unit Cost and
enter the Total Cost instead. The system will then automatically calculate the new Unit Cost for you.
When you Record a Return to the system, the “Quantity On-Hand” is increased by the amount of the return. The
cost information is updated just as if you were receiving goods in the normal manner, as in “Record Receipts.” The
“Quantity On-Hand” will be updated using the “stocking unit of measure” which is the lowest level of stocking
inventory.
A historical transaction is created and a transaction register is printed as your entries are validated. The current
period sales quantity and dollars, as well as the cost of sales amounts, are reduced.
Results:
coIM1dy.dbf - Inventory Item File
- “Quantity On-hand” is increased
- Cost Information is increased
- Historical Information is updated
coIM2dy.dbf - Transaction File
- History Maintained
coIM6.dbf - Cost Layer File
- Cost Layer Information is updated
IM2GL.co - General Ledger Integration File
Updates are:
- Debit to Inventory Asset Account
- Credit to Inventory Cost of Sales Account
RECORD INVENTORY TRANSFERS (IM0106)
This option is valuable if you are utilizing the multi-warehouse inventory feature. It allows you to transfer inventory
from one warehouse to another. This transfer has no effect on sales or purchases history.
When you Record an Inventory Transfer, the system takes the quantity and cost out of one item and puts it into
another item. All inventory transfers made through this option MUST be made using the “stocking unit of
measure” which is your lowest level of stock (usually each). The transferred cost calculation is based on a per unit
cost of the source item (total cost of transfer divided by the quantity transferred), regardless of the costing method
you are using. Once the item is transferred, the system recalculates the new unit cost.
Page 3-10
Enter Transactions
Chapter 3
Manufacturing Inventory Management User Manual
NOTE
When an item is transferred that is a “Serialized” item, you can only transfer a quantity of
one at a time. The system will prompt the user for the “Source Serial Number” followed
by the “Destination Serial Number.” Therefore, this limits the quantities that may be
processed at a single entry.
The system will first ask you to enter the “Source” inventory item number and then the “Destination” inventory
item number and the Quantity to Transfer.
NOTE
Enter either the actual Inventory Item # or Alternate SKU number. The system
will automatically cross reference the actual inventory item # and will display
it in this field. Note: The file position is saved after the Alternate SKU index
is searched.
If the item being transferred is a Serial Number or Lot Number costing method, the system will prompt you for the
Serial Number or Lot Number being transferred and the destination Serial Numbers or Lot Numbers being received.
As a recommendation, you should not transfer to an item that does not have the same costing method as the source
item.
The “Quantity On-hand” and cost information are decreased in the source inventory item and increased in the
destination item. The historical or sales information is not affected by a transfer. A historical transaction is created
and a transaction register is printed as your entries are validated.
Two transactions are written; one withdrawal and one receipt record. The transaction register will reflect both of
these transactions. There would be no effect on the General Ledger Integration File unless the source and destination
items have different General Ledger account numbers.
Results:
coIM1dy.dbf - Inventory Item File
- “Quantities On-hand” is reduced in Source Item;
Increased in Destination Item
- Cost Information is reduced in Source Item; Increased
in Destination Item
coIM2dy.dbf - Transaction File
- History Maintained
coIM6.dbf - Cost Layer File
- Cost Layer Information is updated
IM2GL.co - General Ledger Integration File
Chapter 3
Enter Transactions
Page 3-11
Manufacturing Inventory Management User Manual
Updates are:
- Credit to Source Item Asset Account
- Debit to Destination Item Asset Account
Example:
Inventory can be maintained on a multi-warehouse basis, as well as be easily transferred between warehouses
using the “Record Transfers” option. The following procedures may be very helpful, too, in utilizing this
feature:
1.
Establish the location as one of the Lot Numbers assigned to a specific inventory item. The inventory item
will need to be classified as a “Lot Number” costing method. The “cost label” can then describe the
warehouse location. For example, the cost label may be “Warehouse No.” or “Truck Number” or “Store
Number.”
2.
When adding the inventory for the warehouses, you will add Lots to each inventory item to define the
inventories being stored at each location. Use the “Enter Initial Cost Layers” option to add the warehouse
information as a lot number. For example, you may have two trucks (Numbers 101 and 105) which store
inventory. Each inventory item will need to be classified as a Lot Number costing method. You will then
add a Lot Number 101 and 105 for each inventory item. These lot numbers will then store the quantities
stocked on each truck.
3.
Inventory transfers of stock from one location to another can be recorded through the “Record Transfers”
option. Inventory will be transferred out of the one item's lot number, to arrive at a per unit cost that will be
received into the destination item's lot number.
4.
When printing inventory detailed transaction or cost layer reports you may include the inventory for all
locations, groups of locations, or a single location. This reporting flexibility is handled by the report,
“mask” for Serial/Lot Number. Every time you print an inventory detailed transaction or cost layer report
you can specify a Serial/Lot Number mask to include only the inventory items within a certain location.
This masking concept is explained in more detail in your System Administrator manual.
RECORD INTER-COMPANY TRANSFERS (IM0107)
This option is valuable if you are utilizing the multi-location inventory feature. It allows you to transfer inventory
from one physical location to another.
Inventory can be maintained on a multi-location basis, as well as be easily transferred between warehouses using the
“Record Inter-Company Transfers” option. Conceptually, each location will have its own company set up
including the General Ledger and Manufacturing Inventory Management modules. This will facilitate the
requirement to track the “Due To/Due From” entries that are created when the inventories are transferred from the
central location to the individual site locations.
Audit Trails will be printed to verify the transfer procedure for the transaction. The source company's audit report
will show the inventory withdrawn, while the destination company's audit report will show the receipt of the
inventory. All transfer information will be stored in the inventory transaction files in both companies. The Inventory
Detailed Transaction Report may be run to access this information at a later date.
The system will first ask you to enter the inventory item number you will be transferring. The next data item will ask
you to enter the “Quantity to Transfer.” Enter the transfer quantity using the “stocking unit of measure” which is
the lowest level of stocking inventory. This option does not support the Unit of Measure Conversion procedure.
NOTE
Enter either the actual Inventory Item # or Alternate SKU number. The system
will automatically cross reference the actual inventory item # and will display
it in this field. Note: The file position is saved after the Alternate SKU index
is searched.
Page 3-12
Enter Transactions
Chapter 3
Manufacturing Inventory Management User Manual
The final data item on this screen will request you to enter the location (company #) you will be transferring to. You
may enter the company number or click on the Down Arrow (F2 by default) to scroll through the available choices.
The item numbers must be the same in both locations. If the item number does not exist in the destination company,
the system will warn you and ask if you wish to add this item number to the destination location.
If you click on “Yes,” the item will be added for you and you may continue the transaction. Otherwise, the system
will prompt you for another transaction. Keep in mind that the Inventory Asset and Cost of Sales account set up in
the source item number will also be used in the destination. This requires that the chart of accounts be exact in this
case. Otherwise the system will use the “suspense” account for this transaction.
After validation of the screen, if the item being transferred is a Serial Number or Lot Number costing method, the
system will prompt you for the Serial Numbers or Lot Numbers being transferred and the destination Serial Number
or Lot Number being received. It is highly recommended that you create separate Accounts Receivable and
Accounts Payable accounts to track these special entries which are considered Inter-Company transactions. This will
enhance the analysis if you plan on consolidating your General Ledgers to get the Big Picture.
NOTE
When an item is transferred that is a “Serialized” item, you can only transfer a quantity of
one at a time. The system will prompt the user for the “Source Serial Number” followed
by the “Destination Serial Number.” Therefore, this limits the quantities that may be
processed at a single entry.
You may add an Accounts Receivable and Accounts Payable account for each location (company #) that you wish
to perform transfers to. The system does NOT update any Accounts Receivable Customers with these transactions.
The following explains the transactions the system will create when a transfer is performed.
Company ONE - Source Company
Company TWO - Destination Company
A transfer of ten (10) Corner Blocks
(Item # 10 601 78511) is made from Company ONE to Company TWO. The unit cost is $ 3.50 each.
Entries made in the Company ONE General Ledger:
Account Description
Debit
Inventory
AR – Due From two
Credit
(35.00)
(35.00)
The system will read the Location’s File from the destination company (TWO) and use the Accounts Receivable
account defined. The Inventory account used will be the Asset account defined on the item number's master record
in the source or originating company (ONE).
Chapter 3
Enter Transactions
Page 3-13
Manufacturing Inventory Management User Manual
If you have the General Ledger Master Configuration option “Automatically Post Integration Modules” clicked to
“On,” the transaction will post directly to the General Ledger in company (ONE) while a General Ledger
Integration File will automatically be created for company (TWO). This file must be posted manually in Company
(TWO) to insure all General Ledger results are reflected on that company’s financial statements.
Entries made in the Company TWO General Ledger:
Account Description
Debit
Inventory
35.00
AP – Due to One
Credit
(35.00)
The system will read the Locations File from the source or originating company (ONE) and use the Accounts
Payable account defined. The Inventory account used will be the Asset account defined on the item number's master
record in the destination company (TWO).
RECORD ASSEMBLY PRODUCTIONS (IM0131)
This option allows you to record the manufacture of assemblies or sub-assemblies. The components inventory will
be reduced and the assembly inventory increased by this option. When you select this option, you will be asked for
the assembly inventory item to record production. This item must have a current bill of materials or you will not be
able to produce it.
NOTE
Enter either the actual Inventory Item # or Alternate SKU number. The system
will automatically cross reference the actual inventory item # and will display
it in this field. Note: The file position is saved after the Alternate SKU index
is searched.
Once the item is selected, the following information will be asked:
Quantity Produced
Job Number
Description/Reference #
Enter the Quantity Produced of the assembly. This quantity must be a positive number. Next, enter your specific
in-house Job Number, if applicable. This item is solely for your reference. Then, enter the Description or
Reference # you want to track this transaction by. You may use up to twenty (20) characters (alpha/numeric).
Page 3-14
Enter Transactions
Chapter 3
Manufacturing Inventory Management User Manual
When you “Save” the above information, the system will perform the following two verification checks:
Check if Valid
Components
The system will check each component on the bill of materials to insure
that it is a valid inventory item.
Check if Sufficient
Quantity
The system will check the “Quantity On-Hand” of each component to
insure that sufficient quantity is on hand to record the production.
If either of these error conditions occurs, the system will display which problem has occurred and display the
component's item number.
You will now be able to exit this option and research the problem before any update occurs. If you have turned
“On” the feature “Turn Component Quantity Checking Off” in the Master Configuration, the system will ignore
the insufficient quantity error and allow you to continue the production. If you have turned “On” the feature
“Produce Sub-Assemblies Automatically,” the system will automatically produce all sub-components necessary for
the production of this item.
If no problem is encountered, the system will begin the following updates:
For Components
The component quantity used will be withdrawn from each inventory item.
This quantity is the total of the Quantity Produced times the bill of
materials quantity for each component. The “Usage Quantity” for each
component will also be increased by the component quantity used.
For By-Products
The by-product quantity produced will be added to each inventory item as a
receipt. This quantity is the total of the Quantity Produced times the bill
of materials quantity for each by-product. The unit cost of the receipt will
be the unit cost set up in the bill of materials. The “Quantity Produced”
for each by-product will also be increased by the by-product quantity
produced.
For the Assembly
The Quantity Produced will be added to this inventory item as a receipt.
The cost of the receipt will be the total cost withdrawn from all components
less the total cost of all by-products produced. The “Quantity Produced”
for the assembly will also be increased by the Quantity Produced.
A “Production” transaction will be saved. If any of the components being used as part of the assembly are
serialized or lot # items, a screen will be displayed prompting you to enter the respective information as shown
below.
Chapter 3
Enter Transactions
Page 3-15
Manufacturing Inventory Management User Manual
Enter a Serial Number into the screen and if it is invalid a scrolling near match screen will appear to allow you to
choose from valid Serial Numbers in stock. Once a valid Serial Number is selected, you may validate it by clicking
on “Save” as shown below.
If you click on “Select” the system will take you back to the scrolling screen to choose a different number. Click on
“Cancel” to exit this option. The system will print an audit trail of the information you just entered and will
continue to print until you exit this menu option and begin another option or exit the system entirely.
Results:
coIM1dy.dbf - Inventory Item File
For Assembly:
- “Quantity On-hand” is Increased
- Cost Information Updated
- “Quantity Produced” is Increased
For Components:
- “Quantity On-Hand” is Decreased
- Cost Information Updated
- “Usage Quantity” is Increased
For by-products:
- “Quantity On-hand” is Increased
- Cost Information Updated
- “Quantity Produced” is Increased
coIM3.dbf - Assembly File
- Components' Unit Cost is Updated
Page 3-16
Enter Transactions
Chapter 3
Manufacturing Inventory Management User Manual
coIM2dy.dbf - Transaction File
- History Maintained
IM2GL.co - General Ledger Interaction File
If Interactive:
- Debit to Assembly Asset Account
- Credit to Component Asset Account
- Debit to By-Product Asset Account
RECORD DISASSEMBLY (IM0132)
This option allows you to record the disassembly or breakdown of manufactured items. Cost is distributed to
components based on the average unit cost of each specific component within the existing assemblies. When you
select this option, you will be asked for the assembly inventory item to record disassembly. This item must have a
current bill of materials or you will not be able to select it.
NOTE
Enter either the actual Inventory Item # or Alternate SKU number. The system
will automatically cross reference the actual inventory item # and will display
it in this field. Note: The file position is saved after the Alternate SKU index
is searched.
Once the item is selected the following information will be asked:
Quantity Disassembled
Job Number
Description/Reference #
Enter the Quantity Disassembled of the assembly. This quantity must be a positive number. Next, enter your
specific in-house Job Number, if applicable. This item is solely for your reference. Then, enter the Description or
Reference # you want to track this transaction by. You may use up to twenty (20) characters (alpha/numeric).
Chapter 3
Enter Transactions
Page 3-17
Manufacturing Inventory Management User Manual
When you validate the above information, the system will perform the following two verification checks:
Check if Valid
Components
The system will check each component on the bill of materials to insure
that it is a valid inventory item.
Check if Sufficient
Quantity
The system will check the “Quantity On-Hand” of the assembly to ensure
that there is sufficient quantity to disassemble.
If either of these error conditions occur, the system will display which problem has occurred and display the
component's item number, if applicable. You will now be able to exit this option and research the problem before
any update occurs.
If no problem is encountered, the system will begin the following updates:
For Components
The component quantity returned will be received to each inventory item.
This quantity is the total of the Quantity Produced times the bill of
materials quantity for each component. The unit cost for the receipt is the
last unit cost for the component in the bill of materials. The “Usage
Quantity” for each component will also be decreased by the component
quantity returned.
For By-Products
The by-product quantity reduced will be withdrawn from each inventory
item. This quantity is the total of the Quantity Produced times the bill of
materials quantity for each by-product. The unit cost of the withdrawal will
be the unit cost set up in the inventory for each by-product. The “Quantity
Produced” for each by-product will also be decreased by the by-product
quantity reduced.
For the Assembly
The Quantity Disassembled will be withdrawn from this inventory. The
cost of the withdrawal will be the total cost withdrawn from the assembly
inventory, using the normal costing method. The “Quantity Produced” for
the assembly will also be decreased by the Quantity Disassembled.
Cost Variance
Since the assembly and by-products are withdrawn according to the normal
costing method (e.g., LIFO, FIFO, Average, Latest or Standard) and the
components are restocked according to the last production unit cost, there is
a possibility of a variance between the cost figures.
If any of the components being used as part of the disassembly are serialized or lot # items, a screen will be
displayed prompting you to enter the respective information as shown below.
Page 3-18
Enter Transactions
Chapter 3
Manufacturing Inventory Management User Manual
Enter a Serial Number into the screen and if it is invalid a scrolling near match screen will appear to allow you to
choose from valid Serial Numbers in stock. Once a valid Serial Number is selected, you may validate it by clicking
on “Save” as shown below.
If you click on “Select” the system will take you back to the scrolling screen to choose a different number. Click on
“Cancel” to exit this option. If this cost variance occurs, it will be printed on the audit trail and updated into the
General Ledger, if interactive. If you have specified that inventory transaction detail should be maintained, then
“Disassembly” and “Cost Variance” transactions will be saved.
The system will print an audit trail of the information you just entered and will continue to print until you exit this
option and begin another option or exit the system entirely.
Results:
coIM1dy.dbf - Inventory Item File
For Assembly:
- “Quantity On-hand” is Decreased
- Cost Information Updated
- “Quantity Produced” is Reduced
For Components:
- “Quantity On-Hand” is Increased
- Cost Information Updated
- “Usage Quantity” is Decreased
For By-Products:
- “Quantity On-hand” is Decreased
- Cost Information Updated
- “Quantity Produced” is Reduced
coIM2dy.dbf - Transaction File
- History Maintained
- Cost Variance Recorded
IM2GL.co - General Ledger Interaction File
If Interactive:
- Credit to Assembly Asset Account
- Debit to Component Asset Account
- Credit to By-Product Asset Account
If Cost Variance:
- Debit or Credit to Shrinkage Account
Chapter 3
Enter Transactions
Page 3-19
Manufacturing Inventory Management User Manual
TRANSFER TO A PROJECT (IM0121)
This option allows you to transfer inventory to various projects currently being processed or tracked by the Job Cost
Main Module. The system will transfer the quantities (if quantity tracking is turned on in Job Cost) and costs to the
project detail.
When you first execute this option, the system will ask you for the inventory item to transfer. You may enter the
item number, or click the Down Arrow (F2 by default) to scroll through the inventory file to make your selection.
NOTE
Enter either the actual Inventory Item # or Alternate SKU number. The system
will automatically cross reference the actual inventory item # and will display
it in this field. Note: The file position is saved after the Alternate SKU index
is searched.
The system will then ask for the project information to transfer the item to. There are three data items that are used
to enter this information.
The following table describes these data items:
Job
This is the Job/Project number of the job or project that the inventory item will be
transferred to. You may enter the job or project number, or click the Down Arrow
(F2 by default) to scroll through the Job/Project file to make your selection. After
the project has been selected, the project description will be displayed beside the
project number. The Job/Project number you enter in this field will be retained for
the next transaction, when entering a series of transactions.
Phase/Sub
This item contains the Cost Code that will be used to record the cost information.
You may enter the Cost code number, or click the Down Arrow (F2 by default) to
scroll through the Cost and Billing Code file to make your selection.
If you select a Billing Only type code, you will be given a warning and you must reenter the code. After you have selected the Cost Code, the description will be
displayed beside the Cost Code.
Emp/Sub
This data item contains the project's twenty character additional detail description
that is used to categorize the Cost Codes. If the Job Cost Main Module is
configured to sort this detail description, the default will be the inventory item
number that has been selected to transfer.
Page 3-20
Enter Transactions
Chapter 3
Manufacturing Inventory Management User Manual
After you enter the detail description, the system will search the project detail file for an existing Cost Code set up
for the selected project. If the detail was not found, a scrolling screen will be displayed from which you make your
selection. If the Job Cost Main Module has been configured to not require cost budgets, you may also click on the
“Yes” button to add the new project detail.
After all of the project information has been entered, the screen will be displayed showing the item being
transferred, the project information that the item is being transferred to, and three data items: the quantity to transfer,
a transaction reference number and whether or not you wish to Transfer Bill of Material Items (instead of the
finished product).
At this point you may enter the quantity you wish to transfer to the project.
If you enter a quantity larger than the available quantity, you will be given a warning and allowed to re-enter the
quantity. You may also enter a Transaction Reference Number which will be updated to the Inventory
Transaction File and the Job Cost Transaction File will appear on the “Inventory Detail Report.”
If you wish to transfer the Bill of Material Items instead of the Finished Good Part Number, <click> “on” the
“Transfer BOM” box, otherwise the manufactured item will be transferred. The Bill of Material items must be setup
as a budgeted item unless the Inventory Master Configuration has been configured to not require cost budgets.
Once all information has been entered, and you click on the “Save” button to validate, the system will transfer the
items from inventory at the current calculated cost (based on your Costing Method), and record the quantity (if
quantity tracking is turned on) and costs in the project detail.
Chapter 3
Enter Transactions
Page 3-21
Manufacturing Inventory Management User Manual
This transaction will update the Job Cost Transaction File with the Inventory Item Number or the Bill of Material
Item Numbers as the Job Cost transaction detail description, providing an audit trail of the transfer. A transaction
report will print as each transaction is entered.
Results:
coIM1dy.dbf - Inventory Item File
- “Quantities On-hand” is Reduced in Source Item;
Increased in Destination Cost Code
- Cost Information is Reduced in Source Item;
Increased in Destination Cost Code
coIM2dy.dbf - Transaction File
- History Maintained (optional)
IM2GL.co - General Ledger Interaction File
Updates are:
- Credit to Source Item Asset Account
- Debit to Destination Item Asset Account or WIP
coJC1dy.dbf - Project File
- Historical Cost Information Updated
coJC2dy.dbf - Project Detail File
- Historical Cost Information Updated
- Current Cost Information Updated
coJC3dy.dbf - Transaction File
- Transaction Record Added
TRANSFER FROM A PROJECT (IM0122)
This option allows you to transfer inventory from your projects back into your inventory. The system will transfer
the quantities (if quantity tracking is turned on in Job Cost) and costs out of the project detail and record the
receipt (at cost) in inventory. This is the primary method of transferring inventory items that have been set up in the
Job Cost Main Module as “custom” or “batch” manufactured items back to inventory as finished or assembled
items.
This provides the capabilities of applying additional costs to items such as variable labor costs from Payroll, other
material or freight costs directly from Accounts Payable and Purchase Order. When used in this method, the
combination allows for complete calculation of costs on manufactured items or batches of items before being placed
back into inventory for resale or use in other manufactured items.
When these items are transferred back into inventory, they now reflect within their cost per unit, all associated costs
for manufacturing. The affect of this transfer is to relieve the “Work in Process” amounts maintained on the project
and to increase the value of inventory assets. If items are to be manufactured for resale and billed through the normal
invoicing methods in Accounts Receivable, Point of Sale, or Sales Order Entry, this is the option to select.
If items have been custom manufactured on a project and will be billed directly to the customer for that project, then
the option to “Perform Project Billing” found in the Accounts Receivable module should be used instead of first
transferring them back to inventory.
When you first execute this option, the system will ask you for the inventory item number to transfer. You may enter
the item number, or click the Down Arrow (F2 by default) to scroll through the inventory file to make your
selection.
Page 3-22
Enter Transactions
Chapter 3
Manufacturing Inventory Management User Manual
NOTE
Enter either the actual Inventory Item # or Alternate SKU number. The system
will automatically cross reference the actual inventory item # and will display
it in this field. Note: The file position is saved after the Alternate SKU index
is searched.
The system will next ask for the Job/Project information to transfer the item from. This would be the “Originating
Job.” There are three data items that are used to enter this information.
The following table describes these data items:
Job
This is the Job/Project number of the job/project that the inventory item is
to be transferred from. You may enter the job/project number, or click the
Down Arrow (F2 by default) to scroll through the Job/Project file to make
your selection. After the job/project has been selected, the project
description will be displayed beside the job/project number.
Phase/Sub
This item contains the Cost Code that will be used to remove the cost
information. You may enter the Cost code number, or click the Down
Arrow (F2 by default) to scroll through the Cost and Billing Code file to
make your selection. If you select a Billing Only type code, you will be
given a warning and must re-enter the code. After you have selected the
Cost Code, the description will be displayed beside the Cost Code.
Emp/Sub
This data item contains the project's twenty character additional detail
description that is used to categorize the Cost Codes. If the Job Cost Main
Module is configured to sort this detail description, the default will be the
inventory item number that has been selected to transfer. After you enter
the detail description, the system will search the project detail file for an
existing Cost Code set up for the selected project. If the detail was not
found, a scrolling screen will be displayed from which you make your
selection.
If the Job Cost Main Module has been configured to not require cost budgets, you may click on “Add” to add the
new project detail or click on “Select” to go the scrolling list to choose another existing item.
Chapter 3
Enter Transactions
Page 3-23
Manufacturing Inventory Management User Manual
After all of the job/project information has been entered, the screen will be showing the job/project information that
the item is being transferred from, the inventory item being transferred to, and four data items containing the
quantity, unit cost, extended cost to transfer and a transaction reference number.
The following table describes these data items:
Quantity to
Transfer
This data item contains the quantity that will be transferred from the project
back into inventory.
Unit Cost
This is the unit cost which will be used to calculate the total extended cost of the
transfer. The default value will be calculated from the project detail's Project-toDate Cost divided by the Project-to-Date Quantity.
Total Cost
This is the total, extended, amount of the cost to transfer. This value will be
calculated from the quantity and unit cost entered above.
Reference Number
Enter a Transaction Reference Number which will be updated to the Inventory
Transaction File and the Job Cost Transaction File will appear on the Inventory
Detail Report. This reference number will be helpful in distinguishing specific
information about a particular job or project.
Page 3-24
Enter Transactions
Chapter 3
Manufacturing Inventory Management User Manual
Once the above items have been entered, and you click on the “Save” button, the system will transfer the items from
the project detail back into inventory at the specified cost. This transaction will update the Job Cost Transaction File
with the Inventory Item Number as the Job Cost transaction description, providing an audit trail of the transfer.
A transaction report will print as each transaction is entered.
Results:
coIM1dy.dbf - Inventory Item File
- “Quantities On-hand” are Increased in Destination Item
- Cost Information is Reduced in Source Cost Code
coIM2dy.dbf - Transaction File
- History Maintained (optional)
IM2GL.co - General Ledger Interaction File
Updates are:
- Credit to Source Item Asset Account or WIP
- Debit to Destination Item Asset Account
coJC1dy.dbf - Project File
- Historical Cost Information Updated
coJC2dy.dbf - Project Detail File
- Historical Cost Information Updated
- Current Cost Information Updated
coJC3dy.dbf - Transaction File
- Transaction Record Added
IMPORT TRANSACTIONS (IM0602)
The File Import options allow you to bring information into the appropriate modules from text, or ASCII files.
Word processors, spreadsheets, databases, or many other types of programs may create these text files. This option
is designed to allow you to import Inventory Transactions directly into the Inventory module. All journals will be
updated as if processed as a normal transaction from within the Inventory program. At this point, you may choose
to print the standard map file or create a map file on the hard drive to modify. To print the map file, click on the
“Print Map” button. To create a map file in the program directory, click on the “Create Map” button. This will
print out the format in which this option is looking for information to be organized in.
The Fixed Length ASCII file logical record length for this transaction import file is 107 bytes.
Chapter 3
Description
Type
Position Length
Item #
STRING
1
20
Trans. Date
STRING
21
6
Trans. Type (1-5)
CHAR
27
1
Vendor/Cust #
STRING
28
10
Description
STRING
38
30
Quantity
DOUBLE
68
10
Total Cost
DOUBLE
78
15
Total Sale
DOUBLE
93
15
Enter Transactions
Page 3-25
Manufacturing Inventory Management User Manual
If it is not in this format, you will encounter errors during the import process or not be allowed to continue at all.
The File Import features allow for the importing of “text” file information into the Infinity POWER program. This
includes the ability to import Master File information, such as Charts of Accounts, Customer Names and Addresses,
Employees, Vendors, etc. as well as “transaction” information for those master files, such as invoices and credit
memos, journal entry updates, etc.
These “text” files may be created by a wide range of sources, which may include word processors, spreadsheets,
databases, or other types of accounting programs. These sources may also include other computer systems that
utilize different operating systems and functions, such as mainframes, minicomputers, or various types of PCs.
After printing or creating the map file, you will then be prompted for three (3) data items.
1) Import File Format
2) Import File Name
3) Process Import File
The “Import File Format” is prompting you to select the type of file you will be using during the import process.
There are three choices:
1)
Fixed Length (ASCII)
2) Variable Length (ASCII)
3) Comma Delimited (.PRN)
These three choices are described below.
Fixed Length ASCII Files
Fixed Length ASCII “text” Files are those files in which each data field starts on a specific number of characters
from the start of each record. There should be no separators between data fields and each record should be the exact
same length. The program recognizes each record by the number of characters that is expected per record. There is
no Carriage Return/Line Feed sequence necessary to separate records.
For example:
1
11125 Cash In Bank - Can
1 0
0
0
0
0
0
0
0
0
0
0
0
0
1
68500 Lodging Expense
12 0 100 200 300 400 500 600 700 800 900 1000 1100 1200
Variable Length ASCII Files
Variable Length ASCII “text” Files are those files in which each data field starts on a specific number of characters
from the start of each record and each record is separated by a Carriage Return/Line Feed sequence {CR}{LF}.
There should be no separators between data fields. The program recognizes each record by the Carriage Return/Line
Feed sequence, which allows for other data to be in the file.
For example:
1
11125 Cash In Bank - Can
1 0
0
0
0
0
0
0
0
0
0
0
0
0 {CR}{LF}
1
68500 Lodging Expense
12 0 100 200 300 400 500 600 700 800 900 1000 1100 1200 {CR}{LF}
Comma Delimited *.PRN Files
Comma Delimited *.PRN “text” files are those files in which text type data fields are enclosed in double quotes (“),
and all data fields are separated by commas (,). The text files must contain the information for one record on a single
line of the file. Each line, or record, must be terminated by a Carriage Return/Line Feed sequence {CR}{LF}.
Page 3-26
Enter Transactions
Chapter 3
Manufacturing Inventory Management User Manual
For example, a transaction import should look like this:
1,"11125","Cash In Bank - Can",1,0,0,0,0,0,0,0,0,0,0,0,0,0,0{CR}{LF}
1,"68500","Lodging Expense",12,0,100,200,300,400,500,600,700,800,900,1000,1100,1200{CR}{LF}
Click on one of the three choices to define the type of file you will be using. You will be prompted to enter the
name of the file to be imported. You may use any name consistent with Windows naming structures. You will have
the option to browse for your import file, which may be located anywhere on your hard drive or any network you
may be attached to.
Next, you will be prompted as to whether the system should print an audit trail first before starting the import
process. It is highly recommended that you click on this option. It is selected by default. This will allow you to see if
there are any discrepancies within your “import” file.
The system will first print an audit trail of what will be imported into the Infinity POWER accounting module.
Upon completion of this report, you will be prompted whether or not to go ahead and process the import of data.
If there are any discrepancies that make your import file incompatible, the Infinity POWER import options will not
allow the information to update the system. This audit trail would then serve to assist you in correcting any
problems.
Once you have answered these three questions, click on the “Start” button to begin the process and the system will
begin to either print the audit trail first or go ahead and perform the “import” process based upon your answer. If
you have chosen to print the audit trail, the system will display the printer option screen for you to choose your
method of output.
The screen will then reflect the number of transactions that have been posted to the system as it goes through the
import process. Once it completes the “import” process, the system will return you to the screen and if there are
additional files to import, you may click on the “Next” button, otherwise, click on the “Close” button to return you
to the Menu Bar.
Below is a more comprehensive description of how Import Modules work within the Infinity POWER programs.
File Import Modules Overview
Because the concept of transferring information from one system or program to another via “text” interface files is
more technical than the normal operation of most word processors or the Infinity POWER modules, this
documentation must assume that the reader has some understanding of the terms and concepts explained here.
Otherwise, you may want to work with your reseller or consultant regarding the actual implementation and use of
these modules with your Infinity POWER programs.
The ability to import information into the Infinity POWER modules provides the user with several benefits.
•
It allows the rapid conversion and setup from other computer based accounting systems, without
the manual re-keying of information that is normally required.
•
It allows the batch entry of transactions processed in other specialized or custom software
programs. This may even include updates from Infinity modules running at different locations or
on different network or UNIX fileservers.
•
It allows the update of the accounting system files from remote transaction processing sites.
Please note that the Infinity POWER programs do allow for the exportation of all accounting reports to text files.
The formats of these standard Infinity POWER reports, however, are not compatible with the use of any of the
Infinity POWER File Import options. The order in which information is sent to “text” files and their format do not
correspond to the formats that the File Import Modules require.
The Infinity POWER Report Writer program, however, does provide the user with this ability to organize
information from the various Infinity POWER programs into the formats required by the File Import options.
Chapter 3
Enter Transactions
Page 3-27
Manufacturing Inventory Management User Manual
The text files that contain the information to be imported must be in one of three forms:
1) Fixed Length ASCII Records
2) Variable length ASCII Records
3) Comma Delimited Text
These three types of files are discussed earlier in this section. For all three types of text files, the format of the data
must be accurate for the import options to read the correct information. Each field, or data item, must be in the
correct order across the line, or record, and in the correct format depending on the type of text file.
Each of the import options allow you to print a transaction journal as the import is being performed. This provides
an audit trail of the information being updated into your data files. This report will also indicate if the import of a
record was not performed due to errors encountered in the importation process.
Some of the import file structures allow you to specify “action numbers.” These “action numbers” tell the system
whether you want the information being imported to be added, changed, or deleted. The action numbers are listed
below.
1 = Add Record to file
2 = Change record in file
3 = Delete record in file
4 = Add record if it doesn't exist, otherwise change it
Some of the transaction import file structures require a field called “Cont? (0=NO, 1=YES).” This field indicates to
the import programs whether or not the transaction is continued in the next record. For example, in the Accounts
Receivable Transaction import, there may be several lines of detail on an invoice that is being imported. Each line
should be placed in a separate record of the text file with a “1” for YES to indicate that the transaction is continued.
The last line should contain a “0” for NO indicating the end of the transaction.
For each transaction-related import, there are certain fields that are required and used by the system to verify the
validity of the information being imported. These fields are marked in the field definition section with a asterisk (*).
For each type of import that you wish to perform, the import text file must contain all of the fields specified for that
particular import option. Any text fields that are blank will overwrite existing fields in the data files. Also, numeric
fields that are blank will be considered as zero.
To allow the import of only a subset of the import structure, you must have a custom “MAP” file created. This will
allow you, for example, to only update the retail price in Inventory without affecting, or requiring, any other fields.
You may obtain or create custom import “MAP” files one of two ways. You may first click on the “Create Map”
button at the point in the program when you have selected the “import” option. The result is to produce a
“XXXXXX.map” file in the program directory. The “Xs” in this file name represent the actual name of the Infinity
POWER option within the program (e.g., GL0603.MAP).
The “XXXXXX.map” file is used by the import option to override the default layout of the import transaction
file. By using file editing tools such as EDIT under DOS, Notepad under Windows or “vi” under UNIX, you may
create a customized import record layout. Whenever a “XXXXXX.map” file is created, it overrides the default
predefined import record layout.
Items can be deleted entirely from the record layout file or moved from one position to another. If a field is not
specified in an import file, that field may be deleted from the record layout file.
NOTE: “Key Value” fields must be present in the import file and cannot be deleted from the record layout file.
“Key Value” fields are those fields that are designated with an asterisk (*) in the documented import record layouts.
You may also have customized “MAP” files created for you by calling the Data Pro Support Services group at
727-803-1550.
Page 3-28
Enter Transactions
Chapter 3
Manufacturing Inventory Management User Manual
Sample Import Transactions File
Chapter 3
Enter Transactions
Page 3-29
Manufacturing Inventory Management User Manual
Page 3-30
Enter Transactions
Chapter 3
Manufacturing Inventory Management User Manual
This page intentionally left blank.
Chapter 3
Enter Transactions
Page 3-31
Manufacturing Inventory Management User Manual
CHAPTER 4
PRINT REPORTS
This section includes a description and sample of each report generated by the Inventory module. The reports
included here reflect sample information input into the sample company and only reflect an example of the way a
company may utilize certain features within this module.
All modules are designed to be extremely flexible in the way you may organize data and print the corresponding
reports accordingly. Do not assume that these reports reflect the only way in which the reports may be structured
and/or printed. These reports may be used as a cross reference to determine which reports you should be using in
your daily activities or when trying to locate specific types of information.
The equations used to calculate the amounts on the reports, and how these reports are generated (through the use of
various questions asked by the system) are discussed here. Reports illustrate the results of transactions from the
options within this module or from another integrated module. Reports do not update the actual files.
STANDARD FEATURES FOR REPORTS
Here is a listing of some standard features, which can be utilized with all reports:
CTRL+O (Output Options)
Destination - Printer Choice, E-Mail or Display
Report Titles
E-mail Settings - Recipient and Subject
Font Attributes
Report Print Options
Displayed Report Options
Range of Accounts
Data Record Retrieval
Report Sorting Preference
Masking (Wildcards)
Period to Report On
Cancel the Print Job
CTRL+O (Output Options)
You are able to change your Output Options (printing preference) at any time when you are within the Infinity
POWER programs. By Pressing CTRL O, an overlay screen will appear with your available output options. You
may choose to print to a Printer, send the report as an e-mail, or display the report on the screen.
If you select “Printer,” this will cause the output to be generated to whichever printer device you currently have as
“active” in the Windows operating system. You may choose to change printers by <clicking> on the “Print
Options” button and select another printer that you have set up in your Windows program. Also, by choosing
“Printer,” you have the capability of changing the title of the report you will be printing. The standard report name
will be shown, however, if you wish to overwrite it with another title, you may do so.
If you select “E-Mail,” this will cause the output to generate an e-mail to a specific recipient. On the Output
Options screen, you will need to define the recipient of the e-mail in the “To” field. Make sure to enter their e-mail
address and not just their name. The “Subject” field is automatically assigned the name of the report you will be
generating, however, if you wish to overwrite it with another subject, you may do so.
NOTE
Be sure you have defined your “E-Mail Host” in the Output section of the
Configuration Settings, otherwise, this feature will not be operational. Your
name should be your e-mail address, not your actual name.
Chapter 4
Print Reports
Page 4-1
Manufacturing Inventory Management User Manual
If you select “Display,” this will cause the output to generate the report to the screen. All reports are generally
created in an 80 or 132 column format. You may size your output window both larger and smaller to allow you to
view as much of the report on the screen at once as possible.
If you are used to using the Windows Character-based or UNIX version of Infinity POWER, you realize that you
may also send reports to a “text” file for a myriad of uses. You may do the same in Windows, however, you must
set up a “printer” type in Windows that will direct the output to the file. Once this is done, any time you want to
direct reports to a file, you simply select the new printer definition under Windows.
The principal applies if you want to print any report or form as a FAX document. Define the FAX software as a
printer in Windows and simply redirect your output to that specific printer.
Font Attributes
Within the Output Options window, you can modify font attributes such as color, size, and styles for each report.
This allows you to be creative in your report styles whether formal, informal, or classic professional, depending on
the purpose of the report. You may choose a more informal style for internal reports, but select a more elegant style
for a customer. Selecting a font in the Printer Settings section affects printed reports only. If you select “Print” as
the output destination, this is the font that will be applied to the printed report.
You can also select a font style for the display destination, independent of the Print Settings font selection. In the
Display Settings section of the screen, <click> on the Fonts… button to open the Font window. From this window,
select different fonts, add special effects such as underlining, change the color, font style (bold, italics, bold italic,
etc), and the font size. When a report is selected in display output, this is the font that will be applied when the
report is displayed on the screen.
NOTE
If you send a report to print directly from the displayed output screen, (Send
menu option or the Send to another output destination toolbar options) the
font selected in the Printer Settings will be the font that is applied to the
printed report, regardless of what font settings are selected for the Display
Settings. Font attributes are unique for Printer Settings and Display settings
due to the fact that your printer and the Infinity POWER system may not
support all of the same fonts.
After selecting font attributes for either the Printer Settings or Display
Settings, <clicking> the corresponding Save button will make those current
selections the default settings. If you select different attributes between
displaying/printing reports, you must <click> the Apply button for the new
font attributes to be applied. Otherwise, the selections made for the previous
report (within the same session), will be applied to the current report. Once
you log out of the system, the last saved printer and display settings will be
applied to the reports when you log back into the system.
If E-Mail is selected as the report output destination, the actual report will be embedded within the e-mail message
as an HTML display in a fixed Courier font so that columns will automatically adjust to align properly.
Report Print Options
In the Printer Settings section, <click> on the Options… button to open the Print window. You can select the
entire report, the current page, or a range of pages, or a specific page to be printed. You can also custom adjust
form sizes by increasing or decreasing the horizontal and vertical offsets. The horizontal offset adjusts the
alignment in fractions of an inch. The default offset value is set to 0.00. A positive increase will adjust alignment to
the right, a negative value will adjust alignment to the left. The vertical offset adjusts the alignment in fractions of
an inch. The default offset value is set to 0.00. A positive increase will adjust alignment down, a negative value will
adjust alignment up.
Page 4-2
Print Reports
Chapter 4
Manufacturing Inventory Management User Manual
Displayed Report Options
If the report output is Display, you can also use the navigation toolbar buttons to jump to another page within the
displayed report, or <click> the # toolbar button to specify a particular page. This comes in handy to view specific
information in a long report, without having to navigate page by page.
From within a displayed report, you can also send the report (current page or all pages) to print or change the output
destination for the current page or the entire report without leaving the screen.
By <clicking> the search toolbar button, you can also search for specified text within the displayed report. This
allows you to search for any text, amounts, dates, etc, contained within the report.
Range of Orders
When asked to define the range of orders to report on, place your cursor on the “Beginning Order #” field and
<click> the Down Arrow (F2 by default) to gain access to the account listing. You may choose to search for orders
by order number, vendor number, vendor name or SO Ref #. Once you have selected the Beginning Account
Number, <click> on the Ending Account Number field and then <click> the Down Arrow (F2 by default) to gain
access to the account listing to choose your ending number.
Data Record Retrieval
This function can be done on any indexed field in the currently active system or a field the current system is
integrated with. When the right mouse button is <clicked> in the field, the system will display the choices of data
record retrieval.
This feature is available in most options throughout the Infinity POWER system. It will simplify your retrieval of
records when printing reports. The data record retrieval choices are listed below.
First Record
This option will allow you to select the first record in the requested
file.
Next Record
This option will allow you to retrieve the next sequential record in
the file, assuming you have already selected a record.
Current Record
This option will allow you to select the last record that was accessed.
Scroll View
This option will display a scrolling screen with all records in the
accessed file. You may scroll through the records and select the one
of your choice. You may also change the sorting preference and
search for the record in a variety of ways.
Previous Record
This option will allow you to retrieve the previous sequential record
in the file, assuming you have already selected a record.
Last Record
This option will allow you to select the last record in the requested
file.
Report Sorting Preference
The order in which items will print on reports. This is handled through the method in which you choose the
beginning and ending account range. For example, you will be given three choices when you select your beginning
and ending account number when using the Down Arrow (F2 by default):
Chapter 4
•
Cat/Class/Item/Loc. (Item Number)
•
Description
•
Bin #
Print Reports
Page 4-3
Manufacturing Inventory Management User Manual
Instead of printing all reports in order of the Item Number, you may elect to print them in alphabetical order by the
description of the Item Number by selecting #2. Or, many companies would want reports such as Inventory Count
Sheets printed in order of their Bin # to ease the locating of items during a physical count. They would select #3. All
reports will continue to “Sort By” the option selected until you either change it or exit that particular option.
Masking (Wildcards)
The item number mask is a field which gives you the ability to set up a specific search and have the system only
retrieves those items defined within the parameters of that search. This is very beneficial if you want to print all
reports for a particular location or a specific class or category of items.
The configuration of your item number component lengths is the key to how specific information may be searched
on within your inventory item number. The item number component lengths will be reflected in the mask field on
your screen.
For example, if your inventory is configured as:
Category 4
Class 6
Item 5
Location 3
The item number mask field would appear on your screen as:
[
]
*123412345612345123*
To print a report that contained all of the items for Category “1111” and those with a Location of “113,” you would
specify:
[1111?????????????113]
*123412345612345123*
The areas between the two components can either be spaces or question marks. Question marks are the standard
DOS wildcard format. All reports will continue to “Mask By” the components selected until you either change it or
exit that particular option.
Period to Report On
If a report is a summary type report, the information contained in the report will be inclusive of all data input during
the date range specified at the time of selection of the report. This provides you the ability to do historical period
reporting as well as current period reporting.
Cancel the Print Job
<Clicking> on the “Cancel” button during the printing of a report will cancel the print job. However, keep in mind,
some of the report may still be in the printer buffer at the time of cancellation.
MANUFACTURING REPORTS
Five reports and one calculation option are available by selecting the Manufacturing Reports menu option:
Page 4-4
•
Bill of Materials
•
Production Trends
•
Components Used
•
Enter Projected Usage Amounts
Print Reports
Chapter 4
Manufacturing Inventory Management User Manual
•
Projected Materials Usage
•
Where Used
Each report will be discussed on the following pages.
Bill of Materials Report (IM0231)
This report provides a breakdown of all component inventory necessary to produce each assembly and sub-assembly
(also referred to as a bill of materials). This report is available in five different formats:
Normal
This provides a detailed listing of each assembly with all of the
components, complete inventory descriptions (all 4 lines), alternate
part number, and bin numbers.
Cost Projections
This provides the normal report with cost projections based on “Last
Unit Cost” (cost at last time of recording production) or “Average
Unit Cost” (average unit cost of component inventory in stock).
Summarized
This provides the basic bill of materials information by assembly.
Multi-Level
This provides the basic bill of materials information by assembly for
all sub-assembly levels. This report includes all quantities required
for each sub-component as part of the assembly item.
Multi-Level Cost Projections
This provides the basic bill of materials information by assembly for
all sub-assembly levels. This report includes all quantities, unit of
measure, unit cost and extended costs for each component and
assembly item. The report then Projects what the cost of the item
would be if it were taken from current stock levels verses if it were
manufactured from components (raw materials) at this point in
time. This may be the same number or you may find that costs have
gone up or down depending on the swing in pricing on raw materials
since the last time a manufacturing run was done.
When you select this report you may specify the inventory item range and mask, as well as the desired report format.
Chapter 4
Print Reports
Page 4-5
Manufacturing Inventory Management User Manual
The fields included in this report are:
Field Names:
Assembly and Components:
- Cat./Class/Part/Loc. (Item Number)
- Description (First Line)
- Description Lines 2-4 (formats #1 & #2)
- U/M (Unit of Measure)
- Quantity
- Sub (sub-assembly? Yes or No)
- Alternate Part Numbers (formats #1 & #2)
- Last Unit Cost (format #2)
- Avg. Unit Cost (format #2)
Page 4-6
Print Reports
Chapter 4
Manufacturing Inventory Management User Manual
Bill of Materials Report (Normal)
Chapter 4
Print Reports
Page 4-7
Manufacturing Inventory Management User Manual
Bill of Materials Report (Cost Projections)
Page 4-8
Print Reports
Chapter 4
Manufacturing Inventory Management User Manual
Bill of Materials Report (Summarized)
Chapter 4
Print Reports
Page 4-9
Manufacturing Inventory Management User Manual
Bill of Materials Report (Multi-Level)
Page 4-10
Print Reports
Chapter 4
Manufacturing Inventory Management User Manual
Bill of Materials Report (Multi-Level Cost Projections)
Chapter 4
Print Reports
Page 4-11
Manufacturing Inventory Management User Manual
Production Trends Report (IM0232)
This report provides a complete 12 month breakdown of production by month for all assemblies.
When you select this report you may specify the inventory item range and mask to report on. This report will include
the total quantity produced by month for each assembly within the specified inventory item range.
The fields included in this report are:
Field Names:
Assemblies Only:
- Cat./Class/Part/Loc. (Item Number)
- Description
- U/M (Unit of Measure)
- 12 month Production Quantities
- YTD Quantity Produced (based on the system date)
Page 4-12
Print Reports
Chapter 4
Manufacturing Inventory Management User Manual
Production Trends Report
Chapter 4
Print Reports
Page 4-13
Manufacturing Inventory Management User Manual
Components Used Report (IM0233)
This report provides a complete 12 month breakdown of all components used in production by month for all
components and sub-assemblies.
When you select this report you may specify the inventory item range and mask to report on. This report will include
the total quantity used in production by month for each component and sub-assembly within the specified inventory
item range.
The fields included in this report are:
Field Names:
Components and Sub-assemblies:
- Cat./Class/Part/Loc. (Item Number)
- Description
- U/M (Unit of Measure)
- 12 month Used in Production Quantities
- YTD Quantity Used in Production
(based on the system date)
Page 4-14
Print Reports
Chapter 4
Manufacturing Inventory Management User Manual
Components Used Report
Chapter 4
Print Reports
Page 4-15
Manufacturing Inventory Management User Manual
Enter Projected Usage Amounts (IM0234)
This option allows you to enter projected sales quantities for your finished goods, whether assemblies or
components. In addition, a complete material requirements calculation will be made on your entire inventory. This
materials requirement calculation may be reviewed by printing the “Projected Materials Usage Report.”
This option may be used to perform “what if” analysis of materials usage requirements.
Projected and/or actual material requirements may be entered in one of the following ways:
Clear Projected Usage
Quantities
This option allows you to clear the projected usage quantities for a
range of inventory items. In addition, the manufacturing
requirements will be zeroed.
Copy Reserved To Ship
Quantity to Projected
This option allows you to use your current unfilled customer orders
as the starting place for your projected usage analysis. This option
automatically transfers all “Quantity Reserved to Ship” amounts
into the projected usage fields for each inventory item.
Clear Manufacturing
Requirements Only
This option allows you to clear all projected manufacturing
requirements without affecting the Projected Usage Quantities.
These first two options are primarily used to clear out projection
amounts between your “what if” models.
If you are processing interactive with the Sales Order Entry system
or if you are using the “Record a Sales Order” option in Inventory,
this option reads the total backorder amount for each item (quantity
in “Quantity Reserved to Ship”).
Page 4-16
Print Reports
Chapter 4
Manufacturing Inventory Management User Manual
Calculate Manufacturing
Requirements
This option automatically calculates your complete manufacturing
requirements for all assemblies which have a “Projected Usage
Quantity” greater than the “Quantity On-Hand.” This shortage
amount will be used to calculate the manufacturing requirements of
each component in the assembly's bill of materials.
These calculations may be reviewed in the “Projected Materials
Usage Report,” under the column titled Manf. Req.
Enter Projected Usage
Quantities
This option allows you to directly input the Projected Usage
Quantities for a range of inventory items. When you select this
option, you may specify the range of items and the item number
mask to include.
The system will automatically retrieve each item and display the current Projected Usage Amount. You may change
the quantity or <click> “Update” to continue with no change.
Upon the completion of this option, simply <click> “Close” to return to the menu. Normally, your next step is to
print the “Projected Materials Usage Report,” which is the next option on the menu.
NOTE
The option to Calculate Manufacturing Requirements assumes that your
inventory numbering sequence is such that all sub-assemblies have higher
inventory numbers than assemblies that use them. This is required because the
system calculates manufacturing requirements as it moves through the
inventory file sequentially from lower numbers to higher.
Results:
coIM1dy.dbf - Inventory Item File
- Projected Usage Quantity Updated
- Manufacturing Requirements Updated
Chapter 4
Print Reports
Page 4-17
Manufacturing Inventory Management User Manual
Projected Materials Usage Report (IM0235)
This report displays all material usage requirements as calculated in the “Enter Projected Usage Amounts” option.
A complete breakdown is provided showing all necessary production levels and raw material acquisition
requirements.
This report is available in the following formats:
All Inventory Items
This will include all inventory items within the specified range.
Projections Only
Those inventory items which have had projections entered or which
are required for manufacturing.
Shortage Only
Those inventory items which do not have enough “Quantity OnHand” to meet projected usage requirements.
Overages Only
Those inventory items which have excess “Quantity On-Hand” to
meet projected usage requirements.
When you select this report you may specify the inventory item range and mask, as well as the desired report format.
The fields included in this report are:
Field Name:
Assembly and Components:
- Cat./Class/Part/Loc. (Item Number)
- Description
- Bin Number
- U/M (Unit of Measure)
- Alternate Part Numbers
- Projected (Projected Quantity Needed)
Specified in “Enter Projected Usage Amounts”
- Manf. Req. (Manufacturing Requirements)
Quantity Automatically Calculated from Projected
Page 4-18
Print Reports
Chapter 4
Manufacturing Inventory Management User Manual
Quantity Needed in “Enter Projected Usage Amounts”
- Total Required - Sum of Projected Quantity Needed
plus Manufacturing Requirements
- On-Hand (Quantity On-Hand)
- On-Order (Quantity On-Order)
- Extra (OH) - Excess (or Shortage if negative quantity)
of Inventory Based on On-Hand Minus Total Required
- Extra (OO) - Excess (or Shortage if negative quantity)
of Inventory Based on On-Hand Plus On-Order,
Minus Total Required
- Short - X if a Shortage of Extra (OH) or Extra (OO)
- Primary Vendor Number
- Primary Vendor’s Part Number
- Secondary Vendor Number
- Secondary Vendor’s Part Number
Chapter 4
Print Reports
Page 4-19
Manufacturing Inventory Management User Manual
Projected Materials Usage Report
Page 4-20
Print Reports
Chapter 4
Manufacturing Inventory Management User Manual
“Where Used” Report (IM0236)
This report displays every assembly in which the item selected is used during the course of manufacturing.
This report is a useful tool in tracking down where items may need to be adjusted. For instance, if a raw material is
discontinued and you must make all of the changes in the file. You may select one item per report. Based on the
nature of your business, this can be a very short report or very extensive.
The fields that will print on the report include Item Number, Description, Quantity, and the Value of that item within
a specific assembly.
Chapter 4
Print Reports
Page 4-21
Manufacturing Inventory Management User Manual
"Where Used" Report
Page 4-22
Print Reports
Chapter 4
Manufacturing Inventory Management User Manual
SALES AND PURCHASES REPORTS
Three reports are available by selecting the Sales and Purchases Reports menu option:
•
Sales & Purchases Report
•
Detailed Transactions Report
•
Profit Summary Report
Calculations performed by the system to produce information for key fields in these reports are:
- Gross Profit
- Sales minus Cost of Sales
- GP per Unit
- Gross Profit divided by Quantity Sold
- GP%
- Gross Profit divided by Total Sales (x) 100
Each report will be discussed on the following pages.
Chapter 4
Print Reports
Page 4-23
Manufacturing Inventory Management User Manual
Sales and Purchases Report (IM0201)
This report displays the sales and/or purchases by each inventory item for each period of the current fiscal year.
This report can be used by management to review inventory item movement by accounting period. It can also be
used to establish trend analysis, monitor cyclical usage, aid in manufacturing forecasting, or analyze sales vs. cost of
sales.
When this option is selected, you will define the beginning and ending Item Numbers to include and any item mask.
Then, <click> “Start” to begin the report. <Click> on “Close” when completed.
The fields included in this report are:
Field Name:
- Cat./Class/Part/Loc. (Item Number)
Description:
- U/M (Unit of Measure)
- Bin Number
- Qty On-Hand (Quantity On-Hand)
- Total Value
- Period
- Qty Purch. (Quantity Purchased)
- Purchases
- Qty Sold (Quantity Sold)
- Sales
- Cost of Sales
- Gross Profit
- GP per Unit (Gross Profit per Unit)
- GP % (Gross Profit Percentage)
- Grand Totals:
Page 4-24
Print Reports
Chapter 4
Manufacturing Inventory Management User Manual
Sales & Purchases Report
Chapter 4
Print Reports
Page 4-25
Manufacturing Inventory Management User Manual
Detailed Transactions Report (IM0202)
This report displays all inventory transactions recorded for each inventory item. In addition, it will include all
inventory transactions posted from other systems. To use this option, you must set up your system for transaction
detail.
This report is designed as a management tool for auditing and for doing research. It provides a complete listing of all
activity within Inventory for a specified date range. After you select the range of items to report on, you may specify
the specific transaction type you need reported on.
The transaction types are:
1) Purchase Order
2) Receipts
3) Sales Orders
4) Withdrawals
5)
Returns
6) Transfers
7) Count Adjustments
You may select only one of the items or you may select them all by <clicking> on the “Select All” button. If all
items are required, you must <click> “on” each one. You will then specify the date range to report on. Next, specify
whether to create the report in the standard or export format. You may select a text file or Excel file on the Output
Options screen. Totals will appear at the bottom of each item summarizing the totals by transaction type. A Grand
Total will appear at the end of the report totaling all transaction types for all items.
Page 4-26
Print Reports
Chapter 4
Manufacturing Inventory Management User Manual
If the Item Numbers defined have either Serial Number or Lot Number as their costing method, you may search
specifically for transactions based on a specific Serial Number or Lot Number with this option and find the detailed
transaction history on those specific items or lots. This is what the “Serial/Lot Number Mask” question is
prompting for at the bottom right of the screen.
The fields included in this report are:
Field Name:
- Cat./Class/Part/Loc. (Item Number)
Description:
- Trans. Type (Transaction Type)
- Quantity
- U/M (Unit of Measure)
- Ref.#/Desc.(Reference Number/Description)
- Cust./Vendor/Job # (Customer/Vendor/Job #)
- Unit Cost
- Unit Price
- Total Cost
- Total Price
Totals:
Chapter 4
Print Reports
Page 4-27
Manufacturing Inventory Management User Manual
Detailed Transactions Report
Page 4-28
Print Reports
Chapter 4
Manufacturing Inventory Management User Manual
Chapter 4
Print Reports
Page 4-29
Manufacturing Inventory Management User Manual
Profit Summary Report (IM0203)
This report summarizes quantity sold, sales, and gross profit for each inventory item for the Current Month and
Year-to-Date.
This report is designed to briefly summarize gross profitability by each item in your inventory file. This allows for
quick comparisons and analysis of items. You must make sure that you have set up the Inventory Asset accounts in
each inventory item to make this report truly effective.
When this option is selected, you will define the beginning and ending Item Numbers to include and any item mask.
Then, <click> “Start” to begin the report. <Click> on “Close” when completed.
The fields included in this report are:
Field Name:
- Cat./Class/Part/Loc. (Item Number)
Description:
- U/M (Unit of Measure)
- Bin Number
- Qty. Sold (Quantity Sold)
- Sales
- Gross Profit
- GP per Unit (Gross Profit per Unit)
- GP % (Gross Profit Percentage)
- Grand Totals:
Page 4-30
Print Reports
Chapter 4
Manufacturing Inventory Management User Manual
Profit Summary Report
Chapter 4
Print Reports
Page 4-31
Manufacturing Inventory Management User Manual
MATERIAL REQUIREMENTS REPORTS
Four reports are available by selecting the Material Requirements Reports menu option:
1)
2)
3)
4)
Suggested Order Report
Overstock Report
Quantity Report
Turnover Trend Report
Calculations performed by the system to produce information for key fields in these reports are:
Available (Available to Ship)
Quantity On-Hand plus Quantity On-Order minus Quantity
Reserved to Ship
Suggested Order
Minimum Quantity to Stock minus Quantity Available to Ship plus
Minimum Amount to Order less than Maximum Quantity to Stock
YTD Total Average
Quantity Sold (Year-to-Date) divided by Quantity On-Hand
Quantity Overstocked
Quantity On-Hand plus Quantity On-Order greater than Maximum
Quantity to Stock
Each report will be discussed on the following pages.
Page 4-32
Print Reports
Chapter 4
Manufacturing Inventory Management User Manual
Suggested Order Report (IM0204)
This report recommends a purchase amount for each item based on the following:
+ Minimum Qty. to Stock
- Quantity Available to Ship
= Suggested Order Qty.*
* The Suggested Order amount also reflects the “Minimum and Maximum Quantity to Order.”
This report allows you to consistently order needed inventory items without management decisions being necessary
on a “per-order” basis. Physical inventory counts will not be required to determine what items are necessary to be
ordered at any point in time, while taking into account any quantities already on order to avoid duplication of orders.
Once the min/max quantities and the minimum order parameters have been established, using this report will allow
anyone in your company to follow those parameters. The “Quantity to Order” field is left blank to be used as a
worksheet for what is actually to be ordered at the time.
When this option is selected, you will define the beginning and ending Item Numbers to include and any item mask.
Then, <click> “Start” to begin the report. <Click> on “Close” when completed.
The fields included in this report are:
Field Name:
- Cat./Class/Part/Loc. (Item Number)
Description:
- U/M (Unit of Measure)
- Bin Number
- On-Hand (Quantity On-Hand)
- On Order (Quantity On-Order)
- Reserved (Quantity Reserved to Ship)
- Min. Stock (Minimum Quantity to Stock)
- Max. Stock (Maximum Quantity to Stock)
- Min. Order (Minimum Quantity to Order)
- Suggested Order
- Quantity to Order
Chapter 4
- Primary Vendor Number
- Primary Vendor’s Part Number
- Secondary Vendor Number
- Secondary Vendor’s Part Number
- Available (Quantity Available to Ship)
- Grand Total:
Print Reports
Page 4-33
Manufacturing Inventory Management User Manual
Suggested Order Report
Page 4-34
Print Reports
Chapter 4
Manufacturing Inventory Management User Manual
Overstock Report (IM0205)
This report includes all inventory items that have a quantity on-hand and quantity on-order greater than the
maximum quantity to stock.
This report can be used to flag inventory items which exceed the maximum quantity to stock level. Errors in
ordering, invoicing, or stock withdrawals may be detected through the use of this report. You may also want to use
this report to verify overages you have planned for in the anticipation of unusually high sales periods for an item.
When this option is selected, you will define the beginning and ending Item Numbers to include and any item mask.
Then, <click> “Start” to begin the report. <Click> on “Close” when completed.
The fields included in this report are:
Field Name:
- Cat./Class/Part/Loc. (Item Number)
Description:
- U/M (Unit of Measure)
- Bin Number
- On-Hand (Quantity On-Hand)
- On-Order (Quantity On-Order)
- Reserved (Quantity Reserved to Ship)
- Available (Quantity Available to Ship)
- Min. Stock (Minimum Quantity to Stock)
- Max. Stock (Maximum Quantity to Stock)
- Min. Order (Minimum Quantity to Order)
- Quantity Overstocked
- Grand Total:
Chapter 4
Print Reports
Page 4-35
Manufacturing Inventory Management User Manual
Overstock Report
Page 4-36
Print Reports
Chapter 4
Manufacturing Inventory Management User Manual
Quantity Report (IM0206)
This report displays quantities for Year-to-Date and Month-To-Date sales and purchases, On-Hand, Reserved to
Ship, Available to Ship, as well as Minimum and Maximum stock quantities. It is also used to print reports that list
quantities On Order, Reserved to Ship, and to Adjust.
This report is an overall status type report that will allow you to quickly view key fields for management decisions.
After selecting the range of items, the “Sort By” key, and the item mask; the system will display a screen that asks
the following questions:
“Select the type of Quantity Report you wish to Print.”
1) All Inventory Items
2) On-Order Items Only
3) Reserved to Ship Items Only
4) On-Hand, On-Order, and Reserved
5) Quantity to Adjust Items Only
All versions of this report print the same fields and in the same format. The selection criteria used to determine
which items should be included is the only difference among the different versions of the report.
Chapter 4
Print Reports
Page 4-37
Manufacturing Inventory Management User Manual
All Inventory Items
Selecting this option will print the Quantity Report inclusive of all
items that you have specified in your range.
On-Order Items Only
Selecting this option will print the Quantity Report, but with only
those items included that have a Quantity On-Order amount.
Reserved to Ship Items Only
Selecting this option will print the Quantity Report, but with only
those items included that have Quantity Reserved to Ship amount.
On Hand, On-Order, and
Reserved
Selecting this option will print the Quantity Report, but with only
those items included that have either a Quantity On-Hand, Quantity
On-Order, or Quantity Reserved to Ship amount. Only one of the
three items is necessary to be included in this report.
Quantity to Adjust Items Only
Selecting this option will print the Quantity Report, but with only
those items included that have a Quantity to Adjust amount. This
allows you to get a report of only those items that need to have
adjustments made. The “Adj.” column on any of these reports will
contain an “x” if there is a negative amount in the “Adjust Qty”
column. The number in this column reflects the shrinkage quantity
calculated for that item.
Then, <click> “Start” to begin the report. <Click> on “Close” when completed.
The fields included in this report are:
Field Name:
- Cat./Class/Part/Loc. (Item Number)
Description:
- U/M (Unit of Measure)
- Bin Number
- On-Hand (Quantity On-Hand)
- On-Order (Quantity On-Order)
- Reserved (Quantity Reserved to Ship)
- Available (Quantity Available to Ship)
- Min. Stock (Minimum Quantity to Stock)
- Max. Stock (Maximum Quantity to Stock)
- Min. Order (Minimum Quantity to Order)
- Adjust Qty (Adjustment Quantity)
- Cur. Pur. (Current Purchases)
- YTD Pur. (Year to Date Purchases)
- Cur. Sales (Current Sales)
- YTD Sales (Year to Date Sales)
- Adj (Adjustments Required)
- Grand Totals:
Page 4-38
Print Reports
Chapter 4
Manufacturing Inventory Management User Manual
Quantity Report
Chapter 4
Print Reports
Page 4-39
Manufacturing Inventory Management User Manual
Page 4-40
Print Reports
Chapter 4
Manufacturing Inventory Management User Manual
Turnover Trend Report (IM0221)
This report displays stock turnover for inventory for each month and Year-to-Date based on the following formula:
Quantity Sold for each month
/ Current Quantity On-Hand
= Turnover Times for each period
This report can provide valuable information to management for monitoring inventory movement. By utilizing this
report on a monthly basis, you will have the information necessary to make sound inventory stock investment
decisions. This report can also be an excellent management tool for balancing materials between multiple locations.
When this option is selected, you will define the beginning and ending Item Numbers to include and any item mask.
Then, <click> “Start” to begin the report. <Click> on “Close” when completed.
The “Average” column on the report is calculated by taking:
Total Sales (Year-to-Date) divided by Current On-Hand Quantity divided by Number of Months (Year-to-Date).
Please note that although the report will print a column for twelve months, all calculations are based on a starting
point as your fiscal year and an ending as of the current system date. This gives you the ability to print various
periods of Turnover Trends by simply changing the system date.
The fields included in this report are:
Field Name:
- Cat./Class/Part/Loc. (Item Number)
- Description
- On-Hand (Quantity On-Hand)
- XX/XX (Month/Year)
- YTD Total (Year to Date Total)
- Unit of Measure
- Bin Number
- Average
- Grand Totals:
Chapter 4
Print Reports
Page 4-41
Manufacturing Inventory Management User Manual
Turnover Trend Report
Page 4-42
Print Reports
Chapter 4
Manufacturing Inventory Management User Manual
ANALYTICAL REPORTS
Six reports are available by selecting the Analytical Reports menu option:
1) Quick Moving Items
2) Slow Moving Items
3) Inventory Shrinkage
4) Ranking by Gross Profit
5) Ranking by Cost
6) Inventory Value Summary
Calculations performed by the system to produce this information for key fields in these reports are:
Gross Profit
Sales minus Cost of Sales
GP per Unit
Gross Profit divided by Quantity Sold GP %
Gross Profit divided by Total Sales (x) 100
Available
Quantity On-Hand plus Quantity On-Order minus Quantity Reserved to
Ship
Shrinkage Quantity
Quantity On-Hand minus Last Count
Shrinkage Value
Shrinkage Quantity (x) Item Cost
This cost is calculated by using the cost method set up in the Master Configuration and is treated as a standard
withdrawal. Each Report will be discussed on the following pages.
Quick Moving Items ((IM0207)
This report ranks and displays the quickest selling inventory items (based on quantity sold Month-To-Date or Yearto-Date). This report will be sorted in descending order (quickest to slowest). It will include the number of items you
specify within the range you specify.
This report is designed to allow management to evaluate the fastest selling items specified by the range of items
entered. This report is based on quantity of items sold and not the value of the items sold.
When this option is selected, you will define the beginning and ending Item Numbers to include and any item mask.
Chapter 4
Print Reports
Page 4-43
Manufacturing Inventory Management User Manual
Two additional questions will appear as you select this option.
1) Maximum Number of items to include:
2) Sort on MTD instead of YTD Sales:
You may rank up to 500 items at a time per report and print the report based on Month-To-Date sales instead of
Year-to-Date. The “#” column on this report is the Ranking Number. Then, <click> “Start” to begin the report.
<Click> on “Close” when completed.
The fields included in this report are:
Field Name:
- Cat./Class/Part/Loc. (Item Number)
- Description
- U/M (Unit of Measure)
- Bin Number
- On-Hand (Quantity On-Hand)
- On-Order (Quantity On-Order)
- Reserved (Quantity Reserved to Ship)
- Available (Quantity Available to Ship)
- Min. Stock (Minimum Quantity to Stock)
- Max. Stock (Maximum Quantity to Stock)
- Min. Order (Minimum Quantity to Order)
- Adjust Qty (Adjustment Quantity)
- Cur. Pur. (Current Purchases)
- YTD Pur. (Year to Date Purchases)
- Cur. Sales (Current Sales)
- YTD Sales (Year to Date Sales)
- # (Ranking Number)
- Grand Totals:
Page 4-44
Print Reports
Chapter 4
Manufacturing Inventory Management User Manual
Quick Moving Items Report
Chapter 4
Print Reports
Page 4-45
Manufacturing Inventory Management User Manual
Slow Moving Items (IM0208)
This report ranks and displays the slowest selling inventory items (based on quantity sold Month-To-Date or Yearto-Date). This report will be sorted in descending order (slowest to quickest). It will include the number of items you
specify within the range you specify.
This report is designed to allow management to evaluate the slowest selling items specified by the range of items
entered. This report is based on quantity of items sold and not the value of the items sold.
When this option is selected, you will define the beginning and ending Item Numbers to include and any item mask.
Two additional questions will appear as you select this option.
1) Maximum Number of items to include:
2) Sort on MTD instead of YTD Sales:
You may rank up to 500 items at a time per report and you may print the report based on Month-To-Date sales
instead of Year-to-Date. The “#” column on this report is the Ranking Number. Then, <click> “Start” to begin
the report. <Click> on “Close” when completed.
The fields included in this report are:
Field Name:
- Cat./Class/Part/Loc. (Item Number)
- Description
- U/M (Unit of Measure)
- Bin Number
- On-Hand (Quantity On-Hand)
- On-Order (Quantity On-Order)
- Reserved (Quantity Reserved to Ship)
- Available (Quantity Available to Ship)
- Min. Stock (Minimum Quantity to Stock)
Page 4-46
Print Reports
- Max. Stock (Maximum Quantity to Stock)
- Min. Order (Minimum Quantity to Order)
- Adjust Qty (Adjustment Quantity)
- Cur. Pur. (Current Purchases)
- YTD Pur. (Year to Date Purchases)
- Cur. Sales (Current Sales)
- YTD Sales (Year to Date Sales)
- # (Ranking Number)
- Grand Totals:
Chapter 4
Manufacturing Inventory Management User Manual
Slow Moving Items Report
Chapter 4
Print Reports
Page 4-47
Manufacturing Inventory Management User Manual
Inventory Shrinkage Report (IM0209)
This report displays the total inventory shrinkage in dollars and quantity based on a comparison of the on-hand book
quantity to physical quantity entered through the “Enter New Physical Quantities” option. A summary by General
Ledger account number will also be printed.
This report is valuable in evaluating the quantity and dollar value of inventory shrinkage after a physical count. If
there is an “x” in the “Adj.” column, it means that your physical count showed more inventory than your book did.
The Inventory Shrinkage General Ledger Summary gives you an itemized listing of shrinkage dollars by General
Ledger account number on a second page.
If you are interactive with General Ledger module, a batch file containing this information will exist for you to
update to your General Ledger system. Even if you do not have the General Ledger program, you will still be able to
print this report.
When this option is selected, you will define the beginning and ending Item Numbers to include and any item mask.
You may also check off the “Auto Adjust” box. When you “Print Inventory Shrinkage Report” or “Update Book
Value After Count,” the system will prompt you to make automatic adjustments based on the item's last cost. If you
answer (Y)es, the system will determine the last cost of the item based on the costing method defined on the
inventory item and use that as the value for any increases in stock. For any other adjustments that must be made, use
the “Change Inventory Items” menu option. This is the only option that will allow these kinds of changes without
affecting any sales or cost of sales journals.
<Click> “Start” to begin the report. <Click> on “Close” when completed.
The fields included in this report are:
Field Name:
- Cat./Class/Part/Loc. (Item Number)
- Description
- U/M (Unit of Measure)
- On-Hand Quantity
- Last Count Quantity
- Shrinkage Quantity
- Shrinkage Value
Page 4-48
Print Reports
- Adj. (Adjustment Required)
- G/L Asset Account
- Total Value
- Grand Total
Chapter 4
Manufacturing Inventory Management User Manual
Inventory Shrinkage Report
Chapter 4
Print Reports
Page 4-49
Manufacturing Inventory Management User Manual
Page 4-50
Print Reports
Chapter 4
Manufacturing Inventory Management User Manual
Ranking By Gross Profit (IM0210)
This report ranks and displays the most or least profitable inventory items (based on Month-To-Date or Year-toDate gross profit). The report will be sorted in descending order. It will include the number of items you specify
within a specified range.
This report is a very strong management tool. You may rank items within this report in three different ways:
1)
Total Profit
2)
Profit Dollars ($) per unit
3)
Gross Profit Percentage (%)
Total Profit
This report will list the items which have the highest overall
contribution to the company's profit. This is a good report for
determining your most profitable product lines.
Profit Dollars ($) Per Unit
This report will rank the items which contribute the most revenue on a
“per-item” basis. This report is excellent for analyzing the overall
profitability of an item instead of simply basing buying decisions on
highest margins.
Gross Profit Percentage (%)
This report will rank the items with the highest profit margins. Margin
minded companies will find this extremely valuable.
When you select this menu option, the opening questions will be the same for all three variations of the reports.
After you have selected the range of items to report on, <click> on the remaining choices:
1) Maximum number of items to include:
2) Sort on MTD instead of YTD Sales:
3) Sort Gross Profit By:
•
Total Profit
•
Profit per Unit
•
Gross Profit Percent
You may rank up to 500 items at a time per report and you may print the report based on Month-To-Date sales
instead of Year-to-Date. The “Sort Gross Profit By” option will determine which report will print. All three
reports are generated from this one menu option. All three reports contain the same information; only the ranking
order will vary. For complete analysis of your inventory, you may wish to print all three reports and then compare
where specific items fall on each report. The “#” column is the Ranking number of that item.
Chapter 4
Print Reports
Page 4-51
Manufacturing Inventory Management User Manual
The fields included in this report are:
Field Name:
Cat./Class/Part/Loc. (Item Number)
- Description
- U/M (Unit of Measure)
- Bin Number
- Qty Sold (Quantity Sold)
- Sales
- Gross Profit
- GP per Unit (Gross Profit per Unit)
- GP % (Gross Profit Percentage)
- # (Ranking Number)
- Grand Totals:
Page 4-52
Print Reports
Chapter 4
Manufacturing Inventory Management User Manual
Ranking by Gross Profit Report
Chapter 4
Print Reports
Page 4-53
Manufacturing Inventory Management User Manual
Ranking By Cost (IM0211)
This report ranks and displays the most or least costly inventory items (based on current inventory value). The
report will be sorted in descending order. It will include the number of items that you specify within the range
specified. After you have selected the range of items to report on and any item mask, you can choose up to 500
items to rank.
This report is particularly beneficial in determining where your inventory dollars are tied up. You may want to use
this report to review the inventory costs in a specific location or how much money you have invested in a certain
vendor's products. You may analyze the possible need to slow down the ordering of certain items and perhaps adjust
the minimum/maximum quantities of stock levels.
The fields included in this report are:
Field Name:
Cat./Class/Part/Loc. (Item Number)
- Description
- U/M (Unit of Measure)
- Bin Number
- Quantity On-Hand
- Unit Cost (Average)
- Total Cost
- # (Ranking Number)
- Grand Totals:
Page 4-54
Print Reports
Chapter 4
Manufacturing Inventory Management User Manual
Ranking by Cost Report
Chapter 4
Print Reports
Page 4-55
Manufacturing Inventory Management User Manual
Inventory Value Summary (IM0212)
This report summarizes the current value of inventory by General Ledger account number.
The accounts summarized are the General Ledger asset accounts. You do not need to be interactive with General
Ledger to obtain this information.
There is a maximum of 200 account numbers available for summary. If you exceed this amount, the balance of
account numbers above 200 will be combined into one account total labeled “Error.”
NOTE
This is one of the most important reports that must be run on a Monthly basis
so that you can audit your General Ledger values against what is currently
valued in your Inventory System. If the balances on this report do not match
your General Ledger, then you must begin an audit immediately to determine
where the problem lies and correct it immediately. If you do not match this
balance on a monthly basis, it will become increasingly more difficult to
determine how to balance the two systems together over time.
The fields included in this report are:
Field Name:
- G/L Asset Account (General Ledger Asset Account)
- Total Value
- Grand Total:
Page 4-56
Print Reports
Chapter 4
Manufacturing Inventory Management User Manual
Inventory Value Summary Report
Chapter 4
Print Reports
Page 4-57
Manufacturing Inventory Management User Manual
PRICE LISTS
Five reports are available by selecting the Price Lists menu option:
1) Price Lists
2) Individual Price Labels
3) Price Labels
4) Bar Code Master Sheet
5) Print Bar Code Printer Labels
There are no special calculations associated with any of these reports. Each report will be discussed on the following
pages.
Price Lists (IM0213)
This report displays individual sales prices for a specified range of inventory items. You may specify any price
levels from 1 to 10, or combination of levels.
By utilizing a combination of the masking function, range settings, and specifying the price levels, you can tailor
your price lists to your specific needs. After you have selected the range of items to report on, <click> on which of
the ten price levels available you want included in this report. You may select one or all of them. You may also
indicate whether or not you want to include the current on-hand and available quantities.
Page 4-58
Print Reports
Chapter 4
Manufacturing Inventory Management User Manual
The fields included in this report are:
Field Name:
- Cat./Class/Part/Loc. (Item Number)
- Description
- U/M (Unit of Measure)
- Price Level (1-10) (as specified)
- On-Hand and Available Quantities (if specified)
Chapter 4
Print Reports
Page 4-59
Manufacturing Inventory Management User Manual
Price Lists Report
Page 4-60
Print Reports
Chapter 4
Manufacturing Inventory Management User Manual
Individual Price Labels (IM0214)
This option prints individual inventory “Price Tags” on 15/16” by 3 1/2” labels. You may also print in bar code
format (standard 3 of 9) if you have a printer which will print bar codes. Bar code labels are 1 15/16” by 3 1/2”.
This system will ask you for a single inventory item that you want to print price labels for. After you have selected
the item, another smaller window will appear and first ask you to specify which of the ten price levels available to
include for this report. You may select only one or all of them. One additional question will be asked. “How many
labels do you want to print?”
This allows you to print price labels for every item as you receive them into your stock. This allows you a
convenient way to make sure that all inventory items are marked properly. The printers which will support bar code
printing (with no additional information), are the Texas Instruments 85X and 86X series, the Epson FX series, the
IBM Graphics Printer, and the HP Laser printer series.
The fields included in this report are:
Field Name:
-
Cat./Class/Part/Loc. (Item Number)
- U/M (Unit of Measure)
- Price Level (1-10)(as specified)
Chapter 4
Print Reports
Page 4-61
Manufacturing Inventory Management User Manual
Individual Price Labels
8 X 10 Storage Shed - BUILT
(00 100 8x10 BLT)
Price:
$1,683.54
Price Labels (IM0215)
This option prints inventory “Price Tags” on 15/16” by 3 1/2” labels. You may also print in bar code format
(standard 3 of 9) if you have a printer which will print bar codes. Bar code labels are 1 15/16” by 3 1/2”.
After you have selected the “range” of items to report on and any item mask, you may specify which of the ten
price levels available to include for this report. You may select only one price level per run. One additional question
will be asked. “Do you want a label for every item on-hand (current quantity)?”
This allows the system to print price labels for every item you currently have in stock. This allows you a convenient
way to make sure that all inventory items are marked properly.
The printers which will support bar code printing (with no additional information), are the Texas Instruments 85X
and 86X series, the Epson FX series, the IBM Graphics Printer, and the HP Laser printer series.
The fields included in this report are:
Field Name:
- Cat./Class/Part/Loc. (Item Number)
- U/M (Unit of Measure)
- Price Level (1-10)(as specified)
Page 4-62
Print Reports
Chapter 4
Manufacturing Inventory Management User Manual
Price Labels
8 X 10 Storage Shed - BUILT
(00 100 8x10 BLT)
Price:
$1,683.54
10 X 12 Storage Shed - BUILT
(00 100 10x12 BLT)
Price:
$2,046.21
8 X 10 Storage Shed - KIT
(01 100 8x10 KIT)
Price:
$750.00
10 X 12 Storage Shed - KIT
(01 100 10x12 KIT)
Price:
$900.00
Corner Blocks
(10 601 78511)
Price:
EA
Concrete Blocks
(10 601 85461)
Price:
EA
$5.40
$4.36
Cement - 100 lb. Bag
(10 602 16522)
Price:
$32.00
Bag
Electric Box Pole
(11 A
POLE)
Price:
$185.00
EA
Roofing Tar Paper
(20 150 2241)
Price:
$23.50
Roll
Roofing Tar
(20 151 3311)
Price:
Gal
Chapter 4
$54.00
Print Reports
Page 4-63
Manufacturing Inventory Management User Manual
Bar Code Master Sheet (IM0222)
This option prints a master sheet of special keystrokes in bar code format which may be used for rapid data entry.
This master sheet can be very useful in the Point of Sale module for quickly using the bar code reader to enter the
repetitive keystrokes needed to execute the option. The printers which the system will support for bar code printing
(with no additional information), are the Texas Instruments 85X and 86X series, the Epson FX series, the IBM
Graphics Printer, and the HP Laser printer series.
<Click> on “Start” to begin or “Close” to exit to the menu.
The fields included in this report are:
Field Name:
- ENTER key
- F10 key
- “.” Sales Code for Description Only Line
- 0 - 9 numbers
Page 4-64
Print Reports
Chapter 4
Manufacturing Inventory Management User Manual
Bar Code Master Sheet
Chapter 4
Print Reports
Page 4-65
Manufacturing Inventory Management User Manual
Print Bar Code Printer Labels (IM0223)
This section discusses the printing of bar code labels with the Zebra (Eltron) Bar Code Printer within the
Manufacturing Inventory Management module.
The Manufacturing Inventory Management system provides you with the ability to print Bar Code Price Labels that
can be recognized by the system with an approved bar code reader. The Zebra (Eltron) Bar Code Label Printer
allows you to print a wide range of professional looking bar code labels for your merchandise.
The format of the label is as follows:
1) Normal user readable text which contains the Item Description.
2) Normal user readable text which includes the Item's Part Number and Price.
3) Encoded Inventory Item Number.
When using a bar code reader, pass the bar scanner over the bar coded item number. The scanner may pass in a left
to right, or a right to left direction, but it must be kept at about a 45 degree vertical angle to the bar code.
You may use the bar code entry method any time you are prompted by the system to enter the inventory item
number. This includes a wide range of accounting modules, not just Manufacturing Inventory Management.
Point of Sale, Purchase Order, Accounts Receivable and more all can use bar code readers during normal
operations. The bar code scanner should be configured to automatically perform a carriage return after scanning the
code. Keep in mind that the Inventory Item Number is coded as one (1) field of text. This means that the modules
involved should be configured to “Default to IM,” because the data entry screens will default to one contiguous
line, even if you have item segments defined within your Inventory part numbers.
When you select the option to “Print Bar Code Printer Labels,” the system will display the following screen.
Make sure to <click> on the “Setup” button first to ensure your system is configured correctly before proceeding.
Page 4-66
Print Reports
Chapter 4
Manufacturing Inventory Management User Manual
Bar Code Setup
The system will ask you to press the “Setup” button to set up the parameters for the bar code label format. After
pressing the “Setup” button the system will prompt for the following information.
Printer Device Name
In this field, enter the device name for the Zebra (Eltron) Bar Code
Label Printer. This is normally an LPT port number, such as LPT1 or
LPT2. However some printers may come equipped with a COM port,
in which case the norm would be COM1 or COM2.
You can also specify the printer device with by entering
\\machinename\printername. Ex: If you have a Zebra 2824TPL
printer connected to an XP Pro System via a USB, you can specify the
printer devices as long as it is setup as a shared printer.
Bar Code Label Form Name
In this field, enter the form name of the bar code label.
NOTE
There are two sample formats that are shipping with the Infinity POWER
system. DPLABEL is a standard size bar code label and DPLABEL1 is a
smaller butterfly label, as shown below:
Chapter 4
Print Reports
Page 4-67
Manufacturing Inventory Management User Manual
DPLABEL
DPLABEL1
These formats may be modified to meet each users customized needs on demand. The setup of each form may be
done by the user, your Data Pro Dealer or contact Data Pro Technical Support at (727) 803-1550 for a quote on
any requested modifications.
Bar Code Label Text File
Name
In this field, enter the full path of the bar code label text file name.
This is the file that contains the coding specific to the label format you
are printing. To use either of the two sample formats, enter
DPLABEL.TXT.
<Click> on the “Save” button to continue to the next section.
Inventory Item Range
Enter a beginning and ending inventory item number to include
this range in the printing of bar code labels.
Inventory Item Mask
Enter an Inventory Item Mask to selectively choose a certain type
of inventory item to print bar code labels. For instance, the fourth
and fifth position of your item numbers may represent the Vendor
number. This would allow you to print labels for all items for a
single vendor at a time.
Label Quantity
There are two data fields for the “Label Quantity” information.
They are described as follows.
Print a label for all quantities
on-hand
By <clicking> “on” this checkbox, the system will print the bar
code labels for as many items as the system has calculated onhand quantities. Each item that is in the selected range to print will
print one label for all on-hand quantities.
Quantity of labels for each item
If you do not <click> on the checkbox to print all “on-hand”
quantities, the system will then allow you to enter the number of
labels you wish to print for each item in the selected range.
<Click> on the “Start” button to start the label printing routine.
Page 4-68
Print Reports
Chapter 4
Manufacturing Inventory Management User Manual
The format for these labels uses specific variables that are downloaded to the printer when printing the barcode
label. The variables that come standard with the DPLABEL.TXT file are as follows:
V00 - Item Number
V01 - Item Description Line 1
V02 - Item Description Line 2
V03 - Item Description Line 3
V04 - Item Description Line 4
V05 - Unit of Measure
V06 - Bin Number
V07 - Category
V08 - Price Level 1
V09 - Price Level 2
V10 - Price Level 3
V11 - Price Level 4
V12 - Price Level 5
The following represents the programming code in the DPLABEL.TXT file.
The programming codes may be found in the Zebra (Eltron) Programming Guide.
FK"DPLABEL"
FS"DPLABEL"
V00,20,L,"Item #"
V01,30,L,"Desc1"
V02,30,L,"Desc2"
V03,30,L,"Desc3"
V04,30,L,"Desc4"
V05,4,L,"UOM"
V06,10,L,"Bin"
V07,10,L,"Category"
V08,10,L,"Price1"
V09,10,L,"Price2"
V10,10,L,"Price3"
V11,10,L,"Price4"
V12,10,L,"Price5"
D7
S2
A150,20,0,4,1,1,N,V01
B150,50,0,2,2,6,50,N,V00
A150,110,0,4,1,1,N,"Item #:"
A300,110,0,4,1,1,N,V00
A150,170,0,4,1,1,N,"Price:"
A300,170,0,4,1,1,N,V08
FE
FK"DPLABEL1"
FS"DPLABEL1"
V00,20,L,"Item #"
V01,30,L,"Desc1"
V02,30,L,"Desc2"
V03,30,L,"Desc3"
V04,30,L,"Desc4"
V05,4,L,"UOM"
V06,10,L,"Bin"
V07,10,L,"Category"
V08,10,L,"Price1"
V09,10,L,"Price2"
V10,10,L,"Price3"
Chapter 4
Print Reports
Page 4-69
Manufacturing Inventory Management User Manual
V11,10,L,"Price4"
V12,10,L,"Price5"
D7
S2
A450,00,0,1,1,1,N,V00
A195,12,0,3,1,1,N,V01
B415,12,0,2,1,2,25,N,V00
A450,40,0,3,1,1,N,V08
FE
<Click> on “Start” to begin printing or “Close” to exit to the menu.
Page 4-70
Print Reports
Chapter 4
Manufacturing Inventory Management User Manual
MAINTENANCE REPORTS
Six reports are available by selecting the Maintenance Reports menu option:
•
Inventory Listing
•
Inventory Detail Report
•
Cost Layer Report
•
Count Sheets
•
Bin Labels
•
Price Plan Listing
The calculations performed by the system to produce this information for key fields in these reports are:
Gross Profit
Sales minus Cost of Sales
GP per Unit
Gross Profit divided by Quantity Sold
GP %
Gross Profit divided by Total Sales (x) 100
Available
Quantity On-Hand plus Quantity On-Order minus Quantity Reserved to Ship
Total Cost
Quantity times Unit Cost
Cost of Sales
Sales divided by Qty. Sold
Inventory Listing (IM0216)
This report prints a quick listing of your inventory items. It includes item number, description, unit of measure,
alternate part numbers, vendors, G/L asset and cost of sales account numbers and the Accounts Receivable sales
code.
This report is designed to allow you to cross reference key data fields within the inventory system. If you carry items
from different vendors that are the same or similar, using the alternate part numbers will give you a cross
referencing guide for each item. The report also lists the vendors and their part numbers.
Chapter 4
Print Reports
Page 4-71
Manufacturing Inventory Management User Manual
When this option is selected, you will define the beginning and ending Item Numbers to include and any item mask.
Then, <click> “Start” to begin the report. <Click> on “Close” when completed.
The fields included in this report are:
Field Name:
- Cat./Class/Part/Loc. (Item Number)
- Description
- U/M (Unit of Measure)
- Bin Number
- Alternate Part Number
- Vendors
Page 4-72
Print Reports
- GL Asset (General Ledger Asset Account
- COS Account (General Ledger Cost of Sales
- Account)
- AR Code (Accounts Receivable Sales Code)
- Vendor's Part # (Vendor's Part Number))
Chapter 4
Manufacturing Inventory Management User Manual
Inventory Listing
Chapter 4
Print Reports
Page 4-73
Manufacturing Inventory Management User Manual
Inventory Detail Report (IM0217)
This report prints the detailed inventory information for your inventory items.
This report contains all the information related to each inventory record specified, including historical information.
The report prints in a “one-item-per-page” format. If you specify a large number of items to be printed, be sure
plenty of paper is loaded in the printer. This report is especially beneficial for verifying input after initial set up and
for archival purposes at period or year end.
When this option is selected, you will define the beginning and ending Item Numbers to include and any item mask.
Then, <click> “Start” to begin the report. <Click> on “Close” when completed.
The fields included in this report are:
Field Name:
- Cat./Class/Part/Loc. (Item Number)
- Description
- U/M (Unit of Measure)
- Bin # (Bin Number)
- Alternate Part Number
- Vendors
- Vendor's Part # (Vendor's Part Number)
- GL Asset (General Ledger Asset Account)
- COS Account (General Ledger Cost of Sales
- Account)
- AR Code (Accounts Receivable Sales Code)
- Unit Weight
- JC Code (Job Cost Code)
Page 4-74
Print Reports
Chapter 4
Manufacturing Inventory Management User Manual
Quantities:
- On-Hand (Quantity On-Hand)
- On Order (Quantity On-Order)
- Reserved (Quantity Reserved to Ship)
- Available (Quantity Available to Ship)
- Min. Stock (Minimum Quantity to Stock)
- Max. Stock (Maximum Quantity to Stock)
- Min. Order (Minimum Quantity to Order)
- Adjust Qty (Adjustment Quantity)
- Cur. Pur. (Current Purchases)
- YTD Pur. (Year to Date Purchases)
- Cur. Sales (Current Sales)
- YTD Sales (Year to Date Sales)
- Adj (Adjustment Required)
Prices:
- Price Levels (1-10)
Cost Layers:
- Layer Totals: (For LIFO & FIFO only)
- Date (Date of Layer Origination)
- Quantity
- Unit Cost
- Total Cost
Historical:
Periods (Month/Year)
- Qty Purch. (Quantity Purchased)
- Purchases
- Qty Sold (Quantity Sold)
- Sales
- Cost of Sales
- Gross Profit
- GP per Unit (Gross Profit per Unit)
- GP % (Gross Profit Percentage)
- Total:
Chapter 4
Print Reports
Page 4-75
Manufacturing Inventory Management User Manual
Inventory Detail Report
Page 4-76
Print Reports
Chapter 4
Manufacturing Inventory Management User Manual
Chapter 4
Print Reports
Page 4-77
Manufacturing Inventory Management User Manual
Cost Layer Report (IM0218)
This report displays the cost layers for each inventory item.
This report is designed to detail the exact cost layers that make up the total inventory cost of an item. There are an
unlimited number of cost layers available per inventory item. The layer date indicates the date of origination of that
particular cost layer.
If an item is using either the Serial Number or Lot Number costing method, you may use this report to print out the
detail of the serial number or lot by entering that number in the “Serial/Lot Number Mask” field at the bottom right
of the screen.
When this option is selected, you will define the beginning and ending Item Numbers to include and any item mask.
Then, <click> “Start” to begin the report. <Click> on “Close” when completed.
The fields included in this report are:
Field Name:
- Cat./Class/Part/Loc. (Item Number)
- Description
- U/M (Unit of Measure)
- Bin Number
- Layer Date (Date of Layer Origination)
- Quantity
- Unit Cost
- Total Cost
- Grand Totals
Page 4-78
Print Reports
Chapter 4
Manufacturing Inventory Management User Manual
Cost Layer Report
Chapter 4
Print Reports
Page 4-79
Manufacturing Inventory Management User Manual
INVENTORY COUNT SHEETS (IM0219)
This option prints a worksheet that may be used for performing physical counts. The report will print in inventory
number, description or bin number order.
This worksheet has been designed to include all of the information necessary to do an accurate physical count. The
“Quantity On-hand” has been omitted to insure integrity in the count. If more than one count of your inventory is
going to be taken, simply print multiple copies of this report Select a printer to send the report to and <click>
"Start” to begin printing the report.
When this option is selected, you will define the beginning and ending Item Numbers to include and any item mask.
Then, <click> “Start” to begin the report. <Click> on “Close” when completed.
The fields included in this report are:
Field Name:
- Cat./Class/Part/Loc. (Item Number)
- Description
- U/M (Unit of Measure)
- Bin # (Bin Number)
- Quantity Counted
Page 4-80
Print Reports
Chapter 4
Manufacturing Inventory Management User Manual
Count Sheets Report
Chapter 4
Print Reports
Page 4-81
Manufacturing Inventory Management User Manual
Bin Labels (IM0220)
This option prints inventory labels that include bin number, item number, description and unit of measure. The
alternative part numbers are also included.
These labels are designed to be bin labels, however, you may use them directly on inventory items if you do not
want the sales prices reflected on them. They print in a 1 15/16” label format.
When this option is selected, you will define the beginning and ending Item Numbers to include and any item mask.
Then, <click> “Start” to begin the report. <Click> on “Close” when completed.
The fields included in this report are:
Field Name:
- Bin Number
- U/M (Unit of Measure)
- Cat./Class/Part/Loc. (Item Number)
- Description
- Alt. Parts: (Alternate Part Numbers)
Page 4-82
Print Reports
Chapter 4
Manufacturing Inventory Management User Manual
Bin Labels Report
Chapter 4
Print Reports
Page 4-83
Manufacturing Inventory Management User Manual
PRICE PLAN LISTING (IM0425)
This option allows you to print price plans.
This report prints a detailed or non-detailed listing of the Price Plans set up in your system. The “non-detailed”
version of this report includes the price plan number, description, active status, beginning and ending date ranges for
the plan to be effective. This report will give you a quick glance of the Price Plans currently in your system.
The “detailed” version of this report is especially beneficial for verifying input after initial set up and for archival
purposes at period or year end. This report is much more extensive, as it will print all detail lines, giving you a better
view of all inventory items involved in each Price Plan.
When this option is selected, you will define the beginning and ending Price Plan Numbers to include and whether
you want the “Non-Detailed” or the “Detailed” version of the report. Then, <click> “Start” to begin the report.
<Click> on “Close” when completed.
The fields included in this report are:
Field Names:
Non-detailed Report
- Plan Name
- Description
- Active Status
- Beg. Date (Beginning Date)
- End. Date (Ending Date)
Detailed Report
- Plan Name - Description
- Active Status
- Beg. Date (Beginning Date)
- End. Date (Ending Date)
- Type (Item, Range or Mask)
- Beg. Inventory Item (Beginning Inventory Item)
- End. Inventory Item (Ending Inventory Item)-
Page 4-84
Print Reports
- Min. Quantity (Minimum Quantity)
- Max. Quantity (Maximum Quantity)
- Level (Price Level)
- Adj. % (Adjustment Percentage +/-)
- Specific Price
Chapter 4
Manufacturing Inventory Management User Manual
Price Plan Listing (Non-Detailed)
Chapter 4
Print Reports
Page 4-85
Manufacturing Inventory Management User Manual
Price Plan Listing (Detailed)
Page 4-86
Print Reports
Chapter 4
Manufacturing Inventory Management User Manual
CHAPTER 5
PERFORM ANALYTICAL GRAPHS
This section discusses all five types of Analytical Graphs utilized by the Inventory module. These graphs are
designed to give you an instant visualization of your inventory information. Graphing capabilities are not currently
available with Linux versions.
No other programs are required to execute this option. The system performs all graphics functions from within its
own programs. Check the hardware requirements section in your System Administrator manual to verify that you
have all of the necessary equipment to perform this function.
After the graph has been displayed to your screen, printing is one simple step:
For Windows:
1.
Press ALT Print Screen and paste into a WORD document.
You may also paste this image into a document or an Excel spreadsheet for presentation purposes.
SALES, COS & PURCHASES BY ITEM (IM0301)
This graph displays total sales, cost of sales, and purchases by month for an individual inventory item in Line Graph
format.
This option is designed to chart out the historical information for an inventory item for every month in the current
fiscal year. This will allow you to see very quickly and easily the upward and downward trends of the following
three data items:
1 = Sales Dollars
2 = Cost of Sales Dollars
3 = Purchase Dollars
Chapter 5
Perform Analytical Graphs
Page 5-1
Manufacturing Inventory Management User Manual
GRAPH QUICK MOVING ITEMS (IM0302)
This graph ranks and displays the quickest selling inventory items (based on quantity sold MTD or YTD). The
graph will be sorted in descending order. It will include up to 12 items.
This menu option is designed to display the quickest selling inventory items based on the range you have selected. A
maximum of twelve items can be displayed at one time and the items selected will be sorted in descending order.
After specifying the range of numbers to be graphed, the “Sort By” field, and the Item Number Mask, you must
specify how many items you want included in the graph.
Next, you may have the system sort based on MTD activity rather than YTD activity. The default answer is YTD,
however, if you want to view MTD activity, simply click on it. A list of the item numbers, their descriptions, and the
label letter (e.g., A = Item #1), which will be included on the graph will then be displayed.
Simply specify whether you would like a Bar Graph or a Pie Chart. Then click on the GRAPH button to plot the
graph.
Page 5-2 Perform Analytical Graphs
Chapter 5
Manufacturing Inventory Management User Manual
GRAPH SLOW MOVING ITEMS (IM0303)
This graph ranks and displays the slowest selling inventory items (based on quantity sold MTD or YTD). The graph
will be sorted in descending order. You may specify up to twelve items to be included in the graph.
This option allows you to graph up to twelve of your slowest moving items within a specified range. After
specifying the range of numbers to be graphed, the “Sort By” field, and the Item Number Mask, you must specify
how many items you want included in the graph. Next, you may have the system sort based on MTD activity rather
than YTD activity. The default answer is YTD, however, if you want to view MTD activity, simply click on it.
A list of the Item numbers, their descriptions, and the label letter (e.g., A = Item #1), which will be included on the
graph will then be displayed. Simply specify whether you would like a Bar Graph or a Pie Chart. Then, click on the
GRAPH button plot the graph.
Chapter 5
Perform Analytical Graphs
Page 5-3
Manufacturing Inventory Management User Manual
GRAPH RANKING BY GROSS PROFIT (IM0304)
This graph ranks and displays the most or least profitable inventory items (based on MTD or YTD gross profit). The
graph will be sorted in descending order. You may specify up to twelve items to be included in the graph.
After specifying the range of numbers to be graphed, the “Sort By” field, and the Item Number Mask, you must
specify how many items you want included in the graph. Next, you may have the system sort based on MTD activity
rather than YTD activity. The default answer is YTD, however, if you want to view MTD activity, simply click on
it.
The system will then ask which type of graph you want to “Key On.” This is how you determine the type of graph to
be displayed. The default is “Total Profit.”
•
Total Profit
•
Profit per Unit
•
Gross Profit %
Total Profit
This graph will list the items which have the highest overall
contribution to the company's profit. This is a good graph to use for
determining your most profitable product lines.
Profit per Unit
This graph will list the items which contribute the most revenue on a
“per-item” basis. This graph is excellent for analyzing the overall
profitability of an item versus simply basing buying decisions on
highest margins.
Gross Profit %
This graph will display the items with the highest profit margins.
This graph is beneficial for those firms who may compensate sales
people by gross profit. Next, simply specify whether you would like
a Bar Graph or a Pie Chart. Then press the GRAPH button to plot
the graph.
For a complete analysis of your inventory, you may wish to print all three graph types and then compare where
specific items fall on each graph.
Page 5-4 Perform Analytical Graphs
Chapter 5
Manufacturing Inventory Management User Manual
GRAPH RANKING BY COST (IM0305)
This graph ranks and displays, in either Bar Graph or Pie Chart format, the most or least costly inventory items
(based on current inventory value). The graph will be sorted in descending order. You may specify up to ten items
to be included in the graph.
This graph is particularly beneficial in determining where your inventory dollars are tied up. You may want to use
this graph to review the inventory costs in a specific location or see how much money you have invested in a certain
vendor's products. You can analyze the possible need to slow down the ordering of certain items and perhaps adjust
the minimum/maximum quantities to stock levels.
After specifying the range of numbers to be graphed, the “Sort By” field, and the Item Number Mask, you must
specify how many items you want included in the graph. Next, simply specify whether you would like a Bar Graph
or a Pie Chart. Then, press the GRAPH button to plot the graph.
Chapter 5
Perform Analytical Graphs
Page 5-5
Manufacturing Inventory Management User Manual
Page 5-6 Perform Analytical Graphs
Chapter 5
Inventory Management User Manual
INDEX
A
Active .......................................................................................................................................................................................... 2-73
Adjustment % .............................................................................................................................................................................. 2-75
All Inventory Items...................................................................................................................................................................... 4-38
Alternate Part Numbers ............................................................................................................................................................... 2-12
Alternate SKU ............................................................................................................................................................................. 2-12
ANALYTICAL REPORTS ......................................................................................................................................................... 4-43
AP Account.................................................................................................................................................................................. 2-84
AR – Due To INS ........................................................................................................................................................................ 2-80
AR Account ................................................................................................................................................................................. 2-79
Asset ............................................................................................................................................................................................ 2-11
Auto-Reserve Bill of Materials .................................................................................................................................................... 2-88
Available.............................................................................................................................................................................4-43, 4-71
Available (Available to Ship) ...................................................................................................................................................... 4-32
Average..........................................................................................................................................................................................1-3
B
Bar Code Label Form Name ........................................................................................................................................................ 4-67
Bar Code Label Text File Name .................................................................................................................................................. 4-68
Bar Code Master Sheet ................................................................................................................................................................ 4-64
BAR CODE READER ................................................................................................................................................................ 1-12
Bar Code Setup ............................................................................................................................................................................ 4-67
BAR CODES............................................................................................................................................................................... 2-86
Beginning Date ............................................................................................................................................................................ 2-73
Beginning/Ending Item................................................................................................................................................................ 2-74
Bill of Mat .....................................................................................................................................................................................2-8
Bill of Materials Report (Cost Projections)....................................................................................................................................4-8
Bill of Materials Report (IM0231).................................................................................................................................................4-5
Bill of Materials Report (Multi-Level Cost Projections) ............................................................................................................. 4-11
Bill of Materials Report (Multi-Level) ........................................................................................................................................ 4-10
Bill of Materials Report (Normal ) ................................................................................................................................................4-7
Bill of Materials Report (Summarized)..........................................................................................................................................4-9
Bin # ............................................................................................................................................................................................ 2-49
Bin Labels.................................................................................................................................................................................... 4-82
Bin No. ........................................................................................................................................................................................ 2-10
C
Calculate Manufacturing Requirements....................................................................................................................................... 4-17
Cancel the Print Job .......................................................................................................................................................................4-4
Category ...................................................................................................................................................................................... 2-10
CHANGING COSTING METHODS............................................................................................................................................1-4
Check if Sufficient Quantity ........................................................................................................................................................ 3-14
Check if Valid Components......................................................................................................................................................... 3-14
Clear Manufacturing Requirements Only .................................................................................................................................... 4-16
Clear Projected Usage Quantities ................................................................................................................................................ 4-16
Comments.................................................................................................................................................................................... 2-49
Components Used Report ...................................................................................................................................................4-14, 4-15
Copy Reserved To Ship Quantity to Projected ............................................................................................................................ 4-16
COS ............................................................................................................................................................................................. 2-11
Cost Label.................................................................................................................................................................................... 2-11
Cost Layer Report........................................................................................................................................................................ 4-78
Cost Layers ....................................................................................................................................................................................2-9
Cost Method ................................................................................................................................................................................ 2-10
Index
Page I-1
Inventory Management User Manual
Cost of Sales ................................................................................................................................................................................ 4-71
Cost Transfer ............................................................................................................................................................................... 2-64
Cost Variance .............................................................................................................................................................................. 3-17
Costs ..............................................................................................................................................................................................2-9
CTRL+O (Output Options)............................................................................................................................................................4-1
Current Record ..............................................................................................................................................................................4-3
Customer #................................................................................................................................................................................... 2-49
Customer Invoice #...................................................................................................................................................................... 2-49
D
DATA FILE DESCRIPTIONS.................................................................................................................................................... 1-10
Data Record Retrieval....................................................................................................................................................................4-3
Default Cost Method.................................................................................................................................................................... 2-83
Detailed Transactions Report..............................................................................................................................................4-26, 4-28
Direct Update............................................................................................................................................................................... 2-79
Displayed Report Options..............................................................................................................................................................4-3
Dollar Changes ............................................................................................................................................................................ 2-63
E
Emp/Sub ...................................................................................................................................................................................... 3-19
Ending Date ................................................................................................................................................................................. 2-74
ENTER NEW PHYSICAL QUANTITIES (IM0406) ................................................................................................................. 2-50
Enter Projected Usage Amounts .................................................................................................................................................. 4-16
Enter Projected Usage Quantities ................................................................................................................................................ 4-17
ENTER TRANSACTIONS ...........................................................................................................................................................3-1
Extended Cost.............................................................................................................................................................................. 3-23
F
File Import Modules Overview.................................................................................................................................................... 2-59
First Record ...................................................................................................................................................................................4-3
Fixed O/H ......................................................................................................................................................................................1-4
Font Attributes...............................................................................................................................................................................4-2
G
GENERAL OVERVIEW ..............................................................................................................................................................2-1
GL Journal Number ..................................................................................................................................................................... 2-84
GP %............................................................................................................................................................................................ 4-71
GP per Unit.........................................................................................................................................................................4-43, 4-71
GRAPH QUICK MOVING ITEMS ..............................................................................................................................................5-2
GRAPH RANKING BY COST.....................................................................................................................................................5-5
GRAPH RANKING BY GROSS PROFIT....................................................................................................................................5-4
GRAPH SLOW MOVING ITEMS ...............................................................................................................................................5-3
Gross Profit.........................................................................................................................................................................4-43, 4-71
Gross Profit % ...............................................................................................................................................................................5-4
H
Historical .......................................................................................................................................................................................2-8
HISTORICAL INFORMATION...................................................................................................................................................1-8
I
IMPLEMENT PRICE CHANGES (IM0412).............................................................................................................................. 2-63
IMPORT PHYSICAL COUNTS ................................................................................................................................................. 2-56
IMPORT PRICE TABLE ............................................................................................................................................................ 2-64
IMPORT TRANSACTIONS ....................................................................................................................................................... 3-24
Import Transactions Flowchart .................................................................................................................................................... 1-17
Page I-2
Index
Inventory Management User Manual
Individual Price Labels ................................................................................................................................................................ 4-61
Inquiry Mode (IM0100).................................................................................................................................................................2-8
Integration w/Accounts Payable ....................................................................................................................................................1-9
Integration w/Accounts Receivable ............................................................................................................................................. 1-10
Integration w/General Ledger ........................................................................................................................................................1-9
Integration w/Point of Sale .......................................................................................................................................................... 1-10
Integration w/Purchase Order Entry ..............................................................................................................................................1-9
Integration w/Sales Order Entry .................................................................................................................................................. 1-10
Integration with Job Cost Main Module ........................................................................................................................................1-8
Internet...........................................................................................................................................................................................2-8
INTRODUCTION .........................................................................................................................................................................1-1
Inventory...................................................................................................................................................................................... 2-80
INVENTORY CONFIGURATION ............................................................................................................................................ 2-81
INVENTORY COUNT SHEETS................................................................................................................................................ 4-80
Inventory Data Path ..................................................................................................................................................................... 2-79
Inventory Detail Report ............................................................................................................................................................... 4-74
Inventory Item Mask.................................................................................................................................................................... 4-68
Inventory Item Range .................................................................................................................................................................. 4-68
Inventory Listing (IM0216) ......................................................................................................................................................... 4-71
Inventory Shrinkage Report......................................................................................................................................................... 2-51
Inventory Shrinkage Report (IM0209)......................................................................................................................................... 4-48
Inventory Value Summary........................................................................................................................................................... 4-56
Item #........................................................................................................................................................................................... 2-57
Item Description .......................................................................................................................................................................... 2-10
J
Job ............................................................................................................................................................................................... 3-19
Job Cost Code.............................................................................................................................................................................. 2-11
L
Label Quantity ............................................................................................................................................................................. 4-68
Last Count.................................................................................................................................................................................... 2-12
Last Count Qt............................................................................................................................................................................... 2-57
Last Record....................................................................................................................................................................................4-3
Latest Unit Cost .............................................................................................................................................................................1-3
LIFO & FIFO.................................................................................................................................................................................1-3
Location.........................................................................................................................................................................................2-9
Lot Inventory .................................................................................................................................................................................1-5
Lot Number....................................................................................................................................................................................1-4
M
MAINTAIN INVENTORY FILES (IM0410) ............................................................................................................................. 2-92
MAINTENANCE REPORTS...................................................................................................................................................... 4-71
MAKE COMPLETE DATA BACKUPS .................................................................................................................................... 2-95
Manufact........................................................................................................................................................................................2-8
MANUFACTURING ...........................................................................................................................................................1-2, 2-87
MASKED FIELDS ...................................................................................................................................................................... 1-12
Masking (Wildcards) .....................................................................................................................................................................4-4
MASTER CONFIGURATION ................................................................................................................................................... 2-82
MATERIAL REQUIREMENTS REPORTS............................................................................................................................... 4-32
Maximum Qty.............................................................................................................................................................................. 2-74
Minimum Qty .............................................................................................................................................................................. 2-74
Multi-Location Inventory Tracking ...............................................................................................................................................1-6
Multi-Warehouse Inventory Tracking............................................................................................................................................1-7
N
Navigation Tools ...........................................................................................................................................................................2-5
Index
Page I-3
Inventory Management User Manual
Next Record...................................................................................................................................................................................4-3
NORMAL COSTING METHODS................................................................................................................................................1-3
O
On Hand, On-Order, and Reserved .............................................................................................................................................. 4-38
On-Hand ...................................................................................................................................................................................... 2-13
On-Order...................................................................................................................................................................................... 2-12
On-Order Items Only ................................................................................................................................................................... 4-38
Overstock Report ......................................................................................................................................................................... 4-35
P
Percent Changes........................................................................................................................................................................... 2-63
Period to Report On .......................................................................................................................................................................4-4
Phase/Sub .................................................................................................................................................................................... 3-19
Physical Count Updates Flowchart .............................................................................................................................................. 1-15
PREPRINTED FORMS............................................................................................................................................................... 1-12
Previous Record.............................................................................................................................................................................4-3
Price Table....................................................................................................................................................................................2-8
Price Labels ................................................................................................................................................................................. 4-62
Price Level................................................................................................................................................................................... 2-75
Price Level to Change.................................................................................................................................................................. 2-64
PRICE LEVELS .......................................................................................................................................................................... 2-84
Price Lists .................................................................................................................................................................................... 4-58
Price Plan Listing................................................................................................................................................................4-84, 4-85
Print a labelfor all quantities on-hand .......................................................................................................................................... 4-68
Print Bar Code Printer Labels ...................................................................................................................................................... 4-66
PRINT REPORTS .........................................................................................................................................................................4-1
Printer Device Name.................................................................................................................................................................... 4-67
Produce Sub-Assemblies Automatically...................................................................................................................................... 2-88
Production Trends........................................................................................................................................................................ 4-13
Production Trends Report ............................................................................................................................................................ 4-12
Profit per Unit................................................................................................................................................................................5-4
Profit Summary Report................................................................................................................................................................ 4-30
Projected Materials Usage Report.......................................................................................................................................4-18, 4-20
PROJECTING MATERIAL USAGE............................................................................................................................................1-2
Purchase Date .............................................................................................................................................................................. 2-49
Q
Qty. to Adjust .............................................................................................................................................................................. 2-12
QUANTITIES ............................................................................................................................................................................. 2-12
Quantity ....................................................................................................................................................................................... 2-48
Quantity Decimal......................................................................................................................................................................... 2-83
Quantity of labels for each item................................................................................................................................................... 4-68
Quantity Overstocked .................................................................................................................................................................. 4-32
Quantity Report ........................................................................................................................................................................... 4-37
Quantity to Adjust Items Only ..................................................................................................................................................... 4-38
Quantity to Transfer..................................................................................................................................................................... 3-23
Quick Moving Items .................................................................................................................................................................... 4-43
R
Range of Orders.............................................................................................................................................................................4-3
Ranking By Cost.......................................................................................................................................................................... 4-54
Ranking By Gross Proift.............................................................................................................................................................. 4-51
Recalculate Prices........................................................................................................................................................................ 2-64
Record Assembly Production Flowchart ..................................................................................................................................... 1-13
RECORD DISASSEMBLY......................................................................................................................................................... 3-16
Record Disassembly Production Flowchart ................................................................................................................................. 1-14
Page I-4
Index
Inventory Management User Manual
RECORD INTER-COMPANY TRANSFERS ............................................................................................................................ 3-11
Record Inter-Company Transfers Flowchart................................................................................................................................ 1-25
RECORD INVENTORY TRANSFERS........................................................................................................................................3-9
Record Inventory Transfers Flowchart ........................................................................................................................................ 1-26
RECORD PURCHASE ORDERS.................................................................................................................................................3-1
RECORD RECEIPTS....................................................................................................................................................................3-3
Record Receipts Flowchart .......................................................................................................................................................... 1-19
RECORD RETURNS ....................................................................................................................................................................3-8
Record Returns Flowchart ........................................................................................................................................................... 1-20
RECORD WITHDRAWALS ........................................................................................................................................................3-6
Record Withdrawals Flowchart ................................................................................................................................................... 1-22
Recording Purchase Orders Flowchart......................................................................................................................................... 1-18
Recording Sales Order Flowchart ................................................................................................................................................ 1-21
Reduce On Order ......................................................................................................................................................................... 2-83
Reduce Reserved ......................................................................................................................................................................... 2-83
RENAME IM ITEM NUMBER .................................................................................................................................................. 2-45
Re-Order ........................................................................................................................................................................................2-8
Report Print Options ......................................................................................................................................................................4-2
Report Sorting Preference..............................................................................................................................................................4-3
Req. Manf. ................................................................................................................................................................................... 2-13
Reserved to Ship .......................................................................................................................................................................... 2-12
Reserved to Ship Items Only ....................................................................................................................................................... 4-38
Reset Default Factors................................................................................................................................................................... 2-64
S
Sale Date...................................................................................................................................................................................... 2-49
Sale Price ..................................................................................................................................................................................... 2-49
Sales and Purchases Report ................................................................................................................................................4-24, 4-25
SALES AND PURCHASES REPORTS ..................................................................................................................................... 4-23
SALES, COS & PURCHASES BY ITEM ....................................................................................................................................5-1
Sample Import Inventory Items File ............................................................................................................................................ 2-33
Scroll View ....................................................................................................................................................................................4-3
Serial Number................................................................................................................................................................................1-3
Serial/Lot .......................................................................................................................................................................................2-9
SET UP AND MAINTENANCE ..................................................................................................................................................2-1
SET UP INITIAL COST LAYERS ............................................................................................................................................. 2-47
SET UP INVENTORY ITEMS .....................................................................................................................................................2-6
SET UP INVENTORY LOCATIONS......................................................................................................................................... 2-77
SET UP PRICE PLANS .............................................................................................................................................................. 2-71
Shrinkage Account....................................................................................................................................................................... 2-83
Shrinkage Quantity ...................................................................................................................................................................... 4-43
Shrinkage Value........................................................................................................................................................................... 4-43
Slow Moving Items...................................................................................................................................................................... 4-46
Sls Code....................................................................................................................................................................................... 2-11
SPECIAL DESIGN NOTES..........................................................................................................................................................1-1
Specific Price............................................................................................................................................................................... 2-75
Standard Cost.................................................................................................................................................................................1-3
STANDARD FEATURES FOR REPORTS..................................................................................................................................4-1
START FILE FOR A NEW FISCAL YEAR .............................................................................................................................. 2-93
Suggested Order........................................................................................................................................................................... 4-32
Suggested Order Report............................................................................................................................................................... 4-33
SYSTEM INTEGRATION...................................................................................................................................................1-8, 2-90
T
Total Cost .................................................................................................................................................................................... 4-71
Total Profit.....................................................................................................................................................................................5-4
TRANSACTION PROCESSING FLOWCHARTS .................................................................................................................... 1-13
Transaction Reference Number ................................................................................................................................................... 3-23
TRANSFER FROM A PROJECT ............................................................................................................................................... 3-21
Transfer Inventory from a Project Flowchart............................................................................................................................... 1-23
Index
Page I-5
Inventory Management User Manual
Transfer Inventory to a Project Flowchart ................................................................................................................................... 1-24
TRANSFER TO A PROJECT ..................................................................................................................................................... 3-19
Turn Component Quantity Checking Off .................................................................................................................................... 2-88
Turnover Trend Report ................................................................................................................................................................ 4-41
Type............................................................................................................................................................................................. 2-74
U
U/M ............................................................................................................................................................................................. 2-11
Unit Cost.............................................................................................................................................................................2-49, 3-23
Unit Cost/Price Dec. .................................................................................................................................................................... 2-83
UNIT OF MEASURE CONVERSION .........................................................................................................................................1-7
Unit Wgt. ..................................................................................................................................................................................... 2-10
UPDATE BOOK VALUE AFTER A COUNT ........................................................................................................................... 2-55
Update Physical Count Flowchart................................................................................................................................................ 1-16
V
Vendor # ...................................................................................................................................................................................... 2-49
Vendor Invoice # ......................................................................................................................................................................... 2-49
View Image....................................................................................................................................................................................2-8
W
WAREHOUSE TRACKING.........................................................................................................................................................1-6
Warranty Y/N .............................................................................................................................................................................. 2-49
Weight Decimal (0-5) .................................................................................................................................................................. 2-83
Where Used Report.............................................................................................................................................................4-21, 4-22
Y
YTD Total Average ..................................................................................................................................................................... 4-32
Page I-6
Index