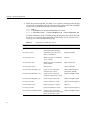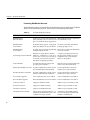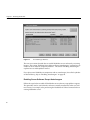
1
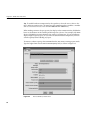
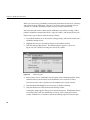
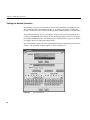
IRIX NetWorker™ Installation Guide
Document Number 007-3505-003
CONTRIBUTORS
Written by Celia Szente, Rebecca Mason, Vickie Brown, and Bill Tuthill
Production by Mike Dixon
Engineering contributions by Legato employees
St. Peter’s Basilica image courtesy of of ENEL SpA and InfoByte SpA . Disk Thrower
image courtesy of Xavier Berenguer, Animatica
© 1996-1997, Legato Systems Corp. and Silicon Graphics, Inc.— All Rights Reserved
The contents of this document may not be copied or duplicated in any form, in whole
or in part, without the prior written permission of Silicon Graphics, Inc.
RESTRICTED RIGHTS LEGEND
Use, duplication, or disclosure of the technical data contained in this document by
the Government is subject to restrictions as set forth in subdivision (c) (1) (ii) of the
Rights in Technical Data and Computer Software clause at DFARS 52.227-7013
and/or in similar or successor clauses in the FAR, or in the DOD or NASA FAR
Supplement. Unpublished rights reserved under the Copyright Laws of the United
States. Contractor/manufacturer is Silicon Graphics, Inc., 2011 N. Shoreline Blvd.,
Mountain View, CA 94043-1389.
Silicon Graphics and the Silicon Graphics logo are registered trademarks, and IRIX,
IRIX NetWorker, and IRIS InSight are trademarks of Silicon Graphics, Inc.
AIX is a trademark of International Business Machines Corp.
Exabyte is a trademark of Exabyte Corporation.
Informix is a registered trademark of Informix Software, Inc.
Legato NetWorker is a registered trademark of Legato Systems Corp.
Macintosh is a registered trademark of Apple Computer, Inc.
Motif is a trademark of the Open Software Foundation.
NetWare is a registered trademark of Novell, Inc.
NFS is a registered trademark of Sun Microsystems, Inc.
Oracle is a registered trademark of Oracle Corporation.
PostScript is a registered trademark of Adobe Systems, Inc.
SunOS and Solaris are trademarks of Sun Microsystems, Inc.
Sybase is a registered trademark of Sybase, Inc.
UNIX is a registered trademark of Silicon Graphics, Inc. of X/Open Company, Ltd.
Windows NT is a registered trademark of Microsoft Corporation.
X Window System is a trademark of the Massachusetts Institute of Technology.
IRIX NetWorker™ Installation Guide
Document Number 007-3505-003
Contents
List of Figures
v
List of Tables vii
About This Guide ix
Intended Audience ix
Conventions ix
Documentation and Support
x
1.
Installing NetWorker 1
Versions and Compatibility 1
Overview of Installation Procedures 2
Installing and Enabling NetWorker Servers 3
Installing NetWorker Servers 3
Licensing NetWorker Servers 6
Evaluating NetWorker—Temporary Licenses 7
Obtaining Permanent Licenses 7
Inserting Permanent Licenses 7
Enabling Server Software Except Autochangers 8
Enabling Autochangers 10
Installing and Enabling NetWorker on Clients 12
Installing Client Software 12
Configuring Clients to Recognize the Server 14
Using NIS to Configure Clients 14
Configuring Clients Without NIS or DNS 15
Removing NetWorker 16
2.
NetWorker Test Drive 17
Starting NetWorker 17
Changing the Device Name
19
iii
Contents
Using Preconfigured Settings 21
Labeling and Mounting a Backup Volume
Manual Backup and Recover 23
Viewing the Backup Schedules 24
Viewing the Client Information 25
Enabling Scheduled Backups 27
Starting a Backup Now 28
Monitoring the Backup 30
Checking Volumes 31
Recovering a File 32
E-mail and Print Confirmation 34
Grouping Clients 34
Index
iv
35
21
List of Figures
Figure 1-1
Figure 2-1
Figure 2-2
Figure 2-3
Figure 2-4
Figure 2-5
Figure 2-6
Figure 2-7
Figure 2-8
Figure 2-9
Figure 2-10
Figure 2-11
Figure 2-12
Figure 2-13
Figure 2-14
LicenseManager Interface 8
NetWorker Administrator Window 18
Devices Window 19
Devices Window, Details View 20
Label Dialog Box 22
Schedules Window 24
Clients Window 26
Groups Window 27
Group Control Window 29
Confirmation to Start Group 29
Group Control Details Window 30
Volume Management Window 31
Save Set Recover Window 32
Save Set Recover Status Window 33
Save Set Recover File Conflict Window 33
v
List of Tables
Table 1-1
Table 1-2
Table 1-3
Subsystems for NetWorker Servers 4
Licensed NetWorker Products 6
Subsystems for NetWorker Clients 13
vii
About This Guide
The IRIX NetWorker Installation Guide contains information on how to install and license
the IRIX NetWorker backup and recover software. Information on how to initiate
backup and recover using NetWorker default configurations is also included.
Intended Audience
This manual is intended for system administrators who install software and maintain the
servers and clients on a network.
For details about using the NetWorker windows and menus, and for configuration
information, refer to the IRIX NetWorker Administrator’s Guide. For instructions on using
the manual Backup and Recover applications, refer to the IRIX NetWorker User’s Guide.
To get information about a specific version of NetWorker, refer to the IRIX NetWorker
Release Notes for your release. If you want technical information about the NetWorker
commands, see the online reference pages after you have installed NetWorker.
Conventions
The following conventions are used in this manual to make information easy to access
and understand.
•
Command names are displayed in bold typeface. For example:
To start the NetWorker Administrator program, use the nwadmin command.
•
Examples of what you type are shown in bold fixed-width typeface. For example:
# nwadmin &
•
Words where you need to substitute a variable are displayed in italic typeface. For
example:
% man nsrCommand
ix
About This Guide
•
Examples, shell prompts, and information displayed on the screen are displayed in
fixed-width typeface. For example:
media waiting: recover waiting for 8mm 5GB tape volume name
•
Names of NetWorker buttons, displays, menus, scrolling lists, and windows are
displayed in Helvetica typeface. For example:
Click the Cancel button to close the Help window.
•
Directory pathnames, machine names, and new terms defined in the glossary are
displayed in italic typeface. For example:
When you use IRIX NetWorker to back up your /usr files from the client machine,
you are saving them to backup volumes on the IRIX NetWorker server.
•
The following paragraph types indicate various kinds of information to help you
use NetWorker productively.
Caution: Important pieces of information and cautionary notes that prevent you
from making a mistake are marked “Caution.”
Note: Helpful information that you might want to know is marked “Note.”
Tip: Tips or suggestions that you do not necessarily have to follow, but may give you
hints as to how to set up NetWorker at your site, are marked “Tip.”
Documentation and Support
Both the IRIX NetWorker Administrator’s Guide and IRIX NetWorker User’s Guide are
available online, as IRIS InSight books. To view the manuals, install the subsystems
networker4.books.NetWorker_AG and networker4.books.NetWorker_UG.
To access these books over the World Wide Web, please visit the Technical Publications
Library at http://techpubs.sgi.com/library/. Once there, click Library Search and search
for “NetWorker” in document titles.
Silicon Graphics offers a comprehensive product support and maintenance program for
IRIX products. For information about using support services for this product, refer to the
release notes that accompany it.
x
Chapter 1
1. Installing NetWorker
This chapter describes the procedure for installing, licensing, enabling, and removing
IRIX NetWorker 4.2.5-B. The NetWorker software distribution CD-ROM contains all the
software you need for Silicon Graphics servers and clients, including:
•
IRIX NetWorker server. The server edition supports parallel backup and recover
sessions and concurrent devices on a Silicon Graphics server. The network edition
also supports 10 network clients; additional clients can be added.
•
IRIX NetWorker client software for Silicon Graphics workstations.
•
Value added IRIX features, including large indexes, multistream filesystem saves,
and sparse file support.
•
Optional Autochanger Software Modules to support various jukeboxes.
•
NetWorker Archive option for file archiving and grooming.
•
BusinesSuite Module for Oracle option to perform high-volume database backup.
Licenses are required to enable the NetWorker server and the optional items. Each
NetWorker server and each autochanger require a license. NetWorker software is
license-protected with FlexLM™ nodelocked licenses. The NetWorker distribution is
shipped with a temporary license that enables full use of the basic NetWorker server for
a short period until you obtain permanent licenses from Silicon Graphics.
Versions and Compatibility
The NetWorker 4.2.5-B server runs on IRIX 5.3 and above. Refer to the IRIX NetWorker
Release Notes for a list of IRIX patch requirements. The server requires tertiary storage
(such as a tape drive) and enough disk space to store the installation images and the
indexes, which consume about 60 MB of disk space for each GB of backup data.
Caution: Server upgrades from NetWorker 4.1.3 (or 4.2.5) to NetWorker 4.2.5 -B are
supported, but upgrades from earlier versions have not been tested. NetWorker 4.2.5-B
replaces NetWorker 4.2.5, and is compatible with NetWorker 4.2.9 Power Edition.
1
Chapter 1: Installing NetWorker
The NetWorker 4.2.5 client software runs on IRIX 5.x or IRIX 6.x. Earlier versions of the
NetWorker client are interoperable with later versions of the NetWorker server.
An IRIX NetWorker server can back up Silicon Graphics clients and client systems from
other vendors as well. NetWorker software for other vendors’ clients, and installation
information for those clients, is included in the NetWorker ClientPak, which is available
either from Legato Systems or from Silicon Graphics.
NetWorker requires a no-rewind tape backup device (except for optical drives) because
it writes a file mark on the backup volume at the end of each backup and then appends
data based on the position of the file mark. If a device rewinds, the file mark position is
lost and previously written data is overwritten by the next backup.
Overview of Installation Procedures
To deploy NetWorker on Silicon Graphics servers, you must install the NetWorker server
software, obtain licenses, and enable the server and its optional components. To back up
the local disks of workstations across the network, you must also install NetWorker client
software on each workstation.
•
•
For instructions on installing the NetWorker server, see the section “Installing and
Enabling NetWorker Servers” on page 3.
–
Use the inst command to install NetWorker server software.
–
Obtain permanent licenses from Silicon Graphics, and use the LicenseManager
command to activate these licenses.
–
Enable the permanent licenses using the nsrcap command. Permanent licenses
replace the temporary license.
For instructions on installing the NetWorker clients, see the section “Installing
Client Software” on page 12.
–
Use the inst command to install NetWorker client software.
–
No license is necessary, but network configuration is advised to that clients can
quickly recognize the NetWorker server.
Note: NetWorker ClientPak products may include older versions of client software for
Silicon Graphics workstations. For the most up-to-date NetWorker client software,
please install from the IRIX NetWorker CD-ROM instead of from the ClientPak.
2
Installing and Enabling NetWorker Servers
Installing and Enabling NetWorker Servers
To install and enable NetWorker, you perform these tasks:
•
Install NetWorker, as described in the section “Installing NetWorker Servers.”
•
Activate licenses and perform other tasks to enable the NetWorker products, as
described in the section “Licensing NetWorker Servers.”
•
Configure DNS (domain naming system), NIS (network information service), or
/etc/hosts files on relevant systems, so clients can recognize the NetWorker server.
This is described in the section “Configuring Clients to Recognize the Server.”
•
For autochangers with the Archive option, plan to dedicate a slot for archiving.
Installing NetWorker Servers
To install NetWorker on an IRIX server, you need a filesystem on the server with enough
free disk space to store both NetWorker and its indexes. For each client (including the
server itself), the size of the indexes on the server is approximately 2% of the disk space
in use on the client, assuming average-size files and the default backup schedule.
Caution: Upgrading from NetWorker 4.1.3 to 4.2.5-B converts indexes to a new format,
and is irreversible (4.2.5-B index format is the same as 4.2.5 and 4.2.9). Before upgrading,
the NetWorker server should have as much free disk space on the /nsr partition as the
indexes currently consume, since index size can nearly double during conversion.
Follow this procedure to install Networker server software:
1.
Load the IRIX NetWorker software distribution CD-ROM.
2. On the NetWorker server, switch user to root.
% /bin/su Password:
If you are upgrading from an older version of NetWorker, stop the daemons now,
and make a copy of the /nsr partition, for example using xfsdump:
# /etc/init.d/networker stop
# xfsdump -f /dev/tape -J /nsr
3. Run the inst command, specifying the location of the NetWorker distribution:
# inst -f /CDROM/dist
inst> list
3
Chapter 1: Installing NetWorker
4. Select subsystems inside inst. Use Table 1-1 as a guide to selecting product images.
For example, to install the software, reference pages, release notes, and the InSight
versions of two NetWorker manuals, enter these commands:
Inst> keep *
Inst> i networker4.sw.server networker4.sw.client
Inst> i networker4.man.* *.books.NetWorker_UG *.books.NetWorker_AG
For more information on the available product images, refer to the IRIX NetWorker
Release Notes. For details about inst, refer to IRIX Admin: Software Installation and
Licensing, or see the inst(1M) reference page.
Table 1-1
4
Subsystems for NetWorker Servers
Subsystem
Description
Required/Optional
networker4.sw.server
NetWorker server software for
system performing backups
Required
networker4.sw.client
NetWorker client software for
IRIX 5.x and IRIX 6.x
Required (Default)
networker4.man.server
Reference pages for NetWorker
server software
Optional
networker4.man.client
Reference pages for NetWorker
client software
Optional (Default)
networker4.man.relnotes
Release notes
Optional (Default)
networker4.books.NetWorker_UG
Online version of the IRIX
NetWorker User’s Guide
Optional; IRIS InSight is a
prerequisite (Default)
networker4.books.NetWorker_AG
Online version of the IRIX
NetWorker Administrator’s Guide
Optional; InSight needed
networker4.books.NetWorker_IG
Online version of this book
Optional; InSight needed
networker4.sw.archive
Archive and retrieve client
Optional; license required
networker4.man.archive
Reference pages for Archive
Optional
networker4.sw.DMO
Database Module for Oracle
Optional; license required
networker4.books.NetWorkerDMO
Online version of the IRIX
Optional; InSight needed
NetWorker BusinesSuite Module for
Oracle Administrator’s Guide
Installing and Enabling NetWorker Servers
5. Perform the installation and exit inst:
Inst> go
...
Inst> quit
Note: If /nsr already existed and you want to evaluate NetWorker using temporary
licenses, you must delete all existing files and directories under /nsr now.
6. Choose a filesystem for the NetWorker index files. You can use part of an existing
filesystem or dedicate a filesystem (typically called /nsr).
Caution: If you are upgrading from NetWorker 4.1.3 to NetWorker 4.2.5-B, you need
as much free space on /nsr as the largest client index, because conversion involves
making a copy of the index. More space is highly recommended, especially to allow
index conversion in parallel. Running out of space results in a hung server.
7. If you choose a non-root partition instead of a dedicated /nsr filesystem, create a
symbolic link so NetWorker knows where to place the index files. For directory,
substitute the relative pathname of a directory on that filesystem, such as ./bigfs/nsr
on the /bigfs filesystem.
# ln -s directory /nsr
If you are upgrading from an older version of NetWorker, expedite the conversion
by running nsrck on each client index; see nsrck(1M) for more information:
# nsrck -D 10 client
nsrck: checking index for client ...
8. Start the NetWorker daemons with this command:
# /etc/init.d/networker start
At this point, the NetWorker server is ready for a test drive as described in Chapter 2.
Out of the box, NetWorker operates in evaluation mode using temporary licenses.
Because licenses have not yet been installed and enabled, you can ignore the following
messages, which eventually appear in /var/adm/SYSLOG and in mail sent to root:
Subject: registration status for client
NetWorker Registration: (notice) server disabled. Install base enabler.
NetWorker registration: (info) Server is disabled (Base expired).
Within 30 days after you install the NetWorker server, you must license it by following
instructions in the sections below. If your NetWorker server supports networked clients,
you must inform some network naming service by following instructions in the section
“Configuring Clients to Recognize the Server” on page 14.
5
Chapter 1: Installing NetWorker
Licensing NetWorker Servers
All NetWorker products are included on the NetWorker software distribution CD-ROM.
Table 1-2 lists NetWorker products, their features, and licensing information.
Table 1-2
Product
Description
IRIX NetWorker
Network edition
Supports 10 or fewer networked clients, IRIX NetWorker license is required on
up to 32 backup or recover sessions, and each NetWorker server.
up to 16 concurrent devices (tape drives).
IRIX NetWorker
Server edition
No built-in client support. An upgrade
makes this identical to network edition.
IRIX NetWorker
Power edition
Provides support for high-speed backup This license is required for NetWorker
and high-capacity devices.
server version 4.2.9.
Autochanger Software Module
Archive Module
6
Licensed NetWorker Products
Licensing Information
No clients—primarily intended for
backing up single servers.
Enables use of tape libraries and disc
jukeboxes. Available for 1-8 slots, up to
16 slots, up to 32 slots, up to 64 slots, up
to 128 slots, up to 256 slots, and more
than 256 slots (upgrades possible).
A separate autochanger license (for
the appropriate number of slots) is
required for each connected tape
library or disc jukebox.
Provides file archiving and optional
grooming and verification.
Client licenses not required, although
archive server must be licensed.
BusinesSuite Module for Oracle Provides a NetWorker connection from
the Oracle Enterprise Backup Utility.
License required for each Oracle
database server (per hostname).
Database Module for Informix
Provides a NetWorker connection from
Informix Online Backup and Restore.
License required for each Informix
database server (per hostname).
Server edition upgrade
Server edition becomes Power edition.
Same as NetWorker Power edition.
Nework edition upgrade
Network edition becomes Power edition. Same as NetWorker Power edition.
5 Client Connection
Supports 5 additional clients
Additive up to a maximum of 1000.
25 Client Connection
Supports 25 additional clients
Additive up to maximum of 1000.
100 Client Connection
Supports 100 additional clients
Additive up to maximum of 1000.
ClientPak Software Module
Allows client to perform backups to, or
administer, the NetWorker server. Also
available from Legato Systems.
Available for many UNIX systems,
various PC desktops, Windows NT,
NetWare, and Macintosh.
Installing and Enabling NetWorker Servers
When you purchase IRIX NetWorker server or any of the related optional products, you
must enable them by installing and activating FlexLM licenses.
Evaluating NetWorker—Temporary Licenses
The software distribution CD-ROM is shipped with evaluation mode, which provides a
temporary NetWorker network edition license, a temporary license for an autochanger
with 1-16 slots, and a temporary Archive license. These licenses allow you to use these
products on any Silicon Graphics server for a short period.
Note: If you are evaluating NetWorker, do not run the nsrcap command as shown in the
steps below, because it disables the temporary licenses that permit evaluation mode.
Obtaining Permanent Licenses
To continue using NetWorker products, before the temporary licenses expire, you must
obtain a permanent, nodelocked license for each NetWorker product you purchase. To
do so, either point your Web browser at http://www.sgi.com/Products/license.html
and fill out the forms, or send e-mail to [email protected]. Both the Web page and e-mail
form ask you to provide proof of purchase.
If you lack Internet access, you may telephone the 1-800-800-4SGI hotline within the
United States, or your local sales office elsewhere.
Inserting Permanent Licenses
If LicenseManager is installed on your server (the default in IRIX 6.2), click the Web site’s
AUTO_INSTALL button, or double-click the e-mail attachment from [email protected], to
have LicenseManager automatically install licenses in the /var/flexlm/license.dat file.
If you received e-mail without an installation script, or encounter a Web site without the
AUTO_INSTALL button, use your favorite editor to copy and paste the appropriate license
lines into the NetWorker server’s /var/flexlm/license.dat file.
The Product Name list in Figure 1-1 shows two NetWorker licenses as they appear after
installation, one license for the Archive option, and one for the NetWorker server
(network edition with 10 clients).
7
Chapter 1: Installing NetWorker
Figure 1-1
LicenseManager Interface
The next two sections describe how to enable NetWorker server software by activating
licenses. The section “Enabling Server Software Except Autochangers” explains how to
enable all server software except for jukeboxes. The section “Enabling Autochangers”
explains how to enable jukebox licenses.
If you plan to run NetWorker in conjunction with an autochanger (also called a jukebox
or robotic library), skip to “Enabling Autochangers” on page 10.
Enabling Server Software Except Autochangers
Follow the steps below to enable all NetWorker server software except jukebox support.
This procedure can be used when the software is initially installed and when you add
new licenses, for example, after purchasing the NetWorker 25 Client Connection for an
existing NetWorker server.
8
Installing and Enabling NetWorker Servers
To enable NetWorker on regular backup devices, follow these steps:
1.
Make sure you have purchased and installed FlexLM permanent nodelocked
licenses as described in the previous section.
2. Switch user to root on the NetWorker server.
% /bin/su Password:
3. If the subsystem license_eoe.sw.flexlm_utils is not already installed, use the inst
command to install it from the IRIX system software CD-ROM.
4. Verify that the NetWorker licenses were installed in /var/flexlm/license.dat. For
example, that file should contain lines like these:
FEATURE NW_BASE sgifd 4.000 1-jan-0 0 AC215525CE8EFE18215D \
VENDOR_STRING=NETWORK_EDITION HOSTID=#1762217977 \
vendor_info="NetWorker Network Edition" \
ISSUER="Silicon Graphics, Inc."
5. Start NetWorker:
# /usr/etc/nwadmin &
6. Activate the FlexLM licenses by running the nsrcap command (see nsrcap(1M) for
more information):
# /usr/etc/nsrcap -v
No license is available for feature
...
Found 1 FlexLM license for feature NW_BASE/NETWORK_EDITION
...
Found a FlexLM license for installation:
name:
NetWorker, Network Edition
enabler code: AC215525CE8EFE18215D
license type: B1
expires:
14299 days (Feb 06, 2036)
The nsrcap output lists the licenses you installed. These licenses are now activated.
Note: If you have the Registration window open from the nwadmin command when
you activate NetWorker licenses with nsrcap, close it to refresh the window.
If you are upgrading from an older version of NetWorker, check the Server window
for values of Parallelism and Sessions per device, which might not have been correctly
preserved during upgrade.
9
Chapter 1: Installing NetWorker
Enabling Autochangers
The procedure for enabling an Autochanger Software Module differs from the procedure
for enabling other NetWorker software in that it uses the jbm_enabler command. Use
the procedure in this section to enable each Autochanger Software Module you purchase,
either initially, or later as you add upgrades.
To enable NetWorker on jukebox devices, follow these steps for each autochanger:
1.
Switch user to root and run the jbm_enabler command to tell NetWorker about the
autochanger; see jbm_enabler(1M) for details. This command queries the system
for jukebox devices, and returns a list of the ones it found. For example:
# /usr/etc/jbm_enabler
Enter the number of the type of jukebox you are installing:
1) /dev/scsi/sc2d3l0
: DLT2700/DLT2700XT/DLT2500XT
Choice? 1
Installing DLT2700/DLT2700XT/DLT2500XT jukebox (/dev/scsi/sc2d3l0).
Name you would like to assign to the jukebox device? DLT
Do you want automated device cleaning support enabled? (yes/no) no
Looking for tape devices...
Following tape devices have been found:
*
1) /dev/rmt/tps2d3nrnsv : dlt
Choice for media drive 1? [1] 1
Jukebox has been added successfully
Note: Automated device cleaning is recommended for devices that lack an indicator
for when they need cleaning.
The numbers that you enter for the slots represent a range of slots, not the total
number of slots available. Entering a single slot number means that only a single
slot would be used for backup and recovery with NetWorker.
If jbm_enabler fails to find all the autochangers connected to a system, you can
disable automatic recognition as follows:
# /usr/etc/jbm_enabler -noauto
Enter the number of the type of jukebox you are installing:
1) DLT2700/DLT2700XT/DLT2500XT
2) DLT4700XT/DLT4500XT
3) ATL/Odetics 2640
4) Spectra Logic SL-4000
5) Breece-Hill Q7
6) Breece-Hill Q47
10
Installing and Enabling NetWorker Servers
7)
8)
9)
10)
11)
12)
13)
14)
15)
16)
17)
Qualstar TLS-4210
IBM 3590
STK-9704/Lago 340
STK-9708/STK-9711/Lago 380
STK-9710
EXB-10e/EXB-10h
EXB-10i
EXB-210
EXB-400 Series
HP-C1553A/Surestore 12000e
other
Choice?
Note: The list of supported jukebox types is subject to change.
2. Verify that the NetWorker jukebox licenses were installed in /var/flexlm/license.dat.
For example, that file should contains lines like these:
FEATURE NW_BASE sgifd 4.000 1-jan-0 0 AC215525CE8EFE18215D \
VENDOR_STRING=NETWORK_EDITION HOSTID=#1762217977 \
vendor_info="NetWorker Network Edition" \
ISSUER="Silicon Graphics, Inc."
FEATURE NW_AUTO sgifd 4.000 1-jan-97 0 DCE11347B151837A0F44 \
VENDOR_STRING=SLOTS=8 HOSTID=ANY vendor_info="NW Autochg <=8 slots" \
ISSUER="Silicon Graphics, Inc."
3. Start NetWorker:
# /usr/etc/nwadmin &
4. Activate the license by running the nsrcap command:
# /usr/etc/nsrcap -v
No license is available for feature
...
Found 1 FlexLM license for feature NW_BASE/NETWORK_EDITION
Found 1 FlexLM license for feature NW_AUTO/SLOTS=8
...
Found a FlexLM license for installation:
name:
NetWorker, Network Edition
enabler code: AC215525CE8EFE18215D
license type: B1
expires:
14299 days (Feb 06, 2036)
Found a FlexLM license for installation:
name:
NetWorker Autochanger, 8 slots
enabler code: DF215525CE8EFE18215G
license type: J8
expires:
14299 days (Feb 06, 2036)
11
Chapter 1: Installing NetWorker
Note: If you have the Registration window open from the nwadmin command when
you activate NetWorker licenses with nsrcap, close it to refresh the window.
If you are upgrading from an older version of NetWorker, check the Server window
for values of Parallelism and Sessions per device, which might not have been correctly
preserved during upgrade.
Installing and Enabling NetWorker on Clients
To install and enable NetWorker clients, you must perform these tasks:
•
Install the NetWorker client software on each NetWorker client workstation, as
described in the section “Installing Client Software.”
•
Configure DNS (domain naming system), NIS (network information service), or
/etc/hosts files on relevant systems, so clients can recognize the NetWorker server.
This is described in the section “Configuring Clients to Recognize the Server.”
NetWorker clients do not require a license. However, the total number of NetWorker
clients may not exceed the maximum number of client connections licensed for the
NetWorker server. Additive client licenses are available in units of 5, 25, and 100, and
may be applied in any combination.
Installing Client Software
Follow the steps in this section to install Networker client software. No enabling of the
client software is required.
1.
On the client, become root and invoke the inst command, specifying the location of
the NetWorker software distribution:
% /bin/su Password:
# inst -f /CDROM/dist
Inst> list
2. Select subsystems inside inst. Use Table 1-3 as a guide to selecting product images.
Subsystems not listed below are never needed on NetWorker clients. For example,
to install the required client software, the reference pages, and the IRIS InSight
version of the NetWorker user manual, enter these commands:
Inst> keep *
12
Installing and Enabling NetWorker on Clients
Inst> install networker4.*.client
Inst> install networker4.books.NetWorker_UG
For additional information on the available NetWorker product images, refer to the
IRIX NetWorker Release Notes.
Table 1-3
Subsystems for NetWorker Clients
Subsystem
Description
Required/Optional
networker4.sw.client
NetWorker client software
Required
networker4.man.client
Reference pages for client
Optional
networker4.books.NetWorker_UG
Online IRIX NetWorker User’s Guide Optional; recommended
networker4.books.NetWorker_AG
Online copy of the IRIX NetWorker
Administrator’s Guide
networker4.sw.archive
Archive and retrieve client software Optional; license needed
to enable server Archive
networker4.man.archive
Reference pages for Archive option Optional
Optional; useful for
system administrators
3. Perform the installation and exit inst:
Inst> go
Inst> quit
4. Check to see if the hostname alias nsrhost has been set to your NetWorker server:
# /usr/etc/ping -c1 nsrhost
PING b2.mktg.corp.com (199.99.172.4): 56 data bytes
64 bytes from 199.99.172.4: icmp_seq=0 ttl=252 time=4 ms
...
In this command, the -c argument is followed by a numeral 1 to indicate only one
ping request. The first line of output should contain the name of the NetWorker
server aliased to nsrhost, in this case b2.mktg.corp.com.
If the output does not contain the name of the NetWorker server, commands such as
the nwadmin do not automatically connect to the NetWorker server; users must
bring up the Change Server dialog box to specify a server, or run nwadmin with the
-s option to specify server name.
To set the hostname alias nsrhost to your NetWorker server, follow the directions in
the section “Configuring Clients to Recognize the Server” below.
13
Chapter 1: Installing NetWorker
Note: In IRIS FailSafe™ clusters, mounted filesystems are not always listed in /etc/fstab.
To have NetWorker back up nonexplicit filesystems, list them in /etc/fstab with the noauto
keyword in the options field:
/dev/dsk/dks1d2s7
/spare
xfs
noauto,rw
Configuring Clients to Recognize the Server
The clients on the network can be configured so that when they use the nwbackup or
nwrecover commands (and with the Archive programs, nwarchive or nwretrieve),
NetWorker automatically points to their server. If clients are not configured this way,
users must use the Change Server dialog box to specify their server, or run NetWorker
commands with the -s option to specify server name. Configure clients by defining a
host alias called nsrhost that can be resolved by each client to be the name of their
NetWorker server.
Configuring clients to recognize the NetWorker server can be done in these ways:
•
If your local network uses NIS (network information service), see the section below,
“Using NIS to Configure Clients.”
•
If your network uses DNS (domain naming system), refer to the chapter on the
BIND Name Server in IRIX Admin: Mail and Networking.
•
If your network uses neither NIS nor DNS, see the section “Configuring Clients
Without NIS or DNS.”
For more information about how clients bind to NetWorker servers, see the introductory
reference page, nsr(1M).
Using NIS to Configure Clients
If you have NIS on the network, follow these steps to configure clients to recognize the
NetWorker server:
1.
Identify the NIS master for each client using the ypwhich command on each client;
see ypwhich(1) for more information:
% ypwhich -m hosts
ypmaster
In this example, ypmaster is the master NIS host for the client.
14
Installing and Enabling NetWorker on Clients
2. As superuser on each of the master NIS hosts, edit the /etc/hosts file, adding nsrhost
as an alias after the original hostname of the NetWorker server. For example:
199.99.172.4
b2 nsrhost
Note: Only one host in /etc/hosts should have the nsrhost alias. If several NetWorker
servers back up files on clients served by a single NIS master host, some users may
have to specify their server by choosing Change from the Server menu (or with the
Change Server button) of nwbackup and nwrecover.
3. As superuser on each of the master NIS hosts, change directory to /var/yp and run
the ypmake command (see ypmake(1M) for details):
# cd /var/yp
# ./ypmake
4. To verify that each client can recognize the NetWorker server, enter this command
on each client after waiting a suitable period for the NIS databases to propagate:
# ypmatch nsrhost hosts
199.99.172.4
b2 nsrhost
The hostname listed in the output should be the name of the NetWorker server.
Configuring Clients Without NIS or DNS
This section describes the procedure for configuring a client to recognize the NetWorker
server when NIS and DNS (BIND) are not used on the network. This procedure can also
be used if NIS or DNS is in use on the network.
Follow these steps to hand-configure clients to recognize the NetWorker server:
1.
As superuser on each NetWorker client, edit the /etc/hosts file, adding nsrhost as an
alias next to the NetWorker server name:
199.99.172.4
b2 nsrhost
In this example, the client will be backed up by the NetWorker server named b2.
Note: If you have purchased NetWorker for more than one server, only one host
should have the nsrhost alias in each client’s /etc/hosts file.
2. If NIS and/or DNS are in use on the network, verify that nsrhost is correctly aliased:
# /usr/etc/ping -c1 nsrhost
PING b2.mktg.corp.com (199.99.172.4): 56 data bytes
64 bytes from 199.99.172.4: icmp_seq=0 ttl=252 time=4 ms
...
15
Chapter 1: Installing NetWorker
In the command, the -c argument is followed by a numeral 1 to indicate only one
ping request. The first line of output should contain the name of the NetWorker
server aliased to nsrhost, in this case b2.mktg.corp.com. If the output does not contain
the name of the NetWorker server, modify the client’s /etc/resolv.conf file so that the
local /etc/hosts file is checked before NIS or BIND. See the resolver(4) reference page
for more information.
Removing NetWorker
If you want to remove the NetWorker software and data files from a server system,
follow these steps:
1.
Shut down the NetWorker daemons using the following command:
# /etc/init.d/networker stop
2. Use the versions command to remove the NetWorker software; see versions(1M) for
more information. For example, to remove all the software, enter this command:
# versions remove networker4
If you want to remove just the NetWorker server, leaving the client software, enter
this command:
# versions remove "networker4.*.server"
Also remove NetWorker software on network clients using the versions command.
3. Remove the NetWorker configuration files and index files by entering these
commands:
# rm -r /nsr/*
# rmdir /nsr
If /nsr is a symbolic link to another filesystem, remove the symbolic link as well.
If you want to continue running the NetWorker client, start the nsrexecd daemon
using the following command:
# /etc/init.d/networker start
The NetWorker client re-creates the /nsr directories as needed.
16
Chapter 2
2. NetWorker Test Drive
This chapter leads you through some simple procedures to get NetWorker started doing
scheduled backups. The test drive includes the following tasks:
•
starting NetWorker
•
changing the device name
•
using preconfigured settings
•
labeling and mounting a backup volume
•
manual backup and recover
•
viewing the backup schedules
•
viewing the client information
•
enabling scheduled backups in the Groups window
•
starting a scheduled backup now
•
verifying the backup
If you have an evaluation copy of the NetWorker software, it is valid for 30 days from the
time you install it. This provides time to learn about NetWorker features and to decide
which NetWorker configuration best benefits your network environment.
Starting NetWorker
To start the NetWorker Administrator program, enter the nwadmin command at the
system prompt, or click the NetWorker Administrator icon, if visible.
# nwadmin -s server_name &
If you do not specify a server when you start nwadmin and you have more than one
server on the network, NetWorker attempts to find the server that backs up the current
directory, or a NetWorker server on the local subnet, or hostname nsrhost. For more
information on automatic server detection, see the nsr(1M) reference page.
17
Chapter 2: NetWorker Test Drive
Tip: To avoid problems when starting NetWorker graphical user interfaces, make sure
the desktop_eoe.sw product image is installed, that the X Window System is running, and
that your DISPLAY variable is set correctly.
The NetWorker window appears, as shown in Figure 2-1. The hostname of the system
where you started nwadmin appears after the at-sign (@).
Figure 2-1
NetWorker Administrator Window
Use the nwadmin window to administer, monitor, and configure backups. Refer to the
IRIX NetWorker Administrator’s Guide for a complete description of this window and its
menu choices.
18
Changing the Device Name
Changing the Device Name
NetWorker does not automatically detect and configure non-robotic devices. If your
backup device is not /dev/rmt/tps1d6nrnsv, you need to inform NetWorker of the correct
device name. (If you used jbm_enabler to autoconfigure jukebox devices, as described
in “Enabling Autochangers” on page 10, it is not necessary to modify any device names.)
To change the backup device, choose Devices from the Media menu. The Devices window
appears, as shown in Figure 2-2.
Figure 2-2
Devices Window
Click the Create button, and in the Name field, enter the pathname of an nrnsv (no-rewind
non-byte-swapping variable-blocksize) device listed in /dev/rmt. Click the Apply button,
and the new name appears in the Devices list. Set options as required. To remove the old
preconfigured device, select it in the Devices list and click the Delete button.
19
Chapter 2: NetWorker Test Drive
Tip: To enable hardware compression by the tape drive, select the nrnsvc device—the
final c indicates compression. (In some cases the compression drive includes a number
such as nrnsv.4000c or nrnsv.7000c for DLT 4000 and DLT 7000 drives.)
When making estimates of tape capacity for display in the Volumes window, NetWorker
bases its calculations on the smallest possible tape for a device. For example, with 4mm
devices, NetWorker assumes 60 meter tape with a 1.3 GB capacity. If your installation
deploys higher capacity tapes, or if you have enabled hardware compression, increase
volume capacity before labeling any tapes.
To increase volume capacity, choose Details from the View menu, entering expert mode.
Type the higher limit into the Volume default capacity field, as shown in Figure 2-3.
Figure 2-3
20
Devices Window, Details View
Using Preconfigured Settings
To get explanations of resource attributes, choose On Window from the Help menu. The
attributes that appear only in the Details view are explained in “expert” help topics.
Note: If you label a tape before setting volume capacity, the % used field in the Volumes
window shows incorrect numbers, although NetWorker can continue writing until the
volume is filled to capacity.
Using Preconfigured Settings
NetWorker is shipped with a complete set of preconfigured settings, which are the
default options for backing up clients on a network. In many cases, especially at first,
you do not need to change the NetWorker defaults. NetWorker provides preconfigured
settings for the following:
•
schedules for controlling when and how data is backed up
•
policies for managing the file and media indexes
•
directives for customizing the way NetWorker backs up data
•
label templates for labeling backup volumes consistently and automatically
•
groups for determining the groups to which clients belong
•
notifications inform you of NetWorker activity by e-mail and hardcopy
•
pools for sorting data to preselected backup volumes
You can use these preconfigured settings to back up your client data immediately after
installing NetWorker. You may change the preconfigured settings or create your own.
Once you enable the Default group in the Groups window, NetWorker backs up the server
as a client of itself using the preconfigured defaults.
Labeling and Mounting a Backup Volume
Backup volumes must be magnetically labeled before NetWorker employs them for
backing up files. NetWorker reads labels to track and identify the contents of backup
volumes. Unless your backup device supports bar codes, always place a physical label
on tapes corresponding with the magnetic label.
21
Chapter 2: NetWorker Test Drive
When you start recovery, NetWorker automatically determines the necessary volume(s)
and requests them by label name. This gives you time to locate and mount recovery
volumes. In a jukebox, NetWorker locates recovery volumes automatically.
You must label and mount volumes before NetWorker can perform a backup. With a
jukebox, NetWorker automatically labels a range of volumes, and mounts the first one.
Follow these steps to label and mount backup volumes:
1.
Locate blank media that can be used for writing backups, and load the media into a
NetWorker backup device.
2. Highlight that device in the Devices display in the nwadmin window.
3. Click the Label speedbar button. The Label dialog box appears, as shown in
Figure 2-4, with a field for entering the name of the volume.
Figure 2-4
Label Dialog Box
4. Enter a name, such as “demo.001” into the Volume name or Starting with field. Many
administrators use the hostname of the NetWorker server instead of “demo.”
You do not need to select a pool because the Default pool is already selected.
5. Click the Mount after labeling box (not necessary for jukebox labeling).
6. Click the Ok button to label and mount the backup volume.
A dialog box might appear, asking you to confirm the request. If NetWorker detects
an existing label, it asks for confirmation to recycle, since existing data on that
volume would be lost. Click OK to confirm the labeling request or Cancel to quit.
22
Manual Backup and Recover
Note: NetWorker does not ask for confirmation to overwrite tapes created by other
programs, such as tar, dd, dump, or xfsdump.
The name of the mounted volume appears next to the device name in the Devices
display in the nwadmin window.
Refer to the IRIX NetWorker Administrator’s Guide for information about the labeling and
mounting features that NetWorker provides for autochangers (jukeboxes).
Note: NetWorker uses the slot numbering scheme provided by the autochanger, which
may or may not correspond to the physical slot layout.
Manual Backup and Recover
Typically, NetWorker operates by automatically performing daily scheduled backups.
You can also use the NetWorker Backup program (nwbackup) to initiate manual backup
of selected files, and the NetWorker Recover program (nwrecover) to recover files, either
those backed up manually, or during a scheduled backup.
Refer to the “Quick Tour” section in Chapter 2 of the IRIX NetWorker User’s Guide for a
description of how to initiate manual backups and recovers. All users with access to
NetWorker client software can perform backup and recovery as needed. This is one of
the big advantages of NetWorker, for users and system administrators alike.
Thanks to the online file and media indexes, users can browse their backed-up files and
quickly identify files for recovery. NetWorker automatically identifies which backup
volumes contain the files needed for recovery. Adding a jukebox to your server allows
you to automate backups and recoveries—data protection and recovery then require
very little administrative intervention.
NetWorker offers many features to help you recover files in addition to those introduced
in the “Quick Tour” section. Refer to the IRIX NetWorker User’s Guide for a complete
description of the backup and recover interfaces.
23
Chapter 2: NetWorker Test Drive
Viewing the Backup Schedules
Most backup activity occurs unattended, thanks to the NetWorker scheduling features.
This section describes the Schedules window. It is common procedure to change the
backup schedule for a client without modifying the Schedules window, as shown below.
The NetWorker backup server is considered a client of itself. Once the Default group is
enabled in Autostart field of the Groups window, NetWorker backs up the server using the
preconfigured Default schedule. The Default group is disabled at first, to give you a chance
to configure devices and prepare backup media.
Open the Schedules window by choosing Schedules from the Customize menu in the main
window. The Schedules window appears, as shown in Figure 2-5.
Figure 2-5
24
Schedules Window
Viewing the Client Information
The Schedules window provides a calendar for setting up custom backup schedules.
Notice that each calendar day displays an “f” or an “i” next to the day: “f” represents a
full backup, and “i” represents an incremental backup.
The schedule named Default calls for a full backup every Sunday, followed by incremental
backups every other day. This minimizes the number of tapes required for recovery, but
consumes tape space relatively quickly because of weekly full backups.
In the Schedules list, select the preconfigured Quarterly backup schedule. This schedule
calls for a full backup on the first day of a quarter, level 5 backups on the first day of
following months, level 7 backups weekly, and incremental backups daily. The quarterly
schedule is a good compromise between ease of recovery and moderate tape use. Refer
to the IRIX NetWorker Administrator’s Guide for more information about schedules.
Note: Regardless of the selections in the preconfigured schedules, NetWorker always
performs a full backup the first time it backs up your files.
Viewing the Client Information
Open the Clients window by choosing Client Setup from the Clients menu. This is the
window to use for controlling backup of networked clients.
To back up client machines across the network, install the networker4.sw.client subsystem
on the clients, as described in the section “Installing Client Software” on page 12, then
use the Clients window to create these clients in some group. You will probably want to
create custom backup groups according to client data backup requirements and network
topology. Refer to the IRIX NetWorker Administrator’s Guide for more information about
creating new groups and assigning clients to them.
After you enable the Default group in the Groups window, the server backs itself up, using
settings in the Clients window. Preconfigured client settings are shown in Figure 2-6.
25
Chapter 2: NetWorker Test Drive
Figure 2-6
Clients Window
Tip: For this NetWorker test drive, change the Save set field to specify a single filesystem
or limited directory hierarchy instead of All. This will allow the test backup to complete
more quickly. For example, change the save set to just the /home directory.
To change from weekly full backups to the quarterly schedule, select Quarterly from the
drop-down list in the Schedule field. In the Aliases field, make sure the simple hostname
is listed in addition to the fully-qualified domain name (FQDN). NetWorker supplies the
correct alias automatically for clients, but not for the server.
26
Enabling Scheduled Backups
Enabling Scheduled Backups
After you configure devices and label backup media, you can enable the Default group.
At first, the only client in the Default group is the NetWorker server. As you add network
clients, you can put them in the Default group, or create specialized groups as needed.
Open the Groups window by choosing Groups from the Customize menu. The Groups
window appears, as shown in Figure 2-7.
Figure 2-7
Groups Window
Notice that the Start time is 3:33 AM and the preselected value for the Autostart choices is
Disabled. If you want to change the time NetWorker starts backing up this group, simply
enter a new start time.
27
Chapter 2: NetWorker Test Drive
To enable the Default group, follow these steps.
1.
Click the Enabled button in the Autostart field.
2. Click the Apply button to apply the change.
3. Choose Exit from the File menu to close the Groups window.
Now the NetWorker server, as part of the Default group, will start backing itself up at
3:33 AM every night. To get started, the first night involves a full backup.
The Client retries field controls the number of times NetWorker restarts failed backups.
Increasing this number improves backup reliability, but may slow down total save time
so that backups fail to complete in a reasonable time.
In the Groups window, choose Details from the View menu. New options appear. Scroll
down to the Inactivity timeout field. This value controls the time NetWorker waits before
abandoning a network save. For large clients, change this from 30 to 60 minutes.
Volume cloning is a good way of creating redundant volumes that can be stored offsite
to improve disaster preparedness. To make cloning work efficiently, it is best to have
multiple backup devices attached to the NetWorker server. Refer to the IRIX NetWorker
Administrator’s Guide for more information about cloning and the Groups window.
Starting a Backup Now
Now that you have enabled its Default group, NetWorker is ready to back up the server.
There are two ways to begin a backup immediately. In the Groups window, you could
select the Start now choice in the Autostart field and click Apply before exiting the window.
The easier way is to click the Start button in the Group Control window.
This example demonstrates how to start a backup in the Group Control window, where
buttons can also stop, restart, and monitor the progress of a backup.
To start a scheduled backup immediately from Group Control window, follow these steps:
1.
Click the Group Control speedbar button or choose Group Control from the Server
menu. The Group Control window appears, as shown in Figure 2-8.
2. If necessary, select the Default group in the Groups list.
28
Starting a Backup Now
Figure 2-8
Group Control Window
3. Click the Start button on the right. A confirmation dialog box appears, as shown in
Figure 2-9. Click OK or Cancel.
Figure 2-9
Confirmation to Start Group
NetWorker begins a backup of clients in the Default group and displays “running” in the
Status column of the Group Control window. The Default group uses the Default schedule
to back up data, unless you changed the schedule in the Clients window. However, the
first time NetWorker backs up any client, it performs a full backup for all of its data,
regardless of the schedule assigned.
Starting a backup now does not eliminate the regularly scheduled backup. If the group
is enabled, it will back up again as scheduled. In this case, NetWorker will back up the
Default group again at 3:33 AM as directed.
29
Chapter 2: NetWorker Test Drive
Monitoring the Backup
After clicking the Start button, keep the Group Control window open to verify and monitor
the progress of your backup. After NetWorker has successfully backed up your files, the
Finished message appears in the Status field.
If you want more detailed information about the files being backed up, click the Details
button in the Group Control window. The Group Control Details window appears, as shown
in Figure 2-10.
Figure 2-10
Group Control Details Window
For more information about the Group Control and the Group Control Details windows, refer
to the IRIX NetWorker Administrator’s Guide.
30
Monitoring the Backup
Checking Volumes
You might be curious how much space is left on the backup volume. An estimate of this
information is available in the media index. To see it, click the Volumes speedbar button,
or choose Volumes from the Media menu. The Volume Management window appears, as
shown in Figure 2-11.
Figure 2-11
Volume Management Window
In this example, NetWorker estimates that volume ishi.001 is 25% full, and remains
appen(dable). Increased media length, hardware compression, and tape blocking factors
can cause inaccuracies in these estimates. It is wise to be prepared with an alternate
backup volume for the inevitable day when the first volume fills up.
31
Chapter 2: NetWorker Test Drive
Recovering a File
To verify that data was correctly written to tape, try recovering a single file from the
backup just performed. The NetWorker save set recover feature makes this possible.
In the nwadmin window, choose Recover from the Save Set menu. The Save Set Recover
window appears, as shown in Figure 2-12.
Figure 2-12
Save Set Recover Window
In the Save Set field, select the backup data, in this case /home/user, instead of the index
and bootstrap. Then click the Recover button in the lower right. The Save Set Recover
Status window appears, as shown in Figure 2-13.
In the Paths to recover text field, enter the name of a text file, in this example tips. After
you press the [Enter] key, the full pathname of the file appears in the Paths to recover area.
Click the Start button at the bottom to begin recovery.
32
Recovering a File
Figure 2-13
Save Set Recover Status Window
After a while, the Save Set Recover File Conflict window appears, as shown in Figure 2-14.
Figure 2-14
Save Set Recover File Conflict Window
33
Chapter 2: NetWorker Test Drive
Click Ok to rename the recovered file. After a message appears in the Status field of the
Save Set Recover Status window indicating that the file was renamed, click Cancel to
avoid futher searching. Run a diff command as follows to compare the original file with
the recovered file—there should be no output.
$ diff /home/user/tips*
E-mail and Print Confirmation
Whenever NetWorker runs save, it sends e-mail to root describing the backup. The first
time involves a full save and looks something like this:
ishi:/home/user no cycles found in media db; doing full save
ishi: /home/user level=full,
232 MB 00:22:09
2846 files
ishi: /nsr/index/ishi no cycles found in media db; doing full save
ishi: /nsr/index/ishi level=full, 500 KB 00:00:05
6 files
ishi: bootstrap
level=full,
24 KB 00:00:03
13 files
NetWorker also prints out bootstrap information to assist during disaster recovery. This
appears in printed form, since e-mail might be unavailable after a system crash:
August 14 03:33 1997 ishi’s bootstrap information Page 1
date
7/29/97
time
3:38:58
level
7
ssid
26141
file
166
record
0
volume
ishi.001
Save the bootstrap information in a file folder, organized chronologically, in case you
need it for disaster recovery someday.
Grouping Clients
Listed below are suggestions for further configuration exercises.
34
•
Add clients to the Default group and enable the group for an overnight backup. In
the morning, check the results of the scheduled backup in your mail.
•
Create your own backup schedules and apply them to the appropriate clients.
Create several groups containing clients grouped logically by department. For
example, create a Marketing group that backs up all their machines at 12:00 AM,
and an Engineering group that backs up their machines at 2:00 AM.
Index
A
autochanger
enabling, 10
license required, 6
see also jukebox
Autochanger Software Module, 6
automated device cleaning, 10
B
backup
device name, 19
enabling scheduled backup, 28
for the first time, 25
no-rewind device, 2
starting now, 28
verifying, 30
bootstrap information for recovery, 34
C
caution, note, tip, x
changing device name, 19
client
binding to server, 14
configuring on network with NIS, 14-15
license not required, 6
recognizing the server, 14
software installation, 12-13
subsystems for, 13
Client Connections, 6
ClientPak Software Module, 2, 6
Clients window, 25
command
dd, 23
dump, 23
inst, 2, 3, 4, 9, 12
jbm_enabler, 10
LicenseManager, 2, 7
networker start, 5
networker stop, 3, 16
nsrcap, 2, 7, 9, 11
nsrck, 5
nsrexecd, 16
nwadmin, 9, 12, 13, 17
nwarchive, 14
nwbackup, 14, 15, 23
nwrecover, 14, 15, 23
nwretrieve, 14
ping, 13, 16
save, 34
tar, 23
versions, 16
xfsdump, 23
ypmake, 15
ypwhich, 14
confirmation, e-mail and print, 34
conventions for fonts, ix
conversion of indexes, 5
customer support, x
35
Index
D
G
daemons, starting up, 5
dd command, 23
device for backups, 19
device name, changing, 19
device pathname, 2
Devices window, 19
disk space for indexes, 3
DNS
and nsrhost alias, 15
configuring, 15
configuring client, 14
dump command, 23
Group Control Details window, 30
Group Control window, 28
Groups window, 27
E
e-mail confirmation, 34
enabling
Default group, 28
NetWorker products, 6-12
scheduled backup, 28
/etc/resolv.conf file, 16
evaluating NetWorker, 17
evaluation mode, 7
F
filesystem for /nsr directory, 5
FlexLM
installing and activating license, 7-12
license, 7
license for NetWorker, 6
license information sheet, 9
subsystem required, 9
36
I
index, disk space requirements, 3
index conversion, 5
index differences, between versions, 3
installation
on client, 12, 12-13
on server, 3-16
requirements, 3
subsystems on client, 13
subsystems on server, 4
inst command, 2, 3, 4, 9, 12
IRIS InSight manuals, x
IRIX version required, 1
J
jbm_enabler command, 10
jukebox
automation, 22
enabling, 10
installing and activating license, 10-12
license required, 6
slot numbers, 10
specifying slots, 10
L
labeling and mounting tapes, 21
Label window, 22
Index
license
FlexLM, 7
FlexLM subsystem required, 9
installing and activating, 8-12
permanent, 7
required for NetWorker, 6
temporary, 1, 7
LicenseManager command, 2
LicenseManager command, 7
nsrexecd command, 16
/nsr filesystem or directory, 5
nsrhost alias, 14-16
nwadmin command, 9, 12, 13, 17
nwadmin window, 18
nwarchive command, 14
nwbackup command, 14, 15, 23
nwrecover command, 14, 15, 23
nwretrieve command, 14
N
P
NetWorker
enabling, 7-12
evaluating, 17
installation, 1-13
other documentation, ix
removing, 16
software distribution CD, 1, 6
software distribution CD part number, 3
starting, 17
version, 2
NetWorker server
client of itself, 25
enabling, 8
enabling jukeboxes, 10
installing, 3
licensing, 7
removing, 16
networker start command, 5
networker stop command, 3, 16
NIS
and configuring, 14-15
and nsrhost alias, 15
no-rewind tape device, 2
note, tip, caution, x
nsrcap command, 2, 7, 9, 11
nsrck command, 5
pathname
of tape device, 2
ping command, 13, 16
preconfigured settings, 21
print confirmation, 34
R
reference pages, ix
reference page subsystems, 4
removing NetWorker, 16
S
save command, 34
Schedules window, 24
server
client of itself, 25
license, 6
license installation, 6-12
software installation, 3-16
software requirements, 3
subsystems for, 4
37
Index
software distribution CD, 6
starting NetWorker, 17
starting NetWorker daemons, 5
X
T
Y
tape device, no-rewind, 2
tar command, 23
technical support, x
temporary license, 1
tip, caution, note, x
typographical conventions, ix
ypmake command, 15
ypwhich command, 14
V
/var/adm/SYSLOG file, 5
/var/flexlm/license.dat file, 11
versions command, 16
versions of IRIX and NetWorker, 1
Volume Management window, 31, 32, 33
W
window
Clients, 25
Devices, 19
Group Control, 28
Group Control Details, 30
Groups, 27
Label, 22
nwadmin, 18
Schedules, 24
Volume Management, 31, 32, 33
38
xfsdump command, 23
Tell Us About This Manual
As a user of Silicon Graphics products, you can help us to better understand your needs
and to improve the quality of our documentation.
Any information that you provide will be useful. Here is a list of suggested topics:
•
General impression of the document
•
Omission of material that you expected to find
•
Technical errors
•
Relevance of the material to the job you had to do
•
Quality of the printing and binding
Please send the title and part number of the document with your comments. The part
number for this document is 007-3505-003.
Thank you!
Three Ways to Reach Us
•
To send your comments by electronic mail, use either of these addresses:
–
On the Internet: [email protected]
–
For UUCP mail (through any backbone site): [your_site]!sgi!techpubs
•
To fax your comments (or annotated copies of manual pages), use this
fax number: 650-965-0964
•
To send your comments by traditional mail, use this address:
Technical Publications
Silicon Graphics, Inc.
2011 North Shoreline Boulevard, M/S 535
Mountain View, California 94043-1389