1
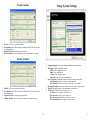
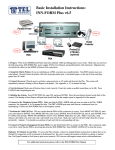
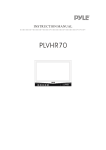
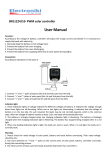
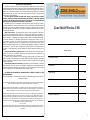
Manufacturer’s Limited Warranty
Manufacturer warrants all Covert Video and Sleuth Gear Hidden Video Products (Product)
assembled and sold by Manufacturer to be free of defects in material and workmanship, subject to
the following conditions. The duration of Manufacturer's warranty with respect to the Product is
limited to one (1) year from the date of sale to the original consumer purchaser only for Products
delivered within the fifty (50) states of the United States, District of Columbia, or the possessions
and territories of the United States
No other express warranties are made with respect to any Product. All implied
warranties, including warranties of merchantability and fitness for a particular purpose
are limited to the warranty period set forth above. This warranty is not transferable and
applies only to the original consumer purchaser of the Product.
Manufacturer will, as its sole obligation under this warranty, replace or repair, at its option,
any Product that does not conform to this warranty. Under no circumstances will the Manufacturer
issue credit or give a refund for Product covered by this warranty. Furthermore, under no circumstances will Manufacturer be liable for any incidental or consequential damages under this warranty or any implied warranties.
What Is Not Covered. This limited warranty does not cover Products that in Manufacturer’s judgment have damage resulting from any (i) deviation from Manufacturer's operating instructions as printed in Manufacturer's catalog or on any packaging, labels or other literature provided with a Product, (ii) installation of a Product in a manner which is inconsistent with Manufacturer's written instructions, (iii) alteration, modification of or tempering with a Product, (iv) misuse, (v) neglect, (vi) abuse, (vii) accident, (viii) power surge, static electricity or other electrical
discharge, (ix) normal wear and tear, (x) commercial use, (xi) service by anyone other than a
Manufacturer authorized repair facility, or (xii) other improper application, installation or operation
of the Product. Or, (xiii) have been purchased from inventory clearance or liquidation sales or
other sales in which Manufacturer expressly disclaims its warranty obligation pertaining to the
Product.
How you (the Customer) can get service: To obtain warranty service during the warranty period, you must return the defective Product with the original receipt to the original place of
purchase. Contact them for return instructions.
If warranty service is needed at any time during the warranty period, the purchaser will be
required to furnish a sales receipt/proof of purchase indicating the date of purchase, amount paid
and place of purchase. Customers who fail to provide such proof of purchase will be charged for
the repair of any Product.
How state law relates to the warranty: Some states do not allow limitations on how long
implied warranties last, or the exclusion or the limitation of incidental or consequential damages.
So the above limitations or exclusions may not apply to you. This warranty gives you specific legal
rights. You may also have other rights that may vary from state to state.
NO PERSON IS AUTHORIZED BY MANUFACTURER TO MODIFY OR ADD TO THIS
LIMITED WARRANTY.
For warranty information on Products delivered outside the United States please contact the original place of purchase.
Zone Shield Wireless USB
Table Of Contents
WUSB Software Installation
2
WUSB Operation
4
Remote View Setup
WUSB Settings
6-7
8-14
IT IS THE USER’S RESPONSIBILITY TO ENSURE THAT THIS EQUIPMENT IS USED IN ACCORDANCE WITH
THE LAW(S) OF THE JURISDICTION IN WHICH THIS EQUIPMENT IS UTILIZED.
DO NOT ATTEMPT TO RETURN PRODUCT TO ORIGINAL MANUFACTURER, AS THIS PRODUCT HAS BEEN
MODIFIED AND IS NO LONGER SUBJECT TO ORIGINAL MANUFACTURER’S WARRANTY. IN THE CASE OF
A DEFECTIVE PRODUCT, CONTACT PLACE OF PURCHASE FOR RETURN PROCEDURE.
Playback Recorded Video
15
THIS EQUIPMENT HAS BEEN TESTED AND HAS BEEN FOUND TO BE IN COMPLIANCE WITH THE LIMITS
FOR A CLASS B DIGITAL DEVICE, PURSUANT TO PART 15 OF THE FCC RULES. THESE LIMITS ARE DESIGNED TO PROVIDE REASONABLE PROTECTIONS AGAINST HARMFUL INTERFERENCE IN A RESIDENTIAL INSTALLATION. THIS EQUIPMENT USES, GENERATES AND CAN RADIATE RADIO FREQUENCY ENERGY AND IF NOT INSTALLED AND USED IN ACCORDANCE WITH INSTRUCTIONS, MAY CAUSE HARMFUL
INTERFERENCE TO RADIO COMMUNICATIONS.
Part 15 Low Power:
ANY CHANGES OR MODIFICATIONS TO THIS EQUIPMENT WITHOUT THE EXPRESS AUTHORIZATION OF
THE MANUFACTURER COULD VOID THE USER’S AUTHORITY TO OPERATE THIS EQUIPMENT. (RULE 15.21
OF THE FCC)
Specifications and Warranty Info
16
16
1
Playback
WUSB Software Installation
1. Main Screen Display: This ar ea shows the video output fr om the
recording.
2. Time and Channel Selection: Select r ecor ding time and channel to
filter recording time. Once selection is made select Query.
3. Record List: This ar ea shows a list of r ecor ded videos. In this ar ea
you can select a recording file and delete it or open new recordings.
4. Video Tracker: Use this to navigate thr ough the video.
5. Playback Controls: Use these tools to cycle thr ough files, fast for ward, and select playback speed.
6. Capture Options: Use the camer a to captur e a scr een shot on the
main display. Use the folder to access previously recorded screen shots.
The Light on the USB Receiver will illuminate when the receiver is inserted
into the USB port on your computer. Insert the provided CD into the CD
drive on your computer.
Click Next
2
15
Alert Settings
Choose the location of the files to be installed
Click Next
Alert settings will be available if the recording option is set to “Triggered”.
This section allows you to set notification options in the event that motion
detection is triggered.
Click Install
1. Vibration Alert: When motion is detected WUSB softwar e will
shake or “vibrate”.
2. Message Alert: Prompts a message on WUSB software when motion is
detected.
3. Sound Alert: When motion is detected the selected sound will occur.
4. Email Alert: An email will be sent when motion is detected.
Click Finish, The driver installation is now complete
14
3
WUSB Operation
Motion Detection Recording
Click the WUSB icon to open the program. The main WUSB screen can be seen below.
1.
2.
1.
2.
Monitoring Screen: This will display the camer a’s view.
Channel Status: This ar ea will display the status of individual camer as.
Camera is monitoring
Camera is in standby mode
Camera is recording
3.
4.
5.
Option Menu: This ar ea allows you to do the following.
Snapshot: Take a snapshot of the camer a’s view.
Detect: Contr ol the viewer to go in to detection mode or standby mode.
Web Server: Enables r emote view mode.
Setup: Enter s the location to change softwar e settings.
Playback: Enter s the playback mode to view r ecor ded videos.
Channel Information: Displays the cur r ent channel.
Camera/Screen Control: This ar ea contr ols the following.
Displays camera
signal strength
Display one channel
Inactive
Display multiple
channels
Open snap shot
folder
Continuous cycle
through all cameras
Display Screen: Shows the cur r ent camer as image.
Detection Settings: Allows custom ar eas to detect motion.
Full Area Detection: Detects all ar eas on the scr een. (Less sensitive)
Custom Detection: Detects user cr eated detection blocks. This is
recommended to detect motion with higher sensitivity.
Add New Area: Select then click and dr ag on the camer as image to cr eate
motion zones. Create multiple small motion zones for higher motion detection
sensitivity.
Delete Area: Select a motion ar ea on the camer as image and select delete
area to remove.
Delete All Areas: Deletes all motion ar eas on the camer as image.
Test Detection: Test motion detection by moving an object in fr ont of the
camera. When motion is triggered the area on the cameras image will change
color.
Sensitivity: Adjust sensitivity of the motion ar ea.
Adjust screen size
on the monitoring
screen
34
13
Weekly Schedule
1.
2.
1.
2.
Setup: System Settings
Weekly: This is to set a weekly schedule.
Start/End Date: Star t Date of when r ecor ding will star t. End date of when
recording will end.
Operative Period: Set r ecor ding oper ation date.
Weekly Schedule: Select the days dur ing the week to enable r ecor ding.
Monthly Schedule
1.
2.
3.
1.
2.
1.
2.
4.
5.
6.
Monthly: This is to set a monthly schedule.
Start/End Date: Star t Date of when r ecor ding will star t. End date of when
recording will end.
Operative Period: Set r ecor ding oper ation date.
Monthly Schedule: Select the days of the month to enable r ecor ding.
12
Language Support: Changes the language displayed on the pr ogr am.
Mail Server: Email notification settings.
SMTP: Your outgoing mail sever
Email: Your email addr ess
Account: Your email user name
Password: Passwor d for your email addr ess
Start Up Options: Settings that ar e in place when softwar e is launched
Start Detecting: Starts the softwar e in detection mode
Start Web Server: Star ts the softwar e with web ser ver enabled
Recurring Recording: Recor ds over older files to save space on stor age dr ive
Record: Stor age location for video r ecor dings and snapshots
Web Service: Configur ation for r emote view
IP Address: Your computer ’s IP addr ess
Web Server Port: Por t used to r emote view
Web Server Account: Default user name is “user ”
Web Server Password: Passwor d for r emote view.
5
Remote View Setup
Setup: Add New Schedule
Follow these instructions carefully to enable remote view capability. Remotely
viewing the WUSB software requires an "always on" broadband internet
connection, a router, and port forwarding.
Periodic Schedule
Open a Router Port
Opening a port on your router allows WUSB to broadcast your live video feed to
the internet. It is recommended to open a port that is not a common port, such as
port 30000. There are several options for opening a router port. It is recommended to contact your router manufacturer's technical support or refer to your router
user manual. If contacting the router manufacturer, tell them you need to open a
router port for remote view of a IP security camera. They should walk you
through doing so. If you're using a broadband router (a combination modem/hub)
provided by your internet service provider (ISP), contact your ISP for instructions
on opening a port. Another option is to visit http://www.portforward.com to find
step-by-step instructions on port forwarding for your particular router. There are
many ads and nuances to this web site, so follow these instructions carefully:
Scroll to the bottom, find, and click on your router brand and model. In the top right corner
of the screen, click the words “Click here to skip this advertisement…” Click the orange
“Default Guide” (located in the last sentence in the upper paragraph) - Here you will find
step-by-step instructions on opening a port on your router. Once again, when you open a
port, use an uncommon port, such as 30000. You may also open a range of ports, e.g.
30000-30005 if necessary.
1.
2.
Periodically: This is to set a schedule that r ecor ds at specified times.
Start/End Date: Star t Date of when r ecor ding will star t. End date of when
recording will end.
Daily Schedule
Find Your External IP Address/Verify Your Open Router Port
There are many sites that can provide you your external IP address. YouGetSignal.com
enables you to find your external IP address and verify the port you opened in your router
is truly open. Your port must be open in order use to remote view.
1.
2.
Go to http://www.yougetsignal.com/tools/open-ports/ (see image above). You will see
your external IP address in the “Remote Address” field. Type the port number you opened
in the “Port Number” field. Click Check. If it tells you the port is open then port forward
was executed successfully. If it tells you that the port is closed the port was not opened
successfully. Double check your router settings as a port must be opened in order to use
remote view.
6
1.
Daily: This is to set a daily r ecor ding schedule.
Start/End Date: Star t Date of when r ecor ding will star t. End date of when
recording will end.
Operative Period: Set r ecording oper ation date.
11
Setup: Record Setup
View Live Video Feed Remotely
Open a web browser (Internet Explorer), in the Address Bar of your computer type in
your external IP address and open port number. Use the following format: http://
IPADDRESS:PORT. As an example, you would use http://12.34.567.89:30000 for the
address and port number in image on pg 6.
Notes
The view that you will see remotely is the current view that you have showing in the software. e.g. if you are showing channel 2 (camera 2) in the software, this is the view you
will see when logging in remotely. If you want to see all 4 cameras from your remote
location, make sure you have quad-view displayed.
Capture software must be running or it will not broadcast your video feed.
1. Image Quality: Adjusts the quality of the r ecor ding for mat.
Resolution: Adjusts the r ecor ding image size.
Quality: Recor ding image detail.
2. Surveillance Mode: Adjusts the types of r ecor ding.
Schedule: Set r ecor ding schedule. Also choose whether to
record continuously or in motion detection.
Record-at-click: Once in standby, click to r ecor d in
continuous or motion.
Non-record: No r ecor ding.
Full-time: Will always recor d.
Triggered: Will r ecor d a time fr ame when viewer detects
movement.
3. Scheduled Based: If “schedule” is chosen fr om mode you can
preset a time to record.
Add new schedule: Add new schedule.
Edit schedule: Edit an existing schedule.
Delete schedule: Delete a selected schedule.
"Remote-View" is exactly that - a live view from a remote computer. This will not work
from a computer that is on the same network.
Occasionally, your ISP may change your external IP address. It may also change after a
power outage, or if you've turned off or unplugged your broadband modem. If your remote
view stops working, check to see if your external IP address has changed
A Few Words About Remote-View Technology
Streaming video is only as good as the equipment and connections that enable it. There
are many variables that affect how smooth the video stream is that you actually see remotely. These variables include the speed, current load, and bandwidth of the internet
connections of both the web server (your computer) and the remote view computer or
smart phone, your ISP's limitations on bandwidth, the speed and current load on your
cellular network (2G, 3G, 4G, etc). Video loss and freezing video are typically due to an
insufficient internet connection. If video loss or freezing occurs this will not affect
WUSB recording.
10
7
Setup: Camera Settings
Setup: Image Adjust
1. Image Adjust: Change video par ameter s to pr ocess br ightness, saturation and gamma.
2. Choose from the following to adjust the image
Flip Horizontal: Flips the image hor izontally
Flip Vertical: Flips the image ver tically
Rotate: Rotates the image accor dingly with r otation angle and
direction.
1. Name and Note: Name defines the name of the camer a. Note is for
any special notes about the camera.
2. Text Display: Allows customization of what infor mation can be
displayed on the cameras image.
Channel Information: Check to show channel number and/or
channel name
Date Time: Check to show date, time, and/or week
Font Size: Adjusts the size of the font being displayed
Fore color: The color of text shown on the scr een
Background: The text’s backgr ound color on the scr een
Watermark: Check for attaching a water mar k image on the
screen.
8
9