1
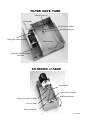
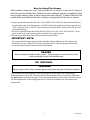
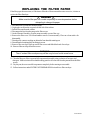
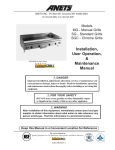
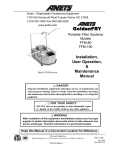
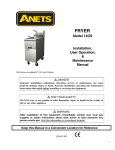
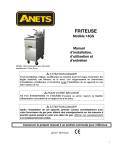
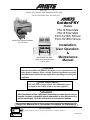
Anets, Inc.
PO Box 501 Concord, New Hampshire 03302-0501
Tel: 603-225-6684 • Fax: 603-228-5231
GoldenFRY
Models
FM-14 Filter Mate
FM-18 Filter Mate
Filt II-14/14W Filtronic
Filt II-18/18W Filtronic
Model Filt II-14W shown banked
to (2) 14” fryers
Model FM-14 Filter Mate
shown under the base system
of (2) 14” fryers
Installation,
User Operation
&
Maintenance
Manual
DANGER
Improper installation, adjustment, alteration, service, or maintenance can
cause property damage, injury or death. Read the installation, operating
and maintenance instructions thoroughly before installing or servicing this
equipment.
! FOR YOUR SAFETY
DO NOT store or use gasoline or other flammable vapors
or liquids in the vicinity of this or any other appliance.
! WARNING
After installation of this equipment, immediately contact your local gas
supplier to obtain information about what action to take whenever any
person smells gas. Post this information in a prominent location.
Keep this Manual in a Convenient Location for Reference
FM-14
FM-18
Filt II-14/14W
Filt II-18/18W
The Anets GoldenLine
Quality Equipment For The Restaurant, Supermarket, and Bakery Industries
1
L20-386 R1
TABLE OF CONTENTS
Shipping Container Inspection ....................................................... 2
Code Requirements ...................................................................... 2
Filter Unit Preparation Instructions ................................................ 3
Filter System Diagrams .................................................................. 4
Filtering Instructions ...................................................................... 5
Oil Disposal Instructions ............................................................... 6
Replacing the Filter Paper ............................................................ 7
Filter Troubleshooting Guide .......................................................... 8
Filter Warranty .............................................................................. 9
! DANGER
Read these specifications, Code Requirements, Installation Requirements,
Installation Instructions, and Operating Instructions very carefully. Failure to follow the
Instructions could cause the filter system to malfunction. A filter system malfunction can
result in property damage, serious bodily injury, or death.
SHIPPING CONTAINER INSPECTION
1. Carefully examine the shipping container for external damage. When damage is noted, notify the
delivery carrier immediately. Save all packing materials for damage claim examination.
2. If no external damage is noted, remove the shipping container from the filter and examine the unit
carefully for damage. Place the filter in a safe location, if damage is noted, so that the freight damage
claims adjuster can examine it.
Models Covered By This Manual
FM-14
FM-18
Filt II-14
Filt II-14W
Filt II-18
Filt II-18W
Filter Mate, Under Fryer Filter System - 14”
Filter Mate, Under Fryer Filter System - 18”
14” Filtronic Filter System in Cabinet
14” Filtronic Filter System with Heat Lamp
18” Filtronic Filter System in Cabinet
18” Filtronic Filter System with Heat Lamp
Standard Accessories furnished in the shipping carton with this filter include:
(1) Filter Screen Assembly
(1) Sample Package Filter Paper
Other available Optional equipment may include a separate hose assembly for shortening removal and a
cleaning brush. These would be packed with the fryers, if ordered.
NOTE: A Parts List for each Anets Filter System is among the items shipped with each unit. If an
additional copy of this list is needed, please contact the factory as directed on the back cover.
2
L20-386 R1
INSTALLATION
This Manual will detail the Installation and Operation of the Filter-Mate
system, with notes where the Filtronic II System differs.
Both the Filter Mate and Filtronic II Systems enable the user to safely and efficiently filter the cooking oil or
shortening from a fryer in a banked row while the other fryers in that row are still being used. Even though
these two Filtration Systems are slightly different in physical dimensions and design, the Installation and
Operation is basically the same.
FILTER ELECTRICAL SPECIFICATIONS
Please make sure that your desired filter location has electrical supply factors that are suitable for this product.
Requirements are 120 Volts, 60 Hz, 8 Amps, 1-phase, three-wire connection, including an electrical
ground.
!
WARNING
!
Electrical Grounding Instructions
This appliance is equipped with a three-prong (grounding) plug for
your protection against shock hazard, and should be plugged
directly into a properly grounded, three-prong receptacle. DO NOT
cut or remove the grounding prong from this plug.
FILTER UNIT PREPARATION (Refer to Photos On Page 4)
1.
2.
3.
4.
5.
6.
7.
8.
9.
10.
Assemble filter envelope to filter screen by sliding the envelope over the filter screen, folding
back the open end over the filter screen. Make sure the hole in the filter envelope fits over the
fitting on the filter screen.
Assemble filter envelope clip over folded back end of envelope and over fitting on filter screen.
Attach knurled retaining nut onto fitting on screen, securing the assembly.
Attach quick-connect coupling on drain tube to knurled retaining nut.
Place filter unit into the filter tank using the lift-out handle.
Connect the filter assembly to the pump using the quick-connect assembly.
Put the filter tank cover on the tank.
Slide the filter tank unit into its location under the fryers or in the filter cabinet.
Make the connection from the fryer return line to the filter pump with the quick-connect fitting.
Plug the cord on the side of the filter unit into the receptacle on the fryer frame. Make sure that
the power switch located on the side or top of filter unit is ON.
3
L20-386 R1
FILTER MATE TANK
Filter envelope clip
Lift out handle
Quick connect coupling
Knurled retaining nut
Pump quick-connect coupling
Filter envelope
Return line and optional hose
connection
FILTRONIC II TANK
Lift out handle
Quick connect coupling
Knurled retaining nut
Pump quick-connect coupling
Filter envelope
Filter envelope clip
4
L20-386 R1
FILTERING INSTRUCTIONS
CAUTION
Never operate the filter unit unless the cooking oil or shortening in the
fryers has been brought up to cooking temperature.
WARNING
Always wear protective heat-resistant gloves when performing the filtering operation.
FILTERING
1. Before filtering the shortening in a fryer, turn the thermostat knob to “OFF” or the Gas Valve to “PILOT” to prevent the fryer from re-lighting during filtering On some models the system automatically
prevents the burners from lighting when the door of the fryer is open.
2. Open the drain valve (black handle) on the fryer to be filtered, letting all the shortening drain into the
filter tank. Leave this valve open.
! DANGER !
Never drain more than one fryer at a time – the filter pan may overflow.
3. Open the return line valve (yellow handle) for the fryer being filtered. This activates the power to the
pump. If the pump does not start immediately check that the switch on the side or top of the pump
frame is “ON”. While the filter system is cycling, use a long-handled cleaning brush to wipe the bottom
of the fryer and push excess crumbs through the drain and into the filter machine.
WARNING
When cleaning the inside of the frypot, do not damage the temperature and
hi-limit probes that protrude into the frypot.
4. When the shortening returning into the fryer is clear, close the drain valve (black handle) and allow the
fryer to refill.
5. Allow the pump to run until no more oil is returning into the vat. Then close the return line valve
(yellow handle), which de-activates the power to the pump.
WARNING
If solid shortening is being used it is very important that all oil is allowed to flow back into
the vat and none is left in the hoses. Failure to do so could cause the pump to fail if the
oil solidifies in the line.
5
L20-386 R1
Note On Using Filter Powder
If filter powder is being used, add 1 cup of powder (for 14” fryers) or 2 cups (for 18” fryers) to
either the fry tank or the filter tank. If added to fry tank, make sure powder is completely flushed
during fry tank cleaning (Step 3) before closing drain valve (Step 4). If added to filter tank, the
powder will be removed when the filter envelope is changed and the filter tank is cleaned.
6. On gas-operated thermostat models (14G, 14GS, MXEG, 18EG, 20EG) the thermostat knob can now
be turned back to the desired temperature. CAUTION: On these models the thermostat must be set to
“OFF” or the Gas Valve to “PILOT” before filtering or the burners MAY come back on if the doors are
closed during filtering.
7. On electric-operated thermostat models (MX-14E, MX-14AA, 18E, 18AA, 20E, and 14EL-17) the
power switch on the control panel must be reset for the fryer to operate again.
8. The other fryers in the bank can be filtered using the same procedure.
IMPORTANT NOTE:
The pump on this filter unit is equipped with a safety that will turn off the motor if it overheats or an
electrical fault occurs. If this occurs, let the pump motor cool for 15 minutes, then press the manual
reset button on the bottom of the motor and restart the motor.
DANGER
Never run water through the filter system. This will cause rust and corrosion in the
motor and pump and will void the Warrranty.
OIL DISPOSAL
WARNING
Always wear protective heat-resistant gloves when performing the oil disposal operation.
If the cooking oil or shortening from a fryer is to be disposed, follow steps 1 and 2 from Filtering
Instructions in previous section. Disconnect the line from the pump to the fryer return line, and connect
the optional hose assembly to the pump. Turn on the pump using the manual switch on the side or top of
the filter and direct the oil into an appropriate device such as an oil shuttle to move the used oil to its
disposal tank.
6
L20-386 R1
REPLACING THE FILTER PAPER
If the filter paper becomes torn, or if the time to filter the oil from one unit becomes excessive, it is time to
replace the Filter Envelope.
! DANGER !
Make sure the filter pan has cooled completely to room temperature before
attempting to change the paper.
1. Disconnect the oil return line from the pump.
2. Unplug the cord from the receptacle on the side of the cabinet.
3. Pull the filter unit from the cabinet.
4. Disconnect the line from the pump to the filter screen.
5. On the Filtronic II models, pivot the motor assembly up out of the way.
6. Remove the filter cover. Use lift out handle to remove screen assembly. Place on a clean surface for
disassembly.
7. Detach quick-connect coupling on drain tube from knurled retaining nut.
8. Detach knurled retaining nut from fitting in screen.
9. Remove filter envelope clip from end of filter screen and folded back end of envelope .
10. Remove filter envelope from filter screen.
WARNING
The oil soaked filter envelope may still be very hot and could cause burns.
11. Clean the filter pan, filter screen and all components thoroughly using a solution of hot water and
detergent. Make sure that all food and breading particles are removed from the pan and from the filter
screen.
12. Dry the pan, the screen and all components completely before starting to reassemble.
13. Follow instructions under FILTER UNIT PREPARATION to install new filter envelope.
7
L20-386 R1
FILTER SYSTEM TROUBLESHOOTING GUIDE
PROBLEM
SOLUTION
Pump does not
start when the
return line valve
(yellow handle) on
the fryer is opened.
1. Make sure the power cord is plugged into the receptacle in the cabinet and the
main power cord from the system is plugged into the appropriate power supply.
2. Turn the switch on the side of the filter to “ON”.
3. Close the return line valve (yellow handle) and try opening the return line valve
on another fryer. If the pump starts, the problem is with the micro switch that
contacts the return line valve on the first fryer.
4. If pump still hasn’t started, depress the thermal overload button on the bottom
of the motor. If the motor is hot to the touch, wait at least 45 minutes before trying
this.
5. If the pump starts and stops again in a short time, or if it hums but does not
pump, there is a restriction somewhere in the filter screen or in the pump itself. Go
to Step 6. If there is no reaction from the pump, go to step 7.
6. Allow the oil/shortening in the filter pan to cool, then empty the pan and verify
that the filter paper and screen assembly is assembled correctly. Disassemble the
filter screen and look for blockages of sediment or solid shortening within.
7. Problem is with the motor/pump or the wiring. Remove the motor from the
filter and bench test by connecting a 120V line to the motor leads. If it runs, the
problem is with the wiring between the motor and the power supply. If it does not
run, the motor needs to be replaced.
Filtering procedure is
very slow. Shortening/oil returning to the
fryer very slow.
1. After all the shortening/oil has been pumped back into the fryer, inspect the
filter paper envelope. Make sure that any excess sediment is removed from the
top of the filter paper envelope.
2. If the filter paper envelope is dirty or torn, disassemble the filter screen
assembly. Inspect for blockages in the lines. Replace with a clean filter paper
envelope.
WARNING
Only use filter paper envelopes from Anets that have been specifically designed for
this filter system. Using the wrong type of filter paper
can cause damage to the pump system, and will void the warranty.
3. If the oil still returns to the fryer slowly, the problem may be a blockage within
the pump itself. The pump section of the motor can be easily disassembled to
look for blockages of sediment or solid shortening within.
Fryers do not re-fire
after filtering.
1. Make sure the door on the fryer is completely closed.
2. Reset the ON/OFF switch on the fryer by flipping to OFF position and
then back to ON. (Note: Each time the fryer door is opened the ON/OFF
switch needs to be reset.
8
L20-386 R1
ORIGINAL EQUIPMENT LIMITED WARRANTY
General Warranty
Anets, Inc. warrants to the original user of its commercial cooking appliances and related equipment that said appliances and related equipment will be free from defects
in material and workmanship under normal use for a period of one (1) year from the date of installation, with appropriate documentation, to a maximum of fifteen (15)
months from the date of manufacture, subject to the following additions, exceptions, exclusions and limitations.
What is covered
This warranty is limited to the repair or replacement at the Company’s option, without charge, of any part found to be defective within the warranty period and reasonable
expenses incurred for freight and material for the installation of such part; in addition, the Company’s obligation shall be limited to reimbursement for normal labor on such
parts.
Anets, Inc. agrees to pay the Authorized Service and Parts Distributor, for any labor and material required to repair or replace, at the Company’s option, any part which
may fail due to defects in material or workmanship during the above general warranty period.
Silver Line Fryers
In addition to the above general warranty, for its economy fryers and cookers, the Company warrants to the original user any mild. Stainless steel fry tank or cooking
vessel to be free from defects for a period of one (1) year, from the date of manufacture. Labor and freight shall be the responsibility of the end user.
Gold Line Fryers
In addition to the above general warranty, for its standard fryers and cookers, the Company warrants to the original user any stainless steel fry tank or cooking vessel
to be free from defects for a period of (1) year parts and labor and 10 year Frypot or cooking vessel Part only from the date of manufacture Labor and freight shall
be the responsibility of the end user.
Pasta Cooker
In addition to the above general warranty, for its standard fryers and cookers, the Company warrants to the original user any stainless steel fry tank or cooking vessel
to be free from defects for a period of one (1) year parts and labor and 5 years Frypot or cooking vessel part only after year one from the date of manufacture.
Labor and freight shall be the responsibility of the end user.
Limitations to Fry Tank and Cooking Vessel Warranty
After the expiration of the general warranty period, any additional warranty on fry tanks or cooking vessels shall only obligate the Company to repair or replace, at its
option, any fry tank or cooking vessel which it determines to be defective. Claims under this item shall be supported by a statement detailing the defect, and the
Company may require the return of the fry tank or cooking vessel claimed to be defective. Labor and freight shall be the responsibility of the end user.
How to Keep Your Warranty in Force
•
•
•
•
•
Make sure any shipping damages are reported immediately. Damages of this nature are the responsibility of the carrier and must be reported by the receiver.
Install the unit properly. This is the responsibility of the installer and the procedures are outlined in the manual.
Do not install it in a home or residence.
Maintain it properly. This is the responsibility of the user of the appliance and the procedures are outlined in the manual.
Adjustments, such as calibration, leveling, tightening of fasteners or plumbing or electrical connections normally associated with initial installation. These
procedures are outlined in the manual and are NOT covered by warranty.
If it is damaged due to flood, fire or other acts of God, this is not covered under this warranty.
•
•Use it for what it is intended. If it is used for a purpose other than for which it was intended or designed, resulting damages are not covered under the
warranty.
•
Make sure that it has the correct voltage, gas supply and/or good quality water. If a failure is due to poor water quality, harsh chemical action, erratic voltage
or gas supplies, these damages are not covered under the warranty.
•
Do not materially alter or modify from the condition in which it left the factory.
Do not obliterate, remove or alter the serial number rating plate.
•
•
Use only Genuine OEM parts from Anets, Inc. or its Authorized Parts and Service Distributors. Repairs are not covered by the warranty.
•
If any other failure occurs which is not attributable to a defect in materials or workmanship, it is not covered.
This warranty specifically excludes parts which wear or would be replaced under normal usage, including, but not limited to, electric lamps, fuses, interior or exterior
finishes, o-rings and gaskets.
Limits to the Warranty
Outside the United States of America and Canada, this warranty is limited to the replacement of parts and Anets, Inc. will not bear any other expense be it labor,
mileage, freight or travel.
If any oral statements have been made regarding the appliance, these statements do not constitute warranties and are not part of the contract of sale. This limited
warranty constitutes the complete, final and exclusive statement with regard to warranties.
THIS LIMITED WARRANTY IS EXCLUSIVE AND IS IN LIEU OF ALL OTHER WARRANTIES WHETHER WRITTEN, ORAL OR IMPLIED, INCLUDING, BUT NOT
LIMITED TO ANY WARRANTY OF MERCHANTABILITY OR FITNESS FOR A PARTICULAR PURPOSE OR WARRANTY AGAINST LATENT DEFECTS.
Limitations of Liability
In the event of a warranty or other claim, the sole obligation of Anets, Inc. will be the repair or replacement, at the Company’s option, of the appliance or the component
part. This repair or replacement will be at the expense of Anets, Inc. except as limited by this warranty statement. Any repair or replacement under this warranty does not
constitute an extension in time to the original warranty. Parts covered under this warranty will be repaired or replaced, at the Company’s option, with new or functionally operative
parts. The liability of Anets, Inc. on any claim of any kind, including claims based on warranty, express or implied contract, negligence, strict liability or any other legal theories
will be exclusively the repair or replacement of the appliance. This liability will not include, and the purchaser specifically renounces any right to recover special, incidental,
consequential or other damages of any kind, including, but not limited to, injuries to persons, damage to property, loss of profits or anticipated loss of the use of this appliance.
If any provision of this warranty is unenforceable under the law of any jurisdiction, that provision only will be inapplicable there, and the remainder of the warranty will
remain unaffected. The maximum exclusion or limitation allowed by law will be substituted for the unenforceable provision.
How to Obtain Warranty Service
First direct your claim to the Anets, Inc. Authorized Service and Parts Distributor closest to you giving complete model, serial and code numbers, voltage, gas type,
and description of the problem. Proof of the date of installation and/or the sales slip may also be required. If this procedure fails to be satisfactory, write the National
Service Manager, Anets, Inc., P. O. Box 501, Concord, NH. 03302-0501. USA
This warranty gives you certain specific legal rights; you may have other rights which vary from state to state.
Anets,Inc.,P.O.Box501,Jct.I‐89&I‐93Concord,NH03302‐0501
509Route3A,Bow,NH03304USA
Tel:(603)225‐6684Fax:(603)228‐5231www.ANETS.com
L14‐022R1PrintedinU.S.A.
9
L20-386 R1
In the event of problems with or questions
About your order, please contact the Anets
Factory at:
1-603-225-6684 World Wide
Website Address: www.anets.com
In the event of problems with or
questions about your equipment, please
contact the Anets Authorized Service and
Parts representative (ASAP) covering
your area, or contact Anets at the number
listed to the left.
MAILING ADDRESS – P.O. BOX 501, CONCORD, NH 03302-0501
SHIPPING ADDRESS – 10 FERRY ST., CONCORD, NH 03301
10
L20-386 R1