1
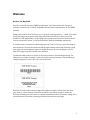
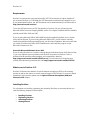
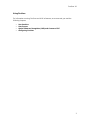
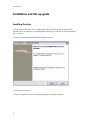
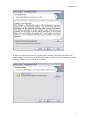
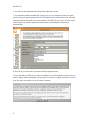
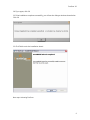
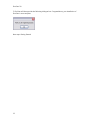
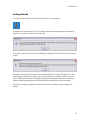
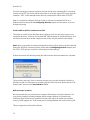
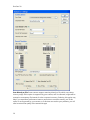
Installation guide and user manual
16 May 2008
i
DocScan 3.0
Copyright notice
Copyright Knowledgeone Corporation, 2008. All rights reserved. Apart from fair dealings for
the purposes of private study, research, criticism or review, as permitted under the Copyright
Act, no part of these materials may be reproduced by any process without written
permission. Enquiries should be directed to Knowledgeone Corporation, Level 5, 56 Berry
Street, North Sydney, NSW, 2060, Australia. Phone 61 2 8913 9300, Fax 61 2 9954 6322.
All trademarks are registered trademarks of their owner.
Every effort has been made to ensure that the information in this document is up to date and
accurate. Knowledgeone Corporation welcomes advice of any changes or corrections for the
next edition.
ii
Table Of Contents
Enquiries
E-mail
To easily obtain information by e-mail, send enquiries to:
Sales
[email protected]
Support
[email protected]
Training
[email protected]
Technical support
For technical support questions or requests, we encourage you to contact our International
Support Center.
E-mail
[email protected]
Toll-free
United States — 1888 325 1614
Canada — 1888 405 9019
United Kingdom — 0808 234 8828
Australia — 1800 221 061 (excluding Sydney)
New Zealand — 0800 445 438
(Sydney customers please phone 8913 9300.)
To speed the technical support process, please note the following before contacting the
International Support Center:
• K1 Corp Customer Number
• K1 Corp Incident PIN
• Product Version
• Type of Database Server (Oracle/MSSQL Server) and Version
Knowledgeone Corporation website
Visit our website at http://www.knowledgeonecorp.com/ for information on the latest K1
Corp products, support issues and training dates.
iii
DocScan 3.0
Table of Contents
Welcome............................................................................................................................... 1
Installation and Set-up guide............................................................................................. 4
Installing DocScan............................................................................................................................................4
Registering DocScan .......................................................................................................................................7
Activating DocScan....................................................................................................................................... 10
Getting Started............................................................................................................................................... 13
User manual ....................................................................................................................... 15
User Interface.................................................................................................................................................. 15
Scan Process.................................................................................................................................................... 19
Optical Character Recognition (OCR) and Convert to PDF........................................................... 21
Configuring DocScan................................................................................................................................... 24
iv
Welcome
DocScan 3.0, May 2008
DocScan works with the latest TWAIN specifications. It has been tested with a range of
scanners to ensure that it is 100% compatible with the latest implementation of the TWAIN
standard.
Please note, however, that DocScan is not a "general" scanning solution — rather, it has been
specifically designed to capture multi-page text documents and store them in a format
suitable for OCR applications. It is also designed to produce documents for RecScan and K1
Scan to process and "attach" to the RecFind and K1 relational databases, respectively.
It contains code to recognize the identifying barcode (Code 3 of 9 only) on the first page of
each document. DocScan then assumes that all pages (without a barcode) following a page
with a barcode are subsequent pages of a single document. It stores all pages in a multipage TIFF image using the barcode as the identifier.
The barcode used must be in Code 3 of 9 format as shown in the following example. The
barcode must contain an asterisk (*) as both the first and last characters. See the following
example displayed in both Code 3 of 9 and Arial format:
DocScan 3.0 works with both text images and graphical images in either black and white,
grey-scale, or colour. Because of the need to search every scanned page for a barcode,
DocScan will always run the scanner at a speed somewhat less than its optimum rating; this is
normal because of the extra processing involved with each and every page.
1
DocScan 3.0
Requirements
DocScan 3.0 requires that you have Microsoft's .NET 2.0 Framework (or higher) installed. If
you received DocScan on a CD-ROM, the .NET framework would have been supplied to you.
If you downloaded DocScan, the .NET framework can be obtained directly from Microsoft, at:
http://www.microsoft.com/net/.
To use the OCR and convert-to-PDF functionality in DocScan 3.0, you will need to have
Microsoft Office Document Imaging (MODI), version 11 or higher, installed. MODI is available
with Microsoft Office 2003 and 2007.
If you are using Microsoft Office 2003, MODI should be installed by default, and no further
action will be required. If you are using Microsoft Office 2007, you will need to manually
install this application before proceeding with your DocScan installation. We recommend that
you obtain your Microsoft Office 2007 installation disc and install this program, as per
Microsoft's instructions, first.
Issue with Microsoft Windows Server 2003
If you are using DocScan on a machine running Microsoft Windows Server 2003 (Service Pack
1), you may experience some problems with the OCR component of DocScan. This is a
problem that Microsoft has acknowledged, and is described in detail at:
http://support.microsoft.com/kb/918215/en-us/. For information on fixing this issue
(directly from Microsoft), please see this link: http://support.microsoft.com/kb/875352/.
What's new in DocScan 3.0?
DocScan 3.0 features the addition of optical character recognition (OCR) to the scanning
process, as well as the option to convert scanned images to PDF format. For a more in-depth
explanation of this process, please see the Optical Character Recognition (OCR) and
Convert to PDF chapter.
Installing DocScan
For information on installing, registering and activating DocScan, we recommend that you
read the following chapters of this help file:
•
•
•
•
2
Installing DocScan
Registering DocScan
Activating DocScan
Getting Started
DocScan 3.0
Using DocScan
For information on using DocScan and all of its features, we recommend you read the
following chapters:
•
•
•
•
User Interface
Scan Process
Optical Character Recognition (OCR) and Convert to PDF
Configuring DocScan
3
DocScan 3.0
Installation and Set-up guide
Installing DocScan
1: If you received DocScan on a CD-ROM, insert the disc and run the file "setup.exe" file
located in the root directory. If you downloaded DocScan, you will have a "docscansetup.exe"
file — run this.
You will be presented with the following dialogue window:
2: Click Next to continue.
3: Select "I accept the terms in the license agreement", and then click Next.
4
DocScan 3.0
4: Select the destination folder for your DocScan installation. We recommend using the
default setting; if you want to install the application to a different location, however, click the
"Change" button to do so. Click Next to continue.
5
DocScan 3.0
5: Click Install to begin the installation process.
6: You will be presented with the following dialogue window during the installation:
Next step: Registering DocScan
6
DocScan 3.0
Registering DocScan
1: Once you have installed DocScan, you will need to register the program. If you do not
register, DocScan will function for forty-five days in a trial mode; all of the program’s
functionality will be present, but a watermark will be superimposed on scanned images and
any generated PDF files.
2: If you decide to register DocScan, you will need to obtain a license file from Knowledgeone
Corporation. You can obtain this by contacting the company at
[email protected]. The license file will be delivered to you on a CD-ROM.
3: Once you have the license file, you may register the program. To do this, open DocScan,
and access the “Register” option on the “Help” pull-down menu.
4: You will be asked for the location of your License File CD-ROM. If you are sure of the path,
you can type it in directly. If you are unsure, click the "folder" icon to browse to the location
using Windows Explorer.
5: Once the path has been entered, click OK to continue.
If you click “Cancel” on Step 2, DocScan will inform you that it will not be able to properly run
until you specify a valid license file:
7
DocScan 3.0
6: You will then be presented with the DocScan registration screen.
7: You would have been provided with a paper copy of your customer number and serial
number when you were shipped DocScan 3.0. Please enter this information in the following
dialogue window, along with your contact details. (The SMTP server is your own mail server,
and is required to send the registration information to Knowledgeone Corporation
automatically.)
8: Once all of your information is entered click the Register button.
9: If you provided an SMTP server and e-mail address, you will be asked to confirm that you
wish to register with Knowledgeone Corporation. If you do not register, DocScan will run for
forty-five days, after which time it will cease to operate.
8
DocScan 3.0
10: If you agree, click OK.
11: If the installation completes successfully, you will see the dialogue window shown below.
Click OK.
12: Click Finish to exit the installation wizard.
Next step: Activating DocScan
9
DocScan 3.0
Activating DocScan
1: If you registered your installation with Knowledgeone Corporation, you should receive an
e-mail providing you with your activation key. It will appear similar to the e-mail presented
below:
2: Copy the attached “activationkey.txt” file to a location on your hard drive. It is important
that you remember where this is.
3: Run DocScan, and click the “Activation” option on the “Help” pull-down menu (as shown in
the screenshot below).
10
DocScan 3.0
4: DocScan will then ask you to specify the location of your Activation Key. Supply the path to
which you saved the file in Step 2, and click OK:
11
DocScan 3.0
5: DocScan will then provide the following dialogue box. Congratulations, your installation of
DocScan is now complete.
Next step: Getting Started
12
DocScan 3.0
Getting Started
To start DocScan, double-click on the DocScan icon on your desktop.
If you have not activated your copy of DocScan a screen will appear stating the number of
days left to activate your DocScan 3.0. Click OK.
If you fail to select a license file when installing the program, DocScan will show this dialogue
screen:
During this trial mode, DocScan will insert a watermark into all scanned images. If this trial
period expires (after forty-five days), you will only be able to access the “Help” pull-down
menu, which provides options for registering and/or activating the software, as necessary.
Please consult the guide earlier in this document for information on these processes.
If DocScan is properly registered and activated, the main interface screen will appear as
follows:
13
DocScan 3.0
You will then have to configure the DocScan program according to your scanner and output
options.
Please consult the remaining chapters in this guide for information on using and configuring
DocScan:
• User Interface
• Scan Process
• Optical Character Recognition (OCR) and Convert to PDF
• Configuring DocScan
14
DocScan 3.0
User manual
User Interface
The main DocScan window is divided into two sections — the thumbnail view and the page
view. The left section of the window displays a tabbed control containing a File Thumbnail
View tab and a Page Thumbnail View tab. The File Thumbnail View tab displays a thumbnail
of each file in the Scan Destination folder. (It will display nothing if the Scan Destination
folder has not been configured, does not exist or is empty.)
Clicking on a File thumbnail will load the selected file and display the first page in the right
section of the screen (page view) for viewing or modifying (see toolbar buttons below). If a
File thumbnail is selected, each page of the file will also be displayed as a thumbnail in the
Page Thumbnail View tab. Selecting a Page thumbnail will display that page in the page view.
Main window showing folder thumbnail view:
15
DocScan 3.0
Main window showing page thumbnail view:
Pull-down menus
DocScan has three pull-down menus visible across the top of the page. Some of these
functions are duplicated in the toolbar. (Please see the following section for a list of
commands available from the toolbar.)
File menu
The File menu contains the following commands:
Settings: This option will load DocScan's configuration page. See the Configuring
DocScan chapter for more information on the settings that may be changed.
View Logs: This option will display the folder location where DocScan saves its log files.
DocScan will generate a log file every time a file (or group of files) is processed. These
files are of .LOG type, and can be viewed in any plain-text text editor (such as Notepad,
for example).
16
DocScan 3.0
DocScan generates one log file per day, with the filename being yyyymmdd.log — so,
for example, a log file generated on 14 May, 2008 would have the filename
20081405.log. If more than one scanning session takes place on a single day, DocScan
will include all log results in the same file, with each entry being time-stamped.
Exit: Select this option to exit the DocScan application.
OCR menu
The OCR menu contains the following commands:
Perform OCR on All Files and Save to PDF: See Optical Character Recognition (OCR)
for details.
Perform OCR on the Selected File and Save to PDF: See Optical Character Recognition
(OCR) for details.
Help menu
The Help menu allows you to either view information about the specific release of DocScan
3.0 you are running (available by selecting the "About" option), or to view DocScan's online
help.
Keyboard shortcuts
There a number of keyboard shortcuts you can use to simplify browsing in DocScan 3.0. In
the Files tab, you can scroll up the list of documents by pressing Page Up, and scroll down by
pressing Page Down. You can scroll in both directions by using the wheel on your mouse. In
the Pages tab, you can scroll up and down the pages of a single document by using the Page
Up and Page Down buttons, and the mouse wheel.
Toolbar
Across the top of the main window is the main toolbar, which provides functions for
configuration, scanning, editing and viewing.
Select TWAIN Source: This displays a dialogue that allows you to select
or change the default scanner. See Configuring DocScan for more
details.
Start Scan Process: This commences the scanning and barcode
recognition process. See Scan Process for more details.
Settings: This is where various DocScan settings can be configured. See
Configuring DocScan for more details.
Perform OCR on the Selected File and Convert to PDF: See Optical
Character Recognition (OCR) for details.
17
DocScan 3.0
Perform OCR on All Files and Convert to PDF: See Optical Character
Recognition (OCR) for details.
Insert Page: This scans and inserts a new page before the current page
being viewed in the page viewer. If multiple pages are scanned, multiple
pages will be inserted.
Append Page: This scans and appends a new page after the last page of
the file being viewed. If multiple pages are scanned, multiple pages will
be appended.
Note about Insert and Append Page: Selecting Insert Page or Append
Page will open the scanner's own scan dialogue. This will allow the user
to configure options such as resolution, color mode, page size and more.
This dialogue will also have a button or menu item to press to
commence scanning. When scanning is complete, you may have to
manually close this scan dialogue. Since each brand and model of
scanner may display a different dialogue, users will need to refer to their
scanner's documentation for help in using it.
Delete Page: This deletes the page currently being viewed in the page
viewer.
Split: This function will split the current file into two. You will be
prompted for the barcode number of the new file, and the file will be
created with the name of xxxx.TIF, where xxxx is the barcode number. The
split will occur on the current page. That is, the new file will consist of the
current page and all subsequent pages. All pages that form part of the
new file will be deleted from the current file, and both files will be saved
automatically.
Save File: This saves changes to the currently selected file.
Reload File: This reloads the current file from disk.
Sort Folder View Thumbnails: This provides a number of sorting
options for the file thumbnail view. Available sorting options are:
• Date Modified
• File Name
• Size
• Type
• Ascending
• Descending
Zoom: This provides a number of zooming options for the page view.
18
DocScan 3.0
Scan Process
Press the Start Scan Process button to begin the scanning and barcode recognition process.
The scan process follows these steps:
1. The scanner's own "scan" dialogue will open. This will allow you to configure options
like resolution, colour mode, page size and more. This dialogue will also have a
button or menu item to press to commence scanning. Here is the scan dialogue for a
Canon flatbed scanner:
Since each brand and model of scanner will display a different dialogue, you will need
to refer to your scanner's documentation for help in using it.
2. The first page is scanned.
3. If the page contains a barcode, a new file will be created in the Scan Destination
directory with the filename xxxx.TIF, where xxxx is the barcode number. If no barcode
is found, you will be asked if you wish to use the saved barcode number (if one
19
DocScan 3.0
exists), or you will be prompted to manually enter a barcode number for the new file
as follows:
If multiple barcodes are found, you will be shown a list of the recognized barcode
numbers and be asked to select one to use for the new file. For example:
The scanned page will become the first page of the new file and the barcode number
will be saved to be used for all subsequent images without a barcode number. (This
continues until another barcode number is found.
4. The next page is scanned.
5. If the page does not contain a barcode, it is appended to the current file. If there is
no current file, the saved barcode number from Step 1 is used.
6. If the page does contain a barcode, a new file is created, as in Step 1.
7. Steps 3 to 5 are repeated until all pages are scanned, the scan process is canceled, or
an error occurs.
8. When scanning is complete, the scanner's dialogue window may need to be manually
closed.
20
DocScan 3.0
Optical Character Recognition (OCR) and Convert to PDF
Beginning with version 3.0, DocScan has the ability to perform optical character recognition
(OCR) on a scanned document. This feature will allow you to process a document once it has
been scanned, after which DocScan will convert the raw image data of the scanned
document into machine-readable text. With this extracted text, you would then have the
ability to index documents within RecFind or Knowledgeone, or "copy and paste" the text
from the image into a word processor, for example.
To perform OCR on a scanned document, you will need to click either the "Perform OCR on
All Files" or "Perform OCR on the Selected File" option in the OCR pull-down menu, or the
appropriate icons on the main toolbar. (See the User Interface chapter for more information
on this.)
The process of performing OCR on a document and then converting it to PDF is "atomic" —
that is, it is not possible to separate one from the other.
There are two ways in which OCR and PDF conversion can be performed:
Perform OCR on Selected File and Convert to PDF
This option is achieved by pressing the "Perform OCR on Selected File and Convert to PDF"
button on the main DocScan window. To use this option, you must first have selected a
document in the "Files" thumbnail view. (For more information on the DocScan main window,
see the User Interface chapter.)
Once you have selected a file and pressed the button, DocScan will initiate the OCR process.
You will see a dialogue box similar to that shown below:
21
DocScan 3.0
Once the conversion process is complete, DocScan will save the converted PDF to the same
location as the TIFF file. The file will have the same name as the original TIFF image, with the
extension ".PDF". In the example shown above, the resultant file will be called "111.PDF".
Note: it is possible to configure DocScan so that it will save the resultant PDF file to a
different location. Please see the Configuring DocScan chapter for information on how to
change this setting.
Perform OCR on All Files and Convert to PDF
This option is similar to that described above, although it will convert every image in your
nominated directory. As above, all converted PDF files will appear in the same directory, and
will share the same name as their respective source files; only the extension will change.
Note: there are a number of settings that determine how DocScan will process and treat files
during the OCR/PDF conversion process. Please see the Configuring DocScan chapter (and
the "OCR + PDF Options" section) for information on these settings.
If there were errors, the following dialog box will be shown when the operation is complete:
This provides a summary of the conversion process. Any errors are described in detail in a
DocScan log file. For information on accessing log files within DocScan, please see the "Pulldown menus" section of the User Interface chapter.
OCR and image resolution
We recommend that you provide source images at 300 dots per inch (dpi) resolution. You
may provide images at resolutions higher than this value, although it is possible that
excessively high resolutions will cause the DocScan OCR engine to exhaust the available
memory. If this happens, an "OCR running error" will be generated and noted in the log file.
This error appears in the log file as follows:
22
DocScan 3.0
ERROR: error [x]
Could not perform OCR on page x. Please check the user manual for more
information.
There are a number of reasons that this error may occur.
The source TIFF image:
• may be too large
• may be too small
• may be corrupt
• may not contain any text
• may have been created using a non-standard compression method (e.g. Deflate)
In these cases, we recommend that you re-scan the document at a more accommodating
resolution. (For information on modifying the settings of your scanned documents, please
refer to the information supplied by the manufacturer of your scanning hardware.)
If an error occurs on a single page (or collection of pages) within a multi-page document,
that page (or those pages) will be inserted into the PDF file as images, but there will be no
embedded text behind them. If a single-page document fails, the resulting PDF file will
contain the image, but no embedded text.
23
DocScan 3.0
Configuring DocScan
Before you can start using the scanning features of DocScan, you will need to configure the
following settings.
Select your scanner
Press the Select TWAIN Source button to display a list of the scanners that are installed on
your computer. A dialogue box similar to the following will open:
Note that the contents of the Sources list will depend on the scanners you have installed on
your PC, and may differ from the list shown above. If there are no scanners shown, you will
need to ensure that your scanner's software is properly installed and that the scanner is
connected and turned on.
Select the scanner that you wish to use and press the Select button. This will save your
selection as the default scanner for future use.
Configuring basic scanner settings
Press the Settings button to display the Basic Settings window shown here:
Scan Folder: This is where DocScan will save scanned images as multi-page TIFF files.
24
DocScan 3.0
Compression Mode: Scanned image files can be compressed to save disk space. Although
the default of Group4FaxEncoding will be suitable for most situations, you can choose from
any of the following Compression modes:
•
•
•
•
•
•
•
•
no compression
Group 3 Fax Encoding
Group 4 Fax Encoding
JPEG compression
Macintosh Packbits
Deflate
LZW
Modified Huffman
Configuring advanced scanning settings
In addition to the Basic settings described above, DocScan provides a number of Advanced
settings. These settings will not need to be configured for most situations, but you may need
to use them if you have memory usage or barcode recognition problems.
25
DocScan 3.0
Scan Directly to File: Some scanners support scanning directly to file, which may reduce
memory usage. If this option is supported by your scanner, and it is selected, images will be
scanned to a temporary file instead of to the computer's memory. Selecting this option may
help if you experience performance issues or errors due to excessive memory use. If this
option is not supported by your scanner, or if this does not resolve your problems, you will
need to reduce the quality of the scanned images.
26
DocScan 3.0
Scan to File Format: This option selects the format that the temporary file will be saved in.
DocScan provides the formats listed below, but please be aware that not all scanners support
all formats. DocScan will notify you if the chosen format is not supported by your selected
scanner. The available formats are:
•
•
•
•
•
•
•
•
•
•
TIFF
PICT
BMP
XBM
JFIF
FPX
TIFFMULTI
PNG
SPIFF
EXIF
Temporary Scan Folder: This is the folder where the Scan Directly to File setting will save
the temporary files during scanning. DocScan will delete the files once they are no longer
required.
Barcode Orientation: DocScan can read barcodes both horizontally and vertically, in
addition to back-to-front barcodes, but only the most common option of horizontal, left to
right, is selected by default. If your barcodes are placed differently, please select the
appropriate option. You can select more than one option, but please note that there may be
an accompanying drop in performance.
Configuring OCR and PDF options
Note: this option will only be visible if you have Microsoft Office Document Imaging
(MODI) installed on your system. For more information on MODI and its role in
DocScan, please see the "Requirements" section of the Welcome chapter.
OCR Language: This option allows you to select the language that will be employed in
determining the characters read in by the OCR process. There are a number of languages
that can be selected, as well as the option "SYSTEM DEFAULT". If you select this option,
DocScan will use the language setting that you currently employ in your Microsoft Windows
installation.
Save PDF files to the Scan Folder: This checkbox allows you to determine the location of
the converted PDF files. If the checkbox is selected (which it is by default), the PDF files will
be saved to the same location as the scanned TIFF images. If the checkbox is not selected,
you will be asked to specify an alternative directory. You may then browse to a folder or
network location that is more suitable to your needs.
27
DocScan 3.0
Automatically Straighten Image: If this option is selected, DocScan will check to see if any
scanned images are a few degrees "off-centre". If this is the case, DocScan will correct the
skew when performing the OCR operation, in an attempt to produce a more accurate
assessment of the characters contained in the document. Neither the source TIFF image, nor
the resulting PDF, will appear changed after the process (that is, any "skew" will be preserved
in the resultant file).
Note: If the source image is scanned at a resolution of greater than 900 dots per inch, the
output PDF file's resolution will be set at a maximum of 900 dots per inch if this option is
selected.
Create a Mapped Text PDF/Basic Embedded-Text PDF: This option allows you to select
the type of PDF generated by DocScan. The two options are as follows:
Mapped-Text PDF: this option will insert scanned text at the correct locations in the
PDF file (that is, it will preserve formatting styles present in the original document).
This option makes it simple to copy-and-paste selections of text from the resultant
PDF file. This option is selected by default, and it is recommended that it be used; it is,
however, the slower of the two options, as it requires more computational power.
Basic Embedded-Text PDF: this option simply inserts the extracted text in paragraphs,
starting at the top-left corner of the document. This option requires significantly less
computation time, and would benefit users who will index/search and copy all text
from a page (and not just a selection of it).
"Basic Embedded-Text PDF" is selected by default, as it produces files that are smaller
than a mapped-text document. Switch this setting to "Mapped-Text PDF" if document
size is less of a consideration, and you want to more accurately replicate the
formatting of the original document.
After Conversion: This option allows you to determine what will happen to the source TIFF
images once the conversion is complete.
Do Nothing: this will leave the TIFF images where they are, in the source folder.
Move TIFF Files: if you select this option, you will be presented with the option to select
a folder path. Once you do this, DocScan will move the images to this folder once the
conversion process is complete.
Delete TIFF Files: if this option is selected, DocScan will delete the images from the file
system once the conversion process is complete.
28