1
Application Note: Interfacing a Gocator To Halcon
Title
Page
1 ( 10)
Interfacing a Gocator to Halcon
Purpose
This document explains how to interface a Gocator sensor to Halcon.
Equipment
Gocator Firmware Release 3.2 or later
Halcon Version 10.0 or later
Table of Contents
1 Overview .................................................................................................................................................................. 2
2 Setting up Halcon with a Gocator for the First Time ................................................................................................ 3
3 Halcon Procedures .................................................................................................................................................. 6
4 Halcon Acquisition Code .......................................................................................................................................... 9
Gocator-2000-2300-Appnote_Halcon_Interface.doc
Application Note: Interfacing a Gocator To Halcon
Page
2 ( 10)
1 Overview
Halcon is a comprehensive software package for machine vision applications with an integrated development
environment. Gocator includes a GenTL driver that can be used to stream 3D point clouds and intensity data into
Halcon in real-time.
This document assumes that Halcon is already installed. Refer to the GenTL chapter in the Gocator’s User Manual on
how to install and setup the Gocator GenTL driver. This document describes how to configure Halcon to acquire data
from the Gocator. Users are assumed to be already familiar with the operation of the Gocator Whole Part mode.
Gocator-2000-2300-Appnote_Halcon_Interface.doc
Application Note: Interfacing a Gocator To Halcon
Page
3 ( 10)
2 Setting up Halcon with a Gocator for the First Time
Follow the steps below to setup Halcon with the Gocator sensor for the first time:
1. Connect a Gocator to the PC running Halcon.
2. Power up the Gocator and put the Gocator into Whole Part mode and enable the Ethernet output. Check Acquire
Intensity if intensity data is required.
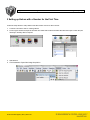
3. Start Halcon.
4. Click Assistants->Open New Image Acquisition.
Gocator-2000-2300-Appnote_Halcon_Interface.doc
Application Note: Interfacing a Gocator To Halcon
Page
4 ( 10)
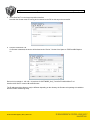
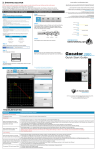
5. Select GenCamTL in the Image Acquisition Interface.
Note that the Gocator must be running and connected to the PC for this step to be successful.
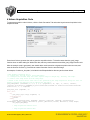
6. Click the Connection Tab.
If a Gocator is detected, the device will be listed under “Device”. Set the Color Space to “RGB” and Bit-Depth to
16.
Device in the example is: 192.168.1.10 producer:C:\SOFTWARE_Go2_Tools\GenTL\x86\Go2GenTL.cti
interface:0:XX::GenTL vendor:LMI model:Gocator.
The IP address and the directory may be different depending on the directory the Gocator tools package is installed to
and the Gocator networking setup.
Gocator-2000-2300-Appnote_Halcon_Interface.doc
Application Note: Interfacing a Gocator To Halcon
Page
5 ( 10)
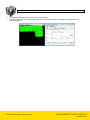
7. Press Snap and trigger the Gocator to output a part object.
The method to trigger the Gocator output depends on the Gocator setup. The output will be displayed in the
Graphic Window.
Gocator-2000-2300-Appnote_Halcon_Interface.doc
Application Note: Interfacing a Gocator To Halcon
Page
6 ( 10)
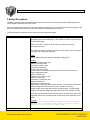
3 Halcon Procedures
The Halcon example code includes internal procedures that could be used to decompose the RGB image and to
control registers opened by the GenTL driver.
User can import the procedures into their own programs by selecting “File->Insert Program->Insert Procedures” and
select the example code Continuous_Acq.hdev under the Examples/Halcon directory.
The following section describes each of these procedures in greater details.
Function Name
Go2GenTL_ParseData
Explanations
The Gocator GenTL driver packs the height map, intensity and stamp
information into a 16-bit RGB image. The function is used to unpack data out
from the RGB image.
Refer to the GenTL chapter in the Gocator user manual on how the
information is packed.
The function accepts the image acquired from grab_image_async, and return
the height map, intensity and stamps.
Inputs
Image: RGB Image acquired from using grab_image_async
Outputs
HeightMap: Height map image
Intensity: Intensity image
FrameCount: Frame count
Timestamp: Timestamp
Encoder: Encoder position
EncoderIndex: Last encoder position at which the encoder index occurs
Inputs: Digital input states
xOffset: X-offset (um)
xResolution: X-resolution (um)
yOffset: Y-offset (um)
yResolution: Y-resolution (um)
zOffset: Z-offset (um)
zResolution: Z-resolution (um)
Width: Width of the image that contains the part. The part width could be less
than the image width requested by the user. (number of columns)
Height: Height of the image that contains the part (length). The part length
could be less than the image width requested by the user. (number of rows)
Each output is returned as a two elements tuple. The first element is the least
significant 32-bit value, and the second element is the most significant 32-bit
value.
Example
Go2GenTL_ParseData(Image, HeightMap, Intensity, frameCount, timestamp,
encoderPosition, encoderIndex, inputs, xOffset, xResolution, yOffset,
yResolution, zOffset, zResolution, width, height)
Go2GenTL_ResampleMode
Returns the resample mode.
Gocator-2000-2300-Appnote_Halcon_Interface.doc
Application Note: Interfacing a Gocator To Halcon
Page
7 ( 10)
Inputs
AcqHandle: Acquisition handle created by open_framegrabber.
Outputs
ResampleMode: ‘No’ or ‘Yes’.
‘No’ – Resample is disabled
‘Yes’ – Resample is enabled.
When enabled, the GenTL driver will resample the height map so that the
pixel spacing is the same in the x and y-axis.
Example
Go2GenTL_ResampleMode (AcqHandle, ResampleMode)
Go2GenTL_SetResampleMode
Sets the resample mode.
Inputs
AcqHandle: Acquisition handle created by open_framegrabber.
ResampleMode: ‘No’ or ‘Yes’. Set to ‘Yes’ to enable the resample mode.
When enabled, the GenTL driver will resample the height map so that the
pixel spacing is the same in the x and y-axis.
Example
Go2GenTL_SetResampleMode (AcqHandle, 'Yes')
Go2GenTL_ConfigFileName
Returns the current live sensor configuration file name.
Inputs
AcqHandle: Acquisition handle created by open_framegrabber.
ConfigFile: Name of the configuration file. The file name is includes the
extension ‘.cfg’
Example
Go2GenTL_ConfigFileName (AcqHandle, ConfigFile)
Go2GenTL_SetConfigFileName
Sets the sensor live configuration.
Inputs
AcqHandle: Acquisition handle created by open_framegrabber.
Outputs
ConfigFile: Name of the configuration file. The file name is includes the
extension ‘.cfg’
Example
Go2GenTL_SetConfigFileName (AcqHandle, 'test2.cfg')
Go2GenTL_Encoder
Reports the current encoder value.
Inputs
AcqHandle: Acquisition handle created by open_framegrabber.
Outputs
Gocator-2000-2300-Appnote_Halcon_Interface.doc
Application Note: Interfacing a Gocator To Halcon
Page
8 ( 10)
EncoderValue: Current encoder value
When this function is called, the GenTL driver retrieves the latest encoder
value from the sensor. The value is returned as a two elements tuple. The
first element is the least significant 32-bit value, and the second element is
the most significant 32-bit value.
Example
Go2GenTL_Encoder(AcqHandle, EncoderValue)
Go2GenTL_ImageSize
Returns the size of the image returned by the Gocator GenTL driver
Inputs
AcqHandle: Acquisition handle created by open_framegrabber.
Outputs
Width: Width of the image
Height: Length of the image
Example
Go2GenTL_ImageSize(AcqHandle, Width, Height)
Go2GenTL_SetImageSize
Sets the size of the image returned by the Gocator GenTL driver
Inputs
AcqHandle: Acquisition handle created by open_framegrabber.
Width: Width of the image
Height: Length of the image
Example
Go2GenTL_SetImageSize(AcqHandle, Width, Height)
Gocator-2000-2300-Appnote_Halcon_Interface.doc
Application Note: Interfacing a Gocator To Halcon
Page
9 ( 10)
4 Halcon Acquisition Code
To generate acquisition code in Halcon, click the Code Generation Tab and select Asynchronous Acquisition in the
Acquisition Mode.
Press Insert Code to generate the code to open the acquisition device. To handle cases when the grab_image
function times out while waiting for Whole Part data, add a try-catch statement around the grab_image function code.
After the example code is generated, user should add a catch instruction to bypass acquisition timeout event, and
uses the function Go2GenTL_ParseData to extract information from the returned image.
An example, Continuous_Acq.hdev, is included in the Examples/Halcon directory and is shown below:
*
*
*
*
This example illustrates how to
1. Acquire data from the Gocator (16-bit RGB image)
2. Decompose the returned image into three separate image for height map, intensity and stamps.
3. Extract some stamp values from the stamp image.
* Connect to the Gocator device. This code is auto generated by the Image Acquisition dialog box. User can
manually override the directory path by editing the line below.
open_framegrabber ('GenICamTL', 0, 0, 0, 0, 0, 0, 'progressive', 16, 'rgb', -1, 'false', 'default',
'192.168.1.10 producer:C:\\SOFTWARE_Go2_Tools\\GenTL\\x86\\Go2GenTL.cti interface:0:XX::GenTL vendor:LMI
model:Gocator', 0, -1, AcqHandle)
grab_image_start (AcqHandle, -1)
while (true)
try
grab_image_async (Image, AcqHandle, -1)
catch(Exception)
continue
endtry
Go2GenTL_ParseData(Image, HeightMap, Intensity, frameCount, timestamp, encoderPosition,
encoderIndex, inputs, xOffset, xResolution, yOffset, yResolution, zOffset, zResolution, width, height)
dev_display(HeightMap)
* Image Acquisition Routines Start
* Image Acquisition Routines End
Gocator-2000-2300-Appnote_Halcon_Interface.doc
Application Note: Interfacing a Gocator To Halcon
Page
10 ( 10)
endwhile
close_framegrabber (AcqHandle)
Users can enter the processing function in the space between the Routines Start and Routines End lines.
Note: The IP address and the path could be different depending on the Gocator’s IP address and the GenTL installed
directory.
Gocator-2000-2300-Appnote_Halcon_Interface.doc