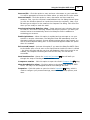
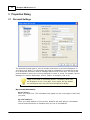
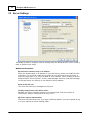
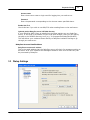
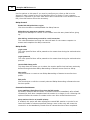
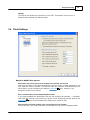
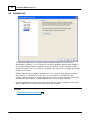
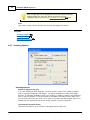
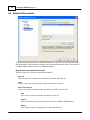
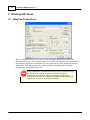
1
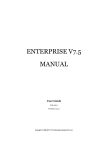
RelayFax SMTP Client
v7.1
RelayFax SMTP Client
User Manual
Copyright © 1996-2014. All rights reserved. Alt-N Technologies, Ltd.
Products that are referred to in this document may be trademarks and/or registered
trademarks of the respective owners.
v7.1.0 - April 2014
Contents
3
Table of Contents
Section I Introduction
6
Section II Using the RelayFax SMTP Client
10
Section III Properties Dialog
14
1 Personal
......................................................................................................................................14
Settings
2 Server
......................................................................................................................................16
Settings
3 Dialup
......................................................................................................................................17
Settings
4 Client
......................................................................................................................................19
Settings
5 Scanner
......................................................................................................................................21
Settings
6 Contact
......................................................................................................................................22
List
Section IV Compose Fax Dialog
24
1 Compose
......................................................................................................................................24
Fax Dialog
2 Properties
......................................................................................................................................25
3 Cover
......................................................................................................................................28
Pages
4 Send
......................................................................................................................................32
Schedule
5 Scan......................................................................................................................................33
Image
Scanning Options
..................................................................................................................................................................34
6 Attached
......................................................................................................................................36
Documents
7 Advanced
......................................................................................................................................37
Options
8 Error......................................................................................................................................38
Message
Section V Working with Faxes
40
1 RelayFax
......................................................................................................................................40
Printer Driver
2 Viewing,
......................................................................................................................................41
Printing, and Editing Faxes
3 Sending
......................................................................................................................................42
a Fax via an Email Client
Sending a..................................................................................................................................................................42
Fax via an Em ail Client
Attaching ..................................................................................................................................................................43
Docum ents to Fax Messages
Em ail Macros
..................................................................................................................................................................43
Banner Text
..................................................................................................................................................................48
& Form atting Characters
4 Advanced
......................................................................................................................................49
Features
Sending Faxes
..................................................................................................................................................................49
Program m atically
Using the ..................................................................................................................................................................50
Broadcast Fax Wizard
ODBC Selector
..................................................................................................................................................................56
Wizard
Index
Copyright © 1996-2014. All rights reserved. Alt-N Technologies, Ltd.
61
Copyright © 1996-2014. All rights reserved. Alt-N Technologies, Ltd.
Section
I
6
RelayFax SMTP Client v7.1
1 Introduction
RelayFax includes a special application called the RelayFax SMTP Client, which can be
installed on your network workstation, at home, or at any other remote location. The
RelayFax SMTP Client, and the accompanying RelayFax Printer Driver 40 and RelayFax
OCR (Optical Character Recognition) Printer Driver, make it possible to fax anything
that you can scan or print. The client will attach the relevant document to an email
message and then send it to the RelayFax server. Then, based upon the contents of
the message or the fax rules configured on the server, RelayFax will route the fax to its
appropriate destination. The client also contains a "Cover page only" feature for
sending short messages requiring only a cover page. Documents can be faxed by
printing to the RelayFax Printer Driver instead of to your normal printer, scanning them
using the client's scanner and twain support, or by attaching files using the client's
Attached Documents pane.
Whenever you scan a document or print one to the RelayFax Printer Driver, the
RelayFax SMTP Client will be opened automatically for completing your fax. You will
enter the fax recipient information manually or with the Contact Manager, choose from
several other options such as alternate cover pages and scheduling, and then click the
Send Fax button. The client will then email the document to your RelayFax server's
mailbox (dialing into the Internet if necessary) where it will be collected and faxed to
its final destination.
When faxing documents via the RelayFax OCR Printer Driver, the documents will be
scanned for specific identifiers to determine the recipient's fax number and name, the
subject of the fax, and so on. It will then be sent to your RelayFax server normally,
just like when sending manually or printing to the RelayFax Printer Driver. The Fax
Client, however, will not be opened because the recipient and other information will be
taken from the document itself.
The RelayFax SMTP Client and RelayFax Printer Driver can also be accessed by custom
applications in order to automatically fax documents. For more information on using this
functionality, see: Sending Faxes Programmatically 49
RelayFax SMTP Client Features
Immediate faxing from within any application by printing a document to the
RelayFax Printer Driver 40 .
A cover page comment
page only" message.
25
Full twain device support
feature allows quick and easy faxing of a brief "cover
33
for faxing from scanners and digital cameras.
Quick-Scan 21 features make it possible to scan and fax documents by simply
clicking a shortcut menu option or pressing the button on your scanner.
Contact Manager
22
that can be used to share contacts over a network.
Confirmation Request 37 feature that will cause RelayFax to inform the sender
when their fax has been successfully transmitted.
RAS Dialup 17 controls make it possible for the Client to automatically dial into
the Internet when being used remotely.
Support for including extra information
25
on the cover page such as: recipient's
Copyright © 1996-2014. All rights reserved. Alt-N Technologies, Ltd.
Introduction
7
name and company, sender's name and contact information, billing codes, and
more.
Client may be used to email
for faxing.
25
messages directly to users instead of to RelayFax
Scheduling 32 feature so that you can designate a specific date and time to
send the fax.
By setting the parameters in the FAXCLNT.INI file, the RelayFax SMTP Client and
RelayFax Printer Driver can be accessed programmatically 49 by other
applications, which enables them to send faxes automatically.
Client contains a personal cover page manager
pages.
Client allows attachment
36
and can utilize custom cover
of documents to outgoing faxes.
See also:
Using the RelayFax SMTP Client
28
10
Copyright © 1996-2014. All rights reserved. Alt-N Technologies, Ltd.
Copyright © 1996-2014. All rights reserved. Alt-N Technologies, Ltd.
Section
II
10
RelayFax SMTP Client v7.1
2 Using the RelayFax SMTP Client
Starting the Client
To start the RelayFax SMTP Client click the icon on the desktop, or click the Windows
START button and navigate to the client's icon in the RelayFax program group. The
client starts automatically when you print to the RelayFax Printer Driver from within a
Windows application, or when you click the scan button on your scanner.
Using the Client
When the client is running, an icon will be displayed in the system tray. Right-click this
icon to display a shortcut menu from which you can access various client features.
The following items are available on the shortcut menu:
About Alt-N RelayFax – Click this option to display copyright, developer, and
support information about RelayFax.
About Alt-N Technologies – Opens your browser to Alt-N Technologies' web site.
Update RelayFax Client – Click this option to find out if there is a more recent
version of the RelayFax SMTP Client available. This will cause a Client Update
Request to be sent to your RelayFax server. Be sure that you have entered your
information into the Server Settings 16 and Dialup Settings 17 panes of the
Properties dialog before attempting to send an update request. Without this
information the client won't be able to send your request correctly. NOTE: Some
RelayFax servers might not be configured to accept requests for client update
information. Consequently, some users may not receive a response to their
update requests.
Scan and fax – If your computer has a scanner installed then you can click this
option to have the RelayFax SMTP Client scan a document and then open the
Compose Fax dialog to fax it.
Copyright © 1996-2014. All rights reserved. Alt-N Technologies, Ltd.
Using the RelayFax SMTP Client
11
Scan and file – Click this option to scan and save a document to your hard disk.
You will be prompted to choose the folder where you wish the file to be saved.
Scan and email – Click this option to scan a document and then email it to
someone. First, type the recipient's email address into the dialog that will open
(or click the Contacts button on it and then choose the recipient). Next, click
OK and type a subject for the email on the Compose Fax dialog. Click Send Fax
when you are ready to send the email.
Scan button launches RelayFax client – Some scanners have a button that can
be used for "one-touch" scanning. Enable this shortcut option if you want your
scanner button to automatically launch the RelayFax Client in addition to
activating your scanner.
Enable Quick-Scan – When this option is enabled and you attempt to use your
scanner to acquire a document, the RelayFax Client will immediately scan the
document using the scanner's current default settings rather than present you
with a Scanner Options dialog first. A check mark will appear beside this option
when it is enabled.
Exit on send/cancel – Activate this option if you want the RelayFax SMTP Client
to shut down after a fax is sent or the Cancel button inside the client is clicked
– the client will close and the tray icon will disappear. When this control is not
enabled, the Compose Fax dialog will close but the tray icon will still be
accessible.
Send broadcast fax - Opens the broadcast fax wizard
through the steps of sending a broadcast fax.
50
that will walk you
Compose a new fax – Click this option to open the client's Compose Fax
24
dialog.
Shut down RelayFax client – Click this option to shut down the RelayFax SMTP
Client. The tray icon will disappear and all client dialogs will close.
Properties – Click this option to open the client's Properties 14 dialog, which is
used to configure your personal settings, server settings, dialup options, and
more.
Copyright © 1996-2014. All rights reserved. Alt-N Technologies, Ltd.
Copyright © 1996-2014. All rights reserved. Alt-N Technologies, Ltd.
Section
III
14
RelayFax SMTP Client v7.1
3 Properties Dialog
3.1 Personal Settings
The Personal Settings pane is used to include various bits of personal information on
your fax's cover page. This information may also be compared by the RelayFax server
to its Outbound Fax Rules. When a message matches one of the rules, the server will
perform whatever action the rule was designed to cause. It could, for example, fax the
message to a specific destination, print it, email it to someone, and so on.
Filling in the fields on this dialog doesn't necessarily mean they
will all appear on the cover page. Cover pages will only display
the information that they have been designed to display.
My Personal Information
My real name is
Enter your name here. This information may appear on the cover page of faxes that
you send.
My email address is
Place your email address in this text box. RelayFax will send delivery confirmation
notices and notifications of problems with your fax to this address.
Copyright © 1996-2014. All rights reserved. Alt-N Technologies, Ltd.
Properties Dialog
15
This address must match a licensed user of the RelayFax
system.
My street address is
Enter your street address here. Two fields are provided but you can leave the
second one blank if it isn't needed.
My city
This field is for you city.
My state or province
Enter your state or province here.
My ZIP or postal code
This field is for your ZIP or postal code.
Put ZIP before City
When formatting an address in some regions, the zip or postal code is placed before
the city. Click this check box if you want your address to be formatted that way.
My company name
Type the name of your company here.
Home phone
Your home telephone number.
Home fax
Your home fax number.
Business phone
Enter the voice telephone number of your business.
Business fax
This is your business fax number.
Billing code
If you are required to provide a billing code or special identifier with your faxes,
enter it into this field.
Fax password
If you are required to include a password with your faxes then enter it here.
Copyright © 1996-2014. All rights reserved. Alt-N Technologies, Ltd.
16
RelayFax SMTP Client v7.1
3.2 Server Settings
This dialog is used to configure various settings that the RelayFax SMTP Client needs in
order to process your faxes.
Mail Server Properties
My mail server's domain name or IP address
Enter the domain name or IP address of your mail server, where your email account
is located. This could be a mail host provided by your Internet service provider, a
mail service provider, or a server located at your company. When sending a fax the
RelayFax SMTP Client will fold it into an email message and then send that message
to this mail server for delivery to the RelayFax Server mailbox.
Send on this TCP port
The client will send your messages on this port.
Visually verify transfer of fax data to server
Normally the client transfers fax data in the background. Click this switch to
interactively monitor transactions as they occur.
My server requires authentication
Click this check box and enter your login credentials below if you are required to log
in to your mail server when sending email.
Copyright © 1996-2014. All rights reserved. Alt-N Technologies, Ltd.
Properties Dialog
17
Account name
Enter the account name or login used for logging into your mail server.
Password
Enter the password corresponding to the Account name specified above.
Enable SSL/TLS
Check this box if you wish to use SSL/TLS when sending faxes to the mail server.
Optional path to RelayFax server's RFC822 directory
If your RelayFax SMTP Client is installed on the same machine as your RelayFax
server, or one that is accessible via your local area network, then you can specify
the path to its RFC822 directory here (e.g. "C:\Program Files\RelayFax\Rfc822").
This will deliver your outbound faxes directly to RelayFax instead of having to go
through your mail server.
RelayFax Account Email Address
RelayFax account email address
This is the email address that the RelayFax server will check for messages waiting to
be faxed. All of your outbound fax messages should be sent here so that they can
be processed by RelayFax.
3.3 Dialup Settings
Copyright © 1996-2014. All rights reserved. Alt-N Technologies, Ltd.
18
RelayFax SMTP Client v7.1
Use the options on this pane if you need to configure your client to dial in to the
Internet in order to pass a fax to the RelayFax server for faxing. If your computer
resides on a network or you have some other direct connection to the Internet such as
DSL, then this feature will not be necessary.
Dialup Control
Enable RAS dialup/dialdown engine
Click this checkbox to enable/disable the dialup feature.
Make this many attempts to establish a session
RelayFax will attempt to connect to the remote host this many times before giving
up.
After dialing, wait this many seconds for a valid connection
This value determines how long the client will wait for the remote computer to
answer and complete the dialup connection.
Dialup Profile
Logon name
The value specified here will be passed to the remote host during the authentication
process.
Logon password
The value specified here will be passed to the remote host during the authentication
process.
Use this RAS dialup profile
This drop-down list allows you to select the session profile that has been previously
defined through windows Dialup Networking or Remote Access Services Setup.
New profile
Click this button to create a new Dialup Networking or Remote Access Services
profile.
Edit profile
Click this button to edit the currently selected Dialup Networking or Remote Access
Services profile.
Connection Persistence
Once established, RelayFax will not close the RAS session
By default, RelayFax will shut down a created connection immediately after all mail
transactions have been completed and the session is no longer in use. Selecting this
option will allow the session to remain active even after all mail has been sent.
Keep sessions alive for at least XX minutes
If enabled, this option will allow a RelayFax created RAS session to survive for at
least the number of minutes specified. Placing a zero in this entry will cause the
connection to be immediately closed after all transactions have been completed.
Copyright © 1996-2014. All rights reserved. Alt-N Technologies, Ltd.
Properties Dialog
19
Hangup
This button will break the connection to the ISP. This button is active only if
RelayFax has initiated the dialup session.
3.4 Client Settings
RelayFax SMTP Client options
Remember and use the previous fax settings each time the client loads
Click this checkbox if you want RelayFax to save the client's current settings for the
next time the client is opened. This will also save any recipient information that you
have filled in on the Compose Fax dialog's Properties 25 pane. However, the
Recipient list will not be saved.
Even remember the previous Subject/keyword value
If you have enabled the "Remember and use the previous fax settings..." checkbox
then click this control if you want the content of the "Subject/Keyword" field on the
Properties 25 pane of the Compose Fax dialog to be saved as well.
Exit (unload) client after sending a fax or pressing the 'Cancel' button
Check this box if you want the Client to exit and the tray icon to disappear after
Copyright © 1996-2014. All rights reserved. Alt-N Technologies, Ltd.
20
RelayFax SMTP Client v7.1
sending a fax or clicking the 'Cancel' button on the dialog. If this control is not
enabled then the tray icon will remain active but the dialog will still close.
RelayFax OCR Printer Driver Options
When sending a fax by printing a document to the RelayFax OCR Printer Driver, the
settings in this section will be used during the Optical Character Recognition scan to
determine the various parameters associated with the fax. Place these identifiers in
your documents in order to designate the fax number, the recipient's name, the subject
of the fax, and so on.
Look for fax numbers after this text
When the RelayFax OCR Printer Driver encounters this text while scanning a
document, the set of numbers immediately following this identifier will be treated as
a fax number.
Look for email addresses after this text
When the RelayFax OCR Printer Driver scans a document, it will look for an email
address immediately following this designated text. RelayFax will then email a copy
of the fax to the address.
Look for recipient name after this text
This text denotes that there is a recipient name following.
Look for recipient company after this text
The fax client will treat text following this identifier as the recipient's company
name.
Look for subject line after this text
This text identifies the subject line of the fax.
Look for comments file after this text
After this text, the fax client will look for a reference to a text file; the contents of
the file will be included in the comment section of the cover page. The text file must
be contained in the \RelayFax\App\ subfolder.
Each page is a separate fax
Click this check box if you wish to treat each page of a document printed to the
OCR Printer Driver as a separate fax. If using this option, be sure to include an
identifier listed above such as FAXTO: or EMAILTO: on each page of the document.
You can also use this feature to include multiple, consecutive
pages of a document in a single fax. Any pages that do not
include either a FAXTO: or EMAILTO: identifier will be
appended to the fax delimited by the last page that did include
one of those identifiers. For example, if page one and page six
of a document included a FAXTO: identifier, then pages one
through five would be included with the first fax, and pages six
and subsequent pages would be included with the second fax.
Copyright © 1996-2014. All rights reserved. Alt-N Technologies, Ltd.
Properties Dialog
21
3.5 Scanner Settings
Scanning Options
The Scan button on my scanner launches this program
Click here if you want the RelayFax Client to respond when you press the scan
button on your scanner.
Enable Quick-Scan feature
Click this control if you want the Scanning Options 34 dialog and your scanner's user
interface to be bypassed whenever you scan a document. Scanning will begin
immediately using the scanner's current default settings. Clear this control if you
want Scanning Options and your user interface to open before scanning.
Use automatic document feeder
If your scanner is equipped with an automatic document feeder, then click this
check box if you wish to use it with RelayFax.
Copyright © 1996-2014. All rights reserved. Alt-N Technologies, Ltd.
22
RelayFax SMTP Client v7.1
3.6 Contact List
The RelayFax SMTP Client is equipped with integrated support for two contact
management systems. You can choose to use either Windows Address Book (WAB) or
the included Address Express (Address Ex) as your default contact manager. WAB is
enabled by default, but if you wish to use Address Ex then you can change the default
setting on this pane.
Address Express can be used to manage all of your contacts, and supports storing a
large amount of information for each one. You can add up to 50 fields for each
contact, assign contacts to groups, add notes for them, sort by any field, launch your
web browser, phone dialer, or email program, and a host of other features.
For more information regarding the various features and options available within either
WAB or Address Ex, see their respective online Help systems.
See also:
Compose Fax Dialog » Properties
25
Copyright © 1996-2014. All rights reserved. Alt-N Technologies, Ltd.
Section
IV
24
RelayFax SMTP Client v7.1
4 Compose Fax Dialog
4.1 Compose Fax Dialog
The Compose Fax dialog is used to enter information relevant to individual faxes. This
dialog appears when you click "Compose a new fax..." or one of the scanning options
on the RelayFax Client's shortcut menu 10 . It will appear automatically each time that
you print to the RelayFax Printer Driver.
This dialog contains six panes:
Properties 25
On this pane you will specify the fax number, the subject of the fax, the recipient's
name and company, and any comments that you want to appear on the cover page.
Cover Pages 28
This pane allows you to specify what cover page (if any) will be included with an
outbound fax.
Send Schedule 32
Used for scheduling a specific date and time that the fax should be sent.
Scan Image 33
Used to acquire a document from a scanner or twain device for faxing. For other
options see the Scanner Settings 21 pane on the client's Properties dialog.
Attached Documents 36
Use the settings on this pane to attach documents to your fax. If the RelayFax
Server has Attachment Faxing support enabled, each attached document will be
converted to a faxable image format and sent as additional pages. Attachments will
also be listed here when you use the RelayFax Printer Driver.
Advanced Options 37
Used for designating a priority setting for your fax. This pane also contains a control
that governs whether or not a confirmation will be returned to you when your fax is
delivered.
Copyright © 1996-2014. All rights reserved. Alt-N Technologies, Ltd.
Compose Fax Dialog
25
4.2 Properties
On this pane you will specify the number to which you want the fax to be sent, the
subject of the fax, the recipient's name and company, and any comments that you
want to appear on the fax's cover page.
Fax Specifics
Fax number
Enter the fax number to which you want your fax to be sent and then click the Add
button to add it to the recipient list. This will also add the contents of the other
recipient information fields.
Recipient's Name
Place the name of the fax recipient here.
Recipient's Company
Place the name of the fax recipient's company here.
Fax subject/keyword
Enter the subject of the fax into this field. This field can also be used for entering
keywords that the RelayFax server's fax rules system may be configured to search
for.
Billing code
This control will display the default billing code value that you have designated on
Copyright © 1996-2014. All rights reserved. Alt-N Technologies, Ltd.
26
RelayFax SMTP Client v7.1
the Personal Settings pane of the Client Properties dialog. You may enter an
alternate value into this text field if you wish to override it for the current fax.
Add
Click this button to add the contents of Fax number, Recipient name,and Recipient
company to the recipient list.
Contacts
Entries can also be added to the Recipient list by using the Contact Manager 22 or
the MDaemon/Outlook Contacts dialog. Click Contacts and then choose either the
RelayFax Contacts or MDaemon/Outlook Contacts option to open the desired dialog.
If using the Contact Manager, click any entry that you wish to add to the list, and
then click OK. If using the MDaemon/Outlook Contacts dialog, click the desired entry
and then click either the Send Email or Send Fax icon. In both dialogs you can select
multiple entries by holding down the CTRL key as you click them.
When using the MDaemon/Outlook option you can access either your WorldClient
contacts stored online in your MDaemon/WorldClient email account, or you can
access your Outlook contacts stored locally under an Outlook profile, when Outlook
is your default email client.
Email Recipients
If you wish to email a copy of the fax to someone, click this button to specify the
address.
Recipient List
This is the list of all the recipients that will receive a copy of this fax. This list must
contain at least one recipient.
Remove
Click this button to remove selected entries from the Recipient List.
Comments for cover page
Use this box to enter any text that you wish to appear in the comments section of
the cover page. If there is more text than will fit in the space provided, a separate
page will be created for the comments. Comments are limited to 3000 characters.
Any text beyond 3000 characters is ignored.
Send Fax
After you have filled in all areas relevant to your fax, click this button to send it.
The RelayFax SMTP Client will fold the fax into an email message and dispatch it to
the RelayFax Server. The Recipient List must contain at least one entry for this
button to be enabled.
To send a "cover page only" fax, simply use this pane to enter
the recipients and your comments and then click Send Fax. As
long as you have not included any Attached Documents 36 ,
the cover page with your included comments is all that will be
sent.
Copyright © 1996-2014. All rights reserved. Alt-N Technologies, Ltd.
Compose Fax Dialog
27
Error Message
After clicking Send Fax on the Compose Fax dialog, a warning message may appear
informing you that the client encountered an error while attempting to deliver the fax.
This is usually due to an error in your Client Properties configuration — a partial
transcript of the delivery attempt will be displayed to help you diagnose the problem.
Click Open Properties to open the Client Properties dialog so that you can check your
settings. The mail server and dialup settings information on this dialog must be entered
properly in order for the client to be able to deliver messages. Make sure that the
correct IP address or domain name of your mail server has been entered on the Server
Settings 16 pane and that correct ISP account information has been entered on the
Dialup Settings 17 pane (if using the dialup features). You can also click Send again if
you wish to try to send the fax again or Cancel fax to cancel it.
Copyright © 1996-2014. All rights reserved. Alt-N Technologies, Ltd.
28
RelayFax SMTP Client v7.1
4.3 Cover Pages
This pane allows you to specify what cover page (if any) will be included with an
outbound fax.
Do not attach a cover page to this fax
Click this checkbox if you do not want RelayFax to append a cover page. In such
cases only the printed document will be faxed. The information that the RelayFax
Server automatically includes on regular cover pages will not be included. However,
each page will still contain a banner at the top.
When this option is selected, the Comments area located on the Properties 25 pane
will be unavailable, since there will be no cover page on which to list any comments.
If you want to create a custom cover page and include it with
your document (instead of the RelayFax formatted cover
pages) you can use this feature to do so. Simply create your
cover page (using whatever method you wish) and then make
it the first page of your document. Then, after printing the
document to the RelayFax Printer Driver make sure that the
"Do not attach a cover page to this fax" checkbox is enabled
before sending the fax.
Let the RelayFax server attach a cover page to this fax
Click here to have the RelayFax Server attach a default cover page to this fax.
Copyright © 1996-2014. All rights reserved. Alt-N Technologies, Ltd.
Compose Fax Dialog
29
Attach one of my personal cover pages to this fax
Click here and select a cover page from the list and it will be used when the fax is
sent.
Preview
Click this button to preview the cover page, as it will appear in the fax.
Advanced
Click this button to open the Cover Pages dialog. This can be used to manage
your custom cover pages.
The RelayFax SMTP Client integrates with the Microsoft Cover Page Editor included
with Windows. This application provides a very high level of custom cover page
design and creation capability. The Microsoft Cover Page Editor allows you to
create and edit richly formatted cover pages which are supported directly by
RelayFax.
The RelayFax SMTP Client uses the Microsoft Cover Page
Editor included with Microsoft Windows XP, 2000, 2003,
Vista, and 2008, excluding XP Home and Vista Home. If the
cover page editor is not installed or associated with these
files then you may need to go to Add/Remove Programs in
the control panel and install the Fax Services (also known as
"Windows Fax and Scan") under Add/Remove Windows
Copyright © 1996-2014. All rights reserved. Alt-N Technologies, Ltd.
30
RelayFax SMTP Client v7.1
Components.
Although the RelayFax SMTP Client can be installed and used
on the Home editions of Windows XP and Vista, the cover
page editor options will not work because those versions of
the operating system do not include the fax services.
Existing Cover Pages
This box displays all available cover pages that you have created.
Remove
You may delete a cover page by selecting it from the Existing Cover Pages list
and then clicking the Remove button. You will be asked to confirm your decision
to delete the cover page before proceeding.
Edit
To edit a previously created cover page select it from the Existing Cover Pages
list and then click the Edit button. The cover page will be loaded into the
Microsoft Cover Page Editor (not available in XP Home or Vista Home editions).
For more information on using the Cover Page Editor, click "H elp»H elp T opics "
within the editor.
New
To create a new cover page, click the New. This will open the Cover Page
Properties dialog, on which you will assign a name for your cover page, and
include any desired comments or notes about this page for your reference.
Cover Page Properties
Copyright © 1996-2014. All rights reserved. Alt-N Technologies, Ltd.
Compose Fax Dialog
31
Cover page name
Type a name for your cover page into this text box. This may be a
descriptive name such as "The Frank Thomas cover page".
Descriptive Comments
Here you may enter up to 255 characters of descriptive text or comments
regarding this cover page. This can be used for reference to easily identify a
specific cover page. This is helpful when creating Outbound Fax Rules to
assign alternate cover pages. For example, "This is the cover page that Frank
Thomas uses when sending faxes about his many heroic exploits." When this
particular cover page is selected from the Existing Cover Pages list this text
will appear in the Comments section of the Cover Pages dialog.
These comments are saved in your cover page folder as
the file "<Cover Page Name>.cmt".
Cover page file:
This is the filename of the cover page. Cover pages are stored in the ...
\RelayFax\Covers subfolder.
Comments:
When you create a cover page you will have the opportunity to include some
comments or a description of the page for your personal reference. These
comments will appear in this area when a cover page is selected from the
Existing Cover Pages list. This text will not appear on the cover page itself.
Copyright © 1996-2014. All rights reserved. Alt-N Technologies, Ltd.
32
RelayFax SMTP Client v7.1
4.4 Send Schedule
This pane makes it possible for you to designate a specific date and time for RelayFax
to send your fax.
Schedule fax for specific time
I want my fax to be sent immediately
Click this option if you want the RelayFax server to send your fax at the earliest
opportunity and on the first available fax modem.
I want to schedule my fax for sending at a particular date and time
Choose this option to cause the RelayFax server to send your fax at a specific date
and time.
Select the date to send your fax
Type the date that you want your fax to be sent. The date must be in the format:
mm/dd/yyyy. You can also click
the date instead.
to open a calendar from which you can choose
Select the time to send your fax
Use the drop-down list boxes to choose the hour, AM or PM, and minute to send the
fax.
Copyright © 1996-2014. All rights reserved. Alt-N Technologies, Ltd.
Compose Fax Dialog
33
4.5 Scan Image
The RelayFax SMTP Client supports TWAIN compatible devices such as scanners and
digital cameras. Direct scanner support makes it possible for you to use the client in
the same manner that you would use a typical fax machine. You can scan a document
at the touch of a button, type-in a fax number, and then click "Send Fax" to send it.
Scan Image
Source
Click the "Source" button to open the Select Source dialog, which lists all available
TWAIN devices that it finds on your machine. Next, select the device that you want
the client to use and then click the "Select" button. The selected device will then
become the default source from which documents will be acquired.
Acquire
Click this button to acquire a document from the selected source. Before acquiring
the document, the Scanning Options 34 dialog will be opened unless you are using
the Quick-Scan feature located on the Scanner Settings 21 pane.
Current fax image file
When you acquire a document from a TWAIN device the path to the file will be
displayed in this field.
Copyright © 1996-2014. All rights reserved. Alt-N Technologies, Ltd.
34
RelayFax SMTP Client v7.1
Only a single file can be displayed in this field. When scanning
multiple pages the first one will be listed here and the
remainder will be listed on the Attached Documents 36 pane.
View
Click View to open the file listed in the Current fax image file control.
See also:
Scanning Options
34
Scanner Settings
21
Attached Documents
36
4.5.1 Scanning Options
Scanning Options
Number of pages to scan [xx]
If you are sending a multi-page fax, use this control to enter the number of pages
that it contains (including cover page). You will be prompted to ready each page
before it is scanned. Depending upon your scanner, a product-specific user interface
may or may not appear. If you are using an automatic document feeder (ADF) with
your scanner then you may enter "0" to cause it to scan all loaded pages. Be sure to
enable the Use automatic document feeder control if you are using one.
Use automatic document feeder
Click this check box if your scanner is equipped with an ADF unit.
Copyright © 1996-2014. All rights reserved. Alt-N Technologies, Ltd.
Compose Fax Dialog
35
Do not enable this control if your scanner isn't equipped with
an automatic document feeder. Configuring the client to use
an ADF unit when there isn't one could lead to errors or system
instability.
Scan resolution
Click the drop-down list box and choose the resolution setting that you want to be
used when scanning the documents.
Brightness adjustment
Use This slider to adjust the brightness setting that will be used when scanning.
Contrast adjustment
Use this slider to adjust the contrast setting that will be used when scanning.
Not all scanner device drivers will accept the Resolution,
Brightness, and Contrast settings from RelayFax. You may
have to replicate these settings once the scanner driver user
interface has loaded.
Copyright © 1996-2014. All rights reserved. Alt-N Technologies, Ltd.
36
RelayFax SMTP Client v7.1
4.6 Attached Documents
Use the settings on this pane to attach documents to your fax. If the RelayFax Server
has Attachment Faxing support enabled, each attached document will be converted to
a faxable image format and sent as additional pages.
Attach These Documents To This Fax
This list shows the currently attached documents.
Remove
Click this button to remove the selected documents from the list.
Open
Select a file from the list and then click this button to open it.
Add This Document
Type in the path to the document you wish to include with this fax.
Add
Click here to add the specified document to the list.
Acquire
Click this button to acquire a document from your default TWAIN device.
Browse
Click here to select a document to include with this fax.
Copyright © 1996-2014. All rights reserved. Alt-N Technologies, Ltd.
Compose Fax Dialog
37
Convert documents to TIFF format before sending
Click this option if you want the client to convert the documents for you before
sending rather than letting the fax server convert them.
4.7 Advanced Options
This pane is used to specify the email address to which fax images will be mailed and
other properties associated with sending the fax.
Faxing Options
I want confirmation that this fax was sent properly
Click this checkbox to request that RelayFax send you a confirmation notice when it
has successfully transmitted your fax. Ordinarily RelayFax would only send a
message to you if it could not send your fax.
This feature will only work if the RelayFax Server has been
configured to honor these requests.
I want a copy of this fax attached to the confirmation message
Click this option if you want the confirmation message to have a copy of your
sent fax attached to it. This control will not be available when the "I want
confirmation that this fax was sent properly" control is cleared.
Copyright © 1996-2014. All rights reserved. Alt-N Technologies, Ltd.
38
RelayFax SMTP Client v7.1
Send Priority
This control if for designating a priority value for your fax. The order in which
RelayFax will send faxes is determined by each fax's priority value – 0 is the highest
priority and 100 is the lowest. Higher priority faxes will always be sent first. If this
control is left blank then RelayFax will assign the "normal" priority value of 50.
4.8 Error Message
After clicking Send Fax on the Compose Fax dialog, a warning message may appear
informing you that the client encountered an error while attempting to deliver the fax.
This is usually due to an error in your Client Properties configuration — a partial
transcript of the delivery attempt will be displayed to help you diagnose the problem.
Click Open Properties to open the Client Properties dialog so that you can check your
settings. The mail server and dialup settings information on this dialog must be entered
properly in order for the client to be able to deliver messages. Make sure that the
correct IP address or domain name of your mail server has been entered on the Server
Settings 16 pane and that correct ISP account information has been entered on the
Dialup Settings 17 pane (if using the dialup features). You can also click Send again if
you wish to try to send the fax again or Cancel fax to cancel it.
Copyright © 1996-2014. All rights reserved. Alt-N Technologies, Ltd.
Section
V
40
RelayFax SMTP Client v7.1
5 Working with Faxes
5.1 RelayFax Printer Driver
With the RelayFax Printer Driver you can fax documents directly from within the
applications that you use to create them. You can do this by printing the document to
the RelayFax Printer Driver instead of to your usual printer. After setting the desired
parameters, click OK and then the client's Compose Fax dialog will be opened
automatically for completing the fax.
During installation, the RelayFax Printer Driver's default settings
will be set to the proper resolution. Exercise caution in
changing these settings. Failure to properly configure the
printer driver will result in improperly formatted fax images that
appear out of scale or otherwise deformed.
Copyright © 1996-2014. All rights reserved. Alt-N Technologies, Ltd.
Working with Faxes
41
See also:
Compose Fax Dialog
24
5.2 Viewing, Printing, and Editing Faxes
Installing the RelayFax SMTP Client on a workstation will also install the RelayFax Fax
Viewer - a simple utility for viewing and printing fax images. This utility will be
associated with the proper extensions for opening and printing TIF documents. If an
existing software package is found associated with the TIF extension, that registry
entry will be saved under the "edit" shell command. Use the arrow keys to move from
page to page in a multi-page fax.
Copyright © 1996-2014. All rights reserved. Alt-N Technologies, Ltd.
42
RelayFax SMTP Client v7.1
5.3 Sending a Fax via an Email Client
5.3.1 Sending a Fax via an Email Client
Most of the time a fax will be created by printing to the RelayFax Printer Driver from
within a Windows application. However, it is possible and sometimes most effective to
simply load up your email client and directly generate a message to be faxed. This is
done by composing your email message and addressing it to one of the email accounts
that you know RelayFax is monitoring. For example, if RelayFax is collecting all the email
messages sent to [email protected] then sending your message to that address
will get it faxed. Several special considerations must be observed in order to use this
method of faxing.
Including a Fax Number in the TO: Header
When you address your email message you can specify just a fax number on the TO:
line like this:
"555-1212" <[email protected]>
You can also specify the recipient's name, company information, and fax number like
this:
"555-1212, Jeff Boyd, Forest Park Lanes" <[email protected]>
Note how each part within the quotations is separated by a comma. The format is like
this:
[Open Quote]FAX NUMBER[Comma]PERSONAL NAME[Comma]COMPANY NAME[Close
Quote]
Because the various sections are separated by a comma, you will need to enclose in
quotation marks any field value that contains a comma. For example:
"555-1212, "Boyd, Jeff", "Alt-N Technologies, Ltd.""
<[email protected]>
Finally, you can specify just the recipient's fax number and company name like this:
"555-1212, , "Alt-N Technologies, Ltd."" <[email protected]>
Using a Fax Number in the Email Address
Your fax server/mail server configuration may have an entire domain (e.g.
"fax.example.com") dedicated to fax messages, allowing a fax number to be used as the
mailbox portion of the email address itself. If that is the case then you would format
the email address like this:
"Frank Thomas, Example Co." <[email protected]>
Copyright © 1996-2014. All rights reserved. Alt-N Technologies, Ltd.
Working with Faxes
43
See:
Email Macros
43
Attaching Documents to Fax Messages
43
5.3.2 Attaching Documents to Fax Messages
The RelayFax Server has the ability to extract attachments and fax them
automatically. For example, it is possible for you to send an email message to the
RelayFax Server which contains an Excel or Word document as an attachment. The
RelayFax Server will extract the document, invoke the associated application to print it
and then fax the resulting image. Any number of separate attachments can be
attached and faxed in this manner. Page breaks within any given document will be
honored and cause multiple pages to be faxed.
When you send a fax through an email message and not
through the printer driver, the text of your mail will be placed
in the comments section of the cover page if the cover page
exists and the length of the text of your message is less than
1000 characters. However, page breaks within the body of
the email message will be honored and cause RelayFax to
generate multiple faxed pages rather than just a cover page.
See Also:
Attached Documents
36
5.3.3 Email Macros
When RelayFax processes an email message in preparation for faxing, it examines the
message to determine where and to whom the fax should be sent. Most of the time this
information will be specified on the TO: line, however it is possible to specify several
key items within the email message itself. The following special macros can be placed
within the body of an email message to achieve specific results. Each macro must
appear on its own line and at the top of the message body:
AUTOEXTRACT: true
This macro tells the RelayFax Server to perform
OCR on the attached TIF file and search for
faxnumbers.
AUTOEXTRACTKEY: true
If AUTOEXTRACT is true, then this macro
contains the string to search for when looking
for recipient fax numbers.
Copyright © 1996-2014. All rights reserved. Alt-N Technologies, Ltd.
44
RelayFax SMTP Client v7.1
AUTOEXTRACTNAME: true
If AUTOEXTRACT is true, then this macro
contains the string to search for when looking
for the recipient name.
AUTOEXTRACTCOMPANY: true
If AUTOEXTRACT is true, then this macro
contains the string to search for when looking
for the recipient company name.
AUTOEXTRACTFILE: true
If AUTOEXTRACT is true, then this macro
contains the string to search for when looking
for the name of a comment file to include on the
cover page.
AUTOEXTRACTSUBJECT: true
If AUTOEXTRACT is true, then this macro
contains the string to search for when looking
for the fax subject.
AUTOEXTRACTEACHPAGESEPAR
ATE: true
If AUTOEXTRACT is true, this macro processes
each page of the attached TIF separately. This
option is used when each page of a single
printout should be sent to a separate user.
EMAILTO: [email protected]
This macro specifies an email address to which
to send a copy of the fax. You can include any
number of these macros. Each email recipient
receives a customized cover page, and the fax
document will be attached in the image format
designated by the RelayFax server.
FAXPASSWORD: Password
Used for including your fax password within the
message. If RelayFax is configured to require a
password then you must use this macro to
include it, when sending a fax via an email
client.
FAXID: Text
This macro specifies the fax ID used when
RelayFax sends a fax. This information is
transmitted to the receiving fax machine.
FAXSUBJECT: Text
This macro specifies the subject of the fax to
"Text". This information appears on the cover
page.
Copyright © 1996-2014. All rights reserved. Alt-N Technologies, Ltd.
Working with Faxes
45
FROMNAME: Text
This macro specifies real name of the sender of
the fax to "Text".
FROMLINE: Text -or-
Either of these macros specifies the email
address of the sender of the fax. The value
must be an email address.
FROMADDRESS: Text
FAXNUMBER: Parms
This macro specifies the one fax recipient.
‘Parms' can specify a fax number only or a fax
number + recipient name + recipient company
name.
Ex: 555-1212
Or 555-1212, Jerry Donald, Alt-N Tech
Or 555-1212, "Hathcock, Arvel", "Alt-N Tech,
LTD."
STREET1:Text
The sender's street address.
STREET2:Text
The sender's secondary address, or second line
of their street address.
CITY:Text
The sender's city.
STATE:Text
The sender's state or province.
ZIP:Text
Sender's zip or postal code.
ZIPCITY: true
This macro specifies the order used in the
sender's address. If "true," then the order is zip,
city, and state.
The default is "false": city, state, and zip.
HOMEPHONE:Text
This is the sender's home telephone number.
HOMEFAX:Text
This is the sender's home fax number.
Copyright © 1996-2014. All rights reserved. Alt-N Technologies, Ltd.
46
RelayFax SMTP Client v7.1
BUSPHONE:Text
The sender's business phone number.
BUSFAX:Text
Sender's business fax number.
BILLINGCODE:Text
The billing code of the sender.
CCNUMBER: Parms
Use this macro to specify additional fax
recipients. You can use as many of these
macros as you need. Specify a single recipient
per macro. ‘Parms' can specify a fax number
only or a fax number + recipient name +
recipient company name.
Ex: 555-1212
Or 555-1212, Jerry Donald, Alt-N Tech
Or 555-1212, "Hathcock, Arvel", "Alt-N Tech,
LTD."
PORT: Number
This macro specifies the port that the fax
should be sent on. Use care to ensure that you
specify a valid port.
FROMCOMPANY: Text
This macro specifies the company name of the
sender of the fax.
FROMPHONE: Text
This macro specifies the voice telephone number
of the sender of the fax. This is the voice
number value that is used in RelayFax's template
files.
FROMFAX: Text
This macro specifies the fax number of the
sender of the fax (typically the RelayFax
Server's fax number).
CONFIRMSEND: true
This macro specifies that the sender of the fax
wishes to receive a confirmation message when
the fax has been successfully sent. The value of
this macro should be the word "true".
Copyright © 1996-2014. All rights reserved. Alt-N Technologies, Ltd.
Working with Faxes
47
ATTACHMENT: Path
Causes the attachment specified in the path to
be included in the fax message. The file path
must be accessible to the RelayFax server for it
to be attached.
COVERPAGE: Path
This macro specifies the cover page that will be
used for this fax. "Path" must specify a valid
.COV file accessible to the RelayFax Server.
PREFIX: Text
This macro specifies a prefix to the fax number
such as "*70" or "9,".
IGNOREBODY:
This macro prevents RelayFax from including the
email body in the comments field. The body is
still scanned for macros.
COMMENTS: Text
This macro specifies the text that will appear in
the NOTES or COMMENTS section of the cover
page. You can specify more than one line of
comment text by placing "%e" into the text
where a line break should appear.
SCHEDULE: mm/dd/yyyy ##:##
am/pm
Designates a specific date and time to send the
fax.
Example: SCHEDULE: 01/01/2001 05:30 PM
NOTE: The day and date parameters must be
two characters: 01, 02, etc. The year must be
four. The hour must be 01-12 with AM or PM
following the minutes.
PRIORITY: 00-100
Sets a priority value for the fax. 00 is the
highest priority and 100 is the lowest. Messages
will always be faxed in the order of their priority
setting. When no priority setting is present,
they will be treated as "normal" with a setting of
50.
WAITFORANSWER: Number
This macro specifies how long RelayFax will wait
for the receiving fax machine to answer. This is
a value in seconds.
Copyright © 1996-2014. All rights reserved. Alt-N Technologies, Ltd.
48
RelayFax SMTP Client v7.1
RETRYATTEMPTS: Number
This macro specifies how many times RelayFax
will retry a failed fax attempt.
RETRYDELAY: Number
This macro specifies the number of seconds
RelayFax will wait between subsequent fax
attempts.
NOCOVERPAGE: true
This macro will prevent RelayFax from
generating a dynamic cover page and sending it
along with your fax. This is useful for situations
in which you either do not want a cover page or
the first printed page of your document is the
cover page for the fax.
BANNERTEXT: Text
This macro specifies the text that appears at
the top of each faxed page. You can use the
special banner characters here. See the Banner
Text & Formatting Characters 48 for more
information.
---Example Start--From: [email protected]
To: "555-1212, Eddie Filewood, "Forest Park Lanes, Front Desk""
<[email protected]>
Subject: My time.
FROMNAME: Frank Thomas
FROMCOMPANY: Forest Park Lanes, Inc.
PRIORITY: 00
COMMENTS: Say, hit me in! I be in ina minute. %e Tell me I'm a lyin'. %
e Frank
---Example End---
5.3.4 Banner Text & Formatting Characters
RelayFax will insert a line of text at the top of each faxed page. This line is called a
banner. With RelayFax it is possible to custom format your banner to automatically
include various kinds of information such as the date and time, total pages, recipient's
or sender's name, your fax device's identifier (CSID), and various other options.
By inserting special formatting characters into the banner, you may automatically
include some information concerning the fax. See the list below for descriptions of
these characters.
Although the banner may be any length, only one line will appear at the top of a fax.
Copyright © 1996-2014. All rights reserved. Alt-N Technologies, Ltd.
Working with Faxes
49
This line may consist of up to three parts. These parts are a left-justified portion, a
center-justified portion, and a right-justified portion. Each part is separated by the
vertical bar character ("|"). Since none of these areas are limited in size, there is the
potential that they may at times overwrite one another.
If the banner option is left blank no fax banner will be sent.
However, it is common practice to include a banner on
outgoing faxes, and in some regions it is even required.
RelayFax Banner Formatting Characters
The following is a glossary of all valid formatting characters that may be used in the
RelayFax Banner:
%d = date in short format
%D = date in long format
%t = send time (24 hour format, e.g. 1:00pm = 13:00:00)
%p = total number of pages in the fax
%c = current page
%r = Recipient's Name
%y = Recipient's Company
%s = Sender's Name
%m = Sender's Company
%i = Sender's Fax ID
%u = Subject of Fax
%f = Recipient's Fax Number
%o = Comments
%x = Sender's Fax Number
%h = Sender's Voice Number
%T = Tracking Number
5.4 Advanced Features
5.4.1 Sending Faxes Programmatically
Your custom application can use the RelayFax system to send a fax by observing the
following steps:
Set the following parameters in the FAXCLNT.INI file under the [FAXPARMS] section.
Copyright © 1996-2014. All rights reserved. Alt-N Technologies, Ltd.
50
RelayFax SMTP Client v7.1
This file can be found in the \Application Data\RelayFax\ subdirectory of the user's
profile (e.g. Documents and Settings in Windows 2000/XP).
LastFaxNumber=555-1212 ; set the fax number here
LastRecipientName=Arvel Hathcock ; set the recipient's name here
LastRecipientCompany=Alt-N Tech ; set the recipient's company here
LastFaxSubject=Sample Subject ; set the subject of the fax message here
LastComments=This is%ea comment ; comments for cover page (%e = line
break)
[email protected] ; address of RelayFax Server's
email account.
ConfirmSend=Yes (or No) ; request a send confirmation
NoCoverPage=Yes (or No) ; use a cover page?
DefaultCoverPage=Yes (or No) ; user server assigned cover page
SpecificCoverPage=Yes (or No) ; use a specific cover page
LastCoverPage=FILENAME ; filename of specific cover page to use
VerifyTransfer=Yes (or No) ; view mail sessions in progress
Once the above parameters are set to your liking, set the following key to activate
automatic faxing: AutoFax=Yes (or No)
If the AutoFax key is set to Yes the RelayFax SMTP Client will create and spool the
next printed document sent to the RelayFax Printer Driver automatically without
prompting the user for any information. After doing so the RelayFax SMTP Client will
reset the AutoFax key to No.
When specifying the LastCoverPage key use only the name of the cover page file – not
the complete path to the file itself. The Client will assume the file is located in the
Cover Page Directory.
Also, the NoCoverPage, DefaultCoverPage, and SpecificCoverPage keys work together.
Only one can be set to Yes. The others must be set to No. An error will result if more
than one of these keys are set to Yes at the same time.
5.4.2 Using the Broadcast Fax Wizard
The RelayFax SMTP Client's broadcasting wizard makes sending a fax to multiple
recipients or a distribution list simple. By stepping through the wizard one screen at a
time and providing a few pieces of information, you can send a fax to any number of
recipients — listed either in a text file or by acquiring them directly from an ODBC
accessible database.
In the wizard you will choose: The text file containing the fax recipients, whether or
not you want the fax to be "cover page only", the fax image to send, the cover page
to use, the template to use, and some sender information. If you want to build the
Copyright © 1996-2014. All rights reserved. Alt-N Technologies, Ltd.
Working with Faxes
51
recipient list from an ODBC accessible database instead of a text file, you can step
through an additional wizard 56 in the middle of this process that will enable you to do
so.
This feature may not be available to all users. The
administrator must grant your account permission before you
will be able to use the client to send broadcast faxes.
Broadcast Fax Wizard Step-by-Step
Step 1—Prepare the recipient list
51
Step 2—Open the Broadcast Fax Wizard
52
Step 3—Choose the recipient list or build it from a database
52
Step 4—Choose the fax image or document that will be sent
52
Step 5—Choose the cover page
53
Step 6—Enter the sender information
Step 7—Begin the broadcast
54
55
Step 1—Prepare the recipient list
Prepare a text file or database that contains the fax numbers and names to which you
wish to send the fax. Remember where this file or database is located. The format of
the text file must be as follows:
The file must contain no more than one fax number per line but each line can also
contain the recipient's name and company information. Lines beginning with "#" or ";"
are ignored to allow you to put comments throughout the file as necessary. Here are
some examples:
555-1212
Only the fax number is specified
555-1212, Arvel Hathcock
Fax number and recipient name specified
555-1212, Arvel Hathcock, Alt-N
Technologies
Fax number, name, and company specified
555-1212, Arvel Hathcock, "Alt-N
Tech, LTD."
Fax parameters may contain commas if
quoted
555-1212, , Alt-N Technologies
Only fax number and company specified
If you want to build the list automatically from a database then the database must first
be included in your Windows ODBC Data Source Administrator. This is located in either
the Control Panel or Administrative Tools under the Control Panel, depending upon
which version of Windows you are using.
If building the list from your fax contacts or address book, you will choose the list of
recipients in Step 3 52 below.
Copyright © 1996-2014. All rights reserved. Alt-N Technologies, Ltd.
52
RelayFax SMTP Client v7.1
Step 2—Open the Broadcast Fax Wizard
Right-click the RelayFax SMTP Client tray icon, and choose "Send broadcast fax...".
Step 3—Choose the recipient list or build it from a database
Click Browse and navigate to the text file containing the fax numbers, or click Contacts
to choose the recipients from the contact manager or address book. If you want to
build the list from a database then click ODBC data source, which will launch the ODBC
Selector Wizard 56 . After this step is completed, the wizard will display the first
several entries to which the broadcast fax will be sent. Click Next.
Step 4—Choose the fax image or document that will be sent
Click Browse and navigate to the fax image or document that you wish to send, or click
the checkbox next to "This broadcast fax consists of a cover page only" if want to
send only a cover page (the cover page will be chosen in the next step). If you have
selected a file to send and you want the client to convert the document for you before
sending it (rather than letting the fax server convert it for you), click "Convert
document to TIFF format before sending." Click Next.
Copyright © 1996-2014. All rights reserved. Alt-N Technologies, Ltd.
Working with Faxes
53
Step 5—Choose the cover page
Choose the cover page for the fax. If you need to create a new cover page or edit an
existing one, click Advanced to open the Cover Page 28 dialog. If you don't want to
include a cover page with the broadcast fax then click the checkbox next to "I do not
wish to use a cover page". Click Next.
Copyright © 1996-2014. All rights reserved. Alt-N Technologies, Ltd.
54
RelayFax SMTP Client v7.1
Step 6—Enter the sender information
1. Enter the sender's name.
2. Enter the sender's email address. RelayFax will send any system or error
messages regarding the broadcast to this address.
3. Enter a billing code for the broadcast, or leave it set to <Default>.
4. Specify a priority value from "0" to "100" for this broadcast. The order in which
faxes are sent is determined by their priority value—"0" being the highest priority
and "100" being the lowest. The default value for normal faxes is "50". The
default value for broadcast faxes is "80". If you want normal faxes to be sent
before the broadcast fax then specify a number greater than 50 in this control.
Further, if you do not want broadcast faxes to count against the
"MaxPendingFaxCount=" value in the RelayFax.ini file, then you must
designate a priority value between "80" and "100".
5. Click Next.
Copyright © 1996-2014. All rights reserved. Alt-N Technologies, Ltd.
Working with Faxes
Step 7—Begin the broadcast
Click Finish to start broadcasting your fax.
Copyright © 1996-2014. All rights reserved. Alt-N Technologies, Ltd.
55
56
RelayFax SMTP Client v7.1
See also:
ODBC Selector Wizard
56
5.4.3 ODBC Selector Wizard
If you choose to build the Broadcast Fax recipient list from a database instead of a
previously prepared text file, use the following steps to do so:
Step 1—Prepare your database
Prepare your database making sure that the table from which you wish to build the list
contains fields for each recipient's fax number, name, and company. Add the database
to your Windows ODBC Data Source Administrator. ODBC Data Source is located in
either the Control Panel or Administrative Tools under the Control Panel, depending
upon which version of Windows you are using.
Step 2—Open the Broadcast Fax Wizard
Right-click the RelayFax SMTP Client tray icon and click "Send broadcast fax...". This
will open the Broadcast Fax Wizard.
Step 3-Open the ODBC Selector Wizard
In the Broadcast Fax Wizard, click "ODBC data source" to open the ODBC Selector
Wizard.
Copyright © 1996-2014. All rights reserved. Alt-N Technologies, Ltd.
Working with Faxes
57
Step 4—Choose the data source
This dialog lists all data sources currently included in the ODBC Data Source
Administrator. Click the data source that contains the table that will be used to build
your list. If a logon and password is required to gain access to the data source then
include that information on this dialog as well. Click "Next".
Copyright © 1996-2014. All rights reserved. Alt-N Technologies, Ltd.
58
RelayFax SMTP Client v7.1
Step 5—Select the table containing the recipient information
This dialog lists the tables contained in the chosen database. Click the table that
contains the fields that you wish to use to build your recipient list. Click "Next".
Copyright © 1996-2014. All rights reserved. Alt-N Technologies, Ltd.
Working with Faxes
59
Step 6—Select the columns to use
Use the drop-down list boxes to select the database columns that you wish to use to
build your list of recipients. Select columns that correspond to the recipient fax
number, name, and company. Name fields 2 and 3 are optional. If your database
contains a single column for Name, then you can assign it to Name field 1 and leave the
others blank. This dialog also contains an optional control that can be used to enter an
SQL SELECT statement "WHERE" clause if necessary. Click "Next". The recipient list will
be built and you will be returned to the Broadcast Fax Wizard.
Copyright © 1996-2014. All rights reserved. Alt-N Technologies, Ltd.
60
RelayFax SMTP Client v7.1
Step 7—Continue in the Broadcast Fax Wizard
Go to step 3 in the Broadcast Fax Wizard
forward.
52
and continue normally from that point
See also:
Using the Broadcast Fax Wizard
50
Copyright © 1996-2014. All rights reserved. Alt-N Technologies, Ltd.
Index
Banner Text
48
Broadcast Fax
10
Sending
50
Wizard
50
Broadcast Faxes
56
Server's domain name
16
Server's IP Address
16
Windows Address Book
22
Client Properties
Client Settings
19
Contact List
22
Dialup Settings
17
Personal Settings
14
Scanner Settings
21
Server Settings
16
Client Settings
19
Comments for cover page
25
Compose Fax Dialog
Advanced Options
37
Attached Documents
36
Cover Pages
28
Error Message
25, 38
Properties
25
Scan Image
33
Scanning Options
34
Send Schedule
32
Summary
24
Composing a fax
10
Confirmation messages
37
Connection Persistance
17
Contact Manager
22
Cover Pages
28
Cover Pages tab (Client)
28
-C-
-D-
characters
48
Client
14
Address Book
22
Attached Documents
36
Attaching files to faxes
36
Attaching personal cover pages to faxes
Comments for cover page
25
Contact Manager
22
Cover Pages
28
Dialup Settings
17
Email
42
Fax Properties
25
Fax Specifics
25
Mail Server
16
Printer Driver
40
Properties
16, 25
Sending Faxes Programmatically
49
Database Wizard
56
Delivery confirmation
37
Dialup
Closing sessions
17
Connection Persistance
17
Hangup
17
Keeping sessions alive
17
Logon Name
17
Logon Password
17
Number of attempts
17
Profiles
17
RAS
17
Settings
17
Time to wait for a connection
Dialup Settings
17
document feeder
21
Driver
40
Index
-AAccount Address
16
Acquiring documents
33
Address
14
Address Book
22
Address Express
22
ADF
21
Advanced Options
37
Alt-N RelayFax Driver
40
Attached Documents
36
Attaching Documents to Fax Messages
Attaching files to faxes
36
Attaching personal cover pages to faxes
Automatic document feeder
21
43
28
-B-
28
Copyright © 1996-2014. All rights reserved. Alt-N Technologies, Ltd.
17
61
62
RelayFax SMTP Client v7.1
-E-
-M-
Editing Faxes
41
Email Client
Sending faxes via
42
Email Macros
43
Enabling RAS dialup/dialdown engine
Error Message
25, 38
Error sending fax
25, 38
Macros
Email
43
Mail Server
16
Message
Error sending fax
-F-
-O-PPersonal settings
14
Printer Driver
40
Printing Faxes
41
Profiles
Dialup
17
Properties
Client
25
Properties Dialog
Client Settings
19
Contact List
22
Dialup Settings
17
Personal Settings
14
Scanner Settings
21
Server Settings
16
-QQuick-scan
-H-
Introduction
6
ISP Account Information
-K25
21
-R-
17
-I-
Keywords
25, 38
OCR Printer Driver Options
19
ODBC Selector Wizard
56
Fax broadcast
10
Fax Broadcasting
Sending
50
Wizard
50
Fax Messages
Attaching Documents to
43
Fax number
14
Fax Properties
25
Fax Viewer
41
FAXCLNT.EXE file
49
FAXCLNT.INI file
49
Faxes
Confirming delivery
37
Sending Programmatically
49
Faxing
Using a scanner
33
Faxing to a list
50
FAXPARMS
49
feeder
21
Formatting Characters
48
Hangup
17
17
Recipient's Company
25
Recipient's Name
25
RelayFax Driver
40
RelayFax Fax Viewer
Editing faxes
41
Printing faxes
41
Viewing faxes
41
RelayFax Printer Driver
40
RelayFax SMTP Client
10
Copyright © 1996-2014. All rights reserved. Alt-N Technologies, Ltd.
Index
RelayFax SMTP Client
10
Attached Documents
36
Attaching files to faxes
36
Attaching personal cover pages to faxes
Comments for cover page
25
Cover Pages
28
Dialup Settings
17
Fax Properties
25
Fax Specifics
25
Introduction
6
Mail Server
16
Overview
6
Printer Driver
40
Properties
16, 25
Sending Faxes Programmatically
49
Server's domain name
16
Server's IP Address
16
Return receipt
37
28
Mail Server
16
Printer Driver
40
Properties
16, 25
Sending Faxes Programmatically
Server's domain name
16
Server's IP Address
16
Source
33
Special characters
48
-TTwain
33
-UUpdating the client
10
Using the RelayFax SMTP Client
-S-
-V-
Saving settings
19
Scan Image
33
Scanner Settings
21
Scanning
10
Scanning options
ADF
34
Document feeder
34
Resolution
34
Schedule
32
Send fax error message
25, 38
Send Schedule
32
Sending Faxes
25
Sending Faxes Programmatically
49
Sending faxes via an email client
42
Sending to multiple users
50
Server
16
Shortcut Menu
Client
10
SMTP Client
Attached Documents
36
Attaching files to faxes
36
Attaching personal cover pages to faxes
Comments for cover page
25
Cover Pages
28
Dialup Settings
17
Fax Properties
25
Fax Specifics
25
Viewer
Editing faxes
Printing faxes
Viewing faxes
41
41
41
-WWarning
25, 38
Windows Address Book
28
Copyright © 1996-2014. All rights reserved. Alt-N Technologies, Ltd.
22
10
49
63