1
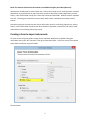
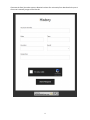
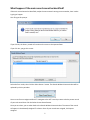
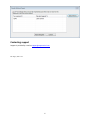
Automatic Web Forms II
for ACT! 2011 and up
User’s manual – part 10
How to set up activity, history, note
or custom table forms to be attached to an existing Act! record
Creating a form to import sub-records ......................................................................................................... 2
Selecting a main entity record type .............................................................................................................. 3
Identifying the main record the imported record will be attached to ......................................................... 3
What happens if the main record cannot be identified?.............................................................................. 5
Contacting support ....................................................................................................................................... 6
NOTE: The features described in this manual are available through a paid subscription only
We have seen already how to create a form with a main entity record as main record (contact, company,
opportunity or group) and one or more sub-entity records as secondary records (opportunity, activity,
history, note, custom table record), like a form with contact and note fields. When the data is imported
into Act!, a contact gets created and a note as well, and the note is attached to the newly created
contact.
Here we are going to see how to create a form which main record is a sub-entity (opportunity, activity,
history, note, custom table record) so that when the data is imported, it creates the sub-entity record
and attaches it to an existing main entity record.
Creating a form to import sub-records
To create a form using sub-entities, simply launch Automatic Web Forms by double-clicking the
notification area in your ACT! top menu. Then go to Forms>New form… In the first screen of the wizard,
select Other and choose a type of records.
Then click Next.
2
This second page allows you to set the type of main entity the sub-record will be attached, then to
choose the field that will be used to identify the main entity.
Selecting a main entity record type
In the first screen, we chose to create a history record form. So in the second screen, you are prompted
to choose if you want to “attach” the history record to a contact, a company, a group or an opportunity
which are the 4 types of main entities in ACT!.
Identifying the main record the imported record will be attached to
We selected Contact History, we now need to identify the field which will help us identify which contact
Automatic Web Forms will attach the imported history record to in section identified as 2 in the above
screenshot. This field should be a field that uniquely identifies the contact. It could be a customer ID, an
account number, maybe an e-mail address.
3
If we save the form (the other steps are identical to those of a main entity form described in the part 1
of our user’s manual), we get a form like this.
4
What happens if the main record cannot be identified?
If the main record cannot be identified, maybe the user entered a wrong account number, here is what
is going to happen.
Your first get this prompt.
If you click No, the history record will remain on the server to be imported later.
If you click Yes, you get this screen:
Select the form result, then click the Select Parent… button. The Results Without Parent window will be
replaced by this tiny window:
You are now free to navigate within ACT!. Navigate to the ACT! record you want to be the parent record
of your sub-record then click the Select Current Record button.
Once you are done, you are taken back to the Results Without Parent window. The name of the record
will appear in the Manually Assigned To column. Once all your records are assigned, click Import
Assigned.
5
Contacting support
Support is provided by e-mail at [email protected].
Rev. Aug 5, 2015 - v.5.1
6