1
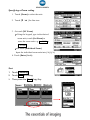
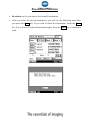
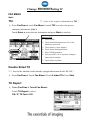
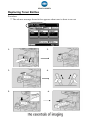
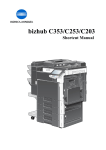
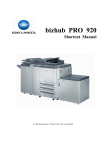
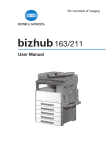
bizhub 350 / 250 English Shortcut Manual For details information, please refer to the operating manual (Usual Manual) Basic Touch Panel Basic Paper 1. Automatically selecting the paper size by press ”Auto Paper Select” setting 2. Touch [Paper] to select desired paper size 3. Copying label or thick paper should through the multiple bypass Change Custom Size 1. Touch [Change Setting] 2. Select Paper Type e.g. [Normal/ OHP…] 3. Select Paper Size e.g. [A4 / Letter] 4. Input Customer paper size by touch [Custom Size] 5. Input the length of paper into [ X ] 6. Input the depth of paper into [ Y ] 7. Save the setting by [Size Registration] And select the [1] or [2] 8. Press [Enter] back to front page Specifying a Zoom setting 1. Touch [Zoom] to select the ratio 2. Touch [▼ / ▲ ] for fine tone 3. Or touch [XY Zoom] Using the keypad, type in the desired zoom ratio, touch [Set Zoom] to store the zoom ratio e.g. 1 x1.000 or 2 x1.000 Or touch [Individual Zoom] Input the individual zoom ratio into [ X ]及[ Y ] 4. Touch [Enter] finally Sort 1. Touch Finishing 2. Touch Sort for sorting 3. Then press the Start Copy Key - Simplex / Duplex Copy Touch Simplex / Duplex for [single size / double size] a. Single-sided Double-sided b. Double-sided Single-Sided c. Double-sided Double-sided Combine Originals Multiple document pages (mainly 2, 4 or 8 pages) can be combined and print on a single paper, reducing paper use. Touch Combine Originals to select 2in1or 4in1 Quality Density 1. Touch [Quality Density] 2. Touch [Lighter] or [Darker] to adjust the level of density 3. Select the original mode [Text] for document contains text [Photo] for document contains photo [Text/Photo] for document contains both text and photo [Dot Matrix ] for document contains faint text Application Cover Mode 1. Touch Application 2. Touch Cover Mode 3. Select either ‘with image’ or ‘blank’ to specify whether or not a page of the document is copied onto the insertion sheet 4. Select the paper tray loaded with the paper 5. Touch Ok to confirm 6. Press the Start key Page Insertion 1. Touch Page Insertion 2. Touch Insert Paper 3. Select With Image / Blank 4. Select the paper tray loaded with the interleaf paper 5. Press the Start key Image Repeat 1. Touch Application 2. Touch Book Copy /Repeat 3. Touch Oversized Paper to input the size 4. Touch Image Repeat 5. Touch Custom Size to input the lenth of X and depth of Y 6. Touch OK to confirm 7. Press the Start key Book Copy 1. Touch Application 2. Touch Book Copy/ Repeat 3. Touch Book Copy 4. Touch Separation,Touch Enter to input 5. Place the book on the original glass 6. Touch Start to start 7. Touch Finish after book scanning is completed 8. Press the Start key Booklet Creation 1. Touch Application 2. Touch Book copy/Repeat 3. Touch Booklet 4. Press the Start key Page Margin 1. Touch Application 2. Touch Page Margin 3. Select the position of ‘Page Margin’ 4. Touch OK to confirm 5. Press the Start key Erase 1. Touch Application 2. Touch Erase 3. Select the position and width 4. Touch OK to confirm 5. Press the Start key Image Settings a). Set Numbering 1. Touch Application 2. Touch Image Setting 3. Touch Set Numbering 4. Input Starting No. 5. Select First Page or All Pages 6. Select Darker / Lighter 7. Press the Start key b). Stamp 1. Touch Application 2. Touch Image Setting 3. Touch Stamp 4. Select Confidential / Copy 5. Select First Page or All Pages 6. Press the Start key Stopping or deleting a job 1. Press the Stop key 2. Touch the button for the job to be deleted Fax / Scan There are 5 different touch panel: 1. One Touch 2. Search 3. Direct Input 4. Quality/Reduction 5. Fax Menu ONE TOUCH QUALITY / REDUCTION SEARCH DIRECT INPUT FAX MENU Set One Touch Key 1. Press Utility/Counter 2. Press User Set 3. Press Fax 4. Press One Touch 5. Select One Touch to Reg. 6. Input One Touch Name (max 12 characters) 7. Press Next 8. Press Fax & G3-1 **For scan to email,press PC and then select Email 9. Press Next 10. Enter Fax Number **input email address if you wan to scan to email 11. Press Next 12. Press Enter 4 times 13. Press Exit Delete One Touch Key 1. Press Utility/Counter 2. Press User Set 3. Press Fax 4. Select the key that you want to delete 5. Press Delete 6. Press Enter Fax document through feeder Fax Document through automatic document feeder 1 Press the Fax / Scan key 2 Touch One Touch key to select the stored address Or Touch Direct Input key to input the fax address (For the multi destination, touch the Next Dest. key to input the next address. The maximum multi destination for direct input is 12 addresses. And the maximum multi destination for one touch is 300 addresses.) 3 For double size scanning or other setting, touch Fax Menu key. (refer to the next page) 4 Press the Start key Fax Document through the original glass Fax Document through original glass 1 Place the original document on the original glass 2 Touch the One Touch key to select the stored address 3 After scanning, touch the Finish key and press the Start key (For multi original document, press the Start key after scanning each page. Lastly, touch the Finish key and press the Start key) Brocadcast Function Broadcast can let you scan or fax to multi destination. After you select the desired destination, you will see the following panel after you press the Start key. If you wish to check the destination, touch the Enter key. You will see all selected destination again. Press the Start key to confirm to send. Change Fax / Scan Setting I Change Scan Quality A). Quality 1 Touch Quality / Reduction 2 Touch Quality 3 Select Standard / Fine / Super Fine B). Density 1 Touch Quality / Reduction 2 Touch Density 3 Select Darker or Lighter C). Reduction Touch Auto Size D). Original document size Scan special size touch Set Original size Select original size Change Fax/Scan Setting II FAX MENU Set 1 TSI **(refer to the register information of TSI) Press Fax/Scan > touch Fax Menu > touch TSI > to select the pre-set company information (1-8) > Touch Enter to select the fax destination and press Start to send out Register TSI 1- Touch Utility 2- Touch Admin Management to key in the administer password 3456- Touch Enter to select Admin 1 Touch Initial Setting and Enter Select TSI Registration Select position (1-8) to input the company name and fax number 7- Touch Name and Enter Double Sided TX **(Just for the machine which already equipped document feeder DF-605) Press Fax/Scan > Touch Fax Menu> Touch 2-sided TX> Press Start TX Report Press Fax/Scan > Touch Fax Menu> Touch TX Report to select ON / IF TX Fails / Off Net You can change the setting for scanning document into PC Subject Sel. **(refer to the below procedure to register subject) Follow the below procedure to select the stored subject 1. Press Fax/Scan 2. Touch Fax Menu Register Subject (Max.: 4) must equipped with SU-501 3. Touch Net Touch Utility select Admin. Management 4. Touch Subject Selection 5. Press Start Input Administrator password touch Enter Select Admin 2 Touch Network Setting Touch Scanner Setting Touch Subject Registration Select position (1-4) to key in the Subject 按 “輸入” Enter 6 次 按 “退出” Exit Reply Address 1. Touch Reply E-mail Addr. 2. Input the email address File Name 1. Touch File Name 2. Touch Enter to confirm after you input the file name Stop the fax dialing / sending 1. Press Stop key 2. Select Dialing 3. Touch Enter to confirm Resend the Fax Document Touch Job List to select Type Touch Retry to resend fax document. If you want to change the fax number, touch to Change Destination. ** For the first 20 waiting retry fax document, you can change the fax number and resend the fax document. Check the Fax-in / Fax-out Report 1. Touch Job List 2. Touch Fax 3. Select to check the report To Clear a paper misfeed ** For the paper misfeed in ADF 1. Pull up the lever for the misfeedclearing cover, and then open the cover 2. Carefully pull out any misfed paper and swing up the document guide lever if necessary 3. While supporting the document feed tray with your right hand, carefully pull out any misfed documents. ** When the message “Misfeed detected” appears, please follow Location of paper misfeed 1. 2. Pull out the right-side door release lever 3. Carefully pull out any misfed paper 4. Carefully pull out any misfed paper around the image Remove misfed paper from the bypass tray transfer roller in the duplex unit 5. Pull out the lower right-side door release leaver, and then open the lower right-side door of the paper feed unit. Carefully pull out any misfed paper Replacing Toner Bottles Procedure: ** The advance message shown below appears when toner is about to run out 1. 2. 3. 4. 5. 6. Check Meter Reading 1. Open the front door 2. The meter counter is just right-hand side of the toner ** Check Counter on the panel, press Utiltiy/Counter Supplementary Notes ----------------------------------------------------------------------------------------------------------------------------------------------------------------------------------------------------------------------------------------------------------------------------------------------------------------------------------------------------------------------------------------------------------------------------------------------------------------------------------------------------------------------------------------------------------------------------------------------------------------------------------------------------------------------------------------------------------------------------------------------------------------------------------------------------------------------------------------------------------------------------------------------------------------------------------------------------------------- Supplementary Notes ----------------------------------------------------------------------------------------------------------------------------------------------------------------------------------------------------------------------------------------------------------------------------------------------------------------------------------------------------------------------------------------------------------------------------------------------------------------------------------------------------------------------------------------------------------------------------------------------------------------------------------------------------------------------------------------------------------------------------------------------------------------------------------------------------------------------------------------------------------------------------------------------------------------------------------------------------------------- 部門熱線Particulars 市務科 Marketing Division Ø 銷售熱線Sales Hotlines • 查詢產品及銷售詳情 New Product and Sales Enquires 聯絡方法Contact us 電話Tel : 2565 2111 電郵Email : [email protected] 服務科 Technical Service Division Ø 維修熱線Repair Hotline • 多功能產品之維修服務 MFP Repair Services 電話Tel : 2565 2176 傳真Fax : 2856 1024 服務科 Technical Service Division Ø 產品之技術支援熱線 • 軟件及網絡支援 Application, Network and System Support 電話Tel : 2565 2178 客戶服務Customer Service Department Ø 客戶服務熱線 Customer Service Hotlines • 保養合約查詢 Maintenance Agreement • 新客戶之產品培訓 New Customer Product Training • 賬單查詢 Invoice Enquiries • 報錶 (請於報錶結算日前報讀。) Report meter reading through telephone system (Please report meter reading on or before cut-off date) 客戶服務 Customer Service Department Ø 用品供應熱線 Order Section Hotlines • 訂購消耗品如碳粉及影印紙 Ordering of Consumable Products (Toners, Paper, etc…) 電話Tel : 2565 2190 傳真Fax : 2565 2128 電話Tel : 2856 4306 電話Tel : 2565 8181 English - Press “2”, then press “2”, 中文 - 按 “1” 字然後按 “2”字 傳真Fax : 2856 2008 電郵Email : [email protected] 電話Tel : 2565 2139 傳真Fax : 2565 7613 電郵Email : [email protected] 財務科 Finance Division Ø 月結單查詢 Statement Enquiries 電話Tel : 2856 4710 傳真Fax : 2516 9177 行政科 Administration Department Ø 客戶的建議及意見反映 Other Suggestions & Comments 電話Tel : 2565 8181 按Press “ 0 ” 網上客戶服務 Online Support Services http://www.konicaminolta.hk/hk/zh-hk/customer-services.php http://www.konicaminolta.hk/hk/en-us/customer-services.php