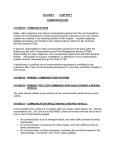
1
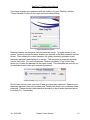
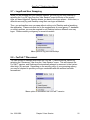
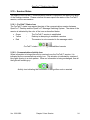
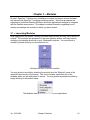
OpenFox™ Desktop User Manual Version Revised 3.00.0500 8/13/2014 Computer Projects of Illinois, Inc. 475 Quadrangle Drive, Suite A Bolingbrook, IL 60440 (630) 754-8820 THIS PAGE INTENTIONALLY LEFT BLANK TABLE OF CONTENTS Chapter 1 – Introduction and Overview .................................................................................................... 3 1.1 – User Logon ...................................................................................................................................... 4 1.2 – Desktop Interface ............................................................................................................................. 4 1.2.1 – Window Title ............................................................................................................................. 5 1.2.2 – Menu Bar .................................................................................................................................. 6 1.2.2.1 – Keyboard Shortcuts ............................................................................................................... 6 1.2.3 – Main Desktop Pane .................................................................................................................. 7 1.2.4 – Desktop Taskbar ...................................................................................................................... 7 1.2.5 – Status Icons .............................................................................................................................. 7 1.3 – Tips of the Day ................................................................................................................................. 8 1.4 – Help System .................................................................................................................................... 9 1.4.1 – Contents Tab .......................................................................................................................... 10 1.4.2 – Index Tab................................................................................................................................ 10 1.4.3 – Search Tab ............................................................................................................................. 11 1.4.3.1 – Search Capitalization .......................................................................................................... 11 1.4.3.2 – Search Terms ...................................................................................................................... 11 1.4.3.3 – Phrase Search ..................................................................................................................... 12 1.4.4 – Navigation Links ..................................................................................................................... 12 1.4.5 – Actions .................................................................................................................................... 12 1.4.6 – Searching Within Help Files ................................................................................................... 13 Chapter 2 – User Session ......................................................................................................................... 15 2.1 – Communication Layers .................................................................................................................. 15 2.2 – User Session Establishment .......................................................................................................... 16 2.3 – Terms of System Access ............................................................................................................... 17 2.4 – Certification .................................................................................................................................... 17 2.5 – Passwords ..................................................................................................................................... 18 2.6 – Password Reset (Optional Feature) .............................................................................................. 20 2.7 – Logoff and User Swapping ............................................................................................................ 22 2.8 – FoxTalk™ Disconnect .................................................................................................................... 22 2.9 – Screen Lock ................................................................................................................................... 23 2.10 – Session Status ............................................................................................................................. 24 2.10.1 – FoxTalk™ Status Icon .......................................................................................................... 24 2.10.2 – Communications Activity Icon .............................................................................................. 24 Chapter 3 – Modules ................................................................................................................................. 25 3.1 – Launching Modules ........................................................................................................................ 25 3.2 – Default Module ............................................................................................................................... 26 3.3 – Active Module ................................................................................................................................ 27 Chapter 4 – Window Management ........................................................................................................... 29 4.1 – Taskbar .......................................................................................................................................... 29 Ver. 3.00.0500 Table of Contents 1 OpenFox™ Desktop User Manual 4.2 – Windows Menu .............................................................................................................................. 29 4.2.1 - Cascade .................................................................................................................................. 30 4.2.2 – Tile Horizontal/Vertical ........................................................................................................... 30 4.3 – Window Controls ............................................................................................................................ 32 4.4 – System Menu ................................................................................................................................. 32 4.5 – Window Snapping .......................................................................................................................... 33 4.5.1 – Maximize ................................................................................................................................ 33 4.5.2 – Restore ................................................................................................................................... 33 4.5.3 – Maximize Left ......................................................................................................................... 34 4.5.4 – Maximize Right ....................................................................................................................... 34 4.6 – Multiple Monitor Support ................................................................................................................ 35 4.6.1 – Additional Desktop Screens ................................................................................................... 36 4.6.2 – Show All Desktop Screens ..................................................................................................... 37 Chapter 5 – Customizing Desktop ........................................................................................................... 39 5.1 – Adjusting Volume ........................................................................................................................... 39 5.2 – User Preferences ........................................................................................................................... 40 5.2.1 – Copying User Preferences ..................................................................................................... 42 5.2.2 – General Preferences .............................................................................................................. 43 5.2.2.1 – General Tab ........................................................................................................................ 44 5.2.2.2 – Code Lists Tab .................................................................................................................... 45 5.2.3 – Appearance Preferences........................................................................................................ 46 5.2.3.1 – Text and Colors Tab ............................................................................................................ 46 5.2.3.2 – Windows Tab ....................................................................................................................... 48 5.2.4 – Multi Screen Preferences ....................................................................................................... 48 5.2.4.1 – General Tab ........................................................................................................................ 49 Chapter 6 – Advanced Topics .................................................................................................................. 51 6.1 – Vin Assist Tool ............................................................................................................................... 52 6.2 – Reset User State Information ........................................................................................................ 53 6.3 – Diagnostic Message ...................................................................................................................... 54 6.4 – Log File .......................................................................................................................................... 55 Ver. 3.00.0500 Table of Contents 2 Chapter 1 – Introduction and Overview OpenFox™ Desktop is an application framework which provides a secure and reliable connection to the OpenFox™ Message Switching system. Through the message switching system, users may communicate with remote data sources to obtain or manage information critical to fulfilling the mission of law enforcement, public safety, and affiliated agencies. Such data sources may include the FBI’s National Crime Information Center (NCIC), state Department/Bureau of Motor Vehicles, state warrant/wanted/property files, criminal history databases, sexual offender registries, Department of Corrections, and many more. The message switching system is typically governed by an agency such as State Police, Highway Patrol, Department of Public Safety, State Radio, etc. This agency is responsible for maintaining and enforcing a set of rules and regulations that govern system access, and this agency is referred to as the “governing agency” throughout the rest of this manual. Many of the rules and regulations set in place by this agency are the direct result of maintaining compliance with the FBI Criminal Justice Information Services (CJIS) Security Policy. As such, please understand that the governing agency may not have complete control over the rules and regulations that govern system access. Desktop integrates OpenFox™ user applications into a unified and secure environment with a consistent look and feel. The OpenFox™ user applications that plug into Desktop are known as Modules, and this manual contains information that is appropriate for users of any OpenFox™ user application. Some commonly integrated Modules are listed below: OpenFox™ Messenger OpenFox™ Mobile Messenger OpenFox™ Criminal History Administrative Client OpenFox™ Sexual Offender Administrative Client OpenFox™ Archive Retrieval OpenFox™ Configurator (version 7) OpenFox™ Form Configurator OpenFox™ Interceptor Ver. 3.00.0500 Chapter 1 Introduction and Overview 3 OpenFox™ Desktop User Manual 1.1 – User Logon Prior to using OpenFox™ Desktop, you must log onto the software with your user ID and logon credentials. If you are unable to supply valid logon credentials, Desktop will prevent you from accessing the system. Depending on the security policies in place at your agency, or governing agency, your logon credentials may include any of the following: Password Hardware token code plus PIN Public-Key Infrastructure (PKI) Certificate – X.509 Example of the Desktop user log on screen 1.2 – Desktop Interface After successfully logging onto Desktop, you are presented with the Desktop screen. This is the main interface through which you will interact with whichever OpenFox™ Module you are using. Regardless of the Module you access, there are several common elements available in the Desktop interface. These elements are identified below. Ver. 3.00.0500 Chapter 1 Introduction and Overview 4 OpenFox™ Desktop User Manual The main components of the Desktop interface 1.2.1 – Window Title The OpenFox™ Desktop window title is used to display a variety of information to the user. With a quick glance the user can determine if the Desktop session is connected to the OpenFox™ Message Switch, the mnemonic of the terminal, the default ORI with which the terminal is associated, and the ID of the user that is currently logged on to the Desktop. The information in the window title can also be customized. Please see the OpenFox™ Desktop Administrators Guide for more information on this topic. Example window title showing a terminal mnemonic of DEMO, an ORI of CP0000021, and that the user FOX is currently logged on Ver. 3.00.0500 Chapter 1 Introduction and Overview 5 OpenFox™ Desktop User Manual 1.2.2 – Menu Bar The Desktop menu bar provides several options, and these menus are described briefly below: The “User Session” menu contains options to manage your logon session. For more information please see [Chapter 2 – User Session]. The “Window” menu provides options to manage application and Module screens. For more information please see [Chapter 4 – Window Management]. The “Tools” menu contains advanced options such as preferences, initialization parameters, and the Desktop log file. The “Help” menu provides access to online help pages and tips of the day. For more information please see section [1.4 – Help System]. The “Modules” menu, located on the right hand side of the window, allows you to access Desktop Modules. For more information please see the [Chapter 3 – Modules]. Example of the Desktop menu bar 1.2.2.1 – Keyboard Shortcuts Many menu items may be chosen via keyboard shortcuts. If there is an equivalent keyboard shortcut for a particular menu item, then the keyboard shortcut appears in blue text on the right side of the menu item. The Lock Display action may be performed by pressing F12 on the keyboard A list of the most commonly used keyboard shortcuts may be found in the Keyboard Shortcuts Cheat Sheet document, which can be found under the “Documentation” link from the Desktop launch page. Ver. 3.00.0500 Chapter 1 Introduction and Overview 6 OpenFox™ Desktop User Manual Link to documentation from the Desktop launch page 1.2.3 – Main Desktop Pane The main Desktop pane is the central area in the Desktop interface. This is the area where application windows appear. You can move windows around the screen, arrange windows side by side, and drag windows onto secondary monitors. For complete information on this topic, please see [Chapter 4 – Window Management]. 1.2.4 – Desktop Taskbar The Desktop taskbar is located at the very bottom of the Desktop screen. The taskbar contains a button for each window in the main Desktop pane. The currently active window is denoted in the taskbar by a dark gray color. Example of the taskbar, showing the Mailbox for FOX window currently active 1.2.5 – Status Icons The Desktop status icons are located in the lower-right portion of the Desktop screen. These icons report information regarding the operation and status of OpenFox™ Desktop. For more information please see [2.10 – Session Status]. Example of the Desktop status icons showing normal operation Ver. 3.00.0500 Chapter 1 Introduction and Overview 7 OpenFox™ Desktop User Manual 1.3 – Tips of the Day The tips of the day screen is displayed when you log onto Desktop. Through this screen you can browse several tips and tricks that should ease the process of using the OpenFox™ Desktop software. The buttons at the bottom of the screen allow you to see the next or previous tip, view a random tip, print the tip you are currently viewing, and close the window. Although Desktop displays the tips of the day screen automatically when you logon, you can change this behavior by removing the check mark from the “Show Tips Automatically” box. Example tips of the day screen If you close the screen, or turn off the option to automatically show it at logon, you can pull up the tips of the day screen by choosing the “Tips of the Day” item from the “Help” menu. Menu item to access the tips of the day screen Ver. 3.00.0500 Chapter 1 Introduction and Overview 8 OpenFox™ Desktop User Manual 1.4 – Help System OpenFox™ Desktop provides an online help system that contains information you may find helpful. The online help system includes standard law enforcement manuals such as the NCIC 2000 Operating Manual, the NLETS User Manual, the NICS Interface Manual, and more. The help system is access by choosing the “Help Files” item from the Desktop Help menu. Menu item to access online help system Choosing this menu option displays the help system window, which is shown below. Navigation options, including the contents, index, and search tabs, are located on the left hand side of the screen. The right hand side of the screen is reserved for the information contained in the help system. Desktop help system window Ver. 3.00.0500 Chapter 1 Introduction and Overview 9 OpenFox™ Desktop User Manual 1.4.1 – Contents Tab The contents tab is located on the left hand side of the screen, and it allows you to navigate through the help system. The help system information is organized into file, and the help files are organized into a hierarchy of folders. You may open and close folders by double clicking on them or by clicking on the plus/minus icon next to the folder. If you click on a help file, the information contained in the file is displayed on the right hand side. Example of the contents tab 1.4.2 – Index Tab The index tab provides an alternate method of viewing the information in the help system, and it has been designed to function similarly to the index of a book. The tab contains a list of folders, one for each important word and topic. Each folder contains links to the help files that include the word or reference the topic named by the folder. The index tab also contains a “Find” box at the top. You can enter a word into this box to quickly jump to the corresponding index folder. Example of the index tab Ver. 3.00.0500 Chapter 1 Introduction and Overview 10 OpenFox™ Desktop User Manual 1.4.3 – Search Tab The search tab allows you to search the entire help system for a word or phrase. After typing search terms into the box, you execute the search by either pressing the Enter key or by clicking the blue arrow to the right hand side. While the help file system is being searched, a spinning arrow appears in the top right hand size of the screen. After the search has completed, the matching help files are listed below. The files are ranked by how relevant they are to the search terms that you entered. The relevancy of a help file is indicated by the icon to the left of the file. Help files with a high degree of relevancy have a colored box, and help files with a low degree of relevancy have an empty box. Example of the search tab 1.4.3.1 – Search Capitalization Search terms and phrases are not case sensitive. The results of a search will be the same regardless of whether a word, or letter in a word, is capitalized. 1.4.3.2 – Search Terms Choosing the right search terms is the key to effectively finding the topics that are most relevant. You can enter multiple search terms to help refine the search results. For example, while searching for ‘ncic’ will return results regarding the NCIC stolen vehicle file, it will also return results regarding all other NCIC files; however, searching for ‘ncic stolen vehicle’ will result in the NCIC stolen vehicle help files appearing at the top of the results. The order of the search terms is irrelevant to the results returned by the search. For example, searching for ‘ncic stolen vehicle’ returns the same results as searching for ‘vehicle stolen ncic’. Ver. 3.00.0500 Chapter 1 Introduction and Overview 11 OpenFox™ Desktop User Manual 1.4.3.3 – Phrase Search By putting quotations around multiple search terms, you will conduct a phrase search of the help system. Although the capitalization does not matter, the order of words in the quotations is important. For example, searching for “ncic stolen vehicle” will return different results than searching for “stolen vehicle ncic”. Running a phrase search will take a longer amount of time than running a search without phrases. 1.4.4 – Navigation Links The help system provides links that all you to quickly navigate among the help files in a sequential manner. The links are located in the upper right hand corner and lower right hand corner of each help file. The links are described in the below table. Tool Description Navigate to the previous help file in the current folder Navigate to the contents page of the current folder Navigate to the next help file in the current folder 1.4.5 – Actions The help system provides several actions via the toolbar and the “Actions” pull down menu. These actions allow you to navigate the help system, print the contents of a help file, and more. The actions are describes in the below table. Icon Name Description Back Navigate to the previous help file Forward Navigate to the next help file Refresh Reloads the contents of the current help file Home Navigate to the help system home page Print Print the contents of the current help file Help Navigate to help files which explain how to use the Desktop help system Ver. 3.00.0500 Chapter 1 Introduction and Overview 12 OpenFox™ Desktop User Manual 1.4.6 – Searching Within Help Files You may search for text within a particular help file either by pressing Ctrl-F on the keyboard or by choosing the “Find in Document” item from the “Action” pull down menu. Either method will result in displaying the search pane at the very bottom of the help system screen. Example of the help file search pane The various components within the Document Window Find toolbar and their usage are described in the table below. Button Ver. 3.00.0500 Name Shortcu t Description Close Esc Closes the search panel Next F3 Finds the next occurrence of the search text Previous Shift-F3 Finds the previous occurrence of the search text Highlight -none- Highlights all occurrences of the search text (shown in yellow above) Match case -none- If checked, search text must exactly match upper and lower case Chapter 1 Introduction and Overview 13 OpenFox™ Desktop User Manual THIS PAGE INTENTIONALLY LEFT BLANK Ver. 3.00.0500 Chapter 1 Introduction and Overview 14 Chapter 2 – User Session The central function of OpenFox™ Desktop is to establish a trusted and secure session between the user and the OpenFox™ message switching system. This session enables an authorized user to access and manage the law enforcement and public safety information housed in data sources connected to the message switching system. 2.1 – Communication Layers A user session is built on top of several other communication layers, and it requires these supporting layers. If any of the supporting layers are interrupted, then the user session will likewise be interrupted. This relationship is visualized below. Visualization of the communication layers that support a user session The base communication layer is network connectivity. This layer may also be referred to as the TCP/IP layer. Modern computer networking equipment enables this layer to be established over both wired and wireless connections. Maintenance of this level of communications is typically the responsibility of your agency IT staff, your network provider, and the governing agency IT department. Although there is far more detail to this level of communications, it is sufficient to abstract these details into one layer. If you wish to know more regarding the details of this layer, please consult your agency IT staff. Ver. 3.00.0500 Chapter 2 User Session 15 OpenFox™ Desktop User Manual Above the layer of network connectivity is the FoxTalk™ communications session layer. FoxTalk™ is an OpenFox™ communications protocol technology that provides industry leading security on top of basic network communications. This layer ensures that the security of sensitive CJIS information is not compromised while it is transmitted between the data source and the user. When both network connectivity and a FoxTalk™ communications session have been established, then an authorized user may log onto OpenFox™ Desktop and establish a user session. If either of these supporting layers is interrupted, then the user session will likewise be interrupted. Only when all three layers of communications (network connectivity, FoxTalk™ communications session, and user session) must be established in order for a user to exchange CJIS data with a data source. If any one of these three layers is interrupted, then no exchange of data will be permitted. 2.2 – User Session Establishment A user session is established when you supply valid logon credentials in the logon screen. If you are unable to supply valid credentials, you will not be granted access to the system. Depending on the security policies in place at your agency, or governing agency, your logon credentials may include any of the following: Password Hardware token code plus PIN Public-Key Infrastructure (PKI) Certificate – X.509 Example of the Desktop user log on screen Ver. 3.00.0500 Chapter 2 User Session 16 OpenFox™ Desktop User Manual 2.3 – Terms of System Access To remain in compliance with the FBI CJIS Security Policy, your governing agency may require you to acknowledge and accept certain terms of access prior to logging onto the system. If your governing agency requires this, then Desktop displays the terms of access after you have supplied your logon credentials. Please read the terms and, if you accept and agree to them, click the appropriate button. If you do not understand the terms or have any questions regarding them, please contact your governing agency for more information. If you do not accept the terms, you will not be allowed to access the system. Example terms of access 2.4 – Certification Your individual user ID must also be certified to successfully log onto Desktop. If the expiration date of your certification is approaching, Desktop will notify you after you have logged onto the system. Please contact your governing agency to determine what steps are necessary to keep your certification valid. Typically, this process involves a certification test, but contact your governing agency for more information. Warning that your certification will expire If your certification expires before you have renewed it, then you will unable to access the system. Desktop displays the following message when your certification has expired. Please contact your governing agency for information on renewing your certification. Notification that your certification has expired Ver. 3.00.0500 Chapter 2 User Session 17 OpenFox™ Desktop User Manual 2.5 – Passwords It is common for security policies to require that user passwords expire and must be changed after a set period of time. If the expiration date of your password is approaching, Desktop will notify you after you have logged onto the system. Warning that your password will expire If you log onto Desktop after your password has expired, you will be required to choose a new password prior to accessing the system. Warning that your password has expired The security policy that governs system access enforces rules on what constitutes a valid password. If you attempt to choose a new password that does not meet the rules expressed in the security policy, Desktop will notify you, and you will be required to choose a different new password. If you are unable to choose a new password after repeated attempts, then some security policies may require the system to lock you out. In such a case, you should contact your governing agency support personnel to regain access to the system. Ver. 3.00.0500 Chapter 2 User Session 18 OpenFox™ Desktop User Manual Desktop forces you to choose a new password If you so choose, you can change your user password after logging onto Desktop. Access this option by choosing the “Change Password” item from the “User Session” menu. Change password menu item You should change your password if you suspect that your password security may have been violated. You may also choose to change your password before it expires. Preemptively changing your password can make the process of choosing a new password which meets all the security policy rules less stressful because you can change your password at any time, and repeated attempts will not lock you out of the system. For more information regarding password rules and expiration periods, please contact your governing agency. Ver. 3.00.0500 Chapter 2 User Session 19 OpenFox™ Desktop User Manual 2.6 – Password Reset (Optional Feature) Some governing agencies have chosen to provide users with the option to reset their password in the case that they have forgotten their password. Please note that this option may not be available due to the rules set in place by your governing agency. If this option is available, you will be able to setup your password reset options after logging onto Desktop. To do so, choose the “Manage Reset Password Options” item from the “User Session” menu. Manage Reset Password Options menu item The manage reset password options dialog box allows you to setup challenge questions and answers. In the event that you forget your password, you will need to provide correct answers to the challenge questions to recover your password and gain system access. Please choose the questions and your answers carefully. Choose answers that you will be able to remember but that cannot be guessed by other individuals. Example password reset options screen Ver. 3.00.0500 Chapter 2 User Session 20 OpenFox™ Desktop User Manual If you have forgotten your password and are unable to log onto Desktop, click the “Forgot Password” button on the logon screen as shown below. Forgot password button Desktop presents the questions that you previously chose. To regain access to the system, you must provide the same answers you entered in the reset password options screen. After entering the correct answers, the system randomly generates a new temporary password and displays it on screen. This password is temporary and may only be used once. For your convenience, Desktop provides a “Copy” button that allows you to paste the password in the logon screen. This eliminates the need for you to remember or write down your temporary password. Temporary password display On the logon screen, enter your user ID and your temporary password. Because your temporary password may only be used once, Desktop will require you to choose a new password. Please choose a new password according to the process described above in section [2.5 – Passwords]. Ver. 3.00.0500 Chapter 2 User Session 21 OpenFox™ Desktop User Manual 2.7 – Logoff and User Swapping When you are finished with your Desktop session, you may log off from Desktop by selecting the “Log Off” item from the “User Session” menu at the top of the screen. After you have logged off, Desktop directs you back to the logon screen. At this time, a different user may log onto Desktop using their own logon credentials. Thus, you and another user can swap without exiting out of Desktop and re-launching the application. Please note that due to the requirements of some agency IT standards or security policies, you may be required to exit Desktop before a different user may logon. Please contact your agency for more information. Menu option to log off from Desktop 2.8 – FoxTalk™ Disconnect You can choose to manually disconnect the FoxTalk™ communications session by selecting the “Disconnect” item from the “User Session” menu. This will interrupt the FoxTalk™ session, and Desktop will automatically attempt to reconnect to the system after thirty (30) seconds. Depending on the security policy of your governing agency, you may be required to provide your logon credentials after the session has been reconnected. Menu option to disconnect the FoxTalk™ session Ver. 3.00.0500 Chapter 2 User Session 22 OpenFox™ Desktop User Manual 2.9 – Screen Lock You may choose to lock the Desktop display by selecting the “Lock Display” item from the “User Session” menu. This will hide any information that is displayed in Desktop, and will prevent further system access until you unlock the display. Please understand that this option will lock only the OpenFox™ Desktop software; it will not lock out Windows® of any other software running on your computer. Lock display menu item Desktop remains locked until you unlock the display by supplying your logon credentials. If the user who locked Desktop is no longer available, then another user may recover use of the terminal by logging the user off of the system. Display locked screen Ver. 3.00.0500 Chapter 2 User Session 23 OpenFox™ Desktop User Manual 2.10 – Session Status The status of the FoxTalk™ communications session is reported in the status icon area of the Desktop interface. Please note that this area reports the status of the FoxTalk™ session, not the user session. 2.10.1 – FoxTalk™ Status Icon The FoxTalk™ status icon reports the state of the communications session between OpenFox™ Desktop and the OpenFox™ Message Switching System. The status of the session is indicated by the color of the icon as described below. Green Yellow Red - The FoxTalk™ session is established Desktop is attempting to establish a session The session is not connected to the message switch FoxTalk™ status icon showing an established session 2.10.2 – Communications Activity Icon When information is being either sent or received over the FoxTalk™ session, it is indicated by the communications activity icon. This situation is indicated by a series of blue lights moving in a circle pattern. When no information is being exchanged, then all the lights will remain grey. Activity icon indicating that information is being either sent or received Ver. 3.00.0500 Chapter 2 User Session 24 Chapter 3 – Modules By itself, OpenFox™ Desktop only establishes a trusted and secure session between the user and the OpenFox™ message switching system. Work flow processes are supported by individual Desktop Modules, which are applications designed to integrate with the Desktop environment. This chapter contains information regarding how to access and manage the modules to which you have access. 3.1 – Launching Modules After logging onto the system, Desktop provides shortcuts that you may use to launch a module. The shortcuts are presented on the main Desktop screen, and they function similarly to the desktop shortcuts on your Windows® computer. You may launch a module by double clicking on a module short cut. Desktop shortcuts to access modules You may launch a module by selecting the module from the “Modules” menu in the upper left hand corner of the screen. This menu contains a pull down list of the modules which you are authorized to access. You may access a particular module by simply clicking on the module name. The Modules menu provides access to your applications Ver. 3.00.0500 Chapter 3 Modules 25 OpenFox™ Desktop User Manual 3.2 – Default Module After logging onto the system, Desktop launches what is called the default module. The first time that you access the system, the default module is OpenFox™ Messenger; however, if you primarily use a different module, you can configure Desktop to launch that module. You can also choose to set the default module to ‘none’, if you wish to be presented with the blank Desktop screen after logging on. To change this setting, access your user preferences, by selecting the “User Preferences” item from the “Tools” menu. The user preferences menu item Select the “Desktop” item at the top of the screen. Select the “General” item on the left hand side of the screen, and make sure that the “General” tab is selected. Navigating the user preferences screen The default module setting is presented in the drop down list shown below. Please choose a specific module, or choose none. Ver. 3.00.0500 Chapter 3 Modules 26 OpenFox™ Desktop User Manual The list of available modules 3.3 – Active Module The Module that you are currently working in is referred to as the active Module. When you click on a window that belongs to a different Module, that Module becomes the new active Module. Desktop displays the icon of the active Module in the upper right hand corner of the screen. In the below example, the Messenger icon is displayed, which indicates that Messenger is the active Module. The active Module is Messenger The active Module may provide pull down menus in addition to the standard Desktop menus. These Module-specific pull down menus appear to the left of the standard Desktop menu items. For more information on the Desktop menu items, please see chapter [1.2.2 – Menu Bar]. For example, when Messenger is the active Module, it adds the Forms and Accessibility pull down menus. Messenger adds the Forms and Accessibility menus If you switch the active Module to the OpenFox™ Configurator, then these pull down menus are replaced with the New Configurator pull down menu. The Forms and Accessibility menus are replaced with the New Configurator menu Ver. 3.00.0500 Chapter 3 Modules 27 OpenFox™ Desktop User Manual THIS PAGE INTENTIONALLY LEFT BLANK Ver. 3.00.0500 Chapter 3 Modules 28 Chapter 4 – Window Management Most of the work you do with OpenFox™ Desktop is done through windows, and this chapter explains the controls that you can use to manage your windows. For example, if you are working with Messenger, you will have a window for your Mailbox and a window for each transaction form that you have opened. If you are working with either the Criminal History Administrative Client or the Sexual Offender Registry Administration Client then you may have a window for the search screen and another window for the details screen. 4.1 – Taskbar Every open window is represented by a button on the Desktop taskbar. The taskbar is a control which runs along the very bottom of the Desktop screen, and it functions similarly to the taskbar on a Windows® computer. You can switch between windows simply by clicking on the appropriate button on the taskbar. You can also right click on a button to access that window’s system menu; for more information on this, please see chapter [4.4 – System Menu]. Desktop taskbar showing windows for the Messenger Mailbox, RQ form, and DQ form 4.2 – Windows Menu The windows menu, located along the top of the Desktop screen, lists actions you can take to arrange your open windows or switch between windows. Just like the taskbar, this menu lists all of the windows you currently have open, and you can switch to one of these windows by selecting the appropriate menu item. The “cycle windows” and “cycle back windows” actions provide a keyboard shortcut to switch between open windows. You can switch to the next open window by pressing Ctrl-Tab on the keyboard, and you can switch to the previous open window by pressing Ctrl+Shift-Tab. Windows menu showing management actions and listing the windows for the Messenger Mailbox, RQ form, and DQ form Ver. 3.00.0500 Window Management 29 OpenFox™ Desktop User Manual 4.2.1 - Cascade Choosing the cascade action arranges all your open windows starting from the upper left corner of the Desktop screen. This action can be useful if you have many windows minimized and want to bring them back. Please note that some windows, such as the Messenger Mailbox window, will not be cascaded when this action is performed. Example of performing the cascade action 4.2.2 – Tile Horizontal/Vertical Choosing one of the tile actions will arrange the open windows in a grid pattern. The windows will be arranged in either a horizontal or vertical manner depending on which action you choose. Ver. 3.00.0500 Chapter 4 Window Management 30 OpenFox™ Desktop User Manual Example of performing the tile horizontal action Example of performing the tile vertical action Ver. 3.00.0500 Chapter 4 Window Management 31 OpenFox™ Desktop User Manual 4.3 – Window Controls Standard window controls are located in the upper right hand corner of each window. These controls provide you with several actions to position and arrange the window on your screen, and they function similarly to the buttons provided by modern operating systems such as Windows®. Button Name Shortcut Maximize Ctrl-F3 Restore Ctrl-F5 Minimize Ctrl-F2 Close Ctrl-F4 Description The window expands to occupy the entire height and width of the Desktop screen. Restores a maximized window to its normal state, where the window can be moved and resized. Shrinks the window down to the taskbar and hides it from view. Dismisses the window. 4.4 – System Menu The window system menu can be accessed by clicking the button in the upper left hand corner of the window. Many of the window control actions described above are listed under this menu, and this menu shows the keyboard shortcut method of performing those actions. In addition to those actions, the system menu provides the following actions: Close All – Performing this action closes all open windows Close Others – Performing this action closes all open windows except for this current window Print – This action allows you to print the contents of the current window There may also be Module specific actions available in a window’s system menu. For more information on this topic, please consult the user manual for the Module with which you are working. Example of a window system menu Ver. 3.00.0500 Chapter 4 Window Management 32 OpenFox™ Desktop User Manual 4.5 – Window Snapping OpenFox™ Desktop allows you to quickly and easily arrange windows on your screen through a feature called snapping. This feature allows you to maximize, restore, left maximize, or right maximize a window by dragging it to the top, left, or right side of the Desktop screen. 4.5.1 – Maximize To quickly maximize a window, you can click on the window title bar and drag it to the top of the Desktop screen. When you release the mouse button, the window is maximized and takes up the entire screen. Example of snapping a window to maximize it 4.5.2 – Restore You can quickly restore a maximized window by clicking on the window title bar and dragging it down, away from the top of the Desktop screen. When you release the mouse button, the window is no longer maximized. Example of snapping a window to restore it Ver. 3.00.0500 Chapter 4 Window Management 33 OpenFox™ Desktop User Manual 4.5.3 – Maximize Left If you click a window title bar and drag it to the left side of the Desktop screen, then the window is left maximized. This means that the window occupies the left half of the Desktop screen. Example of snapping a window to the left hand side 4.5.4 – Maximize Right Just like the maximize left action, you can drag a window to the right side of the Desktop screen to right maximize it. This means that the window occupies the right half of the Desktop screen. Example of snapping a window to the right hand side Ver. 3.00.0500 Chapter 4 Window Management 34 OpenFox™ Desktop User Manual 4.6 – Multiple Monitor Support OpenFox™ Desktop allows you to spread your windows across to multiple monitors. This feature makes is easy to see multiple windows simultaneously so data can be entered into one window while looking at another one. Although the following example discusses this feature as it may apply to a user of Messenger, any Desktop window can be moved to another monitor. For example, if you have two monitors, your display may look like the one shown below. OpenFox™ Desktop (running Messenger) is on the left monitor. Multiple monitor example with Desktop on the left monitor Suppose that you need to enter a new hot files record based on the information displayed in the Messenger Mailbox Window. Your first step is to open the form. When you open the form, it appears on top of the Mailbox Window and hides it Then, simply grab the form title bar and drag it over to your other monitor. Ver. 3.00.0500 Chapter 4 Window Management 35 OpenFox™ Desktop User Manual Grab the form title bar and drag it over to the other monitor When you release the mouse button, the form has been moved to the other monitor. Now you can see the form and the information in the Mailbox Window at the same time. The Mailbox Window is on the left monitor and the form is on the right monitor 4.6.1 – Additional Desktop Screens When you drag a window to another monitor, OpenFox™ Desktop automatically creates an additional screen on that monitor. However, you can also create additional screens by selecting the “New Window” action from the Window menu. Ver. 3.00.0500 Chapter 4 Window Management 36 OpenFox™ Desktop User Manual The New Window item under the Window menu Additional Desktop screens, whether they are created via the new window action or by dragging a window to a different monitor, are denoted with a number. For example, the below image shows an additional Desktop screen denoted with the “#2” indicator. Additional Desktop window title Desktop screens with this indicator may be closed without affecting your user session; however, closing the original Desktop screen (the screen with no number indicator) will log you off from the system and exit the application. 4.6.2 – Show All Desktop Screens The show all Desktop screens button is located in the lower right hand side of the Desktop screen. Pressing this button will display the original Desktop screen and any additional Desktop screens that have been created. This action can come in handy if you’ve spread Desktop out to other monitors, and then worked in other applications which have hidden those Desktop screens. Pressing this button will display the Desktop screens on each monitor, so you can resume your workflow. Show all Desktop screens button Ver. 3.00.0500 Chapter 4 Window Management 37 OpenFox™ Desktop User Manual THIS PAGE INTENTIONALLY LEFT BLANK Ver. 3.00.0500 Chapter 4 Window Management 38 Chapter 5 – Customizing Desktop OpenFox™ Desktop allows you to customize many aspects of the application so that you can truly tune the application to your specific tastes. Any changes you make to customize your experience are saved in the message switching system, and these changes follow you around. If you access the system from a different computer, your individual settings will move to that computer. This also means that two users who share the same computer can customize Desktop so that each one has their own unique experience. 5.1 – Adjusting Volume Some Desktop Modules may play sounds when certain events occur. The volume of sounds generated by Desktop can be adjusted by the volume control icon located in the lower right hand corner of the Desktop screen. Volume control icon Clicking on the volume control icon displays the volume control window. You can use the slider to adjust sound volume from maximum volume, one hundred (100), down to zero (0), which is muted. You can also toggle whether sounds are muted by selecting the “Muted” checkbox. Volume control window If sounds are currently muted, then the volume control icon shows a red circle over the icon as shown below. Volume control icon when muted Ver. 3.00.0500 Chapter 5 Customizing Desktop 39 OpenFox™ Desktop User Manual 5.2 – User Preferences User preferences are options that you can change to customize your OpenFox™ Desktop experience. The preferences available to you are organized into two levels. First is the Module level. Each Module provides a different set of preferences that you can adjust, so as an example, the preferences provided by Messenger are different than the preferences provided by the Criminal History Administration Client. Furthermore, the preferences for a particular Module are organized into different categories. Categories are logical groupings of preferences that relate to similar workflow experiences within each Module. For example, Messenger preferences are organized into Mailbox, Forms, General, Message Display, and Printers categories. Each category is identified with a name and a large picture, so you can quickly and easily remember where certain settings are located. You access the preferences screen by choosing the “User Preferences” item from the Tools menu. User Preferences item under the Tools menu The major elements of the preferences screen are described below. Ver. 3.00.0500 Chapter 5 Customizing Desktop 40 OpenFox™ Desktop User Manual Preferences screen areas Choose a Module – This list allows you to access the preferences for each different Module. Category List – This list allows you to access the preferences for each different category for the selected Module. Preference Area – This area contains the preferences for the current Module and category, and it allows you to adjust the preferences. Buttons o Revert to Defaults – This button will change the preferences for the currently selected category back to their original values. Please note that if there are tabs in the preference area, the settings on all the tabs are reset. o Revert All to Defaults – This button will change all the preferences for each Module listed at the top of the screen back to their original values. o Copy From User – This button allows you to copy the preferences from a different user. Ver. 3.00.0500 Chapter 5 Customizing Desktop 41 OpenFox™ Desktop User Manual o OK – This button accepts any changes you have made to your preferences and closes the window. o Cancel – This button will cancel any changes that you may have made to your preferences and will close the window. 5.2.1 – Copying User Preferences Desktop allows you to copy the preferences from another user by clicking on the “Copy From User” button. This feature is applicable if your agency wants to setup all users to have the same basic preferences. Only one of the users at your agency needs to setup their preferences, and then the other users can simply copy their settings. Copy user preferences screen To copy the preferences of a user, you need to enter the user ID of the user whose preferences you wish to copy. This user ID is the same ID that the user uses to log onto the system. The copy from user ID box The copy user preferences screen also allows you to copy only specific preference categories. Each category has a checkbox next to it. If the checkbox is checked, then Ver. 3.00.0500 Chapter 5 Customizing Desktop 42 OpenFox™ Desktop User Manual the preferences for that category will be copied. If the checkbox is not checked, then those preferences will not be copied. Select which preference categories you wish to copy 5.2.2 – General Preferences Desktop general preferences Ver. 3.00.0500 Chapter 5 Customizing Desktop 43 OpenFox™ Desktop User Manual 5.2.2.1 – General Tab Default Module The default Module setting allows you to change which Module is automatically opened after you have logged onto the system. This setting defaults to Messenger so that you are directed to your mailbox window after logging on; however, you can change this setting to a different Module, or select “None” so that no Module is automatically opened. Default Module setting Popup Notifications This setting allows you to adjust the amount of time for which the popup notification window is shown. The notification window is displayed when certain events occur, such as when you log onto or out from the system, when the network session is interrupted, etc. This value is originally set to five (5) seconds, but you can adjust it so that the popup notification is displayed for a longer or shorter amount of time. Popup notification duration Drop Down List Key Press Desktop allows you to select an item from a drop down box by typing the value of the item, instead of making you choose and item with the mouse. For example, if you are in the NCIC Scars, Marks, and Tattoos field, you can select the code for a removed tattoo on the left forearm by typing “RTAT LFARM” into the field. However, if you take too long between entering each letter, then Desktop will assume that you have started typing a new code from scratch. The amount of time that Desktop will wait before assuming you are starting over can be adjusted through this setting. Ver. 3.00.0500 Chapter 5 Customizing Desktop 44 OpenFox™ Desktop User Manual Drop down list key press setting 5.2.2.2 – Code Lists Tab Code Ordering This setting allows you to choose whether drop down code lists are ordered by the code value or by the code description. For an example, please observe the two screen shots shown below. The left example shows the codes ordered by value and the right example shows the same codes ordered by description. Ordered by value on left, ordered by description on right Search Highlight Color When you search a drop down code list by pressing Ctrl-F, Desktop displays the code list search window. This window allows you to search the code list and indicates matches by highlighting the code description with a color. This setting allows you to modify this color. This setting allows you to choose two colors, the left color for normal color schemes, and the right color for the charcoal (i.e. night-mode) color scheme. Search highlight color example Ver. 3.00.0500 Chapter 5 Customizing Desktop 45 OpenFox™ Desktop User Manual 5.2.3 – Appearance Preferences Desktop appearance preferences 5.2.3.1 – Text and Colors Tab Font Size This setting allows you to change the size of all the text used in OpenFox™ Desktop and Modules. The small setting is intended for use on older systems that do not support higher, more modern resolutions, and it will allow you to see more content. The larger settings are intended for accessibility for users with visual impairments, and for use on newer, modern high resolution monitors. Font size setting Ver. 3.00.0500 Chapter 5 Customizing Desktop 46 OpenFox™ Desktop User Manual Color Theme This setting allows you to customize the colors used in Desktop to your own particular taste. While most of the different themes are intended for aesthetics, Desktop also provides a high contrast color scheme (for users with visual impairments), and the charcoal theme, which is intended for use in low light scenarios or at night. Color theme setting Night Mode This setting allows you to configure Desktop to automatically switch into and out of the charcoal color theme. This setting defaults to disabled, but you can enable it my selecting the “Enabled” checkbox. Once enabled, you adjust the start of day and start of night times. When the start of day time occurs, Desktop switches the display to whichever color theme you have selected under the “Color Theme” setting, described above. When the start of night time occurs, Desktop switches the display to the charcoal color theme. Night mode setting Ver. 3.00.0500 Chapter 5 Customizing Desktop 47 OpenFox™ Desktop User Manual 5.2.3.2 – Windows Tab Window Icons This setting allows you to change the standard window controls (maximize, minimize, close, etc.) from the normal three dimensional icons to high contrast alternatives. This setting is primarily intended to increase accessibility for users with visual impairments; however any user may choose to change this setting for aesthetics. Standard icons shown on left, simple icons shown on right Show Window Contents While Dragging This setting allows you to change whether Desktop displays the full window, or just an outline of the window, when you drag a window around to move it. If you experience slowness or delays when moving windows, you may try turning this setting off, so that only the outline is displayed. That will lessen the workload on your computer and should lead to a smoother performance. Show window contents while dragging setting 5.2.4 – Multi Screen Preferences Desktop multi-screen preferences Ver. 3.00.0500 Chapter 5 Customizing Desktop 48 OpenFox™ Desktop User Manual 5.2.4.1 – General Tab Expand Desktop at Logon This setting allows you to setup Desktop to automatically create additional Desktop windows on your other monitors when you log onto the system. This setting is originally set to “Do not expand” which means that Desktop does not create any additional screens. You can change this setting to specify a number of screens that are created, or you can have Desktop detect how many monitors are connected to your computer and create a screen for each monitor. Expand Desktop at logon setting Ver. 3.00.0500 Chapter 5 Customizing Desktop 49 OpenFox™ Desktop User Manual THIS PAGE INTENTIONALLY LEFT BLANK Ver. 3.00.0500 Chapter 5 Customizing Desktop 50 Chapter 6 – Advanced Topics This chapter explains some advanced topics and features in OpenFox™ Desktop. These features are available under the Tools pull down menu at the top of the Desktop screen. The items under this menu are described below: The Tools pull down menu Appearance – Opens the user preferences screen and goes directly to the appearance settings. For more information on the appearance settings, please see chapter [5.2.3 – Appearance Preferences]. User Preferences – Opens the user preferences screen. For more information, please see chapter [5.2 – User Preferences]. Terminal Preferences – Allows you to access the terminal preferences for this computer. For more information please refer to the Desktop Administrator Guide. Vin Assist Tool – Allows you to decode a VIN into the vehicle make, model, style, and year of manufacture. This feature is described further in chapter [6.1 – Vin Assist Tool]. Reset User State Information – Resets your state information back to the original default settings. You may be instructed to select this item in certain support scenarios. This topic is described further in chapter [6.2 – Reset User State Information]. Desktop Init Parameters – Allows you to adjust the initialization parameters for OpenFox™ Desktop. For more information please refer to the Desktop Administrator Guide. Diagnostic Message – This item sends a message containing diagnostic information to the support or administrative personnel at your governing agency. This topic is discussed further in chapter [6.3 – Diagnostic Message]. View Log File – This item accesses the Desktop error and warning log file. This file keeps a record of any exceptional conditions that occur during operation. You may be requested to provide information from this file for certain support scenarios. This topic is discussed further in chapter [6.4 – Log File]. Ver. 3.00.0500 Chapter 6 Advanced Topics 51 OpenFox™ Desktop User Manual 6.1 – Vin Assist Tool The OpenFox™ Message Switching System has the NICB Vin Assist database integrated as a native service. The Desktop Vin Assist tool provides you access to this database to decode a VIN into the vehicle make, model, style, and year of manufacture information. When you select the Vin Assist item from the Tools menu, Desktop displays the following window. The Vin Assist Tool window Enter a seventeen (17) character VIN into the field at the top of the screen and press the Enter key. The OpenFox™ system decodes the VIN and displays the information back on your screen. The below example shows how the VIN “2G1FP22G3X2145000” has been decoded into a 1999 Chevrolet Camaro, two door. Decoded VIN information After decoding the VIN, you can use the buttons at the bottom of the window to print the decoded information, clear the window to decode another VIN, or close the window. Ver. 3.00.0500 Chapter 6 Advanced Topics 52 OpenFox™ Desktop User Manual 6.2 – Reset User State Information Your state information consists of session settings you have chosen that are not part of your preferences. Your state holds information such as the following: Whether the Tips of the Day window is displayed when you logon The size and position of the code list search window In Messenger, which column you have used to order your Inbox In Messenger, the history of transactions you have sent from the quick query bar And more… In some support scenarios, you may be requested to reset your state information. This step can resolve issues related to this information being corrupted or becoming out of date due to a new software version release. When you select this menu item, Desktop displays the reset state window. Reset user state information window The center part of the window allows you to choose for which Module you are going to reset the state information. Initially, Desktop selects all the Modules for you, but you can choose to deselect certain Modules. For example, if you had an issue caused by your Messenger state information, you could deselect all the Modules and only leave Messenger selected. When you press OK, only your Messenger state information would be reset. Due to the technical implementation of state information, you will be automatically logged off from the system when you reset your state information. You will be directed back to the logon screen so that you can immediately log back onto the system. This is a necessary step to make sure that all your state information is correctly reset to the original settings. Ver. 3.00.0500 Chapter 6 Advanced Topics 53 OpenFox™ Desktop User Manual 6.3 – Diagnostic Message The diagnostic message option sends a message to the administrative or support staff at your governing agency. This message contains information that will assist in troubleshooting any issues that you happen to encounter while running the Desktop application. Please be aware that simply sending a diagnostic message is not a substitute for contacting your support center directly. You should first contact your support center, and then they may ask you to submit a diagnostic message. Diagnostic message window The top of the diagnostic message window allows you to choose who will receive your message. Normally the first destination cannot be changed because this is the destination for your governing agency support center; however, you can add destinations that will receive a copy of your message. Next is a text box that allows you to provide a brief description of the issue you are experiencing. The bottom of the window contains the unchangeable diagnostic information that OpenFox™ Desktop generates for you. This information will assist support staff in resolving your issue. Ver. 3.00.0500 Chapter 6 Advanced Topics 54 OpenFox™ Desktop User Manual 6.4 – Log File The OpenFox™ Desktop log file maintains a history of any warnings or errors that occur while the application is running. The View Log File menu item provides access to this log so that you can forward the information to support staff. When an error or warning occurs, Desktop notifies you with a popup notification as seen below. Error popup notification Clicking on the popup notification will open the Desktop log window. You can also open the log window by choosing the View Log File item from the Tools menu. The log window displays a list of error and warning events, with the newest events appearing at the top of the list. If you select one of the events, the details for that error or warning are displayed in the bottom portion of the window. List of errors and warnings at top, details for selected error at bottom You can right mouse click on an event in the list, or you can right mouse click on the event details to open this information in the diagnostic message window. Right click option to open the diagnostic message window Ver. 3.00.0500 Chapter 6 Advanced Topics 55 OpenFox™ Desktop User Manual Choosing that item will open the diagnostic window and fill in the message text with the details from the log window. Information from log window filled into the diagnostic message window Ver. 3.00.0500 Chapter 6 Advanced Topics 56