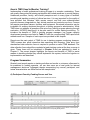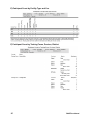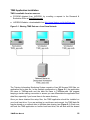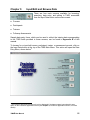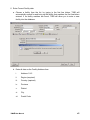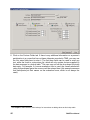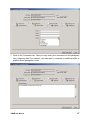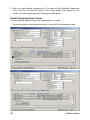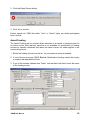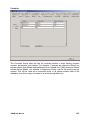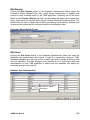
1
Training Information Monitoring System Prepared by: Catherine Schenck-Yglesias, MHS Deborah Estep Annmarie Kearse Training Information Monitoring System Prepared by: Catherine Schenck-Yglesias, MHS Deborah Estep Annmarie Kearse United States Agency for International Development JHPIEGO, an affiliate of Johns Hopkins University, builds global and local partnerships to enhance the quality of health care services for women and families around the world. JHPIEGO is a global leader in the creation of innovative and effective approaches to developing human resources for health. Copyright© 2004 by JHPIEGO Corporation. All rights reserved. JHPIEGO Corporation Brown’s Wharf 1615 Thames Street Baltimore, Maryland 21231, USA www.jhpiego.org Authors: Catherine Schenck-Yglesias Deborah Estep Annmarie Kearse TRADEMARKS: All brand names and product names are trademarks or registered trademarks of their respective companies. The TIMS database application and this manual were made possible through support provided by the Service Delivery Improvement Division, Office of Population and Reproductive Health, Bureau for Global Health, U.S. Agency for International Development, under the terms of Award HRN-A-98-00041-00. The opinions expressed herein are those of JHPIEGO and do not necessarily reflect the views of the U.S. Agency for International Development. Acknowledgments We gratefully acknowledge the Training in Reproductive Health (TRH) Project and USAID for ongoing support and funding for the Training Information Monitoring System (TIMS©) development and implementation. The conceptualization and early versions of TIMS originated from information systems work being done by the JHPIEGO Research and Evaluation Office (Dr. Lynne Gaffikin, John McGrath, Tamara Smith, Dr. Susan Griffey, and Kyahn Kamali). We thank the TRH Project in Nepal, Kenya and Indonesia for spearheading the first field implementations of TIMS. In addition to its use to house JHPIEGO’s global training data at the JHPIEGO headquarters in Baltimore, Maryland, TIMS has been implemented at JHPIEGO country offices in Kenya, Malawi, Indonesia, and Nepal, as well as by the following governmental and nongovernmental partners: HOPE worldwide, South Africa Indonesia National Clinical Training Network Jamaica (Ministry of Health Manpower, Planning & Development Unit, Southeast Regional Health Authority, Western Regional Health Authority, Caribbean Regional VCT Program) Malawi Ministry of Health, Reproductive Health Unit Nepal National Health Training Center We are grateful for the above adopters of the system, who participated in user requirements research, identifying needs for further software development, which guided design specifications, programming, and technical training activities. We would like to acknowledge detailed TIMS system review by Lois Schaefer of USAID/Washington, Julia Brothers and Anne Pfitzer of JHPIEGO/Baltimore. We thank the following for communicating data elements, reports, and technical support needed in the field: Rajshree Haria and Nancy Koskei of JHPIEGO/Kenya; Maryjane Lacoste and James Gondwe of JHPIEGO/Malawi; Ignatius Purnomo, Esty Febriani, Lely Wahiunyar and Nancy Caiola of JHPIEGO/Indonesia; and Rajendra Bhadra, Nar Bahadur Buda, Anita Gibson, Sandhya Limbu, Prashansa Mudvari, Pranita Rai Pant and Chandra Rai of JHPIEGO/Nepal. Their input led to improvements in both the software and documentation. Tom Meier of The ACI Group, Inc. and Vince Eisinger of Vector Software, Inc., provided programming and technical documentation services. Kim Sheehe, formerly of Dell Professional Services, Inc., played a key role in user requirements research and technical documentation of the software. Patrick Wozny, JHPIEGO consultant, also contributed to technical documentation of the software. TIMS User Manual iii Special thanks go to Chandrakant Ruparelia of the JHPIEGO Learning and Performance Support Office in Baltimore, James Gondwe of the JHPIEGO/Malawi office in Lilongwe and Travea Ghee in the Research and Evaluation Office in Baltimore for their review and comments on earlier versions of this TIMS User Manual. We thank Dana Lewison and Youngae Kim of the Information Resources Office in Baltimore for their editing and desktop publishing support. Versions The Training Information Monitoring System (TIMS©) was initially developed by JHPIEGO and FMS, Inc. Version 3.70 was completed in December 2000. Vector Software, Inc. performed software development upgrades from version 3.71 through 4.66. The latter version was released in May 2002. After further software enhancements performed by The ACI Group, Inc., JHPIEGO released version 5.00 in May 2003 and version 6.00 in December 2003. Source and version information can be accessed from the About button on the TIMS main menu. iv TIMS User Manual Table of Contents Acknowledgments........................................................................................................ iii Versions ........................................................................................................................ iv List of Tables ............................................................................................................... vii List of Figures ............................................................................................................. vii How to Use This Manual ............................................................................................... 1 Chapter 1: Benefits of Using TIMS............................................................................ 2 How Is TIMS Used to Monitor Training? .................................................................. 4 Program Summaries ................................................................................................ 4 Trainer Skills .......................................................................................................... 10 Deployment ............................................................................................................ 13 Professional Development ..................................................................................... 20 Limitations of TIMS.................................................................................................. 24 Chapter 2: Requirements for TIMS Implementation .............................................. 26 TIMS Users within an Organization........................................................................ 26 Program Manager .................................................................................................. 26 Data Manager ........................................................................................................ 26 Data Entry Staff...................................................................................................... 27 Additional End Users.............................................................................................. 28 Installation Instructions .......................................................................................... 28 System Requirements............................................................................................ 28 TIMS Application Installation .................................................................................. 29 TIMS is available from two sources:....................................................................... 29 Starting the Application .......................................................................................... 31 Application Login.................................................................................................... 31 The Main Menu ...................................................................................................... 32 Chapter 3: Input/Edit and Browse Data .................................................................. 33 Courses .................................................................................................................... 34 Input/Edit or Browse............................................................................................... 34 Add New Course .................................................................................................... 36 Delete Course ........................................................................................................ 37 Add Trainers to a Course ....................................................................................... 38 Delete Trainer from a Course................................................................................. 47 Add Participants to a Course ................................................................................. 47 Delete Participant from a Course ........................................................................... 58 Award Funding ....................................................................................................... 59 Audit History........................................................................................................... 60 Participants .............................................................................................................. 60 Input/Edit or Browse............................................................................................... 60 Add New Participants and Trainers........................................................................ 61 Delete Person ........................................................................................................ 63 TIMS User Manual v Trainers .................................................................................................................... 64 Input/Edit or Browse............................................................................................... 64 Followup Assessments........................................................................................... 65 Input/Edit or Browse............................................................................................... 65 Entering a New Followup Assessment Record ...................................................... 67 Delete Followup Assessment Record .................................................................... 69 Delete Assessed Service ....................................................................................... 70 Chapter 4: Reports ................................................................................................... 72 Standard Reports..................................................................................................... 72 Master List of MS Access Reports ......................................................................... 73 Master List of MS Excel Reports ............................................................................ 74 Master List of DBF Reports.................................................................................... 75 Data Filters............................................................................................................. 76 Printing Reports ..................................................................................................... 77 Saving Reports....................................................................................................... 81 Modifying a Saved Report...................................................................................... 83 Additional Reports................................................................................................... 84 Master List of Additional Reports ........................................................................... 84 Printing Additional Reports..................................................................................... 84 Creating New Reports ............................................................................................. 87 Chapter 5: Data Collection Forms........................................................................... 89 Key Questions for Form Design ............................................................................. 89 Course Information Form ....................................................................................... 89 Participant Registration Form................................................................................. 90 Trainer Qualification Form...................................................................................... 91 Followup/Assessment Form ................................................................................... 92 Layout....................................................................................................................... 93 Chapter 6: Administration ....................................................................................... 94 The Database Administration Menu....................................................................... 94 Edit Lookups .......................................................................................................... 95 Customize Application.......................................................................................... 112 Edit Labels ........................................................................................................... 118 Edit Reports ......................................................................................................... 119 Edit Users ............................................................................................................ 119 Edit Custom Lookups ........................................................................................... 121 Appendix A: List of TIMS Reports ............................................................................ 125 Available from Reports Menu ............................................................................... 125 Available from Browse Screens ........................................................................... 126 Appendix B: Data Collection Forms......................................................................... 128 vi TIMS User Manual List of Tables Table 1-1. Guide to Human Capacity Development Questions That TIMS Reports Can Answer .............................................................................. 3 Table 2-1. System Requirements for TIMS, Version 6.00 ............................................. 28 Table 4-1. Location, Format, Type and Number of TIMS Reports................................ 72 Table 6-1. TIMS Features, by Permission Level ........................................................... 95 Table 6-2. Where to Add/Modify Values in TIMS Lookup Lists ..................................... 97 Table 6-3. Data Filters for Browse Screens and Reporting Module .............................. 98 Table A-1. Accessing Input/Edit/Browse Screen Reports............................................ 127 List of Figures Figure 1-1.Where Does TIMS Fit into a Country’s Training Information System (TIS)? ........................................................................................ 2 Figure 1-2. Faculty and Trainer Development Pathway ................................................ 11 Figure 2-1. Sharing TIMS Data on a Local Area Network ............................................. 29 TIMS User Manual vii viii TIMS User Manual How to Use This Manual The TIMS User Manual describes the use of the Training Information Monitoring System, TIMS version 6.00. Chapter 1 provides a general introduction to the Training Information Monitoring System, and comprehensively covers the utility of TIMS reports for monitoring a public health training program. The layouts of all standard reports are shown. This is to guide readers toward a decision about whether implementation in their organization is desirable. Chapter 2 describes human resource needs and technical requirements for computer hardware and software, guiding readers toward a decision about whether implementation will be feasible and sustainable in a given setting. This chapter includes installation and setup instructions in order to get started with TIMS. Chapter 3 explains how to input and edit data on courses, participants, trainers, and assessments. TIMS data entry screens are designed to facilitate entry and linkage of these core data. This chapter provides instruction on data entry, assuming some training data have already been collected on standardized forms and are ready for inputting electronically. Chapter 4 provides instruction on running standard reports about courses, participants, trainers, and assessments. These reports will be useful for planning and monitoring training activities, based on attributes entered on a regular basis. Refer back to Chapter 1 for the layouts of all standard reports, and for a guide to their programmatic utility. Chapter 5 presents key questions for training program review when designing data collection forms for use with TIMS. Standardizing data collection and getting all of the information needed for reports is an important step in TIMS implementation; this chapter provides a guide for completing this task. Chapter 6 shows users how to administer the TIMS database, customizing the application by editing lookup tables, forms and reports, adding or deleting users, changing user permissions, and using custom fields. This chapter gets readers started in setting up the application for use in their organization. Data collection forms, designed based on the guidance in Chapter 5, are a prerequisite for the administration section setup explained in this chapter. The Appendices provide a list of all reports available in TIMS, and copies of sample data collection forms that can be modified for use in the field for data collection.1 The forms contain all elements needed on participants, courses, and trainers, for entry into TIMS 6.00. 1 Electronic copies of the forms in MS Word 2000 and Acrobat Reader (PDF) formats are included on the TIMS installation CD, available from the JHPIEGO Research & Evaluation Office, by writing to [email protected]. TIMS User Manual 1 Chapter 1: Benefits of Using TIMS The Training Information Monitoring System (TIMS) was created to monitor JHPIEGO’s inservice family planning/reproductive health (FP/RH) training programs that have been implemented globally. Figure 1-1.Where Does TIMS Fit into a Country’s Training Information System (TIS)? TIMS monitoring Today, TIMS serves inservice and preservice training programs, as well as human resource professionals who track the training of a broad public health staff population. As sustainable training programs for health professionals develop both provider and trainer skills, TIMS tracks various descriptors of training events, participants, and trainers. The software houses participant data on courses taken and skills acquired, as well as the name and level of facility where training participants are currently posted. Providers trained in specific services should be deployed to an appropriate service delivery point and job assignment after graduation/training. TIMS offers a way to monitor trainer development by documenting each course a prospective trainer has attended and conducted. Program staff can then monitor a trainer’s experience vis-à-vis a standardized trainer development pathway or curriculum. Used in tandem with needs assessment and evaluation tools, TIMS provides a useful link within a training information system (see Figure 1-1). 2 TIMS User Manual Table 1-1. Guide to Human Capacity Development Questions That TIMS Reports Can Answer Professional Development Deployment Trainer Skills Program Summaries To Answer These Questions Review These TIMS Reports • For how many course participants is each agency, budget, or award providing training? Participant Count by Funding Source and Year • What types of providers were trained, and when? Participant Count by Qualification and Year • What courses has the program overall and each training center provided, over time? Training Center Activity Master List of Courses • Which trainers taught and which course participants attended a specific course? General Course Roster Detailed Course Roster • Which course participants have received a followup assessment of their skills? Listing of All Followup/Assessment Records • How many trainers of each rank or type has the program trained? Trainers by Trainer Type • What type of trainers has the program developed, what can they teach, and how can I contact them? Trainer Skills Review by Country • Where (country/province/district/facility) do the training participants currently provide services? Participant Count by Qualification and Country/Province/District Coverage Reports by Region/Country/ Province/District/Facility • For what types (government/NGO/private) of employers do the training participants work? Participant Count by Facility Sponsor and Year • In what types of health facilities (hospitals/health centers/etc.) do the training participants work? Participant Count by Facility Type and Year • Where are participants trained in specific technical areas working (province/district)? Participant Count by Training Focus/Topic/ Content/Course Name, Province, District • Export to DBF Reports [to create files for import into geographical information system (GIS) software] Course Summary by Country/Province/District/ Center Participant and Trainer Summaries by Country/Province/District/Facility • Where are participants trained in specific technical areas working (facility name)? Participants by Facility/Workplace and Training Topic/Course Name • At what stage are individuals in working toward clinical skills and trainer status, in which topics? • Are providers attending complementary and/or duplicate courses? Individual Training Profile Person Profile • What is the contact information and trainer type of an individual? Person Profile • What information is available about a participant’s attendance at a particular course (assessment scores, costs, etc.)? Person Profile • What are the results of training followup visits for a specific course participant? Assessment Record for an Individual TIMS User Manual 3 How Is TIMS Used to Monitor Training? Implementing a health professional training program is a complex undertaking. There are usually many potential training participants and limited resources to provide training. Healthcare providers, faculty, and clinical preceptors work in many types of facilities, providing and teaching a variety of clinical services. It is very important for the quality of care provided that clinicians’ skills remain current, and that new evidence-based protocols become integrated into their clinical practice and curricula over time. Courses will require specialized trainers, facilities, and equipment. Structured information can be invaluable for making decisions throughout a training program’s administration. While TIMS does not address all questions that arise from training program planning through evaluation, JHPIEGO has found it to be quite useful for routine training monitoring. To introduce the benefits of TIMS to training program managers, key human capacity development questions are listed in Table 1-1 with the corresponding TIMS reports that address each one. Samples of each report are provided in this chapter. Reports are the main output of TIMS for use in training program monitoring; however, TIMS screens also allow interactive data searching and browsing. Data entry from standardized data collection forms is required to produce a useful TIMS database. The data collection forms should be completed at each training center at the time a course is given. These forms will be introduced in Chapter 2 and are explained in detail in Chapter 5. The current chapter highlights the reports and benefits of TIMS to assist readers in deciding whether they should implement this system, before the logistics on implementation are described. Program Summaries Quarterly and annual reports on training activities and results or outcomes often need to be presented to funding agencies, yet can also serve as a local guide for internal management decisions. Aggregate reports summarizing key course, participant, and trainer characteristics are shown below with sample data: A) Participant Count by Funding Source and Year 4 TIMS User Manual B) Training Participants by Qualification and Year C) Training Center Activity TIMS User Manual 5 D) Trainers and Participants for Course 6 TIMS User Manual E) Detailed Course and Participant Roster TIMS User Manual 7 8 TIMS User Manual F) Listing of All Followup Assessment Records TIMS User Manual 9 Trainer Skills A key characteristic of a sustainable national family planning/reproductive health (FP/RH) training program is that it builds the clinical and training skills of proficient providers into cohorts of trainers of various levels, geographically distributed across the country. In the JHPIEGO Faculty and Trainer Development Pathway, qualified clinical, advanced, and master trainers are developed to train future generations of clinicians, clinical trainers, preservice faculty and clinical preceptors (see Figure 1-2). 10 TIMS User Manual Figure 1-2. Faculty and Trainer Development Pathway TIMS User Manual 11 TIMS trainer reports show how many of each rank or type of trainer are currently active in a global region, country, province, or district, based on filter settings selected in the Reports module. When a training session on a particular topic needs to be scheduled, potential trainers can thus be identified easily within the database. To be cost-effective, it is better to draw upon a local or regional clinical trainer network than to depend on bringing qualified trainers in from the capital city or from abroad on a regular basis. For example, a manager may need to know who has current clinical skills and is qualified to teach a “Malaria in Pregnancy” course to midwives and nurses, and works near Kisumu, Kenya. Below are examples of trainer reports that can be generated from TIMS to address such questions. A) Trainers by Trainer Type 12 TIMS User Manual B) Trainer Skills Review by Country Deployment One of the primary goals of clinical training is to produce proficient healthcare professionals for deployment where specific skills are needed. Populations in different areas of a country may have different needs, based on whether they are urban or rural, or if various diseases are endemic to some areas and not others. Healthcare facilities owned by government or private entities have different numbers of trained staff, as will the different levels of facility, such as central or district hospitals, health centers, maternity clinics, health posts, and dispensaries. In common, however, is that all have needs for qualified personnel to deliver healthcare services to their target populations. A facility’s client attributes or case mix, assessed outside of TIMS, will determine whether there is a specific need for expertise in given services like family planning (multiple short-term methods, or long-term methods like IUD insertion or minilaparotomy), counseling and testing for HIV, or postabortion care. For qualified staff to be matched to fill clinical positions for specific target population needs, TIMS can be queried to identify potential candidates for currently unfilled clinical positions or for succession planning. A funding agency or central ministry also may want a training program to show it has benefited the country in an equitable manner, and not just certain districts. Following are examples of TIMS reports that can be useful in deployment monitoring and decisionmaking. As cohorts of course participants are trained, and the corresponding TIMS TIMS User Manual 13 database is assembled over time, these reports will become increasingly useful. Key data shown in these reports include qualification, geographic distribution, facility type, as well as clinical and training skills course content. A) Training Participants by Qualification and Country B) Training Participants by Qualification and Province 14 TIMS User Manual C) Training Participants by Qualification and District D) Participant Count by Facility Sponsor and Year TIMS User Manual 15 E) Participant Count by Facility Type and Year F) Participant Count by Training Focus, Province, District 16 TIMS User Manual G) Participant Count by Training Focus, Topic, Province, District H) Participant Count by Training Focus, Topic, Content, Province, District TIMS User Manual 17 I) Participant Count by Training Focus, Topic, Course Name 18 TIMS User Manual J) Training Participants by Facility/Workplace and Training Topic TIMS User Manual 19 K) Training Participants by Facility/Workplace and Course Name Professional Development Program managers can use TIMS to review courses completed, skills learned, and qualifications attained for each person on an individual basis. For example, the individual training profile report could function as a transcript feature for a national FP/RH inservice training program. Onsite supervision and followup to assess clinical competency months after training can also be tracked in TIMS. Transcripts generated from TIMS could be the basis for individual meetings between supervisors and staff for planning future training and deployment. Is an obstetrician/gynecologist working at the central hospital committed to achieving the level of skill and responsibility required to be a Qualified Master Trainer and then assisting the country’s only medical school in revamping their FP/RH curriculum? Would a midwife working in the capital city agree to deployment to a rural area with greater unmet need, if she received training in specialized skills needed most in remote health posts? Has an enrolled nurse in a Malawi district hospital been able to successfully use her new skills in infection prevention once she returned to her job after inservice training? Program investment decisions can be guided more conscientiously when TIMS is used for discussing plans with individuals as well as for reviewing aggregate reports and planning on a regional and national scale. The following are examples of currently available reports useful for planning and monitoring of individual-centered training. 20 TIMS User Manual A) Individual Training Profile TIMS User Manual 21 B) Person Profile Report 22 TIMS User Manual C) Assessment Record for an Individual TIMS User Manual 23 Limitations of TIMS Just as important as knowing what you can monitor with TIMS is knowing what you cannot monitor, and what software features are not available in the current version of TIMS. If your organization is looking for the following features, you will need to seek an additional software tool or tools, or wait for a future version of TIMS (if the features of interest are intended for development). TIMS does not have an undelete feature. TIMS is an MS Access application and inherits its inability to undelete once you have confirmed deletion of records. TIMS does prompt users that select the delete button to confirm each deletion, as a safeguard. TIMS does not have a master facility list feature that would allow you to list healthcare facilities where there are no trained providers. TIMS reports show only facilities where at least one trained provider is working. If you print the facility report, you would need to compare it to a master facility list to determine the facilities where no trained providers or trainers are currently deployed. TIMS does not allow you to assign a person to more than one current facility. In some settings, one clinician will rotate to several clinics in a given week or month, for example. In TIMS, you must specify one current facility, which will be used in participant and coverage reports. When a person changes facilities over time sequentially, this will be reflected by the facility at the time of course registration, housed with each course’s data, only if s/he attended courses while working at these different sites. TIMS does not allow you to enter current total numbers of providers deployed in order to calculate percentage of trained providers. TIMS reports show only total numbers, not rates. However, you could use the number of trained providers from TIMS as a numerator and your human resources deployment data as a denominator to calculate these percentages using a spreadsheet or statistical package. There are no modules or methods included for estimating need, for example, the number of trained providers necessary to provide FP/RH services for a given level of contraceptive prevalence and method mix. Another software system such as ProTrain™ may be researched to see if this meets your programmatic needs. TIMS does not allow you to enter targets or numbers of trained providers needed to calculate met need. However, you could use the number of trained providers from TIMS as a numerator and your target data as a denominator to calculate these percentages using a spreadsheet or statistical package. TIMS does not merge or synchronize data from various sites into one central database. It also does not allow you to copy sets of records from one TIMS database to another or import existing data from another training database. This limitation is a result of (a) choosing MS Access over a software package with more robust replication features, such as SQL Server, as a platform for TIMS, in order to maintain it in a desktop environment, not requiring human resources with SQL Server skills for maintenance, as well as (b) allowing customization of lookup lists, 24 TIMS User Manual which generate global unique identifier (GUID) values for each new item on the lookup table. Due to this limitation, all data must be entered into one TIMS file, which can be shared by multiple users on a local area network (LAN). Over long distance, you may want to try PC Anywhere or another such program to access a TIMS database remotely. Connectivity and bandwidth would be the limiting factors for this activity. TIMS has no wizards or utilities to modify existing data entry screens or reports, or to create new ones. However, there are 12 extra or custom fields included in the TIMS application, which can be adapted to users’ needs by following the instructions in Chapter 6 of this manual. Proficient programmers may make unneeded fields invisible and create new reports based on existing data elements, and add to the Reports Menu, using MS Access 2000 tools. JHPIEGO does track user requests for new features, and when new fields or reports are included in a new version, all users can upgrade to the new version and take advantage of the changes requested. Not all changes requested are possible, due to resource limitations. Please note that JHPIEGO does offer limited technical support on the versions of TIMS that it releases to users. However, if local programmers change the Visual Basic code or add new features, JHPIEGO is unable to provide the technical resources to troubleshoot use of the software at that stage. Please note that it is also a copyright infringement to alter the software codes and modules or to use these modules in another application or database. Please contact JHPIEGO at [email protected] if you are interested in seeking training or technical assistance for implementation of TIMS at your organization. TIMS User Manual 25 Chapter 2: Requirements for TIMS Implementation TIMS Users within an Organization One of the first questions that should be addressed before adopting TIMS is: What human resources are required to incorporate this database effectively into existing planning and monitoring operations for training activities? Every organization will need a TIMS implementation team, comprised of a program manager, a data manager, and data entry staff for TIMS. There will likely be several other end users and stakeholders who will play critical roles. Program Manager The program manager is primarily interested in implementing TIMS for what it will do for the organization from a management perspective. The program manager will review the TIMS reports generated by the data manager, to make programmatic decisions, and will also assure that adequate computer and human resources are available to keep the database current and accurate. This individual will work closely with the data manager to discuss frequency of reports and the essentials of data quality for TIMS, and will likely supervise other TIMS team members. The program manager should become familiar with the What human resources are contents of this manual, especially Chapters 1, 4, and 5 required to incorporate and the Appendices. The more that s/he is aware of the TIMS effectively into potential of TIMS, the more utility s/he and the organization existing planning and will derive—by communicating data flow and reporting monitoring operations for needs to the data manager, assuring that staff receive training activities? completed TIMS forms after training events and keep up with data entry, and reviewing the needed reports on a • Program Manager regular basis to make key decisions. A key responsibility is to assure that data are collected from trainers and • Data Manager participants at every training event within the scope of the TIMS database over time. Policies and procedures will • Data Entry Staff need to be put in place by the program manager and other stakeholders in the organization for TIMS data collection to become institutionalized. Data Manager The data manager, or a monitoring and evaluation staff member, will be interested in implementing TIMS largely to bring together training data that historically have been collected in different ways by different trainers or training sites, perhaps some in paper format, and some electronic. Before implementing TIMS, training participants are often tracked by filling in sign-in sheets or registers at each training session, and these sheets are either filed as is or typed into an MS Word or Excel file. Then at annual report time, these lists need to be brought together for analysis. This process is far from seamless when a database application is not used, and often very sparse information is known about each participant. In some training programs, only the participant’s name and the course s/he attended are included on the sign-in sheets, which makes reporting somewhat more difficult. TIMS makes data management easier by standardizing and streamlining data collection and report generation. By including professional 26 TIMS User Manual qualifications, current facility, and clinical competencies on data collection forms and in the database, TIMS assures that there are no major obstacles to confront when reports are needed on these data. Referring to Chapter 2 in this User Manual, the data manager must assure that the human resources, hardware, and software are available to support regular TIMS operations. Using the documentation found in Chapter 6, the data manager can give TIMS login IDs to specific TIMS data entry staff and end users to monitor TIMS use within the organization. By becoming familiar with the concepts in Chapters 3, 4, and 5, the data manager will also be able to respond to users’ questions on the basic functions of TIMS and to train data entry staff to perform their jobs well. The data manager should work closely with the project manager to inform her/him about the technical capabilities of the software to assure the maximum benefit is provided to the organization. The scope and size of the TIMS database, and the importance of TIMS in the overall programmatic structure, should determine the percentage of time allocated to performing this role. In some organizations, the data manager may also have data entry responsibilities; but in this chapter, we have separated the two designations to show how they could be divided when more personnel are available for the project. Data Entry Staff TIMS data entry staff update and query the TIMS database using standard data entry screens and reports, as will be described in Chapters 3 and 4. Data entry staff may be assigned specific duties, including: Entering data from: Course Information forms Participant Registration forms Trainer Qualification forms Followup Assessment forms Running monthly, quarterly, or annual reports on: Courses Participants Trainers Followup Assessments If questions arise, data entry staff should rely on the data manager as a technical resource. TIMS User Manual 27 Additional End Users Additional end users may be given the ability to query or update the training program’s TIMS database, or generate reports for monitoring and decision-making. Depending on the size of the training program in which TIMS is operating and the extent to which it is being used as the primary monitoring tool, there may be several people associated with end user job functions—for example, a training manager responsible for a specific geographic region or specific program content. If the program manager does not consider it feasible to train and support multiple end users of TIMS, these staff could simply be referred to the project manager or data manager when they need reports. Installation Instructions System Requirements TIMS is a database application that runs within Microsoft Access 2000, and therefore has the system requirements of Microsoft Access 2000. The recommended computer hardware and software for TIMS operation are: Table 2-1. System Requirements for TIMS, Version 6.00 System Attribute Required Recommended Processor PC with Pentium 75 MHz or higher processor Pentium III or higher Operating system Microsoft Windows® 95 Any of the operating systems listed Microsoft Windows® NT 4.0 Service Pack 3 or later. Microsoft Windows Me® Microsoft Windows 2000® Microsoft Windows XP® Memory (RAM) Windows® 95/Windows® 98 16MB RAM 32 MB Windows NT® Workstation 4.0 or later 32MB RAM Display VGA or higher-resolution monitor Super VGA recommended Hard disk space 12 MB free disk space to install TIMS application, plus additional space to store data 12 MB for application plus 10 MB additional space to store data 28 TIMS User Manual TIMS Application Installation TIMS is available from two sources: CD-ROM obtained from JHPIEGO, by e-mailing a request to the Research & Evaluation Office at [email protected] JHPIEGO Website—downloadable from http://www.jhpiego.org/global/tims.htm Figure 2-1. Sharing TIMS Data on a Local Area Network The Training Information Monitoring System consists of two MS Access 2000 files, an application and a data file. In the example configuration in Figure 2-1, the application file name is TIMSapp.mdb and the data file name is TIMSdata.mdb. We suggest keeping a similar naming convention to assure you can differentiate the application and data files, especially if you house them in the same directory. Once you have obtained the setup files, the TIMS application should be installed on your local hard drive. If you are working in a multi-user environment, the TIMS data file may be placed on a network drive to facilitate data sharing (see Figure 2-1). Each user will have the TIMS application on her/his local hard drive, but will work with the shared TIMS User Manual 29 data file on the network. The shared network directory’s rights must not be set to readonly. The database (TIMSdata.mdb) is the Microsoft Access 2000 file that contains all of the tables that will store your training data. The TIMS application (TIMSapp.mdb) is the Microsoft Access 2000 file that contains all of the data entry forms, reports, code, and menus that connect and interact with the training data tables. A copy of the TIMS application should be stored on the hard drive of each user’s computer, whereas the data file should be stored in a central location on the network. Each user will use the TIMS application to connect with the database. It is extremely important to keep the computer where TIMS application and data files are housed virus-free and to back up the data on a regular basis to assure that all of the time invested in entering data is not lost. Some organizations back up their network drives nightly, so even if a single user is inputting data into TIMS, it would be a good idea to keep the data file on the network to assure that there is more than one copy of the data in the event of any file damage. JHPIEGO also emphasizes the importance of offsite backups. To install and run TIMS from a desktop for a single-user: 1. Place the TIMS CD-ROM in your computer’s CD reader drive. 2. The Setup program should start automatically. If Setup does not start automatically, go to your CD reader drive and double-click on the setup.exe file. 3. Follow the directions given by the TIMS installation wizard. 4. This will copy each of the following files to the directory that you designate: a. Sample_App.mdb b. Sample_Data.mdb 5. An icon will be created on the Windows desktop if you select this option. 6. To start TIMS, 1. Double-click on the TIMS icon or 2. Open the application file, Sample_App.mdb, in MS Access. 7. The first time you start TIMS, you will get a message to attach to the data file. Browse to the Sample_Data.mdb file in the designated directory, and click OK. (If the application opens and asks for a password, the two files are already attached). 8. When prompted for a password, enter admin. To install and run TIMS from a network for multiple users: 1. Place the TIMS CD-ROM in each end user’s computer CD reader drive. 2. The Setup program should start automatically. If Setup does not start automatically, go to your CD reader drive and double-click on the setup.exe file. 3. Follow the directions given by the TIMS installation wizard. 4. This will copy each of the following files to the directory that you designate: 30 TIMS User Manual a. Sample_App.mdb – install this file on the user’s local drive b. Sample_Data.mdb – install this file on the network drive 9. An icon will be created on the Windows desktop if you select this option. 10. To start TIMS, a. Double-click on the TIMS icon or b. Open the application file, Sample_App.mdb, in MS Access. 11. The first time you start TIMS, you will get a message to attach to the data file. Browse to the Sample_Data.mdb file in the designated network directory, and click OK. (If the application opens and asks for a password, the two files are already attached). 12. When prompted for a password, enter admin. Starting the Application To start the application, double-click the TIMS shortcut icon located on your desktop or browse to and open the TIMS application MS Access file. The application will open as shown below. You are now ready to login. Application Login The TIMS login screen will appear as shown below. You will need to enter one of the two user login IDs that have been created for the system. Data managers and data entry staff will enter admin and other end users will enter user. These logins will give you the following rights to the TIMS database: Admin—Enter, modify, and delete any type of record; make changes to lookup field values. Run all reports. User—Enter and modify data, and delete certain types of records. Run all reports. Once the data manager has set up user accounts for all staff that need electronic access to TIMS, each person will have a unique login ID (by default, the first initial and last name of the person, but these can be modified to keep IDs private). At that point, the user and admin logins should not be used again, as TIMS contains an audit trail mechanism that records the login ID of the person who creates or modifies any record. These generic login names would be meaningless if reviewed for auditing purposes, as TIMS User Manual 31 they are not attached to any individual in your organization. See Chapter 6 for more detail on setting up login IDs for new users. The Main Menu The Main Menu is the central form for navigating to all areas of the Training Information Monitoring System and will appear after logging in to the application. To learn more about TIMS, click the About… button. 32 TIMS User Manual Chapter 3: Input/Edit and Browse Data There are four main screens available for browsing/ searching, data entry, and editing in TIMS, accessible from the Input Data button on the main screen: Courses Participants Trainers Followup Assessments Sample data entry forms, which can be used to collect the training data corresponding to the TIMS fields provided in these screens, can be found in Appendix B of this manual. To browse for or input/edit course, participant, trainer, or assessment records, click on the Input Data button at the top of the TIMS Main Menu. This action will open the Data Entry Menu, shown below.2 2 The Followup Assessments button will only be displayed if the data manager has selected it as an option on the Customize Application screen (See Chapter 5, Customize Application section, for further details). TIMS User Manual 33 Courses Input/Edit or Browse Click on the Courses button, which will open the Browse Course Events form. Once you have opened this form you will notice that the TIMS geographic filter will automatically default to a specific country.3 In the example below, the filter is set to Kenya. Regardless of how many courses have been entered into a TIMS database, the list always comes up empty until the Search button is clicked. To browse a specific subset of courses from your training program: 1. Select from the geography drop-down lists for region, country, province, and district to filter on these attributes. 2. Select from the Training Delivery, Training Focus, and Training Topic lists to filter for specific types of courses. 3. Specify the date range of interest. 4. Click on the Search button to display a list of all courses in the database with these characteristics. 3 This is true if the data manager previously assigned a default country; refer to Chapter 6: Administration. 34 TIMS User Manual You may sort the obtained list by date, training center, or course name, by choosing the appropriate radio button in the Sort By box. The example below shows the results of a search for Malawi group-based clinical skills courses (any topic) sorted by date. Click here to add a new event Click here for course details Clicking on the Clear All button will reset all of your filter selections, including the country. The Country field will now appear as All Countries. Clicking the Search button at this point would return all courses in the database. To view details of a specific course, click on the ellipsis button in the same row as the course that you would like to explore. The Course Events Form will then appear, displaying core data at the top and four tabs below: Course Trainers, Course Participants, Award Funding, and Audit History. TIMS User Manual 35 Add New Course Click here to select a trainer to delete Click for more information about this trainer Click to add a trainer To enter a new course event: 1. Click on the New Event button and a blank Course Events Form will appear. 2. Choose a Training Center/Site from the drop-down list. If the Training Center/Site where this course was held is not already on the list: a. Type in the new training site directly into the white box for this field and press Enter. b. Click Yes when you see the dialog box shown below. 3. Enter Training Delivery, Training Focus, Training Topic, and Training Content, selecting from the drop-down lists that appear. Users cannot edit these lists.4 You may choose only one delivery, focus, and topic, but more than one content. 4. Fill in the formal course name. 4 Only the data manager should alter the contents of certain pull-down lists (lookup tables) in the application. This feature requires administrative privileges. See Chapter 6: Administration, Edit Lookups. 36 TIMS User Manual 5. Complete course start and end dates, and the length of the training course in days, weeks, or months. 6. Enter a longer course description, if desired. This can be browsed later by clicking the ellipsis button. 7. Enter the region, country, province, and district where the course was held (referring to the training center/site location). 8. Continue as explained in the sections below to complete data on the tabs for Trainers, Participants, and Award Funding. Delete Course The Delete Course Event button is shown at the bottom of the Course Events form only when a user has signed into TIMS with administrative privileges, or “Admin” rights. 1. Click Delete Course Event. TIMS User Manual 37 2. Click Yes to delete the course and associated participants and trainers who have been added to the course. Note: Information from the Person’s Data Entry form for these individuals will still be in the TIMS database, but the association with this course, including any information entered into the Participant Registration form, will be deleted. There is no undelete feature, so please exercise caution when deleting courses or any other record in TIMS. Add Trainers to a Course This tab shows the number of trainers for the course, a list of their names, roles, and trainer types, as well as total number of days each trainer taught. Click the ellipsis button on the far right of the trainer's record to display the trainer's personal information and qualifications on the Person’s Data Entry screen. The Person’s Data Entry form stores all personal information including: name, address, phone numbers, National ID, etc. You may browse the trainer’s data on this screen. Click the Close button to return to the previous form. To add a trainer to a course: 1. Click the Add Trainer button at the bottom of the screen and the Select a Trainer screen will appear. 2. Set the geographic filters for country, province, and district to narrow your search to those people you know live in a particular geographic region. (These filters work on 38 TIMS User Manual the Current Address information entered for a person, not on the Current Facility information.) 3. Search for the trainer of this course in the database by last name or national ID, selecting the appropriate option under the Search By box and entering the first few characters of the respective field. Leave this box empty if you want to see the master list of everyone in the database. 4. Click on the search button to display a list of individuals who fit these criteria. All course participants and trainers previously entered into TIMS will appear in the resulting list. The example below shows a search for individuals in Kenya’s Eastern province whose last name begins with “M.” 5. Review the resulting list to find the trainer who taught this course. Trainers appear at the top of the list, followed by all other people in the database who fit the geographic, name, or ID search criteria. 6. If you would like more information on a person in the list before selecting her/him as a trainer for this course, click the ellipsis button on the far right of the person’s record and review the data in the Person’s Data Entry form. When finished reviewing, click the Close button there to return to the Select a Trainer form. 7. To select a trainer, click on the column to the left of the name, and a triangle will show that this individual has been selected. 8. Click on the OK button, which will return you to Course Events form. Click to add this trainer to the course Click for more information on this person TIMS User Manual 39 If you don’t see the needed course trainer on the list, you must add the individual to the database’s master person list before selecting her/him as a trainer for the course, using the following steps: 1. Click on the New Person button on the Select a Trainer form to open a blank Person’s Data Entry form. 2. Enter all available personal information at the top of the form: a. First, middle, and last names b. Birth date c. ID numbers—there are three fields for ID numbers, which may include a national personal identification number assigned by the government to all citizens, an employee or payroll number, a professional licensure number, or even a tracking number specific to the training program. d. Gender e. There is a checkbox for marking someone deceased, although this probably will not be used the first time you enter a person as a trainer. It is here for subsequent use in case the program learns an individual has died and wants to accurately reflect that so as not to generate a mailing list or trainer directory containing this person’s information in the future. 40 TIMS User Manual 3. Enter address information: a. Address 1 & 2 (street address, post office box, etc.). Do not enter facility names into these lines. That information should be input on the Current Facility tab. This space is for home or mailing address separate from where a person works. If the person receives mail only at the facility and not at a separate home address, leave these two lines blank. b. Region (required) c. Country (required) d. Province e. District f. City g. Postal Code h. Home telephone number i. Work telephone number j. E-mail address 4. Click on the Trainer Info tab to begin data entry of that section: a. Check the box after the question, “Is This Person a Trainer?” and several formerly grayed out fields will be enabled for completion. If you do not check the box, when you attempt to enter this person as a trainer for a course, you will get a message from TIMS stating that the person is not a trainer. b. Trainer Type c. Trainer Type Acquired On (date) d. Assessed/Qualified By e. Current Trainer Skills and Dates of Standardization (space for optional comments is also available, for each trainer skill) f. Status (Active or Inactive) g. Languages (select as many as needed) TIMS User Manual 41 5. Enter Clinical Skills—these are skills that the healthcare provider can perform competently. The date of the skills competency assessment should be entered. 42 TIMS User Manual 6. Enter Current Facility data a. Choose a facility from the list, by typing in the first few letters. TIMS will automatically search for and bring up the facility that matches the first few letters entered. If no facility matches are found, TIMS will allow you to enter a new facility into the database. b. Enter all data on the Facility Address form i. Address 1 & 2 ii. Region (required) iii. Country (required) iv. Province v. District vi. City vii. Postal Code TIMS User Manual 43 c. Enter all data on the Facility Info form 44 i. Facility ID ii. Facility Type iii. Facility Subtype iv. Phone v. Fax vi. Sponsor TIMS User Manual 7. Click the Close button on the data entry screens until you return to the Select a Trainer list. 8. The trainer whom you just entered should now appear on that list and can be selected and added to the course. Once you have selected the trainer, press OK. The trainer will now appear on the course data entry form, as shown below. At this time, you may: 9. Specify one or two trainer roles for each trainer. 10. Enter the number of days each trainer taught at the course. TIMS User Manual 45 Duplicate Data Entry Error Warning Before inputting data on a course, participant, trainer, or assessment, data entry staff should first ensure that the particular record has not previously been entered into the TIMS database. TIMS checks for duplicate entries for only two fields: National ID and Payroll ID. These two numbers must be unique for each person entered into the database. If you try to enter the same National ID or Payroll ID for two people, you will get one of the error messages shown below: With regard to other data that also run the risk of being duplicated, you will need to browse and search for the records by pertinent search criteria to ascertain whether the data were previously entered. This step will prevent duplication of persons, courses, and followup records in the database. These can be unwieldy to unduplicate during data 46 TIMS User Manual cleaning later, so proper searching at the time of data entry is strongly recommended, especially when multiple data entry staff are entering data over time. Delete Trainer from a Course If you added someone erroneously as a trainer for a course: 1. Select the person’s record using the boxes to the far left of the trainer name. 2. Click the Delete Trainer button. 3. Click Yes to confirm. People signed into TIMS with either “User” or “Admin” rights can delete trainers from a course. Add Participants to a Course Each participant at a training event should fill out a Participant Registration form on paper. This is usually done the first day of the course. The data collected on that form TIMS User Manual 47 are entered into this section of the database. You may add and edit participant information through the Participant Registration section. The Course Participants tab for a course shows the total number of attendees as well as a list of their names, National IDs, work telephone numbers, facility names, and districts, for convenient browsing. Click here to select a person to delete Click for more information about this participant Click the ellipsis button to the far right of the participant's name on the list to display the Participant Registration Form. If you erroneously added someone to a course, you can select the person’s record using the boxes on the left and then click the Delete Person button. To add a participant to a course: 1. Click the Add Person button at the bottom of the screen and the Find a Person screen will appear. 48 TIMS User Manual 2. Set the geographic filters for region, country, province, and district to narrow your search to those people you know live in a particular geographic region. (These filters work on the Current Address information entered for a person, not on the Current Facility information.) 3. Search for each participant of this course in the database by last name or national ID, selecting the appropriate option under the Search By box and entering the first few characters of the respective field. Leave this box empty if you want to see the master list of everyone in the database. 4. Click on the search button to display a list of individuals who fit these criteria. All course participants and trainers previously entered into TIMS will appear in the resulting list. The example below shows a search for individuals in Kenya. 5. Review the resulting list to find the participants who attended this course. Note that this list shows only name and National ID, unlike the Select a Trainer search results, explained above, which also listed trainer status and type. 6. If you would like more information on a person in the list before selecting her/him as a participant in this course, click the ellipsis button on the far right of the person’s record and review the data in the Person’s Data Entry form. When you are finished reviewing, click the Close button there to return to the Find a Person form. 7. To select a participant, click on the column to the left of the name, and a triangle will show that this individual has been selected. TIMS User Manual 49 Click to add this participant to the course Click for more information about this person 8. Click on the OK button, which will open the Participant Registration form. If you don’t see a needed course participant on the Find a Person list, you must add her/him to the database’s master person list before selecting the person as a participant for the course, by clicking the New Person button. (See steps in the Trainer Section above.) 50 TIMS User Manual Participant data are contained in seven separate tabs: Person’s Info Scores/Financial* Qualifications Custom Fields* Person’s Facility Comments Facility Services* * These tabs can be turned off by the data manager if not needed. See Chapter 6: Administration, Customize Application. TIMS User Manual 51 Click here to edit Person’s Info 1. To edit a participant’s personal information, click the ellipsis to the right of her/his name. This will open the Person’s Data Entry screen, which is described above in the Trainer section. 2. Click on the Qualifications tab, and enter the following: a. Current Qualification b. Year Achieved c. Are you currently providing family planning services? d. Have you ever attended any other family planning training courses? e. Are you employed by the Ministry of Health? f. Year you began working for the Ministry of Health g. Current Responsibility Choices must be selected from the available drop-down lists for Current Qualification and Current Responsibility. Users cannot edit these lists.5 5 Only the data manager, with administrative rights to the database, may alter the contents of certain pulldown lists (lookup tables) in the application. See Chapter 6: Administration, Edit Lookups. 52 TIMS User Manual 3. Click on the Person’s Facility tab, and select a facility from the list. This list works as described in the Trainer section above. 4. Click on the Facility Services tab and enter the following: TIMS User Manual 53 a. Check the box if the participant currently provides clinical services. b. Select from the list the clinical services the participant provides. i. If the service desired is not on the list, you may enter it directly into the list box, and press Enter. You will get the following message: ii. Select Yes, and the following dialog box will appear. You may enter a description of the service, as well. 54 TIMS User Manual If you do add a description of the services as you enter them, the browse screen will be more informative, as shown below: 5. Click on the Scores/Financial tab and enter the following information: a. Assessment Scores (% correct) i. Pre-training ii. Mid-training iii. Post-training b. Course Participation Costs i. Subsistence/Per diem ii. Time Off iii. Tuition iv. Other v. TIMS calculates the Total after the above costs are entered. TIMS User Manual 55 6. Click on the Custom Fields tab. If there is any additional information on a person’s participation in a course that has not been otherwise recorded in TIMS, you may use the four extra fields here to enter it. The first three fields can be used to enter any text, while the fourth is a drop-down list, which will only contain choices supplied by the data manager in a lookup table.6 The user may not edit the drop-down list during data entry. For example, if a course evaluation form is used, the overall satisfaction rating this participant gave the course could be entered here (this example assumes that participants put their names on the evaluation forms, which is not always the case). 6 See Chapter 6: Administration, Edit Lookups, for instructions on adding values to this lookup table. 56 TIMS User Manual 7. Click on the Comments tab. Here you may enter your comments on this participant into a large text field. For example, you may want to comment on additional skills or qualities noted during this course. TIMS User Manual 57 8. After you have finished completing all of the tabs on the Participant Registration Form, click OK. You will then return to the Course Events Form where you can continue to enter all participants by following the steps above. Delete Participant from a Course If you erroneously added someone as a participant for a course: 1. Select the person’s record using the boxes to the far left of the participant name. 58 TIMS User Manual 2. Click the Delete Person button. 3. Click Yes to confirm. People signed into TIMS with either “User” or “Admin” rights can delete participants from a course. Award Funding The Award Funding tab for courses allows selection of an award or funding source for an entire course. Note that this selection is not available for specification of funding sources for specific individuals that attend the same course, but rather applies to the entire training event. 1. Select the funding source from the list. You may enter as many as needed. 2. If one of the sources was USAID Bilateral (field/mission) funding, select the country or mission that awarded the funds. 3. If one of the sources selected was “Other,” use the blank text field to enter the name of the funding source. TIMS User Manual 59 Audit History If you click on the Audit History tab, you will see the name of the person who created the course record, the date it was created, as well as the person who last modified the record and the date of modification. This information is based on login names used when data were entered and modified. Participants Input/Edit or Browse To browse training participants, click on the Input Data button on the Main Menu, then select Participants from the Data Entry menu. This will open the Browse Course Participants screen. To browse and edit participant data: 1. Set the geographic filters for region, country, province, and district to narrow your search. 2. Enter all or the first letter(s) of the last name. 3. Click on the search that fit these criteria. Click here to see a person’s courses button to display a list of all persons in the TIMS database Click here for the Person’s Data Entry screen Click here for the Participant Registration screen 4. To view the courses a person has taken, select that person by clicking on the box to the left of her/his name. An arrow will appear to highlight that record. The courses the person has taken will appear in the Course Registration section at the bottom of the screen. 60 TIMS User Manual button on the far right of the 5. For more information on a person, click the ellipsis person's record. The Person’s Data Entry screen will appear for viewing and editing personal information. Click Close when done. 6. For more information on a participant’s registration for a particular course, click the ellipsis button on the far right of the course record. The Participant Registration screen will appear for viewing and editing. Click Close when done. Add New Participants and Trainers Normally, you will enter entire courses at one time, adding all trainers and participants to the course at the same time that you specify the course training site, content, dates, and funding. However, TIMS also allows you the flexibility to directly enter new people into the database. If you search for a participant whom you know took a particular course, and do not find the person in TIMS, for example, you may add her/him and then connect the person to that course. Or you may want to enter a person into the database simply because you know that this is a trainer who may be available to teach a future course. 1. In the Participant’s module, click on the Add Person button to open the blank Person’s Data Entry screen. If the person is a trainer, enter the data into the Trainer tab. When done adding data to each tab, click the Close button. 2. Making sure you have the correct person highlighted (an arrow will appear to the left of their name), click the New Registration button to add the person to an existing course. TIMS User Manual 61 3. Select the filter criteria for the course to which you would like to add the participant: a. Region b. Country c. Province d. District e. Training Delivery f. Training Focus g. Training Topic h. Date The following example shows Advanced Training Skills courses taught in Kenya. Click here to view additional course information 4. To view the details for a course, click on the ellipsis button to the right. This will open the Course Events Form. All of the relevant information for that course will be displayed. 5. Select the course in which you would like the participant to be registered, and click the OK button at the bottom of the screen to open the Participant Registration Form. 62 TIMS User Manual 6. Enter the participant's information into each tab. Click Close when finished. You will then return to the Browse Course Participants form and find that the course you selected has been added to your participant's list. 7. Continue to click Close until you have returned to the Main Menu. Delete Person The Delete Person button is shown at the bottom of the Participant form for those signed into TIMS with either “Admin” or “User” privileges. 1. Click Delete Person. 2. Click Yes to delete the person and associated course registration records. TIMS User Manual 63 Trainers Input/Edit or Browse Click the Input Data button on the Main Menu and then the Trainers button in the Data Entry Menu. This will open the Browse Course Trainers screen. To browse and edit trainer data: 1. Set the geographic filters for region, country, province, and district to narrow your search. 2. Enter all or the first letter(s) of the last name. 3. Click on the search who fit these criteria. button to display a list of all trainers in the TIMS database Click for more information on this trainer 4. By selecting different trainers, you will see the list of courses that they taught automatically updated on the bottom half of the screen. 5. Click the ellipsis button to the far right of the trainer name to see more information on a particular trainer. 6. Edit data on the Trainer Info tab, as explained above in the Participant section. 64 TIMS User Manual 7. Click Close to return to the previous screen or menu. See Participant section above for instructions on how to add or delete persons within the TIMS application. Followup Assessments Input/Edit or Browse To browse followup assessment records, click on the Input Data button on the Main Menu, then select Followup Assessments from the Data Entry menu. This will open the Browse Followup Assessment Records screen. If you do not see a Followup Assessments button, then the data manager has not enabled this feature. See Chapter 6 for instructions on how to enable this module. 1. Set the geographic filters for region, country, province, and district to narrow your search. 2. Enter all or the first letter(s) of the last name. 3. Click on the search button to display a list of all assessment records in the TIMS database that fit these criteria. 4. Use the radio buttons to the right to sort the results list by person’s last name, training center, or date. TIMS User Manual 65 Click for more information on the followup assessment record 5. If you would like more information on a followup assessment, click the ellipsis button on the far right of the record. 66 TIMS User Manual Entering a New Followup Assessment Record 1. On the Browse Followup Assessment Records screen, click the New Followup Assessment button at the bottom right of the screen. This will take you to the Find a Person screen. 2. At this stage, you are looking for the person who was assessed. Set the geographic and last name or National ID selection criteria for persons and click the search button. Add a New Person, if needed. 3. Choose the person who was assessed and click on OK. The Followup Assessment Data Entry screen will appear. 4. Enter the followup assessment date. 5. Select the Facility Name where the followup assessment visit is taking place. Users must choose from the existing facilities in the list. 6. Select the Training Site where this individual gained the skill to be assessed. Users may add to this list. Select Yes to confirm additions. 7. Select the Followup Assessment Type by choosing from the existing list. You may add new types to the list by typing directly into the white text box. Select Yes to confirm additions. TIMS User Manual 67 8. Click Add Assessed Service at the bottom of the screen. 9. Use the Find a Person screen to choose the Assessor’s name. Use the selection filters to limit your search criteria. 10. Select the service that is being assessed. Users may directly add new services if the desired one is not already on the list. 11. Select the result or level of competency achieved. Users may directly add new results if the desired one is not already on the list. 68 TIMS User Manual Click to change the assessor’s name Click to browse and edit the assessor’s personal information Click to select the result of the assessment 12. If you would like to change the name of the assessor, click on the ellipsis button to the right of the name and select the correct person using the Find a Person search screen. 13. To view or edit the assessor’s information, click on the ellipsis button to the right of the Result column. This will allow you to browse and make changes to the Person’s Data Entry form. Delete Followup Assessment Record When signed into TIMS with “Admin” privileges, you may delete entire Followup Assessment Records for individuals. 1. Browse to the Followup Assessment Record you would like to delete. TIMS User Manual 69 2. Click the Delete Followup Assessment button on the lower right corner of the screen. 3. Click Yes to confirm deletion of the entire followup assessment record, and all assessed services. Delete Assessed Service When signed into TIMS with either “User” or “Admin” privileges, you may delete assessed services within followup assessment records. To delete an assessed service: 1. Highlight the followup assessment record by clicking in the box to the left of the Assessor’s Name. An arrow will appear pointing to that record. 70 TIMS User Manual 2. Click the Delete Assessed Service button. 3. Click “Yes” to confirm the deletion. TIMS User Manual 71 Chapter 4: Reports Selecting the Reports button on the main menu will allow users to run 23 standard MS Access reports: 2 based on courses, 2 trainer reports, 5 coverage reports at various levels of geography, and 14 participant reports. In addition, there are 12 Export to DBF reports that can be used to make TIMS data available for importing into other software packages, such as geographic information systems (GIS), to create training maps. The Reports module also offers 14 data cleaning reports useful for data managers. There are 5 additional reports available from the browse screens in the TIMS application. There are a total number of 54 reports available in TIMS. Chapter 1 of this manual contains reports from a sample database created at JHPIEGO for training purposes. Table 4-1. Location, Format, Type and Number of TIMS Reports Location Reports Module Format MS Access Type Courses Trainers Coverage Participants MS Excel Data Cleaning DBF Export to DBF Courses Browse Screens MS Access Assessments Person Total Number of Reports Available in TIMS Number of Reports 2 2 5 14 14 12 2 2 1 54 Standard Reports Entering the Reports module of TIMS, you will see a list of standard reports, along with several data filters that allow you to specify selection criteria for data to be included in the requested report. You may run one report at a time in TIMS. 72 TIMS User Manual Master List of MS Access Reports The reports available from the TIMS Reports module are listed below. When you select a report from the Reports box on the left half of the screen, a brief description of the report will appear in the box on the right. Course Reports 1. Master List of Courses 2. Training Center Activity Report Coverage Reports 1. Training Coverage Report by Country 2. Training Coverage Report by District 3. Training Coverage Report by Facility 4. Training Coverage Report by Province 5. Training Coverage Report by Region Participant Reports 1. Participant Count by Facility Sponsor and Year 2. Participant Count by Facility Type and Year TIMS User Manual 73 3. Participant Count by Funding Source and Year 4. Participant Count by Qualification and Country 5. Participant Count by Qualification and District 6. Participant Count by Qualification and Province 7. Participant Count by Qualification and Year 8. Participant Count by Training Focus, Province, District 9. Participant Count by Training Focus, Topic, Content, Province, District 10. Participant Count by Training Focus, Topic, Course Name 11. Participant Count by Training Focus, Topic, Province, District 12. Participants by Facility/Workplace and Course Name 13. Participants by Facility/Workplace and Training Topic 14. Person Profile Report Trainer Reports 1. Trainer Count by Trainer Type 2. Trainer Skills Review by Country Master List of MS Excel Reports The data cleaning reports are all in MS Excel format. These can be used for a convenient view of the data in tabular format, showing which data are missing. Using MS Excel, users will be able to sort on any attribute in the reports, and delete any unneeded columns. JHPIEGO uses these data cleaning reports to communicate with personnel and partner agencies via e-mail, by sending the MS Excel data to be verified and/or completed highlighted in specific colors. Data Cleaning Reports 1. Query - Data Cleaning - Check for Completion of Course Province and District 2. Query - Data Cleaning - Check for Duplicate Persons and Identifiers 3. Query - Data Cleaning - Master List of ATS Courses 4. Query - Data Cleaning - Master List of CTS Courses 5. Query - Data Cleaning - Master List of Facility Names by Type, Subtype, Province & District 74 TIMS User Manual 6. Query - Data Cleaning - Participants and Facility Sponsors 7. Query - Data Cleaning - Participants and Qualifications 8. Query - Data Cleaning - Participants Home and Facility Addresses 9. Query - Data Cleaning - Participants with a CTS Course Trainer Status 10. Query - Data Cleaning - Participants with an ATS Course Trainer Status 11. Query - Data Cleaning - Services and Descriptions 12. Query - Data Cleaning - Trainer Types and Ranks 13. Query - Data Cleaning - Trainers 14. Query - Data Cleaning - Training Centers Master List of DBF Reports JHPIEGO uses these reports to prepare summary TIMS data for import into geographical information system (GIS) software for mapping. The DBF files could also be imported into many common spreadsheet or statistical packages for graphing. Export to DBF Reports 1. Course Summary by Country 2. Course Summary by Province 3. Course Summary by District 4. Course Summary by Center 5. Participant Summary by Country 6. Participant Summary by Province 7. Participant Summary by District 8. Participant Summary by Facility 9. Trainer Summary by Country 10. Trainer Summary by Province 11. Trainer Summary by District 12. Trainer Summary by Facility TIMS User Manual 75 Data Filters The filters available for selecting records to be included in TIMS reports are all located at the top of the Reports screen. The type of report selected will determine the filters available. All enabled filters will be visible when a report is selected from the list. The following is a description of how each filter works. Geography Source—Choose the radio button corresponding to the geography field source to use in selecting records for the requested report. Person’s Address—This is entered on the Address tab on the Person’s Data Entry form, and is the residential address of the participant or trainer. Person’s Current Facility—This is entered into the Current Facility tab on the Person’s Data Entry form and is where the person is currently providing services. This is the default setting, as most training programs are concerned with where trained personnel are providing services, rather than with where they reside. Training Center—This is the place where all of the participants gathered to take the course, which may be a hospital, preservice institution, conference center, or hotel. Geography Region—Choose a specific region or “All Regions.” If you choose a specific region, Country, Province and District will be enabled for selection. Country—Choose a specific country or “All Countries.” If you choose a specific country, both Province and District will be enabled for selection. Province—Choose a specific province or “All Provinces.” District—Choose a specific district or “All Districts.” Course Attributes—You may choose only one value in each of the delivery, focus, and topic filters for each report. Leave the selection box blank to default to “all values.” Training Delivery Training Focus Training Topic Date Range—For best results, fill in both the “Between” & “AND” dates for courses that you would like included in the report. By filling in only the “Between” month and year, the report will be limited to courses with start dates during that month. If you fill in only the “AND” month and year, all courses in the database will be included, which would be the same as if you left both fields blank. 76 TIMS User Manual Award—You may choose only one funding award per report. If you leave this filter blank, courses taught by any award or with an unspecified award will be returned in the report. Click on the Clear All button to reset all of the report data filter selections. Printing Reports 1. Set the data filter criteria for the requested report using the drop-down boxes at the top of the Reports screen. 2. Select a report by highlighting its title in the list on the left of the screen. 3. Choose the paper type that your printer supports (TIMS defaults to A4 paper each time you enter the Reports module). 4. Notice the options given at the bottom right of the screen. There will be different options available for each report: a. Next—Click to advance to the next screen to specify further options needed before TIMS can run the requested report. b. Preview—Click to run the report and show it in a new window in TIMS, for review before printing. c. Print—Click to run the report and send directly to the default Windows printer without previewing. d. Close —Click to close out of the Reports screen and return to the Main Menu. “Next” -- Specifying Further Information Several standard reports need to be further specified before they will run. The example below is for the Participant Count by Qualification and Country report. 1. Click the Next button to open a report customization screen, where you may tailor the report output. TIMS User Manual 77 Click to add selected item from the list on the left Click to add all items from list on left 2. Select up to eight of these fields by clicking on the qualification followed by the single forward arrow button in the middle of the screen. The number in parentheses next to each qualification represents the total number of participants with that qualification, to assist users in selecting items for inclusion in the report. Click blue arrows to change the order of columns on the report Click to edit column headings 78 TIMS User Manual 3. Use the blue arrows to reorder fields, as you would like them to appear on the report. Click on the value and then click the up or down arrow to change the order. The default is the order in which they were added from the list on the left. 4. Click Edit Report Labels. 5. Enter 8-character (maximum) headers for each column. TIMS defaults to the first 8 characters of the value in the lookup list, which may not be meaningful to report users, and also may create duplicates if there are similar values such as “Nursing Student” and “Nursing/Midwifery Student” in the list, which need to be differentiated on the report. 6. Click Close to return to the Report Customization screen. The new labels will now be displayed under the Rpt Header column to the right of each field name. 7. Click Preview to run the report and view it on the screen. TIMS User Manual 79 Troubleshooting Value Selections 1. In Step 2 above, you may have selected more than eight values. One way would have been to select all of the values by using the double arrow, or by selecting more than eight individually. Either way, you will get the following error message: Move the selected value from the list at the right back to the left 80 Move all of the values to the right back to the list on the left TIMS User Manual 2. If you try to select Preview or Print to run the report, you will see the following: 3. Click OK and proceed to remove the values using the single or double arrows, as needed, eventually arriving at eight or fewer columns for the report. Saving Reports For reports that require you use the “Next” button, you may save the additional specifications entered for future use. This will allow you to select the up to eight values to appear as data columns and change the column headers for each value only once, and re-run the report on a regular basis. Please note that the report specifications saved are limited to those entered on this customization screen, and do not include the report selection criteria (Geography Source, Geography, and Course Attributes) from the initial Reports screen, which must be set each time you run a report. The example shown below is for the Participants by Qualification and Country Report. 1. Select all of the columns and edit the report labels as you wish them to appear on the report. 2. Preview the report to assure the layout is acceptable. 3. Click the Save As button at the top of the screen, under Report Maintenance. 4. Enter a new name for the report. If you enter a name already in the list, TIMS will ask if you want to overwrite that report. TIMS User Manual 81 5. Click OK to save the new report. 6. Create any additional custom reports selecting different columns for inclusion, and save those with new names. 7. The next time you enter this screen, open the pull-down list to choose a saved report. 82 TIMS User Manual 8. Click Preview or Print to run the saved report. Modifying a Saved Report Under the Report Maintenance area of the report customization screen you will see four options. Each of these options allows you to make modifications to a report created and saved in TIMS. Below, find the explanations of each of the four buttons. Save—To modify a report, change the list of values, and edit report labels, then click on the Save button. This will save the changed report under the same name. Save As—Saves the report specified under a new name, and leaves the original report name on the list. Rename—Saves the report specified under a new name, overwriting the original report name. Delete—Deletes the report and its specifications from the list. TIMS User Manual 83 Additional Reports Master List of Additional Reports The following reports, which were shown in Chapter 1, are not available from the Reports Menu, but rather from other screens within TIMS: Program Summaries General Course Roster Detailed Course Roster Listing of All Followup Assessment Records Professional Development Individual Training Profile Assessment Record for an Individual Printing Additional Reports The screens from which each additional report can be accessed are shown below. Each report can be run by clicking on the printer or report button on the appropriate TIMS “Input/Edit or Browse” screen, when you are browsed to the record whose data you would like the report to reflect. General Roster for a Course Click here to generate report 84 TIMS User Manual Detailed Roster for a Course Click here to generate report Listing of All Followup/Assessment Records Click here to generate report TIMS User Manual 85 Individual Training Profile Click here to generate report Assessment Record for an Individual Click here to generate report 86 TIMS User Manual Creating New Reports Training program managers may wish to query the TIMS database for specific data that are not provided in the standard or additional reports sections listed above. TIMS Entity Relationship (E-R) diagrams, created in MS Visio, are included in the Technical Documentation section of the TIMS installation CD, for the purpose of teaching programmers the table structures and relationships of the TIMS database. Note: Only advanced Visual Basic and MS Access programmers should attempt to use this feature of TIMS, because it involves opening and modifying the TIMS application file. The process for creating new reports would be: 1. Study the TIMS E-R diagram. 2. In the TIMS application file, create a new query in query design mode. 3. In the TIMS application file, create a new report based on that query. 4. To add the new report to the TIMS Standard Reports menu, open the TIMS application file, ztblReports table, in datasheet view. 5. Add a new record at the bottom of the table, with the following data: a. Display Name—This name will appear in the list in the box on the left side of the Reports screen. b. Access Name—Document the name of the report as saved in the MS Access application file. c. Description—This description will appear in the box on the right side of the Reports screen when this report is selected. d. Lookup Table—For those reports that require additional criteria using the “Next” button, document the appropriate query or table name. e. Enabled—Check this box if you want the report added to the Standard Reports menu. f. Report Query—Document the name of the query upon which this report is based. g. Report Row Name h. Report Row Source i. Report Title—Text entered here will display at the top of the generated report. TIMS User Manual 87 j. Check which of the filters should be visible for this report (your new report programming will have to be such that the filters are correctly enabled): i. Geography Source ii. Year iii. District iv. Province v. Course Attributes vi. Rank (this filter is not used in TIMS currently). vii. Country k. Custom Header—Text entered here will replace the Report Title at the top of the report. l. Custom Footer—Text entered here will be printed at the bottom of the table, after the last line of data. m. Paper Size—Default paper size. n. Report Criteria o. Is Query—Check yes if the report itself is a query (applies to all data cleaning reports). 6. Save the changes. 7. Open the TIMS Reports module and the new report should appear in the table. 8. Test for accuracy of the report, and for functionality of all desired filters. Although JHPIEGO is unable to provide extensive technical support or troubleshooting of this customized reporting feature, we are disseminating the data model via the E-R diagram so that advanced programmers can adapt TIMS to make it useful for each training program. 88 TIMS User Manual Chapter 5: Data Collection Forms Although data collection forms are not a module in the TIMS software program, they are a key element in TIMS implementation. Without paper data collection forms, there would be no standardized data for entry into a TIMS database. This chapter presents the types of data collection forms needed, and shows users which questions are important to ask when designing data collection forms. The less data requested on forms, the easier and faster it will be for trainers and participants to fill them out; however, minimal data input into TIMS will result in minimal browsing and reporting available from your TIMS database. Think about the reports you would like to run and the data you would like to browse on the screen, by reviewing Chapters 1–3 in-depth before designing your training program’s data collection forms. Key Questions for Form Design Some of the questions listed below are common to multiple forms; however, they are repeated so that each section can be used as a stand-alone guide for designing that form. Course Information Form 1. How are courses delivered in your training program? Think ahead about whether you plan to add distance learning, computer-assisted learning, or on-the-job training to your program, if you aren’t doing these yet. 2. What levels of geography are used in your country? Starting with country, you have two additional coded fields for data entry and filters. Do you use provinces and districts? Regions and parishes? Districts and municipalities? 3. What topics are taught in your courses? You have three levels: Training Focus, Topic, and Content. Thinking ahead about hierarchy and categorization will make your database and reports more useful. Data entry staff will choose “Other” if you don’t have the categories specified in advance. How useful would “Other” be to the Ministry of Health as a category on a quarterly training report? 4. What unique identification numbers for individuals are used in your country, such as national personal identification numbers (PINs), healthcare provider IDs, or employer IDs? Think about the universality (will all participants and trainers have this ID?) as well as whether people recall it, and whether they will want to share it. If it is an ID used for tax or credit reporting purposes, people may be more reluctant to share this number. The purpose of IDs is to differentiate individuals in the database, which is especially important in countries where several last and first names are common and where people tend to leave their date of birth blank on data entry forms—or fill in different dates of birth each time they are asked. Think twice before creating your own training program ID numbers, as these are easily lost or forgotten and will thus lose their utility. Generating the unique numbers will also generate new clerical work for program staff, without necessarily being a good solution. TIMS User Manual 89 5. Which organizations fund training in your country? Think about all funding agencies, not just the ones from which you have funding now. If you were to be awarded a grant next year from another donor, you don’t want to have to change your forms then to add it. Participant Registration Form 1. What levels of geography are used in your country? Starting with country, you have two additional coded fields for data entry and filters. Do you use provinces and districts? Regions and parishes? Districts and municipalities? 2. What unique identification numbers for individuals are used in your country, such as national personal identification numbers (PINs), healthcare provider IDs, or employer IDs? Think about the universality (will all participants and trainers have this ID?) as well as whether people recall it, and whether they will want to share it. If it is an ID used for tax or credit reporting purposes, people may be more reluctant to share this number. The purpose of IDs is to differentiate individuals in the database, which is especially important in countries where several last and first names are common and where people tend to leave their date of birth blank on data entry forms—or fill in different dates of birth each time they are asked. Think twice before creating your own training program ID numbers, as these are easily lost or forgotten and will thus lose their utility. Generating the unique numbers will also generate new clerical work for program staff, without necessarily being a good solution. 3. Will you ask for residential as well as work address from each participant? 4. How many lines are needed for the street address? 5. Is a postal code used in your country? 6. Do you want to ask for residential as well as work phone numbers? 7. Should you ask for e-mail addresses? 8. Which clinical skills are imparted in your courses? 9. Do you want to know if the clinical skills taught match the clinical services offered at each participant’s facility? 10. Which types (and subtypes) of healthcare facilities do your training participants work in? 11. What are the sponsors of healthcare facilities in your country? 12. What are the professional qualifications or cadres that your training program participants represent? 13. Do you want to track the year that participants graduated from their preservice institution? 90 TIMS User Manual 14. What are the professional roles or responsibilities that your training program participants occupy? 15. Are there additional training and qualification questions you would like to ask? There are three Yes/No fields and one numeric field available. 16. Do you have knowledge or skill assessment scores at any courses? You have three fields in which to save percentage or score data. 17. Do you want to use TIMS to track participant cost data? You have four currency fields for specific cost categories and a fifth currency field that is a calculated total. 18. Is there additional free text or coded data you would like to collect about each course participant? You have three free text fields and one coded custom field available. 19. Is there additional information on each person, regardless of whether participant, trainer, or assessor, which you want collected? You have four coded text fields available for this. Trainer Qualification Form 1. What levels of geography are used in your country? Starting with country, you have two additional coded fields for data entry and filters. Do you use provinces and districts? Regions and parishes? Districts and municipalities? 2. What unique identification numbers for individuals are used in your country, such as national personal identification numbers (PINs), healthcare provider IDs, or employer IDs? Think about the universality (will all participants and trainers have this ID?) as well as whether people recall it, and whether they will want to share it. If it is an ID used for tax or credit reporting purposes, people may be more reluctant to share this number. The purpose of IDs is to differentiate individuals in the database, which is especially important in countries where several last and first names are common and where people tend to leave their date of birth blank on data entry forms—or fill in different dates of birth each time they are asked. Think twice before creating your own training program ID numbers, as these are easily lost or forgotten and will thus lose their utility. Generating the unique numbers will also generate new clerical work for program staff, without necessarily being a good solution. 3. Will you ask for residential as well as work address from each trainer? 4. How many lines are needed for the street address? 5. Is a postal code used in your country? 6. Do you want to ask for residential as well as work phone numbers? 7. Should you ask for e-mail addresses? 8. Which types (and subtypes) of healthcare facilities do your trainers work in? 9. What are the sponsors of healthcare facilities in your country? TIMS User Manual 91 10. Does your training program differentiate between several ranks of trainers? What is each called? 11. Does someone assess or qualify a trainer to certify her/him at a given level or rank? 12. What types of skills can your trainers teach? 13. Do your trainers speak multiple languages, and is this important for the program to know? 14. Do you want to differentiate between Active and Inactive trainers, for example, to denote which are currently available and interested in serving as consultant trainers? 15. Is there additional information on each person, regardless of whether participant, trainer, or assessor, which you want collected? You have four coded text fields available for this. Followup/Assessment Form 1. What levels of geography are used in your country? Starting with country, you have two additional coded fields for data entry and filters. Do you use provinces and districts? Regions and parishes? Districts and municipalities? 2. What unique identification numbers for individuals are used in your country, such as national personal identification numbers (PINs), healthcare provider IDs, or employer IDs? Think about the universality (will all participants and trainers have this ID?) as well as whether people recall it, and whether they will want to share it. If it is an ID used for tax or credit reporting purposes, people may be more reluctant to share this number. The purpose of IDs is to differentiate individuals in the database, which is especially important in countries where several last and first names are common and where people tend to leave their date of birth blank on data entry forms—or fill in different dates of birth each time they are asked. Think twice before creating your own training program ID numbers, as these are easily lost or forgotten and will thus lose their utility. Generating the unique numbers will also generate new clerical work for program staff, without necessarily being a good solution. 3. Will you ask for residential as well as work address from each healthcare provider being assessed or who is assessing someone else’s skills? 4. How many lines are needed for the street address? 5. Is a postal code used in your country? 6. Do you want to ask for residential as well as work phone numbers? 7. Should you ask for e-mail addresses? 8. In which types (and subtypes) of healthcare facilities do your healthcare providers and assessors work? 9. What are the sponsors of healthcare facilities in your country? 92 TIMS User Manual 10. What type of followup visits do you offer to training participants (healthcare providers)? Six-month post-training visits? Quarterly supervision visits? Formal evaluations? 11. Which clinical services do you assess during these followup visits? 12. How do you code the results of each assessed service? Pass/fail? Competent/not competent? In several levels? Numerically by percentage of skills performed correctly? 13. Is there additional information on each person, regardless of whether participant, trainer, or assessor, which you want to collect? You have four coded text fields available for this. Layout The layout of the data on the forms should also match the TIMS screen layout as much as possible, for ease and consistency of data entry. When entering stacks of data from printed forms, it is best to have the same order as well as the same data labels or captions on the form and on the screen. Once you have designed some draft data collection forms, fill a few out and ask your data entry staff to try entering some sample data from them. Elicit their feedback on the design of the forms at this stage, to assure an optimal layout for future data entry. Sample forms are included in Appendix B of this User Manual and in electronic form in both MS Word and PDF format on the TIMS installation CD, to get you started with designing your training program’s forms. It will be easier to start with the sample forms and change and delete the content as needed to adapt them to your training program. TIMS User Manual 93 Chapter 6: Administration The Database Administration Menu Clicking the Administration button in the Main Menu opens the Database Administration Menu shown below. TIMS includes database administration features designed specifically for the data manager to customize TIMS for programmatic use. When assigned “Admin” privileges in TIMS, the data manager will have security rights to access certain administrative tools described in this section. Persons assigned “User” rights will not be able to access all of these utilities. There are six administration features: edit lookups, customize application, edit labels, edit reports, edit users, and edit custom lookups. When first logging in to TIMS, use the admin login ID, and you will have access to the Administration menu, which includes the Edit User module described below. In this module, you can add new users, create login names and assign one of two permission levels, admin or user. Table 6-1 lists the features and their accessibility to administrators and users. Reviewing these features and assigning the correct level of privilege to each person with a TIMS login ID is an important step in implementing TIMS successfully within a training program. 94 TIMS User Manual Table 6-1. TIMS Features, by Permission Level Action Administrator User Administration Menu Edit Lookups Customize Application Edit Labels Edit Reports Edit Users Edit Custom Lookups Delete Course Event Delete Person from a Course Delete Trainer from a Course Delete Person Delete Followup Delete Assessed Service from a Followup Edit Lookups Database administrators should edit the lookup tables in TIMS before any training program data are entered. The data collection forms that were designed following the guidelines in Chapter 5 will determine the values for the lookup tables. Filling in the lookup table values according to the values available for selection on data collection forms is essential for standardizing data to be entered. This prevents inconsistencies and duplications in values, which often occur when users type in each value as data entry proceeds. To start entering new lookup table values in Administration Edit Lookups: 1. Click the Edit Lookups button in the Database Administration Menu to open the Lookup Table Administration form. 2. Add, edit, and delete lookup table values for each of the fields. Field names are shown on tabs. Click on the appropriate tab and TIMS will open the respective screen. TIMS User Manual 95 96 TIMS User Manual Table 6-2. Where to Add/Modify Values in TIMS Lookup Lists Field Administration Edit Lookups Input/Edit/Browse Screens Geography Region Country Province District City Person Clinical Skill Facility Custom Person 1 Custom Person 2 Custom Person 3 Custom Person 4 Courses Training Center/Site Training Delivery Training Focus Training Topic Training Content Award Participants Qualification Current Responsibility Services Extra 4 Trainers Course Role Trainer Type Trainer Skill Followup Type Facility Name Training Site Followup Type Service Result TIMS User Manual 97 For some lookup tables, values can be entered only through the Administration Edit Lookups feature. For others, new values can also be entered in the respective Input/Edit/Browse screen. See Table 6-2 for a complete list of TIMS lookup tables and the screens where their values can be modified. If an "other" category is included in any lookup table list for potential new values to be added later, the data manager can change records with these “other” values at a later date when more specific categories are defined and added. Table 6-3. Data Filters for Browse Screens and Reporting Module Region Country Province District Training Delivery Training Focus Training Topic Course Date Award (Reports module only) The lookup tables and examples of the information collected within them in TIMS as implemented at JHPIEGO are shown below. Lookup tables can also function as filters that can be used to narrow or broaden the scope of data viewed on an Input/Edit/Browse screen or included in a report. Table 6-3 shows the fields that are located in the Input Data, as well as Reports modules of the TIMS application, as data filters. Geography Regions Countries Provinces Districts Cities Training Training Delivery Training Focus Training Topic Training Content 98 TIMS User Manual Trainers Trainer Types Course Roles Languages Course Participants Clinical Services Qualifications Responsibilities Training Centers Awards Facility Services Facility Types Facility Sub-types Sponsors Assessments Followup Assessment Type Assessment Results Reports Default Values Time Months Units of Time Geography The following five tabs—Regions, Countries, Provinces, Districts, and Cities—are important because they allow searching and entering information on participants in a specified geographic region. This feature will be useful with the expansion of training programs, for example, to track the geographic distribution of trained clinicians over time. TIMS User Manual 99 Regions Regions is the first lookup table used in the geographic filter found in TIMS. After completing the regions list, proceed with countries, provinces, then districts and cities (optional). 100 TIMS User Manual Countries The Countries lookup table tab lists all countries needed to enter training program courses, participants, and trainers. For example, if courses are offered in Kenya, but include trainers from Malawi and participants from Uganda, the TIMS country list should include Kenya, Malawi, and Uganda. A telephone country code for the country may be entered. This will be used as an automatic prefix to all phone number fields in the database, once this country is chosen for a record during data entry. TIMS User Manual 101 Provinces On the screen shown above, each province should be connected to a region you’re your Regions table and a country from your Countries table. This allows a cascading filter, whereby only those provinces associated with a country will be available for selection in data entry screens and report criteria. Including an “unknown” province for each country will allow for the possibility of incomplete data on forms, or future redistricting. For example, if a Participant Registration form notes that a nurse’s residential address is in Kenya, but the province was left blank, the data entry staff could choose “unknown” for Province rather than just leaving it blank in the database. Seeing the number of Unknowns explicitly on reports will assist data managers in addressing data completeness issues. Data may be sorted by Province, Country or Region for easier completion of this administration table. 102 TIMS User Manual Districts As shown above, each district is connected to a province (from the Provinces table), a country (from the Countries table), and a region (from the Regions table). An “unknown” district may be included for each country and province. Data may be sorted by District, Province, Country or Region for easier completion of this table. TIMS User Manual 103 Cities This tab contains a list of all cities needed on pull-down lists to enter the location of course venues, as well as trainer and participant addresses. As shown above, each city should be connected to a district from the Districts table, a province from the Provinces table, a country from the Countries table, and a region from the Regions table. An “unknown” city may be included for each country, province, and district set. Data may be sorted by City, District, Province, Country or Region for easier completion of this table. Geographic Filter Choosing All Regions will display all information entered in TIMS. The country, province and district fields are automatically set to the default values and may not be changed. If you use the drop-down list to select a specific region (e.g., Central Africa), and use the default values for country (All Countries), province (All Provinces) and district (All Districts), all of the information entered for Central Africa will be displayed. 104 TIMS User Manual TIMS will automatically default to a specific country, if one is assigned by the data manager using the Customize Application Country Filter (see page 112 for instructions on this setting). Choosing All Countries will display the information entered for every country listed in TIMS. The province and district fields are automatically set to the default values and may not be changed. If you use the drop-down list to select a specific country (e.g., Kenya), and use the default values for province (All Provinces) and district (All Districts), all of the information entered for Kenya will be displayed. To further narrow your search, you may also choose a specific province and/or district within that country. Please see the example below. Note: The geographic filter in TIMS requires information for the Regions, Countries, Provinces, and Districts lookup tables. If the user fails to enter all of the fields for data records, the filter will not function properly. City data are optional and do not have to be entered unless they are useful for monitoring. Training Three independent categorical fields can be used to describe training events: Training Delivery, Training Focus, and Training Topic. A fourth category, Training Content, is related to and dependent upon Training Topic. The Training Delivery list should be filled in first, followed by Training Focus, then Training Topic and Training Content (optional). TIMS User Manual 105 Training Delivery Training Delivery at JHPIEGO designates the way a course is delivered as well as the purpose of the event. A course is a competency-based training event, at the end of which competency in a specific skill or set of skills is assessed. A workshop is a training event where a specific product or set of materials is produced. Many training programs have started to use computer-assisted learning alone or in conjunction with another type of Training Delivery. Training Focus Training Focus describes the training event’s theme in broad terms. JHPIEGO has developed standardized training materials for courses in various areas, such as clinical skills, training skills, and supervision skills, as well as counseling and communications skills. Other organizations may teach a variety of management, health planning, or health information systems courses. This is a broad area within which more specific courses may be meaningfully grouped. Training Topic Within a given focus, Training Topic describes the principal knowledge or skill covered in a course. JHPIEGO clinical skills course topics include Infection Prevention as well as Family Planning. Training skills courses include Clinical Training Skills, Advanced Training Skills, and Instructional Design Skills. 106 TIMS User Manual Training Content Training Content values must each be connected to a Training Topic in the Edit Lookups section of TIMS. As shown to the right, at JHPIEGO, Adolescent Health is a content area covered in both Family Planning and Counseling/ Communication courses. The training filter in TIMS requires information through the Training Topic level. Training Content data do not need to be entered unless they are useful for your program. Training Filter Specific courses may be selected for viewing, editing, or reporting by using the Training Delivery, Training Focus, and Training Topic filters. Training Content is not part of this filter set. Since there is no relationship between them, the Training Delivery, Training Focus, and Training Topic fields may be used independently or in combination for the selection of specific records. If all are set to specific values, TIMS will search for those records meeting all of the criteria set in the filters. Trainers Trainer Types TIMS User Manual 107 The Trainer Types tab provides a list of the types of trainers that teach within a training program. As seen above, a Rank column is available to order these types by increasing proficiency or another meaningful level. This example ranks the JHPIEGO trainer levels from 0 (the lowest) to 8 (the highest). This setting determines the order in which the trainer types appear on the Trainer reports, with categories always appearing on reports from highest to lowest number or rank. Explanations of Trainer Types can be added in the Description field. Course Roles Course roles describe the responsibilities of trainers during a training event. This example shows potential roles for a trainer during JHPIEGO courses, which include demonstrating a clinical procedure, giving a guest lecture, or taking the lead responsibility for the course. Explanations of each course role may be typed in the Description column. The ellipsis button to the right of the Description box opens a larger screen where the description can be entered and edited. 108 TIMS User Manual Course Participants Qualifications Qualification refers to the professional educational background or certification achieved by individual participants in training events. This is an important field for several standard TIMS reports, as it allows training programs to track the professions of people they have trained. This Edit Lookups screen lists some of the clinical and related health sector qualifications of JHPIEGO training event participants. Descriptions can be added for each qualification (optional). Responsibilities The Responsibilities tab provides space to list the job responsibilities or specific job titles of training event participants. This list shows various job titles or professional categories of health sector workers. This field is in contrast to the educational background or credential shown above under Qualifications. TIMS User Manual 109 Training Centers The Training Centers tab is a list of training centers or venues where events are held within the training program. This example shows some of the centers at which JHPIEGO has conducted training. Facility Services Services are healthcare provision activities in which a trainer may be qualified to train, and that clinicians working in healthcare facilities can provide. Type descriptions of any services in the far right column. This example illustrates some services taught by JHPIEGO clinical trainers and provided at facilities in which JHPIEGOtrained clinicians work. Facility Types Training participants generally work at a facility where they will use the skills acquired through training attended and tracked in TIMS. This facility may be a hospital, health center, dispensary, or an administrative office. The sample list to the right shows some of the facility types where JHPIEGO training participants work. 110 TIMS User Manual Sponsors Sponsors can be a general or specific list of health facility owners. This example shows some facility sponsors for facilities of JHPIEGO participants. Assessments Followup Assessment Type Some training programs follow participants several months or a year after coursework is completed to assess knowledge and skill retention, or “transfer of learning” to the workplace. These followup visits may have various names or types. The sample lookup table lists four possible types of visits. Assessment Results The result of followup visits to a training participant can be recorded in the Assessments section of TIMS. This lookup table lists possible results of a visit. For clinical skills assessment purposes, JHPIEGO uses “competent” and “not competent” as possible outcomes. Report Default Values The Default Values tab allows specification of the default values of footers and headers for all printed reports, by typing in the respective Default Values box. In this example, report footers will state that data reports are from TIMS and report headers will lead with “Health Professionals Trained” before the specific report title. TIMS User Manual 111 Time Months This form lists the months of the year. This example shows the 12 months of the Gregorian calendar in English. Other calendars may be used. There is no limit to the number of months specified. Customize Application The Customize Application section allows the data manager to enable (check) or disable (uncheck) several specific pages and functions in TIMS. Disabled pages or functions will not be visible to TIMS users unless or until the database administrator re-enables them through this screen. Below are brief descriptions of each Custom Application option. Date Checker Function When enabled, this feature will verify for all dates entered that the day, month, and year fields are valid within the Gregorian calendar. This feature cannot be used with other calendar systems. The European date display format, Day-Month-Year, is used in TIMS for data entry, screen display, and reports. 112 TIMS User Manual Person Custom Page This function enables/disables the Custom tab on the person’s screen. The Custom tab contains five custom fields (four pull-down lists and one date) about an individual person in the database. If enabled, these custom fields can be entered and browsed for each person. The following three options allow customization of Registration Form input data screens. TIMS User Manual 113 Registration Custom Page This shows/hides the Custom Fields tab on the course registration screen. This tab houses additional information about course participants in the Extra 1–4 fields. 114 TIMS User Manual Scores/Financial Page This page shows/hides the Scores/Financial tab on the course registration screen. The Scores section provides fields to list up to three training scores for pre-training, midtraining, and post-training assessments. The Financial section contains fields on costs to the participant for participating in the course, including: subsistence/ per diem, time off, tuition, other, and total costs. TIMS User Manual 115 Facility Services Page This page shows/hides the Facility Services tab on the course registration screen. This tab shows the clinical services that the participant provides at her/his facility. 116 TIMS User Manual Assessments This shows/hides the Assessments button on the Data Entry Menu, which opens Input/Edit/Browse screens for Followup Records. Country Filter Using the country filter, users may select a specific country or "All Countries." This setting determines the default setting for the country pull-down list that appears when displaying courses, participants, trainers, and assessments in Input/Edit/Browse and Reports screens. For example, if South Africa is selected, every time a screen in TIMS is opened, the default filter will show South Africa data, which would be appropriate for an installation of TIMS in Johannesburg. Only one specific country can be chosen at a time for this setting. In addition to setting the default display country, once a country is selected, TIMS will update all of the data currently in the system and will auto-fill all newly entered data with the country code for this country, which is housed in the AppCountryID field of each table. This is so that data exported from various TIMS databases are clearly marked with the source data country where they were entered. Once set, the country drop-down list will be disabled on the Customize Application screen to prevent subsequent changes to the country. If the default country setting needs to be changed after this update, the database administrator must: 1. Open the zstblControlApp table using MS Access 2000. TIMS User Manual 117 2. Change the value of the field “CountrySet” from “–1” to “0”. 3. Return to the Administration, Customize Application screen, where the country dropdown list on the Country Filter section will be enabled again. 4. Select a different country or “All Countries” can be selected as the new default. Edit Labels Clicking the Edit Labels button in the Database Administration Menu opens the Customize Form/Report Labels form. This is one of the most powerful administrative features of the TIMS application. Labels in the forms and reports listed in the MS Access 2000 tables ztblForms and ztblReports can be customized using this utility. Click the ellipsis (…) buttons to zoom in on a long label name. Selecting one of the data entry forms from the Choose a Form/Report: pull-down list will populate the sub form with a listing of customizable label controls on the form. The example above shows how text box label in the Browse Participants Form for the Courses field has been customized to “Courses Taken” in the custom label field. The database administrator can customize most labels on TIMS main data entry forms. An important warning at the bottom of the screen pertains to hot key denotation when changing tab text labels. It is recommended that the administrator keep the “required” text in fields that are needed for data entry. 118 TIMS User Manual Edit Reports Clicking the Edit Reports button in the Database Administration Menu opens the Customize Report Header/Footer form, which allows customization of headers and footers for each individual report in the TIMS application. Selecting one of the report titles from the Choose a Report: pull-down list will display the default report header and footer, which were set using the Edit Lookups, Default Values tab explained above. The default value for each is shown, and a field is provided for customization. Headers and footers may be customized for all reports listed in the ztblReports table. Customize Report Header/Footer Edit Users Clicking the Edit Users button in the Database Administration Menu will open the Database User Administration form below. A login ID is required for access to TIMS. Database managers may use this section to add a new user or delete an existing user from the database. The data manager must maintain a list of authorized users and administrators for the TIMS database to assure that the database can always be accessed using a known login ID. Database User Administration Select whether the person has “User” or “Admin” permissions. TIMS User Manual 119 To add a new user: 1. Click the Add User button. 2. Type in the user’s first and last names, tabbing between fields. 3. Tab to the Login ID field. This will be automatically created by concatenating the first letter of the first name and the entire last name. TIMS will prompt the data manager to manually modify a user’s Login ID if a duplicate login ID already exists. 4. Specify whether the user will have standard “User” access or “Admin” access. Administration privileges should be limited to the data manager and a few crosstrained personnel. Once a new user has been added to TIMS, the data manager must give the user her/his Login ID so that the user can log in to TIMS. Two temporary login IDs, “admin” and "user", have been assigned for initial use of the system. It is important for users to learn and use their new IDs, and to keep them private. Not only does the login control access to the database, but it also captures the user who created or last modified a particular record. When a specific user no longer needs to have access to TIMS, the data manager may delete the user and associated login ID: 1. Click the user's last or first name. 2. Click the Delete User button. 3. Click OK. Audit History One of the administrative features of TIMS is access to the Audit History tab on all data entry forms. The Audit History tab contains the following information about a database record: date created, created by, date modified, and modified by. An example of the Audit History tab can be seen in the Participant Registration Form. 120 TIMS User Manual Audit History Table Edit Custom Lookups Click the Edit Custom Lookups button to modify contents of the Custom Lookup Table Administration form pull-down lists that appear in the application on the Course Registration Form and the Person’s Data Entry form. Edit Custom Lookup for Courses The Custom tab below is to enter additional course participant data that do not appear in other fields. The additional course registration data will appear in a drop-down list on the Participant Registration Form under Extra 4. The example below illustrates how satisfied the participant was with the course, using a Likert scale: Very satisfied, Satisfied, Undecided, Dissatisfied, Very dissatisfied. TIMS User Manual 121 Custom Lookup Table Administration Person Custom Page 122 TIMS User Manual On the Participant Registration Form’s Custom Fields tab are three Extra fields. Since Extra 1, Extra 2 and Extra 3 are not lookup fields, the end user must enter free text here rather than choosing a value from a list. Edit Custom Lookup for Participants On the Custom Lookup Table Administration form are four custom fields: Custom Person 1, Custom Person 2, Custom Person 3 and Custom Person 4. This additional information on the people in TIMS will appear in drop-down lists on the Person’s data entry form Custom tab. The example below shows that if a training program kept a record of the academic degrees a person earned, one of these fields could store such information. Custom Person 1-4 TIMS User Manual 123 Person Custom Page 1-4 124 TIMS User Manual Appendix A: List of TIMS Reports Thirty-two MS Access reports, 14 MS Excel reports, and 12 DBF format reports are available from the TIMS Reports Menu and five additional reports are available from TIMS Browse screens, for a total of 64 standard reports. Reports are listed in the ztblReports table in MS Access. Available from Reports Menu Course Reports 1. Master List of Courses 2. Training Center Activity Report Coverage Reports 1. Coverage Report – Region 2. Coverage Report – Country 3. Coverage Report – Province 4. Coverage Report – District 5. Facility Coverage Report Participant Reports 1. Participant Count by Facility Sponsor and Year 2. Participant Count by Facility Type and Year 3. Participant Count by Funding Source and Year 4. Participant Count by Qualification and Country 5. Participant Count by Qualification and District 6. Participant Count by Qualification and Province 7. Participant Count by Qualification and Year 8. Participant Count by Training Focus, Province, District 9. Participant Count by Training Focus, Topic, Content, Province, District 10. Participant Count by Training Focus, Topic, Course Name 11. Participant Count by Training Focus, Topic, Province, District 12. Participants by Facility/Workplace and Course Name 13. Participants by Facility/Workplace and Training Topic 14. Person Profile Report TIMS User Manual 125 Trainer Reports 1. Trainer Count by Trainer Type 2. Trainer Skills Review by Country Export to DBF Reports 1. Course Summary by Country 2. Course Summary by Province 3. Course Summary by District 4. Course Summary by Center 5. Participant Summary by Country 6. Participant Summary by Province 7. Participant Summary by District 8. Participant Summary by Facility 9. Trainer Summary by Country 10. Trainer Summary by Province 11. Trainer Summary by District 12. Trainer Summary by Facility Available from Browse Screens 1. General Roster for Course 2. Detailed Roster for Course 3. Individual Training Profile 4. Listing of All Followup/Assessment Records 5. Assessment Record for an Individual Instructions found in Table A-1 show where users may access the above five reports from specific Input/Edit/Browse screens. 126 TIMS User Manual Table A-1. Accessing Input/Edit/Browse Screen Reports Report Section and Screens for Generating Report General Roster for a Course Detailed Roster for a Course Input Data – Courses – Search and Select a Course Individual Training Profile Input Data – Participants – Search for and Select a Person or Input Data – Trainers – Search for and Select a Trainer Listing of All Followup Assessment Records Input Data – Followup Assessments Followup Assessment Record for an Individual Input Data – Followup Assessments – Select a Person TIMS User Manual 127 Appendix B: Data Collection Forms In order to input data into the Training Information Monitoring System (TIMS) to browse the screens and produce the reports in this manual, data elements that match the data entry screens must be used. In this section, sample data collection forms are provided for adaptation during TIMS implementation. Electronic samples of these forms are also available upon request on the TIMS installation CD or by writing to [email protected]. Course Form Participant Registration Form Trainer Qualification Form Followup/Assessment Form 128 TIMS User Manual SAMPLE TIMS COURSE/WORKSHOP GENERAL INFORMATION Training Center/Site: Course Name: Training Delivery: Group-based Course Group-based Course with computer-assisted learning Group-based Workshop Group-based Workshop with computer-assisted learning On-the-job Training Other (specify) Course Start Date: day/month/year Course End Date: day/month/year Course Length: days weeks months (circle one) Course Description: _______________________________ Country: Province: District: Training Focus/Topic/Content Check only one Training Focus (a-e) & one Training Topic within that focus. a. Check all relevant training content within the Training Topic. Clinical Skills Adolescent Reproductive Health Counseling Decision making/negotiations Family Planning/contraceptive technology Gender/sexuality Interpersonal relations/communications Other (specify): _____________________ Cervical Cancer Counseling/Service Provision VIA Family Planning (Multi-method) Adolescents Counseling HIV/AIDS Infection Prevention IUD Cryotherapy LAM Minilaparotomy NFP/Fertility Awareness No Scalpel Vasectomy Norplant Reversible, non-clinical methods (pills, condoms, injectables) STIs/GTIs Other (specify): ________________ ________________ Infection Prevention IUD Maternal & Newborn Health Antenatal Care Complications (nonsurgical) Antenatal Care Normal Decision Making HIV/AIDS (MTCT) Infection Prevention Interpersonal Communications Intrapartum Care, Complications (nonsurgical) Intrapartum Care, Normal Life Saving Skills Malaria Managing Surgical Complications Newborn Care, Normal Newborn Care, Sick Nutrition Postpartum Care, Complications (nonsurgical) Postpartum Care, Normal Other (specify): _____________ _____________ _____________ _____________ Minilaparotomy No Scalpel Vasectomy Norplant b. Postabortion Care Counseling/Service Provision MVA STIs/GTIs/HIV/AIDS HIV/AIDS STIs/GTIs Syndromic Management of STIs Counseling/Communication Skills Counseling/Communication Adolescents Behavior Change Communications Contraceptive Technology Update (CTU) Counseling Interpersonal Communications HIV Voluntary Counseling & Testing (VCT) TIMS User Manual 129 SAMPLE TIMS COURSE/WORKSHOP GENERAL INFORMATION Training Focus/Topic/Content (cont’d) Training Focus and Topic Training Content Check only one training focus (a-e) and one training topic within that focus. c. Check all relevant training content within that topic. Supervision Skills Supervision d. e. Training Skills Advanced Training Skills Group Facilitation/Problem Solving/Decisionmaking Preparing New Trainers Clinical Training Skills Cervical Cancer RH/FP Instructional Design Course Design MNH Materials Development Needs Assessments/Training Evaluation Other Topics Curriculum development/revision Materials development/ updating/adaptation Presentation Skills Service delivery guidelines development Other (identify topic):_____________ Trainers Last Name, First Name, Middle Name Total Number of Participants: Training Sponsor/Award Funding: Country National ID Primary Role Secondary Role Days (Collect detailed information on Participant Registration forms) Check all that apply. TRH (USAID) DFID MNH (USAID) HRSA CECAP (USAID) SFPS/FHA (USAID) USAID Bilateral (specify country): Other (specify): Please return completed Course/Workshop General Information and all Participant Registration forms promptly to: JHPIEGO Corporation Research & Evaluation Office 1615 Thames Street Suite 200 Baltimore, MD 21231 Tel. 410-537-1800 [email protected] 130 TIMS User Manual SAMPLE TIMS TRAINING PARTICIPANT REGISTRATION FORM To be completed by Participant: First Name: Middle Name: Last Name: Date of Birth: National ID Number: Payroll ID Number: Other ID: / Gender Male Female / Day / Month / Year Current Home Address Line 1 Line 2 Country: Province: District: City: Postal Code: Home phone: Work phone: E-mail Address: What type of health professional are you? Check only one current qualification. Nurse Student Auxiliary Enrolled/Registered/Degree Other Midwife Student Enrolled/Registered/Degree Other Nurse/Midwife Student Enrolled/Registered/Degree Other Paramedical Student Clinical Officer Lab Technician Other Physician Intern/Resident General OB/GYN Other Other Health Services Administrator Other, specify: What is your primary job/responsibility? Check only one current responsibility. Health Care Provider Trainer Teacher/Faculty Administrator/Manager Student Clinical Provider Counselor/social worker Other Clinical Trainer Other Nursing Faculty Midwifery Faculty Medical Faculty Clinical Preceptor/Instructor Other Supervisor Administrator Other Where do you primarily work? Facility Name: Line 1 Line 2 Country: Province: District: City: Postal Code: Facility Type: Hospital Health Center/Clinic/Dispensary Medical/Nursing/Midwifery/Other School Center Other Facility Phone: Sponsor: Government Training Fax: NGO/Not-for-Profit Private/Commercial/For Profit TIMS User Manual 131 SAMPLE TIMS TRAINING PARTICIPANT REGISTRATION FORM Year Achieved: ________ Do you currently provide clinical services? No Are you currently providing family planning services? If yes, what clinical services do you provide? Yes Yes No Have you ever attended any other family planning training courses? Yes No Are you employed by the Ministry of Health? Yes No If yes, year you began working for the Ministry of Health: ________ The following information to be completed by Trainer and training program staff: Assessment Scores: Course Participation Costs: Pre-Training Assessment Score: __________ Subsistence/Per Diem: $__________ Mid-Training Assessment Score: __________ Time Off: $__________ Post-Training Assessment Score: __________ Tuition: $__________ Other: $__________ Total: $__________ Choose one, A, B, or C, according to training activity type. Workshop Participant: Completed activity Check only one. Training Skills Course Clinical Skills Course Participant successfully completed this course and is now a candidate: Clinical trainer Advanced trainer Master trainer Classroom faculty Clinical preceptor Participant: is competent is not competent to provide the following clinical service(s) assessed at this training event: __________________________________________________ __________________________________________________ __________________________________________________ __________________________________________________ __________________________________________________ __________________________________________________ Comments regarding this participant: Trainer Name: 132 Trainer Signature: TIMS User Manual SAMPLE TIMS TRAINER QUALIFICATION FORM Please fill out this form when a candidate trainer successfully achieves qualification as a trainer. Trainer Information First Name: ____________________________________ National ID Number: __________________ Middle Name: ____________________________________ Payroll ID Number: __________________ Last Name: ____________________________________ Other ID: ____________________________ Date of Birth: _______/_______/_______ Day / Month / Year Where do you primarily work? Facility Name: Line 1 Line 2 Country: Province: District: City: Postal Code: Gender Male Female Facility Type: Hospital Health Center/Clinic/Dispensary Medical/Nursing/Midwifery/Other School Training Center Other Facility Phone: Fax: Sponsor: Government NGO/Not-for-Profit Private/Commercial/For Profit Is This Person a Trainer? ❑ Trainer Type: Languages (list languages the candidate speaks fluently): ❑Qualified Clinical Trainer ❑Qualified Classroom Faculty ❑Qualified Clinical Preceptor ❑Qualified Advanced Trainer ❑Qualified Master Trainer Trainer Type Acquired On: _______/_______/_______ Day / Month / Year Assessed/Qualified By: ______________________________________________________________________________ Current Trainer Skills Date of Standardization _____/_____/_____ Comments _____/_____/_____ _____/_____/_____ _____/_____/_____ _____/_____/_____ _____/_____/_____ _____/_____/_____ _____/_____/_____ _____/_____/_____ TIMS User Manual 133 SAMPLE TIMS FOLLOWUP/ASSESSMENT FORM National ID Number: Payroll ID Number: Other ID: To be completed by Participant: First Name: Middle Name: Last Name: Date of Birth: / / Day / Month / Year Current Home Address Line 1 Line 2 Country: Province: District: City: Postal Code: Home phone: Work phone: E-mail Address: Where do you primarily work? Facility Name: Line 1 Line 2 Country: Province: District: City: Postal Code: Facility Type: Hospital Health Center/Clinic/Dispensary Medical/Nursing/Midwifery/Other School Other Facility Phone: Sponsor: Government Training Center Fax: NGO/Not-for-Profit Private/Commercial/For Profit The following information to be completed by Assessor: Followup Date: / / Day / Month / Year Training Site: (Site where this person was trained for the skill(s) assessed on this visit.) Followup Type: Assessor’s Information: First Name: Middle Name: Last Name: Date of Birth: / / Day / Month / Year Where do you primarily work? Facility Name: Line 1 Line 2 Country: Province: District: City: Postal Code: Complete according to training activity type. Gender National ID Number: Payroll ID Number: Other ID: Male Female Facility Type: Hospital Health Center/Clinic/Dispensary Medical/Nursing/Midwifery/Other School Training Center Other Fax: Facility Phone: Sponsor: Government NGO/Not-for-Profit Private/Commercial/For Profit Check only one result. Service/Skill Result Competent Not Competent Competent Not Competent Competent Not Competent Competent Not Competent Competent Not Competent Competent Not Competent Assessor Signature: 134 TIMS User Manual