1
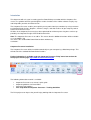
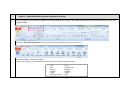
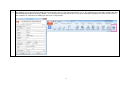
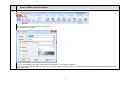
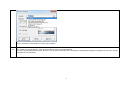
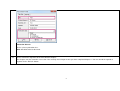
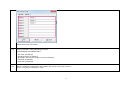
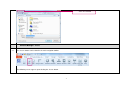
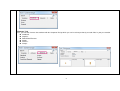
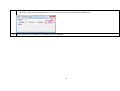
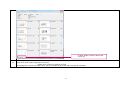
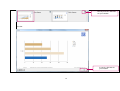
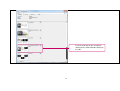
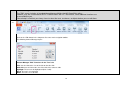
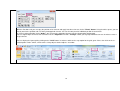
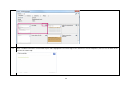
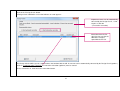
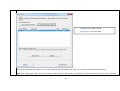
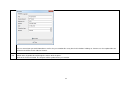
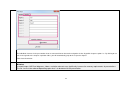
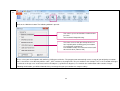
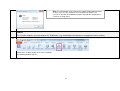
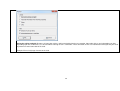
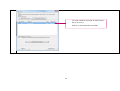
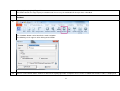
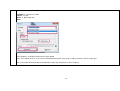
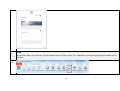
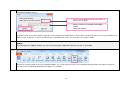
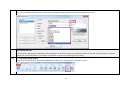
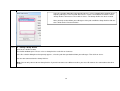
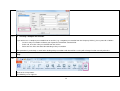
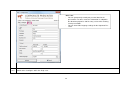
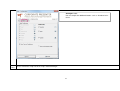
First Steps With the Corporate Presenter
Training Guideline
ZF Friedrichshafen AG
15.08.2013
Table of Contents
Contents
Introduction ....................................................................................................................... 2
General – PowerPoint Master System (Corporate Presenter)................................................. 1
Create and Edit a new Presentation .................................................................................... 3
Content Manager - Insert.................................................................................................... 7
Content Manager - Edit .................................................................................................... 16
Design Check .................................................................................................................. 19
Refresh ........................................................................................................................... 23
Minimize ......................................................................................................................... 25
Publish ............................................................................................................................ 27
Handout .......................................................................................................................... 31
HTML .............................................................................................................................. 33
Update ............................................................................................................................ 34
The Personal Archive........................................................................................................ 35
The Group Archive ........................................................................................................... 37
Help ................................................................................................................................ 39
Introduction
This document will assist you in creating your first PowerPoint presentation with the Corporate Presenter. The guideline will take you through the various functions of the add-on software step by step
and will provide you with an initial overview.
The Corporate Presenter enables you to quickly create professional presentations by using numerous
pre-formatted slide designs, diagrams, elements, images, and slide archives of your company and to
archive them for future reuse.
All slides in the Corporate Presenter have been optimized for minimum processing times and are approved by the Corporate Design of ZF Friedrichshafen AG.
Note: The Corporate Presenter is an add-in. This means that the additional functions will be available
as a new toolbar. You
can still use the standard MS PowerPoint functions without any
restrictions.
Corporate Presenter Installation
The Corporate Presenter will be installed automatically on your computer by a Matrix42 package. This
will not affect the standard MS PowerPoint functions.
Further information is available under the Corporate Presenter "Help" menu item and on the
POS project Intranet page http://www.zf-world.com/POS_EN/
The following information material is available:
•
•
•
•
Corporate Presenter user manual / quick guide
Corporate guidelines for PowerPoint
Interactive help modules
First steps with the Corporate Presenter – Training Guideline
The POS project team hopes that you will enjoy working with the Corporate Presenter.
General – PowerPoint Master System (Corporate Presenter)
1.1
Once the Corporate Presenter add-in software has been installed on your computer, the additional "ZF Friedrichshafen AG" tab will appear in the main
navigation toolbar.
Click on the "ZF Friedrichshafen AG" tab. You will proceed to the Corporate Presenter menu area.
The following buttons should be available.
If buttons are missing, you can additionally display them via the Help
- New
- Edit
- Refresh
- Publish
- HTML
- Work with Archive
Settings function.
- Insert
- Design-Check
- Minimize
- Handout
- Update
- Help
1
1.2
The following screen appears when logging on for the first time. Please enter your data into this screen. The Corporate Presenter will remember this data
and automatically complete title pages, footers, etc. If you did not enter your data on this screen when starting the Corporate Presenter for the first time,
you can do this at a later date or modify your data via the "Help" button.
2
Create and Edit a new Presentation
2.1
Please click on the "New" button in the menu bar.
The following screen opens:
You can select different title slides for the divisions and business units under "Template".
You can determine whether you wish to integrate a table of contents (agenda) and a text slide into your presentation by clicking on the "Agenda" and
"Text Slide" boxes.
3
Please click on the "OK" button to create the presentation.
2.2
The shown screen now appears. You can now manually enter the presentation title.
The Title, Division/Corporate Function, Business Unit, Speaker, Date fields have already been automatically completed (requirement: you have already
entered and saved the data).
4
Protection Classes:
Please select a protection class.
Note: GD 97/05 must be observed.
2.3
Please click on the "Agenda" tab to enter different chapters.
The chapters must be entered in succession. You can only enter Chapter 2 once you have completed Chapter 1. You can amend the agenda at
anytime via the "Refresh" button.
5
Please click on the "OK" button.
2.4
The presentation is now automatically created.
It should include the following slides:
- Title slide (mandatory)
- Agenda overview (if checked)
- An agenda slide for each chapter entered (if checked)
- Text slide (if checked)
- Final slide (mandatory)
2.5
After the automatic creation of the presentation, the system asks you to "Save as".
Please save your presentation as usual.
6
Save Presentation
Content Manager - Insert
3.1
The "Insert" button can be found in the main navigation toolbar.
The following screen appears upon clicking the "Insert" button.
7
"Templates" Tab
This tab contains slides that can be inserted directly into the presentation.
Standard: You can find the general ZF slide master templates. You can enter them directly into your presentation as a slide by clicking on the
arrow.
Visuals: Previously-created slides for various topics are available under Visuals.
Diagrams: You can choose between various diagrams and integrate them into your presentation as a slide.
Specials: More unusual slide layouts
Organizational charts: Templates that assist you in creating organizational charts.
Tables: Several tables can be inserted into the presentation.
"Archives" Tab
The Corporate Presenter differentiates between divisional archives (for the divisions), group archives (share function within a particular group), and
your personal archive. You can access your slides at any time via this tab. Please note that a maximum of 100 slides/user can be saved in the Personal Archive.
8
"Elements" Tab
Here, you can find elements that conform with the Corporate Design which you can insert into previously-created slides in your presentation.
Standards
Graphics
PowerPoint-Elements
Arrows
Surfaces
Stamps
9
"Media" Tab
Images: ZF system visualizations that can be directly inserted into the presentation are available here.
3.2
Please click on Insert
Diagrams. The following screen is displayed.
10
A single, double, or triple column view
can be set.
3.3
Click on the slide image: Single click
Preview
Double click
Direct insertion of the slide
By clicking on the arrow in the right corner, you can also directly insert the slides into your presentation.
11
Directly insert the slide into
the presentation.
Preview:
Insert the slide into the
presentation.
12
3.4
Please take the following path: Templates
els.
Organizational Charts
"Organizational Chart 3 Columns" and select an organizational chart with 3 lev-
Insert the organizational chart with 3 levels into the presentation.
3.5
Go to the Tab
Templates
Standard. Insert an image slide with 3 blocks.
13
Insert the slide into the presentation by
clicking on the arrow or double-clicking on
the slide.
14
In the Content Manager, please go to "Edit", then to the "Elements" tab, and enter a shape (e.g. triangle).
Insert the slide into the presentation by
clicking on the arrow or double-clicking on
the element.
15
Content Manager - Edit
The "Edit" screen includes all standard formatting possibilities that MS PowerPoint offers.
However, they are customized to the ZF Friedrichshafen AG CD. Furthermore, some additional functions are
also available to you.
Please keep in mind that you always have to select the texts, text boxes, or objects before you can edit them.
4.1
Click on the "Edit" button in the Corporate Presenter main navigation toolbar.
The following Content Manager opens.
Content Manager "Edit" Functions in the "Text" tab:
Title: Sets the font to the size of the title on the title slide
Slide title: Sets the font to the size of the title of the contents slide
Highlight: The text can be highlighted (blue + bold)
Black: The text is reset to black
White: The text is reset to white
16
Levels: You can move the texts to various levels. The bullets are automatically generated from Level 2.
Element
1st level
2nd level
3rd level
4th level
5th level
Format
Arial 14 pt, black, no bulleted list
Arial 14 pt, black, bulleted list, square
Arial 14 pt, black, bulleted list, dash
Arial 14 pt, black, bulleted list, dash
Arial 14 pt, black, bulleted list, dash
Content Manager "Edit" Function in the "Color" tab:
Please highlight the triangle in your "Three Blocks" slide within your presentation and switch to the "Color" tab within the "Edit" window.
You can now select another color for the triangle or draw a frame around it by selecting the "Line" checkbox.
Content Manager "Edit" Function in the "Position" tab:
17
With the "Position" tab, you can copy the position of an element and apply it to other elements via the "Photo" button. Using the white square, you can
exactly transfer the position and size of the photographed element. You can also only transfer individual position characteristics
or just the height and width. Under "Order", you can move the individual elements into the foreground or background.
You can align multiple elements with each other via the "Alignment" function. "Arrange" allows you to group individual elements in order to create a
single element.
You can display the layout grid by clicking on the "Grid" button. In order to switch on the snap option for the grid, go to "View", then click on the extended options under "Show", and check the "Snap objects to other objects" checkbox.
18
Design Check
5.1
The "Design Check" button can be found in the main navigation toolbar. The Design Check is a check wizard and, like the spell check in Word, works
by means of active clicking.
5.2
Before using the "Design Check" button, please insert a new text slide via Insert
19
Templates
Standard.
5.3
Enter a random text into the content field of your slide. Highlight the text and change it to a color that is not CD-compliant. (You can use all colors in the
PPT via the "Start" tab).
20
Click on the "Design Check" button.
A Design Check notification screen that indicates an error appears.
Important: 0 errors can be automatically
corrected by the Design Check, 1 error
requires a decision
(= interactive correction)
Information from the Design Check to say that the
color does not correspond with the ZF CD.
The Design Check notifies you of a color that does not conform with the CD. As no error can be automatically corrected by the Design Check (option 1)
and it is essential to make a decision, the interactive correction (option 2) must be started.
Please click on the "2. Start interactive correction" button.
21
You now need to decide whether you want to have the text as standard text or whether you wish to highlight it.
Standard = Text, black, normal
Highlighted = Text, blue, bold
Click on the "Standard text" button. The text is now automatically corrected on your slide. (The text on the slide should now be black).
Note: After completing the CD check, you will always return to the first slide of your presentation as the CD check always checks the entire presenta-
22
tion.
Refresh
The Refresh function assists you in quickly and simply amending the basic data of your presentation. Furthermore, it serves to always
keep your presentation up-to-date.
Ihre Präsentation immer auf dem aktuellsten Stand zu halten.
6.1
Please click on the "Refresh" button in the main navigation toolbar.
The following window appears:
23
You can amend your personal information as well as the presentation title at any time in this window. In doing so, elements are also updated that are
located in the footer of each slide for instance.
6.2
Switch to the "Agenda" tab and change the names of the chapters.
Click on the "Refresh" button. The chapters will be updated in the presentation.
24
The individual elements in the presentation view are converted into an interactive navigation via the "Hyperlink chapters" option. I.e.: By clicking on an
item in the agenda or the chapter separation slides, you will automatically jump to the respective chapter.
Then close the window.
Minimize
Inserted images, MS Excel diagrams, videos, and other elements can significantly increase the memory requirements of presentations.
The file size must be reduced depending upon what is to be done with the presentation.
25
7.1
Click on the "Minimize" button. The following window is opened:
This value is preset and enables maximum compression.
eine maximale Komprimierung.
This value ensures that you will experience no
loss in quality when showing your presentation
via a projector (16:9 format)
Präsentationen über einen Beamer keinen Qualitätsverlust haben (Format 16:9)
Please select your desired option and confirm by clicking on "minimize". The program now automatically creates a copy of your original presentation
that is saved in the same directory with the suffix "_OPT" and closes the original file. The presentation is then compressed, i.e. the resolution of images
is reduced, cut image areas are deleted, and inserted objects (e.g. MS Excel diagrams) are removed after confirmation and inserted as images.
Following minimization, you will be informed of the percentage that your presentation was compressed by.
26
Note: The minimization is based upon the standard PowerPoint functions.
In some cases, the presentations have already been compressed
as much as possible and additional compressing with the Corporate Presenter has a minor effect.
Publish
This function prepares your presentation for "Publication" (e.g. forwarding to third parties or acceptance into an archive).
8.1
Switch to the "Publish" button in the main navigation.
The following window appears:
27
Correction sticker and grid: Removes all correction stickers and inserted grids from the presentation. Correction stickers are information texts that,
depending upon the circumstance, are inserted whilst a design check is carried out. These correction stickers are intended to remind you that you need
to perform a manual correction of the slide.
Example: Excessively large element on the slide
28
The error cannot be corrected. A manual correction is necessary.
Click on "2. Start interactive correction"
29
A correction sticker was placed on the slide. You can
remove it after editing the slide.
Personal information: Removes the personal information that is displayed to you under "Properties".
Notes: Removes the notes from the notes view that are often misused as "Editing history".
Links: Removes links (e.g. the link to embedded MS Excel diagrams). The elements are then inserted as an image and cannot be automatically updated any longer. (Hyperlinks are not links and are therefore not removed).
Embed TrueType fonts: If the ZF corporate fonts were used (e.g. in an inserted table), they are automatically embedded.
Multimedia elements in subfolder: If you incorporate audio or video files in your presentation, the files are not actually incorporated in your presentation. In order to be played on another computer, these files must be saved in the same folder as the presentation. However, this is done automatically
via this function.
Now select the points that you wish to remove and/or add.
Click on "OK". A copy of your presentation with the selected options is saved. At this point, the following folder will be created in the index in which your
original is located:
30
Name_Of_Your_Original_File_publish
This folder contains the copy of your presentation and, if necessary, the multimedia file that you have embedded.
Handout
9.1
The "Handout" button can be found in the main navigation.
The following screen appears after clicking on the button:
9.2
You can set the format and the number of slides for the layout page under "Template". Please create a handout that includes 2 slides, is displayed in
31
color, and includes blank lines for writing down own notes.
Template
A4 portrait, 2 slides
Layout
Color
Notes
With empty lines
Start
Your handout is created by clicking on the "Start" button.
Note: The handout opens as a full screen in MS Word and contains a title page, a table of contents, and the slide pages.
This is what your finished handout should look like (slide page, A4 portrait, 2 slides template):
32
HTML
This function allows you to convert your presentation into an HTML version. This is beneficial if you wish to put your presentation on the
Intranet.
10.1
33
Click on the "HTML" button on the main navigation.
The following window appears:
You can set the display time for each slide in seconds until it changes.
You can select a save location via the folder
symbol.
Speicherort wählen.
An HTML version of your presentation is opened in Internet Explorer by clicking on the "Start" button. In order to be able to use your presentation as an
HMTL version, image files as well as an index file are created from your slides. The entire files are saved in a folder.
Update
By clicking on the "Update" button, you can ensure that your Corporate Presenter version is up-to-date.
11.1
Click on the "Update" button in the main navigation toolbar. The system connects to the server and automatically performs the updates on your PC.
You will receive the following notification if no updates are available.
34
The Personal Archive
The "Personal Archive" enables each individual user to manage and organize their own presentations. This archive can only be accessed
by this user. Your original presentation remains unaffected as the individual slides are separately prepared, organized, and filed.
12.1
Please click on the "Archive" button in the main navigation toolbar.
The following window is opened:
35
Select "Personal Archive" and click on "Import". Within the following window, you can select an existing category or create a new category.
Furthermore, you can decide whether the entire presentation or just the current slide should be imported.
36
Confirm by selecting "Import".
The slides are imported into the archive and can be viewed by the drop down box or by clicking through the preview.
The Group Archive
The procedure regarding the organization and management of the Group Archive is essentially the same as with the "Personal Archive". However,
before you use a Group Archive, you need to create it first or connect to an existing archive (share).
13.1
1. Creating a Group Archive
Click on the "Archive" button. The familiar window opens. Now select "Group Archive" and click on "New".
37
In the file selection dialog that subsequently appears, select a network drive to which all participating colleagues have read and write access. Create a new folder there with the name
"Group Archive" for instance. Then click on "Save". The Group Archive has been created.
Now, you only need to inform your colleagues of the path and fill the Group Archive with contents similar to the "Personal Archive".
13.2
2. Joining a Group Archive
Click on the "Archive" button.
The familiar window opens. Please select a "Group Archive" and click on "Connect".
In the file selection dialog that subsequently appears, select the path that you obtained from your colleague. Then click on "Save".
You are now connected to the "Group Archive".
Note: You can only connect to one Group Archive. If you wish to connect to a different archive, you must "Disconnect" the connection to the other
archive.
38
13.3
3. Inserting a Complete Presentation
If you wish to use a complete presentation from an archive (e.g. a corporate presentation from the Company Archive), please proceed as follows:
Create a new presentation or allocate your layout to a PowerPoint standard slide.
At the end, insert the entire presentation from the archive.
Delete the first slide/s that does/do not belong to the presentation.
This procedure is particularly essential when dealing with presentations with internal links as they will no longer function correctly otherwise.
Help
14.1
Click on the "Help" button.
The following screen appears:
39
"User" tab:
You can permanently record your personal data for the
presentation. To some extent, this information is adopted in
the document properties and the entry screen when creating
a new presentation.
You can amend the language settings for the Corporate Presenter.
14.2
Switch to the "Configure" tab in the "Help" area.
40
"Configure" tab:
You can compile the additional buttons such as "Handout" for instance.
14.3
Please click on the "Help" tab in the "Help" Content Manager.
41
"Help" tab:
Here you can find
The interactive help
The Corporate Presenter user manual / quick guide
Corporate PowerPoint Guidelines
For further information, please go
-
to the POS Intranet page: http://www.zf-world.com/POS_EN/
in the Corporate Presenter "Help" section
The POS project team hopes that you will enjoy working with the Corporate Presenter and the new ZF slide master layout.
42