1
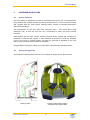
USER MANUAL Toro Model RT-4 (Capacity 4 Passengers) Revision 1.0 15-01-09 TORO USER MANUAL Reflex Marine Ltd Sets the standard in Marine Personnel Transfer This manual contains general instructions for the operation and maintenance of the Toro personnel transfer capsule. Safe and proper use of the Toro is the responsibility of the user having taken due regard of the information provided in this document. The user should ensure that all safety measures as required by relevant applicable legislation and by good operational practice are utilised for operations involving the Toro. It is recommended that adequate training be provided for all personnel involved in the operation of the Toro before the commencement of operational use. Please retain this manual for future reference. contacting Reflex Marine Ltd. Additional copies may be obtained by All information disclosed in this document is the property of Reflex Marine Ltd except where otherwise stated. Reflex Marine Ltd reserves all patent rights, design and manufacturing rights, copyright and sales use rights thereto, and to any article disclosed within this document except where such rights are expressly granted to others or where not applicable to vendor proprietary parts. © Reflex Marine Ltd. All rights reserved. Administration Somar House Heron Way Newham Truro Cornwall TR1 2XN UK Operations/Registered Address D1 Balgownie Technology Centre Bridge of Don Aberdeen AB22 8GW UK Tel +44 (0) 1872 321155 Fax +44 (0) 1872 321166 Tel +44 (0) 1224 209200 Fax +44 (0) 1872 321166 Email [email protected] Websites : www.reflexmarine.com and www.torotransfer.com Registered in Scotland SC141517 VAT Number GB605 1280 79 Rev1.0 Date 15/01/09 2 TORO USER MANUAL DOCUMENT REVISION & CONTROL To ensure that all changes to any of the documents contained in this manual are carried out and distributed in a controlled and authorised manner: 1) Any proposed change in documentation must be submitted to the Reflex Marine Ltd Operations Director in writing for his authorisation. This not only refers to changes in drawings, but also to all documents contained in this manual. 2) A record must be maintained of all documentation changes. 3) A list of all revisions and amendments shall be included in this User Manual. 4) A record will be kept of the Toro client list in order that each client can be sent revisions to this Manual. 5) The control, revision and distribution of this Manual will be the responsibility of the Operations Director. Revision List Items in Bold are the most recent Revisions Rev No. Rev1.0 Date 15/01/09 Reason For Revision 3 Safety Critical Change TORO USER MANUAL CONTENTS 1 INTRODUCTION............................................................................... 6 1.1 1.2 1.3 2 SCOPE .................................................................................................... 6 INTRODUCTION ......................................................................................... 6 SAFETY INFORMATION ................................................................................ 7 SPECIFICATION............................................................................... 8 2.1 2.2 2.3 2.4 3 SPECIFICATION SUMMARY ........................................................................... 8 DESIGN................................................................................................... 9 OPTIONS ............................................................................................... 10 CERTIFICATION AND DOCUMENTATION ......................................................... 11 OPERATING PARAMETERS ............................................................. 12 3.1 3.2 3.3 INTRODUCTION ....................................................................................... 12 OPERATING PARAMETERS ~ SEA STATE ........................................................ 13 OPERATING PARAMETERS ~ ADDITIONAL FACTORS ......................................... 14 4 TRANSFER PLANNING ................................................................... 15 5 OPERATING PROCEDURE ............................................................... 17 5.1 5.2 5.3 5.4 5.5 5.6 5.7 6. PASSENGER INSTRUCTIONS.......................................................... 21 6.1 6.2 6.3 6.4 7 PRE-OPERATIONAL CHECKS ....................................................................... 17 PRE-TRANSFER ....................................................................................... 18 LIFTING ................................................................................................ 18 LANDING ............................................................................................... 18 CRANE OPERATOR GUIDANCE ..................................................................... 19 IMPORTANT NOTE ON USE OF SHORTER SLINGS:............................................. 20 HANDLING EYE ....................................................................................... 20 SEATING FEATURES ................................................................................. 21 SEATING ARRANGEMENT ........................................................................... 21 GENERAL PRECAUTIONS ............................................................................ 22 ENTRY TO AND EXIT FROM THE TORO............................................................ 22 PERIODIC INSPECTION AND MAINTENANCE ................................. 24 7.1 7.2 7.3 7.4 7.5 7.6 7.7 7.8 7.9 INTRODUCTION ....................................................................................... 24 SIX MONTH INSPECTION ........................................................................... 26 ANNUAL INSPECTION ............................................................................... 27 ANNUAL INSPECTION FOR ‘LOW’ TRANSFER USAGE OF TORO ............................. 28 CRITICAL LOAD PATH COMPONENTS ............................................................ 29 UNIT IDENTIFICATION.............................................................................. 29 CRITICAL PARTS SERVICE PACK .................................................................. 29 OTHER MAIN LOAD ITEMS ......................................................................... 30 LOAD TEST PROCEDURE ............................................................................ 31 Rev1.0 Date 15/01/09 4 TORO USER MANUAL 8 ACCESSORIES................................................................................ 32 8.1 8.2 8.3 9 STRETCHER ............................................................................................ 32 POSITIONING THE STRETCHER IN THE TORO .................................................. 33 OTHER ACCESSORIES ............................................................................... 35 HANDLING, SHIPPING AND STORAGE ........................................... 36 9.1 9.2 9.3 9.4 DIMENSIONS .......................................................................................... 36 HANDLING ............................................................................................. 36 SHIPPING ............................................................................................. 36 STORAGE ............................................................................................... 37 APPENDICES......................................................................................... 38 A TRANSFER LOG .............................................................................. 39 B INSPECTION CHECKLISTS ............................................................. 40 B.1 B.2 SIX MONTH INSPECTION CHECKLIST ............................................................ 40 ANNUAL INSPECTION CHECKLIST ................................................................ 41 C DIAGRAMS .................................................................................... 42 D PARTS LIST AND MATERIAL SPECIFICATION ................................ 46 E TORO MARKINGS........................................................................... 49 Rev1.0 Date 15/01/09 5 TORO USER MANUAL 1 INTRODUCTION 1.1 Scope This User Manual is for the four passenger Toro (Model RT-4). 1.2 Introduction The Toro Personnel Transfer Capsule (PTC) is a personnel transfer device designed to provide increased protection when carrying out personnel transfers between vessels / installations by crane. Crane personnel transfers are carried out for a wide variety of reasons including routine, urgent operational and emergency (medical) reasons. The Toro performs a similar function to traditional rope personnel transfer baskets, but passengers are supported, and may be secured, in a semi-seated upright position. Provision for carrying out emergency medical transfers is included by the capability to accommodate a stretcher in a protected environment. The Toro comprises two main assemblies. Firstly, the inner assembly comprising foam filled polyethylene seats mounted on the load-bearing central column and, secondly, a stainless steel outer framework supporting foam filled polyethylene buoyancy panels. All materials have been selected specifically to minimise corrosion in the marine environment. The outer framework protects passengers from impacts and supports the buoyancy elements which ensure the Toro floats and is self-righting in water. The seating assembly is fitted with foam cushions and headrests to provide shock absorption and to reduce the risk of whiplash injuries. The seating assembly also provides added buoyancy. The steel base and floor grating ensure a low centre of gravity and assists in rapid self-righting. The frame lands on four foam feet, which provide primary shock absorption for the device in the event of a hard landing and ensure that the Toro is stable on uneven surfaces or when landing on a heaving vessel. Four large open accesses allow rapid unimpeded entry and exit for all passengers. During transit passengers are supported in a semi-upright seated position which, together with suitably positioned grab handles, allows passengers to adopt a braced position against movement of the device. Lap belts are fitted as standard and full harnesses are available as an option for greater security. The sling assembly is designed to prevent rotation. NOTE: It should be noted that the regulations governing personnel transfer operations vary greatly from country to country and it is imperative that operators of the equipment establish the relevant requirements for the area of operation. Rev1.0 Date 15/01/09 6 TORO USER MANUAL 1.3 Safety Information Safe Transfers Require Careful Planning and Supervision 1. Proper planning of the transfer operation is essential. Planning should include a risk assessment which takes account of all environmental and operational factors. Assessing the impact of these factors on operational risk is best done by competent persons experienced in use of the equipment and the local conditions. 2. It is imperative for the safe operation of the Toro that each unit be periodically inspected and tested in accordance with the procedures and schedules set out within this document. 3. Operating Parameters detailed in this document should be adhered to unless modified following on-site risk assessment by competent, experienced personnel. 4. The Toro should only be used with properly designed and maintained lifting equipment. (It should be noted that some national regulations require cranes to be specifically certified for man-riding operations). 5. Supervisory Personnel (including Deck Crews and Crane Operators) must be competent and should only operate the equipment following proper instruction in its use. Crane Operators should read the ‘Crane Operator Guidance’ contained within this document. 6. Pre-operational checks as detailed in this document should always be performed prior to use of the Toro. 7. Transfer Personnel should receive a proper briefing on the Toro and the transfer operation. 8. Transfer Personnel should at all times be seated and properly secured using the lap belt or harness supplied. 9. The Toro is intended for use only as a personnel transfer device. 10. The Toro is not intended for use as a work-basket. Rev1.0 Date 15/01/09 7 TORO USER MANUAL 2 SPECIFICATION 2.1 Specification Summary MODEL NO RT-4 Payload Dimensions Weight Manufacture Materials Shock Absorption Operating Temperature Rev1.0 Date 15/01/09 4 x 110 kg (4 x 242.5 lb) persons seated or: 2 persons seated plus 1 in a stretcher or: 440 kg (970 lb) of freight evenly distributed Seats EVA foam feet designed to absorb hard landing impact Integral skin polyurethane seat cushion EVA foam headrest Width 1 - across feet. Width 2 - across base. Height Tare Weight Max Gross Weight 2.211 m (87.0 ins.) 1.974 m (77.7 ins) 2.063 m (81.2 ins.) 375 kg (826.7 lb) 815 kg (1798 lb) ISO 9001 : 2000 Outer Framework Central Column Lift Eye Lift Eye Bolts Buoyancy All 316 and A4 Stainless Steel Grade 316 Stainless Steel Grade 316 Stainless Steel A4 Stainless Steel Rotationally moulded MDPE Shell with PU Foam Fill Rotationally moulded MDPE Shell with PU Foam Fill -20°C to +50°C (-4°F to 122°F) 8 TORO USER MANUAL 2.2 Design MODEL NO RT-4 Verification CE mark Manufactured to ISO 9001 : 2000 ABS Type Approval National Technical Standards UK, BS449: Part 2:1969: The use of Structural Steel in Building UK, BS2830:1994: Suspended Chairs and Cradles for the use in the Construction Industry Industry European Standards EC Machinery Directive EN 1050, EN292 Parts 1 & 2 Load Test – LOLER National Regulations Impact Behaviour Shock absorbing materials are used in combination with a semi-upright seated posture to protect passengers from impacts up to 2m/s. The capsule is also highly resistant to lateral impact designed to withstand 2m/s impact. UK, PUWER/LOLER Immersion Behaviour Floats in water with full or partial payload Self righting in water with full or partial payload. Other Features Full height seats with headrest Optional lap belt Optional four-point seat harness Grab Handles Stretcher carrying capability Non-rotating (torque balanced) lifting sling set Secondary back-up sling Handling Eye Dropped Object Protection Netting Rev1.0 Date 15/01/09 9 TORO USER MANUAL 2.3 Options MODEL RT-4 Weatherproof Cover Stretcher and securing straps 3 point safety harnesses Storage / Transit Box Locator strobe light to assist crane driver (Note: Standard strobe light is not certified for use in hazardous areas) Service contract for Annual Inspections and repairs Onshore and Offshore Training available Rev1.0 Date 15/01/09 10 TORO USER MANUAL 2.4 Certification and Documentation Each new build Toro unit will be supplied with a complete set of certification and documentation as specified below. USER PACK User Manual and Support Information Induction and Training Presentation Operational Briefing Media (CD-Rom and DVD) Laminated Operating Instructions Copies of Transfer Log North Sea Lifting Handbook Toro Brochure CERTIFICATION PACK EC Declaration of Conformity* Manufacturers Certificate of Conformance Manufacturers BS EN ISO 9001 : 2000 Certificate Toro Load Test Certificate Sling set Load Test Certificate Lifting Eye Plug Material Certificate Back-up Eye Material Certificate Handling Eye Certificate of Conformance M16 Lifting Eye Plug Bolts Certificate of Conformance M16 Seat Cross Beam Bolts Certificate of Conformance Seat Harness Certificate of Conformance (where fitted) Inspection Checklist Inspection Release Note Reflex Marine will retain copies of the above certification and additional certification as specified below. If required, the applicable certification below can be made available for review by Clients. REFERENCE MATERIAL Material certification for all Critical and Non-critical components Inspection and Repair History Weld Procedures/ Welder qualifications NDT approval (PCN)/ NDT Reports (where applicable) Manufacturing Signed Checklist and Route Cards Rev1.0 Date 15/01/09 11 TORO USER MANUAL 3 OPERATING PARAMETERS 3.1 Introduction The Toro has been designed to ensure passengers safety even when operating in the most demanding conditions. There are a large number of factors that affect the safe conduct of all marine personnel transfer; crew skill and experience, met-ocean conditions, landing area, vessel station keeping response, visibility, line-of-sight, and so on. A combination of many factors will determine the risk involved in a transfer. It is important that all environmental and operational factors are taken into account in the Pre-Transfer Risk Assessment (see Section 4). Assessing the impact of these factors on operational risk is best done by competent persons experienced in use of the equipment and the local conditions. Vertical Impacts Passengers are protected during heavy landings and take-offs from a vessel deck due to the semi-upright seating position and the cushioning properties of the feet and seat cushion. Lateral Impacts Passengers are also protected from lateral impacts by the framework and lap belt or optional seat harness. Lateral impacts are only likely to arise due to sway caused by crane line offlead when lifting. The central load path assembly or peripheral pillar strut assemblies may deform on lateral impact and therefore it is important that the equipment is inspected after any impact. Stability The Toro has a low centre of gravity and 4 landing feet at the periphery of the unit base to provide stability on uneven surfaces or on a pitching / rolling vessel. The landing feet are also of a non-skid design to minimise sliding on deck surfaces. The two-part sling is constructed of non-rotating (torque balanced) steel wire rope. Control of Hoist Line The Toro is designed to stay firmly on the deck of the vessel whilst passengers are transferring in and out of the unit. The crane operator has the responsibility to maintain slack in the line upon landing to allow for the vessel movement. The recommended limits in this section are based on the use of the standard Toro sling length of 30ft/9m. For the use of shorter slings an additional risk assessment combined with dry runs should be performed to establish safe operation routines and weather conditions (see section 5.5 Crane Operator Guidance). Rev1.0 Date 15/01/09 12 TORO USER MANUAL 3.2 Operating Parameters ~ Sea State The Toro has inbuilt cushioning to minimise shock loads and maximise passenger comfort during take off and landing. The maximum recommended sea state, or significant wave height, for the operation of the Toro is determined by the maximum relative velocity between the Toro (or crane hook) and the landing deck. The calculation for relative velocity used here is based on the European offshore crane standard, EN 13852-1:2004. Whereby the maximum anticipated relative velocity between a load and a vessel deck, is given by the following; Relative velocity = Hook velocity* + √ (Vessel deck velocity 2 + Boom tip velocity 2) * Equal to 1.67m/s (100 m/min, 330ft/min) for lifts below 5 tonnes. Higher crane hook speeds may be available, and it follows that the higher the available crane speed the higher the possibility of a heavy landing or take off. However, with a qualified crane operator, it is considered unlikely that the Toro will be landed at full hook speed on a deck rising at full speed, or vice versa. If there are concerns about heavy landings, operators may wish to consider the following methods to reduce risk of heavy landings and take-off; trial landings without passengers and landing in the centre of the deck where there is less vessel movement. TABLE 1: RECOMMENDED MAXIMUM SEA STATES FOR TORO OPERATIONS SIG. WAVE HEIGHT. (M / FT) ≤ 1.0m / 3’ ≤ 1.5m / 5’ ≤ 2.0m / 7’ ≤ 2.5m / 8’ ≤ 3.0m / 10’ ≤ 3.5m / 11’ ≤ 4.0m / 13’ z MAX. WAVE HEIGHT. (M / FT) ≤ 1.9m / 6’ ≤ 2.8m / 9’ ≤ 3.7m / 12’ ≤ 4.6m / 15’ ≤ 5.6m / 18’ ≤ 6.5m / 21’ ≤ 7.5m / 24’ FIXED SEMI-SUB FPSO PLATFORM TO TO TO VESSEL z z z VESSEL z z VESSEL z TO VESSEL z z z z VESSEL Low risk of high landing or take-off velocity which may exceed Toro capability for cushioning of personnel. Increasing risk of high landing or take-off velocity. Consideration of hook speed and consideration of all other factors is recommended to ensure controlled landing and take-off. A trial landing (without personnel) to gauge risk is also recommended. High risk of high landing or take-off velocity. Not suitable for routine operations unless a specific hazard analysis can demonstrate otherwise. In all cases, adequate planning and risk assessment must be performed. Rev1.0 Date 15/01/09 13 TORO USER MANUAL 3.3 Operating Parameters ~ Additional Factors NOTE 1: Operational sea states are highly dependent upon the size and seakeeping qualities of the transfer vessels. Relative motions between two vessels is also an important consideration. NOTE 2: It is emphasised that users should not rely on these recommendations alone. Persons best placed to judge the risk of specific transfers are the onsite persons that have experience of the local conditions and equipment to be used. All factors should be evaluated together in their pre-transfer risk assessment. NOTE 3: It is recommended that crews conduct practice landings without passengers to help assess risk of transfer when there are concerns about conditions. TABLE 2: OTHER OPERATING PARAMETERS PARAMETER RECOMMENDATION Wind Speed 40 knots (equivalent to 20 m/s). Toro is very stable in high wind. Limiting factor is usually crane operability or control of load. Visibility Crane operator should have clear view of the pick up and set down areas. Vessel Motion Pitch 10 o, Roll 10 o. Heave 1.5m Vessel StationKeeping Able to maintain position within a 5m (15ft) radius. If high risk of vessel losing position exists, recommend disconnecting Toro for passenger embarkation. Landing Area Clear of obstructions, protrusions, trip and fall hazards. Landing Area – Ice/Spills Ice and spills must be cleaned from landing area prior to transfer. Landing Area on Vessel Recommended 6m x 6m clear space (20ft x 20ft) Based on +/- 1m landing accuracy + 1m entry and exit path for personnel. Smaller deck spaces require individual risk assessment with consideration of reduced weather limits. Landing Area on Installation Recommended 4m x 4m clear space (13ft x 13ft). Based on +1m entry and exit path all round the Toro. Crane Operator Experience Briefing video within 1 month. Local regulations for personnel transfer must be adhered to. Deck Crew Experience Briefing video within 1 month. Passenger Training Briefing video within 1 month. Communications Radio communication must be established between the crane operator and the vessel deck crew and master. Crane Crane must be certified for lifting personnel and be properly maintained. Rev1.0 Date 15/01/09 14 TORO USER MANUAL 4 TRANSFER PLANNING The key to safe operations is familiarisation of all involved crew in the careful planning of the operation. Operating Parameters detailed within this document are generic and it is recommended that safe operating conditions are determined by onsite supervision with due regard to site specific equipment, vessels and conditions, taking account of any local anomalies. Safe transfers require careful planning and supervision. The following are recommended as a means of ensuring safe transfer operations: Risk Assessment A risk assessment should be conducted by the responsible authority on board the installation and by the transfer vessel Captain prior to the first transfer operation for the specific installation and vessel. The risk assessment should be reviewed periodically and suitably modified in the event of any substantive changes to equipment, procedures or any other factors considered relevant. Communications Communications are an important part of controlling the transfer operations. Local communication practice will vary from work group to work group. However, dedicated three-way radio communications channels should, as a minimum, be provided between the crane operator, vessel master, and deck supervisor. A suitable radio protocol should be agreed and adhered to. Contingency communications using a loud speaker or deck tannoy should be available. Standard hand signals should be used by crane banksmen, where required, to supplement the agreed radio communications. Information Exchange The following transfer vessel information should be provided to the Installation: General layout including the landing area position Limiting environmental parameters Onboard Marine Personnel Transfer procedures The following Installation information should be provided to the transfer vessel: Crane position and hoist speed General layout including the landing area position Limiting environmental parameters Onboard Marine Personnel Transfer procedures including responsible persons Communications channels Any relevant information regarding local currents, field operations etc. Rev1.0 Date 15/01/09 15 TORO USER MANUAL Operational Planning An overall plan should be in place for the proposed personnel transfer operation which details all of the relevant information: Installation name Vessel name Number of personnel to be transferred - Vessel to Installation Number of personnel to be transferred - Installation to Vessel Key personnel on Installation Key personnel on vessel Installation crane to be used Crane hoist speed Requirements for visual inspections of equipment Vessel position and station keeping limits Environmental Limits Current and Forecast weather conditions Checklists to be used. Briefings Ensure that passengers and crews (both installation and vessel) are fully briefed prior to an operation. Consideration should be given to utilising video briefings for transfer passengers. Supervision Ensure that all transfer operations are properly supervised. All personnel directly involved in the transfer operation should be appropriately qualified and experienced. Transfer Log (Example Transfer Log available in Appendix A) Operational records should be maintained by both the installation and the vessel. Records should include: Time of vessel in position Time of checklists completed Time of commencement of transfer operations Weather conditions Vessel motion (roll, pitch, heave) Any special conditions or circumstances Number of passengers transferred to installation Number of passengers transferred to vessel Time of completion of transfer operation / vessel clear of installation Emergency Transfers If a transfer must be carried out in poor conditions in an emergency then a ‘trial run’ should be performed without passengers to assess operating conditions and limits. Training Carry out regular transfer drills (weekly recommended). Rev1.0 Date 15/01/09 16 TORO USER MANUAL 5 OPERATING PROCEDURE 5.1 Pre-Operational Checks Pre-Operational Checks, as detailed below, must be carried out prior to use of the Toro. 1. Check LOAD TEST PLATE and CERTIFICATION are in order. 2. Check all Toro FITTINGS, FRAMEWORK and BUOYANCY are in good order. 3. Check SLINGS are correctly attached and in good order. Check the SPLIT PINS are fitted to shackles. Slings should be in the HIGH VISIBILITY COVER. 4. Check MAIN LIFTING EYE is fully engaged. 5. Check MAIN LIFTING EYE M16 BOLTS are secure and split pins and tamper-proof seals are in position. 6. Check BACK-UP LIFT EYE, nut and tamper-proof seal are fitted correctly and in good order. 7. Check SEAT CROSS BEAM M16 BOLTS are secure and split pins and tamper-proof seals are in position 8. Check HANDLING EYE, nut and tamper-proof seal are fitted correctly and in good order (Seats And Base Frame Not Shown For Clarity) Rev1.0 Date 15/01/09 17 9. Check SEAT BELTS / HARNESSES (where fitted) operate properly and attachment points are secure. TORO USER MANUAL 5.2 Pre-Transfer NO RESPONSIBILITY ACTION 1 Supervisor Conduct Pre-Transfer Risk Assessment (Section 4) 2 Supervisor Conduct inspection of equipment prior to use (Section 5.1) Brief all persons 3 Supervisor 4 Passengers 5 Deck Crew 5.3 i) Crane operator iv) Deck crew iv) Passengers iv) Vessel - Master, Deck crew Don recommended PPE (Personal Protective Equipment), PFD (Personal Floatation Device), and survival suit (as required and where applicable). Ensure any loose personal items are secure. Note: Send PFD to vessel prior to transfer. Hook-up masterlink - ensure sling remains in clear position.* Lifting NO RESPONSIBILITY 1 Deck Crew 2 Passengers 3 Passengers 4 Deck Crew 5 6 Deck Crew Deck Crew 5.4 ACTION Signal to passengers to enter TORO when safe to do so. Ensure passengers enter in same direction to avoid confusion. Ensure even load distribution. Enter to left and sit behind seat pommel. Where fitted, secure harness – loosen belt, tighten lower straps, then upper straps. Grip grab handles. Signal to deck crew when secure by holding hand up/thumbs up. Ensure passengers are securely seated and holding grab handles. Harnesses if fitted should be securely fastened. Ensure taglines (if used) and sling are not snagged. Stand clear and signal lift to crane operator. Landing NO RESPONSIBILITY 1 2 3 Crane Operator Crane Operator Deck Crew 4 Crane Operator 5 6 7 8 Deck Crew Deck Crew Passengers Passengers ACTION All raising / lowering should be over water where possible. Guide TORO into clear landing area. Keep in a safe position if handling unit - do not stand between TORO and vessel rail or other obstruction. If taglines are used beware of specific risks. Crane operator to release slack when TORO has landed and put sling down-weather. (See Section 5.5). Ensure sling slack is not a hazard for exiting passengers.* When Toro securely on deck, signal “All Clear” to passengers Remain seated until given “All Clear” by deck crew Exit Toro to the left of seat and move away from capsule towards safe area as directed by deck crew. *NOTE: If risk of vessel losing position or crane line snatch exists (e.g. during vessel to vessel transfers), it is recommended that the Toro is disconnected from the crane hook for passenger exit and entry. Rev1.0 Date 15/01/09 18 TORO USER MANUAL 5.5 Crane Operator Guidance When landing the Toro on the deck of a heaving vessel, crane operator should always release and maintain line slack to prevent any snatching. This means the Toro will be secure on the deck and will provide occupants plenty of time to enter and exit the Toro. (This landing procedure is different to a collapsible rope basket procedure, which relies on the crane operator to keep the soft rope basket upright during entry and exit). For the standard 30ft / 9m sling provided with the Toro, it is generally recommended that approx. 10 ft / 3m of slack is paid out once the unit has landed on the vessel, however, the required amount may vary according to sea state and vessel motion response. The crane operator should pay out sufficient slack to avoid snatching, although, should avoid paying out more than is necessary as the section of sling hanging could constitute a hazard to crews alighting or entering the capsule. It is also recommended that the crane operator slew the boom ‘down weather’ from the capsule. This will provide more time to crane operator / crews to react in the event of a failure of the vessel’s station keeping. 22.4 ft. (6.8m) 30 ft. (9.1m) Rev1.0 Date 15/01/09 20 ft. (6.1m) 19 TORO USER MANUAL 5.6 Important Note on Use of Shorter Slings: Reflex Marine recommend the use of a 30ft / 9m sling, however for operations where the 30ft sling is not suitable, then a 20ft / 6m or 10ft / 3m sling can be supplied. It should be noted that using shorter slings increases the risk of snatching. Using the 20ft / 6m sling, 10ft / 3m of slack will provide a 17.3ft / 5.3m allowable offset before the sling becomes taught from the crane hook weight. This does not however account for vessel heave. For a 10ft / 3m sling, 8ft / 2.4m of slack will provide 9.8ft / 2.7m (allowable offset). Using a shorter sling set also increases risks associated with the hook block being in close proximity to the passengers alighting. NOTE: The operating parameters in Section 3.2 are defined for Toro with a sling length of 30ft / 9m. For transfers using shorter sling additional risk assessment combined with dry runs should be performed to establish safe operation routines and weather conditions. 5.7 Handling Eye The handling eye is provided for handling of the Toro during transportation or handling of the unit without passengers. The handling eyebolt must never be used as a lift point when transporting passengers. Before use of the handling eye check the nut and tamper-proof seal are fitted correctly and in good order If the main sling set is to remain connected it should be coiled down inside the Toro unit and secured Rev1.0 Date 15/01/09 20 TORO USER MANUAL 6. PASSENGER INSTRUCTIONS 6.1 Seating Features The Toro seating is designed to provide a comfortable and secure ride. The Integral skin polyurethane seat cushion includes a pommel arrangement for a secure seated position and, together with the ‘semi-upright’ seating position, assists in protecting passengers against hard landings. The arrangement of the four seats and individual entry / exit points allow rapid passenger entry to and exit from the Toro, contributing to faster and more efficient transfers. Grab handles and the seat cushion ‘pommel’ provide secure seating and contribute to passenger confidence and comfort. A foam headrest is provided to avoid any whiplash injury in the event of a lateral impact. Lap belts are provided as standard on the Toro with 3-point seat harnesses available as an option. Dropped Object Protection netting is provided above the passenger seating position. 6.2 Seating Arrangement The passenger seating position and the Toro seating arrangement are shown below. Seating Position Rev1.0 Date 15/01/09 Cutaway model showing seating arrangement and grab handles 21 TORO USER MANUAL Seat Cushion The integral skin polyurethane seat cushion provides comfort and protection against hard landings. The pommel feature assists in providing a secure seated position. 6.3 General Precautions 1. Passengers must remain seated, holding the grab handles and ensure that head, hands and feet remain inside the Toro at all times during the transfer operation. 2. Passengers should be aware of the potential trip hazard when entering and exiting the Toro. This should be highlighted during the pre-transfer briefing. Deck crews should reiterate awareness of trip hazard to passengers during entry to and exit from the Toro. 3. When the Toro is in a static position on deck for passenger entry and exit, the lifting sling will be in a static condition and may obstruct one or more of the Toro entry / exit points. Passengers must take care to remain clear of the lifting sling and, if obstructed by the lifting sling, should wait until it is held clear by the deck crew. 6.4 Entry to and Exit from the Toro 6.4.1 General Passenger Entry to and exit from the Toro should only be conducted with the Toro in a stable position on deck as advised by the crane driver to the deck crew member in charge of the transfer operation. Note : all ‘arrival’ transit passengers must be clear of the Toro prior to entry of ‘departure’ transit passengers. Each individual seat has a dedicated entry / exit point and to prevent confusion and ensure an efficient operation all passengers must enter and exit from the same direction. 6.4.2 Passenger Entry When advised to do so by the deck crew member in charge of the transfer operation, passengers should proceed as directed to one of the four Toro entrances (note trip hazard). When instructed to enter the Toro, all passengers should enter to their left and sit on the seat directly facing (as shown in fig.1, below). Rev1.0 Date 15/01/09 22 TORO USER MANUAL Passengers should ensure they are securely seated behind the seat pommel in a ‘semiupright’ posture with feet on the floor. Foot rests are provided at the lower end of the buoyancy panel in front of the seat. Where a seat harness has been fitted, this should be securely fastened. Grab handles are provided on the tubular upright members either side of the buoyancy panel and passengers should grip these firmly prior to the Toro being lifted. 6.4.3 Passenger Exit Following landing of the Toro and when advised to do so by the deck crew, passengers should unfasten the safety harness (where fitted), stand and exit the Toro (note trip hazard) by the exit to the left of the seat used (as shown in fig.2, below). Passengers should move clear of the Toro as directed by the deck crew, ensuring they remain clear of the lifting sling. Fig. 1 : Passenger Entry. All passengers should enter the Toro to the left and use the seat then directly in front. Rev1.0 Date 15/01/09 23 Fig.2 : Passenger Exit. All passengers should stand and move to the exit at the left of the seat used. TORO USER MANUAL 7 PERIODIC INSPECTION AND MAINTENANCE 7.1 Introduction It is imperative for the safe operation of the Toro that each unit be periodically inspected and tested in accordance with procedures and schedules set out below. Visual Inspection A visual inspection is a careful and critical assessment of the components carried out without dismantling of the assembly. Examination An examination is a careful and critical assessment of the components carried out by a competent person. This should include dismantling the assembly and performing a visual assessment of the condition of each component, supplemented by other means such as measurement and non destructive testing as considered necessary. For sling sets this should include a visual inspection of the internal condition of the rope. In order for end fittings of sling sets to be examined properly they may need to be dismantled. Competent Person A competent person should have appropriate practical and theoretical knowledge and experience of the equipment. This will enable them to detect defects and weaknesses and to assess their importance in relation to the safety and continued use of the equipment. It is essential that the competent person is sufficiently independent and impartial to allow objective decisions to be made. NOTE : It is essential that inspections and examinations are carried out by a Competent Person. Rev1.0 Date 15/01/09 24 TORO USER MANUAL 7.1.1 Sling Set Management Wire Rope Slings : Do’s and Don’ts The wire rope sling set supplied for use with the Toro capsule is a critical component. Good management of sling sets is essential for ensuring safe personnel transfers. Do : 9 Do inspect the sling set prior to use. Open the Velcro cover and visually check both legs of the sling set for any signs of mechanical damage or corrosion which may affect the integrity of the sling set. 9 Do ensure that the sling set is thoroughly examined by a competent person at intervals not exceeding six months. 9 9 Do discard and replace sling sets at intervals not exceeding 12 months. 9 Do store sling sets in dry conditions when not in use. Do remove the Velcro cover if a Toro unit or the sling set is to be removed from service for more than one month. Do Not : 8 8 Do not use a sling set which has not been visually inspected prior to use. 8 8 Do not use a sling set which has been in service for more that 12 months. 8 Do not use a sling set which has incurred mechanical damage - including damaged eyes or ferrules, kinks, ‘birdcages’ or broken strands. 8 Do not secure the high visibility cover along its length with cable ties or similar which will prevent opening of the cover for inspection of the sling set. 8 Do not allow the sling set to become immersed in sea water or to be stored where it may be subject to sea water spray or fresh water spray. Do not use a sling set which has not been thoroughly examined within the previous six months by a competent person. Do not leave a sling set in a position where it is vulnerable to mechanical damage or contamination or where it may come into contact with abrasive or corrosive materials. Rev1.0 Date 15/01/09 25 TORO USER MANUAL 7.2 Six Month Inspection PROCEDURE DRAWING REF (AVAILABLE IN APPENDIX C) RT-A2-F : Assembly – Load Path RT-A8-D : Assembly - Frame RT-SA-B : Toro Sling Assembly It is essential that inspections and examinations are carried out by a Competent Person (See 7.1). 1 2 3 4 5 6 7 8 9 10 11 12 13 14 15 Visually inspect Lifting Eye Plug in situ for any signs of wear, cracks, yielding or any other damage. Visually inspect the two M16 Lifting Eye bolts, nuts and seal wire, that connect the Lifting Eye Plug to the Central Column in situ for any wear or damage. Visually inspect the Back-Up Lift Eye, nut and split pin, in situ for any signs of wear, cracks, yielding or any other damage and check that the seal wire is intact. Disconnect the slingset, remove the high visibility mesh cover, and perform a visual inspection of all slingset components. Following inspection, reattach the high visibility cover and reconnect the sling set - replace the sling set if the apparent condition gives cause for concern. Visually check the Handling Eye (eyebolt) in situ for any wear or damage and check that the seal wire is intact. At the lower end of Main support tube (access from below seats), visually inspect the two M16 Seat Cross Beam bolts, nuts and seal wire, that connect the Seat Cross Beam to the Central Column, in situ, for any wear or damage. Check condition of the seat cross beam assembly in situ and ensure that all bolts and fasteners are fully secure. Check stand tubes and upper and lower connections to seat cross beam and floor. Visually inspect the top cross beam in situ for any signs of wear, cracks, yielding or any other damage. Check the frame for any damage. Ensure all fasteners are secure. Check the seats and buoyancy units for any damage. Examine the feet to ensure that they are in good condition and that they are properly secured to the capsule. Check that the Lap Belt or (where fitted) Seat Harness attachment points are secure. Check the webbing for any signs of wear, fraying or damage. Check the Lap Belt or (where fitted) Seat Harness buckles to ensure each is functioning correctly. (Inspector to sit in each seat and check fastening and unfastening of each lap belt / harness). Check the date of the last load test to ensure that the unit has at least six months to run. Complete an inspection report on the above which should be signed and dated by a competent person. (An example is included in Appendix B of this manual). SEE APPENDIX ‘B’ : INSPECTION CHECKLISTS Rev1.0 Date 15/01/09 26 TORO USER MANUAL 7.3 Annual Inspection PROCEDURE DRAWING REF (AVAILABLE IN APPENDIX C) RT-A2-F : Assembly – Load Path RT-A8-D : Assembly - Frame RT-SA-B : Toro Sling Assembly Complete all of the items detailed below followed by the inspection items on the sixmonthly inspection. It is essential that inspections and examinations are carried out by a Competent Person (See 7.1). *Note: If the Toro has seen ‘Low’ transfer usage during the previous year, replacement parts change-out may not be necessary – See Section 7.4, below: “Annual Inspection for ‘Low’ Transfer Usage of Toro”. 1 2 3 4 5 6 7 8 9 10 11 Remove and examine the Lifting Eye Plug for any signs of damage or strain. Replace according to the usage of the Toro (*see Section 7.4, below) or on the recommendation of a Competent Person / Inspector Remove and examine the two M16 Lifting Eye Plug securing bolts for any signs of damage or strain. Inspect the two M16 holes in the Main Support Tube for signs of damage or strain. Replace appropriate parts according to the usage of the Toro (*see Section 7.4, below) or on the recommendation of a Competent Person / Inspector. Bolt torque to 248Nm. Inspect the Back-Up Lift Eye, nut and split pin in situ for any signs of wear, cracks, yielding or any other damage. Replace on the recommendation of a Competent Person / Inspector (*see Section 7.8, below : ‘Other Main Load Items’). Bolt torque to 248Nm Remove and replace the Sling Set and attachments every 12 months irrespective of its condition. Inspect the Handling Eye (eyebolt), nut and split pin in situ for any signs of wear, cracks, yielding or any other damage. Replace on the recommendation of a Competent Person / Inspector (*see Section 7.8, below : ‘Other Main Load Items’). Bolt torque to 248Nm At the lower end of Main support tube (access from below seats), remove and examine the two M16 Seat Cross Beam bolts that connect the Seat Cross Beam to the Central Column for any for any signs of damage or strain. Replace appropriate parts according to the usage of the Toro (*see Section 7.4, below) or on the recommendation of a Competent Person / Inspector. Bolt torque to 210Nm. Visually inspect the seat cross beam assembly for any signs of damage or strain and ensure that all bolts and fasteners are fully secure. Check stand tubes and upper and lower connections to seat cross beam and floor. Visually inspect the top cross beam in situ for any signs of wear, cracks, yielding or any other damage. Carry out a full load test as prescribed in the Load Test Procedure (see Section 7.9). Perform Six Monthly Inspection Procedure. Complete an inspection report on the above, which should be signed and dated by a competent person. (An example is included in Appendix B of this manual). SEE APPENDIX ‘B’ : INSPECTION CHECKLISTS Rev1.0 Date 15/01/09 27 TORO USER MANUAL 7.4 Annual Inspection for ‘Low’ Transfer Usage of Toro A risk based approach is used to define part replacement frequencies; the greater the usage of the Toro, the more frequently parts require to be replaced. Usage is defined as ‘Low’, ‘Normal’ and ‘High’. Usage, and the recommended frequency for parts replacement, is defined below: AVERAGE TRANSFER FREQUENCY RECOMMENDED FREQUENCY OF PARTS REPLACEMENT USAGE DEFINITION (PER YEAR) (AS PER ANNUAL INSPECTION PROCEDURE) <100 Transfers Every 3 years Low Usage 100-500 Transfers Every 2 years Normal Usage >500 Transfers Annually High Usage NOTES: i) It is recommended that sling sets are discarded and replaced at 12 month intervals irrespective of usage or apparent condition. ii) Annual inspections must be carried out for units deemed to be ‘Low’ or ‘Normal’ usage units. However, provided the critical load path components which are defined for periodic inspection and maintenance (other than sling set) show no damage or strain, they do not require to be replaced annually. iii) The maximum recommended period prior to changing out the defined critical load path components (other than sling set) is three years. iv) Records of non change-out should be recorded in the “Comment / Corrective Action” column of the Annual Inspection Checklist. The table above indicates the recommended frequency of change out of parts. v) Operators opting for a lower frequency parts change out routine should monitor usage on a periodic basis to ensure that the usage limits indicated in the table above are not exceeded. If any doubt exists regarding the number of transfer operations performed, then the maintenance strategy should revert to High Usage. This should also be considered if there is any suspicion of impacts or overloads. vi) It should be noted that this recommendation applies to change out of components parts only and does not replace or alter the inspection intervals as prescribed by the relevant legislation. vii) The six monthly inspection routine as detailed in this document must always be carried out on schedule. viii) Where the Toro has sustained substantial damage, a detailed examination of the unit should be carried out and details of all damage should be recorded in a Damage Report. Details of the cause of the damage should also be recorded, if known. If damage to the frame has occurred, welds should be examined for cracks using dye penetrant. ix) Details of all repairs or modifications carried out should be recorded and copies of damage and repair/modifications reports should be sent to the party controlling the use of the Toro and also to Reflex Marine Limited. Rev1.0 Date 15/01/09 28 TORO USER MANUAL 7.5 Critical Load Path Components Critical load path components which are subject to annual changeout (or, where appropriate, as defined by usage of the Toro – refer to section 7.4) are defined as follows : Item Description 1 2 3 4 Sling Set* Lift Eye Plug M16 Lift Eye Plug Securing Bolts M16 Seat Cross Beam Securing Bolts Number in Toro Unit 1 1 2 2 Part Number F-01-024 RT-13 RT-22 RT-23 * Sling Set to be changed out annually irrespective of its apparent condition and irrespective of actual usage of the Toro unit. 7.6 Unit Identification When ordering replacement parts, it is important to ensure the correct replacement parts are ordered for the Toro unit in question. For unit identification, every Toro built is assigned a build serial number. These serial numbers will be allocated sequentially in the order in which they are built. Prior to ordering parts, establish the Toro Serial Number which is stamped on the Load Test Data Plate attached to each Toro. For Model RT-4 the serial numbers will start from RT-4 001, and continue RT-4 002, RT-4 003 etc. 7.7 Critical Parts Service Pack The Part Numbers for the Critical Parts Service Packs are detailed below. The last figure (i.e. -10, -15, -20, or -30 for standard temperature units) denotes the length of the replacement sling set which must be specified when ordering. UNIT SERIAL NUMBER PART NUMBER DESCRIPTION RT4-001 onwards RT-CPK-01-10 RT-CPK-01-15 RT-CPK-01-20 RT-CPK-01-30 Replacement critical parts kit for the Toro containing: Rev1.0 Date 15/01/09 29 · · · Sling Set (select correct length) · M16 Seat Cross Beam bolts (inc. nuts, washers and tamperproof seals). Lifteye plug M16 Lifteye plug bolts (inc. nuts and tamperproof seals) TORO USER MANUAL 7.8 Other Main Load Items Replacement of other main load items is subject to inspection by a competent person. NOTE: Sling Sets are included in the Critical Parts Service Packs (above). As it is recommended that Sling Sets are discarded and replaced at 12 month intervals irrespective of usage or apparent condition they may be ordered separately according to the part numbers detailed below. The replacement Sling Set is a complete two-leg sling complete with masterlink and shackles. DESCRIPTION PART REPLACEMENT FREQUENCY NUMBER 10ft (3.0m) Sling Set F-01-112 15ft (4.6m) Sling Set F-01-116 20ft (6.1m) Sling Set F-01-113 30ft (9.1m) Sling Set F-01-024 Back Up Eye (c/w nut, washer, pin and seal) RT-24 RT-F-06 F-01-085 RT-F-01 F-01-087 Replace at the request of a Competent Person Handling Eye (c/w nut, washer, pin and seal) RT-26 F-01-083 F-01-082 F-01-137 F-01-087 Replace at the request of a Competent person RT-A4 Replace at the request of Competent Person. Landing Foot Assembly Replace every 12 months or earlier at the request of Competent Person. The maximum period prior to changing out the defined critical lifting components (other than the sling set) listed in the Annual Inspection procedure shall be 3 years. It should be noted that this recommendation applies to change out of component parts only and does not replace or alter the inspection intervals as prescribed by the relevant legislation which applies in the area of operations. Rev1.0 Date 15/01/09 30 TORO USER MANUAL 7.9 Load Test Procedure The Load Test should be carried out by an independent company with nationally recognised accreditation for lifting equipment inspection and load testing. 1. Test Load : Main Lift Eye and Back-Up Eye TORO TARE (UNLADEN) WEIGHT TORO SWL (Max. Payload 4 x 110 kg (242 lb) persons) STATIC LOAD = (2.2 x SWL) + TARE WEIGHT TEST WEIGHT REQUIRED Kg 375* 440 1343 968 Pounds 827* 970 2961 2134 The distribution of the test weights should be as follows: 440 kg (970 lb) on the seats and spread equally between them* (see notes) 528 kg (1164 lb) placed on the floor between the seat support tubes and as near to the centre of the unit as is practicable. 2. Load Test : Main Lift Eye and Back-Up Eye The test must be repeated for both the main lifting eye path and the back-up lifting eye path. 1. The Unit will be lifted and held Static for a minimum of 3 minutes. 2. Following the load test, a visual inspection of the Toro must be carried out to ensure that no damage has been incurred to the frame or any of the critical components. In particular, the Top Cross Beam, the Main Lifting Eye Plug and Lifting Eye Plug M16 bolts should be visually inspected for any signs of overstress. This inspection must be carried out by a Competent Person. 3. Load Test : Handling Eye The handling eye should be tested with a load of 2 x Tare (unladen) weight = 750kg (1653 lb). 375 kg (827 lb) should be distributed evenly on the floor and the unit will be lifted and held static for a minimum of 3 minutes. 4. Test plate A test plate will be issued and attached by the test house, which should show as a minimum : - Tare (unladen) weight SWL / Payload (Main / Backup Lift Eyes) Handling Eye SWL The load test date The Model number and serial number of the Toro : RT-4 XXX (where XXX is unit I.D. No.) * Notes : a). Remove seat cushions and protect seat during placing of weights b). If test weights which can safely be placed on seats cannot be provided then all weights may be placed centrally on the floor between the two seat support tubes. Rev1.0 Date 15/01/09 31 TORO USER MANUAL 8 8.1 ACCESSORIES Stretcher The stretcher provided as an accessory is a basket type stretcher as illustrated. The stretcher is supplied complete with 4 x stretcher securing straps. SPECIFICATION Length 2150 mm Width 620 mm Depth 185 mm Weight 9.6 kg Load Limit 280 kg (Load Limit includes the weight of the stretcher, the patient and any additional life support equipment) Operating Temperature Rev1.0 Date 15/01/09 -40oC to +60oC 32 TORO USER MANUAL 8.2 Positioning the Stretcher in the Toro Preparation The stretcher is positioned in the Toro unit without any reconfiguration of the seating arrangement. The stretcher is positioned for transit on the Toro floor underneath the seating and between the seat bases (as depicted in figures below). To facilitate positioning of the stretcher, the Toro unit should be positioned on a flat surface in an area which provides sufficient space to correctly align the stretcher and guide it into position. Ensure that the Toro floor grating is clear of obstructions before positioning the stretcher. D C Fig. 3 : Elevation showing stretcher in position. Rev1.0 Date 15/01/09 33 TORO USER MANUAL C B D P P A Fig. 4 : Plan showing stretcher in position Procedure for stretcher positioning. i) Ensure the stretcher casualty is securely strapped into the stretcher. ii) Using three persons to lift the stretcher (one either side, one at head), align the stretcher with the space between the Toro seat bases. The stretcher is to be aligned with the space between buoyancy modules ‘A’ and ‘B’ or between buoyancy modules ‘C’ and ‘D’. Note: Observe safe manual handling practice when lifting the stretcher. iii) Place the feet-end of the stretcher onto the Toro floor grating and slide the stretcher into position as shown in the figures above. iv) The top cross beam may be used as a support point for an intravenous drip. v) The stretcher is held in position laterally by the seat bases. Secure the head and feet ends of the stretcher to the Toro floor with the four straps provided to prevent longitudinal movement. vi) The casualty should be accompanied by a maximum of two passengers during the transit. Passengers should occupy seating positions marked as ‘P’ on Fig.4 when accompanying a stretcher casualty. Rev1.0 Date 15/01/09 34 TORO USER MANUAL 8.3 Other Accessories Other accessories available are : 3-Point Seat Harnesses – supplied in 2 colours (to be fitted to alternate seats to avoid confusion). Weatherproof cover Strobe light Rev1.0 Date 15/01/09 35 TORO USER MANUAL 9 HANDLING, SHIPPING AND STORAGE 9.1 Dimensions The Toro overall dimensions are as follows: HEIGHT 9.2 WIDTH 1 WIDTH 2 TARE WEIGHT METRIC 2.063 m 1.974 m 2.211 m 375 kg IMPERIAL 81.2 ins. 77.7 ins 87.0 ins. 826.7 lb Handling Forklift: Handling of the Toro with a Forklift truck may damage the underside of the unit or the landing feet. Although the Toro may be handled by forklift if care is taken, it is not recommended unless the unit is secured to a pallet specifically designed for forks. Crane: When lifting the Toro with a short chain or strop, the handling eye should be used. Care must be taken not to damage the Toro lifting sling set. Note : The handling eye must not be used if the Toro is to be lifted with passengers or freight. 9.3 Shipping Inspection: It is recommended that before and after shipping the Toro should be inspected to check for damage sustained in transit. Preparation: The Toro should be shipped fully assembled. Prior to shipping, seat harnesses (if fitted) should be secured by tightening the seat harnesses and tying the buckle together. This will prevent the seat harness damaging the seat. It is recommended that the Toro is covered for shipping either in a Toro transit box, a Toro weatherproof cover or other heavy duty tarpaulin material. Containerisation: The Toro will fit in a standard shipping container. Units should be secured on an appropriate shipping skid and loaded into the container using a ramp and a low mast forklift. If the Toro is transported on a flat rack container it must be secured. Recommended securing points are peripheral floor brace/floor grating and handling eyebolt. To protect it from excess loading, the main lifting eye should not be used as a securing point. Rev1.0 Date 15/01/09 36 TORO USER MANUAL Crating: Contact Reflex Marine Ltd for more details. TYPE Unpacked LENGTH WIDTH HEIGHT MASS 2.211 m 1.974 m 2.063 m c. 375 kg (87.0 ins) (77.7 ins) (81.2 ins) (826.7 lb) Pallet/Skid for standard container (See Note 1) ~ Toro Unit Upright Full Crating (See Note 2) ~ Toro Unit Upright 2.261 m 2.261 m 2.210 m (89.0 ins) (89.0 ins) (87.0 ins) 2.362 m 2.362 m 2.311 m (93.0 ins) (93.0 ins) (91.0 ins) c. 490 kg (1080 lb) c. 801 kg (1766 lb) Note 1: Pallet / Skid Includes 100mm (4 ins) space allowance for fork lift handling. The Pallet / Skid allows two Toro units to be loaded in a standard 20 ft. shipping container using a ramp and a low mast forklift. Note 2: Crate strengthened to allow lifting with slings as well as forklift. The crate cannot be loaded into standard shipping containers. 9.4 Storage Although the Toro has been designed to cope with the harsh conditions on an offshore installation or vessel, it is important to protect the unit as much as possible from hazardous elements. It is, therefore, advised to cover the Toro with a weatherproof protective cover whilst not in use. For deck fastening, Reflex Marine recommends using the peripheral braces around the floor grating. Rev1.0 Date 15/01/09 37 TORO USER MANUAL APPENDICES A TRANSER LOG B INSPECTION CHECKLISTS C DIAGRAMS D PARTS LIST AND MATERIAL SPECIFICATION E TORO MARKINGS Rev1.0 Date 15/01/09 Appendices TORO USER MANUAL A TRANSFER LOG MARINE PERSONNEL TRANSFER LOG 3.40 REV2 / 29.04.02 / Date: From (vessel name): Transfer time: To (vessel name): Personnel Crane (port / starboard etc): Carrier type: Transfer classification ROUTINE / EMERGENCY (delete as appropriate) Reason for transfer: Wind speed Wind direction Sea state Visibility OTHER FACTORS AFFECTING TRANSFER (vessel position / deck space etc) PASSENGER DETAILS Passengers are requested to sign below if they consent to undertaking a basket transfer detailed above. Important note to passenger – Certain national regulations place constraints on the use of personnel transfers. Please ensure you are aware of any local regulations prior to proceeding. Name Title Signed consent Time / date PERSON IN CHARGE Hazards identified : Have operating instructions in the capsule been read and understood Has the condition of the transfer capsule and associated equipment been checked Have passengers been fully briefed on the operation Action to be taken to minimise hazards : Name Position Signature Time / date CLOSE OUT STATEMENT The transfer was carried out without incident YES / NO No unforeseen hazards were identified during the operation YES / NO (Delete as appropriate). If either answer is NO give details / recommendations: Name Position Rev1.0 Date 15/01/09 Signature Appendix A Time / date YES / NO YES / NO YES / NO TORO USER MANUAL B INSPECTION CHECKLISTS B.1 Six Month Inspection Checklist Unit No. Inspection Date Inspected by Position/Company Signature Check No. 1. Description Pass/ Fail Comment/Corrective Action Lifteye plug 2. Lifteye plug M16 Bolts 3. Back-up lift eye 4. Sling set (disconnect and remove cover) 5. Handling Eye 6. Seat Cross Beam M16 Bolts 7. Seat Cross Beam assembly 8. Top Cross Beam 9. Frame 10. Buoyancy and Seats 11. Landing Feet 12. (Where fitted). Seat Harnesses condition. 13. (Where fitted). Seat Harnesses operation. 14. Load Test Plate 15. Documentation/Report NOTES: Rev1.0 Date 15/01/09 Appendix B TORO USER MANUAL B.2 Annual Inspection Checklist Unit No. Inspection Date Inspected by Position Signature Check Description No. Annual Inspection 1. Lifting Eye Plug (replace according to usage or condition) 2. Lifting Eye M16 Bolts (replace according to usage or condition) 3. Back-up Lift Eye 4. Replace Sling Set 5. Handling Eye 6. Seat Cross Beam M16 bolts (replace according to usage or condition) 7. Seat Cross Beam Assy. 8. Top Cross Beam 9. Load Test 10 Six Monthly Inspection 11. Report/Documentation Pass/ Fail Comment/ Corrective Action NOTES: Rev1.0 Date 15/01/09 Appendix B TORO USER MANUAL C DIAGRAMS RT-A2-F : Assembly – Load Path RT-A8-D : Assembly - Frame RT-SA-B : Toro Sling Assembly Rev1.0 Date 15/01/09 Appendix C 2 3 ITEM PART NUMBER NO. 4 DESCRIPTION 5 6 7 8 9 10 11 12 REVISIONS QTY. ECN No. REV. B E C D B F 1 RT-08-C CENTRAL COLUMN 1 2 RT-A6-D ASSY - TOP CROSS BEAM 1 3 RT-A7-D ASSY - SEAT CROSS BEAM 1 4 RT-12-B SPREADER PLATE 1 5 RT-13-C LIFTING EYE PLUG 1 6 RT-20-C SADDLE SPACER 2 7 RT-22-B CROSS BOLT - LIFT EYE PLUG 2 8 RT-23-C CROSS BOLT - SEAT TUBE 2 9 RT-24-B BACK UP PAD EYE 1 10 RT-26-A LONG SHANK EYEBOLT 1 11 RT-30-E HEADREST - TORO 1 12 RT-31-A SEAT RETAINER - TOP 1 13 RT-32-A RETAINER, HEADREST 1 14 RT-34-A LOADING PLATE - SEATS 1 15 HC9-F-005 M8x20 HEX SCREW DIN 931 A4 4 16 F-01-137 SPLIT COTTER PIN M3x30 DIN 92 A4 5 17 RT-F-01 SPLIT COTTER PIN M4x40 DIN 92 A4 1 18 F-01-055 M16 HEX NYLOC NUT DIN 985, A4 4 19 F-01-082 M16 FLAT WASHER FORM A DIN125 A4 5 20 F-01-083 M16 HEX HD NUT DIN 934 A4 1 21 F-01-085 M24 FLAT WASHER FORM A DIN 125, A4 1 22 RT-F-06 M24x2.0 (FINE) HEX HD NUT DIN 934 A4 1 23 F-01-084 TAMPER PROOF SEAL - M16 CROSS BOLTS 4 E 24 F-01-087 TAMPER PROOF SEAL - BACK UP AND HANDLING EYES 2 E REF ISO VIEW DESCRIPTION DATE APPD A FIRST ISSUE 30-06-08 DC B ITEMS 1,3,6-8 RAISED IN ISSUE ITEMS 10-15 ADDED 22-08-08 DC C ITEM 2 RAISED IN ISSUE 08-10-08 DC ITEM 2 RAISED IN ISSUE 09/10/08 ITEMS 1 & 5 RAISED IN ISSUE. ITEMS 04-12-08 23 & 24 TAMPER PROOF SEALS ADDED SEAT TUBE GUSSET PLATES WERE 10, 22-12-08 WEB PLATES ADDED TO SEAT PLATE. DC D E B B B B B B B B E F NOTE ORIENTATION 17 22 21 9 A DC DC B 5 10 19 20 16 23 24 B 2 24 7 6 6 18 16 4 23 C TYP 2 PLACES 1512 1 D 1 1 13 E 11 F 23 23 B F F 8 19 19 18 16 TYP 2 PLACES 748 15 12 14 LOOSE ASSEMBLE ITEMS12-15 ON ITEM 1 AND SECURE WITH TYRAPS TOP AND BOTTOM. POSITION NOT IMPORTANT AT THIS STAGE NOTE 1. ASSEMBLY WEIGHT = 42Kgs DRAWN RJ FUDGE 30-06-08 MATERIAL SPECIFICATION SEE DETAILS CHECKED AG 30-06-08 NATURAL SURFACE TREATMENT APPROVED DC 30-06-08 3rd ANGLE PROJECTION WEIGHT: 44.65 Kg SCALE 1:5 FINISH B-B G NO. OFF 1 TOLERANCES UNLESS OTHERWISE SPECIFIED 0 DEC PLACE +/- 1 1 DEC PLACE +/- 0.25 2 DEC PLACE +/- 0.1 ANGULAR +/- 1/4° ALL DIMENSIONS IN mm UNLESS OTHERWISE STATED REFLEX MARINE LTD DEBURR AND BREAK SHARP EDGES ALL DIAMETERS CONCENTRIC 0.05 T.I.R. 16 SURFACE FINISH ALL OVER U.O.S. THIS DRAWING, DESIGN AND SPECIFICATION ARE THE PROPERTY OF REFLEX MARINE LTD AND MAY NOT BE REPRODUCED OR USED IN WHOLE OR PART AS THE BASIS FOR SALE C 2008 REFLEX MARINE LTD OF SOMAR HOUSE, HERON WAY, TRURO, CORNWALL TR1 2XN SOMAR HOUSE, HERON WAY, TRURO, CORNWALL, UK WWW.REFLEXMARINE.COM TITLE H ASSY - LOAD PATH DRAWING NO. RT-A2-F SHEET 1 1 A2 OF 1 PART NUMBER RT-A3-C 2 RT-A5-C 3 4 5 QTY. ASSY - BASE FRAME 1 B C ASSY - PILLAR STRUTS 4 B C 3 RT-A2-F ASSY - LOAD PATH 1 B C D 4 RT-04-C SUPPORT, TUBE STAND 2 B C 5 RT-06-A STAND TUBE 2 6 RT-05-C FLOOR GRATING 2 7 RT-47-A LOAD TEST MOUNTING PLATE 1 8 H-6X-080 M8 HEX NYLOC NUT DIN 985 A4 8 9 H-6X-081 10 F-01-051 M10 HEX NYLOC NUT DIN 985 A4 16 11 F-01-052 M10 FLAT WASHER FORM A DIN 125 A4 16 12 F-01-217 M10x50 SOC BUTTON HD SCREW ISO7380 A4 8 13 F-01-056 M10x80 SOC BUTTON HD SCREW ISO7380 A4 8 14 F-01-143 M12 HEX NYLOC NUT DIN 985 A4 8 15 F-01-158 M12 FLAT WASHER FORM A DIN 125 A4 16 16 RT-F-04 M12x80 HEX HD BOLT DIN 931 A4 4 17 RT-F-08 M12x70 HEX HD BOLT DIN 931 A4 4 18 RT-F-010 M8x60 HEX HD BOLT DIN 931 A4 8 FORM A DIN 125 A4 7 8 9 10 11 12 REVISIONS DESCRIPTION M8 FLAT WASHER 6 0 7. ITEM NO. 1 2 ECN No. REV. 6 7 DETAIL G (1 : 10) SHOWING FITTING OF LOAD TEST MOUNTING PLATE C G 8 DESCRIPTION DATE APPD A FIRST ISSUE 01-09-08 DC B ITEMS 1-4 RAISED IN ISSUE 08-10-08 DC C ITEMS 1,2,3,4,6 RAISED IN ISSUE. ITEM 9 WAS M8x20 (NEW PART No.), NOW 10-12-08 THROUGH BOLT. ITEM 16, NEW PART No. WAS F-01-140, M12x70 SCREW. DC D LOAD PATH ASSY REVISED. WEB PLATES ADDED TO SEAT PLATE. SEAT TUBE 31-12-08 GUSSET WERE 50 WIDE NOW 100. DC ITEM 7 TANGENT TO HOLE IN GRID 7 A B 18 9 8 1 6 DETAIL C (1 : 4) TYP 8 PLACES 16 15 14 3 C C 2 DETAIL H (1 : 5) SHOWING REV D DETAIL D (1 : 5) TYP 4 PLACES D 5 D 5 13 11 10 TYP 8 PLACES SEE DETAIL E DETAIL F (1 : 5) 14 15 15 14 E F SEE DETAIL B 12 11 10 4 TYP 8 PLACES SEE DETAIL A 4 14 15 15 17 DETAIL E (1 : 4) TYP 8 PLACES TYP 4 PLACES 4 ASSEMBLY ORDER (EXCLUDING FASTENERS) ITEM 4, 2 OFF ON ITEM 1 (SEE DETAIL B FOR ORIENTATION) ITEM 6, 2 OFF INTO ITEM 1, ALIGN WITH HOLES IN ITEM 4 ITEM 5 INTO ITEM 4 ITEM 3 ONTO ITEMS 5 ITEM 2, 4 OFF, ONTO ITEM 1 AND 3 DRAWN RJ FUDGE 21-08-08 MATERIAL SPECIFICATION SEE DETAILS CHECKED DC 22-08-08 SURFACE TREATMENT APPROVED DC 22-08-08 3rd ANGLE PROJECTION WEIGHT: 189.96 Kg SCALE 1:20 NO. OFF FINISH DETAIL B (1 : 4) TYP 2 PLACES NOTE FOR HANDLING PURPOSES ASSEMBLED WEIGHT = 185Kgs DETAIL A (1 : 4) TYP 8 PLACES B 1. 2. 3. 4. 5. F 1 TOLERANCES UNLESS OTHERWISE SPECIFIED 0 DEC PLACE +/- 1 1 DEC PLACE +/- 0.25 2 DEC PLACE +/- 0.1 ANGULAR +/- 1/4° ALL DIMENSIONS IN mm UNLESS OTHERWISE STATED G REFLEX MARINE LTD DEBURR AND BREAK SHARP EDGES ALL DIAMETERS CONCENTRIC 0.05 T.I.R. 16 SURFACE FINISH ALL OVER U.O.S. THIS DRAWING, DESIGN AND SPECIFICATION ARE THE PROPERTY OF REFLEX MARINE LTD AND MAY NOT BE REPRODUCED OR USED IN WHOLE OR PART AS THE BASIS FOR SALE C 2008 REFLEX MARINE LTD OF SOMAR HOUSE, HERON WAY, TRURO, CORNWALL TR1 2XN SOMAR HOUSE, HERON WAY, TRURO, CORNWALL, UK WWW.REFLEXMARINE.COM TITLE DRAWING NO. H ASSY - FRAME RT-A8-D SHEET 1 1 A2 OF 1 ITEM NO. PART NUMBER 2 3 DESCRIPTION QTY. 1 RT-A1-C GENERAL ASSEMBLY - TORO 1 2 F-01-024 2 LEG SLING 30FT 1 3 F-01-124 HIGH VISIBLITY SLING COVER (30FT) 1 4 F-01-201 HEAVY DUTY CABLE TIE 4 4 5 6 ECNo. 7 REV REVISIONS DESCRIPTION A B 8 DATE APPD FIRST ISSUE 06-10-08 DC SLING COVER AND ASSOCIATED CABLE TIES REVISED 13-11-08 DC A 2 B 4 2ND CABLE TIE LOOP TO RETAIN SLING COVER 3 SLING LONGER LEG B MAIN LIFTING EYE BACK UP PAD EYE DETAIL B 1:5 HANDLING EYE A 1 DETAILS SHOWING ATTACHMENT OF SLING COVER USING CABLE TIES C 2063 2ND CABLE TIE LOOP TO RETAIN SLING COVER 4 NOTE TORO = 345Kg 30FT (9.1m) SLING = 25Kg D DETAIL A 1:5 SCALE 1:20 DRAWN RJ FUDGE 06-10-08 MATERIAL SPECIFICATION SEE DETAILS SCALE 1:20 NO. OFF FINISH CHECKED RF 06-10-08 SURFACE TREATMENT APPROVED DC 06-10-08 WEIGHT: 370.47 Kg TOLERANCES UNLESS OTHERWISE SPECIFIED 0 DEC PLACE +/- 1 1 DEC PLACE +/- 0.25 2 DEC PLACE +/- 0.1 ANGULAR +/- 1/4° 3rd ANGLE PROJECTION ALL DIMENSIONS IN mm UNLESS OTHERWISE STATED REFLEX MARINE LTD DEBURR AND BREAK SHARP EDGES ALL DIAMETERS CONCENTRIC 0.05 T.I.R. SURFACE FINISH 3.2 ALL OVER U.O.S. THIS DRAWING, DESIGN AND SPECIFICATION ARE THE PROPERTY OF REFLEX MARINE LTD AND MAY NOT BE REPRODUCED OR USED IN WHOLE OR PART AS THE BASIS FOR SALE C 2008 REFLEX MARINE LTD OF SOMAR HOUSE, HERON WAY, TRURO, CORNWALL TR1 2XN SOMAR HOUSE, HERON WAY, TRURO, CORNWALL, UK WWW.REFLEXMARINE.COM TITLE DRAWING NO. E TORO SLING ASSEMBLY RT-SA-B SHEET 1 1 OF A3 TORO USER MANUAL D PARTS LIST AND MATERIAL SPECIFICATION NOTES FOR PARTS LIST: i) Definition According to Criticality All items in the parts list are divided into two groups, critical and non-critical components. The critical components are defined as follows: Components in which if failure were to occur, then there would be a high risk to the safety of the passengers in the Toro. The critical components are all connected to the Main Support Tube, which is the prime structural component in the design. All components defined as critical are identified in the parts list. ii) Fastener Specifications Because of corrosion considerations, all fasteners on the Toro must be supplied in stainless steel suitable for marine use. All nuts and bolts must be Grade A4 or A2. All nuts should be fitted with NYLOC inserts where applicable. iii) Certification Certification Supplied is identified with the following letters: MC - 3.1B Material Certificate CC - Certificate of Conformance LTC - Load test Certificate NDE - Non-Destructive Examination report Rev1.0 Date 15/01/09 Appendix D TORO PARTS LIST & MATERIAL SPECIFICATION CREATED: 12-JAN-2009 REV 1.1 LAST UPDATE: 12-01-09 Notes : UPDATED INFORMATION IN BOLD AUX - AUXILIARY ITEM. NOT SUPPLIED AS STANDARD PART NO. RT-04-C RT-05-C RT-06-A RT-08-C RT-12-B RT-13-C RT-20-C RT-21-A RT-22-B RT-23-C RT-24-B RT-26-A RT-27-C RT-28-C RT-29-A RT-30-E RT-31-A RT-32-A RT-33-B RT-34-A RT-35-A RT-36-A RT-37-B RT-38-A RT-39-A RT-40-A RT-41-A RT-42-A RT-43-A RT-44-A RT-47-A RT-48-A RT-49-A RT-F-01 RT-F-02 RT-F-04 RT-F-05 RT-F-06 RT-F-07 RT-F-08 RT-F-010 RT-F-011 F-01-051 F-01-052 F-01-055 F-01-056 QTY 2 2 2 1 1 1 2 4 2 2 1 1 4 4 4 1 1 1 2 1 4 4 4 4 1 1 32 8 6 16 1 1 4 1 4 4 1 1 8 4 8 16 28 32 4 8 DESCRIPTION SUPPORT, TUBE STAND FLOOR GRATING STAND TUBE CENTRAL COLUMN SPREADER PLATE LIFTING EYE PLUG SADDLE SPACER LOWER SEAT LOCATOR CROSS BOLT - LIFT EYE PLUG CROSS BOLT - SEAT TUBE BACK UP PAD EYE LONG SHANK EYEBOLT BUOYANCY - MOULDING SEAT - MOULDING SEAT CUSHION HEADREST SEAT RETAINER - TOP RETAINER, HEADREST FOOT PLATE LOADING PLATE - SEATS SEAT LOCATOR - BASE CLAMP PLATE SEAT LOCATOR TAB WASHER OCCUPANT DROP SHIELD MARKER PLATE MARKER PLATE - ABS & CE PLASTIC SADDLE WASHER GRAB HANDLE RECTANGULAR PLASTIC TUBE INSERT 60x40 SECURE COVER CAP LOAD TEST MOUNTING PLATE HEADREST RETAINER CLIP LAP STRAP SPILT COTTER PIN M4x40 DIN 92 A4 M8x35 SOC CSK SCREW DIN 7991 A4 M12x80HEX HD BOLT DIN 931 A4 M6x60 HEX HD BOLT DIN 931 A4 M24x2.0 (FINE) HEX HD NUT DIN 934 A4 M8x40 HEX BOLT DIN 931 A4 M12x70 HEX HD BOLT DIN 931 A4 M8x60 HEX HD BOLT DIN 931 A4 M8x60 SOC HD SCREW DIN 912 A4 M10 HEX NYLOC DIN 985 A4 M10 FLAT WASHER FORM A DIN 125 A4 M16 HEX NYLOC NUT DIN 985 A4 M10x80SOC BUTTON HD SCREW ISO7380 A4 CRITICAL Y Y Y Y Y Y Y CERTS MC MC CC CC MC CC CC - MATERIAL ST. STEEL 316L ST. STEEL 316L ST. STEEL 316L ST. STEEL 316L ST. STEEL 316L ST. STEEL 316L ST. STEEL 316L NYLON ST. STEEL, A4 ST. STEEL, A4 ST. STEEL 316L ST. STEEL 316L MDPE WITH FOAM FILL MDPE PE FOAM EVA 60 ST. STEEL 316L ST. STEEL 316L ST. STEEL 316L ST. STEEL 316L ST. STEEL 316L ST. STEEL 316L ST. STEEL 316L ST. STEEL 316L ST. STEEL 316L ST. STEEL 316L PE BLACK, PA6 MID GREY, PE BLACK, PE ST. STEEL 316L BLACK, PP WEBBING & SS ST. STEEL, A4 ST. STEEL, A4 ST. STEEL, A4 ST. STEEL, A4 ST. STEEL, A4 ST. STEEL, A4 ST. STEEL, A4 ST. STEEL, A4 ST. STEEL, A4 ST. STEEL, A4 ST. STEEL, A4 ST. STEEL, A4 ST. STEEL, A4 WEIGHT Kgs 3.6 25.52 1.2 7.6 0.2 2.4 0.14 0.031 0.17 0.23 0.93 0.3 18 14 2 9 0.62 0.04 0.51 0.16 0.13 0.14 0.003 0.87 F-01-070 8 M10x60 SOC BUTTON HD SCREW ISO7380 A4 - ST. STEEL, A4 0.045 5 1 1 5 8 16 M16 FLAT WASHER FORM A DIN 125 A4 M16 HEX HD NUT DIN 934 A4 M24 FLAT WASHER FORM A DIN 125 A4 SPILT COTTER PIN M3x30 DIN 92 A4 M12 HEX NYLOC NUT DIN 985 A4 M12 FLAT WASHER FORM A DIN 125 A4 - ST. STEEL, A4 ST. STEEL, A4 0.013 0.04 0.04 0.002 0.02 0.005 F-01-217 H-6X-080 H-6X-081 HC9-F-005 HC9-F-015 HC9-F-021 HC9-F-027 F-01-084 F-01-087 RT-D1-B RT-D2-B RT-D3-A RT-D4-A RT-D5-A RT-A3-C RT-A4-E RT-A5-C RT-A6-D RT-A7-D F-01-024 F-01-201 F-01-124 8 28 12 4 2 2 1 4 2 1 1 1 1 1 1 4 4 1 1 1 4 1 M10x50 SOC BUTTON HD SCREW ISO7380 A4 M8 HEX NYLOC NUT DIN 985 A4 M8 FLAT WASHER FORM A DIN 125 A4 M8x20 HEX SCREW DIN 931 A4 M10x25 HEX SCREW DIN 931 A4 M10x110 HEX BOLT DIN 931 A4 M6 HEX NYLOC DIN 985 A4 TAMPER PROOF SEAL (LEP & SEAT BEAM BOLTS) TAMPER PROOF SEAL (BU & HANDLING EYE BOLTS) OPERATING INSTRUCTIONS (2 SHEETS) SAFETY STICKERS ENTRY AND EXIT STRETCHER POSITIONING BUOYANCY STICKERS ASSY - BASE FRAME ASSY - LANDING FOOT ASSY - PILLAR STRUT ASSY - TOP CROSS ASSY - SEAT CROSS BEAM 2 LEG SLING - 30FT LONG (INC SHACKLES) H/DUTY CABLE TIE HIGH VISIBILITY SLING COVER (30FT) - Y Y CC LTC, MC - ST. STEEL, A4 ST. STEEL, A4 ST. STEEL, A4 ST. STEEL, A4 ST. STEEL, A4 ST. STEEL, A4 ST. STEEL, A4 ST. STEEL, A4 ST. STEEL ST. STEEL ----------------------------------ST. STEEL, A4 -----------------ST. STEEL 316L EVA & 316L SS ST. STEEL 316L ST. STEEL 316L 316L ST.STEEL & NYLON ---------------------------------------------------- Y Y Y Y Y Y 0.01 1 0.004 0.02 0.09 0.02 0.18 0.02 0.08 0.03 0.03 0.013 0.004 0.03 0.06 F-01-082 F-01-083 F-01-085 F-01-137 F-01-143 F-01-158 ST. STEEL, A4 ST. STEEL, A4 ST. STEEL, A4 I.D. NO. (See TM 4) 0.039 0.01 0.002 0.01 0.03 0.08 0.01 Y Y PART NO. F-01-112 F-01-113 F-01-116 F-01-122 F-01-125 F-01-126 F-01-250 F-01-251 H-01-278 H-6X-040 QTY AUX AUX AUX 1 AUX AUX AUX 2 AUX 1 AUX 2 AUX 2 AUX DESCRIPTION CRITICAL CERTS Y Y Y 2 LEG SLING - 10FT LONG (INC SHACKLES) 2 LEG SLING - 20FT LONG (INC SHACKLES) 2 LEG SLING - 15FT LONG (INC SHACKLES) JOTRON AQ4 STROBE HIGH VISIBILITY SLING COVER (10FT) HIGH VISIBILITY SLING COVER (20FT) ATEX STROBE LIGHT ST. STEEL CLIP FOR ATEX STROBE LIGHT (27-51mm) RED SEAT HARNESS (optional) YELLOW SEAT HARNESS (optional) Y Y LTC, MC LTC, MC LTC, MC CC CC MATERIAL -------------------------------------------------------------------------------------ST. STEEL WEBBING & SS WEBBING & SS I.D. NO. (See TM 4) Y Y Y 1.5 1.5 Y & SEE PART DRG'S RT-RP-01-B AUX REPLACEMENT PARTS KIT Y MC, MC, CC RT-CPK-01-10 AUX CRITICAL PARTS KIT (10FT SLING) Y LTC/MC, MC, VARIOUS MC, CC Y & SEE PART DRG'S RT-CPK-01-15 AUX CRITICAL PARTS KIT (15FT SLING) Y LTC/MC, MC, VARIOUS MC, CC Y & SEE PART DRG'S RT-CPK-01-20 AUX CRITICAL PARTS KIT (20FT SLING) Y LTC/MC, MC, VARIOUS MC, CC Y & SEE PART DRG'S RT-CPK-01-30 AUX CRITICAL PARTS KIT (30FT SLING) Y LTC/MC, MC, MC, CC TBA - Y & SEE PART DRG'S RT-A9-A RT-50-B RT-51 RT-61-A AUX TORO BOX 1 AUX TORO STRETCHER AUX TORO WEATHER COVER AUX TORO STRETCHER TIE DOWN STRAPS (SET OF 4-OFF) AISI 316, A4 & ST.STEEL WEIGHT Kgs VARIOUS VARIOUS POLYETHYLENE & WEBBING -----------------STEEL & WEBBING TORO USER MANUAL E E.1 TORO MARKINGS Essential Requirement as per EU Machinery Directive The Toro is indelibly marked with the following information. CE Mark (as applicable) Type Approval Mark (as applicable) Description of Equipment Model Serial Number Manufacturers Address Year of construction Mass of usual configuration/Mass without Payload (Tare weight) Safe Working Load (SWL) Maximum Gross Mass (MGM) Maximum number of Passengers MARKING PLATES FOR TORO Rev1.0 Date 15/01/09 Appendix E TORO USER MANUAL E.2 Orientation for Markings C B D Load Test Plate A To establish unit orientation for application of markings : 1. Identify location of Load Test Plate 2. Buoyancy module on the left of the Load Test Plate is designated as module ‘A’ 3. Remaining buoyancy modules are designated ‘B’, ‘C’ and ‘D’ sequentially in a clockwise direction. E.3 Location of Plate Markings Between Modules ‘A’ and ‘D’ Manufacturers Marker Plate Load Test Plate Approvals Marker Plate Between Modules ‘B’ and ‘C’ Rev1.0 Date 15/01/09 Appendix E TORO USER MANUAL E.4 Instructions - Located Inside of Buoyancy Units Module C Inner Module A Inner Modules B and D Inner 7 4 8 5 6 1 1 2 3 4 E.5 Operating Instructions (2 x A4) Entry and Exit (A4) Stretcher Positioning (A4) Seat Belts... Fit to All Modules 2 3 5 6 7 8 Keep feet inside... Fit to All Modules SWL Hand Hold Fit to All Modules Client Feedback No Step Labels ‘No Step’ - 2 Positions Between Modules ‘A’ and ‘B’ and between Modules ‘C’ and ‘D’ Rev1.0 Date 15/01/09 Appendix E TORO USER MANUAL E.6 Logo Labelling Note that Modules are labelled A, B, C and D according to unit orientation (see E.2, above) All Modules Outer A 9 9 9 10 9 Logo Decal (three-part) 10 Entry Arrow E.7 Application of Adhesive Labels / Decals MDPE Buoyancy requires surface preparation for good contact adhesion of the adhesive labels / decals. 1. Gently heat the contact area until the surface is oxidized and has a shiny appearance. 2. Allow contact area to cool to ambient temperature 3. Apply label / decal Rev1.0 Date 15/01/09 Appendix E