1
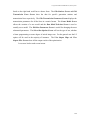
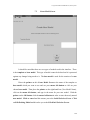
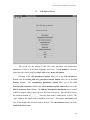
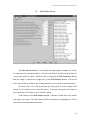
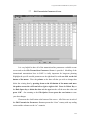
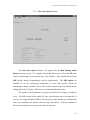
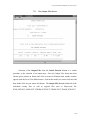
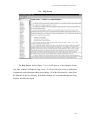
Long Term Model USER MANUAL, February 2001
CHAPTER 7
THE POWER POOL WINDOWS INTERFACE
The third year of the SAPP modeling work has seen the creation of the Power
Pool Windows Interface. This new windows facility provides greater user friendliness
with the SAPP models such that a general user no longer requires any knowledge of the
GAMS solver or to have any code editing skills. The interface enables the general user to
quickly and safely change the input data to the model and be provided with results in the
form of output maps and tabulated files.
The interface is created using JAVA
programming and now makes it very simple to:
Edit existing models generation and transmission data
Create new models with up to ten time periods
Run models with linear or integer variables
Add and delete stations or lines
View output regional and national data files
View output maps.
The screen shots illustrated in this chapter show the windows facilities that are
now available and provide an introduction to their use. Advanced help facilities and
other enhancements are planned. On starting to run the interface a flash card appears for
20 seconds, which is then followed by the Initial Selection Screen. All of the options
listed above are shown in this first screen. These windows are produced from with JAVA
program by extracting all of the required data from the GAMS code files. The output
maps provide a very powerful technique of collecting together all of the related output
results and presenting them in a clear picture format.
The Edit Model Selection Screen gives the choice as to which model is to be
edited. The Edit Options Screen gives an option on the type of editing that can be done
whether changing the values of general parameters or the sets of data related to one
specific generating station etc. The Edit Parameters Screen has all the 130 parameters
145
Long Term Model USER MANUAL, February 2001
listed on the right hand scroll bar to choose from. The Edit Stations Screen and Edit
Transmission Lines Screen show the data for specific generation stations and
transmission lines respectively. The Edit Transmission Parameters Screem displays the
transmission parameters for all the lines in a matrix format. The Create Model Screen
allows the creation of a new model and the Run Model Selection Screen is used to
actually run a model. The Edit Run Parameters Screen is useful for changing the most
substantial parameters. The Select Run Options Screen will set the type of run, whether
a linear programming or some degree of mixed integer run. For the general user the LP
option will be used in the majority of instances. The View Output Maps and View
Output Files Screens show all the output results of the optimization.
Let us now look at each screen in turn.
146
Long Term Model USER MANUAL, February 2001
7.1
Initial Selection Screen
Using the mouse place the arrow on the option button that is required and make
a single click on the left mouse button. If you change your mind on the chosen option
then clicking on the cancel button will return you to this Initial Selection Screen. (The
help facility button is still being developed.) The exit button takes you out of the
interface. You will be asked to confirm your wanting to exit the program.
If you are starting to use the interface for the very first time you will need to use
your mouse left button to click onto the Create New Model option. This will then take
you to the Create New Model screen.
147
Long Term Model USER MANUAL, February 2001
7.2
Create Model Screen
It should be noted that there are two types of models used in the interface. There
is the template or base model. This type of model cannot be deleted and it is protected
against any changes being made to it. The base model is used for the creation of a user
model.
Direct the pointer on this Create Model Screen to the name of the template or
base model which you want to use and use your mouse left button to click on your
chosen base model. Then place the pointer on the right-hand box (New Model Name),
click on the mouse left button, and type in the name for your new model. With the
pointer on the OK button click the mouse left button in order to store the newly named
user model. Click on cancel and this returns you to the Initial Selection Screen. Click
on Edit Existing Model and this takes you to the Edit Model Selection Screen.
148
Long Term Model USER MANUAL, February 2001
7.3
Edit Model Selection Screen
This screen allows you to choose from the existing user models in the interface.
The BaseModel2Dec1 model permits 10 time periods and only includes those new
generation projects which have been specified by SAPP and are listed in Chapter 1.
Highlight the chosen user model with one click of your mouse left button and
then use the pointer and click on OK with one click on the mouse left button. The
interface now loads up all the files from GAMS into the JAVA program which will then
enable the interface to edit the data and run the model. The cancel button returns you to
the Initial Selection Screen. A time bar will appear while your selected model is being
loaded into the interface.
149
Long Term Model USER MANUAL, February 2001
7.4
Edit Options Screen
This screen, for the editing of data files with generation and transmission
parameters, is likely to be the most frequently used screen. Use the pointer to select the
option that you want by making a single click on the mouse left button.
Selection of the edit parameters button takes you to the Edit Parameters
Screen, and the existing and new generation stations button takes you to the Edit
Stations Screen.
The transmission parameters button takes you to the Edit
Transmission Parameters Screen, and edit transmission plant button takes you to the
Edit Transmission Lines Screen. The add new transmission line button causes a small
window to appear which requires the new line name to be given. This should be kept to
the standard notation of _ _ _/_ _ _ where the three nodes/ country name is given. The
“type” option in this small window should be set at “new”. Pressing the save button will
save all the changes that you have made to the data. The cancel button returns you to the
Initial Selection Screen.
150
Long Term Model USER MANUAL, February 2001
7.5
Edit Parameters Screen
This Edit Parameters Screen has over 160 parameters listed on the right hand
side. The scroll bar enables you to go down the list. The notation at the beginning of
this manual will provide you with all the definitions of these parameters as well as their
definitions being printed on the top of each parameter screen. Selection of the set of data
for each parameter appears when you highlight the parameter with a single click on the
mouse left button.
To change any data for the parameter you choose just highlight it by using the
mouse left button and the type the new value into the space. Press “OK” once you have
finished making the changes. Press the save button on the Edit Existing Model Screen in
order for your new data to replace the initial value of the data.
151
Long Term Model USER MANUAL, February 2001
7.6
Edit Stations Screen
This Edit Stations Screen is very helpful for inspecting the complete set of data
for each respective generating station. It assists each utility to quickly check the data for
every station under its control. Whenever data is changed in the Edit Parameters Screen
then the change is also shown straight away in this Edit Stations Screen. This screen
shows the data that is stored for the existing stations as well as the new optional stations.
Selection of the “view” pull down menu gives the option of a select display of all
stations for all countries or for a selected country. It also gives the option of existing or
new stations for all countries or for a selected country.
At the bottom of this Edit Stations Screen a “Rename” button allows any station
to be given a new name. The delete button delete the station that is highlighted as well as
all the data stored under that station name.
152
Long Term Model USER MANUAL, February 2001
7.7
Edit Transmission Parameters Screen
It is very helpful to have all of the transmission line parameters available on one
screen and so the Edit Transmission Parameters Screen is provided. Modeling of the
international transmission lines in SAPP is vitally important for long-term planning
Highlight the specific needed parameter on the right-hand list with one click on the left
button of the mouse. Place the pointer on the data cell that you wish to change then
delete the existing data by pressing down on the left button of the mouse and move
the pointer across the cell from left to right or right to left. Press the Delete Key or
the Back Space key to delete the data and then type into the cell the new data value and
press “OK”. On returning to the Edit Options Screen press the save button to store
your data changes.
Please note the clarification at the bottom of the screen. All of the rows in each of
the Edit Transmission Parameters Screen represent the “from” country with any trading
action and the columns are the “to” countries.
153
Long Term Model USER MANUAL, February 2001
7.8
Edit Transmission Lines Screen
Similar to the Edit Stations Screen the Edit Transmission Lines Screen provides
the whole set of data for each respective transmission line. The names of each line refer
to the names of the two countries at which the line starts and where it ends.
Highlight the data you wish to change and then press “OK”. Once back in Edit
Existing Model Screen press the same button in order to store your changes.
154
Long Term Model USER MANUAL, February 2001
7.9
Run Model Selection Screen
With the Run Model Selection Screen direct the pointer to the model that you
wish to run and so highlight your chosen model. Direct the pointer now to the OK
button and click on the mouse left button. This will take you directly to the Select Run
Options Screen.
155
Long Term Model USER MANUAL, February 2001
7.10
Edit Run Parameters Screen
The Edit Run Parameters Screen includes the most significant parameters that
can be changed to reflect major policy issues such as national autonomy, electricity
growth rates (for each possible time period), years in one period, demand side
management, demand data, and reserves. The desired parameter is chosen by directing
the pointer to it and then directing the pointer to the OK button and then pressing the
mouse left button.
156
Long Term Model USER MANUAL, February 2001
7.11
Select Run Options Screen
The Select Run Options Screen will appear after the Run Existing Model
button has been pressed. It is strongly advised that this screen is left in the LP mode
(Linear Programming) for the general user of the interface. After careful discussion the
MIP (Mixed Integer Programming) could be implemented.
The MIP options are
intended for use by experienced programmers or users with specific reasons for
introducing an integer variable. Please refer to other sections of the User Manual before
changing from the LP option. MIP runs are recommended for best results.
The options in the left bottom box permit increased levels of integer variables to
occur. The MIP version of the model will take a much longer time to run than the LP
version. It is suggested that the MIP be chosen for new hydro stations, new transmission
lines, new combined cycle stations, and new large coal stations. If all the variables are
allowed to be integer then very long run times are expected.
157
Long Term Model USER MANUAL, February 2001
7.12
View Output Maps Screen
When selecting the View Output Map from the Initial Selection Screen a file
selection window will first appear. This enables you to choose to see the output maps
from the various user models that have already been created. Use your pointer to select
the user model file that you want and click on your mouse left button. Another window
appears and you will need to double click onto the file SAPP.map and this will then take
you into the View Output Maps Screen. When you open your map file you will see that
there are several more options to choose from at the top left of the View Output Maps
Screen. Place your pointer on the technology that you want to look at and then click the
mouse left button. Following this selection you will then need to point to the Generate
Map Button in the bottom right hand side of the screen. This button will need to be
chosen each time that you want to look at the results from each technology. By placing
the pointer on the select period scroll bar and at the same time pressing on the mouse
left button then the results can be seen for each time period specified.
158
Long Term Model USER MANUAL, February 2001
7.13
View Output Files Screen
Selection of the Output Files from the Initial Selection Screen is a similar
procedure to the selection of an output map. Once the Output Files button has been
chosen (place pointer on button and click on mouse left button) then another window
appears with the list of User Model names. Point at the model you want to look into and
then double click on your mouse left button. The Output Files Screen include all of the
individual country files as well as regional files such as Projects.out file,
HYD_EXP.OUT, SAPP.OUT, THERM_EXP.OUT, TRADE.OUT, TRANS_EXP.OUT.
159
Long Term Model USER MANUAL, February 2001
7.14
Help Screen
The Help Screen facility (Figure 7.14) is in the process of development for the
July 2000 windows workshop in Cape Town. It will provide quick access to definitions
of parameters and information about the modeling. All of the help material is taken from
the Edition 5 of the User Manual. With further funding it is recommended that more help
facilities should be developed.
160