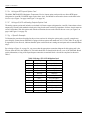
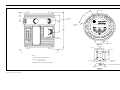
1
GE Measurement & Control Solutions Flow DigitalFlow™ XMT868i Ultrasonic Flow Transmitter for Liquids (1 & 2-Channel) Startup Guide 910-171U Rev. F October 2011 DigitalFlow™ XMT868i Ultrasonic Flow Transmitter for Liquids (1 & 2-Channel) Startup Guide 910-171U Rev. F October 2011 ge-mcs.com ©2011 General Electric Company. All rights reserved. Technical content subject to change without notice. [no content intended for this page] ii Preface Information Paragraphs • Note paragraphs provide information that provides a deeper understanding of the situation, but is not essential to the proper completion of the instructions. • Important paragraphs provide information that emphasizes instructions that are essential to proper setup of the equipment. Failure to follow these instructions carefully may cause unreliable performance. • Caution! paragraphs provide information that alerts the operator to a hazardous situation that can cause damage to property or equipment. • Warning! paragraphs provide information that alerts the operator to a hazardous situation that can cause injury to personnel. Cautionary information is also included, when applicable. Safety Issues WARNING! It is the responsibility of the user to make sure all local, county, state and national codes, regulations, rules and laws related to safety and safe operating conditions are met for each installation. Auxiliary Equipment Local Safety Standards The user must make sure that he operates all auxiliary equipment in accordance with local codes, standards, regulations, or laws applicable to safety. Working Area WARNING! Auxiliary equipment may have both manual and automatic modes of operation. As equipment can move suddenly and without warning, do not enter the work cell of this equipment during automatic operation, and do not enter the work envelope of this equipment during manual operation. If you do, serious injury can result. WARNING! Make sure that power to the auxiliary equipment is turned OFF and locked out before you perform maintenance procedures on the equipment. Qualification of Personnel Make sure that all personnel have manufacturer-approved training applicable to the auxiliary equipment. Personal Safety Equipment Make sure that operators and maintenance personnel have all safety equipment applicable to the auxiliary equipment. Examples include safety glasses, protective headgear, safety shoes, etc. Unauthorized Operation Make sure that unauthorized personnel cannot gain access to the operation of the equipment. DigitalFlow™ XMT868i Startup Guide iii Preface Environmental Compliance Waste Electrical and Electronic Equipment (WEEE) Directive GE Measurement & Control Solutions is an active participant in Europe’s Waste Electrical and Electronic Equipment (WEEE) take-back initiative, directive 2002/96/EC. The equipment that you bought has required the extraction and use of natural resources for its production. It may contain hazardous substances that could impact health and the environment. In order to avoid the dissemination of those substances in our environment and to diminish the pressure on the natural resources, we encourage you to use the appropriate take-back systems. Those systems will reuse or recycle most of the materials of your end life equipment in a sound way. The crossed-out wheeled bin symbol invites you to use those systems. If you need more information on the collection, reuse and recycling systems, please contact your local or regional waste administration. Visit http://www.ge-mcs.com/en/about-us/environmental-health-and-safety/1741-weee-req.html for take-back instructions and more information about this initiative. iv DigitalFlow™ XMT868i Startup Guide Contents Chapter 1. Installation 1.1 1.2 1.3 1.4 1.5 1.6 1.7 Introduction . . . . . . . . . . . . . . . . . . . . . . . . . . . . . . . . . . . . . . . . . . . . . . . . . . . . . . . . . . . . . . . . . . . . . . . . . . . . . . . . . . . . . . . . . . . . 1 Unpacking . . . . . . . . . . . . . . . . . . . . . . . . . . . . . . . . . . . . . . . . . . . . . . . . . . . . . . . . . . . . . . . . . . . . . . . . . . . . . . . . . . . . . . . . . . . . . 1 Site Considerations . . . . . . . . . . . . . . . . . . . . . . . . . . . . . . . . . . . . . . . . . . . . . . . . . . . . . . . . . . . . . . . . . . . . . . . . . . . . . . . . . . . . . 2 1.3.1 Electronics Enclosure Location . . . . . . . . . . . . . . . . . . . . . . . . . . . . . . . . . . . . . . . . . . . . . . . . . . . . . . . . . . . . . . . . . . . . . 2 1.3.2 Flowcell Location. . . . . . . . . . . . . . . . . . . . . . . . . . . . . . . . . . . . . . . . . . . . . . . . . . . . . . . . . . . . . . . . . . . . . . . . . . . . . . . . . . 2 1.3.3 Transducer Location. . . . . . . . . . . . . . . . . . . . . . . . . . . . . . . . . . . . . . . . . . . . . . . . . . . . . . . . . . . . . . . . . . . . . . . . . . . . . . . 3 1.3.4 Cable Lengths. . . . . . . . . . . . . . . . . . . . . . . . . . . . . . . . . . . . . . . . . . . . . . . . . . . . . . . . . . . . . . . . . . . . . . . . . . . . . . . . . . . . . 3 1.3.5 Transducer Cables . . . . . . . . . . . . . . . . . . . . . . . . . . . . . . . . . . . . . . . . . . . . . . . . . . . . . . . . . . . . . . . . . . . . . . . . . . . . . . . . 3 Installing a Flowcell. . . . . . . . . . . . . . . . . . . . . . . . . . . . . . . . . . . . . . . . . . . . . . . . . . . . . . . . . . . . . . . . . . . . . . . . . . . . . . . . . . . . . 3 Installing Temperature Transmitters . . . . . . . . . . . . . . . . . . . . . . . . . . . . . . . . . . . . . . . . . . . . . . . . . . . . . . . . . . . . . . . . . . . . . 4 Mounting the XMT868i Electronics Enclosure. . . . . . . . . . . . . . . . . . . . . . . . . . . . . . . . . . . . . . . . . . . . . . . . . . . . . . . . . . . . . 5 Making Electrical Connections . . . . . . . . . . . . . . . . . . . . . . . . . . . . . . . . . . . . . . . . . . . . . . . . . . . . . . . . . . . . . . . . . . . . . . . . . . 5 1.7.1 Wiring the Line Power . . . . . . . . . . . . . . . . . . . . . . . . . . . . . . . . . . . . . . . . . . . . . . . . . . . . . . . . . . . . . . . . . . . . . . . . . . . . . 6 1.7.2 Wiring Transducers. . . . . . . . . . . . . . . . . . . . . . . . . . . . . . . . . . . . . . . . . . . . . . . . . . . . . . . . . . . . . . . . . . . . . . . . . . . . . . . . 8 1.7.3 Wiring Standard 0/4-20 mA Analog Outputs . . . . . . . . . . . . . . . . . . . . . . . . . . . . . . . . . . . . . . . . . . . . . . . . . . . . . . . . 9 1.7.4 Wiring the Serial Port . . . . . . . . . . . . . . . . . . . . . . . . . . . . . . . . . . . . . . . . . . . . . . . . . . . . . . . . . . . . . . . . . . . . . . . . . . . . . . 9 1.7.5 Wiring Option Cards . . . . . . . . . . . . . . . . . . . . . . . . . . . . . . . . . . . . . . . . . . . . . . . . . . . . . . . . . . . . . . . . . . . . . . . . . . . . . .12 Chapter 2. Initial Setup 2.1 2.2 2.3 2.4 Introduction . . . . . . . . . . . . . . . . . . . . . . . . . . . . . . . . . . . . . . . . . . . . . . . . . . . . . . . . . . . . . . . . . . . . . . . . . . . . . . . . . . . . . . . . . . .27 XMT868i Enclosure Infrared Keypad . . . . . . . . . . . . . . . . . . . . . . . . . . . . . . . . . . . . . . . . . . . . . . . . . . . . . . . . . . . . . . . . . . . .28 Entering Data in the Global Menu . . . . . . . . . . . . . . . . . . . . . . . . . . . . . . . . . . . . . . . . . . . . . . . . . . . . . . . . . . . . . . . . . . . . . .29 2.3.1 Entering Global System Data. . . . . . . . . . . . . . . . . . . . . . . . . . . . . . . . . . . . . . . . . . . . . . . . . . . . . . . . . . . . . . . . . . . . . .29 Entering Data in the Channel Menu. . . . . . . . . . . . . . . . . . . . . . . . . . . . . . . . . . . . . . . . . . . . . . . . . . . . . . . . . . . . . . . . . . . . .34 2.4.1 Selecting the Channel Measurement Method . . . . . . . . . . . . . . . . . . . . . . . . . . . . . . . . . . . . . . . . . . . . . . . . . . . . . .34 2.4.2 Entering Data in the Channel System Option. . . . . . . . . . . . . . . . . . . . . . . . . . . . . . . . . . . . . . . . . . . . . . . . . . . . . . .35 2.4.3 Entering Pipe Parameters. . . . . . . . . . . . . . . . . . . . . . . . . . . . . . . . . . . . . . . . . . . . . . . . . . . . . . . . . . . . . . . . . . . . . . . . .39 Chapter 3. Operation 3.1 3.2 3.3 3.4 3.5 Introduction . . . . . . . . . . . . . . . . . . . . . . . . . . . . . . . . . . . . . . . . . . . . . . . . . . . . . . . . . . . . . . . . . . . . . . . . . . . . . . . . . . . . . . . . . . .47 Powering Up . . . . . . . . . . . . . . . . . . . . . . . . . . . . . . . . . . . . . . . . . . . . . . . . . . . . . . . . . . . . . . . . . . . . . . . . . . . . . . . . . . . . . . . . . .48 The LCD Display . . . . . . . . . . . . . . . . . . . . . . . . . . . . . . . . . . . . . . . . . . . . . . . . . . . . . . . . . . . . . . . . . . . . . . . . . . . . . . . . . . . . . . .49 The Optional PanaView Display . . . . . . . . . . . . . . . . . . . . . . . . . . . . . . . . . . . . . . . . . . . . . . . . . . . . . . . . . . . . . . . . . . . . . . . .50 Taking Measurements . . . . . . . . . . . . . . . . . . . . . . . . . . . . . . . . . . . . . . . . . . . . . . . . . . . . . . . . . . . . . . . . . . . . . . . . . . . . . . . . .51 3.5.1 Programming the LCD . . . . . . . . . . . . . . . . . . . . . . . . . . . . . . . . . . . . . . . . . . . . . . . . . . . . . . . . . . . . . . . . . . . . . . . . . . . .51 3.5.2 Using the LCD Display . . . . . . . . . . . . . . . . . . . . . . . . . . . . . . . . . . . . . . . . . . . . . . . . . . . . . . . . . . . . . . . . . . . . . . . . . . . .53 3.5.3 PanaView Display . . . . . . . . . . . . . . . . . . . . . . . . . . . . . . . . . . . . . . . . . . . . . . . . . . . . . . . . . . . . . . . . . . . . . . . . . . . . . . . .54 3.5.4 Pausing Measurement. . . . . . . . . . . . . . . . . . . . . . . . . . . . . . . . . . . . . . . . . . . . . . . . . . . . . . . . . . . . . . . . . . . . . . . . . . . .57 DigitalFlow™ XMT868i Startup Guide v Contents Chapter 4. Specifications 4.1 4.2 4.3 4.4 4.5 General . . . . . . . . . . . . . . . . . . . . . . . . . . . . . . . . . . . . . . . . . . . . . . . . . . . . . . . . . . . . . . . . . . . . . . . . . . . . . . . . . . . . . . . . . . . . . . .59 4.1.1 Hardware Configuration. . . . . . . . . . . . . . . . . . . . . . . . . . . . . . . . . . . . . . . . . . . . . . . . . . . . . . . . . . . . . . . . . . . . . . . . . .59 4.1.2 Environmental . . . . . . . . . . . . . . . . . . . . . . . . . . . . . . . . . . . . . . . . . . . . . . . . . . . . . . . . . . . . . . . . . . . . . . . . . . . . . . . . . . .59 4.1.3 Flow Accuracy (Velocity) . . . . . . . . . . . . . . . . . . . . . . . . . . . . . . . . . . . . . . . . . . . . . . . . . . . . . . . . . . . . . . . . . . . . . . . . . .60 4.1.4 Range . . . . . . . . . . . . . . . . . . . . . . . . . . . . . . . . . . . . . . . . . . . . . . . . . . . . . . . . . . . . . . . . . . . . . . . . . . . . . . . . . . . . . . . . . . .60 4.1.5 Rangeability (Overall) . . . . . . . . . . . . . . . . . . . . . . . . . . . . . . . . . . . . . . . . . . . . . . . . . . . . . . . . . . . . . . . . . . . . . . . . . . . . .60 4.1.6 Repeatability. . . . . . . . . . . . . . . . . . . . . . . . . . . . . . . . . . . . . . . . . . . . . . . . . . . . . . . . . . . . . . . . . . . . . . . . . . . . . . . . . . . . .60 4.1.7 Energy Accuracy (% of Reading): . . . . . . . . . . . . . . . . . . . . . . . . . . . . . . . . . . . . . . . . . . . . . . . . . . . . . . . . . . . . . . . . . .60 4.1.8 Fluid Types. . . . . . . . . . . . . . . . . . . . . . . . . . . . . . . . . . . . . . . . . . . . . . . . . . . . . . . . . . . . . . . . . . . . . . . . . . . . . . . . . . . . . . .60 Electrical. . . . . . . . . . . . . . . . . . . . . . . . . . . . . . . . . . . . . . . . . . . . . . . . . . . . . . . . . . . . . . . . . . . . . . . . . . . . . . . . . . . . . . . . . . . . . .61 4.2.1 Power Supply . . . . . . . . . . . . . . . . . . . . . . . . . . . . . . . . . . . . . . . . . . . . . . . . . . . . . . . . . . . . . . . . . . . . . . . . . . . . . . . . . . . .61 4.2.2 Operating Modes. . . . . . . . . . . . . . . . . . . . . . . . . . . . . . . . . . . . . . . . . . . . . . . . . . . . . . . . . . . . . . . . . . . . . . . . . . . . . . . . .61 4.2.3 European Compliance . . . . . . . . . . . . . . . . . . . . . . . . . . . . . . . . . . . . . . . . . . . . . . . . . . . . . . . . . . . . . . . . . . . . . . . . . . . .61 4.2.4 Input/Output. . . . . . . . . . . . . . . . . . . . . . . . . . . . . . . . . . . . . . . . . . . . . . . . . . . . . . . . . . . . . . . . . . . . . . . . . . . . . . . . . . . . .62 4.2.5 Additional Options . . . . . . . . . . . . . . . . . . . . . . . . . . . . . . . . . . . . . . . . . . . . . . . . . . . . . . . . . . . . . . . . . . . . . . . . . . . . . . .62 Transducer . . . . . . . . . . . . . . . . . . . . . . . . . . . . . . . . . . . . . . . . . . . . . . . . . . . . . . . . . . . . . . . . . . . . . . . . . . . . . . . . . . . . . . . . . . .63 4.3.1 Wetted Transducers. . . . . . . . . . . . . . . . . . . . . . . . . . . . . . . . . . . . . . . . . . . . . . . . . . . . . . . . . . . . . . . . . . . . . . . . . . . . . .63 4.3.2 Clamp-On Transducers . . . . . . . . . . . . . . . . . . . . . . . . . . . . . . . . . . . . . . . . . . . . . . . . . . . . . . . . . . . . . . . . . . . . . . . . . . .64 4.3.3 Transducer Cables . . . . . . . . . . . . . . . . . . . . . . . . . . . . . . . . . . . . . . . . . . . . . . . . . . . . . . . . . . . . . . . . . . . . . . . . . . . . . . .64 4.3.4 Temperature Transducers (optional). . . . . . . . . . . . . . . . . . . . . . . . . . . . . . . . . . . . . . . . . . . . . . . . . . . . . . . . . . . . . . .64 Pipe Size and Materials . . . . . . . . . . . . . . . . . . . . . . . . . . . . . . . . . . . . . . . . . . . . . . . . . . . . . . . . . . . . . . . . . . . . . . . . . . . . . . . .65 4.4.1 Wetted Transducers. . . . . . . . . . . . . . . . . . . . . . . . . . . . . . . . . . . . . . . . . . . . . . . . . . . . . . . . . . . . . . . . . . . . . . . . . . . . . .65 4.4.2 Clamp-on Transducers . . . . . . . . . . . . . . . . . . . . . . . . . . . . . . . . . . . . . . . . . . . . . . . . . . . . . . . . . . . . . . . . . . . . . . . . . . .65 Flowcell. . . . . . . . . . . . . . . . . . . . . . . . . . . . . . . . . . . . . . . . . . . . . . . . . . . . . . . . . . . . . . . . . . . . . . . . . . . . . . . . . . . . . . . . . . . . . . .66 4.5.1 Tilted Diameter . . . . . . . . . . . . . . . . . . . . . . . . . . . . . . . . . . . . . . . . . . . . . . . . . . . . . . . . . . . . . . . . . . . . . . . . . . . . . . . . . .66 Appendix A. CE Mark Compliance A.1 Introduction. . . . . . . . . . . . . . . . . . . . . . . . . . . . . . . . . . . . . . . . . . . . . . . . . . . . . . . . . . . . . . . . . . . . . . . . . . . . . . . . . . . . . . . . . . .67 A.2 Wiring . . . . . . . . . . . . . . . . . . . . . . . . . . . . . . . . . . . . . . . . . . . . . . . . . . . . . . . . . . . . . . . . . . . . . . . . . . . . . . . . . . . . . . . . . . . . . . . .67 Appendix B. Data Records B.1 Available Option Cards . . . . . . . . . . . . . . . . . . . . . . . . . . . . . . . . . . . . . . . . . . . . . . . . . . . . . . . . . . . . . . . . . . . . . . . . . . . . . . . .69 B.2 Option Cards Installed . . . . . . . . . . . . . . . . . . . . . . . . . . . . . . . . . . . . . . . . . . . . . . . . . . . . . . . . . . . . . . . . . . . . . . . . . . . . . . . . .70 B.3 Site Data. . . . . . . . . . . . . . . . . . . . . . . . . . . . . . . . . . . . . . . . . . . . . . . . . . . . . . . . . . . . . . . . . . . . . . . . . . . . . . . . . . . . . . . . . . . . . .71 Appendix C. Measuring P and L Dimensions C.1 Measuring P and L . . . . . . . . . . . . . . . . . . . . . . . . . . . . . . . . . . . . . . . . . . . . . . . . . . . . . . . . . . . . . . . . . . . . . . . . . . . . . . . . . . . .75 vi DigitalFlow™ XMT868i Startup Guide Chapter 1. Installation Chapter 1. 1.1 Installation Introduction To ensure safe and reliable operation of the Model XMT868i Flowmeter, the system must be installed in accordance with the guidelines established by GE engineers. Those guidelines, explained in detail in this chapter, include the following topics: • Unpacking the Model XMT868i system • Selecting suitable sites for the electronics enclosure and the flowcell/transducers • Installing the flowcell/transducers Note: See the enclosed Transducer Installation Guide for detailed instructions on transducer installation. • Installing optional temperature transmitters • Installing the electronics enclosure • Wiring the electronics enclosure WARNING! The Model XMT868i flow transmitter can measure the flow rate of many fluids, some potentially hazardous. The importance of proper safety practices cannot be overemphasized. Be sure to follow all applicable local safety codes and regulations for installing electrical equipment and working with hazardous fluids or flow conditions. Consult company safety personnel or local safety authorities to verify the safety of any procedure or practice. !ATTENTION EUROPEAN CUSTOMERS! To meet CE Mark requirements, all cables must be installed as described in Appendix A, CE Mark Compliance. 1.2 Unpacking Carefully remove the electronics enclosure, the transducers, and the cables from the shipping containers. Before discarding any of the packing materials, account for all components and documentation listed on the packing slip. The discarding of an important item along with the packing materials is all too common. If anything is missing or damaged, contact the factory immediately for assistance. DigitalFlow™ XMT868i Startup Guide 1 Chapter 1. Installation 1.3 Site Considerations Because the relative location of the flowcell and the electronics enclosure is important, use the guidelines in this section to plan the XMT868i installation. Figure 1 shows a typical installation. Figure 1: A Typical Model XMT868i System 1.3.1 Electronics Enclosure Location The standard Model XMT868i electronics enclosure is a powder-coated, cast-aluminum, Type-7/4X explosion-proof enclosure, and an optional stainless-steel enclosure is available. Typically, the enclosure is mounted as close as possible to the transducers. When choosing a site, make sure the location permits easy access to the electronics enclosure for programming, maintenance and service. Note: For compliance with the European Union’s Low Voltage Directive (73/23/EEC), this unit requires an external power disconnect device such as a switch or circuit breaker. The disconnect device must be marked as such, clearly visible, directly accessible, and located within 1.8 m (6 ft) of the Model XMT868i. 1.3.2 Flowcell Location Ideally, choose a section of pipe with unlimited access; for example, a long stretch of pipe that is above ground. However, if the flowcell is to be mounted on an underground pipe, dig a pit around the pipe to facilitate installation of the transducers. 2 DigitalFlow™ XMT868i Startup Guide Chapter 1. Installation 1.3.3 Transducer Location For a given fluid and pipe, the Model XMT868i’s accuracy depends primarily on the location and alignment of the transducers. In addition to accessibility, when planning for transducer location, adhere to the following guidelines: • Locate the transducers so that there are at least 10 pipe diameters of straight, undisturbed flow upstream and 5 pipe diameters of straight, undisturbed flow downstream from the measurement point. Undisturbed flow means avoiding sources of turbulence in the fluid such as valves, flanges, expansions, and elbows; avoiding swirl; and avoiding cavitation. • Locate the transducers on a common axial plane along the pipe. Locate the transducers on the side of the pipe, rather than the top or bottom, since the top of the pipe tends to accumulate gas and the bottom tends to accumulate sediment. Either condition will cause increased attenuation of the ultrasonic signal. There is no similar restriction with vertical pipes. However, vertical pipes should be avoided in order to insure a full pipe at the measurement point. 1.3.4 Cable Lengths Locate the electronics enclosure as close as possible to the flowcell/transducers, preferably directly on the flowcell. However, GE can supply transducer cables up to 1,000 ft (300 m) in length for remote location of the electronics enclosure. If longer cables are required, consult the factory for assistance. 1.3.5 Transducer Cables When installing the transducer cables, always observe established standard practices for the installation of electrical cables. Do not route transducer cables alongside high amperage AC power lines or any other cables that could cause electrical interference. Also, protect the transducer cables and connections from the weather and corrosive atmospheres. Note: If you are using your own cables to connect the transducers to the electronics console, they must have electrical characteristics identical to the cables supplied by GE. For transducer frequencies up to 2 MHz, the cables in each pair must be the same length within ±4 in. (10 cm). For transducer frequencies above 2 MHz, the cables in each pair must be the same length within ±0.5 in. (1.25 cm). 1.4 Installing a Flowcell A flowcell is the section of pipe where the transducers are mounted. It can be created either by mounting the transducers on the existing pipeline or by mounting them on a spoolpiece. A spoolpiece is a separately manufactured pipe section, matched to the existing pipe, which contains ports for mounting the transducers. This approach allows the transducers to be aligned and calibrated before inserting the spoolpiece into the pipeline. Figure 1 on page 2 shows a typical Model XMT868i spoolpiece, with a mounting bracket to hold the electronics enclosure. For detailed instructions on installing the transducers and/or spoolpiece, refer to the supplied drawings and the enclosed GE Liquid Transducer Installation Guide (916-055). DigitalFlow™ XMT868i Startup Guide 3 Chapter 1. Installation 1.5 Installing Temperature Transmitters Optional temperature transmitters may be installed as part of the flowcell, near the ultrasonic transducer ports. Be sure to observe the siting requirements given earlier in this chapter. These transmitters should send a 0/4-20 mA signal to the Model XMT868i. In turn, the XMT868i must be fitted with a suitable option card to process the signals and to provide the required 24 VDC power to the transmitters. Any desired transmitters or sensors may be used, but they must have an accuracy equal to 0.5% of the reading or better. Note: Resistive Thermal Devices (RTDs) are a good choice for measuring the temperature. Typically, a 1/2” NPT female threaded port is used to mount the transmitters on the flowcell. If the pipeline is insulated, the coupling may need to be extended to provide convenient access. Of course, other types of mounting ports, including flanged ports, may be used for the transmitters. Figure 2 shows a typical mounting arrangement for a temperature transmitter. The temperature transmitter should protrude 1/4 to 1/2 way into the pipe. Temperature Transmitter RTD Thermowell Coupling Flowcell Wall Figure 2: Typical Temperature Transmitter Mounting 4 DigitalFlow™ XMT868i Startup Guide Chapter 1. Installation 1.6 Mounting the XMT868i Electronics Enclosure The standard model XMT868i electronics package is housed in a Type-4X weather-resistant enclosure suitable for indoor or outdoor use. Refer to Figure 8 on page 21 for the mounting dimensions and the weight of this enclosure. The Model XMT868i electronics enclosure is fitted with a mounting boss that has a single 3/4” NPTF threaded hole at its center and four 1/4-20 tapped holes at its corners. By using this mounting boss, the electronics enclosure may be mounted by any of the typical techniques shown in Figure 9 on page 22. WARNING! Proper grounding of the XMT868i chassis is required to prevent the possibility of electric shock. See Figure 9 on page 22 to locate the chassis grounding screw. IMPORTANT: Since the IREX keys do not work properly in direct sunlight, be sure to position the XMT868i with an optional sunshield or out of direct sunlight. 1.7 Making Electrical Connections This section contains instructions for making all the necessary electrical connections to the Model XMT868i flow transmitter. Refer to Figure 10 on page 23 for a complete wiring diagram. Except for the power connector, all electrical connectors are stored on their terminal blocks during shipment and may be removed from the enclosure for more convenient wiring. Simply, feed the cables through the conduit holes on the side of the enclosure, attach the wires to the appropriate connectors and plug the connectors back into their terminal blocks. !ATTENTION EUROPEAN CUSTOMERS! To meet CE Mark requirements, all cables must be installed as described in Appendix A, CE Mark Compliance. Refer to Figure 3 on page 6 and prepare the Model XMT868i for wiring by completing the following steps: WARNING! Always disconnect the line power from the Model XMT868i before removing either the front cover or the rear cover. This is especially important in a hazardous environment. 1. Disconnect any previously wired power line from the unit. 2. Loosen the set screw on the rear cover. 3. Place a rod or long screwdriver across the cover in the slots provided, and rotate the cover counterclockwise until it comes free from the enclosure. 4. Install any required cable glands in the appropriate conduit holes around the side of the enclosure. CAUTION! To ensure safe and reliable operation of the flowmeter, be sure to install and tighten all cable glands in accordance with the gland manufacturer’s instructions. 5. Note the labels inside the rear cover to assist in wiring the power and option card connections. Also, Figure 11 on page 24 shows the rear cover option card labels for every available option card configuration. Proceed to the appropriate section of this chapter to make the desired wiring connections. DigitalFlow™ XMT868i Startup Guide 5 Chapter 1. Installation 1.7 Making Electrical Connections (cont.) Power Connections Option Card Connections Slots Set Screw Label Inside View Outside View Figure 3: Rear Cover with Connection Labels 1.7.1 Wiring the Line Power The Model XMT868i may be ordered for operation with power inputs of 100-120 VAC, 220-240 VAC, or 12-28 VDC. The label on the side of the electronics enclosure lists the meter’s required line voltage and power rating. The fuse size is listed in Chapter 4, Specifications. Be sure to connect the meter only to the specified line voltage. Note: For compliance with the European Union’s Low Voltage Directive (73/23/EEC), this unit requires an external power disconnect device such as a switch or circuit breaker. The disconnect device must be marked as such, clearly visible, directly accessible, and located within 1.8 m (6 ft) of the Model XMT868i. Refer to Figure 10 on page 23 to locate terminal block TB5 and connect the line power as follows: WARNING! Improper connection of the line power leads or connecting the meter to the incorrect line voltage may damage the unit. It may also result in hazardous voltages at the flowcell and associated piping as well as within the electronics enclosure. 6 DigitalFlow™ XMT868i Startup Guide Chapter 1. Installation 1.7.1 Wiring the Line Power (cont.) 1. Prepare the line power leads by trimming the line and neutral AC power leads (or the positive and negative DC power leads) to a length 0.5 in. (1 cm) shorter than the ground lead. This ensures that the ground lead is the last to detach if the power cable is forcibly disconnected from the meter. 2. Install a suitable cable clamp in the conduit hole indicated in Figure 10 on page 23. If possible, avoid using the other conduit holes for this purpose, to minimize any interference in the circuitry from the AC power line. !ATTENTION EUROPEAN CUSTOMERS! To meet CE Mark requirements, all cables must be installed as described in Appendix A, CE Mark Compliance. 3. Strip 1/4-in. of insulation from the end of each of the three line power leads. 4. Route the cable through the conduit hole and connect the line power leads to terminal block TB5, using the pin number assignments shown in Figure 10 on page 23. 5. Leaving a bit of slack, secure the power line with the cable clamp. WARNING! Make sure both covers, with their O-ring seals, are installed and the set screws tightened before applying power in a hazardous environment. CAUTION! The transducers must be properly wired before applying power to the meter. Proceed to the next section to continue the initial wiring of the Model XMT868i flow transmitter. DigitalFlow™ XMT868i Startup Guide 7 Chapter 1. Installation 1.7.2 Wiring Transducers Before wiring the XMT868i transducers, complete the following steps: • Disconnect the main power from the electronics enclosure. • Remove the rear cover and install all required cable clamps. WARNING! Before connecting the transducers, take them to a safe area and discharge any static buildup by shorting the center conductor of the transducer cables to the metal shield on the cable connector. Note: For transducer frequencies below 2 MHz, the cable lengths must be within 4 in. (10 cm) of each other. If the transducer frequency exceeds 2 MHz, the cable lengths must be within 0.5 in. (1.25 cm) of each other. 1. Locate the CH1 transducer cables and connect them to the two CH1 transducers in the flowcell. Feed the free ends of the cables through the selected conduit hole in the electronics enclosure. 2. If an optional lightning protector is being installed, connect it between the meter and the transducers. 3. Refer to the wiring diagram in Figure 10 on page 23 and connect the transducer cables to terminal block J3. Then, secure the cable clamp. Note: The RED cable leads are the SIG(+) leads and the BLACK cable leads are the RTN(-) leads. !ATTENTION EUROPEAN CUSTOMERS! To meet CE Mark requirements, all cables must be installed as described in Appendix A, CE Mark Compliance. 4. For a 2-Channel XMT868i, repeat steps 1-2 to connect the CH2 transducers to terminal block J4. It is not required that both channels of a 2-Channel unit be connected. 5. If wiring of the unit has been completed, reinstall the rear cover on the enclosure and tighten the set screw. Note: A channel must be activated before it can begin taking measurements. See Chapter 2, Initial Setup, for instructions. 8 DigitalFlow™ XMT868i Startup Guide Chapter 1. Installation 1.7.3 Wiring Standard 0/4-20 mA Analog Outputs The standard configuration of the Model XMT868i flow transmitter includes two isolated 0/4-20 mA analog outputs (designated as outputs 1 and 2). Connections to these outputs may be made with standard twisted-pair wiring, but the current loop impedance for these circuits must not exceed 600 ohms. To wire the analog outputs, complete the following steps: 1. Disconnect the main power to the unit and remove the rear cover. 2. Install the required cable clamp in the chosen conduit hole on the side of the electronics enclosure. 3. Refer to Figure 10 on page 23 for the location of terminal block J1 and wire the analog outputs as shown. Secure the cable clamp. Note: Analog outputs 1 and 2 in the wiring diagram correspond to analog outputs A and B in Slot 0 in the XMT868i software. !ATTENTION EUROPEAN CUSTOMERS! To meet CE Mark requirements, all cables must be installed as described in Appendix A, CE Mark Compliance. 4. If wiring of the unit has been completed, reinstall the rear cover on the enclosure and tighten the set screw. WARNING! Make sure both covers, with their o-ring seals, are installed and the set screws tightened before applying power in a hazardous environment. Note: Prior to use, the analog outputs must be set up and calibrated. See Chapter 1, Calibration, of the Service Manual for detailed instructions. Proceed to the next section to continue the initial wiring of the unit. 1.7.4 Wiring the Serial Port The Model XMT868i flow transmitter is equipped with a built-in serial communications port. The standard port is an RS232 interface, but an optional RS485 interface is available upon request. Proceed to the appropriate sub-section for wiring instructions. For more information on serial communications refer to the EIA-RS Serial Communications manual (916-054). DigitalFlow™ XMT868i Startup Guide 9 Chapter 1. Installation 1.7.4a Wiring the RS232 Interface Use the serial port to connect the Model XMT868i flow transmitter to a printer, an ANSI terminal or a personal computer. The RS232 interface is wired as Data Terminal Equipment (DTE), and the signals available at terminal block J1 are shown in Table 1. Refer to Figure 10 on page 23 and complete the following steps: 1. Disconnect the main power to the unit and remove the rear cover. 2. Install the required cable clamp in the chosen conduit hole on the side of the electronics enclosure. 3. Use the information in Table 1 to construct a suitable cable for connecting the Model XMT868i to the external device. If desired, an appropriate cable may be purchased from GE. Table 1: RS232 Connection to DCE or DTE Device J1 Pin # Signal Description DCE DB25 Pin # DCE DB9 Pin # DTE DB25 Pin # DTE DB9 Pin # 5 DTR (Data Terminal Ready) 20 4 20 4 6 CTS (Clear to Send) 4 7 5 8 7 COM (Ground) 7 5 7 5 8 RX (Receive) 2 3 3 2 9 TX (Transmit) 3 2 2 3 Note: Signal names that imply direction (e.g., transmit and receive) are named from the point of view of the DTE device (the GE meter is usually considered the DTE device). When the RS232 standard is strictly followed, these signals are labeled with the same name and pin # on the DCE device side as well. Unfortunately, the convention is not followed because the DTE and DCE side get confused. Therefore, connections that imply direction are changed to reflect their direction on the DCE side. 4. Feed the flying leads end of the cable through the conduit hole and wire it to terminal block J1. Connect the other end of the cable to the printer, ANSI terminal or personal computer, and secure the cable clamp. !ATTENTION EUROPEAN CUSTOMERS! To meet CE Mark requirements, all cables must be installed as described in Appendix A, CE Mark Compliance. After the wiring has been completed, consult the User’s Manual for the external device to configure it for use with the XMT868i. 10 DigitalFlow™ XMT868i Startup Guide Chapter 1. Installation 1.7.4b Wiring the RS485 Interface Use the optional RS485 serial port to network multiple XMT868i flow transmitters to a single computer terminal. As an option, the standard RS232 port on the XMT868i may be configured as a two-wire, half-duplex RS485 interface. IMPORTANT: The XMT868i must be configured at the factory for RS485 operation. The maximum cable length for RS485 is 4000 ft (1200 m). To wire the RS485 serial port, refer to Figure 10 on page 23 and complete the following steps: 1. Disconnect the main power to the unit and remove the rear cover. 2. Install the required cable clamp in the chosen conduit hole on the side of the electronics enclosure. 3. Feed one end of the cable through the conduit hole, wire it to terminal block J1 and secure the cable clamp. Use the information in Table 2 to wire a suitable cable for connecting the XMT868i to the external device. Table 2: RS485 Connections J1 Pin # Signal Description 9 Data + 8 Data - 7 Shield 6 Not Used 5 Not Used 4 Not Used !ATTENTION EUROPEAN CUSTOMERS! To meet CE Mark requirements, all cables must be installed as described in Appendix A, CE Mark Compliance. 4. If wiring of the unit has been completed, reinstall the rear cover on the enclosure and tighten the set screw. Proceed to the next section to continue the initial wiring of the unit. DigitalFlow™ XMT868i Startup Guide 11 Chapter 1. Installation 1.7.5 Wiring Option Cards The XMT868i can accommodate one option card in Slot 1 and one option card in Slot 2. The following types of option cards are available only in the combinations listed in Table 22 on page 69: • Alarm Relays (Slot 1) • Analog Inputs (Slot 1) • Totalizer/Frequency Outputs (Slot 1) • RTD Inputs (Slot 1) • Analog Outputs (Slot 1) • MODBUS Communications (Slot 2) • MODBUS/TCP Communications (Slot 2) • Ethernet (Slot 2) • Foundation Fieldbus (Slot 2) • Data logging (Slot 2) - no wiring required 1.7.5a Preparing for Wiring Wiring any option card installed in Slot 1 requires completion of the following general steps: 1. Disconnect the main power to the unit and remove the rear cover. 2. Install a cable clamp in the chosen conduit hole on the side of the electronics enclosure and feed a standard twisted-pair cable through this conduit hole. 3. Locate the 12-pin terminal block (J2) in Figure 10 on page 23 and wire the option card as indicated on the label inside the rear cover (see Figure 3 on page 6 and Figure 11 on page 24). Secure the cable clamp. IMPORTANT: Because of the attached wiring label, all rear covers must remain with their original meters. !ATTENTION EUROPEAN CUSTOMERS! To meet CE Mark requirements, all cables must be installed as described in Appendix A, CE Mark Compliance. 4. If wiring of the unit has been completed, reinstall the rear cover on the enclosure and tighten the set screw. Note: Prior to use, the option card must be set up and calibrated. See Chapter 1, Programming Site Data, in the Programming Manual and Chapter 1, Calibration, in the Service Manual for detailed instructions. For more specific instructions on particular option cards, proceed to the appropriate sub-section(s) that follow. 12 DigitalFlow™ XMT868i Startup Guide Chapter 1. Installation 1.7.5b Wiring an Alarms Option Card Each alarms option card includes two or four general-purpose Form C relays (designated as A, B, C and D). The maximum electrical ratings for the relays are listed in Chapter 4, Specifications. Each of the alarm relays can be wired as either Normally Open (NO) or Normally Closed (NC). In setting up an alarm relay, it may be wired for either conventional or fail-safe operation. In fail-safe mode, the alarm relay is constantly energized, except when it is triggered or a power failure or other interruption occurs. See Figure 4 for the operation of a normally open alarm relay in both conventional and fail-safe mode. Connect each alarm relay in accordance with the wiring instructions shown on the label inside the rear cover (see Figure 3 on page 6 and Figure 11 on page 24). Conventional not triggered Fail-Safe not triggered NO NO C C NC NC ALARM MONITORING DEVICE ALARM MONITORING DEVICE NO NO C C NC NC ALARM MONITORING DEVICE ALARM MONITORING DEVICE Conventional triggered Fail-Safe triggered or power failure Figure 4: Conventional and Fail-Safe Operation DigitalFlow™ XMT868i Startup Guide 13 Chapter 1. Installation 1.7.5c Wiring a 0/4-20 mA Analog Inputs Option Card This option card includes two or four isolated 0/4-20 mA analog inputs (designated as A, B, C and D), each of which includes a 24 VDC power supply for loop-powered transmitters. Either input may be used to process the temperature signal, while the other input is used to process the pressure signal. Note: To enter programming data during operation of the meter, it will be necessary to know which input is assigned to which process parameter. This information should be entered in Appendix B, Data Records. The analog inputs, which have an impedance of 118 ohms, should be connected with standard twisted-pair wiring. Power to the transmitters may be supplied either by the integral 24 VDC power supply on the analog input option card or by an external power supply. Figure 5 shows typical wiring diagrams, with and without an external power supply, for one of the analog inputs. With External Power Supply 24 VDC POWER SUPPLY – + Analog Input Transmitter + IN Sensor – OUT INPUT + +24V Analog Input Transmitter – OUT INPUT + +24V Sensor + IN With Internal Power Supply Figure 5: Analog Input Wiring Diagram 14 DigitalFlow™ XMT868i Startup Guide Chapter 1. Installation 1.7.5c Wiring a 0/4-20 mA Analog Inputs Option Card (cont.) Wire the analog inputs as shown on the label in the rear cover (see Figure 3 on page 6 and Figure 11 on page 24). Note: The analog inputs option card can be calibrated with the Model XMT868i’s built-in analog outputs. However, be certain that the analog outputs have been calibrated first. See Chapter 1, Calibration, in the Service Manual for the appropriate procedures. 1.7.5d Wiring a Totalizer and Frequency Output Option Card Each totalizer and frequency output option card provides two or four outputs (designated as A, B, C, and D). Wire this option card in accordance with the connections shown on the label in the rear cover (see Figure 3 on page 6 and Figure 11 on page 24). Figure 6 shows sample wiring diagrams of a totalizer output circuit and a frequency output circuit. Refer to Electrical Specifications on page 61 for the load and voltage requirements. Totalizer Output Model XMT868 Pulse Counter Volts + (Int. Pwr. Sup.) OUT Load RTN Volts (Common) Model XMT868 Frequency Counter +5V 200Ω OUT IN RTN Common Frequency Output Figure 6: Totalizer and Frequency Output Wiring DigitalFlow™ XMT868i Startup Guide 15 Chapter 1. Installation 1.7.5e Wiring an RTD Inputs Option Card The Model XMT868i RTD (Resistance Temperature Device) inputs option card provides two direct RTD inputs (designated as A and B). Each RTD input requires three wires, and should be connected as shown on the label in the rear cover (see Figure 3 on page 6 and Figure 11 on page 24). 1.7.5f Wiring a 0/4-20 mA Analog Outputs Option Card The analog outputs option card includes two isolated 0/4-20 mA outputs (designated as A and B). Connections to these outputs may be made with standard twisted-pair wiring, but the total current loop impedance for these circuits must not exceed 1,000 ohms. Wire this option card with the connections shown on the label in the rear cover (see Figure 3 on page 6 and Figure 11 on page 24). 1.7.5g A Specific Example To illustrate the procedures described in the previous sections for wiring the option cards, a specific example may prove helpful. Assume that an XMT868i is equipped with an option card numbered 703-1223-08. Table 22 on page 69 in Appendix B, Data Records, indicates that this option card includes two analog current inputs and two standard alarm relays. By referring to Figure 11 on page 24, you can see that the appropriate connection diagram for this option card is the first one from the left in the middle row. This label should also be found inside the rear cover of the XMT868i. Based on this information, wiring of the Input/Output connections to terminal block J2 should be completed as shown in Table 3. Table 3: Wiring a 703-1223-08 Option Card J2 Pin # Description Connection 1 Alarm A Normally Open 2 Alarm A Common 3 Alarm A Normally Closed 4 Alarm B Normally Open 5 Alarm B Common 6 Alarm B Normally Closed 7 Out C +24 V to Input C 8 Input C Signal (+) 9 Input C Return (-) 10 Out D +24 V to Input D 11 Input D Signal (+) 12 Input D Return (-) 16 DigitalFlow™ XMT868i Startup Guide Chapter 1. Installation 1.7.5h Wiring the MODBUS Option Card The MODBUS option card uses the RS485 standard for MODBUS communication. The MODBUS card must be installed in Slot 2. The RS485 standard allows up to 32 nodes (drivers and receivers) on one multidrop network, at distances up to 4,000 ft (1,200 m). GE recommends using 24-gauge (24 AWG) twisted-pair wire with a characteristic impedance of 120 ohms and 120-ohm termination at each end of the communications line. Note: The MODBUS option card provides its own RS485 connections. Thus, the meter can have its serial port configured as RS232 and still provide RS485 MODBUS signals. IMPORTANT: Because the MODBUS option card uses pins 1 and 2 on terminal block J2, only those option cards that do not use these pins may be installed in Slot 1, while a MODBUS card is installed in Slot 2. Specifically, only the option cards designated as “OI” and “OR” in Figure 11 on page 24 are compatible with the MODBUS option card. To link the XMT868i to the control system (refer to Figure 7): 1. Connect the MODBUS – wire to pin #2, the inverting or negative connection. 2. Connect the MODBUS + wire to pin #1, the non-inverting or positive connection. 3. Pin #3 has no connection. MODBUS + MODBUS – N/C Figure 7: The RS485 MODBUS Terminal Block Connector DigitalFlow™ XMT868i Startup Guide 17 Chapter 1. Installation 1.7.5i Wiring the MODBUS/TCP Interface Customers can also use a modified XMT868i that provides a MODBUS/TCP interface to communicate to an internal network. An optional MODBUS/TCP card with a unique MAC (IP) address (installed only in slot 2) includes an RJ45 connector. To connect the MODBUS/TCP-enabled XMT868i to the network, insert the jack of an RJ45 cable into the RJ45 connector, route the cable through one of the conduit holes using an appropriate cable clamp, and wire the other end of the cable to the Ethernet network according to the manufacturer’s instructions. See Figure 12 on page 25. Note: The MAC address for a specific XMT868i is included with customer documentation. For more information on setting up the MAC address, refer to Chapter 6 of the Programming Manual. 1.7.5j Wiring the Ethernet Interface A modified XMT868i can use the Ethernet interface to communicate to a local area network. An optional Ethernet card with a unique MAC (IP) address (installed only in slot 2) includes an RJ45 connector. To connect the Ethernet-enabled XMT868i to the network, insert the jack of an RJ45 cable into the RJ45 connector, route the cable through one of the conduit holes using an appropriate cable clamp, and wire the other end of the cable to the Ethernet network according to the manufacturer’s instructions. An external connection is required between the Ethernet option card and the XMT868i’s RS232 connector, as shown in Table 4 and Figure 12 on page 25. Note: The MAC address for a specific XMT868i is included with customer documentation. For more information on setting up the MAC address, refer to Appendix C of the Programming Manual. Table 4: RS232 to Ethernet Interconnections 18 XMT868i Type Terminal Block Terminal Block Terminal RS232 on Rear Board TB1 on Ethernet Card TX Pin 1 RX Pin 2 COM Pin 3 DigitalFlow™ XMT868i Startup Guide Chapter 1. Installation 1.7.5k Wiring the Foundation Fieldbus Interface To connect the Foundation Fieldbus interface to the XMT868i, make the network connections at J8, pins 1 and 2, as shown in drawing Y of Figure 12 on page 25. As an option, you can connect a shield to J8 pin 3, depending on the network wiring. No connections are made to J9 under normal operation. If you need to reset the network board to factory defaults: 1. Connect a jumper between J9 pin 2 and J9 pin 3. 2. Power cycle (i.e., turn off and on) the XMT868i. 3. Ten seconds after the power has been restored to the XMT868i, remove the jumper to return the network board to normal operation. 1.7.5l Data Logging Option Card The XMT868i can be fitted with a data logging option card, which must be installed in Slot 2. The data logging option card increases the XMT868i’s memory by up to 2 MB. !ATTENTION EUROPEAN CUSTOMERS! To meet CE Mark requirements, all cables must be installed as described in Appendix A, CE Mark Compliance. 1.7.5m Procedure Options After the XMT868i has been completely installed and wired, proceed to Chapter 2, Initial Setup, to program the meter for taking flow rate measurements. WARNING! Make sure both covers, with their o-ring seals, are installed and the set screws tightened before applying power in a hazardous environment. DigitalFlow™ XMT868i Startup Guide 19 Chapter 1. Installation [no content intended for this page] 20 DigitalFlow™ XMT868i Startup Guide Chapter 1. Installation Ø6.10 (155) DO ED IS NO G 3/4" NPTF 7 PLCS HI EN W LE EN P ER O T 3.86 (98) 3/4" NPTF 7 PLCS P AS SEE DETAIL A NS NE IO N 8.20 (208) TE OU VR I R SOUS VIEW A-A 0.28 (7) A A 0.52 (13) 1.00 (25) 0.25 (6) 1.50 (38) NOTES: Figure 8: Model XMT868i Outline and Installation (ref. dwg #712-1318) 51° 7 PLCS 2.06 (52) 1. ALL DIMENSIONS ARE REFERENCE. 2. WEIGHT: 10 LB (4.5 KG) AL 25 LB (11.5 KG) SS 1/4-20 UNC-2B 4PLCS 3/4" NPT 3. DIMENSIONS ARE IN INCHES (MILLIMETERS). 10-32 EXTERNAL GROUND SCREW DETAIL A DigitalFlow™ XMT868i Startup Guide 21 Chapter 1. Installation .135 Ø6.10 (155) .410 2.06 (52) 51° 7 PLCS .270 .205 3.86 (98) 3/4" NPTF 7 PLCS 8.20 (208) SEE DETAIL A P AS NS 1.250 NE 5.00 IO N 1.250 ED DO IS NO G DETAIL C 8 PLACES HI EN W L E EN P ER O T 1.250 OU VR IR S OU S TE 2.375" PIPE REF ONLY 0.52 (13) .625 SEE DETAIL C 1.00 A 1.000 A 1/4-20 x 3/4 BOLT LOCK WASHER WASHER 4 PLACES 6.00 1.08 VIEW A-A 2.830 5/16 -18 NUT LOCK WASHER WASHER 4 PLACES 1.00 (25) 0.28 (7) .375 0.25 (6) BRACKET SEE DETAIL B 1.50 (38) 2.830 6.00 1/4-20 UNC-2B 4PLCS 3/4" NPT 2" PIPE U-BOLT 2 PLACES 10-32 EXTERNAL GROUND SCREW MATERIAL: AL 6x6 x .375 THK (REF) STRUCTUAL ANGLE DETAIL A 1.40 Figure 9: Model XMT868i Outline and Installation - Right Angle Mounting Bracket (ref. dwg #712-1317) .135 R NOTES: 1. ALL DIMENSIONS ARE REFERENCE DETAIL B DigitalFlow™ XMT868i Startup Guide Ø.330 4 HOLES 2. WEIGHT = 10 LB (4.5 KG) 3. DIMENSIONS ARE IN INCHES (MILLIMETERS)] 5.00 22 Chapter 1. Installation J2 - INPUT/OUTPUT CONNECTIONS* NOTE: For compliance with the European Union's Low Voltage Directive (73/23/EEC), this unit requires an external power disconnect device such as a switch or circuit breaker. The disconnect device must be marked as such, clearly visible, directly accessible and located within 1.8 m (6 ft) of the Model XGS868i. Pin # 1 2 3 5 6 7 8 9 10 11 Description *See the wiring label inside the rear cover and Figure 1-11. Pin # Designation Description Description 1 TX(RS485+) Transmit / + 2 RX(RS485–) Receive / – 1 + MODBUS + 3 COM (SHLD) Ground 2 – MODBUS – 4 CTS Clear To Send 3 N/C 5 DTR Data Terminal Ready 6 AOUT B– 4-20 Output 2 RTN 7 AOUT B+ 4-20 Output 2 SIG 8 AOUT A– 4-20 Output 1 RTN 9 AOUT A+ 4-20 Output 1 SIG N/C Power Cable Inlet Conduit Hole (1 of 7) Protective Conductor Terminal DC POWER INPUT Grounding Jumper Pin # NOTE: Enclosure is shown from the rear with the rear cover removed. Mounting Boss J4 - CH2 TRANSDUCER CONNECTION (optional) Pin # Designation 1 CH2UP 2 Description Description 1 Line Positive 2 Line Negative 3 No Connection Figure 10: Model XMT868i Wiring Diagram (ref. dwg 702-646) J1 - RS232/RS485 / 4-20 OUTPUT J5 - MODBUS CONNECTION J3 - CH1 TRANSDUCER CONNECTION Pin # Designation Upstream Transducer SIG(+) 1 CH1UP CH2RTN Upstream Transducer Analog RTN(-) 2 CH1RTN 3 CH2RTN Downstream Transducer Analog RTN(-) 3 CH1RTN 4 CH2DN Downstream Transducer SIG(+) 4 CH1DN DigitalFlow™ XMT868i Startup Guide 12 Designation I/O1 I/O2 I/O3 I/O4 I/O5 I/O6 I/O7 I/O8 I/O9 I/O10 I/O11 I/O12 Nameplate Pin # Designation 4 Description Upstream Transducer SIG(+) AC POWER INPUT Pin # Description Upstream Transducer Analog RTN(–) 1 Line Power Downstream Transducer Analog RTN(-) 2 Line Neutral Downstream Transducer SIG(+) 3 Earth Ground 23 Chapter 1. Installation -02 (FF,TT,FT,CT,CF) -03 (FO,TO,CO) -04 (FA,FH,TA,TH,CA,CH) -05 (CI,TI,FI) -06 (CR,FR,TR) Pin 1 Pin 1 Pin 1 Pin 1 Pin 1 Pin 1 2 2 2 2 2 2 3 3 3 3 3 3 4 4 4 4 4 4 5 5 5 5 5 5 6 6 6 6 6 6 7 7 7 7 7 7 8 8 8 8 8 8 9 9 9 9 9 9 10 10 10 10 10 10 11 11 11 11 11 11 12 12 12 12 12 12 -08 (AI,HI) -07 (CIR) -09 (OI) -10 (OR) -11 (AR,HR) -12 (II) Pin 1 Pin 1 Pin 1 Pin 1 Pin 1 Pin 1 2 2 2 2 2 2 3 3 3 3 3 3 4 4 4 4 4 4 5 5 5 5 5 5 6 6 6 6 6 6 7 7 7 7 7 7 8 8 8 8 8 8 9 9 9 9 9 9 10 10 10 10 10 10 11 11 11 11 11 11 12 12 12 12 12 12 -13 (RR) -14 (IR) -15 (FHII) -16 (HART) -17 (HART/OI) -18 (F(F)HH) -19 (HART/RI) Pin 1 Pin 1 Pin 1 Pin 1 Pin 1 Pin 1 Pin 1 2 2 2 2 2 2 2 3 3 3 3 3 3 3 4 4 4 4 4 4 4 5 5 5 5 5 5 5 6 6 6 6 6 6 6 7 7 7 7 7 7 7 8 8 8 8 8 8 8 9 9 9 9 9 9 9 10 10 10 10 10 10 10 11 11 11 11 11 11 11 12 12 12 12 12 12 12 DigitalFlow™ XMT868i Startup Guide Figure 11: Option Card Connection Labels (ref. dwg #442-615) -01 (AA,HH) NOTE: R = RTD Input A = Standard Alarm H = Hermetic Alarm F = Frequency Output T = Totalizer Output I = Current Input C = Current Output O = Blank/No Connection 24 1 2 1 2 3 J8 1 2 RTN FACTORY RESET N/C SHIELD (OPTIONAL) FIELDBUS NET (–) FIELDBUS NET (+) TX 3 J6 3 J9 ETHERNET (RJ45) TB6 (a) ETHERNET Terminal Block Connector DigitalFlow™ XMT868i Startup Guide (b) FOUNDATION FIELDBUS Terminal Block Connector (c) MODBUS/TCP Terminal Block Connector Figure 12: Ethernet, Foundation Fieldbus and MODBUS/TCP Terminal Block Connections ETHERNET (RJ45) RX COM Chapter 1. Installation 25 Chapter 1. Installation [no content intended for this page] DigitalFlow™ XMT868i Startup Guide 26 Chapter 2. Initial Setup Chapter 2. 2.1 Initial Setup Introduction This chapter provides instructions for programming the minimum amount of data required to place the Model XMT868i flowmeter into operation. Before the Model XMT868i can begin taking measurements and displaying valid data, the current system and pipe parameters must be entered. In addition, a 2-Channel meter requires that each channel be activated prior to use. Additional programming options provide access to the more advanced features of the Model XMT868i, but this information is not required to begin taking measurements. Note: See the Programming Manual for information on those User Program features not covered in this chapter. You can program the XMT868i using either the infrared keypad on the lower part of the glass enclosure, or PanaView™, a PC-based, non-resident software program that communicates with the XMT868i using its RS232 serial port. PanaView supplements basic XMT868i functions with several additional capabilities. With PanaView, you can: • load and save site file data • create and save graph and log files • display text output and graphs of live measurement data • create custom templates for displaying text, graph and log data • interface with multiple GE instruments. This chapter focuses on programming using the infrared keypad. For information on programming the XMT868i using PanaView, refer to Appendix C of the Programming Manual. DigitalFlow™ XMT868i Startup Guide 27 Chapter 2. Initial Setup 2.2 XMT868i Enclosure Infrared Keypad HI EN W LE EN ER OP T G ED IS NO The window at the top of the XMT868i enclosure includes the components shown in Figure 13. DO DigitalFlow™ Panametrics XMT868i Liquid Flow Transmitter Escape P AS NS NE IO N Enter TE OU VR I R SOUS Figure 13: The Enclosure Window IMPORTANT: The XMT868i’s infrared keypad permits programming of the instrument through the glass faceplate without removing the cover. Thus, all programming procedures may be performed while the unit is installed in a hazardous area. Six keys on the infrared keypad enable users to program the XMT868i: • [Enter] - confirms choice of a specific option and data entry within the option • [Escape] - allows users to exit from a specific option without entering unconfirmed data • [] and [] - enable users to highlight a specific window in the display option or to scroll through a list of options (parameters, letters, and numbers 0-9 as well as the negative sign and decimal point) in a menu • [] and [] - enable users to scroll to a specific option, among choices in an option, or to a character in a text entry. When you power up the XMT868i, the display first shows the model and software version: GE XMT868i X3A.STD 28 DigitalFlow™ XMT868i Startup Guide Chapter 2. Initial Setup 2.2 XMT868i Enclosure Infrared Keypad (cont.) The meter then starts to display measured parameters. CH1 VEL 10.00 E1 Ft/s To enter the Keypad Program, press the [Escape] key, followed by the [Enter] key, and the [Escape] key again. Each successive key must be entered within 10 seconds of the prior key. As a guide in following the programming instructions in this chapter, the relevant portions of the Model XMT868i menu map have been reproduced in Figure 14 on page 45 and Figure 15 on page 46. Proceed to the following sections to enter data in the Channel or GLOBL menus. IMPORTANT: If the keypad has not been pressed for 10 minutes, the XMT868i exits the Keypad Program and returns to displaying measurements. The meter retains any configuration changes that were confirmed with the [Enter] key, and restarts as if the operator had completed the programming cycle. 2.3 Entering Data in the Global Menu To begin programming your meter, you must select the system units from the GLOBL menu as discussed below. Refer to Figure 14 on page 45 and remember to record all programming data in Appendix B, Data Records. Note: Refer to the Programming Manual for information on the other submenus in the GLOBL menu. 2.3.1 Entering Global System Data The GLOBL-SYSTM submenu is used to enter several general system parameters (e.g., English or metric units). For units with 2 channels, this menu is also used to compute parameters such as the sum, difference or average of the channel 1 and channel 2 signals. When calculating the SUM, DIF or AVE readouts, data from the GLOBL-SYSTM submenu is used. Any conflicting data entered in the Channel Systm submenu is overridden. 1. In the Keypad Program, scroll to PROG and press [Enter]. 2. In the PROG menu, scroll to GLOBL and press [Enter]. 3. In the Global PROGRAM menu, scroll to SYSTM and press [Enter]. 4. The first prompt asks for a Meter Message. Enter a numeric or text message (up to 16 characters) and press [Enter]. 5. Scroll to the desired System Units selection (either metric or English) and press [Enter]. The XMT868i will display all parameters and measurements in the designated units. • For a single-channel XMT868i, the program returns to the Global PROGRAM menu. Scroll to CH1 or CH2 to enter the Channel menu discussed on page 34. • For a 2-channel meter, proceed to step 6. DigitalFlow™ XMT868i Startup Guide 29 Chapter 2. Initial Setup 2.3.1a Volumetric Units 6. Scroll to the desired Volumetric Units for the flow rate display and press [Enter]. Table 5 lists the available volumetric units. Table 5: Available Volumetric Units English GAL/S = gallons/second GAL/M = gallons/minute GAL/H = gallons/hour MGD = mega gallons/day ft3/s = Cubic ft/sec ft3/m = Cubic ft/min ft3/h = Cubic ft/hr ft3/d = Cubic ft/day Mft3/d = mega cubic feet/day BBL/S = Barrel/sec BBL/M = Barrel/min BBL/H = Barrel/hr BBL/D = Barrel/day MBL/D = mega barrels/day A-I/S = Acre-inch/sec A-I/M = Acre-inch/min A-I/H = Acre-inch/hr A-I/D = Acre-inch/day A-F/S = Acre-feet/sec A-F/M = Acre-feet/min A-F/H = Acre-feet/hr A-F/D = Acre-feet/day Metric L/S = Liter/sec L/M = Liter/min L/H = Liter/hr ML/D = mega liters/day m^3/s = Cubic m/sec m^3/m = Cubic m/min m^3/h = Cubic m/hr m^3/d = Cubic m/day Mm^3/d = mega cubic meters/ day BBL/S = Barrel/sec BBL/M = Barrel/min BBL/H = Barrel/hr BBL/D = Barrel/day MBL/D = mega barrels/day 7. Scroll to the desired number of Vol Decimal Digits (digits to the right of the decimal point) in the volumetric flow display, and press [Enter]. 30 DigitalFlow™ XMT868i Startup Guide Chapter 2. Initial Setup 2.3.1b Totalizer Units 8. Scroll to the desired Totalizer Units for the totalized flow rate display (listed in Table 6), and press [Enter]. Table 6: Totalizer Units English GAL = Gallons MGAL = mega gallons ft^3 = Cubic feet Mft^3 = mega cubic feet BBL = Barrels MBBL = mega barrels AC-IN = Acre-inches AC-FT = Acre-feet Metric L = Liters ML = Megaliters m^3 = Cubic meters Mm^3= mega cubic meters BBL = Barrels MBBL = mega barrels 9. Scroll to the desired number of Decimal Digits (digits to the right of the decimal point) in the totalized flow display, and press [Enter]. The program now varies, depending on whether you have activated Mass Flow (see the Programming Manual for details) or the Energy Option in one of the Channel PROGRAM options. • If you have activated Mass Flow, continue to step 1 on page 32. • If you have activated the Energy Option (but not Mass Flow), skip to step 1 on page 33. • If you have activated neither option, the XMT868i returns to the Global PROGRAM window. Press [Escape] to return to the PROG menu. Then scroll to CH1 or CH2 and press [Enter] to program the Channel menu. DigitalFlow™ XMT868i Startup Guide 31 Chapter 2. Initial Setup 2.3.1c Programming Mass Flow Data 1. Scroll to the desired Mass Flow Units for flow rate display (listed in Table 7), and press [Enter]. Table 7: Available Mass Flow Units English LB = Pounds KLB = KiloPounds (Thousands of Pounds) MMLB = MegaPounds TONS (2000 LB) Metric KG = Kilograms Tonne = Metric Tons (1000 KG) 2. Scroll to the desired Mass Flow Time Units (from seconds to days), and press [Enter]. 3. Scroll to the desired number of Decimal Digits (digits to the right of the decimal point) in the mass flow rate display, and press [Enter]. 4. Scroll to the desired Mass Totals (units for the totalized mass flow rate display, listed in Table 7 on page 32), and press [Enter]. 5. Scroll to the desired number of Mass Decimal Digits (digits to the right of the decimal point) in the totalized mass flow rate display, and press [Enter]. The program varies, depending on whether or not you have enabled the Energy Option. • If you have not enabled the option, the XMT868i returns to the Global PROGRAM window. Press [Escape] to return to the PROG menu and scroll to the Channel PROGRAM. • If you have enabled the option, continue to the next page. 32 DigitalFlow™ XMT868i Startup Guide Chapter 2. Initial Setup 2.3.1d Programming the Energy Option 1. Scroll to the desired Power Units (listed in Table 8) and press [Enter]. Table 8: Available Power Units English kBTUh = Thousands of BTUs/hour MMBTU = Millions of BTUs/hour kW = Kilowatt TONS = Tons of refrigerant Metric kCALs = Kilocalories/second kCALm = Kilocalories/minute kCALh = Kilocalories/hour kCALd = Kilocalories/day MCals = Megacalories/second MCALm = Megacalories/minute MCALh = Megacalories/hour MCALd = Megacalories/day kW = Kilowatt MW = Megawatt 2. Scroll to the desired number of Power Decimal Digits, and press [Enter]. 3. Scroll to the desired Total Energy Units (shown in Table 9), and press [Enter]. Table 9: Available Total Energy Units English kBTU = Thousands of BTUs MMBTU = Millions of BTUs kWHr = Kilowatt-hour TONS = Tons (of refrigerant) Metric kCAL = Kilocalories MCAL = Megacalories kWHr = Kilowatt-hour MWHr = Megawatt-hour 4. Scroll to the desired number of Energy Decimal Digits, and press [Enter]. You have completed entering selections in this option.The program returns to the Global PROGRAM menu. Scroll to CH1 or CH2 and press [Enter] to program the Channel menu on the next page. DigitalFlow™ XMT868i Startup Guide 33 Chapter 2. Initial Setup 2.4 Entering Data in the Channel Menu The Channel menu is used to enter data specific to each channel. Refer to Figure 14 on page 45 and remember to record all programming data in Appendix B, Data Records. Note: In this manual, only the programming of Channel 1 will be described. To program Channel 2 of a 2-Channel meter, simply repeat the same procedures presented for Channel 1. 2.4.1 Selecting the Channel Measurement Method The ACTIV submenu permits selection of the desired measurement method. 1. In the Keypad Program, scroll to PROG and press [Enter]. 2. In the PROG menu, scroll to the desired channel (CH1 or CH2) and press [Enter]. Note: In the 1-Channel XMT868i, CH2 does not appear. 3. In the Channel PROGRAM menu, scroll to ACTIV and press [Enter]. 4. The option offers two choices: OFF and TRANS (Transit-Time). Scroll to the desired option for this channel and press [Enter]. Note: In the 1-Channel XMT868i, OFF does not appear. The XMT868i returns to the Channel PROGRAM menu. Scroll to the SYSTM option. 34 DigitalFlow™ XMT868i Startup Guide Chapter 2. Initial Setup 2.4.2 Entering Data in the Channel System Option 1. From the Channel PROGRAM menu, scroll to the SYSTM option and press [Enter]. 2. The first prompt asks for the Channel Label.Use the four scrolling keys to enter the desired label (in any numeric or text combination up to three characters) in the right pane, and press [Enter]. 3. The next prompt asks for the Channel Message. Enter the desired text in the same manner as the channel label, and press [Enter]. 4. The program now asks if you want the Energy Option, which enables flow measurement in a heating or cooling system. Scroll to Off or On, and press [Enter]. 5. The next prompt asks for the Volumetric Units. Scroll through the available units (from the list shown in Table 10) and press [Enter] when you reach the desired unit. Note: Refer to the SYSTM option of the GLOBL menu to choose between English and metric measurements. Table 10: Available Volumetric Units English Volumetric Units Metric Volumetric Units GAL/S - U.S. Gallons per Second L/S = Liters per Second GAL/M - U.S. Gallons per Minute L/M = Liters per Minute GAL/H - U.S. Gallons per Hour L/H = Liters per Hour MGD - Mega U.S. Gallons per Day ML/D = MegaLiters per Day ft3/s - Cubic Feet per Second m^3/s = Cubic Meters per Second ft3/m - Cubic Feet per Minute m^3/m = Cubic Meters per Minute ft3/h- Cubic Feet per Hour m^3/h = Cubic Meters per Hour ft3/d- Cubic Feet per Day m^3/d = Cubic Meters per Day Mf3/d- Mega Cubic Feet per Day Mm3/d = Mega Cubic Meters per Day BBL/S - Barrels per Second BBL/S = Barrels per Second BBL/M - Barrels per Minute BBL/M = Barrels per Minute BBL/H - Barrels per Hour BBL/H = Barrels per Hour BBL/D - Barrels per Day BBL/D = Barrels per Day MBL/D - Mega Barrels per Day MBL/D = Mega Barrels per Day A-I/S-Acre-inches per second N/A A-I/M -Acre-inches per minute N/A A-I/H -Acre-inches per hour N/A A-I/D -Acre-inches per day N/A A-F/S -Acre-feet per second N/A A-F/M-Acre-feet per minute N/A A-F/H -Acre-feet per hour N/A A-F/D -Acre-feet per day N/A DigitalFlow™ XMT868i Startup Guide 35 Chapter 2. Initial Setup 2.4.2 Entering Data in the Channel System Option (cont.) 6. Scroll to the desired number of Vol Decimal Digits (digits to the right of the decimal point) in the volumetric flow display, and press [Enter]. 7. Scroll to the desired Totalizer Units for the totalized flow rate display (listed in Table 11), and press [Enter]. . Table 11: Totalizer Units English Metric GAL - U.S. Gallons L - Liters MGAL - Mega U.S. gallons ML - Megaliters ft^3 - Cubic Feet m^3- Cubic Meters Mft^3 - Mega Cubic Feet Mm^3- Mega Cubic Meters BBL - Barrels BBL - Barrels MBBL - Megabarrels MBBL - Megabarrels AC-IN - Acre-inches AC-FT - Acre-feet 8. Scroll to the desired number of Decimal Digits (digits to the right of the decimal point) in the totalized flow rate display, and press [Enter]. The program now varies, depending on whether you have activated Mass Flow (see the Programming Manual for details) or the Energy Option. • If you have activated Mass Flow, continue to step 1 on the next page. • If you have activated the Energy Option (but not Mass Flow), skip to step 1 on page 38. • If you have activated neither option, the XMT868i returns to the Channel PROGRAM window. Proceed to the PIPE option. 36 DigitalFlow™ XMT868i Startup Guide Chapter 2. Initial Setup 2.4.2a Programming the Mass Flow Option 1. Scroll to the desired Mass Flow Units for flow rate display (listed in Table 12), and press [Enter]. Table 12: Available Mass Flow Units English LB = Pounds KLB = KiloPounds (Thousands of Pounds) MMLB = MegaPounds TONS (2000 LB) Metric Kilograms Tonnes = Metric Tons (1000 KG) 2. Scroll to the desired Mass Flow Time Units (from seconds to days), and press [Enter]. 3. Scroll to the desired number of Decimal Digits (digits to the right of the decimal point) in the mass flow rate display, and press [Enter]. 4. Scroll to the desired Mass Totals (units for the totalized mass flow rate display, listed in Table 12), and press [Enter]. 5. Scroll to the desired number of Mass Decimal Digits (digits to the right of the decimal point) in the totalized mass flow rate display, and press [Enter]. The program varies, depending on whether or not you have enabled the Energy Option. • If you have not enabled the option, the XMT868i returns to the Channel PROGRAM window. Proceed to the PIPE option. • If you have enabled the option, continue to the next page. DigitalFlow™ XMT868i Startup Guide 37 Chapter 2. Initial Setup 2.4.2b Programming the Energy Option 1. Scroll to the desired Power Units (listed in Table 13) and press [Enter]. Table 13: Available Power Units English kBTUh = Thousands of BTUs/hour MMBTU = Mega BTUs/hour kW = Kilowatt TONS = Tons (2000 LB) Metric kCALs = Kilocalories/second kCALm = Kilocalories/minute kCALh = Kilocalories/hour kCALd = Kilocalories/day MCALs = Megacalories/second MCALm = Megacalories/minute MCALh = Megacalories/hour MCALd = Megacalories/day kWATT = Kilowatt MWATT - Megawatt 2. Scroll to the desired number of Power Decimal Digits, and press [Enter]. 3. Scroll to the desired Total Energy Units (shown in Table 14), and press [Enter]. Table 14: Available Total Energy Units English kBTU = Thousands of BTUs/hr MMBTU = Mega BTUs/hour kWHr = Kilowatt-hour TONS = Tons (2000 LB) Metric kCAL = Kilocalories MCAL = Megacalories kWHr = Kilowatt-hour MWHr - Megawatt-hour 4. Scroll to the desired number of Energy Decimal Digits, and press [Enter]. 5. Scroll to highlight if you are using a Heating or Cooling System, and press [Enter]. 6. The final prompt asks whether you want to conduct Flow Measurement at the point of RTN (Return, where the liquid exits) or of SPPLY (Supply, where the liquid enters). Scroll to the appropriate choice, and press [Enter]. You have completed entering data in the SYSTM option. The meter returns to the Channel PROGRAM menu. Proceed to the next page to enter PIPE parameters. 38 DigitalFlow™ XMT868i Startup Guide Chapter 2. Initial Setup 2.4.3 Entering Pipe Parameters Enter the transducer and pipe parameters using the PIPE submenu. While following the programming instructions, refer to Figure 15 on page 46. 1. From the Channel PROGRAM menu, scroll to the PIPE option and press [Enter]. 2. The first prompt asks for the Transducer Number. • For a standard transducer, enter the number engraved on the transducer head in the right pane, and press [Enter]. • If there is no number engraved on the transducer head, press the right arrow key to scroll to the Special option, enter an assigned number (from 91 to 99), and press [Enter]. IMPORTANT: Special transducers, which have no engraved number on the head, are rarely used. Examine the transducer head carefully for a number. The menu now varies, depending on your selection in step 2. • If you entered the number for a standard clamp-on transducer, proceed to the Pipe Material prompt in step 4. • If you entered the number for a standard wetted transducer, proceed to the Pipe OD prompt in step 5. • If you entered the number for a special transducer, proceed to step 3 below. 2.4.3a Special Transducers Note: For special transducers, GE will supply a transducer data sheet with programming information. 3. For special transducers: a. The program first asks for the Wedge Type. Press the appropriate transducer type (Rayleigh clamp-on, shear clamp-on, or wetted). Note: GE will supply the information required for steps b through f with the transducers. b. Press the appropriate Frequency (from 500 kHz to 5 MHz). c. Enter the Time Delay (Tw) value supplied by GE and press [Enter]. If you have selected a special wetted transducer, the program now goes to step 5. But if you have selected a clamp-on transducer, three more prompts appear. d. Enter the Wedge Angle of the transducer (the angle of the ultrasonic transmission, in degrees) and press [Enter]. e. Enter the Wedge Temperature and press [Enter]. f. Enter the Wedge Soundspeed and press [Enter]. DigitalFlow™ XMT868i Startup Guide 39 Chapter 2. Initial Setup 2.4.3b Pipe Material 4. Scroll to the appropriate Pipe Material from the supplied list. For some materials (shown in Table 15), the program displays additional selections. At the desired choice, press [Enter]. Table 15: Pipe Material Choices Material Steel Iron Copper Aluminum Brass Copper Nickel Glass Plastic OTHER 40 Types Carbon Steel Stainless Steel Ductile Iron Cast Iron no additional selection required no additional selection required no additional selection required 70%Cu/30%Ni - 70/30 Copper/Nickel 90%Cu/10%Ni - 90/10 Copper/Nickel Pyrex Heavy Silicate Flint Light Borate Crown Nylon Polyethylene Polypropylene PVC (Polyvinyl Chloride), CPVC Acrylic Enter the soundspeed of the pipe material and press [Enter]. If the soundspeed is unknown, refer to the Sound Speeds and Pipe Size Data manual (914-004). DigitalFlow™ XMT868i Startup Guide Chapter 2. Initial Setup 2.4.3c Pipe OD 5. To select the appropriate Pipe OD Unit type from the list shown in Table 16, scroll to the right side of the screen, and use the up and down arrow keys to step through the list. Press [Enter]. Then enter the known pipe outside diameter or circumference on the left side and press [Enter]. Obtain the required information by measuring either the pipe outside diameter (OD) or circumference at the transducer installation site. The data may also be obtained from standard pipe size tables found in Sound Speeds and Pipe Size Data (914-004). Table 16: Available Pipe OD Units English inch feet in/PI = pipe circumference in inches ft/PI = pipe circumference in feet Metric mm = millimeters m = meters mm/PI = pipe circumference in millimeters m/PI = pipe circumference in meters 6. Use the arrow keys to enter the known Pipe Wall Thickness (in inches or mm) and press [Enter]. If you are using clamp-on transducers, skip to step 9 below. 2.4.3d Path and Axial Lengths 7. To enter the Path Length: a. Use the [] arrow key to highlight the path length unit type at the right of the screen.Then use the [] and [] arrow keys to scroll to the desired unit type. b. Use the [] arrow key to return to the numeric entry on the left, and enter the path length of the ultrasonic signal. Press [Enter]. Note: If a spoolpiece was ordered with the meter, the transducer signal path length (P) and the transducer signal axial length (L) are engraved on the flowcell and/or are included in the documentation supplied with the meter. For on-site transducer installations, refer to Appendix C, Measuring P and L Dimensions, for instructions. 8. In the same manner, enter the appropriate Axial Length L unit type and axial length of the ultrasonic signal, and press [Enter]. Skip to step 10 on page 42. 2.4.3e Pipe Lining 9. Scroll to the appropriate choice to indicate whether you have a Pipe Lining. a. If you have selected Yes, then select the Lining Material from the supplied list. • If OTHER is selected, enter the lining sound speed, and press [Enter]. b. Then enter the lining thickness and press [Enter]. DigitalFlow™ XMT868i Startup Guide 41 Chapter 2. Initial Setup 2.4.3f Tracking Windows 10. Press the appropriate choice to indicate whether you want Tracking Windows. These windows are used to detect the receive signal when you are unsure of the fluid sound speed. 2.4.3g Fluid Type 11. Press the appropriate Fluid Type. The selections for fluid type vary depending on whether: • the Energy Option is ON or OFF; and • the Tracking Window is enabled or disabled. Refer to Table 17 if Energy Option is OFF, or to Table 18 if Energy Option is ON. Note: Some of the fluid types may require additional selections, as shown in the following tables. Table 17: Fluid Types for ENERGY OFF Tracking Windows = NO Additional Selections YES Water Normal Water Sea Water Note: If Normal Water is selected, enter the Water Temperature and press [Enter]. Water, 0-100C No additional selections required. Lube Oil Crude Oil Water, 0-260C No additional selections required. Oil Methanol (25 C) No additional selections required. Ethanol (25C) No additional selections required. LN2 No additional selections required. Freon No additional selections required. OTHER Enter the fluid soundspeed and press [Enter]. Additional Selections Oil, Tracking No additional selections required. OTHER Enter Minimum Soundspeed and press [Enter]. Then enter Maximum Soundspeed and press [Enter]. Table 18: Fluid Types for ENERGY ON Tracking Windows = NO Water Additional Selections Enter Water Temperature and press [Enter]. Water, Glycol Enter Fluid Soundspeed and press Mixture [Enter]. Then enter Percentage of Water and press [Enter]. OTHER 42 Enter Fluid Soundspeed and press [Enter]. YES Water, 0-260C Additional Selections No additional selections required. Water, Glycol Enter Percentage of Water and press [Enter]. Mixture OTHER Enter Minimum Soundspeed and press [Enter]. Then enter Maximum Soundspeed and press [Enter]. DigitalFlow™ XMT868i Startup Guide Chapter 2. Initial Setup 2.4.3h Reynolds Correction 12. Scroll to the appropriate choice to indicate whether you want Reynolds Correction. • If Off is selected, enter the Calibration Factor and press [Enter]. • If Activ is selected, the program asks for KV Input Selection. Scroll to SIGS (Signals), SOUND (Soundspeed) or STATC. • If SIGS or SOUND is selected, enter the Calibration Factor and press [Enter]. • If STATC is selected, enter the Kinematic Viscosity and press [Enter]. Then enter the Calibration Factor and press [Enter]. • For wetted transducers, the program returns to the Channel PROGRAM menu. You have completed entering PIPE parameters. • For clamp-on transducers, proceed to step 13 below. Number of Traverses 13. Scroll to the appropriate Number of Traverses (from 1 to 5) and press [Enter]. 14. Accept the value for the Transducer Spacing by pressing [Enter]. Note: The XMT868i automatically calculates the transducer spacing. You should not enter a different value unless specifically instructed by the factory. PanaView returns to the Channel PROGRAM menu. You have completed entering PIPE parameters. Note: The site data programmed in this chapter is automatically stored in the meter’s non-volatile RAM (NVR). If the power to the meter is disconnected, the same site data will be applied when the unit is next powered on. 2.4.3i Procedure Options Proceed to Chapter 3, Operation, for instructions on taking measurements. Or refer to the Programming Manual for instructions on programming the Model XMT868i’s advanced features. DigitalFlow™ XMT868i Startup Guide 43 Chapter 2. Initial Setup [no content intended for this page] 44 DigitalFlow™ XMT868i Startup Guide Chapter 2. Menu Maps [Esc] [Enter] [Esc] PROG RESET CALIB CONTRAST (* for 2-Channel meter only) CH1 CH2* GLOBL SYSTM I/O COMM METER MESSAGE SYSTM PIPE Disabled* ENERGY OPTION Transit I/O SETUP SYSTEM UNITS See Figure 2-3 SITE/CHANNEL LABEL SITE/CHANNEL MESSAGE OFF ENG METRC 1-CHANNEL UNITS ON 2-CHANNEL UNITS VOLUMETRIC UNITS English VOLUMETRIC UNITS Metric English Metric GAL/S GAL/M GAL/H MGD ft3/s ft3/m Liter/S Liter/M Liter/H MLiter/D m3/s m3/m GAL/S GAL/M GAL/H MGD ft3/s ft3/m Liter/S Liter/M Liter/H MLiter/D m3/s m3/m ft3/h Mft3/d BBL/S BBL/M BBL/H MBL/D m3/h Mm3/d BBL/S BBL/M BBL/H MBL/D ft3/h Mft3/d BBL/S BBL/M BBL/H MBL/D m3/h Mm3/d BBL/S BBL/M BBL/H MBL/D A-I/S A-I/M A-I/H A-I/D A-F/S A-F/M A-I/S A-I/M A-I/H A-I/D A-F/S A-F/M A-F/H A-F/D A-F/H A-F/D VOL DECIMAL DIGITS 0 VOL DECIMAL DIGITS 1 2 3 0 TOTALIZER UNITS 1 2 3 TOTALIZER UNITS English Metric Metric English GAL MGAL ft^3 Mft^3 Liter Mliter m^3 BBL MBBL AC-IN AC-FT Mm^3 BBL MBBL ENERGY OPTION ON ENERGY OPTION OFF GAL MGAL ft^3 Mft^3 Liter Mliter m^3 BBL MBBL AC-IN AC-FT Mm^3 BBL MBBL ENERGY OPTION ON POWER POWER English MASS FLOW English LB KLB TOTAL DECIMAL DIGITS Metric MMLB TONS KG TONNES 0 1 2 Metric English MASS FLOW kBTU MMBTU kWHr TONS KCal/s MCal/s KW MW 3 English LB KLB Metric MMLB TONS KG TONNES TOTAL DECIMAL DIGITS 0 1 2 kBTU MASS FLOW ON 0 /SEC /MIN /HR 1 2 3 /SEC English MDOT DECIMAL DIGITS 0 KBTU 1 2 KLB MMLB TONS KWHr TONS KG TONNES KCal 1 2 MCal KWHr MWHr 1 MCal/s KW MW 1 2 3 ENERGY (TOTAL) /DAY KBTU 2 3 KLB TONS KWHr TONS KCal MCal KWHr MWHr 3 Metric MMLB MMBTU Metric ENERGY DECIMAL DIGITS English LB HEATING or COOLING COOL KG TONNES HEAT 0 1 2 3 HEATING or COOLING COOL HEAT MASS DECIMAL DIGITS 1 2 3 FLOW MEASUREMENT RTN ENERGY OPTION OFF /HR MASS TOTALS MASS DECIMAL DIGITS 0 /MIN MDOT DECIMAL DIGITS 0 0 KCal/s English ENERGY DECIMAL DIGITS Metric 0 Metric 3 MASS TOTALS English LB MMBTU TONS MASS FLOW OFF MASS FLOW TIME ENERGY (TOTAL) /DAY kWHr POWER DECIMAL DIGITS MASS FLOW OFF MASS FLOW TIME MMBTU Metric 3 POWER DECIMAL DIGITS MASS FLOW ON ENERGY OPTION OFF Figure 14: Channel-ACTIV, SYSTM and GLOBL-SYSTM Menu Map ACTIV ENERGY OPTION ON DigitalFlow™ XMT868i Programming Manual 0 1 2 3 SPPLY FLOW MEASUREMENT RTN ENERGY OPTION OFF SPPLY ENERGY OPTION ON 45 Chapter 2. Menu Maps [Esc] [Enter] [Esc] PROG RESET CALIB CONTRAST (* for 2-Channel meter only) CH1 CH2* GLOBL SYSTM I/O COMM See Figure 2-2 SYSTM See Figure 2-2 PIPE I/O SETUP TRANSDUCER NUMBER STD SPEC TRACKING WINDOWS? SPECIAL TRANSDUCER NO WEDGE TYPE RAYL (Wetted Type) (Clamp-on Type) SHEAR FLUID TYPE FREQUENCY TRACKING WINDOWS? NO WETTD 500k YES 1MHz 2MHz (WETTD) FLUID TYPE WATER TEMPERATURE WEDGE SOUNDSPEED FLUID SOUNDSPEED STEEL IRON Cu Al METH ETH NORML SEA LUBE CRUDE LN2 BRASS CuNi GLASS PLSTC OTHER OTHER PIPE SOUNDSPEED W100 W260 OIL OTHER MINIMUM SOUNDSPEED MAXIMUM SOUNDSPEED FLUID TYPE W260 FREON FLUID SOUNDSPEED WATER TEMPERATURE PIPE MATERIAL Percentage of Water OIL (RAYL/SHEAR) OTHER FLUID SOUNDSPEED WATER 5MHz WEDGE ANGLE MIXED WATER YES MIXED OTHER Percentage of Water CARBN SS DUCT CAST 30%Ni 10%Ni PYREX FLINT NYLON POLYE PVC ACRYL POLYP MINIMUM SOUNDSPEED REYNOLDS CORRECTION MAXIMUM SOUNDSPEED ACTIVE OFF REYNOLDS CORRECTION OFF PIPE OD KV INPUT SELECTION PIPE OD (Metric) (English) ACTIVE (Metric) (English) SIGS SOUND STATC KV INPUT SELECTION KINEMATIC VISCOSITY inch SIGS SOUND KINEMATIC VISCOSITY (Clamp-On Transducers) feet cir.in cir.ft mm m cir.mm cir.m inch feet cir.in cir.ft mm m cir.mm cir.m CALIBRATION FACTOR STATC CALIBRATION FACTOR Figure 15: Channel-PIPE Menu Map ACTIV See Figure 2-2 (Clamp-On Transducers) (Wetted Transducers) PIPE WALL PATH LENGTH P (English) PIPE WALL (Wetted Transducers) inch feet mm NUMBER OF TRAVERSES LINING (Metric) NO m 1(Z) YES 2(V) 3 4 5 TRANSDUCER SPACING LINING MATERIAL NUMBER OF TRAVERSES 1(Z) 2(V) 3 4 5 TRANSDUCER SPACING AXIAL LENGTH L (English) inch feet TAR (Metric) mm PYREX m ASBES MORTR RUBBR TEFLN OTHER LINING SOUNDSPEED LINING THICKNESS Energy Option ON DigitalFlow™ XMT868i Programming Manual Energy Option OFF 46 Chapter 3. Operation Chapter 3. 3.1 Operation Introduction See Chapter 1, Installation, and Chapter 2, Initial Setup, to prepare the Model XMT868i system for operation. When the meter is ready to take measurements, proceed with this chapter. The following specific topics are discussed: • Powering Up • Using the Display • Taking Measurements • Pausing Measurement Note: All inputs and outputs of the Model XMT868i are calibrated at the factory, prior to shipment. If it becomes necessary to recalibrate any of the inputs and/or outputs, see Chapter 1, Calibration, of the Service Manual for instructions. WARNING! To ensure the safe operation of the Model XMT868i, it must be installed and operated as described in this manual. In addition, be sure to follow all applicable local safety codes and regulations for the installation of electrical equipment. DigitalFlow™ XMT868i Startup Guide 47 Chapter 3. Operation 3.2 Powering Up Because the Model XMT868i does not have an ON/OFF switch, it will power up as soon as the connected power source is energized. Note: For compliance with the European Union’s Low Voltage Directive (73/23/EEC), this unit requires an external power disconnect device such as a switch or circuit breaker. The disconnect device must be marked as such, clearly visible, directly accessible, and located within 1.8 m (6 ft) of the Model XMT868i. There are three methods for obtaining readings from the XMT868i: • Built-in LCD display • PanaView software on a computer • Device to read the XMT868i’s analog output At least one of the above display options must be installed in order to obtain flow rate readings from the meter. Immediately upon power up the software version display appears. Then, the meter performs a series of internal checks, which take about 45 seconds, prior to displaying the flow rate data. CAUTION! The XMT868i conducts the FRAM (non-volatile RAM) test only on the first powering up. If the screen displays the message, “Program Memory Fault Detected,” consult the factory immediately. Otherwise, the XMT868i will not repeat the test and may not properly save programmed values. Note: If the Model XMT868i fails any of the internal checks (see Chapter 2, Error Codes, in the Service Manual), try disconnecting the power and then repowering the unit. If the meter continues to fail any of the internal checks, contact the factory for assistance. After successfully performing the internal checks, the Model XMT868i begins taking measurements and the software version display is replaced by a measurement mode display. Proceed to the appropriate section for instructions on using the LCD display and the PanaView display option. Note: As a minimum, the system and pipe parameters (for each installed channel of a 2-channel meter) must be entered before the Model XMT868i can display valid data. Refer to Chapter 2, Initial Setup, for specific instructions. 48 DigitalFlow™ XMT868i Startup Guide Chapter 3. Operation 3.3 The LCD Display The components of the LCD display are shown in Figure 16, along with a typical mass flow rate readout. Channel # Parameter CH1 VOL 4500 VEL GAL/H XMT868i Flow Rate Units Figure 16: A Typical LCD Flow Rate Display As shown in Figure 16, the display screen includes the following information: • Channel Number • Flow Parameter • Units of Measure • Flow Rate Value The example in Figure 16 uses the default display settings. However, the first three items in the list above may be reprogrammed to display a variety of alternative choices. See the Programming Manual for detailed instructions on programming these parameters. Note: The LCD backlight flashes to signal errors. If the backlight is off when an error is detected, the display is illuminated briefly; if the backlight is already on, the light is interrupted briefly. Error code messages may appear in the upper right corner of the LCD display. For information about these error codes and how to respond to them, refer to Chapter 2, Error Codes, in the Service Manual. Proceed to the Taking Measurements section to use the XMT868i. DigitalFlow™ XMT868i Startup Guide 49 Chapter 3. Operation 3.4 The Optional PanaView Display The components of the PanaView text display appear in Figure 17, along with a typical flow rate readout. Figure 17: A Typical PanaView Text Display Pane As shown in Figure 17, the text pane includes the following information: • Channel Number • Flow Parameter • Units of Measure • Flow Rate Value The example in Figure 17 is typical, but the first three items in the list above may be reprogrammed to display a variety of alternative choices. See the next section for detailed instructions on programming these parameters. Note: Error code messages may appear in the lower left corner of the PanaView text display window. For information about these error codes and how to respond to them, refer to Chapter 2, Error Codes, in the Service Manual. Proceed to the Taking Measurements section to use the XMT868i. 50 DigitalFlow™ XMT868i Startup Guide Chapter 3. Operation 3.5 Taking Measurements The Model XMT868i is capable of displaying several different variables in a variety of formats. However, this manual will only discuss the basic measurement displays using the LCD display or the PanaView display. Refer to Chapter 2, Displaying Data, in the Programming Manual for instructions on setting up alternate choices. Also, refer to the Programming Manual and/or the PanaView User’s Manual to use PanaView or the analog outputs to obtain the flow rate data. 3.5.1 Programming the LCD Note: When you first initialize the XMT868i, the number of LCD parameters is set to OFF. You must program the LCD to display any measured parameters. Through the Keypad Program, you can program the LCD display to display up to four variables in sequence. Complete the following steps to program the LCD display: 1. Power up the XMT868i and wait until it has initialized. 2. Press [Escape]. [Enter], [Escape]. 3. In the Keypad Program window, scroll to PROG and press [Enter]. 4. In the PROG menu, scroll to GLOBL and press [Enter]. 5. Scroll to I/O and press [Enter]. 6. Scroll to LCD and press [Enter]. 7. The window now asks for the # of LCD Parameters. Scroll to the desired number (from OFF through 1-4 and KEY) and press [Enter]. The OFF setting switches the measurement display off, while the KEY setting enables users to change the measurement display using the arrow keys, without accessing the Keypad Program. If you select KEY: • To view a parameter other than the one currently displayed, press the [] and [] keys to scroll through the various parameters. • To view the channel measurements on a two-channel XMT868i, press the [] or [] keys until you have reached the desired channel and measurement. For a 1-Channel XMT868i, the data for Channel 1 is displayed automatically, and you can skip to step 9. However, for a 2-Channel meter, the channel data to be displayed must be specified at the following prompt. DigitalFlow™ XMT868i Startup Guide 51 Chapter 3. Operation 3.5.1 Programming the LCD (cont.) 8. Scroll to the desired Channel option, as listed in Table 19. Table 19: Channel Options Option Description CH1 Channel 1 CH2 Channel 2 SUM CH1+CH2 DIF CH1-CH2 AVE (CH1+CH2)/2 9. For each channel, select the desired Measurement Parameter, as shown in Table 20. Table 20: Output Measurement Options Option Bar Choice VEL Flow Velocity VOLUM Volumetric Flow +TOTL Forward Totalized Volume Flow -TOTL Reverse Totalized Volume Flow TIME Total Flow Measurement Time MDOT Mass Flow +MASS Forward Totalized Mass Flow -MASS Reverse Totalized Mass Flow POWER Energy Flow Power +ENRG Forward Energy Flow -ENRG Reverse Energy Flow SS up Signal strength for the upstream transducer. SS do Signal strength for the downstream transducer. Soundspeed Measured speed of sound in the fluid. DAC up AGC DAC count for upstream gain setting. DAC do AGC DAC count for downstream gain setting. T up Upstream ultrasonic signal transit time. Tdown Downstream ultrasonic signal transit time. DELTA Transit time difference between upstream and downstream signals. REYN# Current velocity/reynolds number. K (RE) K factor, based on the Reynolds number. PEAK% 52 Description Percentage of peak (set to +50 by default). DigitalFlow™ XMT868i Startup Guide Chapter 3. Operation Table 20: Output Measurement Options (cont.) Option Bar Choice THETA Qup Description Theta 3 is the angle between the ultrasonic beam and the normal to the pipe wall. It is calculated from measured transit time and the clamp-on parameters (clamp-ons only). Displays the signal quality for the upstream transducer. Qdown Displays the signal quality for the downstream transducer. AMPup Displays the value for the signal amplitude of the upstream transducer. AMPdn Displays the value for the signal amplitude of the downstream transducer. P#up Displays signal peaks for the upstream transducer. P#dn Displays signal peaks for the downstream transducer. NFup Displays the normalization factor for the upstream transducer. NFdn Displays the normalization factor for the downstream transducer. Cxdcr Displays the speed of sound in the transducer (clamp-on only). TEMPs Displays the temperature for the supply input (energy measurement). TEMPr Displays the temperature for the return input (energy measurement). Ts-Tr Difference between supply input and return input measurement (energy measurement). DENSs Displays the density for the supply input (energy measurement). DENSr Displays the density for the return input (energy measurement). DELTh Displays the delta enthalpy which is the difference between the supply and return. Enthalpy is a measure of energy contained in the fluid (energy measurement). Note: The measurement units that appear in these prompts are those selected in the GLOBL-SYSTM menu earlier in this section. Also, when differences in one channel's programming invalidate an output previously chosen for the other, the measurement defaults to the nearest selectable item in the parameter list. The previous two prompts repeat until all of the specified # of LCD Parameters have been set up. When all of the display parameters have been set up, the meter returns to the Global I/O window. To leave the Keypad Program, press the [Escape] key three times. After leaving the Keypad Program, the XMT868i will reset itself and will begin to display the parameters specified in this section. If more than one parameter was set up, each of the parameters will be displayed in sequence, with a pause of several seconds between display changes. 3.5.2 Using the LCD Display To use the programmed LCD display for obtaining flow rate data, simply power on the XMT868i as described earlier in this chapter. Then, read the flow rate directly from the display, as shown in Figure 16 on page 49. Note: See Chapter 2, Displaying Data, in the Programming Manual to customize the contents of the LCD display. DigitalFlow™ XMT868i Startup Guide 53 Chapter 3. Operation 3.5.3 PanaView Display Power up PanaView, establish communications with the XMT868i and enter the required startup parameters, as described in Chapter 2, Initial Setup. Then, proceed as follows: Note: See Chapter 2, Initial Setup, in this manual and/or Chapter 1, Programming Site Data, in the Programming Manual for complete instructions on entering startup data using PanaView. 1. In PanaView, pull down the Output menu, as shown in Figure 18, and click on the Text Display option. Figure 18: The Output Menu Note: The Text Display window that appears after Step 1 is actually stacked on top of any previously opened windows (such as the Meter Browser window). 2. Using the Window menu, as described in the PanaView User’s Manual, arrange the open windows in the desired format. For this discussion, Figure 19 shows the Text Display window in its maximized (full-screen) size. Figure 19: The Text Display Window 3. The left pane of the Text Display window contains the standard PanaView network tree. Expand the XMT branch, and double-click on the desired channel. (On 2-channel units, you can also display the SUM, DIFF or AVG parameters.) 54 DigitalFlow™ XMT868i Startup Guide Chapter 3. Operation 3.5.3 PanaView Display (cont.) 4. From the expanded tree, double-click on the desired flow parameter to display it in the right pane of the window. 5. Before actual data values can be displayed in the text pane, activate one of the following data collection modes (see Figure 19): • Click on the [Get Once] option button at the bottom of the right pane in the Text Display window. The current value of the selected process parameter, as specified in the PanaView network tree, is displayed in the right pane of the Text Display window. or • Enter an “interval” in the text box at the bottom of the right pane in the Text Display window, or check the “Max. Comm Rate” box to collect readings as fast as the system allows (1 sec). Then, click on the [Continuous] option button to begin collecting data for display in the right pane of the Text Display window. Note: Any value entered in the “Interval” text box is overridden if the “Max. Comm Rate” box is checked. The right pane now appears similar to Figure 17 on page 50. 6. If the [Continuous] option was selected in Step 5 above, click on the [Stop] option button, which has replaced the original [Continuous] option button, to terminate data collection. The Text Display window may be left open while other tasks are performed, or it may be closed by clicking on the lower [X] control button at the far right of the menu bar. IMPORTANT: If you click on the upper [X] control button at the far right of the PanaView title bar, you will exit PanaView completely. DigitalFlow™ XMT868i Startup Guide 55 Chapter 3. Operation 3.5.3a Displaying Multiple Process Parameters The procedure for displaying a single process parameter in a text screen may be repeated to simultaneously display multiple process parameters. To do so, proceed as follows: 1. Display the first process parameter in a text screen, as described in the previous section. 2. Repeat Step 1 for any desired additional process parameters, by double clicking on them in the PanaView network tree. PanaView automatically tiles the multiple text screens in the right pane of the Text Display window, as shown in Figure 20. Figure 20: Multiple Text Screens in the Text Display Window 3. As in any standard Windows application, the multiple text screens may be resized by dragging their borders. Also, the individual panes within a parameter’s text screen may be resized by dragging the borders within that text screen. 4. To close an open text screen, right click anywhere within that screen (except in the title bar or the error section) and click on the [Remove] option that pops up in the context menu. Note: After resizing or removing any of the multiple text screens, the default tiled layout may be restored by opening the Window menu (see the PanaView User’s Manual) and clicking on the Tile Output Displays option. 56 DigitalFlow™ XMT868i Startup Guide Chapter 3. Operation 3.5.3b Displaying Multiple Text Windows The procedures for displaying one or more process parameters in a single Text Display window may be repeated to open multiple Text Display windows. To do so, proceed as follows: 1. To open another Text Display window and display the desired process parameter(s) in the new window, repeat the steps in PanaView Display. 2. Arrange the multiple Text Display windows as desired using the Window menu (see the PanaView User’s Manual). 3.5.4 Pausing Measurement On occasion, it might become necessary for the XMT868i to stop taking measurements. Through PanaView, you can direct the XMT868i to pause measurements without cutting off power from the meter. 1. From the meter tree in the New Meter Browser, click on the XMT entry. 2. Expand the Edit Functions option, and double-click on the Pause Measurement entry. A window opens similar to Figure 21. Figure 21: The Pause Measurement Window 3. To pause current measurements, double-click on the Stop measurement option. The window closes, and the XMT868i stops taking measurements. 4. To restart measurement, double-click on the Pause Measurement entry, and then on the Measure flow option. The XMT868i resumes flow measurement. DigitalFlow™ XMT868i Startup Guide 57 Chapter 3. Operation 3.5.4a Procedure Options The Startup Guide is intended to provide only those instructions necessary to get the XMT868i installed and operating. By following the instructions in this chapter, the Model XMT868i can be set up to display the desired channel option and the desired measurement parameter, using either the LCD display or PanaView. To utilize the more advanced capabilities of the Model XMT868i, refer to the Programming Manual and/or the Service Manual for the instrument. Also, refer to the PanaView User’s Manual for instructions on using the PanaView software with the XMT868i. 58 DigitalFlow™ XMT868i Startup Guide Chapter 4. Specifications Chapter 4. 4.1 Specifications General The general specifications for the Model XMT868i flow transmitter are divided into the following categories: 4.1.1 Hardware Configuration Channel Options: Standard: 1 Channel. Optional: 2 Channel (2 pipes or 2 paths per pipe). Mode Options: Transit-Time. Package Options: Standard: Epoxy-coated aluminum Type 7/4X, IP66 Explosion proof Class I, Div. 1, Groups B, C & D. Class II, Groups E, F & G; Class III Flameproof II 2 GD EEx d IIC T5/T6 Optional: Stainless steel Type 7/4X. Explosion proof Class I, Div. 1, Groups B, C & D. Class II, Groups E, F & G; Class III Flameproof II 2 GD EEx d IIC T5/T6 Dimensions: Standard housing: 10 lb (4.5 kg); 8.2 x 6.6 in. (208 x 168 mm). Optional housing: 30 lb (13.6 kg); 8.2 x 6.6 in. (208 x 168 mm). 4.1.2 Environmental Operating Temperature: -40° to 140°F (–40° to 60°C). Storage Temperature: -67° to 167°F (–55° to 75°C). DigitalFlow™ XMT868i Startup Guide 59 Chapter 4. Specifications 4.1.3 Flow Accuracy (Velocity) Accuracy specifications assume a fully developed flow profile and a straight run of 10 pipe diameters upstream and 5 pipe diameters downstream. ±0.5% of reading (achievable with process calibration) Typical Clamp-On Flow Accuracy (Velocity) Pipe Diameter (ID) > 6 in. (150 mm): ±1% to 2% of reading Pipe Diameter (ID) < 6 in. (150 mm): ±2 to 5% of reading Typical Wetted Flow Accuracy (Velocity): ±1% of reading Note: Accuracy depends on pipe size, installation and whether measurement is one-path or two-path. 4.1.4 Range Transit-Time Mode: -40 to 40 ft/s (-12.2 to 12.2 m/s). 4.1.5 Rangeability (Overall) 400:1. 4.1.6 Repeatability ±0.1% to 0.3 of reading 4.1.7 Energy Accuracy (% of Reading): The accuracy of the energy measurement is a combination of the accuracy of the flow and temperature measurements. Transit-Time Mode: Accuracy of 1% is typical for calibrated systems. Note: Above specifications require a straight run of 10 pipe diameters upstream and 5 pipe diameters downstream. 4.1.8 Fluid Types Transit-Time Mode: Acoustically-conductive fluids. This includes most clean liquids and many with entrained solids or gas bubbles (the maximum void fraction depends on the transducer, interrogation carrier frequency, path length and pipe configuration). Consult the factory for additional information. 60 DigitalFlow™ XMT868i Startup Guide Chapter 4. Specifications 4.2 Electrical The electrical specifications for the Model XMT868i flow transmitter are divided into the following categories: 4.2.1 Power Supply Options: Standard: 95 to 240 VAC, 50/60 Hz, ± 10%. Optional: 12 to 28 VDC, ± 5%. Power Consumption: 20 W maximum. 4.2.2 Operating Modes Flow Measurement: Standard: Correlation Transit-Time™ Mode with clamp-on or wetted transducers. Energy Measurement (optional): To calculate energy flow rate, use Analog Input Board for transmitters. Use RTD Input Board for direct RTDs. 4.2.3 European Compliance This unit complies with EMC Directive 2004/108/EC and 2006/95/EC Low Voltage Directive (Installation Category II, Pollution Degree 2), and transducers comply with PED 97/23/EC for DN<25. DigitalFlow™ XMT868i Startup Guide 61 Chapter 4. Specifications 4.2.4 Input/Output Digital Display: 2-line x 16-character LCD display, LED backlight, configurable to display up to 4 measurement parameters in sequence, or to scroll through measurement parameters Digital Communications: Standard: RS232 serial port for PC, terminal or printer. Optional: RS485 serial port for multi-user network. RS485 MODBUS communication MODBUS/TCP OPC Server Ethernet Foundation Fieldbus Analog Outputs (built-in): Standard: Two isolated 0/4–20 mA, 600 Ω max. load. Option Cards: Optional Inputs/Outputs of the following types may be added: 1. Analog Inputs: two isolated 0/4-20 mA inputs, 24-V loop power. 2. RTD Inputs: two isolated 3-wire RTD inputs; Span –148° to 662°F (–100° to 350°C), 100 Ω Pt., Alpha 385. 3. Analog Outputs: two isolated 0/4–20 mA analog outputs, 1000 Ω maximum load. 4. Data Logging: 128 kB or 2 MB memory. 5. Totalizer or Frequency Outputs: two or four optically isolated pulse or frequency outputs, 100 VDC/3 A/1 W/10 KHz max. Totalizer Mode: one pulse per defined unit of parameter (e.g., 1 pulse/gal). Frequency Mode: pulse frequency proportional to magnitude of parameter (e.g., 10 Hz = 1 gal/min). 6. Alarm Relays: two or four Form-C relays General Purpose: 120 VAC, 28 VDC max., 5 A max., DC: 30 W max., AC: 60 VA max. Note: The above optional inputs/outputs are available only in specific combinations. Consult GE or see Table 22 on page 69 for details. 4.2.5 Additional Options PC-Interface Software: PanaView™ software option links the XMT868i to a PC. Software package includes CD and manual. 62 DigitalFlow™ XMT868i Startup Guide Chapter 4. Specifications 4.3 Transducer 4.3.1 Wetted Transducers Material: Standard: 316 Stainless Steel. Optional (for isolating PanAdapta Plugs): Hastelloy, Monel, Titanium, Duplex, CPVC, PVDF and others. Process Connection: Standard: 1-in. NPTM, 3/8-in. NPTM. Optional: RF flange, socket weld, fuse bond and others. Maximum Pressure: Standard: 0 to 3,000 psig (0.1013 to 20 MPa). Optional: Higher pressures on request. Temperature Range: Standard: –40° to 212°F (–40° to 100°C). Optional (overall range): -310o to 932oF (-190 to 500oC). Mounting: Spoolpiece, hot tap, or cold tap. Area Classifications: Standard: General-purpose Optional: Explosion proof: Class I, Div. 1, Groups B, C & D; Class II, Groups E, F and G; Class III Flameproof: II 2 G EEx d IIC T6 Weatherproof: Type 4/IP65. Submersible. Note: Wetted transducers for special applications and flowcells are also available. Consult the factory for details. DigitalFlow™ XMT868i Startup Guide 63 Chapter 4. Specifications 4.3.2 Clamp-On Transducers Temperature Range: Standard: –40° to 300°F (–40° to 150°C). Optional (overall range): -310o to 572oF (-190o to 300oC). Mounting: SS chain or strap, welded or magnetic clamping fixtures. Area Classifications: Standard: General-purpose Optional: Explosion proof: Class I, Div. 1, Groups B, C & D; Class II, Groups E, F and G; Class III Flameproof: II 2 G EEx md IIC T6-T3. [no content intended for this page] Weatherproof: Type 4/IP65. Submersible. Note: Clamp-on transducers for special applications and flowcells are also available. Consult the factory for details. 4.3.3 Transducer Cables Length: Standard: Pair of coaxial cables, type RG62 aU, length to 3 ft (1 m). Optional: Lengths up to 1000 ft (330 m) maximum. 4.3.4 Temperature Transducers (optional) Type: Loop-powered 3-wire platinum RTDs; clamp-on and wetted (thermowell) types are available. Range: -4o to 500oF (-20o to 260oC), not all extremes of parameters can be achieved simultaneously. Accuracy: 0.27oF (0.15oC), wetted RTDs, matched pairs. 64 DigitalFlow™ XMT868i Startup Guide Chapter 4. Specifications 4.4 Pipe Size and Materials 4.4.1 Wetted Transducers Materials: All metals and most plastics. (Consult the factory for concrete, glass and cement.) Pipe Sizes: Transit-Time Mode: Inside diameter 1 to 200 in. 4.4.2 Clamp-on Transducers Materials: All metals and most plastics. (Consult the factory for concrete, composite materials and highly corroded or lined pipes.) Pipe Sizes: Transit-Time Mode: Outside Diameter: 0.5 to 300 in. (12.7 mm to 7.6 m) and larger. Pipe Wall Thickness: Up to 3 in. (76.2 mm). DigitalFlow™ XMT868i Startup Guide 65 Chapter 4. Specifications 4.5 Flowcell 4.5.1 Tilted Diameter Pipe Sizes: Standard: 2 to 200 in. (50 to 5,000 mm). Optional: >200 in. Material: Standard: Stainless steel; carbon steel; plastics; fiberglass. Optional: Other metals; plastics; etc. Process Connection: Standard: Straight (welding); 150-lb flange; 300-lb flange. Optional: MJ; Victaulic; RTJ flanged; cold tap. Wetted Transducer Connection: 1” NPTM for 6 in. or greater pipe sizes; 3/8” NPTM for 2 to 5 in. sizes. Interrogation: Standard: Conventional 45o tilted-diameter; one or more traversals. Optional: Mid-radius chord; multi-chords including multiple paths. 66 DigitalFlow™ XMT868i Startup Guide Appendix A. CE Mark Compliance Appendix A. CE Mark Compliance A.1 Introduction For CE Mark compliance, the Model XMT868i flow transmitter must be wired in accordance with the instructions in this appendix. IMPORTANT: CE Mark compliance is required only for units intended for use in EC countries. A.2 Wiring The Model XMT868i must be wired with the recommended cable, and all connections must be properly shielded and grounded. Refer to Table 21 for the specific requirements. Table 21: Wiring Requirements Cable Type Connection Transducer Ground Termination Armored RG62 a/U Grounded using a cable gland. Input/ Output Armored 22 AWG shielded (e.g. Baystate #78-1197) with armored material added to outside of jacket Grounded using a cable gland. Power Armored 14 AWG 3 conductor Grounded using a cable gland. Note: If the Model XMT868i is wired as described in this appendix, the unit will comply with the EMC Directive 89/336/EEC. DigitalFlow™ XMT868i Startup Guide 67 Appendix A. CE Mark Compliance [no content intended for this page] 68 DigitalFlow™ XMT868i Startup Guide Appendix B. Data Records Appendix B. Data Records B.1 Available Option Cards The XMT868i can accommodate one option card in Slot 1 and one in Slot 2. The available configurations are listed in Table 22. Card #7131215-02 1215-03 1215-04 1215-05 1215-06 1215-07 1215-09 1215-11 1223-02/1473-02 1223-03/1473-03 1223-04/1473-04 1223-05/1473-05 1223-06/1473-06 1223-07/1473-07 1223-08/1473-08 1223-10/1473-10 1225-13 1225-14 1225-15 1225-16 1430-03 1430-04 1146-02/1332-02 1146-03/1332-03 1345-04 1477-03 1477-01 1475-01 DigitalFlow™ XMT868i Startup Guide Table 22: Option Card Configurations Slot # Configuration 1 FF - 4 Frequency Outputs TT - 4 Totalizer Outputs FT - 2 Frequency Outputs/2 Totalizer Outputs FO - 2 Frequency Outputs TO - 2 Totalizer Outputs AA - 4 Standard Alarms FA - 2 Frequency Outputs/2 Standard Alarms TA - 2 Totalizer Outputs/2 Standard Alarms OI - 2 Current Inputs OR - 2 RTD Inputs TI - 2 Current Inputs/2 Totalizer Inputs TR - 2 RTD Inputs/2 Totalizer Inputs FI - 2 Current Inputs/2 Frequency Inputs FR - 2 RTD Inputs/2 Frequency Inputs AI - 2 Current Inputs/2 Standard Alarms AR - 2 RTD Inputs/2 Standard Alarms CO - 2 Current Outputs CF - 2 Current Outputs/2 Frequency Outputs CT - 2 Current Outputs/2 Totalizer Outputs CA - 2 Current Outputs/2 Standard Alarms RR - 4 RTD Inputs IR - 2 RTD Inputs/2 Current Inputs 2 128 KB Memory 2 MB Memory Modbus Communications Protocol 2 MODBUS/TCP/IP 2 Ethernet 2 Foundation Fieldbus 69 Appendix B. Data Records B.2 Option Cards Installed Whenever an option card is installed or changed in the XMT868i flow transmitter, record the type of card and any additional setup information in the appropriate row of Table 23. Slot # 0 Table 23: Option Cards Installed Type of Option Card Additional Setup Information Analog Outputs (A, B) 1 2 70 DigitalFlow™ XMT868i Startup Guide Appendix B. Data Records B.3 Site Data After the Model XMT868i flow transmitter has been installed, specific site data must be entered via the Keypad Program, prior to operation. Record that information in Table 24. Model # Software Vers. Meter Message System Units Vol. Units English Error Handling Meter Address Baud Rate MOD. Baud Rate Channel 1 Channel Status Off1 Table 24: Site Data General Information Serial # Setup Date GLOBL-SYSTEM Vol. Dec. Digits Metric Totalizer Units Tot. Dec. Dig. GLOBL-I/O-ERROR 2-Path Error No Yes GLOBL-COMM MOD. Parity MOD. Stop Bits MOD. Address CHANNEL X-ACTIV Channel 2 (if applicable) Trans Channel Status Trans Off1 CHANNEL X-SYSTM Channel 1 Channel 2 (if applicable) Channel Label Channel Label Chan. Message2 Energy Option Vol. Units Vol. Dec. Digits Totalizer Units Tot. Dec. Dig. Mass Flow Mass Flow Time MDOT Dec. Dig. Mass Totals Mass Dec. Digits Power Power Dec.Dig. Energy (Total) Energy Dec. Dig. Heat. or Cool. Flow Meas. 1not On Off Chan. Message2 Energy Option Vol. Units Vol. Dec. Digits Totalizer Units Tot. Dec. Dig. Mass Flow Mass Flow Time MDOT Dec. Dig. Mass Totals Mass Dec. Digits Power Power Dec. Dig. Energy (Total) Energy Dec. Dig. Heat. or Cool. Flow Meas. On Off available for 1-Channel meter, 2”Site Message” for 1-Channel meter DigitalFlow™ XMT868i Startup Guide 71 Appendix B. Data Records Table 24: Site Data (cont.) CHANNELx-I/O Zero Cutoff Temp. Input Fixed ( ) Live Pipe/Transducer Parameters - PIPE Channel 1 Channel 2 (if applicable) Trans. Type STD SPEC Trans. Type STD SPEC Transducer # Transducer # Special Transducers Special Transducers Wedge Type Rayl Shear Wettd Wedge Type Rayl Shear Wettd Frequency Hz Frequency Hz Trans. Tw Trans. Tw Wedge Angle Wedge Angle Wedge Sndspd Wedge Sndspd Pipe Material Pipe Material All Clamp-On and Wetted Transducers All Clamp-On and Wetted Transducers Pipe O.D. Pipe O.D. Pipe Wall Pipe Wall Path Length (P) Path Length (P) Axial Length (L) Axial Length (L) Lining Yes No Lining Yes No Lining Material Lining Material Lining Sndspd Lining Sndspd Lining Thickness Lining Thickness Track. Window. Yes No Track. Window. Yes No Fluid Type Fluid Type Other/Sndspd Other/Sndspd % of Water % of Water Reynolds Corr. Off Active Reynolds Corr. Off Active KV Input Sel. Table Static KV Input Sel. Table Static Kin. Visc. Kin. Visc. Cal. Factor Cal. Factor # of Traverses # of Traverses Trans. Spacing Trans. Spacing Response Time Response Time CHANNELx-SETUP-ADVANCED FEATURES -MASS FLOW Mass Flow No Yes Mass Flow No Yes Static Density Static Density CHANNELx-SETUP-ADVANCED FEATURES-CODE LENGTH Code Length Auto Short Long Code Length Auto Short Long 72 DigitalFlow™ XMT868i Startup Guide Appendix B. Data Records Table 24: Site Data (cont.) CHx-SETUP-ADVANCED FEATURES-KV/SS KV/SS (or C3) Pairs KV/SS (or C3) Pairs # Sig. Stren./ Kin. Visc. # Sig. Stren./ Kin. Visc. Soundspeed Soundspeed 1 1 2 2 3 3 4 4 5 5 6 6 7 7 8 8 9 9 10 10 11 11 12 12 13 13 14 14 15 15 16 16 17 17 18 18 19 19 20 20 CHx-SETUP-ADVANCED FEATURES-MULTIK Custom Type CstV CstR CustomType CstV CstR K-Factor Table K-Factor Table K-Factor # Vel./Reyn. K Factor K-Factor # Vel./Reyn. K Factor 1 1 2 2 3 3 4 4 5 5 6 6 7 7 8 8 9 9 10 10 11 11 12 12 13 13 DigitalFlow™ XMT868i Startup Guide 73 Appendix B. Data Records K-Factor # 14 15 16 17 18 19 20 74 Table 24: Site Data (cont.) CHx-SETUP-ADVANCED FEATURES-MULTIK (cont.) Vel./Reyn. K Factor K-Factor # Vel./Reyn. 14 15 16 17 18 19 20 K Factor DigitalFlow™ XMT868i Startup Guide Appendix C. Measuring P and L Dimensions Appendix C. Measuring P and L Dimensions C.1 Measuring P and L If you are using wetted transducers, the XMT868i requires you to enter the path length (P) and the axial dimension (L). P is the transducer face-to-face distance, and L is the axial projection of P in the flow stream. To determine L, physically measure the distance between the center of the transducer ports at the inside wall as shown in Figure 22 below, if possible. If not, consult the factory. Pipe Thickness P θ Pipe O.D. L Figure 22: 180o Transducer Installations - Top View To determine P, you need the following: • the pipe inside diameter (ID) • the wall thickness (WT) • the installed pipe coupling length (CL) • the transducers face depth (FD) • the mounting angle (MA) DigitalFlow™ XMT868i Startup Guide 75 Appendix C. Measuring P and L Dimensions C.1 Measuring P and L (cont.) Use Figure 23 below to properly measure the coupling length. Typically, the transducer face is positioned just outside the inside diameter (ID) of the pipe, or slightly retracted inside the coupling. FD MA 45o CL Figure 23: Determining the Pipe Coupling Length Use the following formula to determine P dimension: [ID + 2(WT)]/(cos MA) + 2(CL) - FD) = P Dimension. For example, given the following: • inside diameter (ID) = 48” • wall thickness (WT) = 3/8” • installed coupling length (CL) = 2.0” • a transducer face depth (FD) = 1.75” • mounting angle (MA) - 45o The P dimension would be [48 + 2(3/8)]/(0.7071) + 2(2.0 - 1.75) = 69.4” 76 DigitalFlow™ XMT868i Startup Guide Warranty Warranty Each instrument manufactured by GE Sensing is warranted to be free from defects in material and workmanship. Liability under this warranty is limited to restoring the instrument to normal operation or replacing the instrument, at the sole discretion of GE Sensing. Fuses and batteries are specifically excluded from any liability. This warranty is effective from the date of delivery to the original purchaser. If GE Sensing determines that the equipment was defective, the warranty period is: • one year from delivery for electronic or mechanical failures • one year from delivery for sensor shelf life If GE Sensing determines that the equipment was damaged by misuse, improper installation, the use of unauthorized replacement parts, or operating conditions outside the guidelines specified by GE Sensing, the repairs are not covered under this warranty. The warranties set forth herein are exclusive and are in lieu of all other warranties whether statutory, express or implied (including warranties or merchantability and fitness for a particular purpose, and warranties arising from course of dealing or usage or trade). Return Policy If a GE Sensing instrument malfunctions within the warranty period, the following procedure must be completed: 1. Notify GE Sensing, giving full details of the problem, and provide the model number and serial number of the instrument. If the nature of the problem indicates the need for factory service, GE Sensing will issue a RETURN AUTHORIZATION NUMBER (RAN), and shipping instructions for the return of the instrument to a service center will be provided. 2. If GE Sensing instructs you to send your instrument to a service center, it must be shipped prepaid to the authorized repair station indicated in the shipping instructions. 3. Upon receipt, GE Sensing will evaluate the instrument to determine the cause of the malfunction. Then, one of the following courses of action will then be taken: • If the damage is covered under the terms of the warranty, the instrument will be repaired at no cost to the owner and returned. • If GE Sensing determines that the damage is not covered under the terms of the warranty, or if the warranty has expired, an estimate for the cost of the repairs at standard rates will be provided. Upon receipt of the owner’s approval to proceed, the instrument will be repaired and returned. DigitalFlow™ XMT868i Startup Guide 77 Warranty [no content intended for this page] 78 DigitalFlow™ XMT868i Startup Guide Index A ACTIV Submenu. . . . . . . . . . . . . . . . . . . . . . . . . . . 34 Alarms Option Card Connecting . . . . . . . . . . . . . . . . . . . . . . . . . . . . . 12 Fail-Safe Operation . . . . . . . . . . . . . . . . . . . . . . . 13 Analog Inputs Option Card Connecting . . . . . . . . . . . . . . . . . . . . . . . . . . . . . 14 Pin Assignments . . . . . . . . . . . . . . . . . . . . . . . . . 14 Rating . . . . . . . . . . . . . . . . . . . . . . . . . . . . . . . . . 14 Analog Outputs Units Options . . . . . . . . . . . . . . . . . . . . . . . . . . . 52 Analog Outputs (Slot 0) Connecting . . . . . . . . . . . . . . . . . . . . . . . . . . . . . . 9 Analog Outputs Option Card Connecting . . . . . . . . . . . . . . . . . . . . . . . . . . 16, 19 Arrow Keys . . . . . . . . . . . . . . . . . . . . . . . . . . . . . . 28 Axial Length . . . . . . . . . . . . . . . . . . . . . . . . . . . . . . 41 C Cable Serial Port . . . . . . . . . . . . . . . . . . . . . . . . . . . . . . 10 Transducers . . . . . . . . . . . . . . . . . . . . . . . . . . . . . . 3 CE Mark Compliance . . . . . . . . . . . . . . . . . . . . . . . 67 Channel Label . . . . . . . . . . . . . . . . . . . . . . . . . . . . . 35 Channel Menu . . . . . . . . . . . . . . . . . . . . . . . . . . . . . 34 Channel Message. . . . . . . . . . . . . . . . . . . . . . . . . . . 35 Channel-SYSTM Submenu . . . . . . . . . . . . . . . . . . . 35 CHx Menu . . . . . . . . . . . . . . . . . . . . . . . . . . . . . . . 34 Connecting See Part Name Connectors, Electrical . . . . . . . . . . . . . . . . . . . . . . . . 5 D Display Data . . . . . . . . . . . . . . . . . . . . . . . . . . . . . . . . . . 48 Measurement Mode . . . . . . . . . . . . . . . . . . . . . . . 48 Down Arrow Key . . . . . . . . . . . . . . . . . . . . . . . . . . 28 E Electrical Connectors . . . . . . . . . . . . . . . . . . . . . . . . . 5 Electronics Console Description . . . . . . . . . . . . . . . . . . . . . . . . . . . . . . 2 Mounting . . . . . . . . . . . . . . . . . . . . . . . . . . . . . . . 5 Energy Option, Enabling . . . . . . . . . . . . . . . . . . . . . 35 DigitalFlow™ XMT868i Startup Guide Energy Option, Programming . . . . . . . . . . . . . . . 33, 38 Enter Key . . . . . . . . . . . . . . . . . . . . . . . . . . . . . . . . 28 Escape Key . . . . . . . . . . . . . . . . . . . . . . . . . . . . . . . 28 Ethernet, Wiring the. . . . . . . . . . . . . . . . . . . . . . . . . 18 F Flowcell Installing . . . . . . . . . . . . . . . . . . . . . . . . . . . . . . . . 3 Fluid Type. . . . . . . . . . . . . . . . . . . . . . . . . . . . . . . . 42 Fluid Type, Selecting . . . . . . . . . . . . . . . . . . . . . . . . 41 Frequency for Special Transducers . . . . . . . . . . . . . . . . . . . . 39 Fuse Ratings . . . . . . . . . . . . . . . . . . . . . . . . . . . . . . 61 G Global Menu . . . . . . . . . . . . . . . . . . . . . . . . . . . . . . . . . 29 Submenus . . . . . . . . . . . . . . . . . . . . . . . . . . . . . . 29 GLOBL Menu . . . . . . . . . . . . . . . . . . . . . . . . . . . . . 29 GLOBL-SYSTM Submenu . . . . . . . . . . . . . . . . . . . 29 I I/O (Global) Submenu LCD Option . . . . . . . . . . . . . . . . . . . . . . . . . . . . 51 Infrared Keypad, Using . . . . . . . . . . . . . . . . . . . . . . 28 Initial Setup Data Table . . . . . . . . . . . . . . . . . . . . . . . . . . . . . . 71 Minimum Required . . . . . . . . . . . . . . . . . . . . . . . 27 Input Voltage . . . . . . . . . . . . . . . . . . . . . . . . . . . . . . . 6 Internal Tests . . . . . . . . . . . . . . . . . . . . . . . . . . . . . . 48 K Keypad Program ACTIV Submenu . . . . . . . . . . . . . . . . . . . . . . . . . 34 Keypad Program, Entering . . . . . . . . . . . . . . . . . . . . 29 Keypad Program, Exiting if Unused . . . . . . . . . . . . . 29 KV Input Selection . . . . . . . . . . . . . . . . . . . . . . . . . 43 L LCD Option . . . . . . . . . . . . . . . . . . . . . . . . . . . . . . 51 Left Arrow Key . . . . . . . . . . . . . . . . . . . . . . . . . . . . 28 Lightning Protector, Connecting . . . . . . . . . . . . . . . . . 8 Liquid Crystal Display (Transmitter) Setting Up . . . . . . . . . . . . . . . . . . . . . . . . . . . . . . 51 LVD Statement . . . . . . . . . . . . . . . . . . . . . . . . . . . . . 2 79 Index M Mass Flow Data, Programming . . . . . . . . . . . . . . . . 32 Mass Flow Option, Programming . . . . . . . . . . . . . . . 37 Measurements Displaying . . . . . . . . . . . . . . . . . . . . . . . . . . . 48, 51 Taking . . . . . . . . . . . . . . . . . . . . . . . . . . . . . . 48, 51 Menus Output . . . . . . . . . . . . . . . . . . . . . . . . . . . . . . . . . 54 MODBUS . . . . . . . . . . . . . . . . . . . . . . . . . . . . . . . . 17 MODBUS/TCP, Wiring the . . . . . . . . . . . . . . . . . . . 18 Multiple Parameter Text Displays . . . . . . . . . . . . . . . 56 Multiple Text Windows . . . . . . . . . . . . . . . . . . . . . . 57 O Option Card Alarms . . . . . . . . . . . . . . . . . . . . . . . . . . . . . . . . 12 Analog Inputs . . . . . . . . . . . . . . . . . . . . . . . . . . . 14 Analog Outputs . . . . . . . . . . . . . . . . . . . . . . . 16, 19 RTD Inputs . . . . . . . . . . . . . . . . . . . . . . . . . . . . . 16 Setup Information Table . . . . . . . . . . . . . . . . . . . . 70 Totalizer/Frequency Outputs . . . . . . . . . . . . . . . . . 15 Output Menu . . . . . . . . . . . . . . . . . . . . . . . . . . . . . . 54 P PanaView, Displaying Data in . . . . . . . . . . . . . . . . . 50 Path Length . . . . . . . . . . . . . . . . . . . . . . . . . . . . . . . 41 Pausing Measurement . . . . . . . . . . . . . . . . . . . . . . . 57 PIPE Submenu . . . . . . . . . . . . . . . . . . . . . . . . . . . . . . . 39 Pipe Length . . . . . . . . . . . . . . . . . . . . . . . . . . . . . . . 41 Pipe Lining . . . . . . . . . . . . . . . . . . . . . . . . . . . . . . . 41 Pipe Material . . . . . . . . . . . . . . . . . . . . . . . . . . . . . . 40 Pipe OD Unit . . . . . . . . . . . . . . . . . . . . . . . . . . . . . 41 Pipe OD, Programming . . . . . . . . . . . . . . . . . . . . . . 41 Pipe Wall Thickness . . . . . . . . . . . . . . . . . . . . . . . . 41 Power Connecting . . . . . . . . . . . . . . . . . . . . . . . . . . . . . . 6 Terminal Block . . . . . . . . . . . . . . . . . . . . . . . . . . . 6 Powering Up Display . . . . . . . . . . . . . . . . . . . . . . . . . . . . . . . . 48 Internal Checks . . . . . . . . . . . . . . . . . . . . . . . . . . 48 Pressure Transmitter Installing . . . . . . . . . . . . . . . . . . . . . . . . . . . . . . . . 4 80 R Return Policy . . . . . . . . . . . . . . . . . . . . . . . . . . . . . 77 Right Arrow Key . . . . . . . . . . . . . . . . . . . . . . . . . . . 28 RS232 Port See Serial Port RS485 Port See Serial Port RS485 Serial Port MODBUS . . . . . . . . . . . . . . . . . . . . . . . . . . . . . . 17 RTD Inputs Option Card Connecting . . . . . . . . . . . . . . . . . . . . . . . . . . . . . 16 S Serial Port Cable . . . . . . . . . . . . . . . . . . . . . . . . . . . . . . . . . 10 Connecting . . . . . . . . . . . . . . . . . . . . . . . . . . 10, 11 Pin Assignments . . . . . . . . . . . . . . . . . . . . . . 10, 11 Slot 0 Output Measurement Options . . . . . . . . . . . . . . . . 52 See Analog Outputs (Slot 0) Special Transducers, Programming . . . . . . . . . . . . . . 39 Specifications Electrical . . . . . . . . . . . . . . . . . . . . . . . . . . . . . . . 61 General . . . . . . . . . . . . . . . . . . . . . . . . . . . . . . . . 59 Transducer . . . . . . . . . . . . . . . . . . . . . . . . . . 63, 64 System (Channel) Submenu . . . . . . . . . . . . . . . . . . . 35 System (Global) Submenu . . . . . . . . . . . . . . . . . . . . 29 System Data Entering in GLOBL Menu . . . . . . . . . . . . . . . . . . 29 System Units in GLOBL-SYSTM Submenu . . . . . . . . . . . . . . . . 29 T Temperature Transmitter Installing . . . . . . . . . . . . . . . . . . . . . . . . . . . . . . . . 4 Terminal Block Analog Outputs - I/O . . . . . . . . . . . . . . . . . . . . . . . 9 Power - TB1 . . . . . . . . . . . . . . . . . . . . . . . . . . . . . 6 Serial Port - RS232 . . . . . . . . . . . . . . . . . . . . . . . 10 Serial Port - RS485 . . . . . . . . . . . . . . . . . . . . . . . 11 Time Delay . . . . . . . . . . . . . . . . . . . . . . . . . . . . . . . 39 Totalizer Units in Channel Menu . . . . . . . . . . . . . . . . . . . . . . . . . 36 in GLOBL Menu . . . . . . . . . . . . . . . . . . . . . . . . . 31 DigitalFlow™ XMT868i Startup Guide Index Totalizer/Frequency Option Card Connecting . . . . . . . . . . . . . . . . . . . . . . . . . . . . . 15 Tracking Windows. . . . . . . . . . . . . . . . . . . . . . . . . . 42 Transducer Number . . . . . . . . . . . . . . . . . . . . . . . . . 39 Transducer Parameters, Programming . . . . . . . . . . . . 39 Transducers Axial Dimension . . . . . . . . . . . . . . . . . . . . . . . . . 75 Cables . . . . . . . . . . . . . . . . . . . . . . . . . . . . . . . . . . 3 Installation Angle. . . . . . . . . . . . . . . . . . . . . . . . . 75 Location . . . . . . . . . . . . . . . . . . . . . . . . . . . . . . . . 3 Path Length . . . . . . . . . . . . . . . . . . . . . . . . . . . . . 75 Transmitter LCD, Setting Up . . . . . . . . . . . . . . . . . . . . . . . . . 51 U Unpacking . . . . . . . . . . . . . . . . . . . . . . . . . . . . . . . . 1 Up Arrow Key. . . . . . . . . . . . . . . . . . . . . . . . . . . . . 28 V Voltage, Input . . . . . . . . . . . . . . . . . . . . . . . . . . . . . . 6 Volumetric Units in Channel Menu . . . . . . . . . . . . . . . . . . . . . . . . . 35 in GLOBL Menu . . . . . . . . . . . . . . . . . . . . . . . . . 30 W Warranty . . . . . . . . . . . . . . . . . . . . . . . . . . . . . . . . . 77 Wedge Angle. . . . . . . . . . . . . . . . . . . . . . . . . . . . . . 39 Wedge Soundspeed . . . . . . . . . . . . . . . . . . . . . . . . . 39 Wedge Temperature . . . . . . . . . . . . . . . . . . . . . . . . . 39 Wedge Type . . . . . . . . . . . . . . . . . . . . . . . . . . . . . . 39 Windows Resizing . . . . . . . . . . . . . . . . . . . . . . . . . . . . . . . 56 Tiling . . . . . . . . . . . . . . . . . . . . . . . . . . . . . . . . . 56 Wiring CE Mark Compliance . . . . . . . . . . . . . . . . . . . . . . 67 Option Card . . . . . . . . . . . . . . . . . . . . . See Card Name Terminal Block . . . . . . . . . . . . . . . . . See Block Name DigitalFlow™ XMT868i Startup Guide 81 Index [no content intended for this page] 82 DigitalFlow™ XMT868i Startup Guide GE Sensing ATEX COMPLIANCE GE Infrastructure Sensing, Inc. 1100 Technology Park Drive Billerica, MA 01821-4111 U.S.A. We, as the manufacturer, declare under our sole responsibility that the product XMT868 Liquid Ultrasonic Flow Transmitter to which this document relates, in accordance with the provisions of ATEX Directive 94/9/EC Annex II, meets the following specifications: II 2 GD EEx d IIC T5 (-20°C to +65°C) 1180 ISSeP02ATEX008 T95°C IP66 Furthermore, the following additional requirements and specifications apply to the product: • Having been designed in accordance with EN 50014, EN 50018, and EN 50281, the product meets the fault tolerance requirements of electrical apparatus for category “d”. • The product is an electrical apparatus and must be installed in the hazardous area in accordance with the requirements of the EC Type Examination Certificate. The installation must be carried out in accordance with all appropriate international, national and local standard codes and practices and site regulations for flameproof apparatus and in accordance with the instructions contained in the manual. Access to the circuitry must not be made during operation. • Only trained, competent personnel may install, operate and maintain the equipment. • The product has been designed so that the protection afforded will not be reduced due to the effects of corrosion of materials, electrical conductivity, impact strength, aging resistance or the effects of temperature variations. • The product cannot be repaired by the user; it must be replaced by an equivalent certified product. Repairs should only be carried out by the manufacturer or by an approved repairer. • The product must not be subjected to mechanical or thermal stresses in excess of those permitted in the certification documentation and the instruction manual. • The product contains no exposed parts which produce surface temperature infrared, electromagnetic ionizing, or non-electrical dangers. CERT-ATEX-D (Rev. August 2004) GE Sensing DECLARATION OF CONFORMITY DOC-0002, Rev. A GE Sensing 1100 Technology Park Drive Billerica, MA 01821 USA We, declare under our sole responsibility that the DigitalFlow™ IGM878 Industrial Gas Flow Ultrasonic Transmitter DigitalFlow™ XGM868 Gas Flow Ultrasonic Transmitter DigitalFlow™ XGS868 Steam Flow Ultrasonic Transmitter DigitalFlow™ XMT868 Liquid Flow Ultrasonic Transmitter to which this declaration relates, are in conformity with the following standards: • EN 60079-0: 2007 • EN 60079-1: 2004 • EN 50281-1-1: 1998 • II 2 GD EEx d IIC T5; ISSeP02ATEX008 (ISSeP, B7340 Colfontaine, Belgium - NoBo 492) • EN 61326-1: 2006, Class A, Table 2, Industrial Locations • EN 61326-2-3: 2006 • EN 61010-1: 2001, Overvoltage Category II, Pollution Degree 2 Other standards Used: • EN 50014: 1997 +A1, A2, A3 • EN 50018: 2000 following the provisions of the 2004/108/EC EMC, 2006/95/EC Low Voltage and 94/9/EC ATEX Directives. Where products were initially assessed for compliance with the Essential Health and Safety Requirements of the ATEX Directive 94/9/EC using earlier harmonized standards, a subsequent review has determined that “technical knowledge” is unaffected by the current harmonized standards listed above. The units listed above and any ancillary equipment supplied with them do not bear CE marking for the Pressure Equipment Directive, as they are supplied in accordance with Article 3, Section 3 (sound engineering practices and codes of good workmanship) of the Pressure Equipment Directive 97/23/EC for DN<25. Billerica - August 2010 Issued Mr. Gary Kozinski Certification & Standards, Lead Engineer Customer Support Centers U.S.A. The Boston Center 1100 Technology Park Drive Billerica, MA 01821 U.S.A. Tel: 800 833 9438 (toll-free) 978 437 1000 E-mail: [email protected] Ireland Sensing House Shannon Free Zone East Shannon, County Clare Ireland Tel: +353 (0)61 470291 E-mail: [email protected] An ISO 9001:2000 Certified Company www.ge-mcs.com/en/about-us/quality.html www.ge-mcs.com ©2011 General Electric Company. All rights reserved. Technical content subject to change without notice. 910-171U Rev. F