1
Embest SBC2440-I Single Board
Linux User Manual
V1.0
Copywrite©2006 by Shenzhen Embest Info&Tech Co.,LTD.
All rights reserved.
No part of this document may be reproducted or transmitted in any form or by any
means without prior written consent of Embest Info&Tech Co.,LTD.
-1-
CONTENTS
1. PREREQUISITES ............................................................................................................................................. 3
1.1 Host Computer Requirements................................................................................................................. 3
1.2 Hardware setup ...................................................................................................................................... 3
2. INSTALLING THE TOOLCHAINS AND SOURCE CODE FILE ................................................................................ 3
2.1 Installing the toolchains ......................................................................................................................... 3
2.2 Installing Linux source code .................................................................................................................. 4
2.3 Set the environment variable .................................................................................................................. 4
3.COMPILE VIVI................................................................................................................................................. 4
4. CONFIGURE AND COMPILE KERNEL ............................................................................................................... 7
5. MAKE YAFFS FILE SYSTEM IMAGE................................................................................................................ 8
6.LINUX APPLICATION PROGRAM DEVELOPMENT GUIDE ................................................................................... 9
7. HOW TO BURN LINUX IMAGE TO NANDFLASH ........................................................................................ 10
Step 1. Burn vivi to NANDflash using JTAG Cable and SJF2440.exe ....................................................... 10
Step 2 Install USB driver............................................................................................................................ 13
Step 3. Burn Linux kernel and File System via USB................................................................................... 18
-2-
1. Prerequisites
1.1 Host Computer Requirements
In order to use this demonstration and further tools, the following minimum personal computer requirements
must be met:
Personal computer running Redhat 9.0 (suggest fully installing Linux)
One free RS232 serial port (DB9)
Minimum 500MB of disk space
A Linux terminal program such as Minicom
1.2 Hardware setup
The SBC2440-I kit includes a basic guide for setting up hardware. It is assumed that the kit is configured as
described in this guide. Here are the minimum required connections for using this demo:
SBC2440-I Single Board
12V DC power supply
RS232 Serial cable
USB Cable
JTAG Cable made by Embest
Hyper terminal
DNW.exe
2. Installing the toolchains and source code file
This section mainly introduce how to install arm-linux development environment on Redhat 9.0
Including:
Install cross compiler
Install kernel source code
Install tools
The below steps are based on Redhat 9.0. Please make sure your hard disc has at least 1GB surplus
space.
2.1 Installing the toolchains
In order to build the Linux kernel, you will need a Linux PC running Red Hat 9.0 with the necessary GNU
compiler toolchains installed.
Please login in using the user name root and insert the SBC2440-I CD in your CD-ROM.
Step1: Mount CD
#mount /dev/cdrom /mnt/cdrom
Step2: get in CD directory
-3-
#cd /mnt/cdrom/Linux
Step3: install compiler
#tar xvzf arm-linux-gcc-3.4.1.tgz –C /
Decompress to create the directory /usr/local/arm/3.4.1 where the arm-linux-gcc compiler is located.
2.2 Installing Linux source code
Step1: get into the CD directory
#cd /mnt/cdrom/Linux
Step2: install SBC2440-I kernel source code
#tar xvzf SBC2440I.tgz –C /
create /opt/Embest /SBC2440-I directory, the structure of the directory is as below:
|___ vivi
bootloader of SBC2440-I board
|___ kernel –2.6.13
Kernel source code 2.6.13 of the SBC2440-I board
|___ root_default
File System without QT
|___ root_qtopia_tp
QT File System with Tounch panel
|___ root_qtopia_mouse
QT File System with USB mouse
|___examples
Example source code
|___Jflash
Flash programmer tool
|___mkyaffs
yaffs file system making tool
Following operations all run under the above directory.
2.3 Set the environment variable
To easily use arm-linux-gcc compilersystem, it is recommended to add arm-linux tool chain directory to
environment variable PATH.
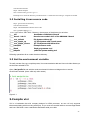
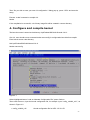
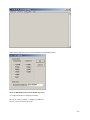
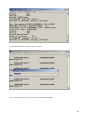
Open /etc/profle file and add the words as showed in belowo red diagram box to set the
environment variable. (Note: valid only after restart)
Figure 2-1
3.Compile vivi
Vivi is a bootloader that mizi company designs for ARM processor, as now vivi only supports
telecommunicating with host using serial port, so you must use a serial cable to connect target board
and host. SBC2440-I uses a standard male/female serial port cable.
-4-
Enter vivi source code directory:
# cd /opt/Embest/SBC2440I/vivi
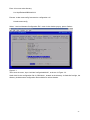
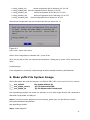
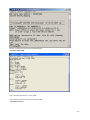
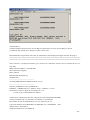
Execute “make menuconfig”command to configuration vivi
# make menuconfig
Select “Load on Alternate Configuration File” menu in the window pop up, press <Select>
Figure 3-1
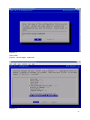
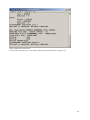
Then enter the menu ,input “arch/def-configs/smdk2440”, as shown in Figure 3-2.
Smdk 2440 is the configuration file for SBC2440-I, located at the directory vivi/arch/def-configs, the
directory includes some configuration files suitable for various boards.
-5-
Figure 3-2
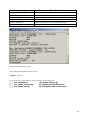
Press <OK>
Figure 3-1 shows again , select exit
Figure 3-3
-6-
Then “Do you wish to save your new vivi configuration ” dialog pop up, press <YES> and save the
setup,.
Execute “make”command to compile vivi.
#make
If the compilation is successful, a vivi binary image file will be created in current directory.
4. Configure and compile kernel
The kernel sources is stored at the directory /opt/Embest/SBC2440-I/kernel-2.6.13.
Like vivi, user should excute command“make menuconfig”to configuration kernel before compile.
Enter kernel source code directory:
#cd /opt/Embest/SBC2440I/kernel-2.6.13
#make menuconfig
Figure 4-1
Select highlighted letters “Load an Alternate Configuration File”,press <Select>
Then enter the menu ,input the kernel configuration file, for example ,input “config_cs8900_s35 ”, as
shown in Figure 4-2.
• config_cs8900_n35
Kernel configuration file for NEC 3.5” tft LCD
-7-
• config_cs8900_s35
Kernel configuration file for Samsung 3.5” tft LCD
• config_cs8900_tft84 Kernel configuration file for Sharp 8.4” tft LCD
• config_dm9000_n35
Kernel configuration file for NEC 3.5” tft LCD
• config_dm9000_s35
Kernel configuration file for Samsung 3.5” tft LCD
• config_ dm9000_tft84
Kernel configuration file for Sharp 8.4” tft LCD
These kernel configuration files are located at the directory kernel-2.6.13.
Figure 4-2
Press <OK> ,return main memu.
Select “Save configuration to Alternate File ”, press <Exit>
Then “Do you wish to save your new kernel configuration ” dialog pop up, press <YES> and save the
setup.
# make zImage
If the compilation is successful, a kernel image file will be created in directory arch/arm/boot.
5. Make yaffs File System Image
Files of file system are under the directory /opt/Embest /SBC2440-I and consist of below contents:
|___ root_default
File System without QT
|___ root_qtopia_mouse
QT File System with USB
|___ root_qtopia_tp
QT File System with Tounch panel
Use mkyaffsimge program can make one directory to be a yaffs image file and then download to
SBC2440-I single board via USB port.
Steps1: In order to use the program more conveniently, please copy it to the directory /usr/bin.
#cd /opt/Embest/SBC2440I/mkyaffs
#cp mkyaffsimge /usr/bin
Step2: create image file
-8-
#cd /opt/Embest/SBC2440I/
#mkyaffsimage root_qtopia_tp root_qtopia_tp.img
root_qtopia_tp.img will be created under the directory /opt/Embest/SBC2440-I.
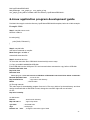
6.Linux application program development guide
Provided Linux app is under the directory /opt/Embest/SBC2440I/examples, below is a Hello example:
Example1: Hello
Step1: compile source code
#include <stdio.h>
int main(void) {
printf("hello, Embest!\n");
}
Step2: compile hello
Use below command to compile:
#arm-linux-gcc –o hello .c
create hello execution file
Step3: download and run
To move the execution file to SBC2440-I board mainly has two ways:
(1) Copy to mobile harddisk like USB disk
Insert USB disk into the USB port of PC and execute below command to copy hello to USB disk.
# mount /dev/sda1 /mnt
#cp hello /mnt
#umount /mnt
Please plug out U disc and insert it to USB Host of SBC2440-I board and follow below commands:
#mount /dev/sda1 /mnt
; mount U disc
#cp /mnt/hello bin
; copy hello to bin directory
#hello
; execute hello
(2) Through network
The main steps for downloading program from net is: First copy hello to ftp share directory and then
use ftp download hello to SBC2440-I board, change the execution right and run as below:
On PC:
#cp hello /home/ftp
On SBC2440-I:
#cd /bin
; enter into bin directory
#ftp 192.168.0.1
; login in ftp server
>get hello
; download hello
>bye
; exit ftp login
#chmod a+x hello
; change the execution right of hello
-9-
#hello
; execute hello
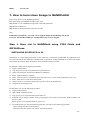
7. How to burn Linux Image to NANDFLASH
Linux image locate in CD_ROM/Image/linux/.
Burn linux image to NandFlash includes below steps:
Step 1: Burn vivi to NANDflash using JTAG Cable and sjf2440.exe
Step 2: Install USB driver
Step 3: Burn Linux kernel and File System via USB
Note:
If SBC2440-I preload sbc_vivi, Step1 can be skipped. Please do not destroy vivi at will.
If your PC has installed USB driver for SBC2440-I ,Step 2 can be skipped.
Step 1. Burn vivi to NANDflash using JTAG Cable and
SJF2440.exe
INSTALLING GIVEIO.SYS on PC
SJF2440.exe is a JTAG flash programmer of S3C2440 CPU. In Windows NT/2000/XP, any application can’t
access the I/O such as the parallel port. GIVEIO.SYS is required for enabling SJF2440.exe to access the parallel
port without any memory fault. In windows 95/98, GIVEIO.SYS isn’t needed .
For Windows *2000, use the following procedure:
1) Login as administrator
2) Copy the giveio.sys file to %systemroot%\system32\drivers.
3) Choose Control Panel, and choose Add/Remove Hardware.
4) Select ‘Add/Troubleshoot a device’
5) Select ‘Add a new device’ and choose Next, and select ‘No, I want to select the hardware from a list’
6) Select ‘Other devices’ and choose ‘Have Disk.’
7) Choose ‘Browse’ to locate the folder where giveio.inf file (CD_ROM\Tools\)
8) Complete the remained process
For Windows *NT, use the following procedure:
1) Login as administrator.
2) Open a DOS command window.
3) Copy giveio.sys to %systemroot%\system32\drivers.
4) Install the driver using the instdrv utility specifying the driver name and the FULL PATH NAME to the
giveio.sys file.
Instdrv giveio c:\winnt\system32\drivers\giveio.sys
5) To enable the driver to start automatically each time you boot,use the following procedure:
--Chose Setting and choose Control Panel
--Chose Devices,select giveio from the list, and choose Startup
- 10 -
--Select Startup Type Automatic from the Device menu
For Windows *XP, use the following procedure:
1) Copy the included GIVEIO.SYS file to your C:\WINNT\system32\drivers directory.
2) Choose “Add Hardware” from the Control Panel
3) Choose NEXT when the Add Hardware Wizard appears.
4) Check “Yes, I have already added the hardware” button; then choose NEXT.
5) Scroll down and select “Add a new hardware device”, then choose NEXT.
6) Select “Install hardware manually from list”, then choose NEXT.
7) Select “Ports” from the hardware list and then choose NEXT.
8) Select “Have Disk” and browse to the giveio.inf file.
9) Choose OK, then NEXT, then NEXT, then CONTINUE ANYWAY when the digital signing warning
message appears.
10) Confirm and finish the installation by choosing NEXT and then FINISH.
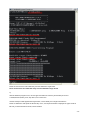
Burn VIVI to single board
Before the burning is started, please first connect the JTAG supplied with development board to PC’s
DB25 parallel port, connect the other end to the custom JTAG port of development board, then power on
development board
1)
In the DOS command window on PC, change the current directory to the one containing SJF2440.exe and
sbc_vivi .Run SJF2440.exe as following:
SJF2440.exe /f:sbc_vivi
Enter ‘0’, detect flash type.
Enter ‘0’, select the program function
Enter ‘0’, set the program start block number
After finish burning, Enter ‘2’, exit
Shows as follow:
- 11 -
Power off and move the JTAG cable away from the SBC2440-I single board.
Power off and move the JTAG cable away from the SBC2440-I single board.
2)
Click the Windows program menu, choose Hyper terminal from accessory and set Bits per second
115200,Data bits 8,Parity none, Stop bits 1,Flow control none.
Use the serial port cable supplied with single board; connect serial port of single board with PC.
Power on SBC2440-I while press the SPACE key on PC; vivi output information is displayed in Hyper Terminal.
Be sure you have entered ViVi mode, shows as below:
- 12 -
Power off SBC2440-I single board.
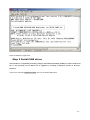
Step 2 Install USB driver
The USB driver is supplied by Samsung Company. Recommend installing USB driver under windows 98,
XP or NT operating system. DNW tool is supplied by Sumsung Company.It locates in directory
CD\Tools .
Run dnw.exe and select configuration/option menu and set UART/USB Options
- 13 -
You must set serial part as
[COM1, 115200bps]
Select Serial Port/Connect menu.
Power on SBC2440-I single board while press the PC SPACE key and enter vivi mode,
show as below:
- 14 -
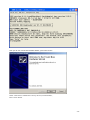
Then you can see “Found New Hardware Wizard”, press “Next” button
Select “Search for a suitable driver for my device (recommended)”,
Press “Next” button.
- 15 -
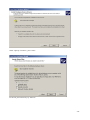
Select “Specify a location”, press “Next”.
Locate usb_driver directory by “Browse”
- 16 -
Press”OK”
Press “Next”
Press “Finish” button.
- 17 -
Now the USB driver is installed on PC successfully
Step 3. Burn Linux kernel and File System via USB
Use the serial port cable supplied with single board; connect serial port of single board with PC.
Connect USB device of single board and PC USB host with a USB cable .
Run the DNW.exe.
- 18 -
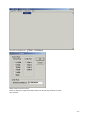
Select DNW/Configuration menu and set configuration under DNW as below:
Power on SBC2440I while press the SPACE key on PC,
vivi output information is displayed in DNW
Be sure the menu is [COM1, 115200bps], [USB:OK]
Be sure you have entered ViVi mode,
- 19 -
Execute command to partition the Nandflash block
bon part 0 320k 2368k
Type command download vivi using USB
Type command download Linux kernel using USB:
Load flash kernel u
- 20 -
Select USB Post/Transmit menu
Locate Linux image directory, select kernel image file.The default kernel is zImage_s35
- 21 -
zImage type
Description
zImage_cs8900_n35
Image for NEC 3.5” LCD /CS8900 Net Chip
zImage_cs8900_s35
Image for Samsung 3.5” LCD /CS8900 Net Chip
zImage_cs8900_tft84
Image for Sharp 8.4” 640x480LCD /CS8900 Net Chip
zImage_DM9000_n35
Image for NEC 3.5” LCD /dm9000 Net Chip
zImage_DM9000_s35
Image for Samsung 3.5” LCD /dm9000 Net Chip
zImage_DM9000_tft84
Image for Sharp 8.4” 640x480LCD /dm9000 Net Chip
Finish downloading Linux image.
Type command download Linux file system:
loadyaffs root u
Locate Linux file system directory, select Linux file system image file.
|___ root_default.img
|___ root_qtopia_mouse.img
|___ root_qtopia_tp.img
File System without QT
QT File System with USB mouse
QT File System with Tounch panel
- 22 -
The download procedure will take about 2 minutes.
Now Linux kernel and file system have been burned into Nandflash.
- 23 -
Close DNW.exe.
Click the Windows program menu, choose Hyper terminal from accessory and set Bits per second
115200,Data bits 8,Parity none, Stop bits 1,Flow control none.
Reset SBC2440-I single board, linux start up information will be displayed in Hyper terminal, showing as
=========================================================================================
=========================================================================================
VIVI version 0.1.4 (root@vmwarelinux) (gcc version 2.95.3 20010315 (release)) #0.1.4 Tue Mar 20 19:17:15
CST 2007
MMU table base address = 0x33DFC000
Succeed memory mapping.
DIVN_UPLL0
MPLLVal [M:7fh,P:2h,S:1h]
CLKDIVN:5h
+-------------------------------------------+
| FriendlyARM SBC2440 USB Downloader ver1.0 |
+-------------------------------------------+
USB: IN_ENDPOINT:1 OUT_ENDPOINT:3
FORMAT: <ADDR(DATA):4>+<SIZE(n+10):4>+<DATA:n>+<CS:2>
NOTE: Power off/on or press the reset button for 1 sec
in order to get a valid USB device address.
NAND device: Manufacture ID: 0xec, Chip ID: 0x76 (Samsung K9D1208V0M)
Could not found stored vivi parameters. Use default vivi parameters.
Press Return to start the LINUX/Wince now, any other key for vivi
Copy linux kernel from 0x00050000 to 0x30008000, size = 0x00200000 ... done
zImage magic = 0x016f2818
Setup linux parameters at 0x30000100
- 24 -
linux command line is: "noinitrd root=/dev/mtdblock2 init=/linuxrc console=ttySAC0"
MACH_TYPE = 782
NOW, Booting Linux......
Uncompressing Linux................................................................................................. done, booting the kernel.
Linux version 2.6.13 (root@xq) (gcc version 3.4.1) #1 Sat Apr 14 12:03:36 CST 2007
CPU: ARM920Tid(wb) [41129200] revision 0 (ARMv4T)
Machine: SBC2440
ATAG_INITRD is deprecated; please update your bootloader.
Memory policy: ECC disabled, Data cache writeback
CPU S3C2440A (id 0x32440001)
BUG: mapping for 0x19000000 at 0xd0000000 overlaps vmalloc space
S3C2440: core 405.000 MHz, memory 101.250 MHz, peripheral 50.625 MHz
S3C2410 Clocks, (c) 2004 Simtec Electronics
CPU0: D VIVT write-back cache
CPU0: I cache: 16384 bytes, associativity 64, 32 byte lines, 8 sets
CPU0: D cache: 16384 bytes, associativity 64, 32 byte lines, 8 sets
Built 1 zonelists
Kernel command line: noinitrd root=/dev/mtdblock2 init=/linuxrc console=ttySAC0
irq: clearing pending ext status 00000200
irq: clearing subpending status 00000002
PID hash table entries: 512 (order: 9, 8192 bytes)
timer tcon=00000000, tcnt a4ca, tcfg 00000200,00000000, usec 00001e57
Console: colour dummy device 80x30
Dentry cache hash table entries: 16384 (order: 4, 65536 bytes)
Inode-cache hash table entries: 8192 (order: 3, 32768 bytes)
Memory: 64MB = 64MB total
Memory: 61696KB available (2325K code, 580K data, 180K init)
Mount-cache hash table entries: 512
CPU: Testing write buffer coherency: ok
NET: Registered protocol family 16
USB Power Control, (c) 2004 Simtec Electronics
S3C2440: Initialising architecture
S3C2440: IRQ Support
S3C2440: Clock Support, UPLL 48.000 MHz
SCSI subsystem initialized
usbcore: registered new driver hub
S3C2410 DMA Driver, (c) 2003-2004 Simtec Electronics
DMA channel 0 at c4800000, irq 33
DMA channel 1 at c4800040, irq 34
DMA channel 2 at c4800080, irq 35
DMA channel 3 at c48000c0, irq 36
NetWinder Floating Point Emulator V0.97 (double precision)
devfs: 2004-01-31 Richard Gooch ([email protected])
devfs: boot_options: 0x1
yaffs Apr 14 2007 11:58:50 Installing.
Initializing Cryptographic API
- 25 -
Console: switching to colour frame buffer device 64x30
S3C24X0 fb0: s3c2410fb frame buffer device initialize done
GPIO L3 bus interface for S3C2440, installed
S3C2410 RTC, (c) 2004 Simtec Electronics
s3c2410-rtc s3c2410-rtc: rtc disabled, re-enabling
leds initialized
Serial: 8250/16550 driver $Revision: 1.90 $ 4 ports, IRQ sharing disabled
s3c2410_serial0 at MMIO 0x50000000 (irq = 70) is a S3C2440
devfs_mk_dev: could not append to parent for tts/0
s3c2410_serial1 at MMIO 0x50004000 (irq = 73) is a S3C2440
devfs_mk_dev: could not append to parent for tts/1
s3c2410_serial2 at MMIO 0x50008000 (irq = 76) is a S3C2440
devfs_mk_dev: could not append to parent for tts/2
io scheduler noop registered
io scheduler anticipatory registered
io scheduler deadline registered
io scheduler cfq registered
RAMDISK driver initialized: 16 RAM disks of 4096K size 1024 blocksize
loop: loaded (max 8 devices)
nbd: registered device at major 43
Cirrus Logic CS8900A driver for Linux (Modified for SMDK2410)
eth0: CS8900A rev E at 0xd0000300 irq=53, no eeprom , addr: 08: 0:3E:26:0A:5B
Uniform Multi-Platform E-IDE driver Revision: 7.00alpha2
ide: Assuming 50MHz system bus speed for PIO modes; override with idebus=xx
ide_s3c2440_init
ide0: S3C2410 IDE interface
S3C24XX NAND Driver, (c) 2004 Simtec Electronics
s3c2410-nand: mapped registers at c4880000
30 ns is too big for current clock rate 101250
s3c2410-nand: timing: Tacls 0ns, Twrph0 4294ns, Twrph1 0ns
NAND device: Manufacturer ID: 0xec, Chip ID: 0x76 (Samsung NAND 64MiB 3,3V 8-bit)
Scanning device for bad blocks
Bad eraseblock 3265 at 0x03304000
Creating 3 MTD partitions on "NAND 64MiB 3,3V 8-bit":
0x00000000-0x00030000 : "bootloader"
mtd: Giving out device 0 to bootloader
0x00050000-0x00250000 : "kernel"
mtd: Giving out device 1 to kernel
0x00250000-0x03ffc000 : "root"
mtd: Giving out device 2 to root
s3c2410-ohci s3c2410-ohci: S3C24XX OHCI
s3c2410-ohci s3c2410-ohci: new USB bus registered, assigned bus number 1
s3c2410-ohci s3c2410-ohci: irq 42, io mem 0x49000000
hub 1-0:1.0: USB hub found
hub 1-0:1.0: 2 ports detected
- 26 -
Initializing USB Mass Storage driver...
usbcore: registered new driver usb-storage
USB Mass Storage support registered.
usbcore: registered new driver usbhid
drivers/usb/input/hid-core.c: v2.01:USB HID core driver
mice: PS/2 mouse device common for all mice
ts: Compaq touchscreen protocol output
s3c2410 TouchScreen successfully loaded
i2c /dev entries driver
s3c2440-i2c s3c2440-i2c: slave address 0x10
s3c2440-i2c s3c2440-i2c: bus frequency set to 98 KHz
s3c2440-i2c s3c2440-i2c: i2c-0: S3C I2C adapter
mmci-s3c2410: probe: mapped sdi_base=c4d00000 irq=37 irq_cd=60 dma=0.
mmci-s3c2410: initialisation done.
SBC2440 SOUND driver register
SBC2440 SOUND driver probe!
SBC2440 UDA1341 audio driver initialized
NET: Registered protocol family 2
IP route cache hash table entries: 1024 (order: 0, 4096 bytes)
TCP established hash table entries: 4096 (order: 3, 32768 bytes)
TCP bind hash table entries: 4096 (order: 2, 16384 bytes)
TCP: Hash tables configured (established 4096 bind 4096)
TCP reno registered
TCP bic registered
NET: Registered protocol family 1
NET: Registered protocol family 17
MMC: sd_app_op_cond: at least one card is busy - trying again.
MMC: sd_app_op_cond: at least one card is busy - trying again.
MMC: sd_app_op_cond: at least one card is busy - trying again.
MMC: sd_app_op_cond: at least one card is busy - trying again.
MMC: sd_app_op_cond: at least one card is busy - trying again.
MMC: sd_app_op_cond: at least one card is busy - trying again.
MMC: sd_app_op_cond: at least one card is busy - trying again.
MMC: sd_app_op_cond: at least one card is busy - trying again.
MMC: sd_app_op_cond: at least one card is busy - trying again.
MMC: sd_app_op_cond: at least one card is busy - trying again.
MMC: sd_app_op_cond locked busy. Probably have broken SD-Card.
yaffs: dev is 32505858 name is "mtdblock2"
yaffs: Attempting MTD mount on 31.2, "mtdblock2"
yaffs: yaffs_GutsInitialise()
block 3118 is bad
yaffs: yaffs_GutsInitialise() done.
VFS: Mounted root (yaffs filesystem).
Mounted devfs on /dev
Freeing init memory: 180K
- 27 -
[01/Jan/1970:00:00:06 +0000] boa: server version Boa/0.94.13
[01/Jan/1970:00:00:06 +0000] boa: server built Feb 28 2004 at 21:47:23.
[01/Jan/1970:00:00:06 +0000] boa: starting server pid=772, port 80
Please press Enter to activate this console. [9;0] [?33l [?25l Create pluginlibman in libqpe
Unable to open /usr/share/zoneinfo/zone.tab
Timezone data must be installed at /usr/share/zoneinfo/
Unable to open '/usr/share/zoneinfo/America/New_York'
TimeZone::data Can't create a valid data object for 'America/New_York'
TzCache::location unable to find America/New_York
initEnvironment() Invalid TimeZone America/New_York
Use QPEApplication's PluginLibraryManager
QMemoryFile::QMemoryFile("/opt/qtopia/etc/dict/dawg")
Created QMemoryfile for /opt/qtopia/etc/dict/dawg with a size of 189396
inserting Documents at -1
could not register server
found obex lib
inserting Applications at 0
inserting Games at 1
inserting Settings at 2
Doing slow search for image: Hello
QGDict::hashKeyString: Invalid null key
addAppLnk: No view for type (null). Can't add app (null)!
Create pluginlibman in libqpe
Use QPEApplication's PluginLibraryManager
QuickLauncher running
Unable to open /usr/share/zoneinfo/zone.tab
Timezone data must be installed at /usr/share/zoneinfo/
Unable to open '/usr/share/zoneinfo/America/New_York'
TimeZone::data Can't create a valid data object for 'America/New_York'
TzCache::location unable to find America/New_York
Registered QPE/QuickLauncher-783
-sh: can't access tty; job control turned off
[root@FriendlyARM /]#
- 28 -