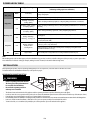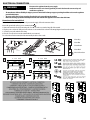
1
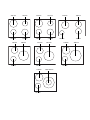
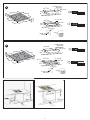
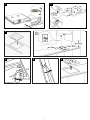
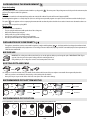
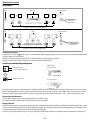
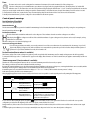
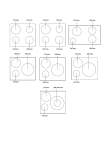
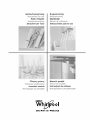
210 mm
145 mm
210 mm
145 mm
145 mm
180 mm
145 mm
210 mm
180 mm
145 mm
240 mm
210 mm
240 mm
210 mm
145 mm
210 mm
145 mm
145 mm
210 mm
280/180 mm
145 mm
1
180 mm
180 mm
260 mm
ENGLISH
Installation
Page 2
Instructions for use
Page
4
DEUTSCH
Installation
Seite 2
Bedienungsanleitung
Seite
12
FRANÇAIS
Installation
Page 2
Mode d’emploi
Page
21
NEDERLANDS
Installatie
Pagina 2
Gebruiksaanwijzing
Pagina
29
Instalación
Página 2
Instrucciones de uso
Página
38
Instalação
Página 2
Instruções de utilização
Página
46
ITALIANO
Installazione
Pagina 2
Istruzioni per l’uso
Pagina
54
ΕΛΛΗΝΙΚΑ
ESPAÑOL
PORTUGUÊS
Εγκατάσταση
Σελίδα 2
Οδηγίες χρήσης
Σελίδα
62
SVENSKA
Installation
Sidan 2
Bruksanvisning
Sidan
71
NORSK
Installasjon
Side 2
Bruksanvisning
Side
79
DANSK
Installation
Side 2
Brugervejledning
Side
87
SUOMI
Asennus
Sivu 2
Käyttöohje
Sivu
95
POLSKI
Instalacja
Strona 2
Instrukcja obsługi
Strona
104
ČESKY
Instalace
Strana 2
Návod k použití
Strana
113
SLOVENSKY
MAGYAR
РУССКИЙ
БЪЛГАРСКИ
ROMÂNĂ
УКРАЇНСЬКА
Inštalácia
Strana 2
Návod na používanie
Strana
121
Üzembe helyezés
Oldal 2
Használati útmutató
Oldal
129
Установка
Страница 2
Инструкции по пользованию прибором Страница
137
Инсталиране
Страница 2
Инструкции за употреба Страница
147
Instalarea
Pagina 2
Instrucţiuni de utilizare
Pagina
156
Установлення
Сторінка 2
Інструкції з експлуатації
Сторінка
164
2
A
R = Min. 6,5 mm
Max. 8 mm
0
560 +2 mm
0
490 +2
510 mm
mm
mm
54 mm
Min. 50 mm
580 mm
0
30
553 mm
R = 11,5 mm
583 +2 mm
+1
0
483 mm
0
0
560+2
0
513 +2 mm
490+2 mm
mm
R = 11,5 mm
6 mm
R = Min. 6,5 mm
Max. 8 mm
B
R = Min. 6,5 mm
Max. 8 mm
0
750 +2 mm
Min. 50 mm
510 mm
+1
0
30 mm
54 mm
770 mm
0
490 +2
483 mm
742 mm
mm
0
R = 11,5 mm
773 +2 mm
Min. 50 mm
0
490+2 mm
0
0
513 +2
mm
750+2 mm
R = 11,5 mm
R = Min. 6,5 mm
Max. 8 mm
Min. 5 mm
Min. 3 cm
Max. 6 cm
2
6 mm
1
2
3
Min. 40 cm
Min. 10 cm
Min. 5 cm
4
5
6
X4
3
IMPORTANT SAFETY INSTRUCTIONS
YOUR SAFETY AND THAT OF OTHERS IS VERY IMPORTANT
This manual and the appliance itself provide important safety messages, to be read and always observed.
This is the danger symbol, regarding safety, warning of potential risks to users and others.
All safety messages will be preceded by the danger symbol and the following words:
DANGER
Indicates a hazardous situation which, if not avoided, will result in serious injury.
WARNING
Indicates a hazardous situation which, if not avoided, could cause serious injury.
All messages relevant to safety specify the potential risk to which they refer and indicate how to reduce the risk of injury,
damage and electric shocks due to incorrect use of the appliance. Make sure to comply with the following:
- The appliance must be disconnected from the power supply before carrying out any installation operation.
- Installation and maintenance must be carried out by a specialised technician, in compliance with the manufacturer’s
instructions and the local safety regulations in force. Do not repair or replace any part of the appliance unless
specifically stated in the user manual.
- The appliance must be earthed.
- The power cable must be long enough for connecting the appliance, fitted in the cabinet, to the power supply.
- For installation to comply with the current safety regulations, an omnipolar switch with minimum contact gap of
3mm is required.
- Do not use multi-sockets or extension cords.
- Do not pull the appliance’s power cable.
- The electrical parts must not be accessible to the user after installation.
- The appliance is designed solely for domestic use for cooking food. No other use is permitted (e.g. heating rooms).
The Manufacturer declines any liability for inappropriate use or incorrect setting of the controls.
- The appliance and its accessible parts become hot during use. Care should be taken to avoid touching heating
elements. Children less than 8 years old shall be kept away unless continuously supervised.
- The accessible parts can become very hot during use. Children must be kept away from the appliance and watched
over to ensure they do not play with it.
- Do not touch the appliance heating elements during and after use. Do not allow the appliance to come into contact
with cloths or other flammable materials until all the components have cooled sufficiently.
- Do not place flammable materials on or near the appliance.
- Overheated oils and fats catch fire easily. Pay attention when cooking food products rich in fat and oil.
- This appliance can be used by children aged from 8 years and above and persons with reduced physical, sensory or
mental capabilities or lack of experience and knowledge if they have been given supervision or instruction
concerning use of the appliance in a safe way and understand hazards involved. Children shall not play with the
appliance. Cleaning and user maintenance shall not be made by children without supervision.
- A separator panel (not supplied) must be installed in the compartment under the appliance.
- If the surface is cracked, switch off the appliance to avoid the possibility of electric shock.
- The appliance is not intended to be operated by means of an external timer or separate remote control system.
- Unattended cooking on a hob with fat or oil can be dangerous and may result in fire. NEVER try to extinguish a fire
with water, but switch off the appliance and then cover flame e.g. with a lid or a fire blanket.
Danger of fire: do not store items on the cooking surfaces.
- Do not use steam cleaners.
- Metallic objects such as knives, forks, spoons and lids should not be placed on the hob surface since they can get hot.
- After use, switch off the hob element by its control and do not rely on the pan detector.
EN4
SAFEGUARDING THE ENVIRONMENT
Disposal of packing
The packing material is 100% recyclable and marked with the recycling symbol (
disposed of in compliance with local regulations.
). The various parts of the packing must not be dispersed in the environment, but
Disposal
This appliance is marked in conformity with European Directive 2002/96/EC on Waste Electrical and Electronic Equipment (WEEE).
By ensuring that this appliance is correctly disposed of, the user can help prevent potentially negative consequences for the environment and the health of people.
The symbol
on the appliance or the accompanying documentation indicates that this product should not be treated as domestic waste but must be taken to an
appropriate collection point for recycling WEEE.
Energy saving
For optimum results, it is advisable to:
• Use pots and pans with bottom width equal to that of the cooking zone.
• Only use flat-bottomed pots and pans.
• When possible, keep pot lids on during cooking.
• Use a pressure cooker to to save even more energy and time.
• Place the pot in the middle of the cooking zone marked on the hob.
DECLARATION OF CONFORMITY
-
This appliance, intended to come into contact with food products, complies with Regulation ( ) no. 1935/2004, and has been designed, manufactured and
marketed in conformity with the safety requirements of “Low Voltage” Directive 2006/95/EC (replacing 73/23/EEC as amended) and protection requirements of
“EMC” Directive 2004/108/EC.
BEFORE USE
IMPORTANT: The cooking zones will not switch on if pots are not the right size. Only use pots bearing the symbol “INDUCTION SYSTEM” (Figure
opposite). Place the pot on the required cooking zone before switching the hob on.
Using suitable pots, the cooking zones cannot be used at temperatures below 10°C.
EXISTING POTS AND PANS
OK
NO
Use a magnet to check if the bottom of the pot is suitable for the induction hob: bottom of the pots and pans are unsuitable if not magnetically detectable.
- Make sure pots have a smooth bottom, otherwise they could scratch the hob. Check dishes.
- Never place hot pots or pans on the surface of the hob’s control panel. This could result in damage.
RECOMMENDED POT BOTTOM WIDTHS
Ø
Ø
XL
28 cm
L
21 cm
17 cm min.
28 cm max.
Ø
Ø
15 cm min.
21 cm max.
M
S
12 cm min.
RECOMMENDED POT POSITION
18 cm max.
Ø
Ø
14.5 cm
For best performance, when you use two pots simultaneously, put them according to the pictures below:
EN5
Ø
Ø
18 cm
10 cm min.
14.5 cm max
POWER LEVEL TABLE
Power level
Type of cooking
Boost
Fast heating
Max. power
Frying - boiling
9-7
Browning - slow frying boiling - grilling
Level use
(indicating cooking experience and habits)
Ideal for rapidly increasing the temperature of food to fast boiling in the case of water or rapidly
heating cooking liquids
Ideal for browning, starting to cook, frying frozen products, fast boiling
Ideal for slow frying, maintaining a high boil, cooking and grilling (short duration, 5-10 minutes)
High power
Browning - cooking - stewing - Ideal for slow frying, maintaining a low boil, cooking and grilling (medium duration, 10-20 minutes),
preheating
slow frying - grilling
7-5
Cooking - stewing slow frying - grilling
Medium power
4-3
Cooking - simmering thickening - creaming pasta
Low power
2-1
Melting - defrosting keeping food hot creaming risottos
OFF
Zero
power
Support surface
Ideal for stewing, maintaining a gentle boil, cooking and grilling (long duration).
Ideal for prolonged cooking (rice, sauces, roasts, fish) with liquids (e.g. water, wine, broth, milk),
creaming pasta.
Ideal for prolonged cooking (volumes of less than a litre: rice, sauces, roasts, fish) with liquids
(e.g. water, wine, broth, milk)
Ideal for softening butter, gently melting chocolate, thawing small products and keeping just-cooked
food hot (e.g. sauces, soups, minestrone)
Ideal for keeping just-cooked food hot, creaming risottos and keeping serving dishes warm
(with induction-suitable accessory),
Hob in standby mode or off (possible end-of-cooking residual heat, indicated by “H”)
NOTE:
When making quick-cook foods that require perfect heat distribution (e.g. pancakes) on the 28 cm double cooking zone (where present), use pans no greater than
24 cm in diameter. For delicate cooking (for example, melting chocolate or butter) use the smaller diameter single zones.
INSTALLATION
After unpacking the product, check for any damage during transport. In case of problems, contact the dealer or the After-Sales Service.
For built-in dimensions and installation instruction, see the pictures in page 2.
PREPARING THE CABINET FOR FITTING
WARNING
•
•
•
•
•
•
Install a separator panel under the hob.
The lower part of the product must not
be accessible after installation.
Do not fit the separator panel if an
undertop oven is installed.
57
75
min. 5 mm
-
80
min. 20 mm
6-7 cm
The distance between the underside of the appliance and the separator panel must respect the dimensions given in the figure.
In order to ensure the correct operation of the product, do not obstruct the minimum required clearance between the hob and the top of the unit (min. 5 mm).
If an undertop oven is installed, make sure the oven is equipped with a cooling system.
Do not install the hob above a dishwasher or washing-machine, so that the electronic circuits do not come into contact with steam or moisture which could damage them.
In the case of flush-mounted installation, call the After-Sales Service to request assembly of screws kit 4801 211 00112.
To remove the hob, use a screwdriver (not provided) to prise off the perimeter clips on the underside of the appliance.
EN6
ELECTRICAL CONNECTION
-
Disconnect the appliance from the power supply.
Installation must be carried out by qualified personnel who know the current safety and
installation regulations.
The manufacturer declines all liability for injury to persons or animals and for damage to property resulting from failure to observe the regulations
provided in this chapter.
The power cable must be long enough to allow the hob to be removed from the worktop.
Make sure the voltage specified on the dataplate located on the bottom of the appliance is the same as that of the home.
WARNING
-
Connection to the terminal block
For the electrical connection of the power cord is present in the supply. Follow the instructions below.
Connect the ground cable yellow / green to terminal symbol
.
1. Remove the terminal cover (A) by unscrewing the screw and insert the cover into the hinge (B) of the terminal.
2. Plug the power cord into the clamp and connect the wires to the terminal block as shown in the wiring diagram located near the terminal.
3. Secure the power cable with the cable clamp.
4. Close the cover (C) and screw on the terminal with the screw removed.
For each connection to the network, the hob automatically checks for a few seconds.
A
B
Colour Grey
C
Colour Blue
Colours Brown
Colour Black
Colour Yellow-Green
E
L1 L2
N1 N2
E
L1 L2
N1 N2
E
L1 L2
N1 N2
E
L1 L2
N1 N2
L1
L2
N2 N
N1
380-415V
380-415V
EN7
220-240V
220-240V
230-240V
220-240V
380-415V
Control Panel Description
Control panel
On/Off
Quick access
Control panel lock
Slider
Power Management/
Timer/Lock
function button
POWER
Cooking zone controls and corresponding display
On/Off
Timer
Control panel lock
Power Management/
Ecobooster/Automatic/Lock
function button
Cooking zone controls and corresponding display
Switching the hob ON/OFF
To switch the hob on, press the button for approx. 2 seconds until the cooking zone displays light up. To switch off, press the same button until the displays switch
off. All the cooking zones are deactivated.
If the hob has been in use, the residual heat indicator “H” remains lit until the cooking zones have cooled down.
If within 10 seconds of switching on, no function is selected, the hob switches off automatically.
Switching on and adjusting cooking zones
Slider operation
Power indicator display
Increase power level
Selected cooking zone indication
Cooking zone positioning
Decrease power level
Place the pot on the cooking zone, switching the hob on, activate the required cooking zone by pressing the corresponding circular button “5” appears on the display.
With the Slider (if available) it is possible to select the required power level, from min. 0 to max. 9, or booster “P” if available. To increase the power level, slide your
finger on the slider from left to right several times; to decrease it, slide in the opposite direction. Alternatively the “+” and “-” quick access buttons can be used.
Deactivation of cooking zones
To switch off the cooking zone, press the corresponding button for more than 3 seconds.
The cooking zone switches off and, if still hot, the letter “H” appears on the zone display.
Control panel lock
This function locks the controls to prevent accidental activation of the hob. To activate the control panel lock, switch the hob on and press the Lock function button for three seconds;
an acoustic signal and a luminous indicator near the padlock symbol signal activation. The control panel is locked except for the switching off function. To deactivate the control
lock, repeat the activation procedure. The luminous dot goes off and the hob is active again.
The presence of water, liquid spilled from pots or any objects resting on the button below the symbol can accidentally activate or deactivate the control panel lock.
EN8
Timer
The timer can be used to set the cooking time for a maximum of 99 minutes (1 hour and 39 minutes) for all the cooking zones.
Select the cooking zone to be used with the timer, press the timer (see figure) and a beep signals the function. The display shows “00” and the LED
indication comes on. The Timer value can be decreased and increased by keeping the slider function “+” and “-” buttons pressed. When the set time has
elapsed, an acoustic signal sounds and the cooking zone switches off automatically. To deactivate the timer, keep the Timer button pressed for at least 3 seconds.
To set the timer for another zone, repeat the above steps. The timer display always shows the timer for the selected zone or the shortest timer.
To modify or deactivate the timer, press the cooking zone selection button for the timer in question.
Control panel warnings
Special functions (If available)
Some models have special functions:
Automatic function
The function automatically sets a power level suitable for maintaining a low boil. Activate this function after bringing to the boil, pressing the corresponding zone
button first and then the button
.
Residual heat indicator.
The hob is fitted with a residual heat indicator for each cooking zone. These indicators alert the user when cooking zones are still hot.
If the display shows , the cooking zone is still hot. If the residual heat indicator of a given cooking zone is lit, that zone can be used, for example, to keep
a dish warm or to melt butter.
When the cooking zone cools down, the display goes off.
Incorrect or missing pot indicator.
If you are using a pot that is not suitable, not correctly positioned or not of the correct dimensions for your induction hob, the message “no pot” will
appear in the display (see figure at side). In these situations it is recommended to reposition the pot on the hob surface until you find the position of
operation. If no pot is detected within 60 seconds, the hob switches off.
Fast boil function (Booster where it is available)
This function, only present on some cooking zones, makes it possible to exploit the hob’s maximum power (for example to bring water to the boil very quickly).
To activate the function, press the “+” button until “P” appears on the display. After 5 minutes’ use of the booster function, the appliance automatically sets the zone
to level 9.
“Power management” (Function where it is available)
Thanks to the “Power management” function, the user can set the maximum power the hob can reach, as required.
This setting is possible at any time and is maintained until the next change.
By setting the required maximum power, the hob automatically adjusts distribution in the various cooking zones, ensuring that this limit is never exceeded; with the
advantage of also being able to manage all the zones simultaneously, but without overload problems.
4 maximum power levels are available and showed on display: 2.5 – 4.0 – 6.0 – 7.2 kW (7.2 kW is considered as max power of cooktop)
At the time of purchase, the hob is set to maximum power
After plugging the appliance into the electrical socket, in the first 60 seconds it is possible to set the required power level by running the following points:
Step
1
2
3
4
/
Control panel
Press for approximately
3 seconds
Press the Power
Management button to
confirm the previous step
Press to set the chosen level
amongst the different
options available
Press the Power
Management button to
confirm the previous step
Display
The display shows
The light comes on together with the in-use
lights for the individual cooking zones
The display shows the set level which flashes
for approximately 2 seconds; after which the
hob emits an acoustic signal and then turns
itself off; it is now ready for use
In case of an error when setting the power, the symbol
appears in the middle and an acoustic signal sounds for about 5 seconds. In this case repeat the
configuration procedure from the beginning. If the error occurs again, contact the After-Sales Service.
During normal use, if the user tries to increase the maximum available power level when reached, the level of the zone in use flashes twice and an acoustic signal
sounds.
To obtain a higher power in that zone, it is necessary to manually decrease the power level of one or more already active cooking zones.
EN9
Activation/deactivation of the acoustic signal (not available on slider version)
After switching the hob on, press and hold the “+” button and the outermost button on the right simultaneously for at least three seconds (“control panel lock”).
CLEANING
WARNING
-
Do not use steam cleaners.
Before cleaning, make sure the cooking zones are switched off and that the residual heat indicator (“H”)
is not displayed.
IMPORTANT: Do not use abrasive sponges or scouring pads. Their use could eventually ruin the glass.
• After each use, clean the hob (when it is cool) to remove any deposits and stains due to food residuals.
• Sugar or foods with a high sugar content damage the hob and must be immediately removed.
• Salt, sugar and sand could scratch the glass surface.
• Use a soft cloth, absorbent kitchen paper or a specific hob cleaner (follow the Manufacturer’s instructions).
• Liquid spillages on the cooking zones may make pans vibrate or move.
TROUBLESHOOTING GUIDE
•
•
•
•
•
Read and follow the instructions given in the section “Instructions for use”.
Check that the electricity supply has not been shut off.
Dry the hob thoroughly after cleaning it.
If, when the hob is switched on, alphanumeric codes appear on the display, consult the following table for instructions.
If the hob cannot be switched off after using it, disconnect it from the power supply.
ERROR CODE
C81, C82
C83
C85
F02 or F04 or C84
F01, F05, F06, F07, F10, F12, F25, F33, F34,
F36, F37, F46, F47, F48, F49, F58, F61, F62,
F63, F72, F74, F77
DESCRIPTION
POSSIBLE CAUSES
ERROR ELIMINATION
The control panel switches off
The internal temperature of electronic
Wait for the hob to cool down
because of excessively high
parts is too high
before using it again.
temperatures
The control panel indicates the error
Cooktop has been supplied with over Cooktop may be still used but call
code hob off because of an issue on
voltage
the After-Sales Service
electronic circuit
Hob is not able to give power to
Pot is not suitable to the induction hob
Use another induction pot
the pot
The sensor detects a discrepancy
Disconnect the hob from the
The connection voltage is wrong or
between the appliance voltage and
mains and check the electrical
issue to the power supply
that of the mains supply
connection
Disconnect the hob from the power supply.
Wait a few seconds and plug it again.
If the problem persists, call the After-Sales Service and specify the error code
NOISES MADE BY THE HOB
The induction cooktops can generate a set of noise and vibration during normal operation, depending on the type of material and the processing of the food, such as
those described below:
• Noise contact: this type of vibration is due to the use of pots made of different materials superimposed.
• Sounds click at mid-lower power: this noise is produced in order to achieve the low-mid power required.
• Sounds like rhythmic click: this noise is produced when operating several areas of cooking and / or high performance.
• Hissing weak: this noise is due to the type of container used and the quantity of food contained.
• Background noise: the induction cooker is equipped with a fan aimed at cooling the electronic components and for this reason during operation and also for a
few minutes after switching off the hob you hear the noise of the fan. Increase / decrease the cooking zones activated, the background noise of the fan may
increase or decrease.
These conditions are normal and essential for the proper functioning of the induction system, they are not indication of failure or damage.
EN10
AFTER-SALES SERVICE
Before contacting the After-sales Service:
1. See if you can solve the problem yourself with the help of the “Troubleshooting guide”.
2. Switch the appliance off and then on again it to see if the problem has been eliminated.
If the problem persists after the above checks, contact the nearest After-Sales Service.
Always specify:
• a brief description of the fault;
• the product type and exact model;
• the Service number (the number after the word Service on the rating plate), located under the appliance (on the metal plate).
• your full address;
• your telephone number.
If any repairs are required, contact an authorised After-Sales Service Centre (to ensure the use of original spare parts and correct repairs). Spare parts are available
for 10 years.
EN11
5019 300 01435
GB
DE
FR
NL
ES
PT
DK
FI
PL
CZ
SK
HU
IT
RU
GR
SE
BG
RO
NO
UA
Whirlpool® Registered trademark/TM Trademark of Whirlpool group of companies © Copyright Whirlpool Europe s.r.l. 2012. All rights reserved - http://www.whirlpool.eu
06/12