1
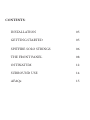
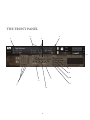
SOLO STRINGS
Andrew Haveron • Bruce White • Caroline Dale
by
S P I T F I R E
U S E R
M A N U A L
V 1 . 1
Welcome.
Thanks for purchasing Solo Strings, a definitive selection of demoing tools made; “the Spitfire way”.
Reading manuals is a bore, so stick this next to your loo and give a read whenever you can, you may find a host
of good tips and ideas on how to get the best out of your purchase.
About Spitfire:
Spitfire was formed in 2008 by a group of successful British composers as a means of producing the tools they
needed for their busy work schedules. Sick of dry, humourless, ugly, unrealistic, enormously untamable sounding libraries, Spitfire set about redefining the way samples were created.
Our aim is to reproduce the conditions of top movie recording sessions and approach sampling as if we were
recording a film score one note at a time. To record performances, and parts thereof, not scientifically created
samples. To capture the timbre of a world-class set of players but also to record the room they were playing in.
If you are wanting perfectly tuned, normalised or “dry” samples you have probably come to the wrong place.
For here you may find the odd string squeak, a “fruity” long note, or a fumbled pizz, and always plenty of the
room we recorded in. But put this altogether within a performance and suddenly, a human, natural, but more
importantly, realistic result will ensue.
About Solo Strings:
Solo strings is the latest in Spitfire’s “commercial” range. Whilst our bespoke range offers the greatest deal of detail, most of our commercial modules are designed as easy tools that play intuitively directly “out-of-the-box”.
That are designed to enable composers to quickly and effectively realise their ideas. In our harp and percussion
modules we also hope to offer “definitive” products within their class. With solo strings we hope to combine
both of these objectives. To provide the world with a definitive solo, orchestral string set, whilst making them
easy and quick to use, but more importantly at a price that everyone can afford.
We are not in the business of putting musicians out of work, which is why we voluntarily pay our musical contributors an ongoing royalty. As working film composers ourselves we have aimed the primary objective of solo
strings to give us a sketching tool that best represents these types of instruments before re-recording them live.
Whilst not many of us have the luxury of a big orchestra at our disposal we are convinced that there is never
a good string soloist too far away, whoever you are, even a fine student who would be willing to add sparkle
to your compositions. We hope you guys write some beautiful dots with our Solo Strings module with view to
booking a real player further down the line!
We have provided the perfect conditions for a stand-out library. Recording at one of the greatest studios in the
world, and really concentrating on the space around the players. This, we hope, will mean that solo strings will
compliment any other Spitfire modules you may have perfectly.
But more importantly we have enlisted the best that the British film music world has to offer. Andrew Haveron,
Bruce White, and Caroline Dale, are three of the most successful, in-demand session player, soloists, principals
and leaders in London. With all three working with some of the greatest ensembles in a concert capacity, some
great rock and pop acts (Caroline recently worked with U2) and all of the A-list Hollywood movie sessions that
hit our shores. These three legends will be surprisingly familiar to you already.
For more info about these great contributors please see their biographies on our website, but for now let’s get
into Spitfire Solo strings.
System Requirements
KONTAKT
Solo Strings is NOT a Kontakt Player library, so you WILL need a full version Kontakt to run it. But because
it doesn’t authorise through the NI Service Centre and is personally watermarked to you, you will be able to
authorise it and install on all the machines you own. Owning a full version of Kontakt will afford you the luxury
of being able to edit and revise the patches to your particular preference. Remember we pride ourselves in making trully esoteric tools, so if there’s a sample you don’t like, you can change it for another with relative ease.
RECOMMENDED SPEC:
The better your computer, the better the performance of any Spitfire module. But not to worry if you’re not
spec’d up to the hilt. All programs are provided with a set of parameters that enable you to tone back the CPU
demands of any given patch. But moving forward, we’re confident this module will keep your computer busy
for many years to come! We recommend a combination of high processor speeds, a good chunk of memory
and a devoted 7200rpm eSata, USBII, Thunderbolt, or Firewire audio drive. The more memory you have, the
less demand placed on your drive, and having a totally devoted drive gives you the chance to load less into
memory and reduce load times. The higher the speed of your CPU, the more capable your computer will be to
deal with some of the amazing, but complicated scripts we’ve written.
PCs:
We recommend an i5, or i7 Quad or 8 Core machine with 8 Gig or above memory. Vista 64 or WIndows 7.
However, it will work with SP2, Pentium or Athlon XP 1.4GHz 1Gig RAM.
MACs:
We recommend a Mac-Pro Intel Based Dual, Quad or 8 Core machine with 8 Gig or above memory. Mac OS
10.6.1 (Snow Leopard). However, we have made the module work satisfactorily on a Mac Mini 2.4 GHz and a
MacBook Pro 2.4GHz Intel Core 2 Duo.
DRIVES:
Firewire, USBII, or eSata, 7200rpm. Ask your dealer for drives that are suitable for “AV use”. We always recommend as small a drive as possible, as the platter will be smaller and the seek time less. The library will eventually
take up 5-6 Gig on your hard drive. If using several large libraries, or a number of Spitfire modules from the
same machine, we really recommend having your samples distributed over a number of drives. Lacie eSata or
Quadras 7200rpm we highly recommend. Moreover, an exciting development lies in the recent arrival of some
amazing solid state (SSD) drives. With seek times reduced to a fraction (0.1ms vs 6-9ms) of what standard
drives can offer, we are certain you will be able to reduce your sampler’s “pre-load” (page 15.) buffer tenfold
meaning you’ll be able to load enormous orchestral palettes into a single machine.
HOST:
The Kontakt 4 platform should work comfortably on most commonly found platforms and DAWs. As always
make sure you’re as up-to-date as you can afford! If you’re planning on building or adding Spitfire to an already
large orchestral palette, we recommend running your library independently of your DAW, either on your host
computer (e.g. via Re-Wire) or on a slave device (e.g.. via Midi or MOL). This will assist your loading times,
and will allow your DAW to do what it does best, sort out all your note ons and note offs! We heartily endorse
Plogue Bidule (www.plogue.com) as a virtual rack/ routing system. For more advice and information about
setting up please check our website.
CONTENTS:
INSTALLATION05
GETTING STARTED05
SPITFIRE SOLO STRINGS06
THE FRONT PANEL08
OSTINATUM12
SURROUND USE14
AFAQs15
INSTALLATION
Because you’re reading this manual, we can presume you have successfully downloaded Solo Strings. Included
in your download email are some detailed installation instructions, please follow these carefully before going
any further. We’ll see you back here, when you’re installed!
GETTING STARTED
If you have never used Kontakt before we wholeheartedly recommend your familiarise yourself with the basics
of patch (or instrument) loading, multi management, outputting and MIDI routing detailed in the Kontakt
user-manual and Native Instruments website:
http://www.native-instruments.com/#/en/products/producer/kontakt-4/?page=975
5.
WELCOME TO THE SPITFIRE ORCHESTRAL EXPERIENCE!
When you start playing these patches you will be triggering some of the greatest players, playing the greatest some priceless - instruments, in one of the greatest recording studios in the world. Produced by successful film
composers and orchestrators, through a selection of unique vintage mics, via world class Neve mic pre’s and
the world’s largest Neve 88R desk and finally via head-of-the-class prism AD converters into the digital format
you are now enjoying.
It’s just about to get very very fun.
**** THE MOD WHEEL ****
Without this you will be under using any module in the entire Spitfire library by about 75%.
Go on, give it a wiggle.
All longs patches use the mod wheel to dial in different dynamic layers. Used in conjunction with a volume
fader you will get an extraordinary sense of dynamic headroom and timbral control. Look out for “MW” in the
title of the patch or instrument.
SAMPLE STARTS
To maintain reality we cut our samples earlier than others. The start of a note often gives a sample it’s character.
By cutting it’s front off too much we feel you take away it’s personality. If things are playing back a bit behind
the beat, even after quantizing don’t be afraid of pulling that Sequencer pre-delay back a few dozen ms.
TWO PATCHES PER INSTRUMENT
Each instrument comes in two formats; Legato and Multi Mic. Here’s descriptions of these two distinctions and
the articulations contained therein:
Legato:
These are very much a modern development. We have painstakingly recorded all the possible intervals between
notes which Kontakt cleverly cuts in whilst you’re playing. We have 2 years of experience making these patches
and feel that Solo Strings is a distillation of this experience by providing you with some incredibly easy to use
and instantly workable instruments.
For effective use, play in a legato style, preferably with a little overhang between each note (your orchestrator
will love you for this). For experiment’s sake its worth seeing how effective fast phrases are.
As there is a lot of number crunching going on under the bonnet it is fair to expect a degree of extra latency
with these patches, be generous with your DAW’s pre-delay to tighten up your arrangement.
Multi Mic (mm):
These patches are more of a detailed work-horse, with multi-mic functionality, and a selection of articulations
which are either toggled on the front panel (see page 09) or are keyswitched at the bottom of your controller
range (simply hit keys A0 - D1 and the next note you will play will toggle to a different articulation):
For descriptions of these different articulations PTO:
6.
THE ARTICULATIONS
A0-B0= Longs:
As the name suggests, long, polyphonic articulations with ModWheel dynamic control.
C1 = Pizzicato:
Plucked strings, unlike other libraries, reproduced here as played. Loose. We have not artificially snipped these
performances. These are as varied as world-class players play these fiddly articulations. If you’re scoring the
next series of Desperate Housewives or Six Feet Under you may want to go back to your super-tight and very
un-real-worldy pizzicato patches!
D1 = Spiccato:
Spiccato is a bouncing of the bow to create short articulations. These patches are velocity controlled for dynamic layers (how hard or soft you hit the keyboard) but can be switched to your mod wheel via the front panel.
E1 = Staccato:
Staccato or short struck phrases. These patches are velocity controlled for dynamic layers (how hard or soft you
hit the keyboard) but can be switched to your mod wheel via the front panel.
F1 = Artificial Harmonics Long:
Much used in modern film music, the difficult technique of resting the finger lightly on the string being played
one 4th above the root pitch. The effect given is a glassy still tone some two octaves above the root pitch. We
have organised these articulations to play not at pitch but as they would be written (to give your orchestrators
a fighting chance!).
G1 = Artificial Harmonics Shorts:
As above but a short strike.
As mentioned in our FAQ section, some of these articulations aren’t available on all the instruments (ie Pizz.
On the Viola). This is because we release our libraries whilst still in production. It enables us to garner from
you guys what still needs to be recorded, and allows us the flexibility of re-visiting some areas once it has been
use in anger by our user-base.
We will be implementing these “missing” articulations as quickly as we can whilst adding extra much-requested techniques very soon.
7.
THE FRONT PANEL
2.
1.
4.
3.
12.
8.
9.
7.
6.
10.
11.
5.
13.
8.
THE FRONT PANEL KEY:
This manual presumes that you have already used Kontakt. If the main Kontakt window is unfamiliar to you
please consult your Kontakt manual or the Native Instruments site. They explain it better than we ever could:
http://www.native-instruments.com/#/en/products/producer/kontakt-player/
1. Front Panel/ Ostinatum.
These tags toggle you between the 2 main pages of the front panel.
2. Voices & Max.
The left numeral refers to how many voices are currently being processed in the Kontakt engine. Max.
Refers to the maximum number of voices assigned to this instance of Kontakt. If you’re experiencing dropouts,
clicks or crackles you may want to have a look at these two numbers. If the “voices” numeral creeps up and
equals the “max” numeral you may want to increase your voice ceiling (the max setting).
3. Articulations.
Both displays active, toggle switches your current articulation. Remember these can also be toggled via
key switches which are arranged (from left-to-right): Longs , Pizzicato, Spiccato, Staccato, Artificial Harmonics
Long, Artificial Harmonics Short.
See page 9 for descriptions of these articulations.
4. Samples Load Status.
Again, if you’re hearing clicks or crackles or if your sample is cutting out erratically check that the rightmost bar is illuminated. This signals that all the samples for your patch are fully loaded. If the lefter-most panel
is illuminated the patch has yet to start loading, the middle, the patch is in the process of doing so.
5. Mic Controllers
One of the most exciting aspects of the Spitfire range. C(lose) T(ree) A(mbient) mics. Above these letters are the mic cut buttons that dial the mic signals in or out, this will unload or load the samples needed to
keep your system lean. Above the cut buttons are fader controls that allow you to mix the mic signals to your
liking.
C - Close mics, a selection of ribbon and valve mics placed for optimum focus close to the instruments.
This mic control is great to add in for added definition and at times a bit of “rounding of sound”, in isolation it
can be a way of achieving a more intimate or pop-music style sound.
T - Tree. This refers to the “Decca” tree of three mics placed above the conductor’s podium. In the case
of Albion; 3 priceless vintage Neumann M50s. These are placed to give the ultimate sound of the band, the hall
and are the default mic position that loads in with each patch.
A - Ambient. A set of condenser mics placed high up in the gallery away from the band. This mic position gives a massive amount of stereo spread and room sound over the band. Great mixed in with the other
mics but also ideal fed to your Ls & Rs speaker sends for true surround information (see page 23).
6. Dynamics
This is a visual representation of what your modulation wheel is up to. You can also reassign this controller from this fader.
7. Vibrato
Mapped to controller CC#24 (you can remap in many DAWs by CTRL clicking or right clicking and
“learn new assignment). This Xfades between performances with and without vibrato.
9.
8. Purge Unused
This control keeps unloading any samples you are not using to keep your memory usage as low as possible.
9. Use 4x Round Robin
This refers to the number of round robins your patch uses, the number can be dragged up and down
(1-4) to save you memory.
10. Reset On Key C0
When using round robins there may be a point where you clearly want to use a specific note. This enables you to control where you are in the round robin* cycle, or if you are using duplicates of patches in a surround format (page 23) this will be how you can guarantee your round robins are in sync. Simply program or
hit a note event on C0 on your selected patch and it’s duplicates. (You can click to change the default note.)
11. Transpose
A quick way for you to get the sampler to address different samples, select the transpose amount and
then try tuning the instrument in the opposite direction. So say -3 transpose, +3.00 tune, the instrument will
be playing at the same pitch as before but now addressing samples that are placed two semitones away from the
ones you’re playing.
12. Custom Velocity Curve Table
Patches with large numbers of velocity layers can very much react differently to different MIDI controllers. We have found several controllers that don’t actually reach 127 even if you make your assistant hit it
as hard as possible! This table allows you to tweak a velocity curve that suits your controller and your playing
style. The table works from left to right 0-127 boost the bars in the table at any given point and you’ll boost the
amount of juice your controller gives to the patch at that given velocity point. To enable this function click on....
13. Memory Purge Toggles
These little switches allow you to purge certain articulations from memory should you be certain that
there are some that you don’t wish to use and you want to save memory, or simply that you prefer to use a single
articulation per instance of the instrument on a separate track of your DAW (load up the instrument, purge all
artic’s but the one that you wish to use). We know that orchestrators will prefer the latter way of working.
10.
YOU WILL NOTICE LESS FUNCTIONS ARE AVAILABLE ON THE FRONT PANEL OF THE “LEGATO”
INSTRUMENTS. THIS IS BECAUSE OF THE COMPLEX CODING INVOLVED IN THEIR CREATION
AND IMPLEMENTATION:
1.
2.
3.
1. Interval Type
Solo Strings’ Legato Patches come with 3 types of interval the first (left-to-right) is glissando, or portamento (sliding between one note to another in one bow), slur (moving between one not to another in one bow),
and detache (one bow per note). These interval types are selected by how loud or soft you play the 1-18 is gliss,
19-80 is slur, 80-127 is detache. To get the legato patches to work properly make sure you play in a “legato” style
preferably pressing one note down and only lifting this note once the next note is pressed so there is a slight
overlap (something your orchestrators won’t thank you for).
2. Interval Locks
Either by clicking these or by hitting, C1/D1/E1 respectively you can lock and restrict your intervals to
one type.
3. Hall Size
As we do not have mic control on our “Legato” patches this clever tool uses scripts to choke the release
triggers to “dry up “ the samples should you require.
About the “NV” and “BPD” suffixes.
These refer to the “Non-Vib” or senza vibrato versions of the legato patches. We didn’t include these in
the original Solo Strings release because we felt they didn’t quite work. As you move between notes with these
legato patches, Kontakt cleverly inserts the appropriate interval sample that we have exhaustively recorded
between the two notes. It does this by x-fading between the long articulation, interval sample and into the
next long articulation sample. When presented with a single instrument playing senza vib we found it was
virtually impossible to x-fade into the legato intervals without it being very audible. You could hear the joins.
After several online communities polled us to include NV legato versions and after some nifty programming
we present here a “workable” solution bearing in mind this library is primarily a demoing tool. But we present
these patches with the “BPD” which stands for “By-Popular-Demand” as means of disclaimer.
11.
OSTINATUM
1.
4.
2.
7.
3.
5.
6.
12.
OSTINATUM FRONT PANEL
A.K.A. “Your Orchestrator’s Next Headache”.
Developed for our Albion range, this unique (to Spitfire) and esoteric tool can be used in a very scientific manner so you can very carefully design your ostinati, or in a random manner that will, we’re sure, provide you
with acres of inspiration. It works only with non-legato patches and is most effective with the short and plucked
articulations.
KEY:
1. Note length.
Use the pop down menu to select the frequency of the notes in your ostinato. This will then be displayed
in text to the left of the pop down arrow and in notation on the sequencer stave to the right.
2. Key Order
Use this to select how “note numbers” are assigned (if at all) to each of the keys you’ve depressed. You
can then use these note numbers in any order to form your ostinato. Simply pull down the menu arrow and
select one of these options:
Order pressed - This will assign note numbers to your key strokes in the order you play them.
Ascending - This selection will assign note numbers from lowest in pitch first through to highest last.
Descending - This selection will assign note numbers from highest in pitch first through to lowest last.
Chords - This selection will ignore assigning any note numbers and will simply play the chord you’re
playing in unison at the frequency determined and with the dynamics you have programmed.
3. Keys Held
Simply displays the keys you have depressed and how the engine has assigned the note numbers.
4. Sequence Notation Display
A notation display of the note frequency selected and the length of the sequence/ ostinato.
5. Note Number Assignments
Selects which notes you wish to be played in the sequence. You do this by scrolling up or down. Scrolling down all the way produces a hyphen which denotes tacet for this step in the sequence, enabling you to make
dotted and more complex rhythmic phrases.
6. Velocity Dynamic Controls
As with the Note Number Assignments, scroll up or down to vary the velocity, volume or accent your
sequence. Please note, on all short articulations (ie non Ostinatum patches) you also have velocity control as
per usual, ie by hitting your keyboard louder or softer. These dynamic controls will alter micro velocities in
relation to the dynamic you’re playing at.
7. Sequence/ Ostinato Length Tool
This ingenious device allows you to determine your sequence or ostinato length. Simply drag to the left
and right until your phrase has the desired number of notes. Whether that be a 1 bar phrase or a 9/16!
13.
SURROUND USE:
If you are lucky enough to work in 5.1 you will be delighted by how Solo Strings works in this respect and with
the number of mic combinations, there’s a number of different ways of doing it.
The basic principal is to load in several instances of the same patch routed to the same MIDI channel with different mics selected and each instance routed to a different out, or panning selection on your surround panner.
Each, and all microphone samples have been edited to sample accuracy together, so provided you give each
instance identical MIDI information, or indeed the same channel, everything will remain true as recorded. If
you are concerned that a round robin cycle may be out of sync, hit C0 on your keyboard controller to reset.
Here’s some suggestions:
Basic Quad (2 instances):
Output an instance with T(ree) to your L&R, A(mbient) to your Ls & Rs.
Intermediate 5.0 (3 instances)
Output an instance with T(ree) to your L&R, A(mbient) to your Ls & Rs. Bus a slightly smaller amount of Tree
into your C alongside a final instance with C(lose).
Posh 5.1 (4 instances + some clever routing):
It would be easy for us to suggest you simply pull up the LFE fader as found in Logic (pictured above) on one
of your 4 instances. Indeed, the C(lose) mic would be a nice focussed signal for this task. But your dubbing
engineer wont like your for it, and 9 times out of 10, he’ll simply cut all of your LFE tracks.
You can make his life easier by understanding the much misunderstood roll of the LFE track in cinemas. This
is, as the title suggests, an “effects” track. It is for intermittent use (albeit these-days, often used!). This should
never be part of your bass management and should be used in a selective manner. If you give them continuous
program, they’ll strip it out as it will interfere with their room tones, nice bangs and thuds. And with a 60 piece
orchestra all sorts of info gets into the sub range if you simply route your mix to it, even with instruments playing in a pitch range well clear of the sub.
Your C(lose) signal is a good starting point. Route this to a sub bass synthesizer, the Waves MaxxBass is a great
plug, alongside many free plugs bundled with DAWs. But the DBX 120A is very much the industry standard,
and inexpensive bit of outboard kit for this purpose. Send your C(lose) into this but also make sure you noise
gate it. Judge a point that you feel is a loud peak, and set the threshold to that, with a nice slow attack and release. Hey presto, you just made friends with a dubbing engineer.
14.
AFAQs (Anticipated FAQs)
Our first comment is to remind everyone that this is a manual to accompany v1.0 of a totally new line for Spitfire. With a totally new set of samples, scripts, and UI. We have used our experience as busy film composers to
deliver something that we’d like.
It is our hope that you keep in touch with us to let us know how you’re getting on, how you’re using Solo
Strings, how you’re finding it, and, if we were to consider looking at areas in the future, what you’d like us to
look at. From this we’ll form a consensus and wholeheartedly pledge that we will act upon it wherever possible
or practical. Our private library is what we often refer to as a “living” library, that has embraced true legato
among and other scripting technologies and will no doubt find new life in experiences we have earned in making Solo Strings. We hope that Solo Strings too can enjoy this kind of fluid feedback that will keep our tool-sets
fresh and vibrant.
See you at v10.0!
• This library really isn’t behaving how I’d expect. - OK, so we’re now officially blue in the face. But before you
go ANY further please check you are using the ABSOLUTE latest version of Kontakt. Visit your trusty service
centre and we hope this page remains relatively under-thumbed.
• My instrument or patch seems to be playing just bits of sound, some keys are missing, and there’s lots of
clicks and crackles. - Make sure that your patch is fully loaded (detailed on the front panel, page 9). Some of
these are biggies so can take a while. But if problems persist make sure Kontakt memory manager is activated:
then:
You’ll have to restart this instance of Kontakt to feel it’s benefits.
Another reason your system may be struggling is that you’re using too many mics live for the spec of your
machine. Try cutting the mics as detailed on the front panel to see if this cures your problem. If it does, don’t
worry you can still use these mics, just play in your parts with one active (we recommend the T(ree)) and then
activate multiple mics and render down (eg. freeze function in Logic Studio).
If you’re still suffering may we suggest you try and manage your pre-load buffer. Kontakt pre-loads some samples into memory so that when you hit a note Kontakt plays it out from RAM whilst addressing the rest of your
samples from your hard drive(s). The slower your drives, the more you may want to rely on RAM, the faster
the drives, or smaller RAM available, the more you may want to rely or your drives. If you’re using the latest
generation of SSDs you’ll find you can radically reduce your pre-load buffer. Referring to the plate above tick
the “Instruments Default Pre-Load Buffer Size” and drag the fader to a setting you’re happy with.
15.
• I’m a media composer, and my cues take an age to load between cues. - Ha ha, we too wish that some DAWs
handled memory a bit better. Make sure the Kontakt Memory Manager is on (detailed above), and try and create a palette from which all your cues derive. But most importantly, if you’re using a lot of our sounds. Try and
run your orchestral palette in the background, either via rewire using Plogue Bidule for example, or indeed
from an entirely different “slave” computer. We’d recommend loading the Brunel Loops into your host however
so you can enjoy the beat-matching. You can beat match in Plogue, using the MIDI Clock To SYNC bidule.
• These samples are sounding a little cold and still. - You really want to wiggle your mod wheel or program
some CC1 information so that you can feel the true life of this sample-set.
• Why can’t I play more than one note on the “Legato” patches. - These are strictly for monophonic use and
are designed for lead lines.
• Is it me or are the “Legato” patches not touch sensitive? - You’ll need to wiggle your modulation wheel and
volume or expression controller to get the true dynamic range out of this class of patch. The touch sensitivity
for these patches select the type of interval between the note, see page 12 (interval type).
• I thought this module had more than just long notes, how do I get the pizzicato to play? - 1st make sure
that you have a “multi mic” instrument loaded in. Then either click on the “articulation” toggle switches (see
page front panel (page 9) section for a guide to these) or use Keyswitches A0-D1 on your controller keyboard.
• Where’s the viola Pizzicato, hmm, and some trills would nice? - Developing this module has been a battle
of content vs a desire to make this a library that can be used quickly and easily on a multitude of set-ups and at
a price point that wont break the bank in these difficult times. With legato patches in particular, the wider we
go the larger the library grows, but at an exponential rate. We have leaned extensively on our experience as film
composers and have carried out extensive research with classic movie scores to provide you with a set of “go to”
tools. We hope you enjoy the ease of use in our Solo Strings module, that your orchestral palette doesn’t need
to be scrolled, but also we’d love it if you could check back with us for many anticipated updates and additions.
• Some of these notes sound a bit.... fruity? Some of the tuning isn’t perfect, and the pizz’s are a bit loose
at points? - This is where we stand steadfast. We design our recording process to embrace such imperfections.
Having blind tested a control group with demos made on Spitfire vs other libraries we have unanimously found
that people feel our library sounds the most convincing. We too are utterly convinced that this is not only due
to the magnificent environment and talent involved in the recording, but that we allow a degree of humanity to
permeate through our entire library. These imperfections exist in our bespoke range and we have arguably the
greatest user-base of any independent sample enterprise. If something is unacceptable to you, the brilliance of
Kontakt allows you to delete the “offending” article and stretch across a neighbouring zone. Or more simply try
using the transpose function detailed in the front panel outline (page 9). For help on this you may also want to
refer to the Kontakt manual found here:
• You keep mentioning “round robins”, what are they? - * Round Robins are a method of recording a number
of versions of the same sample so that when playing repeated notes in fast succession you don’t get “machine
gunning” a rapid repeat of the same sample that gives the game away immediately.
16.
A QUICK THANKS
Christian & Paul would like to thank the cabal of genius assembled herein. To Dominic Kelly and the searing
talents of Andrew, Bruce and Caroline, to Alison Burton and the whole of the Air Studios team. To Jake Jackson
for making everything sound so marvellous, and the remarkable talents, immense intellect and invention of
Andrew Blaney, Blake Robinson and Stu Kennedy.
Most of all we would like to thank the amazing support and loyalty of our user-base, our Facebook friends and
everyone at VI Control.
We are in the same boat as all of you. We’re not software developers by trade, so appreciate your honesty in
paying your way to be a part of our family and not distributing this illegally. But more importantly, if you have
any ideas or criticism please let us know directly via our website and in a constructive manner. You never know,
you just may have thought of something that we hadn’t considered. We want to make our entire range the best
there is, and we rely on you to help us achieve that..... With thanks.
C & P.
COPYRIGHT SPITFIRE AUDIO LLP 2011
www.spitfireaudio.com