1
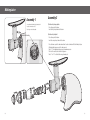
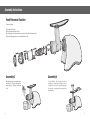
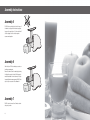
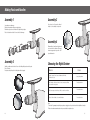
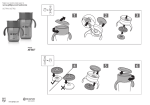
INSTRUCTION MANUAL FOR THE OSCAR CLASSIC JUICER
DA-950
Important Safeguards
Oscar Classic (DA-950)
1. Read all instructions.
The Oscar Classic working at a low speed of 63-75 RPMs ensures full taste and the
highest nutrirional value.
2. To protect against risk of electrical shock, do not put the main body (motor) in water or any other
liquid.
The Oscar Classic is easy to assemble and disassemble for quick cleaning.
3. Close supervision is necessary when any appliance is used by or near children.
20-year warranty on the motor and 5-year warranty on the front end.
4. Unplug from outlet when not in use, before assembling or taking off parts and before cleaning.
The warranty only covers manufacturing defects.
5. Avoid contact with moving parts.
6. Do not operate appliance with a damaged cord or plug or after the appliance malfunctions, or is
dropped or damaged in any manner. Return appliance to the nearest authorized service facility
for examination, repair or electrical or mechanical adjustment.
7. The use of attachments not recommended or sold by the manufacturer may cause fire, electric
shock or injury.
8. Do not let cord hang over edge of table or counter.
9. Always make sure juicer locking clip is locked while juicer is in operation.
This heavy-duty juicer features a patented, stone mill-like auger, made of hygienic
U.S. FDA-approved Ultem.
The Oscar Classic assures you many years of trouble-free, dependable service.
Parts broken through wear and tear are not covered.
Multi-Purpose Juicer/Food Processor
1. Fruit Juice Extractor
The Oscar Classic juicer efficiently juices soft and hard fruits, even citrus fruits, one of the hardest fruits to juice.
2. Vegetable Juice Extractor
The Oscar Classic efficiently juices all kinds of vegetables, including celery, carrots, peppers, radishes,
and cabbage without destroying the natural flavor and nutrition. Fresh taste and full nutrition is
guaranteed with this unique extraction process.
10. Be sure to turn switch to OFF position after each use of your juicer. Make sure the motor stops
completely before disassembling.
3. Grass Juice Extractor
Wheat grasses, aloe leaves and pine tree leaves are just some of the other natural products you
can juice with the Oscar Classic juicer. Enjoy the best that nature offers in raw foods of all kinds. Juice them
for full nutritional benefits.
11. Do not put your fingers or other objects into the juicer while it is in operation. If food becomes
lodged in the opening, use food plunger or another piece of fruit or vegetable to push it down.
When this method is not possible, turn the motor off and disassemble juicer to remove the
remaining food.
4. Processing /Chopper Functions
The Oscar Classic also chops and processes, garlic, scallions, red pepper, ginger, radish and many other
foods, including herbs and seasonings, providng natural flavor and nutrition. Soft foods for babies
and geriatric patients are quick and easy to prepare with the processing strainer.
12. Read all the instructions and operating procedures before plugging in and using appliance.
13. Do not unplug from electrical outlet by pulling on the cord. To unplug, grasp the plug, not the
cord, and pull.
14. Turn off all controls before unplugging from or plugging into an electrical outlet.
02 |
5. Pasta Maker
Make fresh noodles in just minutes with the pasta nozzles. See page 14 for more information.
6. Homogenizer
Make fresh frozen desserts, natural baby food, and nut butters.
7. Grinder
Grind coffee beans and flour.
| 03
Parts for juicing
Hopper
Locking Clip
Feeding tube
Fine
juicing strainer
Adjustable
pressure Cap
ON-OFF
Switch
Coarse
juicing strainer
Juicing
strainer
Drum Cap
Auger
Drum
Parts for Processing
Main Body
Hopper
Round
Noodle
Nozzle
Pulp container
Round
Noodle
Nozzle
Flat
Noodle
Nozzle
Bread
Stick
Nozzle
Feeding tube
Juice container
Cleaning brush
Food pusher
04 |
Nozzle
Drum cap
Processing
strainer
Auger
Drum
| 05
Juice fruits and vegetables
Juice grasses
Mince herbs & seasonings
Make noodles and bread sticks
Make baby food and sorbets
1. Thoroughly wash unpeeled fruit and vegetables before juicing.
2. Cut fruit or vegetables into small pieces (about 5cm) so juice may be extracted more
thoroughly.
3. Turn on the machine. Let it run without interruption until all the juice has been extracted.
4. If the juicer starts to vibrate slightly during operation, turn off the machine. Empty the drum set.
Specifications
Model Name
Dimensions
Voltage
Motor
Auger RPM
Fuse
Certified
Re-assemble and resume normal operation.
Oscar Classic DA-950
Length: 420 mm
Width: 187 mm
Height: 320 mm
230 V / 50 Hz (200W power)
Single-phase induction
63-75
250V 5A
CE & IEC
5. After placing the last pieces of fruits or vegetables into the hopper, keep the machine running for
a few seconds to ensure the machine has extracted the last drops of juice.
6. Turn off machine.
7. Clean drum set after each use.
8. Do NOT run the machine for more than 30 minutes at a time.
Cleaning Instructions
Parts and Accessories Included with Your Juicer
Wash the auger and parts in warm, soapy water in your kitchen sink and rinse well.
1 User Manual
2 Containers
2 Round Noodle Nozzles
1 Bread Noodle Nozzle
1 Flat Noodle Nozzle
1 Auger
2 Juicing Strainers
Do not immerse unit in water. Clean with a damp cloth.
1 Processing Strainer
1 Food Pusher
1 Hopper + Drum
1 Cleaning Brush
1 Drum Cap
1 Adjustable pressure Cap
Do not place parts or accessories in your dishwasher.
Total of 16 parts including this manual
06 |
| 07
Making Juice
Assembly 1
Connect drum with main body by turning locking clip clockwise (about 60°).
Place hopper onto feeding tube.
2
1
Assembly 2
1) Function for juicing vegetable
Place the auger into the drum.
Insert the fine juicing strainer into the durm.
2) Function for juicing fruit
Place the auger into the drum.
Insert the coarse juicing strainer into the drum.
Place the drum cap onto the drum end and turn it counter clockwise until it clicks firmly into place.
Attach adjustable pressure cap to the drum cap end.
Turn to “5” on the adjustable pressure cap for maximum pressure.
This is best for carrot, beetroot and the leafygreens.
Turn to “1 or “2” for soft fruits like orange, strawberry etc.
08 |
| 09
Assembly Instructions
Food Processor Function
For processing function
Place the auger into the drum.
Insert the processing strainer into the drum.
Place the drum cap onto the drum end and turn it counter-clock-wise until it clicks firmly into place.
If interested in making pasta, please refer to the “Making Pasta” section.
Assembly 3
When juicing, place juice bowl and pulp bowl under the drum set. When processing, you don’t
need the juice bowl. Plug power cord into wall
outlet.
10 |
Assembly 4
Press the ON button. Place a few pieces of cut fruit or
vegetables, one at a time into the feeding tube. Use the
food pusher to press the fruit or vegetables gently down
the feeding tube. Leave the machine on as you feed in the
fruits/vegetables.
| 11
Assembly Instructions
Assembly 5
DO NOT place any foreign objects into the hopper. If
the drum set is clogged or the machine stops operating, press the reverse button 2 to 3 times which will
clear the clogging. Press the on button again to
resume normal operation.
Assembly 6
Switch the juicer OFF before changing accessories or
touching any moving parts.
Remove the drum set from the main body by turning
the locking clip counter-clock wise. Pull the auger forward to disassemble it from the drum set. After juicing, wash all parts in warm soapy water. Do NOT place
any of the juicer accessories in the dishwasher.
Assembly 7
Do NOT run juicer for more than 30 minutes continuously at any one time.
12 |
| 13
Making Pasta and Noodles
Assembly 1
Open and remove drum cap
Replace juicing strainer with processing strainer.
Turn drum cap counter-clock-wise until it clips firmly into place.
Place the desired nozzle into the front end of the drum cap.
Assembly 3
Use scissors to cut the pasta to desired
lengths. Cook according to recipe used.
Assembly 4
Disassemble unit and rinse all parts and
accessories first in cold water. Then wash
in warm soapy water in your sink – NOT
in your dishwasher.
Assembly 2
Sprinkle a small amount of wheat flour on the holding dish placed under the spout.
Press ON button.
Push pasta dough through the feeding tube without stopping.
Choosing the Right Strainer
Material
Apples, Oranges, Pears, Grapes, Strawberries, Kiwi fruit,
Tomatoes, Aloe, etc
Strainer
Coarse juicing strainer
Kale, Radishes, Beet tops, Spinach, Carrots, Sweet potato, Wheat
grass and other leafy greens
Fine juicing strainer
Red/ green pepper, Garlic, Ginger, Chilies, Soaked rice and Beans.
Processing strainer
Pasta, Coffee and Grains, Ice cream, Nut butters
Processing strainer
Notes:
* Some fruits E.g. pawpaw, tomato, kiwi, pear, produce a pulpy juice as they do not have sufficient liquid for a clear juice
* Fruits such as bananas and avocado can be processed but do not produce juice
14 |
| 15
4DB010051_V.01