1
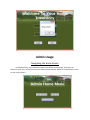
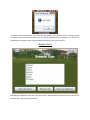
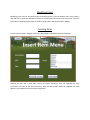
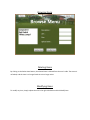
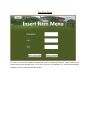
Home Inventory User Manual
About Home Inventory
The HomeInventory Project consists of a customized front-end user application and a Java application
server manipulating a MySQL database for data storage. With two types of roles, Users and
Administrators, clients logged into the HomeInventory have access to a variety of commands.
HomeInventory stores each user’s items safely and privately, without worry that others will see their
additions.
Why Home Inventory?
HomeInventory allows for multiple users to store their belongings privately into a shared
database. With the HomeInventory, you can track your accumulated purchases by entering
Logging In:
When first running the client application, you’ll be greeted with the following page.
Entering your credentials will log you into the system. Be sure as to not leave either field blank.
If you attempt a login with incorrect credentials, you’ll be prompted with an appropriate message.
Below is an example of logging in with an invalid username.
Admin Usage
Navigating the Home Screen
In HomeInventory, Users and Administrators have different home pages, catering to the
features of each. First, we’ll take a look at the Administrative features. Below, at the Home Menu, there
are four major options.
Creating A New User
Like most of the menus, the Create User screen is very intuitive. With this feature, Administrators
supplies the new information required to create a new user. Such as below, Administrators fill in the
fields and click on Confirm.
Assume the username supplied, if the user does not already exist, the user will be created, granting
immediate access to the system. Once a user is created, the Home Screen will refresh onto the screen.
Navigating to the Browse Users screen will display the existant Users in the system.
Browse Users
Navigating to the Browse Users menu, the list of Users is displayed with the options to View Users Items,
Remove Users, and View User Attributes.
Removing Users
For Remove User, the currently selected user will be deleted. All items belonging to the user will also be
deleted.
Viewing Users Items
The Browse Users Items screen provides a great deal of information. The left side on the screen lists the
items belonging to a given user. By selecting an item, the information pertinent to that item is
distributed to the boxes on the right. The owner of the items displayed is shown in the User box.
Deleting Items
By clicking on the Delete Item button, the selected item is deleted from the user’s table. The screen is
refreshed, and the item is no longer listed since it no longer exists.
Modifying Items
To modify any item, simply replace the text in the right-side boxes and click Modify Item
Modifying Users
Modifying users works in the same manner as modifying items. From the Browse Users menu, select a
user and click on View User Attributes. The screen is nearly identical to the Create User menu. The users
information is displayed in the fields; to modify change values and choose Confirm Modify.
Inserting Items
From the Home Screen, navigate to the Insert Item Menu via the Admin Insert Items button.
Inserting an item into a users table consists of simply selecting a user and supplying the item
information. For ease of use and consistency, using barcode lookup checks the supplied UPC code
against a UPC database and retrieves the information.
Users
Home Screen Navigation
The User Home screen is substantially more limited than the Administrator page.
Browsing Items
Deleting Items
By clicking on the Delete Item button, the selected item is deleted from the user’s table. The screen is
refreshed, and the item is no longer listed since it no longer exists.
Modifying Items
To modify any item, simply replace the text in the right-side boxes and click Modify Item.
Inserting Items
For Users, insert consists of Manual and Barcode inserts. For Barcode insertion, simply enter the UPC
number and choose Barcode Insert. If the item is found in the database, it it inserted automatically.
Otherwise, the item must be inserted manually.