1
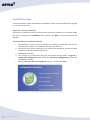
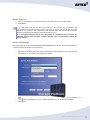
Attix5 Pro Storage Platform V6.0 User Manual Cover Your guide to configuring the Attix5 Pro Storage Platform. for Microsoft Windows SERVER EDITION V6.0 for MICROSOFT WINDOWS Copyright Notice and Proprietary Information All rights reserved. © Attix5, 2010 Trademarks ® - Microsoft, Windows, Microsoft Windows, Microsoft Windows Server, Microsoft Server, Microsoft Volume Shadow Copy Service, VSS, MS Windows, MS Exchange, MS SQL, MS SharePoint, Exchange, Internet Explorer, and Windows Explorer are registered trademarks of Microsoft Corporation. 1 Copyright Notice and Proprietary Information Instruction Symbols The following icons appear in the user manual: The information icon precedes important information. The example icon indicates a practical illustration of a process or procedure. The hint icon indicates a suggestion or hint to guide or assist users performing a task. The warning icon provides a warning against potential mistakes and actions that could cause critical error. Instruction Symbols 2 SERVER EDITION V6.0 for MICROSOFT WINDOWS Contents Contents ................................................................................................. 3 1. Introduction ....................................................................................... 4 Storage solution ................................................................................................. 4 Storage Platform ................................................................................................ 4 Storage Platform Console .................................................................................... 5 This manual ....................................................................................................... 5 2. Preparation......................................................................................... 6 Hardware and software requirements ................................................................... 6 Product Activation .............................................................................................. 8 Environment ...................................................................................................... 8 Port configuration on the network ..................................................................... 8 3. Installation .......................................................................................10 A new Storage Platform installation .................................................................... 10 Installation steps........................................................................................... 11 Additional or multiple StorageServers ................................................................. 16 Installation steps........................................................................................... 16 Installing a MirrorServer (Mirror StorageServer) ................................................... 21 Slave AccountServer installation ......................................................................... 22 Installation steps........................................................................................... 23 4. Upgrading (from V5.1 to V6.0) ........................................................29 Introduction ..................................................................................................... 29 Installation steps........................................................................................... 30 5. Upgrading from V6.0 to the latest V6.0 ...........................................37 Introduction ..................................................................................................... 37 Installation steps........................................................................................... 37 3 Table of Contents 1. Introduction Storage solution Within an Attix5 Pro storage solution setup, Backup Clients (Desktop & Laptop [DL] and/or Server Edition [SE]) connect and back up data to the Storage Platform. The following diagram illustrates a common scenario: Files and folders stored on one or more machines running SE or DL can be Client Storage Platform backed up to a Storage Platform over an Internet Client connection or within a Local Area Network. In the event of data loss or corruption on the server, data can be retrieved from the Storage Platform and restored to the original or another Client in just a few easy steps. Storage Platform An Attix5 Pro Storage Platform (SP) consists of an AccountServer (AS) connected to one or more StorageServer[s] (SS). The AccountServer handles user authentication and Backup Group management. The StorageServer is the file storage location for Clients‟ encrypted data. The diagram on the left represents a Storage Platform common scenario: When an AccountServer is connected to one or more StorageServer(s), together they function as a Storage Platform. AccountServer StorageServer Note: These components (AS & SS) may run on the same or separate physical platforms. Chapter 1: introduction 4 SERVER EDITION V6.0 for MICROSOFT WINDOWS Storage Platform Console The Attix5 Pro Storage Platform Console is used to manage and administer all the elements within the storage solution. Storage Platform The diagram on the left represents a simplified scenario: The Storage Platform Console connects to the Storage Platform and enables the management of the entire backup environment Backup Clients (Backup and Accounts, the Storage Platform). Storage Platform Console This manual This User Manual will cover installation guidelines and initial configuration of the Storage Platform itself. Additional configuration, management and maintenance aspects are all covered by the Storage Platform Console User manual. Additional hits, examples and warnings are included with this manual that are all installation related and form part of the scoping and design elements of either new installations or to be upgraded V5.1 Storage Platforms. All system requirements and compatibility aspects are stipulated in the “RequirementsCompatibility-V6.0.0” matrix. 5 Chapter 1: introduction 2. Preparation This section will provide you with valuable information as part of the preparation that needs to be done before installing. Hardware and software requirements The hardware required to support the minimum SP, with the AccountServer and a single StorageServer, depends upon the number of users, the size of their backup data, and the frequency and transmission rates of their backups. Operating System Microsoft Windows Server 2003, or Microsoft Windows Server 2008 Microsoft Windows Server 2008 R2 (Recommended) Processor & Memory Recommendation table Amount of data Recommended Recommended memory protected processor (Above operating system requirements) Less than 200GB P4 High-end 1GB 200 - 500GB Dual Xeon 1GB 500GB - 1TB Quad Xeon 2GB Above 1TB 2 x Quad Xeon 4GB Chapter 2: Preparation 6 SERVER EDITION V6.0 for MICROSOFT WINDOWS Disk Space Required: (SATA Drive) 5 GB and storage space 30% of protected data free space: 100 Desktop & Laptop accounts, each with a 200MB account = 20GB + 6GB 100 Server Edition accounts, each with a 5GB account = 500GB + 150GB Recommended: (RAID 5) 10GB and storage space for all users plus 60% of protected data free space: 100 Desktop & Laptop accounts, each with a 200MB account = 20GB + 12GB 100 Server Edition accounts, each with a 5GB account = 500GB + 300GB Other 800 x 600 Resolution, more than 256 colours Microsoft .NET Framework Version 3.5 (SP1) Network interface card or a virtual network adapter with a fixed IP Address, Host name or DNS name (preferred for flexibility) Internet access Example: A recommended system to handle 100 Server Edition Clients with 5 GB Accounts and 300 Desktop & Laptop Clients with 200 MB Accounts (+/- 1 TB in total) would be: Quad Xeon Processor 3GHz 2GB RAM 1 TB free hard drive space Windows 2008 Server Fixed IP address or DNS name Additional hard drive space can be added to support a higher number of users. A faster processor, faster disk and higher-capacity network would support a greater number of simultaneous backup users and/or a larger throughput. Multiple StorageServers can be added to the network to further scale the backup and recovery solution. Note: It is advised to consult with Attix5 directly when planning new hardware for a Storage Platform installation. 7 Chapter 2: Preparation Product Activation To ensure a high level of security, the Attix5 Pro SP must be authorised and validated by Attix5 during the installation process. You will be asked to supply a Product Activation Key as one of the SP installation steps. This key has been generated by the Attix5 Pro LicenceServer after you or your reseller added your company details. Keeping this in mind, you are advised to notify your Account Manager/Reseller in advance before upgrading hardware, reinstalling the software or requesting additional licences. This will allow them to arrange the purchase order, if needed, and update your information on the LicenceServer. Note: Please ensure that you keep your unique Product Activation Key in a safe place. The unique key can only be used with a single SP; you will not be allowed to use the same key on multiple platforms. Also note that the key has to remain with the SP even if it gets replaced with new hardware at a later stage. Environment This section outlines the environmental requirements to be configured and considered as part of the Storage Platform installation. Port configuration on the network Public address The default installation for the AccountServer and the StorageServer is to listen for connections on all available IP addresses with the AccountServer on port 443 and the StorageServer on port 8443. However, it is sometimes desirable for the StorageServer to listen on port 443 as well, especially if backups will be done over the Internet where many company firewalls and HTTP proxies only allow SSL communications over port 443. This can be achieved if the server on which the Storage Platform will be installed has more than one IP address available. Configure the first IP address to be used for the AccountServer and the second for the StorageServer and then set both to use port 443. The recommended port for Report access via the web interface is 80 although it can be reconfigured for any desired port. It is therefore recommended to use another port for nonsecure access (SSL disabled) should this feature be required for secure networks to be used for the backup data transfers between the Clients and their respective StorageServers. Chapter 2: Preparation 8 SERVER EDITION V6.0 for MICROSOFT WINDOWS Private address The private address is required for internal communications between the AccountServer and StorageServer, between different StorageServers and between StorageServers and MirrorServers. By default, it will bind on any available port and on all IP addresses but if a specific port or IP address is required (e.g. if a firewall is between a StorageServer and a MirrorServer), it can be configured under the Private address. Firewall considerations If there is a firewall between the Backup Clients and the Storage Platform, the public port(s) used for the AccountServer (e.g. 443) and StorageServer (e.g. 443 or 8443) should allow incoming connections. (The default private ports can be used as they do not go through the firewall.) If there is a firewall between a StorageServer and a MirrorServer, the private port should be fixed (set to something other than „0‟ which is the option for a random available port selection) and that port, along with the public port, should be opened for incoming connections on the firewall. 9 Chapter 2: Preparation 3. Installation This chapter describes the Storage Platform (SP) installation process for new installations. Administration of the SP requires that you choose an Administrator (admin) username and password. Note: Store the admin password in a safe place. This password MUST be the same for all components (AS, SS and Slave AS) in the same Storage Platform installation (including remote dedicated servers). It is strongly advised not to use this built in Administrator account for Console access and to rather create separate users with Admin rights for this purpose. The V6.x SP Installer does not support multiple installations on the same server. E.g. Installing a Slave AccountServer with the Installer and then installing a StorageServer afterwards. A manual installation has to be done in these cases by running the following in a command prompt for the installation of an additional SS: StorageServer.exe –Install –ServiceName=SS_Service2 “– settings.AdminPass=password” “–settings.StorageVolumes=E:\data path\” – Start A new Storage Platform installation Before you install It is advised to complete the SQL and .Net installations before installing the Attix5 Pro SP. The Installer will, however, test for these installations and assist you accordingly. Warning: Resource management: Both antivirus software scans and backup processes are resource-intensive. It is advised not to run a major Attix5 task and antivirus scan at the same time as this will significantly decrease general performance. Exclude the Attix5 Pro Data folder and any other Attix5 subfolders from the list of folders to be scanned for viruses. If using an enterprise antivirus solution, please ensure that the exclusions are set on the central controlling machine. Also exclude the Attix5 SQL database folder. Ensure that the hardware and software requirements are met before starting the installation process as described below. Refer to the Preparation chapter in this manual as well as the “System requirements and Compatibility spec matrix for V6.x” The installation will not be possible without a valid .Net installation. Multiple StorageServers on the same server installation - Not supported for new V6.0 installations and will only be catered for as part of the V5.1 to V6.0 migration should the previous V5.1 SP have both the NS and FS on the same box. Chapter 3: Installation 10 SERVER EDITION V6.0 for MICROSOFT WINDOWS Installation steps To install the Attix5 Pro Storage Platform software, simply run the installation file supplied by your software provider. Open file - Security warning File Security is verified on certain operating systems. The Attix5 publisher can be verified during this step by clicking the Publisher link provided. Click Run to start the extraction and Installer. Storage Platform Installation Wizard 1. The installation wizard will start by searching for existing SP installations and services and will continue with a new installation if none are detected. Note: Please refer to the Upgraded section below should the Installer detect a previous installation and provide a migration option at this point. 2. An install location will be requested for the required file installation and the successful completion of the file transfer will be shown. 3. Click Next to continue. Storage Platform Configuration Wizard Two options are provided that will guide the installer through either a Typical or Advanced Configuration. Typical configuration This option will configure the typical components with default settings starting off with the Product Activation. This option will install the AccountServer and a single StorageServer by default. Advanced configuration This configuration path will provide you with more options to give you control over the components and how they are configured. 1. In the first step, specify which components must be installed. You have the following options: Set up AccountServer and StorageServer (Same as a Typical configuration above) 11 Chapter 3: Installation Set up AccountServer (A dedicated AS will be installed.) Set up StorageServer (A dedicated SS will be installed.) – Please refer to the Addition or Multiple StorageServer section below. Set up a Slave AccountServer (A dedicated AccountServer will be installed for Slave use to another AccountServer.) Recover AccountServer from License Server (This option must only be selected for Disaster Recovery reasons.) 2. Select a Typical Configuration or Set up AccountServer and StorageServer for this example of a single box installation and click on Next. Product Activation Product activation can only be achieved by providing a valid V6 Product key that will be validated after clicking Next. Note: Product key checking is done and the Next button will become active once validated. The Product key is also validated on the Licence Server after clicking the Next button and feedback will be provided if it could not be verified. Proxy settings will also be used during this step. The option for a Manual activation is provided should an Internet connection not be available during the installation. Proxy settings can also be configured if required. Folder Selection a. Select the location in which you wish to store the user data. The default path is C:\ProgramData\Attix5 Pro\SS_Service\Data. You can select another disk drive on the same machine if required. b. Click Next. Note: There must be enough hard drive space available on the selected drive to store all backup data. The drive can represent a Local volume/NAS Drive etc. Only local NTFS volumes will benefit from Single Instance Storage. Database Server 1. Choose the SQL database to be used. You have the option to Use a local instance of SQL Server or Specify the connection strings manually. The latter, however, requires additional connection string information and it is advised for advanced users only. Chapter 3: Installation 12 SERVER EDITION V6.0 for MICROSOFT WINDOWS A. Use a local instance of SQL Server 1. For this option, you need to specify the database names for both the Accounts and Reports. (Defaults are recommended). 2. Click Next. B. Specify the connection strings manually This option is advised for advanced users only. The wizard will attempt to create the manually specified databases if they do not exist and you need to specify the correct connection strings for both the AccountServer and the Reports Database. Tip: You can configure the Data Link Properties by clicking the button on the right-hand side of each database connection string. The selected database under step 3 of the Data Link Properties will fail when being tested if it does not exist and will be created by the SP Installer afterwards. Note: The default instance name “SQLExpress must be removed when using a full SQL server installation. Data Source=(local)\SQLExpress (local)= name of server & SQLExpress = instance name For more info. refer users to : www.connectionstrings.com 2. Click Next. (Databases will be created after this step) Note: The number of Console connections made at the same time, i.e. at start-up of the AS or after upgrading the AS, can be defined in the AS connection string by adding the following to the end of the default string “; Max Pool Size=xxx”, where xxx defines the number of Console connections. The default is 100 and doesn’t have to be defined. It is also possible to edit the ConnectionStrings configuration file in the installation folder afterwards if required. See: http://msdn.microsoft.com/en-us/library/8xx3tyca(VS.71).aspx for more information. 13 Chapter 3: Installation Database Server Instance This option will only be shown should more than one Instance be detected. All SQL database instances will be detected automatically according to the previous selection and be shown in the drop-down selection provided. Make a selection and click on Next. Master Password 1. Enter a strong admin password for the SP to be used and keep it in a safe place. 2. Click Next. Note: This password MUST be the same for all components (AS, SS and Slave AS) in the same Storage Platform installation (including remote dedicated servers). It is strongly advised not to use this built in Administrator account for Console access and to rather create separate users with Admin rights for this purpose. Server Port Bindings This page will only be shown if the Advanced Installation was chosen. For more information, see Environment in Chapter 2, “Preparation.” Note: You need to ensure that no other software application is using the ports specified. A “0” entered specifies the use of a random available port for all Private bindings. Click Next. Chapter 3: Installation 14 SERVER EDITION V6.0 for MICROSOFT WINDOWS Configuration Summary 1. All chosen options will be summarised. Verify the configuration settings before clicking the Apply button. 2. Once everything has been configured, if an automatic start-up cannot be performed, the installer will prompt you to start the AccountServer and StorageServer services manually. Note: The wizard will complete all necessary settings and configuration and provide an option to install the SP Console if the installation file was detected in the same folder as the initial SP Installer. 3. Click Close. The AccountServer and StorageServers are now installed and a SP Console connection can now be made using the AS server name, admin username and password as specified during the installation. Initial Console Access users including dedicated Administrator users and Backup Groups can now be created after start-up via the Console. (No default groups are created as part of the installation for new SP installations) Note: The two servers run as system services (see below) and do not require a user to be logged in for the services to function properly. 15 Chapter 3: Installation Additional or multiple StorageServers Additional StorageServers can be installed, should limited storage space be available on the current volume used for the Client Backup Data, or if load balancing across multiple StorageServers is required. This section will cover the installation of a new dedicated StorageServer. Please refer to A Storage Platform upgrade in Chapter 3, “Installation,” should an upgrade from a V5.1 FileServer be performed. Before you install Warnings: Resource management: Both antivirus software scans and backup processes are resource-intensive. It is advised not to run a major Attix5 task and antivirus scan at the same time as this will significantly decrease general performance. Exclude the Attix5 Pro Data folder and any other Attix5 subfolders from the list of folders to be scanned for viruses. If using an enterprise antivirus solution, please ensure that the exclusions are set on the central controlling machine. Ensure that the hardware and software requirements are met before starting the installation process as described below. The installation will not be possible without a valid .Net installation. The SP Installer does not support multiple installations on the same server. E.g. Installing a Slave AccountServer with the Installer and then installing a StorageServer afterwards. A manual installation has to be done in these cases by running the following in a command prompt for the installation of an additional SS: StorageServer.exe –Install –Servername=serverhostname – ServiceName=SS_Service2 “–settings.AdminPass=password” “– settings.StorageVolumes=E:\data path\” –Start Installation steps To start the Attix5 Pro Storage Platform upgrade, simply run the installation file supplied by your software provider. Open file- Security warning File security is verified on certain operating systems. The Attix5 publisher can be verified during this step by clicking the Publisher link provided. Click Run to start the extraction and Installer. Chapter 3: Installation 16 SERVER EDITION V6.0 for MICROSOFT WINDOWS Storage Platform Installation Wizard 1. The installation wizard will start by searching for existing SP installations and services and will continue with a new installation after none was detected. 2. An Install location will be requested for the required file installation and the successful completion of the file transfer will be shown. 3. Click Next to continue. 4. Two options are provided that will guide you through either a Typical or Advanced Configuration path. 5. Select the Advanced Configuration option and Click Next to continue. Advanced Configuration This page will only be shown after selecting the Advanced Configuration option on the previous screen. 6. Select the Set up StorageServer option and click on Next. Folder Selection 1. Select the location in which you wish to store the user data. The default path is C:\ProgramData\Attix5 Pro\SS_Service\Data. You can select another volume drive on the same machine if required. 2. Click Next. Note: There must be enough hard drive space available on the selected drive to store all backup data. The drive can represent a Local volume/NAS Drive etc. Only local NTFS volumes will benefit from Single Instance Storage 17 Chapter 3: Installation Master Password 1. Enter a strong admin password for the SP to be used and keep it in a safe place. Note: This password has to be the same as the admin password of the master AS. 2. Click Next. Server Port Bindings 1. Select the IP binding settings for the StorageServer for both Private and Public use. For more information, see Environment in Chapter 2, “Preparation.” No changes are required by default. Note: The AccountServer section will be greyed-out seeing that this is a dedicated StorageServer installation and AS bindings are not required. You must ensure that no other software application is using the ports specified. A “0” entered specifies the use of a random available port for all Private bindings. 2. Click Next. Chapter 3: Installation 18 SERVER EDITION V6.0 for MICROSOFT WINDOWS Configuration Summary 1. All chosen options will be summarised. Verify that all configuration settings are correct, and then click the Apply button. 2. Once everything has been configured, if an automatic start-up cannot be performed, the installer will prompt you to start the StorageServer service manually. Note: The wizard will complete all the necessary settings and configuration and provide an option to install the SP Console if the Installation file was detected in the same folder ad the initial SP Installer. The Congratulations screen will display a One Time Password (OTP) that is required for Console configuration in order to complete the setup of this additional StorageServer. For more information, please refer to the Storage Platform Console manual. 19 Chapter 3: Installation Warning: The OTP string must be recorded for use in the Console and will not be displayed again after clicking on the Close button. The OTP is, however, saved in the Settings.xml file located in %appdata%\Attix5 Pro\SS_Service\. It is the first 8 characters of the <ServerGuid> entry i.e. <ServerGuid>83470821-caec-482c... 3. Click Close. The dedicated StorageServer is now installed and an SP Console connection can now be made using the AS server name, admin username and password as specified during the installation. Note: The SS server runs as a system service and does not require a user to be logged in for the services to function properly. Chapter 3: Installation 20 SERVER EDITION V6.0 for MICROSOFT WINDOWS Installing a MirrorServer (Mirror StorageServer) MirrorServers can be added to StorageServers to mirror their data and the data can be mirrored from one MirrorServer to another. Mirroring enables the automatic creation of a StorageServer on another server, usually on a server that is not in the same physical location. The MirrorServer must be installed and configured in exactly the same way as a normal StorageServer. For more information, see “Additional or Multiple StorageServers” above. 21 Chapter 3: Installation Slave AccountServer installation An additional AccountServer can be installed to act as a slave to the master AccountServer. The AccountServer slave periodically retrieves the AccountServer and ReportServer database information and populates a copy of these. A Backup Client will always try to connect to the master AccountServer, but in the event that the master is not available, it will connect to the slave for authentication. Note: The Slave AccountServer option must be enabled on the LicenceServer using the same Activation Key used for the Master AccountServer. The Slave AccountServer address will only be sent to Backup Accounts with the next backup or when settings are retrieved from the Client. A Slave AS is read-only and only serves to allow backups. This section will cover the installation of a new dedicated Slave AS. Please refer to A Storage Platform Upgrade earlier in this chapter if an upgrade from a V5.1 Slave NameServer is required. Before you install Warning: Resource management: Both antivirus software scans and backup processes are resource-intensive. It is advised not to run a major Attix5 task and antivirus scan at the same time as this will significantly decrease general performance. Exclude all the Attix5 subfolders from the list of folders to be scanned for viruses. If using an enterprise antivirus solution, please ensure that the exclusions are set on the central controlling machine. Ensure that the hardware and software requirements are met before beginning the installation process. The installation will not be possible without valid .Net and SQL installation. A valid Product Activation Key that has been assigned to the Master AS with a Slave AS enabled is also required. Chapter 3: Installation 22 SERVER EDITION V6.0 for MICROSOFT WINDOWS Installation steps To start the Attix5 Pro Slave AccountServer installation, simply run the installation file supplied by your software provider. Open File - Security Warning File security is verified on certain operating systems. The Attix5 publisher can be verified during this step by clicking on the Publisher link provided. Click Run to start the extraction and Installer. Storage Platform Installation Wizard 1. The installation wizard will start by searching for existing SP installations and services and will continue with a new installation after none was detected. 2. An Install location will be requested for the required file installation and the successful completion of the file transfer will be shown. 3. Click Next to continue. 4. Two options are provided that will guide the installer through either a Typical or Advanced Configuration path. Select the Advanced Configuration option and Click Next to continue. 5. 23 Select the Set up a Slave AccountServer option, and then click Next. Chapter 3: Installation Product Activation 1. Product activation can only be done by providing a valid V6 Product key that has been enabled for a Slave AccountServer. Note: Product key checking is done and the Next button will become active once validated. The Product key is also validated on the Licence Server after clicking the Next button and feedback will be provided if it could not be verified. Proxy settings will also be used during this step. 2. The option for a Manual activation is provided should an Internet connection not be available during the installation. 3. Proxy settings can also be configured if required and all relevant configuration settings will be requested when selecting the Connect to the Licence Server through a proxy option. 4. Click Next. Database Server 1. Choose the SQL database to be used. You have the option to Use a local instance of SQL Server or Specify the connection strings manually. The latter, however, requires additional connection string information and it is advised for advanced users only. A. Use a local instance of SQL Server 1. For this option, you need to specify the database names for both the Accounts and Reports. (Defaults are recommended). 2. Click Next. B. Specify the connection strings manually This option is advised for advanced users only. The wizard will attempt to create the manually specified databases if they do not exist and you need to specify the correct connection strings for both the AccountServer and the Reports Database. Chapter 3: Installation 24 SERVER EDITION V6.0 for MICROSOFT WINDOWS Tip: You can configure the Data Link Properties by clicking the globe button on the right-hand side of each database connection string. The selected database under step 3 of the Data Link Properties will fail when being tested if it does not exist and will be created by the SP Installer afterwards. 2. Click Next. (Databases will be created after this step) Note: The number of Console connections made at the same time, i.e. at start-up of the AS or after upgrading the AS, can be defined in the AS connection string by adding the following to the end of the default string “; Max Pool Size=xxx”, where xxx defines the number of Console connections. The default is 100 and doesn’t have to be defined. It is also possible to edit the ConnectionStrings configuration file in the installation folder afterwards if required. See: http://msdn.microsoft.com/en-us/library/8xx3tyca(VS.71).aspx for more information. Database Server Instance This option will only be shown should more than one Instance be detected. All SQL database instances will be detected automatically according to the previous selection and be shown in the drop down selection provided. Make a selection and then click Next. Master Password Enter a strong admin password for the SP to be used and keep it in a safe place. Click Next. Note: This password MUST be the same as the master AS admin password. 25 Chapter 3: Installation Server Port Bindings 1. Select the IP binding settings for the Slave AccountServer for both Private and Public use. For more information, see Environment in Chapter 2, “Preparation.” No changes are required by default. Note: Ensure that no other software application is using the ports specified. A “0” entered specifies the use of a random available port for all Private bindings. 2. Click Next. Chapter 3: Installation 26 SERVER EDITION V6.0 for MICROSOFT WINDOWS Configuration Summary 1. All chosen options will be summarised. Verify that all configuration settings are correct, and then click the Apply button. 2. Once everything has been configured, the installer will prompt you to start the AccountServer service manually if required. Note: An option to install the SP Console if the Installation file was detected in the same folder as the initial SP Installer will be available. The Congratulations screen will display a One Time Password (OTP) that is required for Console configuration in order to complete the setup of this additional StorageServer. For more information, please refer to the Storage Platform Console manual. 27 Chapter 3: Installation Warning: The OTP string must be recorded for use in the Console and will not be displayed again after clicking on the Close button. The OTP is, however, saved in the Settings.xml file located in %appdata%\Attix5 Pro\SS_Service\. It is the first 8 characters of the <ServerGuid> entry i.e. <ServerGuid>83470821-caec-482c... 3. Click Close. Note: The wizard will provide sufficient warnings should special service user name changes be required at this point. An SP Console connection can now be made using the AS server name, admin username and password as specified during the installation. Note: The Slave AS runs as system service and does not require a user to be logged in for the service to function properly. Example: The following steps can be performed to verify the above Slave AS configuration: Connect directly to the Slave AccountServer using the Console and view the logs to verify that the connection between the Slave AS and the master AS has been made successfully. Perform a test backup from a Client to allow the main AccountServer to populate the second AccountServer IP address/Hostname. Block the main IP from the Client and perform a backup again. Chapter 3: Installation 28 SERVER EDITION V6.0 for MICROSOFT WINDOWS 4. Upgrading (from V5.1 to V6.0) Introduction This section will cover the upgrade and migration of an existing V5.1 Storage Platform. It also applies to dedicated StorageServer/MirrorServer upgrades. Before you upgrade It is advised to complete the SQL and .Net installation before upgrading the Attix5 Pro SP. The Installer will, however, test for these installations and direct you accordingly. Warning: Resource management: Both antivirus software scans and backup processes are resource-intensive. It is advised not to run a major Attix5 task and antivirus scan at the same time as this will significantly decrease general performance. Exclude the Attix5 Pro Data folder and any other Attix5 subfolders from the list of folders to be scanned for viruses. If using an enterprise antivirus solution, please ensure that the exclusions are set on the central controlling machine. Also exclude the Attix5 SQL database folder. Ensure that the hardware and software requirements are met before starting the upgrade process described below. Installation is not possible without a valid .Net installation. An upgrade can only be performed on a V5.1 SP and above. Ensure that all Consoles are closed before an SP upgrade to prevent conflicting settings between V5.1 and V6.0. General Platform preparation: Previous remote V5.1 FileServers to be migrated must be upgraded to V6.0 StorageServers as soon as possible after the master NS->AS upgrade. Are there any Accounts that reside on a FS that are not currently part of the V5.1 SP configuration? If so, correct this problem first and ensure that these are under the SP control. Are there any orphaned Accounts that exist in the current SP database that do not belong to a Group? The V6 installer will not migrate these Accounts and they will, in effect, be lost. Are there any SE accounts that use Plug-in versions/combinations that might prevent an Auto-update being performed after the SP upgrade? Please refer to the known list in the Release notes. (E.g. SharePoint Plug-in requires .Net installation) All FSs not upgraded with the NS must be taken off-line for upgrading in order to prevent backups being performed during the NS to AS upgrade. Ensure that all Group settings are correct before migration, keeping the following in mind: All Clients that are disabled for SSL connections must either be enabled manually, via profiling or via the latest Client update. Failing to do so will result in these Clients not being able to connect to the V6.0 Storage Platform after the migration. All Groups intended for Client Auto-updates need to be set up correctly. 29 Chapter 4: Upgrading (from V5.1 to V6.0) Installation steps To upgrade the Attix5 Pro Storage Platform, simply run the installation file supplied by your software provider. Open file - Security warning File Security is verified on certain operating systems. The Attix5 publisher can be verified during this step by clicking the Publisher link provided. Click Run to start the extraction and Installer. Storage Platform Installation Wizard The installation wizard will start by searching for existing SP installations and services and will continue with a migration once they are detected. Install Location 1. An Install location will be requested for the required file installation and the successful completion of the file transfer will be shown. 2. Select the folder in which you wish to install the Storage Platform software. The default folder is C:\Program Files\Attix5 Pro\Storage Platform. To change it, click the Folder icon and browse to a new location. Note: This must be a different location than the previous SP installation. The migration will detect the previous installation for migration of the V5.1 configuration. Actual Backup Account data will be migrated as follows: If the V5.1 Data folder is located in the default location (i.e. a subfolder of the Storage Platform install location), then it will be moved to the new V6 default location, which is %appdata%\Attix5 Pro\. On Windows Server 2003, it will usually be moved to: C:\Document and Settings\All Users\Application Data\Attix5 Pro\. If the V5 data is stored on the same logical drive as the new default location, it will be moved. For example: on Windows Server 2008, the new default location is C:\ProgramData\Attix5Pro\SS_Service\Data. If the V5 data is anywhere on the C: drive, it will be moved to the new default folder. It is important to note that the move is instantaneous; since the top-level folder is essentially just “renamed” into the new location (i.e. the data will not be moved file-by-file). Data will never be moved from one volume to another. The StorageServer will modify existing directory structures after start up (i.e. GROUP_ACCOUNT 5c7ba40a-ca4d-4807-ad6f-5b4e40779e37). Chapter 4: Upgrading (from V5.1 to V6.0) 30 SERVER EDITION V6.0 for MICROSOFT WINDOWS Note continued... As soon as the Backup Client logs into the AS (whether for a backup or not), its encryption key is captured and sent to the SS to start the process of moving files around (without changing any contents). If the Client connects to the SS for a backup, the SS will keep the Client waiting until the file restructuring is complete, and then continue with the backup. SE Clients will be able to send files during the “Compressing and patching” part of the backup process (if configured) while the SS is restructuring the Account folder. Restores will not be possible until the restructuring is complete. 3. Click Install. 4. The installation will confirm the transfer of SP files required for configuration, initiate a scan for previous installations and provide an option for migration being selected by default. Note: Should migration not be an option the remaining steps will be seen as a normal new installation without any of the previous V5.1 configuration or data to be migrated. Future upgrading of the V5.1 installation will not be possible until the V6.0 installation has been uninstalled first. 5. Click Next, should the migration of the V5.1 configuration and data be required and to start the Migration and Configuration process. 31 Chapter 4: Upgrading (from V5.1 to V6.0) Migratable services and upgradability check All services detected for migration will be listed and will be selected by default should they be active at this point in time. Note: Only active V5.1 service(s) on the local installation will be detected and if selected be migrated. Multiple StorageServers on the same server installation is not supported for new V6.0 installations and will only be catered for as part of the V5.1 to V6.0 migration. 1. Select the desired services that must be migrated and click Next to continue. An upgradability check will be performed of previous databases with “Everything looks OK” as confirmation. The following scenarios can be detected by this check and will be reported accordingly: Are there any Accounts that reside on a FS that are not currently part of the V5.1 SP configuration? If so, correct this problem first and ensure that these are under the SP control. Are there any orphaned Accounts that exist in the current SP database that do not belong to a Group? The V6 Installer will not import these Accounts and they will, in effect, be lost. 2. Click Next to continue with the migration. Product Activation 1. Product activation can only be done by providing a valid V6 Product key. 2. The option for a Manual activation is provided should an Internet connection not be available during the installation. 3. Proxy settings can also be configured if required and all relevant configuration settings will be requested when selecting the Connect to the Licence Server through a proxy option. Note: Product key checking is done and the Next button will become active once validated. The Product key is also validated on the Licence Server after clicking the Next button and feedback will be provided if it could not be verified. Proxy settings will also be used during this step. 4. Click Next. Database Server 1. Choose the SQL database to be used. You have the option to Use a local instance of SQL Server or Specify the connection strings manually. The latter, however, requires additional connection string information and it is advised for advanced users only. Chapter 4: Upgrading (from V5.1 to V6.0) 32 SERVER EDITION V6.0 for MICROSOFT WINDOWS A. Use a local instance of SQL Server 1. For this option, you need to specify the database names for both the Accounts and Reports. (Defaults are recommended). 2. Click Next. B. Specify the connection strings manually This option is advised for advanced users only. The wizard will attempt to create the manually specified databases if they do not exist and you need to specify the correct connection strings for both the AccountServer and the Reports Database. Tip: You can configure the Data Link Properties by clicking the button on the right-hand side of each database connection string. The selected database under step 3 of the Data Link Properties will fail when being tested if it does not exist and will be created by the SP Installer afterwards. 3. Click Next. (Databases will be created after this step.) Note: The number of Console connections made at the same time, i.e. at start-up of the AS or after upgrading the AS, can be defined in the AS connection string by adding the following to the end of the default string “; Max Pool Size=xxx”, where xxx defines the number of Console connections. The default is 100 and doesn’t have to be defined. It is also possible to edit the ConnectionStrings configuration file in the installation folder afterwards if required. See: http://msdn.microsoft.com/en-us/library/8xx3tyca(VS.71).aspx for more information. Database Server Instance This option will only be shown should more than one Instance be detected. All SQL database instances will be detected automatically according to the previous selection and be shown in the drop down selection provided. Make a selection and click Next. 33 Chapter 4: Upgrading (from V5.1 to V6.0) Master Password 1. Enter a strong admin password for the SP to be used and keep it in a safe place. 2. Click Next. Note: This password does not have any relation to the previous V5.1 installation but will however be migrated and be shown (masked). It can be changed at this point but MUST be the same for all components (AS, SS and Slave AS) on the same Storage Platform installation (including remote dedicated servers). It is strongly advised not to use this built in Administrator account for Console access and to rather create separate users with Admin rights for this purpose. Server Port Bindings This page will only be shown if the Advanced Installation was chosen. For more information, see Environment in Chapter 2, “Preparation.” 1. Select the IP binding settings for the AccountServer and StorageServer for both Private and Public use. No changes are required by default. Note: Ensure that no other software application is using the ports specified. A “0” entered specifies the use of a random available port for all Private bindings. 2. Click Next. Chapter 4: Upgrading (from V5.1 to V6.0) 34 SERVER EDITION V6.0 for MICROSOFT WINDOWS Migration Summary All chosen options will be summarised. 1. Verify the configuration settings, and then click the Apply button. 2. Once everything has been configured, the installer will prompt you to start the AccountServer and StorageServer manually should it be required. Note: The Migration Wizard will complete all the necessary settings and configuration and will provide an option to install the SP Console if the Installation file was detected in the same folder ad the initial SP Installer. 3. Click Close. Warning: The wizard will provide sufficient warnings should special service user name changes be required at this point. 35 Chapter 4: Upgrading (from V5.1 to V6.0) The services should look like this after a successful migration of a NameServer to AccountServer and two Local FileServers to two StorageServers: The AccountServer and StorageServers are now upgraded and a SP Console connection can now be made using the AS server name, admin username and password as specified during the installation. Note: The two servers run as system services and do not require a physical user to be logged in for the services to function properly. All local StorageServer installations will be migrated as selected. Chapter 4: Upgrading (from V5.1 to V6.0) 36 SERVER EDITION V6.0 for MICROSOFT WINDOWS 5. Upgrading from V6.0 to the latest V6.0 Introduction This section will cover the upgrade of an existing V6.0 Storage Platform. It also applies to dedicated StorageServer, MirrorServer and Slave AccountServer upgrades. Before you upgrade Ensure that the hardware and software requirements are met before starting the upgrade process described below. Ensure that all Consoles are closed before an SP upgrade to prevent conflicting settings. The upgrade must be performed on each AccountServer, Slave AccountServer and StorageServers separately, beginning with the AccountServer. Installation steps To upgrade the Attix5 Pro Storage Platform, simply run the installation file supplied by your software provider. Open file - Security warning File Security is verified on certain operating systems. The Attix5 publisher can be verified during this step by clicking the Publisher link provided. Click Run to start the extraction and Installer. Storage Platform Installation Wizard The installation wizard will start by searching for existing SP installations and services and will continue with the upgraded once they are detected. 37 Chapter 5: Upgrading (from V6.0 to the latest V6.0) 1. Verify that the correct versions are displayed by the wizard and click the Upgrade button. 2. The wizard will detect the current services/applications that are open and requires confirmation to have them Automatically closed in order to continue with the upgrade. Select the “Automatically close applications” option and click the OK button. Chapter 5: Upgrading (from V6.0 to the latest V6.0) 38 SERVER EDITION V6.0 for MICROSOFT WINDOWS 3. The wizard will complete the upgrade and confirm when it is done. Click the Close button. The locally installed services/applications are now upgraded and a SP Console connection can now be made to verify the upgrade version numbers. 39 Chapter 5: Upgrading (from V6.0 to the latest V6.0)