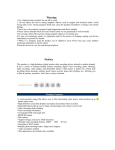
1
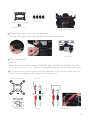
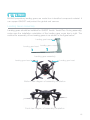
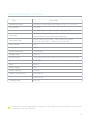
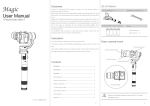
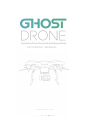
C R E A T E D
B Y
E H A N G ,
ADVANCED MANUAL
w w w. e h a n g . c o m
I N C.
CONTENTS
Cautions
01
Reading Tips
02
Symbol Designation
Usage Suggestions
Watching Tutorial Videos
About Flight
03-04
Flight Environment
Flight Safety
Pre-flight Examination
Cautions during Flight
About GHOST
05
Introduction
Parts List
Preparations
06-19
Battery
Gimbal
G-BOX
Landing Gear
GHOST
Camera
Propeller
GHOST App
Prop Guard
GHOST App
20-28
GHOST App Instructions
After-sales Services
29
Flight Restrictions
Please refer to relevant regulations of the International Civil Aviation Organization,
local airspace control and UAV management rules. Otherwise it may incur liabilities
for violation of laws or regulations. Once this product is used, it will be assumed that
the user has knowledge and accepted all the contents of this statement. User will
be held accountable for their actions or any direct or indirect consequences caused
by incompliance with the aviation restrictions of this manual.
Black Box
Each GHOST drone is equipped with a black box which records flight information
and working parameters of the motor, which are used for flying tests and accidence
analysis.
Operation
Please operate the GHOST carefully. This product contains sensitive electronic
components, which might be damaged if GHOST is dropt, broken or exposed in
water.
Modification/Combination
If you need to modify GHOST or mount other devices on GHOST, please consult
our customer service in advance. EHANG is not accountable for damages or loss
caused by unsupervised modification or mounting on GHOST.
Maintenance
Please do not disassemble or repair GHOST on your own, which may cause product damages or personal injuries. If GHOST is damaged, malfunctioned or exposed
to liquid, please contact EHANG or authorized distributors.
Battery
Please do not disassemble, squeeze, strike, burn, drop or step on the battery. Do
not short circuit or touch the battery interface with metallic objects. Do not expose
the battery in the environment with a temperature higher than 60º C. Please charge
the battery with our original charger. Please store the battery in a dry environment
out of children’s reach.
Storage Environment
If GHOST and its parts are to be left idle for a while, please take out the battery and
store it in a dry environment free from dampness, molds, and exposure to sun and
electromagnetic interference (EMI).
01
READING TIPS
Symbol Designation
Prohibited Operations
Cautions
Operation Instructions
Usage Suggestions
EHANG provides the GHOST users with tutorial videos and manuals to ensure you
can experience a more joyful flight.
1.Tutorial Videos
Website: www.ehang.com
2.Disclaimer
Website: www.ehang.com
3.Quick-start Manual---help users to have a quick start
4.GHOST User Manual---provides detailed instructions for use
Watching Tutorial Videos
Official GHOST tutorial video:
Please watch the tutorial video on www.ehang.com to intuitively learn how to use
the GHOST correctly and safely.
Video Collections of GHOST
Assembly
Video of GHOST Aerial
Assembly
02
ABOUT FLIGHT
Flight Environment
GHOST might encounter errors due to interferences in the environment with
dense or high buildings. Please fly GHOST in open area to reduce drift error.
Please fly GHOST away from obstacles, crowds, high-tension lines, trees, water
surface, etc.
Please do not fly GHOST in the restricted airspace by relevant laws or regulations.
Please fly GHOST away from places with complex electromagnetic environment.
Please fly GHOST over 200m away from signal towers, base stations, etc. where
interference exists to avoid takeoff failure or crash caused by strong EMI.
Please do not fly GHOST under high temperature or in extreme weather including
heavy rain, snow or strong wind (stronger than Class 5) and heavy fog.
Pre-flight Examination
Check whether the G-box and battery have sufficient power.
Whether propellers are correctly installed and secured.
Whether motors can be normally started up after being unlocked.
Flight Safety
Make sure that there is a minimum of 5m distance between you and GHOST.
Please stay away from dangerous obstacles such as barriers, crowds, and
high-tension lines.
During the flight, keep GHOST within your sight to avoid accidents caused by
oversight of the surroundings.
Landing gears and prop guards can not be installed in GHOST at the same time.
Children must be accompanied by experienced flyers when operating GHOST.
03
Caution During Flight
User is recommended to hold the G-BOX in hands or put it in the pocket. Otherwise it will lose communication beyond the limited distance.
Smartphone
G-BOX
G-BOX
Pocket
Height control is only accessible in hovering status. During flight, the height
control bar is hidden on the right side of the APP interface.
It is normal for the battery level to rise again after landing. It is not advisable to
launch your GHOST when battery level is less than 30%. It is best to fly GHOST
with a fully charged battery.
Please tap “HOVER” immediately in times of emergency. If GHOST fails to hover,
please ensure your own safety before attending to GHOST. Do not be afraid to
damage GHOST.
04
ABOUT GHOST
Introduction
GHOST is the first quadcopter completely controlled by a smartphone App in
China. With an advanced flight control system and a smart mobile device, GHOST
App can realize the functions including point-to-point flying, out-of-sight flying,
auto-follow mode and tilt mode. Simple operations on a smartphone enable everyone can fly a drone to experience the joy of flight.
Part List
GHOST Basic
1
3
GHOST
Battery
2
4
G-BOX (G-BOX cable)
Battery charger (Battery Cable*2)
GHOST Aerial Plus:
1
4
7
GHOST 2 G-BOX (G-BOX cable)
Battery charger (Battery Cable*2)
8 Screwdriver
Landing gears
3
5
9
Battery
Gimbal
8 screws
6
Camera (including 16G SD card)
GHOST Aerial:
Compared to GHOST Aerial Plus, GHOST Aerial is without the
6
camera
Note: 5- - 9 are components of GHOST Aerial Plus
1
2
3
4
5
6
7
8
9
05
PREPARATIONS
To use GHOST Aerial Plus, users need to install the landing gears, gimbal and
camera and dissemble the prop guards. We recommend that GHOST Aerial
Plus users practice flying GHOST Basic without camera first. And then assemble and operate GHOST Aerial Plus after you can skillfully operate GHOST.
Battery
Before using GHOST, please ensure that the battery and G-BOX have sufficient power.
Battery Introduction
GHOST’s battery is a 5400mAh/11.1V lithium polymer battery with XT60 connector
and charge-discharge function. It must be charged with an EHANG proprietary
charger.
Battery
Charger
Battery Charging
2S
4S
1S
3S
4S
LiPo
2S
3S
1A 2A 3A
Make sure the wiring of the battery is correct.
Battery Charging Schematic Diagram
Side view of battery charger
Insert the charger into the 3S interface.
1S
LiPo
2S
3S
4S
1A 2A 3A
Battery charging normally
Schematic diagram of control
panel of battery charger
When battery is being normally charged, 1S, 2S and
3S indicator lights are on and 4S indicator light is off.
Battery Type: LiPo
Charge status: indicating that the battery is being
charged;
indicating that the battery is fully charged.
1A 2A 3A: charge current value.
(a bigger value indicates a faster charging speed. You can
select a charge current value)
06
Battery Installation
Place GHOST on the horizontal ground and connect the battery wire. When flickering frequency decreases (approximately 5s), push the battery into the battery compartment in the correct direction. Close the compartment door and make sure that the
battery is tightly retained in the battery compartment (please perform these operations in an
open area).
If the battery is not tightly retained, this will lead to poor contact or failure to acquire
battery information which will affect flight safety and even lead to takeoff failure.
Caution for Use
You must charge the battery with the EHANG proprietary charger.
You must make sure that the battery is free from damage, deformation, bulging,
etc.
Used battery should be cooled down to room temperature before charging again.
It is strictly prohibited to charge the battery on a combustible object or without
attending.
Please do not store or charge the battery in the sunlight.
Do not charge the battery for more than 3 hours.
Improper use of the battery may lead to fire, explode or other dangers.
It is strictly prohibited to disassemble or modify the battery circuit or penetrate the
battery.
The voltage must be maintained between 11.4V and 11.6V (voltage of a single battery
cell should be maintained between 3.8V and 3.85V).
You must keep the battery far away from children, water sources and fire sources.
07
G-BOX
G-BOX Introduction
G-BOX is a communication device to transmit signals to GHOST. Each GHOST is
equipped with a G-BOX. Please store it properly because you will be unable to operate GHOST through your smartphone without G-BOX.
Charge cable
Communication
ON/OFF
G-BOX
USB charging cable
Charge
indicator
Power
indicatorinterface
Charging and Use of G-BOX
Power-on: press the ON/OFF button.
Power-off: press and hold the ON/OFF button until PWR indicator turns off.
Charging: four indicators flicker in order.
Fully Charged: the indicator at the far left flickers and three indicators on the right
are constantly on.
After G-BOX is fully charged, turn on smartphone Bluetooth to connect the smartphone APP with G-BOX.
App
GHOST
G-BOX
08
GHOST
GHOST Introduction
The GHOST quadcopter has a built-in flight controller which enables users to directly and easily control through the smartphone App to execute the commands of
forward/backward, leftward/rightward, ascend/descend, rotate and point-to-point
flying, and make GHOST fly stably.
Description of LED Indicators
There are two colors of LED indicators: red ones indicate forward and blue ones
indicate backward.
Blue LED indicators flickering:
GHOST is searching for GPS satellites.
Blue LED indicators solid on:
more than 6 satellites are found and GHOST can be unlocked and takeoff.
Red LED indicator flickering:
1. Before takeoff: initial status 2. During flight: battery level is low
Red LED indicator solid on:
1. GHOST is unlocked;
2. During flight.;
Red LED indicator
Blue LED indicator
09
Propellers
Scan to watch the tutorial
video for propellers installation.
Propellers Introduction
GHOST is equipped with 8-inch three-blade reversible
propellers. Propellers are consumable parts. You can
visit EHANG’s official website to buy propellers if
needed.
Propellers Installation
1
Prepare GHOST parts
Prepare all the parts and tools.
(Note: grey part indicates the backsides of GHOST and parts)
GHOST drone
2
Right propeller*2
Left propeller*2
cushion*4
Nut*4
Screwdriver
Identify the front and back ends of propellers
R indicates right propeller. L indicates left propeller.
The character can be found on the propeller’s rim on the front end.
No character on the back of the propellers.
Left
Right
L
Back
front
R
Back
front
10
3
Assemble Propellers
Pick the cushion in the red circle and fit it in the small holes on the backside of
propellers respectively.
------------Before
4
After
Install Propellers
Put GHOST upside down. The propeller should be placed on the motor with
propeller’s front ends (with character) facing downwards. L propeller should be
installed to the R motor. R propeller should be installed to the L motor. Fasten the
nuts at the back.
Upside down
Before
-------------
-------------
Note: during installation, please press the propeller with your left hand, tighten the nut with
your right hand, and fasten the nut with a screwdriver (follow similar technics to dissemble
propellers)
After
Completion
Caution for Propellers
Before each flight, check whether propellers are installed correctly and securely.
Before each flight, please check whether each propeller is in good condition.
Replace any damaged and aged propeller timely.
Please do not approach the spinning propellers to avoid personal hurt.
Please use EHANG proprietary three-blade reversible propellers to ensure optimal
flight effect.
11
Prop guards
GHOST prop guards are made from intensified compound material. They are lighter
and more appropriate for flight and also can protect blades from damages caused
by external collision.
Assembly and Disassembly of Prop guards
Assembly: place the prop guards to the fixed position of GHOST and fasten three
2.0 screws with the screwdriver.
Disassembly: screw off the three 2.0 screws fixed the prop guards with the screwdriver and remove the prop guards.
Assembly Completion Diagram
Gimbal
GHOST proprietary gimbal is made from aluminum alloy material and used for carrying the Camera.
Technical Parameters of Gimbal
Weight: 178g
Accuracy: ±0.09°
Operating voltage: 7V to 17V
Balancing and stabilization angle: roll angle±45°
Angle of pitch -90°to +30°
Supported types of Camera: EHANG Camera,
Gopro3, Gopro3+ and Gopro4
Scan to watch the tutorial
video for installation of gimbal
and landing gear
12
Note: While you attach Gopro 4 on the GHOST gimbal, please affix this iron clump on the
gimbal to avoid shaking.
How to use the iron clump:
Pull off the adhesive paper on the iron clump. Affix the iron clump on the gimbal's electrode.
(as shown in illustration)
Iron Clump
Gimbal Installation
1
Camera Assembly
Fix the Camera ring to the Camera with the long 1.5 screws. Then connect the
Camera with the lower base of the gimbal with the short 1.5 screws.
(Note: installed parts need to be tightened with the screwdriver.)
Gimbal
Lower base of gimbal
Camera
Completion
Camera guard
2
Long 1.5 screws
1.5 screws
Install the upper base of Gimbal
Fix the Camera guard to the Camera by using the long 1.5 screws. Then connect
the Camera with the lower base of the gimbal by using the short 1.5 screws.
(Note: installed parts need to be reinforced by using the screwdriver.)
13
Upper base of gimbal
Absorber
Short 2.0 screw
3
Completion Diagram
Connect the upper and lower gimbal base
Connect the upper and lower gimbal base with 4 absorbers.
completion
4
Wiring (Important)
Method:
Open the front and rear covers of GHOST and cut off the tie binding the plug
(be careful not to cut the cable). Take the red and black plugs out from the rear cover.
You must ensure that the plug must be inserted into the correct slots with the
right colors; otherwise, the gimbal will be blown out.
GHOST bottom
GHOST
Gimbal Back
Gimbal
Completion
14
Landing Gears
EHANG proprietary landing gears are made from intensified compound material. It
can support GHOST and protect the gimbal and camera.
Landing Gears Assembly
Landing gears should be installed for GHOST Aerial / Aerial Plus. During assembly,
make sure the installation orientation of the landing gear cross bar is right. The
method for assembly of two landing gears is as shown in the figure below.
Landing gear base
Landing gear head Landing gear cross bar
Landing gear assembly
Landing gear head
Landing gear head
Rear
Bottom view diagram of assembly completion
Front view diagram of assembly completion
15
EHANG Camera
EHANG Camera not only has an ultra mini appearance but also can shoot 1080P
HD video.
Product Features
Shooting Features
The ultra-high definition display screen can display and replay wonderful videos.
The battery is detachable and this increases the ease of replacement and extends
the battery life.
Video recording while charging
Video recording with mains connected
12 million pixels HD wide-angle lens
HDMI HD output function
Up to 32G SD card
1080P/720P/WVGA
Video recording in the MOV format
Multiple shooting modes, single shot, automatic continuous shooting
Video mode locking
Ultra mini appearance
Camera schematic diagram
Indicator
OK button
ON/OFF button/
Mode button
lens
MIC
MICRO SD
USB
HDMI
Battery
cover
Attery cover
lock button
Screen
Operation Indicator
Charge Indicator
UP button
Speaker
Down button
16
Use and Operation of Camera
1
Insert the Micro SD card
Note: please use quality Micro SD card.
Format it to the exFAT32k format on your
computer before use. Ordinary neutral cards
cannot be used normally.
2
Placement and Removal of Battery
You can open the battery cover by pushing it down.
Put the battery correctly into the camera
following the plus and minus symbol and
arrow direction indicated on the battery.
You can remove the battery by pushing
the battery cover out.
3
Battery Charging
Battery can be charged by either connecting it to a computer or with a power adapter.
Battery can be charged with a car
charger.
Video recording while charging. (turn on the
Car Mode in the functional list setting)
Battery can be charged when camera is
off.
The charging current needs to be less
than 1000mA; otherwise the battery will
be damaged.
4
Power-on and Power-off of Camera
You can power on or off the camera by
pressing the ON/OFF button on the front of
the camera (press power button to turn on the
camera. Long press the power button, GOODBYE
display on the screen and camera is turned off).
5
Mode Switching (mode)
After camera is powered on, short press the
ON/OFF button to switch the camera Video
Recording/Replay/Functional modes. The
mode signs are displayed on the top of the
screen.
Video Recording,
Picture
Capture and
Video Replay modes and
Functional List setting are shown in order.
6
Setting and Use of Camera
Video Recording and Video Setting
When the camera is on the video recording mode and a symbol
is shown in the
upper left corner of the screen, press OK
to start video recording, and the • symbol
starts flickering at the upper left corner of
the screen. Then pressing OK stops video
recording and at the same time the •
symbol disappears in the upper left corner
of the screen.
Picture Capturing and Picture Capturing
Setting
Turn on the power and select the Picture
Capture mode. When a symbol is shown
at the upper left corner of the screen, the
camera enters the picture capture mode;
Press OK to take pictures. Picture taking
mode: single shot/timed self-potrait
(2s/5s/10s)/continuous shooting.
File Storage and Playing
After video recording is completed, copy
video files generated onto a computer by
using a USB drive. Also you can take the
Micro SD card out and read video data on
the card by using a card reader.
Note: when the camera operates poorly and a dead halt occurs, you can remove
the battery and re-install it and then the Camera can return to normal.
17
Technical Parameters of Camera
Item
Parameter
Operating system
Windows XP/VistaorAbove/win7/Mac os 59.27*41.13*29.28
LCD screen
1.5LTPS
Lens
170 DEG Grade A+ high-resolution wide angle lens
Language
Simplified Chinese/Traditional Chinese/English/German/French/
Spanish/Italian/Portuguese/Russian/Japanese
Recorded video
1080P (1920*1080) 30FPS、720P (1280*720) 60FPS、
VGA (848*480) 60FPS、QVGA (640*480) 60FPS
video format
MOV
video signal compression format
H.264
picture resolution
12M/8M/5M
storage card
Micro SD
picture mode
single shot/timed self-portrait (2s/5s/10s)/continuous shooting
light source frequency
50Hz/60Hz
USB
USB2.0
power supply
5VIA
Power capacity
900mAh
Power consumption
[email protected]
Video recording duration
1080P/70min
Charging time
about 3h
Parameters may be upgraded or changed. Specifications and parameters might defer
contingent upon real product.
18
GHOST App
GHOST App is a smartphone operating system specially developed for the GHOST
quadcopter. You can fly GHOST on your own through performing operations with
GHOST App without use of RC transmitter. All functions of the RC transmitter
joysticks are simplified as “one-click command”, which simplifies flight and delivers
a smoother flight experience to you.
GHOST App Download
You can download through following methods:
Note: The GHOST App supported devices and operating systems includes Android smart
phones running Android 3.0 or above, iPhone 5 smartphones running iOS 7.0 or above, and
iPad 3 running iOS 7.0 or above.
1
Visit www.ehang.com to download EHANG GHOST App;
www.ehang.com
2
Download the App by scanning the QR code;
3
Download the App from Google Play.
19
GHOST APP INSTRUCTIONS
App Interface
1
Start the App on your smartphone. Enter the welcome interface.
2
The system automatically searches for devices and automatically enables the
Bluetooth feature and connects the Bluetooth device. (you need to turn on the G-BOX).
Note: the following interfaces will appear after
the first time. Then enter 2 .
1
when you log onto the App for
20
Drone Type Settings
After successful Bluetooth pairing, the drone type settings window will automatically pop up. Please make the settings for your actual GHOST version. After clicking OK, the system will show the setting of GHOST parameters is completed and
then enter the App operation interface automatically.
If you need to reset, click the Setting button at the upper left corner to modify the
drone type settings (you must make the settings according to the actual GHOST configuration on
the premise of recommended version).
If you select a drone type with the symbol
, the system will display
“This setting is not available.” Click OK to select again.
21
INTRODUCTION TO APP SETTINGS
App Bluetooth Pairing
You can view the existing paired Bluetooth device, search for new devices, rename
and remove a device.
View Bluetooth Devices
Click the Setting button at the upper left corner to enter the Setting interface and
view the connected Bluetooth device.
Search for Bluetooth Devices
Click the Search button at the bottom right corner to search for new devices.
When a new Bluetooth device is found, directly click the corresponding device
to connect it.
Rename Bluetooth Device
Rename the Bluetooth device by clicking the Edit button
Enter the new name and then click OK.
on the right side.
22
Drone Type Settings
This feature is used for selecting the GHOST configurations
Other Settings
Binding
This feature can solve the problem of connection failure with a new G-BOX.
Method: open the APP and turn on the G-BOX (the first DATA indicator flickers in
blue) to make Bluetooth connection (you must not electrify the GHOST at
this time). After Bluetooth connection is established (the first DATA
indicator is solid on), click Setting-Other Settings- Binding. The system
shows that it is binding. Please connect the battery to electrify GHOST.
And successful binding will be shown in 2 seconds. If the system still
shows that it is binding 5s later, it is recommended to perform operations
above once again.
Map:
This feature is for selecting the type of flight map.
Click the corresponding map to switch.
About EHANG
You can view the current App version and introduction of EHANG.
23
GHOST App Interface Instruction
1
2
11
12
3
13
10
4
5
6
7
8
1
Setting, Flight Mode, Satellite Number,
Battery Level, Distance, Height,
Horizontal Speed, Flight Time
2
Gimbal
right/left tilt
3
Gimbal
up/down tilt
4
Lock/Unlock
Lock: Propellers stop
Unlock: Propellers spin at low speed.
Ready to take off
5
Takeoff
GHOST ascends to flight starting point
10m above takeoff point and hover
6
Return
GHOST returns to flight starting point
7
Land
GHOST descends to ground
8
Follow
GHOST automatically follows the user
(minimum horizontal distance required: 3m)
9
9
Hover
GHOST remains at the same spot in
the air
10 Micro-control
make slight adjustment to GHOST in
hovering status (similar to joystick)
11 Rotate
control GHOST’s directions in the air
12 Ascend/Descend
control GHOST’s height
13 White dotted line: flight path
Blue line: assigned route
Red line: distance between
takeoff point and GHOST
Yellow line: distance between
smartphone and GHOST
Note:
The map above is for indicative purpose
only. The actual map may differ.
Buttons can’t be used when in grey.
24
Unlock
Unlocked.
Ready to takeoff
Unlock
Tap “Takeoff”
to fly GHOST
Voice notice
indicates
Propellers spin
at low speed
GHOST will beep if flight command is not received in three minutes and thirty
seconds. This is a normal notice. You can tap “TAKEOFF” or unplug the battery
to extinguish this notice.
After tapping "LOCK", a prompt will pop up and confirm again if you want to lock
your GHOST. Please note that GHOST's propellers will stop spinning after
"LOCK".
Takeoff
D
A
C
B
10m
→B(destination spot)
Ascend to 10m
Takeoff point→ height and hover →A→C→
→D(updated destination spot)
(Note: the point-to-point command can be executed only when the height is 10m or higher.)
Only if satellite number is >6, GHOST can take off normally. Only if user’s smartphone connects to Internet, the APP interface will display the positions of user
and GHOST on the GPS map.
As the picture shows: A is GHOST’s spot. Click any destination (B) on the map to
direct GHOST. If the destination is updated in midway, GHOST will fly from current
spot C to the updated destination D.
Hover
Hover: GHOST remains the current spot in the air.
TAPPing Hover in any status will terminate the previous command
and keep GHOST hovering.
Estimate the height of barriers to avoid collision.
25
Auto Follow
B
A
A-to-B distance is the horizontally projected distance
Please fly GHOST in an open area (GHOST does not have the obstacle avoiding function).
While climbing, please adjust GHOST’s height accordingly (GHOST cannot automatically adjust its height).
Available only in HOVERING status (the premise is that GPS on smartphone is activated).
At minimum 3m horizontally projected distance from the smartphone holder (with
the G-BOX), GHOST begins to follow the user automatically. The farther apart
GHOST is from the user, the faster GHOST flies (maximum speed: 18km/h).
To stop, user should lower his/her pace gradually. (Do not stop immediately, or GHOST
will fly over the user due to high speed.)
To terminate auto following, tap any available button on interface.
It is recommended that the GHOST height should be higher than the user’s.
Return
①Height >15m, GHOST
directly returns.
15m
-------------------------------------------------------------10m
②Height≤15m, GHOST
ascends to 15m and returns.
Note:
Two situations of return: ① GHOST’s height is over 15m above takeoff point ② GHOST’s
height is less than 15m above takeoff point.
In either situation, GHOST adjusts its height to 15m automatically and descends to 10m’s
height and hovers.
Heights in the figure are all calculated based on the horizontal plane of the takeoff point as
reference.
The flight path is a straight line. Please ensure that no obstacle in the flight path.
26
Ascend/Descend/Rotate
Pull leftward
Pull rightward
Rotate
Ascend/Descend
GHOST rotates
counterclockwise
GHOST rotates
clockwise
Pull upward
GHOST ascends
Pull downward
GHOST descends
Note: During flight, the height control bar is hidden on right side of the APP
interface. Height control is only accessible in hovering status.
Gimbal Operations
Pull leftward
Gimbal tilts left
Pull rightward
Gimbal tilts right
Pull upward
Gimbal tilts upward
Pull downward
Gimbal tilts downward
Land
GHOST automatically lands
On the ground slowly.
GHOST locks automatically
five seconds after landing.
Micro-control
Micro-control is available only after you tap the
Hover button.
Micro-control is available only after you tap the
Hover button.
Micro-control enables GHOST to move
horizontally on the current horizontal plane of
the current height.
Red lights marks the forward, blue lights mark
the backward.
Micro-control enables accurate landing.
Scan to watch the
video of microcontrol operation
MICR
27
AFTER-SALES SERVICES
After-sales Services
All GHOST products are supported with after-sales services. If you encounter any
problems, please e-mail: [email protected]. To learn more about software
update, campaigns, product development and after-sales services, please visit
our official website www.ehang.com.
28
EHANG,INC.
WEBSITE : www.ehang.com
FACEBOOK : theghostdrone
TWITTER : @GhostDrone
INSTAGRAM : #GhostDrone