1
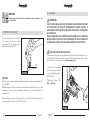
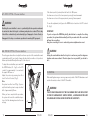
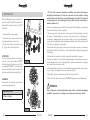
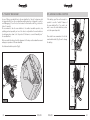
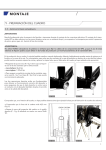
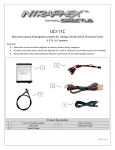
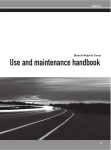
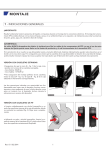
REAR DERAILLEUR
WARNING!
Carefully read, follow and understand the instructions given in this manual. It is
an essential part of the product, and you should keep it in a safe place for future
reference.
MECHANIC QUALIFICATION - Please be advised that many bicycle service and repair
tasks require specialized knowledge, tools and experience. General mechanical aptitude may not be sufficient to properly service or repair your bicycle. If you have any
doubt whatsoever regarding your service/repair ability, please take your bicycle to a
qualified repair shop.
INTENDED USE - This Campagnolo® product is designed and manufactured for use
only on road racing style bicycles that are ridden only on smooth road or track surfaces.
Any other use of this product, such as off-road or on trails is forbidden.
"AN ACCIDENT" - Please note that throughout this manual, reference is made that
"an accident" could occur. Any accident could result in damage to your bicycle, its
components and, more importantly, could cause you or a bystander to sustain severe
personal injury or even death.
LIFESPAN - WEAR - INSPECTION REQUIREMENT - The lifespan of Campagnolo®
components depends on many factors, such as rider size and riding conditions.
Impacts, falls, improper use or harsh use in general may compromise the structural
integrity of the components and significantly reduce their lifespan. Some components
are also subject to wear over time. Please have your bicycle and its components regularly inspected by a qualified mechanic for any cracks, deformation, signs of fatigue
or wear. Disassembly your bicycle components and especially the pedals, is required
during these inspections. If the inspection reveals any deformation, cracks, impact
marks or stress marks, no matter how slight, immediately replace the component;
components that have experienced excessive wear also need immediate replacement.
The frequency of inspection depends on many factors; check with your authorized
representative of Campagnolo S.r.l. to select a schedule that is best for you. If you
weigh 82 kg/180 lbs or more, you must be especially vigilant and have your bicycle
inspected more frequently (than someone weighting less than 82 kg/180 lbs) for any
evidence of cracks, deformation, or other signs of fatigue or stress. Check with your
mechanic to discuss whether the components you selected are suitable for your use,
and to determine the frequency of inspections.
14
ENGLISH
Important PERFORMANCE, SAFETY and WARRANTY Notice - Dear
customer, please remember that to maximise the performance of your
EPS drivetrain and to prevent jeopardising its safety, performance, longlife and functionality, it is absolutely necessary to use the 6 components of
EPS drivetrain with components of the Campagnolo 11 speed mechanical
drivetrain; it is not possible to use EPS components that are not manufactured by Campagnolo.
Note: Tools supplied by other manufacturers for components similar to Campagnolo®
components may not be compatible with Campagnolo® components. Likewise, tools
supplied by Campagnolo S.r.l. may not be compatible with components supplied by
other manufacturers. Always check with your mechanic or the tool manufacturer to
insure compatibility before using tools supplied by one manufacturer on components
supplied by another.
The user of this Campagnolo® product expressly recognizes that there are risks inherent
in bicycle riding, including but not limited to the risk that a component of the bicycle
can fail, resulting in an accident, personal injury or death. By his purchase and use of
this Campagnolo® product, the user expressly, voluntarily and knowingly accepts and/
or assumes these risks and agrees to hold Campagnolo S.r.l. harmless against any
resulting damages.
If you ever have any questions, please contact your mechanic or your nearest
Campagnolo® dealer for additional information.
ENGLISH
15
2 - ASSEMBLY
WARNING!
Always wear protective gloves and glasses while working on the
rear derailleur.
WARNING!
THE EPS REAR DERAILLEUR MUST BE MOUNTED AND CONNECTED ONLY
AND EXCLUSIVELY BY ONE OF CAMPAGNOLO'S SERVICE CENTERS, A
CAMPAGNOLO PRO-SHOP OR A MECHANIC SPECIALISED IN MOUNTING
EPS GROUPSETS.
PLEASE REMEMBER THAT TAMPERING OR INCORRECT OR INCOMPLETE
INSTALLATION OF EVEN JUST ONE COMPONENT OF THE EPS GROUPSET
AUTOMATICALLY RESULTS IN THE INVALIDATION OF ANY WARRANTY.
1 - PREPARING THE FRAME
Clear the threading of the rear derailleur connection fitting on the right
rear dropout (B - Fig. 1) using a tool
tap with threading 10x26 TPI.
NOTE FOR SPECIALISED MECHANICS!
Please remember that all assembly, disassembly, adjustment and maintenance procedures for the EPS drivetrain are described in the EPS technical manual, which is available in PDF format on our internet site www.campagnolo.com.
B
10x26 TPI
• Secure the rear derailleur
to the frame using screw (A
- Fig. 2), and tighten with a
TORX T-25 key.
1
CAUTION
Check and, if necessary, realign the rear derailleur dropout only be using Campagnolo®
tool UT-VS030.
NEVER straighten the dropout with therear derailleur assembled because you could
damage the dropout and cause irreparable damage or loss in functionality to your
rear derailleur.
Tightening torque: 15
Nm - 133 in.lbs
When installing/removing or servicing components, switch off the EPS drivetrain as indicated in the instruction sheet of the EPS Power Unit.
2
16
ENGLISH
ENGLISH
17
If the chain is perfectly centred, from the 2nd to the 10th pinion:
the chain moves closer to the lower pinion by moving 3 times downwards
the chain moves closer to the upper pinion by moving 3 times upwards
2.1 - ZERO SETTING of the rear derailleur
WARNING!
Resetting the rear derailleur to zero is a particularly delicate operation and must
be carried out when the bicycle is stationary and placed on a stand. This is why
it should be conducted only and exclusively by a Campagnolo Service Center, a
Campagnolo Pro-shop or a mechanic specialised in mounting EPS groupsets.
IMPORTANT!
If you do not press the MODE key briefly, which allows to complete the setting
procedure, the system will automatically exit the procedure after 48 seconds and
will save the new setting.
Every time a resetting to zero is conducted, previous adjustments are reset.
WARNING!
2.2 - RIDING SETTING of the rear derailleur
The setting procedure allows to adjust the reference position of the rear derailleur and
is particularly useful if you intend to change the wheel with one with a set of sprockets
that are positioned differently with respect to the drop-out.
To adjust the rear derailleur, press and hold
the MODE button (D - Fig.3) on the EPS
controls for approximately 6 seconds until
the purple LED turns on.
Adjust the position by pressing lever B or
lever C on the left control (Fig. 3).
Setting the rear derailleur when the bicycle is in motion may result in dangerous
situations and cause accidents. Therefore please be very careful if you decide to
do it.
3 - REMOVAL
When installing/removing or servicing components, switch off the EPS drivetrain as indicated in the instruction sheet of the EPS Power Unit.
Note
Every time lever B or lever C (Fig. 3) is pressed, this allows the system to carry out a fixed
shift of approximately 0.2 mm.
When you have completed the procedure,
the system will correct the established positions of all the chainrings based on the new
settings.
To save the adjustment, briefly press the MODE button located on the EPS controls
(D - Fig.3).
WARNING!
C D
A
THE EPS REAR DERAILLEUR MUST BE DISASSEMBLED ONLY AND EXCLUSIVELY
BY ONE OF CAMPAGNOLO'S SERVICE CENTERS, A CAMPAGNOLO PRO-SHOP
OR A MECHANIC SPECIALISED IN MOUNTING EPS GROUPSETS.
B
3
18
ENGLISH
ENGLISH
19
• The life of the components depends on conditions of use and on the frequency
and quality of maintenance. To keep the components in good condition, cleaning
and lubrication must therefore be repeated frequently, especially if it is subjected
to heavy-duty use (i.e. after washing your bicycle, after every ride in wet, dusty or
muddy conditions etc.).
4 - MAINTENANCE
When installing/removing or servicing components, switch off the EPS drivetrain as indicated in the instruction sheet of the EPS
Power Unit.
• Dirt seriously damage bicycles and their components. Thoroughly rinse, clean and dry
your bike after using it in these conditions.
• Never spray your bicycle with water under pressure. Pressurized water, even from
the nozzle of a small garden hose, can pass seals and enter into your Campagnolo®
components, damaging them beyond repair. Wash your bicycle and Campagnolo®
components by wiping them down with water and neutral soap. Dry them using a soft
cloth. Never use abrasive or metal pads.
• Lubricate all the joints regularly.
• If the rollers do not rotate smoothly, clean
throughly and replace if necessary.
• To remove the rollers, unscrew the screws
(E - Fig. 4) with a 3 mm Allen screw.
ATTENTION!
The two rollers are different: on the upper
section, fit the roller marked “UPPER”
(with side play); in the lower section, fit the
roller marked “LOWER”: it is unidirectional
and must be fitted so that it rotates in the
direction indicated by the arrows (Fig. 5).
• Before lubricating, thoroughly clean the drive system (chain, sprocket set, chainrings
and derailleur pulleys) with a brush or cloth saturated with an appropriate degreaser
or detergent.
• Relubricate the components carefully using a lubricant suitable to purpose.
E
• Using poor-quality or incorrect lubricant may damage the chain and cause excessive
wear or damage to the system. A damaged drive system can malfunction, resulting in
an accident, personal injury or death.
4
• After applying the lubricant move the cranks and engage all possible gear combinations in order to thoroughly lubricate the entire drive system.
• Thoroughly clean any residual lubricant from the bicycle and floor.
• At the end of the lubrication operation, CAREFULLY degrease rims and brake pads.
WARNING!
Comply with the following specifications
when replacing the pulleys:
WARNING!
Traces of lubricant on the rims and brake pads can reduce or eliminate the braking
capabilities of your bicycle, resulting in an accident, personal injury or death.
Tightening torque
2,7 Nm - 24 in.lbs
5
20
ENGLISH
ENGLISH
21
5 - "UNHOOK" MECHANISM
5.1 - «RIDE BACK HOME» FUNCTION
In case of falling or accidental blows to the rear derailleur, the "unhook" mechanism could
be triggered which frees the rear derailleur parallelogram from its diagonal (in order to
avoid damaging it). You will notice this because the rear derailleur will not go below the
2nd or 1st sprocket.
We recommend to take the rear derailleur to the smallest reachable sprocket, stop
pedalling and act repeatedly on lever 2. In order to verify whether the rear derailleur is
hooked again, drop down to the 1st sprocket: If this has not occurred "manually force"
the rear derailleur.
If the battery goes flat «on the road», it is
possible to use the "unhook" feature of
the rear derailleur (Fig. 7) in order to be
able to move the rear derailleur position
onto the required sprocket.
After successful rehooking, check the alignment of the drop-out/rear derailleur mount
and proper operation of the rear derailleur.
Once back home remember to hook the
rear derailleur back (Fig. 8) and to charge
the battery.
Hooked rear derailleur position (Fig.6).
7
6
8
22
ENGLISH
ENGLISH
23