1
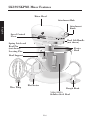
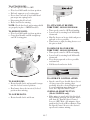
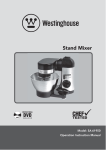
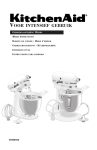
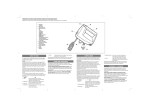
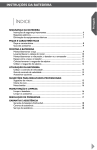
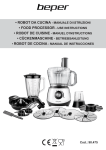
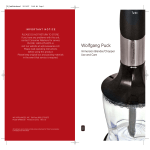
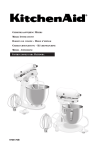
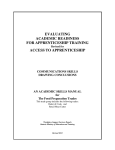
®
HEAVY DUTY
GEBRUIKSAANWIJZING MIXERS
MIXER INSTRUCTIONS
ROBOTS
DE CUISINE
: MODE D’EMPLOI
GEBRAUCHSANLEITUNG - KÜCHENMASCHINE
ISTRUZIONI D’USO
INSTRUCCIONES
PARA BATIDORA
Kitchen
Aid
St. Joseph
, Michiga
n, USA
0
0
8 10
4 6
12
id
nAan, USA
hig
itcephhe
, Mic
KJos
St.
9706978A
12 4 6
8 10
Heavy Dut
y
Table of Contents
English
Important Safety Instructions....................................................................................3
About Your Mixer
Model 5K45SS Mixer Features .........................................................................4, 5
Model 5K5SS/5KPM5 Mixer Features..............................................................6, 7
Using your KitchenAid® Attachments...................................................................8
Beater To Bowl Clearance.....................................................................................8
Care and Cleaning ................................................................................................8
Planetary Mixing Action .......................................................................................9
Mixer Use..............................................................................................................9
Speed Control Guide.............................................................................................9
Mixing Tips.............................................................................................................10
Mixing and Kneading Yeast Dough...............................................................10, 11
Egg Whites..........................................................................................................11
Whipped Cream ..................................................................................................11
When You Need Service .........................................................................................12
Mixer Warranty .......................................................................................................12
Important Safety Instructions
When reading the Instructions Manual…
Pay special attention to sections marked by
the following words:
! CAUTION
! WARNING
These help you avoid accidents that could lead to
injury for someone using the product incorrectly.
These help you avoid damage to the product
and/or other property.
“NOTE:” or “IMPORTANT”
These sections give you helpful tips on using the
product.
11. The use of attachments not
recommended by KitchenAid may
cause fire, electrical shock or injury.
12. Do not use outdoors.
13. Do not let cord hang over edge of table
1. Read all instructions.
or counter, or touch hot surfaces.
2. To protect against risk of electrical shock,
14. When using a mixer model with a tilt
never immerse mixer in water or other
head, the head must be completely
liquid.
down before locking. Before mixing,
3. Be sure that the prongs on the plug of the
make sure lock is in position by
unit mate with the electrical wall
attempting to raise head.
receptacle into which it will be plugged.
15. Do not use an extension cord.
Observation of proper grounding
techniques and local electrical codes is 16. When making dough with the mixer,
never use recipes calling for more than
required.
the following maximum measurements:
4. Do not let children operate or play with
Model 5K45SS – 1.12 kg (8 cups) of
mixer.
all-purpose flour or 840 g (6 cups) of
5. Close supervision is necessary when any
whole wheat flour. Models 5K5SS,
appliance is used by or near children. Do
5KPM5, and 5KSM5 – 1.4 kg (10 cups)
not leave mixer unattended while it is
of all-purpose flour or 1120 g (8 cups)
operating.
of whole wheat flour.
6. Unplug mixer from outlet when not in use,
17. When making dough with the mixer,
before inserting or removing parts, and
never operate mixer continuously for
before cleaning.
more than 10 minutes.
7. Avoid contacting moving parts. Keep
hands, hair, clothing, as well as spatulas 18. Be careful when lifting mixer as it is
and other utensils away from beater during heavy.
operation to prevent injury, and/or damage 19. Use the mixer only for its intended
function.
to the mixer.
8. Do not operate mixer unattended or near 20. ELECTRICAL REQUIREMENTS: Your
KitchenAid® Mixer operates on a regular
edge of work surface. When used for
220-240 volt A.C., 50-60 hertz house
heavy loads or at high speeds, mixer may
current. The wattage rating for your
move on work surface.
KitchenAid® Mixer is printed on the trim
9. Remove flat beater, wire whip or dough
band. This wattage is determined by using
hook from mixer before washing.
the attachment which draws the greatest
10. Do not operate any appliance with a
power. Other recommended attachments
damaged cord set or after the appliance
may draw significantly less power.
has been dropped or damaged in any
manner. Return appliance to the nearest 21. Be certain the attachment hub is secure
(tighten attachment knob) prior to using
authorized service center for examination,
mixer to avoid any possibility of the
repair or adjustment.
attachment hub falling into the bowl
during mixing.
SAVE THESE INSTRUCTIONS
R-3
English
! WARNING
TO REDUCE THE RISK OF FIRE, ELECTRICAL
SHOCK, INJURY TO PERSONS, OR DAMAGE
WHEN USING THE MIXER, FOLLOW BASIC
PRECAUTIONS, INCLUDING THE FOLLOWING:
5K45SS Mixer Features
Attachment Hub
English
Motor Head
Speed
Control
Lever
0
12
8
4 6
Attachment Knob
Motor Head
Locking Lever
(not shown)
Beater Shaft
10
id
nA n, USA
cheichiga
KJoitseph, M
St.
Flat Beater
R-4
Wire Whip
4.5 Qt
(4.3 L)
Stainless
Steel Bowl
Bowl Clamping Plate
Dough Hook
R-4
0
12
8 10
4 6
d
, USA
enAi
igan
tch
Mich
ph,
KiJose
St.
ON
TO LOCK MOTOR HEAD IN RAISED
POSITION
• Push locking lever up into UNLOCK
position and hold.
• Tilt motor head back.
• Move locking lever into LOCK position.
TO ATTACH BOWL
• Be sure speed control is OFF.
• Tilt motor head back.
• Place bowl on bowl-clamping plate.
• Turn bowl gently in clockwise direction
(see picture above).
• Sit pouring shield on bowl.
TO LOCK MOTOR HEAD IN
OPERATING POSITION
• Push locking lever up into UNLOCK
position and hold.
• Lower motor head until it is completely
down into operating position.
• Move locking lever into LOCK position.
• Before mixing, test motor head lock by
attempting to raise head.
TO REMOVE BOWL
• Turn speed control to OFF.
• Tilt motor head back.
• Turn bowl in counterclockwise direction.
NOTE: Motor head should always be kept
in LOCK position when using mixer.
0
TO ATTACH FLAT BEATER,
WIRE WHIP, OR DOUGH HOOK
• Turn speed control to OFF and unplug.
• Raise motor head.
• Slip beater onto beater shaft and press
upward as far as possible.
• Turn beater to right, hooking beater over
pin on shaft.
1 2 4 6 8 10
TO OPERATE CONTROL SPEED
• Speed control lever should always be set
on lowest speed for starting, then
gradually moved to desired higher speed
to avoid splashing ingredients out of
bowl. See “Speed Control Guide.”
TO REMOVE FLAT BEATER,
WIRE WHIP OR DOUGH HOOK
• Turn speed control to OFF and unplug.
• Raise motor head.
• Press beater upward as far as possible
and turn left.
• Pull beater from beater shaft.
R-5
English
OFF
5K5SS/5KPM5 Mixer Features
Motor Head
Attachment Hub
English
Attachment
Knob
Speed Control
Lever
Kitchen
Aid
h, Michi
St. Josep
gan, USA
0
12 4 6
8 10
Heavy Du
ty
Bowl Lift Handle
(not shown)
Spring Latch and
Bowl Pin
(not shown)
Locating Pins
Beater
Shaft
Bowl Support
Flat Beater
Wire Whip
Dough Hook
5 Qt (4.8 L)
Stainless Steel Bowl
R-6
TO ATTACH FLAT BEATER,
WIRE WHIP, OR DOUGH HOOK
• Turn speed control to OFF and unplug.
• Lower bowl by rotating bowl lift handle
downward.
• Slip flat beater on beater shaft and press
upward as far as possible.
• Turn beater to right, hooking beater over
the pin on shaft.
TO REMOVE BOWL
• Place bowl lift handle in down position.
• Grasp bowl handle and lift straight up
and off locating pins.
Heavy Dut
TO REMOVE FLAT BEATER,
WIRE WHIP, OR DOUGH HOOK
• Turn speed control to OFF and unplug.
• Lower bowl by rotating bowl lift handle
downward.
• Press beater upward as far as possible
and turn left.
• Pull beater from beater shaft.
y
0
1 2 4 6 8 10
TO OPERATE CONTROL SPEED
• Speed control lever should always be set
on lowest speed for starting, then
gradually moved to desired higher speed
to avoid splashing ingredients out of
bowl. See “Speed Control Guide.”
OVERLOAD RESET BUTTON
(Model 5KPM50 only)
• If the mixer is overloaded, the Overload
Reset Button will pop out and the mixer
will shut off. Turn the Speed Control
Lever to OFF. Wait a few minutes, then
push in the Overload Reset Button. Turn
the Speed Control Lever to the desired
speed and continue mixing.
TO RAISE BOWL
• Rotate handle back and up until it snaps
into the locked vertical position.
• Bowl must always be in raised, locked
position when mixing.
TO LOWER BOWL
• Rotate handle back and down.
R-7
English
TO ATTACH BOWL
• Be sure speed control is OFF.
• Place bowl lift handle in down position.
• Fit bowl supports over locating pins.
• Press down on back of bowl until bowl
pin snaps into spring latch.
• Sit pouring shield on bowl.
• Raise bowl before mixing.
NOTE: Check that bowl and pouring shield
are properly in place (5KPM5 models).
Using Your KitchenAid® Attachments
Dough Hook for mixing and kneading
yeast doughs, such as:
breads
coffee cakes
rolls
buns
Beater To Bowl Clearance
Your mixer is adjusted at the factory so that
the flat beater just clears the bottom of the
bowl. If, for any reason, the flat beater
strikes the bottom of the bowl, or is too far
away from the bowl, clearance can be
corrected as follows:
Model
5K5SS/5KSM5/5KPM5
• Place bowl lift handle in
B
down position.
• Turn screw (B) slightly
to the left to raise flat
beater and to the right
to lower flat beater.
• Make adjustments with flat beater, so it just
clears surface of bowl.
NOTE: Flat beater must not strike on bottom or
side of bowl when properly adjusted. If beater or
wire whip is adjusted too close so that it strikes
bottom of bowl, coating may wear off of beaters
or wires may wear through on wire whip.
Scraping sides of bowl may be necessary under
certain conditions regardless of beater
adjustment. Mixer must be stopped to scrape
bowl or damage to mixer may occur.
A
Model 5K45SS:
• Lift motor head.
• Turn screw (A) slightly to the left to raise
flat beater and to the right to lower flat
beater.
• Make adjustment with flat beater, so it
just clears surface of bowl.
Care and Cleaning of Your Mixer
English
See the Stand Mixer Attachments Use and Care Guide for speed settings and operating
times.
Wire Whip for mixtures which need
Flat Beater, for normal to heavy
to incorporate air, such as:
mixtures, such as:
eggs
sponge cakes
cakes
biscuits
egg whites
mayonnaise
creamed frostings
crumpets
heavy cream
some candies
candies
meat loaf
boiled frostings
cookies
mashed potatoes
pie pastry
! WARNING
Bowl, flat beater and dough hook may be
washed in an automatic dishwasher. The
wire whip and these other basic accessories
can be cleaned thoroughly in hot sudsy
water and rinsed completely before drying.
ELECTRICAL SHOCK HAZARD
ALWAYS BE SURE TO UNPLUG
MIXER BEFORE CLEANING TO AVOID
POSSIBLE ELECTRICAL SHOCK.
Wipe mixer with a damp cloth. DO
NOT IMMERSE IN WATER. Wipe off
beater shaft frequently, removing any
residue that may accumulate.
Lubrication: Motor bearings are selflubricating and should require no further
attention under normal use.
R-8
Planetary Mixing Action
Your KitchenAid® Mixer will mix faster and
more thoroughly than most other electric
mixers. Therefore, the mixing time in most
recipes must be adjusted to avoid
overbeating.
English
During operation, the flat
beater moves around the
stationary bowl, at the
same time turning in the
opposite direction on its
own axis. The diagram
shows the complete
coverage of the bowl made
by the path of the beater.
Mixer Use
The mixer may warm up during use. Under
heavy loads with extended mixing time, you
may not be able to comfortably touch the
top of the unit. This is normal.
The bowl and beater are designed to provide
thorough mixing without frequent scraping.
Scraping the bowl once or twice during
mixing is usually sufficient.
! WARNING
PERSONAL INJURY HAZARD
To avoid personal injury and damage to
the beater, do not attempt to scrape
bowl while mixer is operating; turn
mixer off. Should scraper or other
object drop into bowl, turn motor OFF
before removing.
Speed Control Guide
NUMBER OF SPEED
1
STIR
For slow stirring, combining, mashing, starting all mixing
procedures. Use to add flour and dry ingredients to batter, add
liquids to dry ingredients, and combine heavy mixtures.
2
SLOW MIXING
For slow beating, mashing, faster stirring. Use to beat heavy
batters and candies, start mashing potatoes or other vegetables, cut
shortening into flour, beat thin or splashy batters, and mix and
knead yeast dough. Use with Can Opener attachment.
4
MIXING, BEATING
For mixing semi-heavy batters such as cookies. Use to cream
sugar and shortening and add sugar to egg whites for meringues.
Medium speed for cake mixes. Use with attachments: Food
Grinder, Rotor Slicer/Shredder and Fruit/Vegetable Strainer.
6
BEATING,
CREAMING
For beating or creaming, medium fast whipping. Use to finish
mixing cakes, doughnut and other batters. High speed for cake
mixes. Use with Citrus Juice attachment.
8
FAST BEATING,
WHIPPING
For whipping cream, egg whites, and boiled frostings.
10
FAST
WHIPPING
For whipping small amounts of cream and egg whites. Use with
Pasta Maker and Grain Mill attachments.
NOTE: The Speed Control Lever can be set between the above speeds if a finer adjustment is required.
R-9
Mixing Tips
English
Converting Your Recipe to the Mixer
The mixing instructions found in this book
can be used to convert your favorite recipes
for use with your KitchenAid® Mixer.
To help determine a mixing procedure, your
own observations and experience will be
needed. Watch the batter or dough and mix
only until it has the desired appearance
described in your recipe, such as “smooth
and creamy.” Use the “Speed Control
Guide” to help determine proper mixing
speeds.
Adding Ingredients
The standard procedure to follow when
mixing most batters, especially cake and
cookie batters, is to add:
1/3 dry ingredients
1/2 liquid ingredients
1/3 dry ingredients
1/2 liquid ingredients
1/3 dry ingredients
Use Stir Speed until ingredients have been
blended. Then gradually increase to desired
speed.
Always add ingredients as close to side of
bowl as possible, not directly into moving
beater. The Pouring Shield can be used to
simplify adding ingredients.
NOTE: If ingredients in very bottom of
bowl are not thoroughly mixed, the beater
is not far enough into the bowl. See “Beater
to Bowl Clearance.”
Cake Mixes
When preparing packaged cake mixes, use
Speed 4 for medium speed and Speed 6 for
high speed. For best results, mix for the
time stated on the package directions.
Adding Nuts, Raisins or
Candied Fruits
Solid materials should be folded in the last
few sections of mixing on Stir Speed. The
batter should be thick enough to keep the
fruits and nuts from sinking to the bottom
of the pan during baking. Sticky fruits
should be dusted with flour for better
distribution in the batter.
Liquid Mixture
Mixtures containing large amounts of liquid
ingredients should be mixed at lower
speeds to avoid splashing. Increase speed
only after mixture has thickened.
Mixing and Kneading Yeast Dough
1. Place all dry ingredients including yeast
into bowl, except last 1 to 2 cups (250 mL
to 500 mL) flour.
2. Attach bowl and dough hook. Lock
5K45SS head or raise 5K5SS/5KPM5
bowl. Turn to Speed 2 and mix about
15 seconds or until ingredients are
combined.
Kitc
St.
henA
NOTE: If liquid ingredients are added too
quickly, they will form a pool around the
dough hook and slow down mixing process.
Kitc
St.
Jos
henA
eph
, Mic
higa
id
n, USA
0
12
46
8 10
Jos
eph
, Mich
igan
, USA
id
0
12
46
8 10
4. Continuing on speed 2, gently tap
remaining flour around sides of bowl,
1/2 cup (125 mL) at a time, as needed.
Mix until dough clings to hook and
cleans sides of bowl, about 2 minutes.
3. Continuing on Speed 2, gradually add
liquid ingredients to flour mixture, about
30 seconds to 1 minute. Mix 1 minute
longer.
R-10
n, USA
0
12
46
8 10
5. When dough clings to hook, knead on
Speed 2 for 2 minutes or until dough is
smooth and elastic.
NOTE: These instructions illustrate bread
making with the Rapid Mix method. When
using the conventional method, dissolve
yeast in warm water in warmed bowl. Add
remaining liquids and dry ingredients –
except last 1 to 2 cups (250 mL to 500 mL)
flour. Turn to Speed 2 for about 1 minute, or
until ingredients are thoroughly mixed.
Proceed with steps 4 through 6.
Egg Whites
Place room temperature egg whites in
clean, dry bowl. Attach bowl and wire
whip. To avoid splashing, gradually turn
to designated speed and whip to desired
stage. See chart below.
Amount
1 egg white
2-4 egg whites
6 or more egg whites
Speed
Gradually to 10
Gradually to 8
Gradually to 6
WHIPPING STAGES
Frothy:
Large, uneven air bubbles.
Begin to hold shape:
Air bubbles are fine and compact; product
is white.
Soft peak:
Tips of peaks fall over when wire whip is
removed.
Almost stiff:
Sharp peaks form when wire whip is
removed, but whites are actually soft.
Stiff but not dry:
Sharp, stiff peaks form when wire whip is
removed. Whites are uniform in color and
glisten.
Stiff and dry:
Sharp, stiff peaks form when wire whip is
removed. Whites are speckled and dull in
appearance.
Whipped Cream
Pour cream into chilled bowl. Attach bowl
and wire whip. To avoid splashing,
gradually turn to designated speed and
whip to desired stage. See chart below.
Amount
59 mL (1/4 cup)
118 mL (1/2 cup)
236 mL (1 cup)
472 mL (2 cups)
Speed
Gradually to 10
Gradually to 10
Gradually to 8
Gradually to 8
WHIPPING STAGES
Begins to thicken:
Cream is thick and custard-like.
Holds its shape:
Cream forms soft peaks when wire whip
is removed. Can be folded into other
ingredients when making deserts and
sauces.
Stiff:
Cream stands in stiff, sharp peaks when
wire whip is removed. Use for topping on
cakes or desserts, or filling for cream puffs.
NOTE: Watch cream closely during
whipping; there are just a few seconds
between whipping stages. DO NOT
OVERWHIP.
R-11
English
6. Unlock and raise head on 5K45SS or
lower bowl on 5K5SS/5KSM5 and remove
dough from hook.
Kitc
Jos he
eph nA
, Mic id
higa
St.
When You Need Service
English
Please read the following before
calling your service center.
1. The mixer may warm up during use.
Under heavy loads with extended mixing
time periods, you may not be able to
comfortably touch the top of the unit.
This is normal.
2. The mixer may emit a pungent odor,
especially when new. This is common
with electric motors.
3. If flat beater strikes bowl, stop the mixer.
See “Beater to Bowl Clearance.”
If your mixer should malfunction or
fail to operate, please check the
following:
1. Is your mixer plugged in?
2. Is the fuse in the circuit to the mixer in
working order? If you have a circuit
breaker box, be sure the circuit is closed.
3. Are the bowl and pouring shield properly
in place (5KPM5 models)?
4. If the problem is not due to one of the
above items, see "How to Obtain
Service."
HOW TO OBTAIN SERVICE:
All service should be handled locally by an
authorized KitchenAid Service Center.
Contact the dealer from whom the unit was
purchased to obtain the name of the nearest
authorized KitchenAid service facility.
Heavy Duty Mixer Warranty
LENGTH OF
WARRANTY:
KITCHENAID WILL
PAY FOR:
KITCHENAID WILL
NOT PAY FOR:
ONE YEAR FULL
WARRANTY FROM
date of purchase.
Replacement parts and
repair labor costs to
correct defects in materials
or workmanship. Service
must be provided by an
Authorized KitchenAid
Service Center.
A. Repairs when mixer is
used for operations
other than normal food
preparation.
B. Damage resulting from
accidents, alterations,
misuse, abuse, or
installation/operation
not in accordance with
local electrical codes.
KITCHENAID DOES NOT ASSUME ANY RESPONSIBILITY FOR INCIDENTAL
OR CONSEQUENTIAL DAMAGES.
Specifications subject to change without notice.
KitchenAid Europa, Inc.
Nijverheidslaan 3 Box 5
Strombeek-Bever (Brussels)
1853 BELGIUM
9706978A
©2009. All rights reserved
®Registered trademark/TMTrademark/the shape
of stand mixer is a registered trademark
of KitchenAid, U.S.A.
1/09
Printed in U.S.A.