1
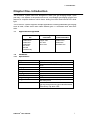
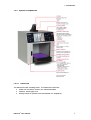
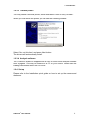
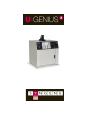
Contents Page Contents Page Chapter One- Introduction....................................................................................... 1 1.1 Applications supported.................................................................................... 1 1.2 Hardware......................................................................................................... 1 1.2.1 Specification.......................................................................................... 1 1.2.2 System Components............................................................................ 2 1.2.2.1 UV transilluminator........................................................................ 3 1.2.2.2 Filter draw...................................................................................... 3 1.2.2.3 LCD Touch screen......................................................................... 3 1.2.2.4 USB Flash Drive............................................................................ 1.2.3 Accessories............................................................................................... 3 1.2.3.1 Visible Light converter.................................................................... 3 1.2.3.2 Blue LED transilluminator............................................................... 3 1.2.3.3 Thermal Printer............................................................................... 3 1.2.3.4 Analysis software.......................................................................... 4 1.2.4 Set-up....................................................................................................... 4 Chapter Two- Image Acquisition............................................................................ 4 2.1 Capturing an image of an agarose EtBr or similar gel................................... 5 2.2 Capturing an image of a protein gel (coomassie, silver stained) or other 5 white light image (colony plate, autorad, microtitre plate etc)...................... 7 Chapter Three- Saving/Opening and Printing Images.................................. 9 3.1 Saving Images............................................................................................. 9 3.2 Opening Images........................................................................................... 9 3.3 Printing Images............................................................................................ Chapter Four- Image Enhancement................................................................ 9 4.1 Image Enhancement................................................................................... 10 4.2 Annotate...................................................................................................... 11 4.3 Digital Zoom................................................................................................ 12 Chapter Five- User Preferences....................................................................... 13 5.1 Neutral Fielding........................................................................................... 14 5.2 Extended Dynamic Range (EDR)................................................................. 14 5.3 External Keyboard........................................................................................ 15 5.4 Regional Power Frequency Settings............................................................ 15 Chapter Six- Troubleshooting and Contact Information.............................. 16 6.1 Troubleshooting.......................................................................................... 16 6.2 Contact Syngene........................................................................................ 16 3 U:Genius User manual 1 1. Introduction Chapter One- Introduction The U:Genius3 system has been designed to make your gel imaging simple, quick and easy. This system is the perfect choice for a low budget gel imaging system and features a compact darkroom which has a sliding front door and internal LED white light. The U:Genius3 system supports multiple applications including DNA/RNA gel imaging such as EtBr, SYBR Green and visible stained gels i.e. coomassie blue and silver stain. 1.1 Applications supported Transilluminator UV Ethidium Bromide SYBR Green SYBR Gold SYBR Safe Gel Green Gel Red SYPRO Ruby 1.2 Hardware 1.2.1 Specification Camera CCD Zoom Display Filter Draw Max gel size Data types CCD resolution Image storage Image enhancements Illumination 3 U:Genius User manual Visible Light Converter Coomassie blue stain Copper stain Zinc stain Silver stain Blue LED Transilluminator SYBR Gold SYBR Green SYBR Safe UltraSafe blue 12/16 bit 1/3 inch Manual zoom 6.5-39, F1.4 , aperture and focus 8” colour touch screen Yes UV filter as standard 20 x 20 cm TIFF and JPEG 3M pixels USB Rotation and inversion, sharpen, smooth and many more Slide in and out UV transilluminator, visible light converter and blue LED transilluminator (Ultra-Slim), Epi white LED 1 1. Introduction 1.2.2 System Components 1.2.2.1 Darkroom The darkroom has a sliding door. The darkroom features: Slide out mid wave 302nm UV transilluminator Internal white light LED Safety switch to protect from accidental UV exposure 3 U:Genius User manual 2 1. Introduction 1.2.2.3 UV Transilluminator The UV transilluminator will excite many fluorescent stains such as Ethidium bromide, SYBR™ stains, Gel Red™. The standard wavelength is 302nm. To protect users from accidental exposure, the UV light is automatically shut off if the door is opened. The transilluminator can be slid easily in and out of the cabinet. 1.2.2.4 Filter Drawer Interchange a range of filters for extensive choice of fluorescent applications. 1.2.2.5 LCD Touch Screen A built-in 8 inch VGA colour LCD touch-screen allows users to preview, capture, print and save images, as well as to select various processing functions, without the connection of an external keyboard or mouse. 1.2.2.6 USB Flash Drive The USB flash drive on the front of the U:Genius3 for the easy storage of images. 1.2.3 Accessories 1.2.3.1 Visible light converter Syngene offers a visible light converter that can be placed on top of the UV transilluminator for imaging coomassie and silver stained gels. 1.2.3.2 Blue LED transilluminator The UltraSlim blue LED transilluminator is ideal for safely imaging gels stained with SYBR Safe, Gold and Green, GelGreen and UltraSafe blue. 3 U:Genius User manual 3 1. Introduction 1.2.3.3 Thermal printer You may attach a thermal printer, either Mitsubishi P93D or Sony UPD897. When you first attach the printer you will see the following window Select ‘No, not this time’ and press Next button The drivers will automatically install. 1.2.3.4 Analysis software The U:Genius3 system is supplied with a copy of GeneTools analysis software from Syngene. This may be loaded on a PC of your choice. Please see the loading instructions within the CD cover. 1.2.4 Set-up Please refer to the Installation quick guide on how to set up the camera and darkroom. 3 U:Genius User manual 4 2. Image Acquisition Chapter Two- Image Acquisition 2.1 Capturing an image of an agarose EtBr or similar gel (For rapid capture see Quick Guide-Capture) Step One Position the sample on the centre of the transilluminator, close the door, ensure the UV filter has been placed in the filter draw and then manually turn UV on by pressing the ‘UV On’ switch on the front of the unit. Then press the ‘Live’ button icon. Figure 1- LIVE view icon Step Two Manually adjust the camera settings such as the aperture, zoom and focus. Adjust the aperture, zoom and focus settings until a suitable image is displayed, preferably with the sample filling the screen for maximum resolution. Please note that opening the aperture too far may result in areas of the sample being saturated. Figure 2- Lens control 3 U:Genius User manual 5 2. Image Acquisition Step Three The exposure time can either be set manually or automatically. Adjusting the exposure time will alter the brightness of the image. To manually increase or decrease the exposure time use the following icons. Figure 3- Manual Exposure controls The auto-exposure function sets the exposure time to a level that ensures no saturation of the image occurs. To use the auto-exposure function select the following icon. Figure 4- Auto Expose icon Step Four To capture the image press the Capture button. If you have selected autoexpose then you will not need to press the Capture button. . Figure 5- Capture button 3 U:Genius User manual 6 2. Image Acquisition 2.2 Capturing an image of a protein gel (coomassie, silver stained) or other white light image (Colony plate, autorad, microtitre plate etc) Step One Make sure that you place the visible light converter on top of the transilluminator. Position your sample on the centre of the visible light converter and close the door. Manually turn on UV by pressing the ‘UV On’ switch. Step Two Manually adjust the camera settings such as the aperture, zoom and focus. Adjust the aperture, zoom and focus settings until a suitable image is displayed, preferably with the sample filling the screen for maximum resolution. Please note that opening the aperture too far may result in areas of the sample being saturated. Figure 6- Lens control Step Three The exposure time can either be set manually or automatically. Adjusting the exposure time will alter the brightness of the image. To manually increase or decrease the exposure time use the following icons. Figure 7- Manual Exposure controls 3 U:Genius User manual 7 2. Image Acquisition The auto-exposure function sets the exposure time to a level that ensures no saturation of the image occurs. To use the auto-exposure function select the following icon. Figure 8- Auto Expose icon Step Four To capture the image press the Capture button. If you have selected auto expose then you will not need to press the Capture button. . Figure 9- Capture button 3 U:Genius User manual 8 3. Saving/Opening and Printing Images Chapter Three- Saving/ Opening and Printing Images 3.1 Saving images To save a captured image press the ‘Save’ button. N.B. You can only save an image to a USB device or your local area network (LAN). Images can be saved in the following formats TIFF and JPEG. Figure 10- Save Button 3.2 Opening Images From the front screen select ‘Open Image’ to browse captured images. Figure 11- Open Images Icon 3.3 Printing Images If you have a thermal printer attached to your U:Genius3 press the following button. Figure 12- Print button 3 U:Genius User manual 9 4. Image Enhancement Chapter Four- Image Enhancement The U:Genius3 system offers a variety of functions ranging from image enhancement to annotation. 4.1 Image enhancement To access the enhance functions select the Enhance button via the Edit Menu button. From this menu you can select to smooth, sharpen, invert or rotate your image. Figure 13- Enhance icon Click on this icon to apply a smoothing filter. This is useful when the image has specks of dust or bubbles present. However, this will make bands appear less sharp. Click on this icon to apply a sharpening filter to your image. When this filter has been applied band edges should become more pronounced but you may also observe an increase in the graininess of the image. The Invert icon will reverse the image to give black bands on a white background or vice versa. This icon is particularly useful when trying to see faint bands. To freely rotate your images press the Rotate icon. Press the Undo button to remove any enhancement that you may have performed. Use the Back button to navigate between the menus. 3 U:Genius User manual 10 4. Image Enhancement 4.2 Annotate To access the annotation functions select the Annotate button via the Edit Menu button. From this menu you can add text, change the font, select to have your text horizontal or vertical or remove text. Figure 14- Annotate button Use this icon to add text to your image. Press or place the mouse cursor on your image and type your text. To change the font style press this icon. If you wish to have your text displayed horizontally select this button. If you wish to have your text displayed vertically select this button. To remove any annotation select this button. Use the Back button to navigate between menus. 3 U:Genius User manual 11 4. Image Enhancement 4.3 Digital Zoom To zoom in or out on your image select the Zoom button from the screen once you have captured your image. Figure 15- Zoom button Digitally zoom in on your image to see faint bands. Digitally zoom out on your sample. Zoom settings can reset at any time. Use the Back button to navigate between the menus. 3 U:Genius User manual 12 5. User Preferences Chapter Five- User Preferences To access U:Genius3 settings and set user preferences for neutral fielding, EDR, to view external keyboard and to set regional power frequency settings. Figure 16- Preferences icon You will be directed to a new screen (Figure 17). Figure 17- Preferences screen 3 U:Genius User manual 13 5. User Preferences 5.1 Neutral fielding The neutral field function is based on powerful algorithms which corrects for uneven illumination. This results in an image with a flat, even background whilst maintaining GLP compliance. To neutral field check the box (Figure 18) then follow the on-screen instructions (Figure 19) Figure 18- Neutral fielding button Figure 19- Neutral fielding on-screen instructions 5.2 Extended Dynamic Range (EDR) Many gels contain areas that are too bright or too dark to be successfully captured. Closing the iris to cut down the light may prevent the viewing of dark or faint bands, whilst opening it may lead to saturation. EDR solves this problem by automatically capturing a series of images of different exposure times. The content of each image is assessed and those areas that are within the dynamic range of the camera are combined. The result is an image with a large dynamic range (up to 65536 grey levels) that encompasses all the brightness ranges existing within the sample without saturation. Figure 20- EDR button 3 U:Genius User manual 14 5. User Preferences 5.3 External Keyboard If you wish to connect an external keyboard to the U:Genius3 system select this button. Figure 21- External Keyboard button 5.4 Regional Power Frequency Settings Select your regional power frequency settings - choose between 50Hz or 60Hz. Figure 22- Regional Power Frequency Settings buttons 3 U:Genius User manual 15 6. Troubleshooting and Contact Information Chapter Six - Troubleshooting and Contact Information 6.1 Troubleshooting No power to the darkroom Check connection of main power cord to main power port on the rear of the U:Genius3. Try another power socket within lab. Transilluminator will not turn on Check power cord by sliding transilluminator fully out from cabinet. If loose push back in. If still not on, remove power cord and attach another one plugged in elsewhere. If transilluminator comes on there is an electrical supply problem within the U:Genius3. If it still does not come on it is likely the transilluminator has failed. Contact Syngene. 6.2 Contact Syngene EUROPE: BEACON HOUSE NUFFIELD ROAD CAMBRIDGE CB4 1TF Tel: +44 1223 727123 Fax: +44 1223 727101 Email: [email protected] USA: 5108 PEGASUS COURT, SUITE M FREDERICK MD 21704 Tel: 800 686 4407/1 301 662 2863 Fax: 301 631 3977 Email: [email protected] www.syngene.com 3 U:Genius User manual 16