1
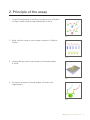
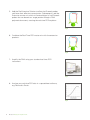
Assay Development kit
User Manual
The protocols in this manual are compatible with Proseek Probemaker A (Art. no. 93001-0010),
Proseek Probemaker B (Art. no. 93002-0010) and Proseek Assay Reagents in reactions/size 100 and 1000
(Art. no. 93003-0100 and Art. no. 93003-1000).
Table of content
1. Introduction 4
2. Principle of the assay 5
3. Application 3.1 Detect and quantify protein expression 7
7
4. Reagents and equipment 4.1 Proseek Assay Development kit reagents 4.2 Reagents to be supplied by the user 4.3 Equipment needed 4.4 Software for analysis 8
8
9
9
9
5. Assay considerations 5.1 Antibodies 5.2 Sample material 5.3 Validation of assay 10
10
10
11
6. Reagent handling and storage 6.1 Proseek Probemaker 6.2 Proseek Assay Reagents 12
12
13
7. Protocols 7.1 Proseek Probemaker protocol 7.2 Proseek Assay protocol 14
14
15
8. Results 8.1 Typical results 8.2 Analysis of real-time PCR data 19
19
20
9. Tips and tricks 9.1 Precision 9.2 Sensitivity 9.3 Quantification 21
21
21
21
10. Troubleshooting 22
Appendix 1 – 96-well plate template 24
Proseek Assay Development kit
3
1. Introduction
Proseek® reagents from Olink® Bioscience enable detection and
quantification of proteins in a solution, such as plasma and serum, in a
minimal sample volume. With the Proseek Assay Development kit a new
assay for any target protein with appropriate available antibodies can rapidly
be developed. Combining the target specific antibodies with the Proseek
reagents, the protein of interest is detected using standard real-time PCR.
The Proseek reagents are based on PEA, which is a Proximity Extension
Assay technology. A pair of oligonucleotide labeled antibodies, Proseek
probes, are allowed to pair-wise bind to the target protein present in the
sample in a homogeneous assay, without washing steps. When the two
Proseek probes are in close proximity, a new PCR target sequence is
formed by a proximity dependent DNA polymerization event. The resulting
sequence is subsequently detected and quantified using real-time PCR.
4
Proseek Assay Development kit
2. Principle of the assay
1: Create Proseek probes A and B by conjugating your antibodies
to Oligo A and B using Proseek Probemaker A and B.
Fig 1.
2: Make a dilution series of your antigen standard in Calibrator
Diluent.
Fig 2.
3: Incubate dilution series and samples with Proseek probes
A and B.
Fig 3.
4: During the incubation, Proseek probes will bind to the
target protein.
Fig 4.
Proseek Assay Development kit
5
5: Add the Pre-Extension Solution to dilute the Proseek probes
and lower their effective concentration. Subsequently, add the
Extension master mix which will extend oligos of two Proseek
probes that are bound to a target protein through a DNA
polymerization event, creating the real-time PCR amplicon.
Fig 5.
6: Combine the Real-Time PCR master mix with the extension
products.
Fig 6.
7: Amplify the DNA using your standard real-time PCR
instrument.
Fig 7.
8: Analyze your real-time PCR data in a spreadsheet software,
e.g. Microsoft® Excel®.
Fig 8.
6
Proseek Assay Development kit
3. Application
3.1 Detect and quantify protein expression
Proseek is intended to be used for detection and quantification of a
single protein in a solution, e.g. plasma and serum. 1 µl of sample
is needed per reaction and the target protein is detected using
one single antigen affinity purified polyclonal antibody batch or two
matched monoclonal antibodies.
Fig 9. Single protein
detection.
Proseek Assay Development kit
7
4. Reagents and equipment
4.1 Proseek Assay Development kit reagents
When setting up a new Proseek assay you need the following Proseek Assay Development kit
components:
Proseek Probemaker A – to create Proseek probe A
Proseek Probemaker B – to create Proseek probe B
Proseek Assay Reagents – to perform the assay
4.1.1 Proseek Probemaker
Proseek Probemaker enables conjugation of an antibody to Oligo A or B, creating Proseek
probe A or B. One Proseek Probemaker (A or B) can be used for only one antibody conjugation.
Proseek probes from one conjugation is sufficient for approximately 100 000 reactions.
Each Proseek Probemaker box contains the following:
Oligo A or B – One vial with lyophilized activated oligonucleotide for conjugation of 10 µg
antibody at a concentration of 1 mg/ml.
Conjugation Buffer (ready-to-use) – Reagents for buffering the conjugation reaction.
Stop Reagent (ready-to-use) – Reagents for stopping the conjugation reaction.
Storage Solution A or B (ready-to-use) – Reagents for preserving the Proseek probe A or
B. The probe is stable in the Storage Solution for 12 months at +4°C.
4.1.2 Proseek Assay Reagents
Proseek Assay Reagents contains all necessary reagents to perform the Proseek Assay
protocol. Proseek Assay Reagents is available in kit sizes of 100 and 1000 reactions.
Each Proseek Assay Reagents box contains the following:
8
Probe Diluent (ready-to-use) – For dilution and 3-month storage of Proseek probes.
Calibrator Diluent (ready-to-use) – For dilution of antigen standard and sample
(if necessary).
Assay Solution (ready-to-use) – For combining with Proseek probes to set up incubation
with samples and diluted antigen standard.
Pre-Extension Solution (10x) – For dilution of the incubation reaction.
Extension Solution (10x) – Contains all the components needed for the extension of the
Proseek probe oligos except for the Extension Polymerase.
Extension Polymerase (5 U/μl).
Real-Time PCR Solution (ready-to-use) – Contains all the components needed for real-time
PCR detection and quantification except for the Real-Time PCR Polymerase.
Real-Time PCR Polymerase (1 U/μl).
Proseek Assay Development kit
4.2 Reagents to be supplied by the user
One single antigen affinity purified polyclonal antibody batch or two matched monoclonal
antibodies
Antigen standard, preferably from the same supplier as for the antibody (recommended)
High purity water (distilled, MilliQ® or similar)
4.3 Equipment needed
Microfuge tubes
96-well microplate or test tubes (typically PCR tubes)
Optical 96- or 384-well microplate or test tubes (for real-time PCR detection)
Pipettes (covering the range from 1 µl to 1000 µl)
Multi-channel pipettes (recommended)
Pipette tips
Freezing block (-20°C) for enzymes
Thermal cycler with heated lid
Incubator or oven, +37°C
Vortexer
Centrifuge for plates or tubes
Adhesive plastic film
Optical adhesive plastic film (for real-time PCR detection)
Real-time PCR instrument; Olink has tested Applied Biosystems 7900, Applied
Biosystems StepOne and Stratagene MX3000P
4.4 Software for analysis
The result from a Proseek experiment is a result file with Ct values obtained from the realtime PCR instrument. This result file can easily be exported to a spreadsheet program, e.g.
Microsoft Excel, where average Ct, ΔCt and standard deviations can be calculated and further
converted to concentrations.
Proseek Assay Development kit
9
5. Assay considerations
5.1 Antibodies
Your choice of antibody or antibodies is crucial when setting up the Proseek assay. For
conjugation with Proseek Probemaker you can use either one single polyclonal batch or two
matched monoclonals. The antibody or antibodies should meet the following criteria:
If a polyclonal antibody is used, it must be raised against the whole native protein or at
least large fragments (not peptides) and be antigen affinity purified (not IgG fraction).
The antibody must have a concentration of 1 mg/ml (10 µl is needed per conjugation).
The antibody has to be in an amine free buffer, ideally PBS. Low levels of BSA (0.1%),
trehalose (5%) and sodium azide (0.02%) are tolerated.
If you are unsure about the composition of the buffer your antibodies are stored in, Olink
strongly recommends dialysis or buffer exchange prior to conjugation. Antibodies from various
sources and suppliers vary in residual primary amine content often in the form of remaining
glycine from the acidic elution of the antibody during the antigen-affinity purification step.
Even if the supplier states PBS content, it is likely that there are residual amounts of primary
amines. Antibodies from R&D Systems are suitable to conjugate directly with Proseek
Probemaker and do not require dialysis.
Olink recommends the following standard procedure for buffer exchange:
Pre-equilibrate an illustra MicroSpin G-50 Columns spin column (GE Healthcare, Art. no.
27-5330-01) with 1xPBS by first spinning the column at 3000 rpm for 1 min, then add
400 μl of 1xPBS and spin again for 1 min and repeat 4 times. Place the column in a new
microfuge tube.
Add your antibody (25–50 μl) to the column and spin again for 2 min at 3000 rpm. The
concentration of the collected antibody should be verified by OD. 1 mg/ml should have an
OD 280 nm of 1.4.
Concentrating low concentration antibodies prior to Proseek Probemaker conjugation is not
recommended unless you have large milligram amounts since losses are very high with filter
type concentrations.
5.2 Sample material
Proseek has so far shown to be successful with the following sample types:
Serum
EDTA plasma
Citrate plasma
Cerebrospinal fluid (CSF)
Note: Do not use heparin treated plasma since it will inhibit the real-time PCR reaction.
10
Proseek Assay Development kit
5.3 Validation of assay
To be able to properly evaluate your results it is advisable to do a simple validation of your
assay, e.g. by assessing sensitivity, dynamic range, precision, recovery and linearity of
dilution.
5.3.1 Background
By adding the Calibrator Diluent only (without the antigen) you will obtain a value for the
background level of your assay.
5.3.2 Calibration curve: sensitivity, dynamic range and precision
The calibration curve, made from a dilution series of the antigen standard in replicates will
give information about the sensitivity, dynamic range and precision of your assay. Sensitivity,
or limit of detection, is defined as the lowest detectable concentration that significantly
exceeds the background level and is calculated as the obtained background concentration
+2 standard deviations. The precision can be improved by increasing the number of replicates.
5.3.3 Recovery
You will get an indication of the recovery by spiking in the antigen standard at a certain
concentration within the dynamic range of the calibration curve into one of your samples.
Recovery is defined as the ratio of the measured concentration of the spiked-in protein in the
sample (after subtracting the endogenous concentration) and the measured amount of the
spiked-in protein in the Calibrator Diluent, expressed as a percentage.
5.3.4 Linearity of dilution
Sample matrix effects can be investigated by spiking in the antigen standard at a high
concentration into one of your samples followed by a serial dilution of the spiked-in sample.
The resulting dilution curve should be linear if no matrix effects are present in the sample.
Proseek Assay Development kit
11
6. Reagent handling and storage
6.1 Proseek Probemaker
Store the unused Proseek Probemaker kit at -20°C. Once you have conjugated your antibody
with Proseek Probemaker we recommend storage at +4°C in Storage Solution A or B. The
Storage Solution A and B contains buffer and reagents for stabilizing and preserving Proseek
probes A and B.
Each Proseek Probemaker kit (A or B) contains reagents to conjugate 10 µg antibody at a
concentration of 1 mg/ml. Proseek probes from one conjugation is sufficient for approximately
100 000 reactions.
Oligo A or B – store at -20°C
One vial with lyophilized activated oligonucleotide for one conjugation of 10 µg antibody at
a concentration of 1 mg/ml.
Conjugation Buffer – store at -20°C
Thaw, vortex and quick spin before use
Ready-to-use solution
Stop Reagent – store at -20°C
Thaw, vortex and quick spin before use
Ready-to-use solution
Storage Solution A or B – store at -20°C
12
Thaw, vortex and quick spin before use
Ready-to-use solution
Proseek Assay Development kit
6.2 Proseek Assay Reagents
Store the unused Proseek Assay Reagents at -20°C. Some solutions are supplied as 10x
concentrated stocks. Dilute required volumes of the stocks immediately before use.
Note: Do not store diluted reagents.
Calibrator Diluent – store at -20°C
Thaw, vortex and quick spin before use
Ready-to-use solution
Probe Diluent – store at -20°C
Thaw, vortex and quick spin before use
Ready-to-use solution
Assay Solution – store at -20°C
Thaw, vortex and quick spin before use
Ready-to-use solution
Pre-Extension Solution (10x) – store at -20°C
Thaw, vortex and quick spin before use
Dilute 1:10 in high purity water immediately before use
Extension Solution (10x) – store at -20°C
Thaw, vortex and quick spin before use
Dilute 1:10 in high purity water immediately before use
Extension Polymerase (5 U/μl) – store at -20°C
The Extension Polymerase should be kept at -20°C at all times. Use a freezing block
(-20°C) when removing the enzyme from the freezer.
Quick spin the Extension Polymerase before adding to the Extension Solution and high
purity water at a 1:100 dilution immediately before use.
Ensure that the Extension master mix is thoroughly vortexed before addition to the samples.
Real-Time PCR Solution – store at -20°C
Thaw, vortex and quick spin before use
Ready-to-use solution
Real-Time PCR Polymerase (1 U/μl) – store at -20°C
The Real-Time PCR Polymerase should be kept at -20°C at all times. Use a freezing block
(-20°C) when removing the enzyme from the freezer.
Quick spin the Real-Time PCR Polymerase before adding to the Real-Time PCR Solution at
a 1:30 dilution immediately before use.
Ensure that the Real-Time PCR master mix is thoroughly vortexed before addition to the
samples.
Proseek Assay Development kit
13
7. Protocols
7.1 Proseek Probemaker protocol
The following Proseek Probemaker protocol describes how you conjugate either the Oligo A
or the Oligo B to one antibody, to create a Proseek probe A or B. You can create the Proseek
probes A and B in parallel, however it is highly important to change pipette tips and gloves
between the A and B conjugation in order to avoid cross-contamination between the probes.
If a single polyclonal antibody batch is used, split the antibody into two separate tubes with 10
μl in each and label one with Oligo A and the other with Oligo B.
Before starting:
1. Please read through the entire Proseek Probemaker protocol.
2. Ensure that your antibody or antibodies to be conjugated meet the requirements specified
in Section 5.1.
Conjugation of Proseek Probemaker Oligo A or B to antibody
14
1)
Add 1 µl of Conjugation Buffer to 10 µl of the antibody to be conjugated.
2)
Mix gently with a pipette.
3)
Transfer the antibody solution to one vial of lyophilized Oligo (A or B).
4)
Mix gently with a pipette and make sure the oligo is completely dissolved.
5)
Incubate for 3 h at +37°C.
6)
Add 1 µl of Stop Reagent to the reaction.
7)
Agitate gently.
8)
Incubate for 30 min at room temperature.
9)
Transfer 9.6 µl of the reaction to the vial with Storage Solution (A or B). Store the few µl that are left of
the reaction in the Oligo vial at +4°C if you would like to verify the conjugate with gel electrophoresis.
10)
Incubate for 30 min at room temperature.
11)
The conjugation is now completed and your Proseek probe is stable in the Storage Solution for
12 months at +4°C. Write the name of the antibody that was conjugated on the new label (Probe A
or Probe B, 130 nM) and put it over the old label.
Note: Stability may vary between antibodies.
Proseek Assay Development kit
7.2 Proseek Assay protocol
The following Assay protocol describes how you perform the Proseek assay in a 96-well
microplate but you can as well use test tubes (PCR type). For the real-time PCR detection you
will need either an optical 96- or 384-well plate or optical test tubes. It is advisable to use a
multi-channel pipette in the reagent transfer steps when it is possible. For loading the multichannel pipette you can transfer the master mix to an 8- or 12-tube strip. Change pipette tips
between sample and reagent transfer steps to avoid cross-contamination.
There is always a loss of volume when pipetting and transferring reagents; therefore always
prepare master mixes for additional reactions. This has also been taken into account in the
Proseek Assay Reagents where Assay Reagents in kit size of 100 reactions contains reagents
for approximately 120 reactions and Assay Reagents in kit size of 1000 reactions contains
reagents for approximately 1200 reactions. If your total number of reactions in one experiment
is 40 or more, we recommend you to prepare master mixes for 8 additional reactions.
Before starting:
1. Please read through the entire Proseek Assay protocol.
2. Decide how many samples you will include in the experiment and the number of
replicates.
3. Plan how to prepare the calibration curve; number of concentrations, dilution factor and
number of replicates.
4. Calculate the total number of reactions in the experiment.
5. Use the 96-well plate template in Appendix A on page 24 and select a location for each
reaction.
1.
Dilution of Proseek probes for 3-month storage
a)
Thaw the Probe Diluent, vortex and quick spin.
b)
Dilute Proseek probes A and B (from Probemaker Storage Solution, 130 nM) 1:200 in the Probe
Diluent in separate tubes: add 1 µl of each Proseek probe to 199 µl of Probe Diluent. The final
concentration is now 650 pM, the Proseek probes can be stored in the Probe Diluent for 3 months
at +4°C.
2.
Preparation of calibration curve and samples
a)
Thaw the Calibrator Diluent and the Assay Solution, vortex and quick spin.
b)
Prepare a serial dilution of your antigen standard in the Calibrator Diluent. We recommend
7 concentrations in dilution steps of 1:10 in the calibration curve, e.g. 10 nM, 1 nM, 100 pM, 10 pM,
1 pM, 0.1 pM and 0.01 pM, and a zero standard (0 pM). 1 pM of a 10 kDa antigen corresponds to
10 pg/ml). After each dilution, mix gently by pipetting and then change to a new pipette tip.
c)
If necessary, dilute your samples in the Calibrator Diluent.
Proseek Assay Development kit
15
3.
Probe incubation
a)
Prepare a probe master mix by mixing Proseek probes A and B from step 1b) with the Assay
Solution according to the table below and vortex briefly. 3 µl of probe master mix is needed per
reaction; prepare an excess volume to account for pipetting losses.
reactions (µl)
Proseek probe A (650 pM)
0.3
Proseek probe B (650 pM)
0.3
Assay Solution
2.4
3
Total volume of probe master mix
16
1 reaction (µl)
b)
Transfer 3 µl of the probe master mix to each well of a 96-well plate (or multi-tube strip). It is
advisable to transfer the probe master mix to an 8- or 12-tube strip and use a 1–10 µl multi-channel
pipette when subsequently transferring to the plate.
c)
Add 1 µl of sample or diluted antigen standard to the 96-well plate.
Note: Do not mix by pipetting up and down since bubbles will form, instead centrifuge the plate
briefly after all samples and diluted antigen standards have been transferred to the plate.
d)
Seal the plate with an adhesive plastic film.
e)
Incubate the plate for 2 h at room temperature. This incubation can also be done over night at +4°C.
Proseek Assay Development kit
4.
Pre-Extension and Extension
a)
Thaw the Pre-Extension Solution and the Extension Solution, vortex and quick spin.
Pre-heat the thermal cycler to +37°C. Make sure you have the following Extension program ready
in the thermal cycler:
Polymerization: 20 min, +37°C
Inactivation of enzyme: 10 min, +85°C
Cooling: ∞, +4°C
b)
Prepare a Pre-Extension master mix by mixing the Pre-Extension Solution (10x) with high purity
water according to the table below and vortex briefly. 76 µl of Pre-Extension master mix is needed
per reaction; prepare an excess volume to account for pipetting losses.
1 reaction (µl)
reactions (µl)
7.6
68.4
76
Pre-Extension Solution (10x)
High purity water
Total volume of Pre-Extension master mix
c)
Prepare an Extension master mix by mixing the Extension Solution (10x) and the Extension
Polymerase (5 U/μl) with high purity water according to the table below and vortex briefly. Use a
freezing block when removing the Extension Polymerase from -20°C. 20 µl of Extension master mix
is needed per reaction; prepare an excess volume to account for pipetting losses.
1 reaction (µl)
reactions (µl)
2
Extension Polymerase (5 U/μl)
0.2
High purity water
17.8
Total volume of Extension master mix
20
Extension Solution (10x)
d)
Place the plate from 3e) in the pre-heated thermal cycler. Add 76 µl of the Pre-Extension master
mix to each well and incubate for 5 min at +37°C without sealing the plate.
e)
Transfer 20 µl of the Extension master mix to each well of the plate. Seal the plate with an adhesive
plastic film. The total volume in each well is now 100 µl.
f)
Start the thermal cycler Extension program and use a heated lid:
Polymerization (100 µl): 20 min, +37°C
Inactivation of enzyme (100 µl): 10 min, +85°C
Cooling: ∞, +4°C
If not being able to run real-time PCR immediately after the Extension, the plate can be stored at
+4°C for 24 h.
Proseek Assay Development kit
17
5.
Real-Time PCR
a)
Thaw the Real-Time PCR Solution, vortex and quick spin.
Note: The real-time PCR instrument should be turned on at least 30 min before starting the
amplification.
b)
Prepare a Real-Time PCR master mix by mixing the Real-Time PCR Polymerase (1 U/μl) with the
Real-Time PCR Solution according to the table below and vortex briefly. Use a freezing block when
removing the Real-Time PCR Polymerase from -20°C. 6 µl of Real-Time PCR master mix is needed
per reaction; prepare an excess volume to account for pipetting losses.
1 reaction (µl)
reactions (µl)
Real-Time PCR Solution
5.8
Real-Time PCR Polymerase (1 U/μl)
0.2
6
Total volume of Real-Time PCR master mix
c)
Transfer 6 µl of the Real-Time PCR master mix to each well of a new optical 96- or 384-well plate.
d)
Add 4 µl of each extension product from step 4f) to the plate.
e)
Seal the plate with an optical adhesive plastic film and centrifuge briefly.
f)
Place the plate in your real-time PCR instrument.
g)
Thermal-cycling conditions:
FAM as reporter and ROX as passive reference (Dabcyl is the quencher, you may denote “none” or
“non-fluorescent” with equal performance).
+95°C, 5 min
+95°C, 15 s
+60°C, 1 min 45 cycles
Start the run.
When the run is finished, remove and dispose of the plate.
6.
Analysis
Export the result file from the real-time PCR instrument to a spreadsheet program e.g. Microsoft
Excel. Calculate the average Ct value and standard deviation of replicates for samples and data
points in the calibration curve. Plot the calibration curve with the concentrations on the x-axis and
the average Ct values (in reverse order) on the y-axis.
18
Proseek Assay Development kit
8. Results
8.1 Typical results
Fig 10. Typical result file from the real-time PCR
instrument (Applied Biosystems 7900).
Fig 11. Result file exported to Microsoft Excel.
0
0.01
0.1
1
10
100
1000
10000
Ct Rep. 1
33.9
33.3
32.0
30.9
29.0
27.1
25.7
27.2
Ct Rep. 2
33.7
32.7
32.0
30.6
29.1
26.7
25.1
26.6
Avg. Ct
33.8
33.0
32.0
30.7
29.0
26.9
25.4
26.9
Stdev. Ct
0.09
0.42
0.00
0.21
0.04
0.26
0.44
0.41
Fig 12. Ct values in duplicates (Rep. 1 and. Rep. 2),
average Ct (Avg. Ct) and standard deviation
(Stdev. Ct) of each data point in the calibration
curve.
Proseek Assay Development kit
19
VEGF
25
26
Avg Ct (n=2)
27
28
29
30
Fig 13. Calibration curve of VEGF (R&D
Systems Ab:AF-293-NA and Ag:293-VE-010),
0–10 000 pM, with concentrations on the x-axis
and the average Ct values (in reverse order)
of duplicates on the y-axis. Error bars indicate
± standard deviation.
31
32
33
34
35
0
0,01
0,1
1
10
100
1000 10000
Concentration VEGF (pM)
8.2 Analysis of real-time PCR data
8.2.1 Absolute quantification with linear regression
Calculate the concentrations in the calibration curve to log10 scale in a spreadsheet program
e.g. Microsoft Excel; exclude the zero buffer and concentrations that are not within the
linear range of the calibration curve. Plot the values in a dot plot graph with the log10 scale
concentrations on the x-axis and the average Ct values in reverse order on the y-axis. Use
linear regression and display the trend line, the equation (y=kx+m) and the R2 value in the
graph. Use the formula 10((m-Ct)/k) to back-calculate the concentration of each Ct value in the
calibration curve and your samples.
VEGF
25
26
Avg Ct (n=2)
27
28
29
30
31
y = -1,7047x + 30,515
32
R2 = 0,9939
33
-2
20
-1
0
1
2
3
Concentration VEGF (log pM)
Proseek Assay Development kit
4
Fig 14. Calibration curve of VEGF, 0.1–1000 pM,
with concentrations converted to log10 scale on
the x-axis and the average Ct value (in reverse
order) of duplicates on the y-axis. Standard
linear regression is used.
9. Tips and tricks
9.1 Precision
The use of appropriate equipment and pipetting technique are crucial in order to obtain high
precision and low standard deviation between replicates; using well calibrated pipettes for
small volumes, fine and well attached pipette tips and a consistent and accurate pipetting
technique are of utmost importance. Increasing the number of replicates will also improve the
precision.
9.2 Sensitivity
The sensitivity of your assay may be increased by diluting the Proseek probes, stored in the
Probe Diluent at 650 pM, slightly further, e.g. another 1:2 dilution in Probe Diluent before
preparing the probe master mix. However, this will give you a background level at a higher Ct
value, thus increasing the risk for lower precision. Performing the probe incubation over night
at +4°C, instead of 2 h at room temperature, may also help increasing the sensitivity.
9.3 Quantification
To enhance the precision further of the quantification you can narrow the concentration range
of the calibration curve closer to the protein levels of your samples, and use a smaller dilution
factor of the antigen standard, e.g. 1:2 or 1:3.
Proseek Assay Development kit
21
10. Troubleshooting
Some general guidelines are given below.
Problem
Probable cause
Suggested solution
Poor
standard
curve
No or inefficient
conjugation with
Proseek Probemaker
Run a polyacrylamide or agarose gel elecrophoresis with your
Proseek probes and free antibody to verify a conjugation with
Proseek Probemaker. Contact [email protected] to receive
protocols and gel images of expected results.
No or insufficient
binding of Proseek
probes to antigen
Check the quality of the antigen. Also ensure that your
antibody used for Probemaker conjugation has been raised
against the selected antigen; preferably the antigen should be
purchased from the same supplier as the antibody.
Improper dilution of
antigen standard
Ensure that the dilution series of the antigen standard has
been properly prepared.
No or inefficient
extension reaction
Ensure that the Extension Polymerase has been stored at
-20°C.
No or inefficient
real-time PCR
amplification
Ensure that the Real-Time PCR Polymerase has been stored
at -20°C.
Wrong settings on
the real-time PCR
instrument
Ensure that correct settings have been used on the real-time
PCR instrument.
Real-time PCR
instrument is not
operating well
Run real-time PCR replicates of any real-time PCR master mix
(not necessarily Proseek reagents). CV% should be below 8%
on a linear scale, if not, recalibrate the instrument and contact
the manufacturer.
Protein levels in
samples are lower
than the detection
limit
By spiking in the antigen standard into one of your samples at
a concentration within the linear range of the calibration curve,
you can confirm that a signal over background is detected and
the lack of signal in the non-spiked samples is not caused by
any sample matrix effects.
Protein in sample
is highly abundant
and not within the
dynamic range of the
calibration curve
Dilute your samples further.
Low signals
in samples
22
Proseek Assay Development kit
Problem
Probable cause
Suggested solution
High
standard
deviation of
replicates
Incomplete mixing of
reagents
Ensure that all reagents are thoroughly mixed before applying
to the reaction plate.
Uncalibrated pipettes
Ensure that your pipettes are calibrated and that the pipette
tips are well attached to the pipettes.
Uneven pipetting of
reagents
Ensure that you use a consistent and accurate pipetting
technique during reagent and sample transfer steps. Avoid
bubble formation.
Partial evaporation of
samples
Ensure that the adhesive plastic film (or tube lids) is
completely sealed during the Probe incubation, Extension and
Real-Time PCR.
Contamination from
other wells
Be careful when removing the adhesive plastic film (or tube
lids) after the Probe incubation and the Extension to avoid
contamination drops from other wells. Before removing the film
(or lids) centrifuge the plate briefly. Also remember to change
pipette tips between sample and reagent transfer steps.
Real-time PCR
instrument is not
operating well
Run real-time PCR replicates of any real-time PCR master mix
(not necessarily Proseek reagents). CV% should be below 8%
on a linear scale, if not, recalibrate the instrument and contact
the manufacturer.
If problems remain, please contact us at [email protected] or +46 18 444 3970.
Proseek Assay Development kit
23
Appendix 1 –
96-well plate template
1
2
3
A
B
C
D
E
F
G
H
24
Proseek Assay Development kit
4
5
6
7
8
9
10
11
12
Proseek Assay Development kit
25
26
Proseek Assay Development kit
Olink Bioscience
Dag Hammarskjölds v. 52B
SE-752 37 Uppsala, Sweden
www.olink.com
0791, v1.0, 2011-05-04
This product is for research use only. Not for use in human diagnostic or therapeutic procedures.
This product includes a license for non-commercial use of the Proseek product. Commercial users will require additional licenses. Please
contact Olink AB for details.
There are no warranties, expressed or implied, which extend beyond this description. Olink AB is not liable for property damage, personal
injury, or economic loss caused by this product.
The following trademarks are owned by Olink AB: Olink®, Olink Bioscience, Proseek®, Duolink® and PLA®.
This product is covered by several patents and patent applications including US 6,511,809, US 7,306,904, and related US and foreign patents.
This product is sold under license from PHRI Properties, Inc. and may be used under PHRI Properties patent rights outside the field of
human in vitro diagnostics.
DreamTaq is a trademark of Fermentas UAB, a wholly owned subsidiary of Thermo Scientific Inc.
The oligonucleotide labelling components in the Proseek Probemaker kit utilise Lightning-Link™ technology and are provided under
license from Innova Biosciences.
© 2011 Olink AB.
All third party trademarks are the property of their respective owners.