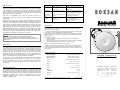
1
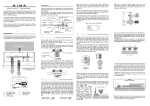
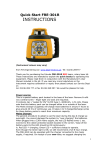
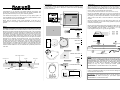
Radius5
Record Player
Packaging
Assembly
Your Radius5 is carefully and thoughtfully packed so that the packaging can be
re-used whenever you need to transport it. Please store all the packaging
material for future use.
Remove the Radius5 from its protective bag and check that the voltage
label indicates the correct voltage range for your mains supply. If the
Radius5 is fitted with the NIMA tone arm, be extra careful not to damage
the arm while you are assembling the record player.
(If in any doubt, remove the tone arm. Refer to the NIMA user manual)
Congratulations on your purchase of the Roksan Radius5 record player. This
record Player is designed and manufactured to the highest specification and
rigorously tested to reward you many years of listening pleasure.
Remove the Adjustable Spike Feet (x3) from the accessories bag and
carefully fit them to the bottom plinth. Initially screw them all the way as
the surface you intend to place the Radius5 on would normally be level.
These could be used later to level the Radius5 in its final position if
required.
Your Radius5 record player is at the heart of your vinyl replay system. Its
correct installation, set-up and operation will have a profound influence on the
sonic performance of the entire hi-fi installation.
Please read the contents of this manual thoroughly. It will help you to
understand your record playing equipment better and enhance your listening
pleasure.
Remove the Platter, with the record label recess upper most, carefully
locate its central hole over the main bearing spindle and gently lower it
until the two fit/mate together.
OPEN
CARTON TOP
Brief
The design of the Radius5 record player has many special features not found in
other similar turntables. Drive mechanism utilises a custom synchronous motor
fitted with a precision-machined solid aluminium alloy pulley. The main bearing
housing and spindle are custom designed and machined from solid brass and
solid stainless steel to extremely high precision to ensure ultra smooth running
and longevity. The platter is machined from solid Acrylic to very high accuracy
and ensures speed stability. Main bearing, Platter and Tone Arm are mounted
on the sub-plinth and three point de-coupled from the main-plinth to maximise
performance and minimise acoustic break through. The motor assembly is
mounted on the motor block and then onto the main-plinth and further decoupled to avoid motor noise break through. Tone Arm cable is rigidly fixed to
the main-plinth that acts as a mechanical ground and minimises interference
with the sub-plinth. The Radius5 has three custom made adjustable spike feet
to allow levelling and provide optimum coupling to the surface that it sits on.
Partnered with the NIMA tone arm, the Radius5 has unparalleled performance
in its class.
CAREFULLY REMOVE:
1
Remove the Drive Belt and gently place it around the platter and onto the
pulley. Note position 1 & 3 would provide 33 & 45 rpm for mains supplies
running at 60Hz (cycles) and position 2 & 4 provide 33 & 45 rpm for
mains supplies running at 50Hz (cycles) see figure below.
TOP CARD 1
1
2
3
4
33 rpm
33 rpm
45 rpm
45 rpm
60Hz
50Hz
60Hz
50Hz
PLATTER PACKAGING 2
INFO PACK 3
2
3
PLATTER
PLATTER 4
4
PROTECTIVE CARD 5
DRIVE BELT
ADJUSTABLE SPIKE FEET
MAIN BEARING SPINDLE
6
MOTOR BLOCK
PLATTER
5
RADIUS5
7
MAIN PLINTH
MAIN BEARING HOUSING
6
SUB-PLINTH
SUB-PLINTH DE-COUPLING
MOUNTS
ACCESSORIES PACK 7
SUPPLIED ONLY WITH ROKSAN
NIMA TONE ARM
NOTE:
The Main Bearing is already charged with correct type oil & grease and
it is important that the Main Bearing Spindle is not removed from the
bearing housing. This will disperse some of the oil and necessitate
charging the Main Bearing with oil again. The Main Bearing will require
cleaning with a cotton bud and recharging, with Roksan supplied
bearing oil, every two years. Consult your Roksan appointed
retailer/distributor or contact Roksan Audio for any assistance.
Finally, for assembling and fitting of your tone arm and cartridge, refer to
the manufacturer’s user manual.
IMPORTANT:
The Radius5 is mains operated. DO NOT try to gain access to the
inside of this unit. Refer all servicing to your Roksan appointed
retailer/distributor or contact Roksan Audio.
Installation
Place the Radius5 on a rigid level surface (take care to avoid damaging the
surface by the spike feet). The arm cable should be securely fixed into the base
of the tone arm and connected to the phono input of the amplifier without pulling
on to the Radius5. It is important to ensure the phono input is correct with the
type of cartridge you are using and that the tone arm cable ground lead is firmly
attached to the phono grounding point.
Note that the cartridge/tone arm should be assembled according to
manufacturer’s instructions to ensure correct geometry, tracking weight and
anti-skate force.
Connect the power lead to the correct voltage mains supply and switch the
Radius5 on. The Radius5 platter will start to rotate at the speed corresponding
to the position of the drive belt on the pulley and the mains supply frequency. In
most countries, 220-240Vac supplies are at 50Hz and 110-120Vac mains are at
60Hz. If you are unsure of your mains supply frequency, you can check both
pulley positions and verify the correct selection by listening to a piece of music.
Please note that the motor body is de-coupled and it will oscillate back and forth
while it synchronises with the mains frequency and gets to the correct speed.
This method of mounting and isolating the motor ensures minimal motor noise
break through and stabilises the continuous running speed.
NOTE:
Always remove the platter before transporting the Radius5.
The drive belt is best fitted by carefully placing it around the platter,
diagonally opposite the pulley, then gently stretching and placing it in the
pulley groove.
SYMPTOM
No power
Wrong speed
Mis-tracking
and poor sound
quality
Hum from
speakers
LIKELY CAUSE
SUGGESTED REMEDY
AC Mains lead not inserted
properly
Ensure AC Mains lead is fully inserted
Unit not switched
Incorrect pulley groove selected
Switch unit on
Check your mains supply frequency and
place drive belt in the correct pulley groove
(see figure in assembly section above)
Incorrect arm/cartridge set-up and
alignment
Check arm/cartridge set-up (refer to
manufacturer’s user manual)
Tone arm cable ground not
connected
Connect tone arm cable ground lead to
phono amp ground terminal
Incorrect Grounding
Check Mains polarity and grounding on all
connected equipment
Radius5
Record Player
Guarantee
There are no user-serviceable parts inside your Roksan Radius5 Record Player. If a fault
should develop, refer any servicing to your appointed ROKSAN dealer, distributor or
ROKSAN approved service agent.
Your Roksan Radius5 Record Player is guaranteed against any defect in materials and
workmanship for a period of two years from the date of purchase.
This guarantee only becomes effective if the warranty card is validated (by the ROKSAN
retailer from whom the equipment was purchased) and returned to ROKSAN within 28
days of purchase.
This guarantee excludes:
1. Damage caused due to accident, misuse, neglect and incorrect installation,
adjustment or repair.
2. Liability for damage or loss during transit from the retailer or purchaser to ROKSAN
or its authorised distributor for the purposes of repair or inspection.
Carriage costs to ROKSAN shall be borne by the consignor.
Operation
Your Radius5 record player is now ready for use. With the drive belt in the
desired pulley groove switch the Radius5 on. Check the amplifier volume is set
to low and that the correct input for phono is selected. Gently increase the
volume and check for any unwanted hum/noise. Check the hum level with the
amplifier at full volume. There should no hum or very low level of hum audible
(Remember to lower the volume afterwards). If so, then carefully place the
record you wish to play onto the platter, gently lower the arm/cartridge onto the
track you want to listen to and enjoy the music from your Radiu5.
To select 45 or 33 rpm, switch the motor off and place the belt around the
corresponding pulley groove and start the motor again. The motor will at first
rock back and forth a few times to catch up with speed and synchronise. Once
the motor has settled down, place the record on the platter and play your
desired track.
All claims under this guarantee must be made through an authorised ROKSAN retailer.
If equipment returned for repair to ROKSAN is found on inspection to comply with the
product specification ROKSAN reserves the right to make a charge for examination and
return carriage.
Specifications
Main Bearing Spindle
Main Bearing Housing
Main Bearing Ball
Precision machined stainless steel
Precision machined solid brass
Precision case hardened steel
Pulley
Precision machined Aluminium alloy
Platter
Precision machined Acrylic
Motor
Custom made 24 pole synchronous
Speed
33 & 45 rpm
Troubleshooting
Power
110 or 220 Vac – 50/60 Hz
If you suspect that your Radius5 record player is not working correctly, first
check all the connections. Pay particular attention to cartridge tag connections,
(channel & phase), tone arm cable connections (phono RCAs & ground) and
mains lead connection. Below are some commonly encountered problems with
suggestions for possible cure. The list is not exhaustive: If you have any
unresolved problems, please consult your ROKSAN appointed retailer,
distributor or Roksan Audio.
Rumble
<-75dB
Wow & Flutter
<0.04%
Dimension
User Manual
R O K S A N
L I M I T E D
6 NORTHFIELD INDUSTRIAL ESTATE
BERESFORD AVENUE
ALPERTON
ENGLAND
MIDDLESEX HA0 1NW
400 x 350 x 150mm (W x D x H)
T E L .
7Kg
F A X .
Weight
A U D I O
+ 4 4
+ 4 4
+ 4 4
( 0 ) 2 0 8
( 0 ) 2 0 8
( 0 ) 2 0 8
9 0 0
9 0 0
9 0 0
w w w . r o k s a n . c o . u k
All specifications are liable to change without prior notice. E. & O.E.
Printed in England
6 8 0 1
6 8 0 2
0 7 3 4