1
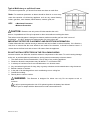
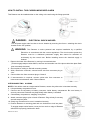
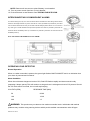
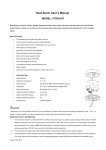
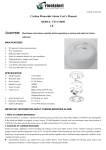
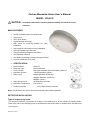
Carbon Monoxide Alarm User’s Manual MODEL: CDA/CO CAUTION: Read these instructions carefully before installing and retain for future reference. MAIN FEATURES AC/DC operated carbon monoxide alarm Insect proof Test / Hush button High and stable sensitivity With quick fix mounting bracket for easy installation and simple AC connector for easy installation Inter-connectable up to 20 units Fitting and battery tamper-resist feature LED operation indicator Low-battery and battery missing warning indicator Auto reset after the CO is clear SPECIFICATION Model Number: Detection Type: Power Source: Operation Current: Alarm Level: CDA/CO Electrochemical 220-240V AC 50Hz and 9V DC Battery back-up <30mA operation (mains) 50ppm (Between 60-90 min) 100ppm (Between 10-40 min) 300ppm (<3min.) Alarm Sound Level Operation Temperature: Ambient Humidity: 85 Decibels at 3 meters 5ºC to 38 ºC 15% to 90% Relative Humidity Note: This Detector can only be interconnected with other alarms specified. DETECTOR INSTALLATION Typical single-story home For minimum protection you should fit an alarm in the bedrooms or in the hallway of sleeping areas. Place it as near to the sleeping areas as possible and ensure the alarm is audible when the bedrooms are occupied. ISSUE 2 02 2012 Typical Multi-story or split level home For minimum protection, you should fit at least one alarm on each floor. Note: For maximum protection an alarm should be fitted in or near every room that contains a fuel-burning appliance such as any central heating boilers, gas fires, room heaters, water heaters, cookers, grills, etc. KEY: ● Maximum Protection ○Minimum Protection CAUTION: Detectors can only sense CO that reaches the unit‟s sensor. It‟s possible that CO may be present in other areas without reaching the alarm. This carbon monoxide alarm is designed to detector carbon monoxide gas from ANY source of combustion. It is NOT designed to detect smoke, fire or any other gas. IMPORTANT DETECTOR PLACEMENT AND EXCEPTION INFORMATION Carbon Monoxide has a similar density to warm air and can be fitted in various locations. If it is fitted to a wall, then to ensure that the most effective use made of the detector, it should be fitted at least 1.5 meters above the floor level and at least 1.85 meters from the appliance. DO NOT INSTALL DETECTORS IN THE FOLLOWING AREAS Incorrect location can affect the sensitive electronic components in this alarm. To avoid causing damage to the unit, to provide optimum performance, and to prevent unnecessary nuisance alarms: 1. The alarm should not be located within 1.5m (5 feet) of any cooking appliance. 2. Situations where the temperature may fall below 5℃ or rise above 38℃. 3. In a damp or humid area such as near bathrooms or in shower areas. 4. Any area where high levels of dusty, dirty or greasy emissions could contaminate or clog the sensor. 5. Behind curtains or furniture. 6. In the path of air discharged from a air conditioning vent or ceiling fan. 7. Outside the building. 8. Directly above a sink or cooker. WARNING: This Detector is designed for indoor use only. Do not expose to rain or moisture It will not protect against the risk of CO poisoning when the battery has drained. DO NOT open or tamper with the alarm as this could cause malfunction. ISSUE 2 02 2012 HOW TO INSTALL THIS CARBON MONOXIDE ALARM This Detector can be installed either on the ceiling or the wall using the fixings provided. DANGER: ELECTRICAL SHOCK HAZARD. Turn off power at the main fuse box or circuit breaker by removing the fuse or switching the circuit breaker to the OFF position. WARNING: 1. 2. 3. 4. 5. This Detector is mains powered and requires installation by a qualified Electrician in accordance with the current regulations. The circuit used to power the Detector must be a dedicated permanent supply that cannot be switched off accidentally by the normal user. Before installing ensure the electrical supply is isolated. Remove the base of the Detector, by turning it counterclockwise. (To later engage tamper-resist feature, twist out and set aside one of the pins molded into plate. Both pins are exactly the same.) Secure plate to ceiling or wall with mounting screws. With a small wire connector, connect brown wire from connecter plug to „Live‟ Connect blue wire from connector plug to „Neutral‟ If interconnection is required, connect yellow wire from connector to interconnect wire between other Channel alarms. INTERCONNECTING ALARMS. NOTE: If this will be used as a single-station Detector, ensure the yellow wire is insulated correctly. 6. Lift open battery compartment cover. 7. Connect new 9-volt battery to battery connector inside battery compartment. Be sure battery is securely connected. Detector may beep briefly when battery is installed. 8. Close battery compartment, snapping it into place. 9. Attach connector plug to pins on back of Detector. Plug will only fit one way and will snap into place. 10. Gently tug connector to be sure it is attached securely. 11. Position Detector to mounting plate and turn clockwise to lock into place. To engage tamper-resist feature, insert pin into notch on edge of Detector after alarm is properly positioned in base. ISSUE 2 02 2012 NOTE: Detector will not mount to plate if battery is not installed. 12. Turn on power at main fuse box or circuit breaker. 13. Push test button to test Detector. See TESTING THE DETECTOR. INTERCONNECTING CO/SMOKE/HEAT ALARMS For interconnecting line, only use 1.5mm minimum solid or stranded wire. When being interconnected, maximum wire length between any two is 1500 feet for 1.5mm (20 OHMS loop resistance). The alarm can be interconnected with as many as 20 other Channel Safety Systems alarms. Do not connect to any other type or model heat alarms except those specified. This alarm is powered by 220-240V AC 50Hz and with 9V DC Battery back-up. This Detector is powered by 220-240V AC 50Hz and with 9V DC Battery back-up. Note: The YELLOW WIRE IS NOT ‘EARTH’ OPERATING YOUR DETECTOR Normal Operation When no carbon monoxide is present, the green light flashes ONCE A MINUTE and is an indication that your alarm is powered and functional. Alarm Condition When the unit detects dangerous levels of CO, Red LED flashes rapidly and alarm sounds loudly (repeating 4 beeps, pause).This will continue as long as there is a dangerous level of CO present. Should the CO levels return to normal, the unit will stop beeping. CO LEVEL (PPM) RESPONSE TIME (MIN) 50 60-90 100 10-40 300 <3 WARNING: This product may not alarm at low carbon monoxide levels. Individuals with medical problems may consider using warning devices which provide audible concentrations under 30 ppm. ISSUE 2 02 2012 Hush Feature WARNING: • The Hush Feature is for your convenience only and will not correct a CO problem. Always check your home for a potential problem after any alarm. Failure to do so can result in illness or death. NEVER remove the battery from your Detector to silence an alarm. Use the silence feature. Removing the battery removes your protection! See “If Your Detector Sounds” for details on responding to an alarm. The Hush Feature is intended to temporarily silence your Detector‟s alarm while you correct the problem—it will not correct a CO problem. While the alarm is silenced it will continue to monitor the air for CO .When CO reaches alarm levels the alarm will sound— repeating sounder pattern: 4 beeps, a pause, 4 beeps, etc. Press and hold the Test/Silence button until the sounder is silent. The initial Silence cycle will last approximately 4 minutes. NOTE: After initial 4-minute Silence cycle, the Detector re-evaluates present CO levels and responds accordingly. If CO levels remain potentially dangerous or start rising the alarm will start sounding again. While the detector is silenced: If the Detector... This means... Is silent for only 4 minutes, then starts sounding loudly—4 beeps, pause, 4 beeps, pause CO levels are still potentially dangerous. If the Detector... This means... Remains silent after you pressed the Test/Hush button CO levels are dropping. Low Battery Signal The light continues to flash (RED) and the sounder also “chirps” once every minute. This warning should last for up to 30 days, but you should replace the battery as soon as possible. NOTE: With normal use the battery will last for 1 year minimum. However, battery life will be reduced if either a fault occurs with the battery or the unit remains in alarm for long periods of time. Unit Malfunction Your Detector performs an internal self-diagnosis to make sure that it is functioning properly. If the unit has detected an error, the light flashes (RED) and the sounder sounds 3 quick “chirps” every minute. Detector needs to be replaced. Never ignore a CO unit‟s alarm. A true alarm is an indication of potentially dangerous levels of carbon monoxide. Detectors are designed to alert you to the presence of carbon monoxide before an emergency, before most people would experience symptoms of carbon monoxide poisoning, giving you time to resolve the problem calmly. ISSUE 2 02 2012 TESTING THE DETECTOR • Test the Detector once a week. If the Detector ever fails to test correctly, have it replaced immediately! If the Detector is not working properly, it cannot alert you to a problem. • DO NOT stand close to the Alarm when the sounder is sounding. Exposure at close range may be harmful to your hearing. When testing, step away when sounder starts sounding. Push and hold the Test/Silence button on the cover until the LED flashes. The alarm sounder will sound 4 beeps, pause, then 4 beeps. The ALARM (RED) light will flash. The alarm sequence should last 5-6 seconds. If it does not alarm, make sure fresh batteries are correctly installed, and test it again. If the unit still does not alarm, replace it immediately. If the alarm does not test properly: 1. Make sure that fresh batteries are installed correctly. 2. Be sure the Alarm is clean and dust-free. 3. Install fresh 9V batteries* and test the Alarm again. WARNING: • The Test/Hush button is the only proper way to test the Detector. NEVER use vehicle exhaust! Exhaust may cause permanent damage and voids your warranty. *For a list of acceptable replacement batteries, see “CHOOSING A REPLACEMENT BATTERY.” MAINTAINING YOUR DETECTOR Your alarm will alert you to potentially hazardous CO concentrations in your home when maintained properly. To maintain your alarm in proper working order, it is recommended that you: 1. Test your alarm at least once a week. 2. Clean your Detector regularly to prevent dust build up. See “CLEAN THE DETECTOR” BATTERY REPLACEMENT Always turn off the AC supply to the Detector before replacing the battery. Replace battery at least once a year or immediately when the low battery signal sounds once a minute, even though the Detector is receiving AC power. Battery should be replaced regularly as necessary. WARNING: Do not use any other type of battery, except as specified in this manual. Do not use rechargeable batteries. A good quality battery should be used. Some batteries may last more than one year. The battery should only be replaced by a qualified electrician or similarly qualified person. 1. Turn off AC power supply to the Detector. 2. Remove the 2 tamperproof tabs fitted between the base plate and detector by tools. Turn Detector anti-clockwise to detach it from the mounting plate. 3. Gently pull down Detector. 4. Remove battery from the compartment. 5. Insert a new 9-volt battery to connector. NOTE POLARITY OF CONNECTIONS. Ensure the metal tab is fully depressed when the ISSUE 2 02 2012 battery has been fitted. 6. Using the Push-to-Test button, test the Detector to verify 9V DC battery back-up. See “TESTING THE DETECTOR” 7. Reattach the Detector to the mounting plate by turning Detector clockwise until it snaps into place. Insert the two tamperproof tabs back into the notch on edge of Detector after alarm is properly positioned in base 8. Turn on power supply and test Detector using push-to-test button. See “TESTING THE DETECTOR” Note: If the unit fails to operate when being tested, Please refer to “TROUBLESHOOTING”. CHOOSING A REPLACEMENT BATTERY: The unit requires one standard 9V battery. The following batteries are acceptable as replacements: Duracell, Eveready, Powersonic. CLEAN THE DETECTOR Clean the detector at least once a month to remove dust, dirt, or debris. Using the soft brush or wand attachment to a vacuum cleaner, vacuum all sides and cover of Detector. Be sure all the vents are free of debris. If necessary, use a damp cloth to clean Detector cover. IMPORTANT: Do not attempt to remove the cover to clean inside the detector. This will void your warranty. NOTE: Never use detergents or solvents to clean the alarm. Chemicals can permanently damage or temporarily contaminate the sensor. Avoid spraying air fresheners, hair spray, paint or other aerosols near the alarm. Do not paint the alarm. Paint will seal the vents and interfere with proper sensor operation. Move the Detector to a remote location, to prevent possible damage to or contamination of the sensor if you will be staining or stripping wood floors or furniture, painting, wall-papering, or using aerosols or adhesives. WARNING: Reinstall the Detector as soon as possible to assure continuous protection. The following is a list of substances that at high levels can damage the sensor or cause temporary false alarm that is not a carbon monoxide alarm. Ethylene, ethanol, alcohol, iso-propanol, benzene, toluene, ethyl acetate, hydrogen, hydrogen sulfide and sulphur dioxide. Also most aerosol sprays, alcohol based products; paint, thinner, solvent, adhesive, hair spray, after shave, perfume, auto exhaust (cold start) and some cleaning agents. Trouble Shooting Guide PROBLEM... THIS MEANS... YOU SHOULD... The light continues to flash (RED) Low battery warning. Install new 9V battery. The light flashes (RED) and the MALFUNCTION SIGNAL. Detector Detectors under warranty should be returned to sounder sounds 3 quick “chirps” needs to be replaced. manufacturer for replacement. Detector goes back into alarm 4 CO levels indicate a potentially IF YOU ARE FEELING SYMPTOMS OF CO minutes after you press the dangerous situation. POISONING, EVACUATE your home. If not, press and the sounder “chirps” once every minute. every minute. Test/Hush button. the Test/Hush button again and keep ventilating your home. Detector sounds frequently even The Detector may be improperly Relocate your alarm. If frequent alarms continue, though no high levels of CO are located. Refer to “DETECTOR have home rechecked for potential CO problems. revealed in an investigation. PLACEMENT.” You may be experiencing an intermittent CO ISSUE 2 02 2012 problem. ISSUE 2 02 2012