1
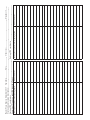
The Plants of Baxter State Park Project
A Manual for Citizen Scientists
2013 - version 3.0
This manual is intended for volunteers wanting to assist the Baxter Flora Project by walking specific trails or
roads and documenting plants encountered. Note: Collecting plants or parts of plants in Baxter State Park
is not permitted - however by taking lots of photos, you can help us out tremendously. You don’t need to
know the identification of plants to be of help with this project, however, we suggest hiking
with a field guide and trying to figure out what plants you are seeing.
Objectives for Flora of Baxter State Park Project:
Our goal is to develop an inventory of all of the vascular plants (think flowering plants,
grasses, sedges, and ferns - not lichens or moss) of Baxter State Park by 2016. The Park has
many miles of roads and trails that we would like to visit during each month, thus we can use
all of the help that we can get. We will be keeping separate species lists for each township.
A few things to keep in mind:
1. Safety first. Let’s try for zero injuries, no one gets lost, and everyone has a great time. Know your
limitations and turn back early, even if you haven’t covered the entire trail.
2. Use ‘Leave No Trace’ practices.
3. Collecting of plants in Baxter State Park is not permitted. If you find a plant that seems very interesting,
take lots of photos and record a GPS location for the plant. If we can’t tell what it is from your photos,
we may make a trip to see the plant, and your coordinates will lead us right to it.
Minimum equipment you need for assisting:
Digital Camera (point and shoot camera works fine)
Handheld GPS unit and some knowledge of how to change the basic setup of the unit
This manual and multiple copies of the datasheet at the end of this document
Your own transportation and camping reservations in Baxter State Park
Any hiking/camping/safety gear you require for your hike.
Steps for signing up and collecting useful data for the Baxter Flora Project:
1) Contact the project leader (Glen Mittelhauser, [email protected]) to
sign up to walk a particular road, trail, or campsite and document plant diversity; let
us know if you already have a preference for what trails/roadsides and timeframe that you want to cover.
Note that if you are recording plant details, you won’t be able to hike very fast, thus take this into account
when planning.
2) Walk the section that you signed up for and take photos of plants and note geographic coordinates with
your GPS and fill in the data on the datasheets. Please read and follow the detailed instructions below.
3) Stick to the trails and roadsides - no wandering off trail for this project, particularly above treeline.
4) When you return from your trip, mail copies of your photos on a CD or flash drive (with the original
sequential numbered file names created by the camera), the photo permission form, and your original
datasheets to:
Maine Natural History Observatory
Baxter Flora Project
317 Guzzle Road
Gouldsboro, ME 04607
[email protected]
Data collection
On the form labeled ‘Baxter Flora Species Datasheet 2013’, fill out the header section. Make sure to fill in the
GPS coordinates for your starting location on the trail. As you start hiking,
1) write a short description of a plant (only as you first encounter it),
2) take a photograph of the datasheet showing the plant description you just wrote,
3) take multiple photos of the plant, and
4) occasionally record GPS coordinates (not for every plant, but every few hundred yards or so along the trail).
If you find a plant that you think is particularly interesting, make sure to take many photos and record the
GPS coordinates on the datasheet. Also, if you come across an interesting habitat, record that on the datasheet
as well and record the GPS coordinates. At the end of your data recording session, record your ending GPS
coordinates on the datasheet. That is all there is to it; each plant species is recorded only once on the datasheet.
When you send us your photos and datasheets, we will identify plants as best as we can from your images by
matching up your images with your datasheet.
GPS use
You need to collect locational data in a in a format that will be useful to
the project. Please be sure set your GPS to record locations in UTMs
(Universal Tranvers Mercator, Zone 19) coordinate system (rather than
latitute,longitude) and in the NAD83 datum (North American Datum
of 1983) (or WGS84[World Geodetic System of 1984] if this is easier
for you). Note that your GPS receiver may only refer to the coordinate
system as UTM and may set the zone automatically. If you don’t know
how to set this in your GPS unit, check your user manual, search online
for instructions, or find someone with more knowledge about setting this
on your GPS. On the datasheets, enter coordinates in the blank provided,
A.C. Dibble
rounding to the nearest whole meter. Note that Easting coordinates are
always composed of six digits in Maine, though in some GPS receivers
there will be a leading zero as the first digit. Northing coordinates are always composed of seven digits in
Maine.
Macro photography tips for compact point and shoot cameras
Taking good close-up images of plants can take some practice. The tips noted below may help improve the
quality of your photos. We recommend taking multiple photos per plant to insure at least some of them are in
focus and capture features necessary for identification. Please take photos of all plant parts including the flower,
the flower cluster, leaves, fruits, and the whole plant.
Setting up your camera:
Select macro mode: Macro mode is generally symbolized with a little flower and when selected it will
tell your camera that you want to focus on a subject closer to your lens than normal. In some cameras you
need to be zoomed all the way to wide angle for the macro feature to work.
Photo quality (image size): Do not shoot at the smallest image size (often noted as “for email”). If
you know your camera, shoot at a large image size with enough resolution that allows for zooming in
when viewed on a computer. When in doubt, shoot in a higher quality mode with more pixels (i.e. pick
3072x2304 rather than 800x600). Some point-and-shoot models use categories rather than pixel numbers,
such as SHQ (super high quality) or HQ (high quality).
ISO setting: We generally set the ISO to between 80 and 100. In good light turn the ISO as low as
possible, in very low light you can turn the ISO up as required to get a balanced exposure, however, realize
that setting the camera to a higher ISO setting introduces graininess to the image (lower image quality).
Image stabilization, camera shake, and wind: If your camera has image stabilization, turn it on to
prevent blurriness in the image. If your camera doesn’t have image stabilization, bracing it against
something like a tree trunk, stump, rock, or if you are kneeling, a thigh can help minimize image blurring.
If wind is shaking the plant, wait for it to become still, or if necessary create a wind break with your
backpack or a companion.
Aperture: If your camera allows you to change aperture settings (size of the lens opening) while in Macro
mode, you may use this to improve your close-up images. Aperture affects “depth of field” (the portion or
depth of the photograph that is in focus). The smaller the aperture (= greater the number), the greater the
depth of field will be. Another factor that affects depth of field, is distance between camera and subject—
the closer the camera is to a subject, the narrower the depth of field becomes. This is critical in close-up
photos of small parts of plants, when the camera may be a few inches from the subject, and the depth of
field may be limited to an extremely narrow zone only an inch or so deep. Choosing the smallest aperture
possible (= greatest aperture number) in a given situation will provide the greatest depth of field. Using a
slow shutter speed (e.g. 60) when there is no wind or camera shake, will allow for a smaller aperture. Keep
in mind the number for aperture setting is somewhat counter-intuitive. The larger the number, the smaller
the aperture. For example, 8.1 is a smaller aperture setting than 3.2. Another thing to keep in mind: the
depth of field around the focus point is 1/3 towards the camera and 2/3 away from the camera.
Exposure compensation: Some cameras let you alter the exposure (make the image darker or lighter).
When photographing a light-colored subject such as a white flower, with a darker background (e.g.,
green foliage or shadow), many cameras calculate correct exposure based on the whole image. This can
result in bright areas where detail is wanted, to appear washed out. In such cases we suggest adjusting the
exposure so that the image is on the dark side (underexposed) as we can always make these images lighter
while keeping detail in the underexposed areas using photo editing software. An image that is too light
(overexposed) cannot gain detail in the washed out portion of the image using photo editing software.
Flash: If you can avoid it, don’t use flash. Taking a picture with a lot of light will make for a clearer image,
however, you need specialized flash equipment to light macro images well. Turn off your flash on your
camera. Supplemental lighting need not be electronic. If the sun is shining, it’s easy work to redirect the
rays of sunlight onto your subject using portable folding reflectors (strips of crumpled tin foil, leaves, white
paper, etc.).
Setting up your photograph
Focusing: This is probably the most important facet of Macro mode. The lens will automatically focus on a
particular close-up object, but it might not be the one you want. Sometimes you’ll have to play around with
the camera, usually by moving it around, pressing down on the shutter button lightly (but not all the way
so it doesn’t take a picture) to re-focus the lens. If you are having trouble getting the camera to focus on
your subject, sometimes you can hold a leaf in front of your subject, focus on that, then take the leaf away
and take the photo. You can also aim your camera at the base of the plant, get it to auto focus there, then
move it back up to frame the image, but you have to judge the distance to your subject to get this to work.
You also need to think of what will be in focus and what will be out of focus when composing your shot,
regarding depth of field as discussed above under aperture. Keep in mind that with very low depth of field
in many shots, it will help if you can get your subject aligned all in one plane roughly the same distance
from the camera lens. When in doubt, because limited depth of field may result in too much of your subject
being out of focus, after taking the closest shots, back away and take a few additional pictures from a
greater distance from the subject.
Be mindful of sun and shadows: A frequent challenge when engaging in close-up photography is keeping
the shadow of the camera, lens and sometimes the person taking the picture out of the image area. If the
angle of the sun is positioned off to the side, it’s usually easy to find an agreeable middle ground between
the position of the camera, the sun and your subject. But sometimes you end up casting shadows across
your taking area regardless of how much you try to duck, tilt or hide.
Be mindful of the background: When taking photos, study the background to see what will be included
in the picture. You might want to move aside some grass other vegetation if they are cluttering the
background. The best backgrounds contrast markedly with the color of what you are photographing. Blue
sky in the background, bare soil, or some paper sometimes helps to create an appropriate background. Be
creative in thinking up appropriate backgrounds. Putting the camera right on the ground next to a small
plant, with blue sky in the background may work very well for some shots. Having the subject in full sun
with a shaded background also works.
Be mindful of image composition: Generally we don’t pay much attention to photo composition for
taking close-up photos of plants. However, these may be some tips that will prove useful. Placing your
main subject slightly off of center, generally creates an interesting image. Some photographers suggest
following the rule of thirds (most of the time): place your subject just one third in from any side of the
frame. This creates a space for the eye to move through the picture, making it more interesting by default.
Also, having some diagonals in an image can be pleasing to the eye.
Take a lot of photos: Many photos will turn out blurry for many reasons, even the smallest gust of wind
can shake your subject and cause a blur. Therefore, it is prudent to hedge your bets by taking multiple shots
of the same subject.
Anticipated Questions:
Should I be recording and photographing those small grasses and sedges as well as ferns and trees and
plants in flower and fruit? Actually, this is up to you. We are interested in documenting all plants in the Park,
but we can’t expect everyone to have a strong interest in looking at grasses or sedges as we do. You can just
focus on the species that are flowering, you can do the trees, you can photograph ferns, you can pay attention to
the grasses, sedges, and rushes, or all or portions of the above. Just record on the header of your data sheet the
plants that you are generally ignoring.
What if I find a more photogenic plant later in my walk, but this species was recorded and photographed
earlier in the day? In the next open row of your datasheet, you should add another description of the plant,
photograph the datasheet, then photograph the plant. Thus, it is OK to have a plant species show up multiple
times on a datasheet.
I know my plants fairly well and could record species and abundance of each species along the trail - is
this useful information for the datasheet? Yes, record species names if you know them, and also feel free to
add additional notes to the datasheet on abundance or other details. These datasheets and photographs will be
archived at Baxter State Park Headquarters and additional details will be extremely helpful to researchers 100
years from now who are trying to figure out how the flora has changed in the Park.
I don’t know my plants very well at all, is it still useful to have me record data on the Park flora? Yes!
You don’t need to know plant identification to document the species along a trail. Most species do not look
alike at all. On the datasheet, write a short description of the plant (e.g., white flowers on short stalks with
narrow leaves) to help jog your memory on what the plant looks like, photograph your description on the
datasheet, and then photograph the plant. We will figure out what the plant species is from your photographs.
If you have additional questions, contact Glen Mittelhauser, [email protected]; 207-963-2012
Description of plant or habitat photographed
GPS Coordinates
Description of plant or habitat photographed
GPS Coordinates
Baxter Flora Species Datasheet 2013 Township ________ Date___________ Observers:________________________________Datasheet #_____
Trail name and location description:_________________________________________________________________________________________
Starting GPS coordinates:________________________________________Ending GPS coordinates_______________________________________
Summary of Plants you generally ignored (if any):_______________________________________________________________________________
Photo permission form
Please fill out and mail to Maine Natural History Observatory when submitting photos
Baxter State Park and Maine Natural History Observatory have my permission for the use of my photographs
(detailed below) for archiving purposes. In addition, Baxter State Park and Maine Natural History Observatory
have my permission to use my photographs during presentations and for educational purposes (including the
field guide to the plants of Baxter State Park), as long as photographer credit is given.
Please print clearly below.
Range of dates photographs taken:____________________________________________________________
Location(s) where photographs taken:___________________________________________________________
_________________________________________________________________________________________
__________________________________________________________________________________________
Photographer Name:_________________________________________________________________________
Signature:__________________________________________________________________________________
Date Signed:_________________________________________________________________________
Mailing address (We will send you a complimentary copy of the Plants of Baxter SP field guide if we use your
photos in the guide) Where would you like us to mail your copy?
_______________________________________________
_______________________________________________
_______________________________________________
_______________________________________________
_______________________________________________
Please send signed form back to:
Maine Natural History Observatory
317 Guzzle Road
Gouldsboro, ME 04607
[email protected]
207-963-2012