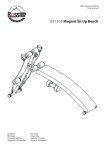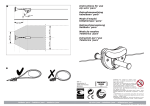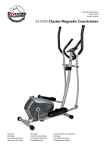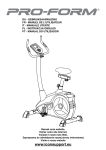
1
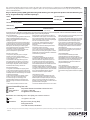
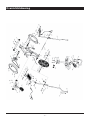
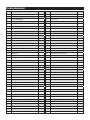
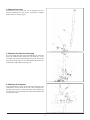
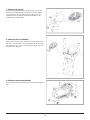
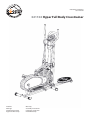
Gebruikersaanwijzing
User manual
021104 Hyper
yp Full Body
y Crosstrainer
rantie
Garantie
Montage
Computerinstructies
Algemene fitnesstips
Warranty
Assembly Instructions
Computer Instruction
General fitness tips
Inhoudsopgave
Algemene veiligheidsvoorschriften . . . . . . . . . . . . . . . . . . . . . 3
Garantie. . . . . . . . . . . . . . . . . . . . . . . . . . . . . . . . . . . . . . . . . . . . . . . . 5
Overzichtstekening . . . . . . . . . . . . . . . . . . . . . . . . . . . . . . . . . . . . . 6
Onderdelenlijst . . . . . . . . . . . . . . . . . . . . . . . . . . . . . . . . . . . . . . . . . 7
Montagehandleiding . . . . . . . . . . . . . . . . . . . . . . . . . . . . . . . . . . . 8
1. Monteer de voor- en achterstabilisator . . . . . . . . . . . . . . . . 8
2. Monteer de stuurstang en pedaalstang . . . . . . . . . . . . . . . 8
3. Monteer de voetsteunen . . . . . . . . . . . . . . . . . . . . . . . . . . . . . 8
4. Monteer het stuur . . . . . . . . . . . . . . . . . . . . . . . . . . . . . . . . . . . . 9
5. Monteer de verticale stuurstang . . . . . . . . . . . . . . . . . . . . . . 9
6. Monteer de computer . . . . . . . . . . . . . . . . . . . . . . . . . . . . . . . . 9
7. Monteer de twister . . . . . . . . . . . . . . . . . . . . . . . . . . . . . . . . . . 10
8. Monteer de sensortkabels . . . . . . . . . . . . . . . . . . . . . . . . . . . 10
9. Monteer weerstandsbanden. . . . . . . . . . . . . . . . . . . . . . . . . 10
Weerstand instellen . . . . . . . . . . . . . . . . . . . . . . . . . . . . . . . . . . . 11
Computerhandleiding . . . . . . . . . . . . . . . . . . . . . . . . . . . . . . . . . 12
Algemene fitnesstips . . . . . . . . . . . . . . . . . . . . . . . . . . . . . . . . . . 13
Table of contents
General safety instructions. . . . . . . . . . . . . . . . . . . . . . . . . . . . . 16
Warranty . . . . . . . . . . . . . . . . . . . . . . . . . . . . . . . . . . . . . . . . . . . . . . 18
General reference drawing. . . . . . . . . . . . . . . . . . . . . . . . . . . . . 19
Parts list . . . . . . . . . . . . . . . . . . . . . . . . . . . . . . . . . . . . . . . . . . . . . . . 20
Assembly Instructions . . . . . . . . . . . . . . . . . . . . . . . . . . . . . . . . . 21
1. Install the Front and Rear Stabilizers . . . . . . . . . . . . . . . . . 21
2. Install the Swing bar. . . . . . . . . . . . . . . . . . . . . . . . . . . . . . . . . 21
3. Install the Pedals . . . . . . . . . . . . . . . . . . . . . . . . . . . . . . . . . . . . 21
4. Install the Handlebar . . . . . . . . . . . . . . . . . . . . . . . . . . . . . . . . 22
5. Install the Frame . . . . . . . . . . . . . . . . . . . . . . . . . . . . . . . . . . . . 22
6. Install the Covers . . . . . . . . . . . . . . . . . . . . . . . . . . . . . . . . . . . . 22
7. Attach the Twister support . . . . . . . . . . . . . . . . . . . . . . . . . . 23
8. Conccect the Pulse sensor . . . . . . . . . . . . . . . . . . . . . . . . . . . 23
9. Attache the Ropes. . . . . . . . . . . . . . . . . . . . . . . . . . . . . . . . . . . 23
Tension adjustment . . . . . . . . . . . . . . . . . . . . . . . . . . . . . . . . . . . 24
Computer Instruction . . . . . . . . . . . . . . . . . . . . . . . . . . . . . . . . . . 25
General fitness tips . . . . . . . . . . . . . . . . . . . . . . . . . . . . . . . . . . . . 26
-2-
Algemene veiligheidsvoorschriften
Bij het ontwerp en de productie van dit fitnessapparaat is veel aandacht besteed aan veiligheid. U dient echter altijd bepaalde
veiligheidsvoorschriften in acht te nemen. Zorg ervoor dat u de gehele handleiding uitvoerig heeft doorgelezen voordat u
het apparaat in gebruik neemt. Houd daarbij rekening met onderstaande punten:
1 Dit apparaat is geen speelgoed en dient alleen gebruikt te worden voor doeleinden zoals beschreven in deze
gebruiksaanwijzing. Lees de onderstaande voorschriften zorgvuldig door voordat u dit apparaat in gebruik neemt.
2 Houd uw kinderen en huisdieren uit de buurt van de apparatuur. Het enthousiasme van kinderen kan leiden tot onjuist
gebruik van het apparaat. Indien kinderen toestemming krijgen dit apparaat te gebruiken, dan dient men de kinderen
te controleren en instructies te geven over het juiste gebruik van het apparaat. Onder geen geval is het apparaat te
gebruiken als speelgoed.
3 Raadpleeg altijd eerst uw arts voordat u dit apparaat of andere fitnessapparaten in gebruik neemt.
4 Draag altijd veilige en makkelijke kleding als u gebruik maakt van fitnessapparatuur. Draag bij voorkeur sportschoenen
of aerobicschoenen.
5 Indien u zich niet goed voelt of andere klachten krijgt, dient u onmiddellijk met de oefening te stoppen. U dient tevens
te stoppen als u pijn of druk op uw gewrichten voelt.
6 Zorg dat nooit meer dan één gebruiker met het apparaat bezig is. Plaats het apparaat op een vlakke ondergrond, de
benodigde ruimte is ongeveer 3 x 3 meter.
7 Zorg dat het apparaat juist is geïnstalleerd voordat het in gebruik wordt genomen. Wees er zeker van dat alle schroeven,
bouten en moeren op de juiste wijze zijn geplaatst en vastgedraaid. Gebruik alleen onderdelen die door de importeur
worden aanbevolen en zijn meegeleverd.
8 Gebruik het apparaat niet indien het beschadigd of kapot is.
9 Let in het bijzonder op de reactie van uw lichaam na gebruik. Duizeligheid geeft aan dat u te intensief met het apparaat
bezig bent geweest. Als u zich duizelig voelt, ga dan op de grond liggen en kom niet eerder overeind totdat u zich weer
beter voelt.
10 Gebruik het apparaat altijd op een gladde en schone ondergrond. Gebruik het nooit buiten of in het water.
11 Houd goed in de gaten dat uw armen en benen niet te dicht bij bewegende onderdelen komen. Stop geen materialen
in bestaande openingen van het apparaat.
12 Gebruik dit apparaat alleen voor doeleinden zoals beschreven in deze gebruiksaanwijzing. Gebruik geen onderdelen die
niet door de fabrikant worden aanbevolen.
13 Zorg dat zich geen scherpe objecten in de buurt van dit fitnessapparaat bevinden.
14 Wij adviseren gehandicapte of mindervalide personen dit apparaat alleen te gebruiken in bijzijn van gekwalificeerde
begeleiders.
15 Het apparaat dient eerst stil te staan, alvorens u het apparaat verlaat.
16 Gebruik het apparaat op de juiste wijze. Onjuist gebruik van het apparaat kan leiden tot lichamelijk letsel.
17 Dit apparaat is geproduceerd overeenkomstig EN-norm 957-5 Klasse HA. Maximaal belastbaar gewicht: 100kg.
18 Dit apparaat is niet geschikt voor revalidatie doeleinden.
19 Een incorrecte en te intensieve workout kan blessures veroorzaken.
-3-
Waarschuwing
Raadpleeg uw arts voordat u met oefeningen begint. Een frequent en inspannend trainingsprogramma moet eerst door uw
huisarts worden goedgekeurd. Dit is met name belangrijk voor mensen die 35 jaar of ouder zijn of mensen die lichamelijke
problemen hebben. Lees de gehele handleiding zorgvuldig door voordat u met de training begint. Wij staan in geen geval
in voor persoonlijk letsel of lichamelijke klachten die zijn ontstaan door gebruik van dit apparaat en kunnen derhalve niet
aansprakelijk worden gesteld. Bewaar deze instructies zorgvuldig. Letsel kan ontstaan door incorrect of buitensporig gebruik.
Let op: het maximale toelaatbare gewicht op dit apparaat is 100 kg.
Montage
Deze gebruikershandleiding is samengesteld om het monteren van dit apparaat éénvoudiger te maken en tevens het juiste
gebruik uit te leggen. Zorg ervoor dat u de handleiding uitvoerig leest. Om u zelf bekend te maken met de onderdelen en het
apparaat, raden wij u aan alvorens tot montage en gebruik over te gaan, eerst de overzichtstekening nauwkeurig te bestuderen.
Leg alle montagematerialen overzichtelijk op de grond en verwijder alle verpakkingsmaterialen. Bekijk de onderdelenlijst
om te verifiëren welke onderdelen aanwezig zijn. Voor de montage verwijzen wij u naar de volgende pagina’s.
Hartelijk dank
Wij danken u voor de aanschaf van dit apparaat. Dit apparaat zal u helpen uw conditie op peil te brengen en uw spieren op
de juiste wijze te ontwikkelen. En van dit alles kunt u in uw eigen omgeving genieten.
Onderhoud en gebruik
Raadpleeg uw arts voordat u met oefeningen begint. Een frequent en inspannend trainingsprogramma moet eerst door uw
huisarts worden goedgekeurd.
• Het apparaat dient regelmatig nagekeken te worden om lichamelijk letsel te voorkomen. Dit betekent ook dat men
regelmatig dient te kijken of bouten en moeren goed zijn aangedraaid, of er beginnende scheuren geconstateerd
worden en of er geen scherpe randen e.d. zijn wat tot lichamelijk letsel kan leiden.
• Defecte onderdelen dienen direct vervangen te worden. Indien dit niet direct mogelijk is, dient de apparatuur buiten
gebruik gesteld te worden tot reparatie heeft plaatsgevonden.
• Let op! U dient geen sigaretten, vuur e.d. te gebruiken in de buurt van het apparaat, daar sommige kunststof onderdelen
brandbaar zijn.
• Gebruik het apparaat niet voor een hete kachel en/of open haard.
• Indien men allergisch is voor kunststof, dient men eerst een arts te raadplegen alvorens het apparaat te gebruiken.
• Indien u het apparaat wat weer uit elkaar wenst te halen volgt u de montage aanwijzingen in omgekeerde richting.
VERPAKKING
Milieu vriendelijke recyclebare materialen
• Buitenverpakking is van karton
• Onderdelen van foam zijn CPC-vrij polystyrene(PS)
• Folies en zakjes zijn gemaakt van polyethylene (PE)
• Weerstandsbanden zijn gemaakt van polypropylene (PP)
AFVAL
Gooi uw afval op de juiste milieuvriendelijke manier weg.
Voor meer informatie hierover kunt u contact opnemen
met de Gemeentelijke reinigingsdienst.
-4-
77
Bicycle Industry Group (BIG) garandeert de goede werking van het geleverde product met inachtneming van
de op dit garantiebewijs vermelde bepalingen.
Naam:
Aankoopdatum:
Adres:
Model/type:
Postcode / Woonplaats:
Gekocht bij:
Telefoonnummer:
Framenummer*:
*indien aanwezig
Dit deel samen met de aankoopbon zorgvuldig bewaren. Dit garantie bewijs is alleen geldig als u zich heeft aangemeld via de site www.fietsservicenederland.nl en dit deel
volledig ingevuld kan overleggen met de originele aankoopbon in geval van benodigde reparatie.
Artikel 1 Garantiebepalingen
1.1. Bicycle Industry Group (BIG) garandeert dat alle Producten
waarop dit garantiebewijs betrekking heeft vrij zijn van
constructie- en/of materiaalfouten conform hetgeen in deze
bepalingen is opgenomen.
1.2 Garantie wordt door Bicycle Industry Group (BIG) gegeven
aan de eerste eigenaar van de Producten. Voor elke volgende
eigenaar vervalt de aan de eerste eigenaar verstrekte garantie.
Iedere eigenaar, met uitzondering van de eerste eigenaar,
zal zijn schade moeten verhalen op de verkoper van de fiets /
fitness apparaat. Garantie is niet overdraagbaar.
1.3 De duur van de garantie, alsmede het vervallen van de
garantie, wordt bepaald in de volgende artikelen.
Artikel 2 Duur van de garantie
2.1 Bicycle Industry Group (BIG) geeft voor de volgende
onderdelen van de fiets de volgende garantieduur:
a. Frame 5 jaar ( niet van toepassing op fitness apparatuur )
b. Overige onderdelen: 2 jaar.
2.2 Op onderdelen die aan slijtage onderhevig zijn wordt
geen garantie gegeven, tenzij sprake is van constructie en/
of materiaalfouten. Hieronder vallen onder andere (binnen-)
banden, kettingen, kettingbladen, freewheel, remblokken,
achtertandwiel, kabels, verlichting, handvatten, etc.
Artikel 3 Garantie-uitsluitingen
3.1 De garantie vervalt uitdrukkelijk in de volgende gevallen:
a. Indien de schade is ontstaan door slijtage, onjuiste mon-tage
en montage van niet-originele onderdelen, alsmede niet verricht
noodzakelijk onderhoud en foutieve afstel-lingen van onderdelen
van de fiets / fitness apparatuur;
b. Indien de schade is ontstaan door ongelukken, misbruik,
vernieling, incorrect dan wel onvoldoende onderhoud
en het incorrect opvolgen van de aanwijzingen uit de
gebruikershandleiding, alsmede door het niet tijdig of niet
vakkundig vervangen van onderdelen van de fiets of fitness
apparaat;
c. Indien de schade is ontstaan door ander dan normaal
gebruik waaronder in ieder geval verstaan wordt: gebruik in
competitieverband, stunten, springen, het vervoeren van zware
lading, commerciële doeleinden, fietsenverhuur of activiteiten
welke in de beoordeling van Bicycle Industry Group (BIG) gelijk
staan aan voornoemde situaties en gevallen;
d. In geval de fiets / het fitness apparaat niet conform de
gebruikersaanwijzingen van bijbehorend handleiding is
onderhouden;
e. Indien schade is ontstaan door klimatologische invloeden,
zoals verwering van lak en roestvorming.
3.2 Kosten voor het vervoer en (de-)montage van de fiets
naar en van Bicycle Industry Group (BIG) vallen buiten de
garantie en komen voor rekening van de eigenaar van de fiets.
Hetzelfde geldt voor eventuele verzendkosten en arbeidskosten
voortvloeiende uit de garantieclaim.
Artikel 4 Garantieonderdelen
4.1 Gedurende de garantieperiode zullen de onder deze
garantievoorwaarden vallende onderdelen waarvan door
Fiets Service Nederland is vastgesteld dat er sprake is van
een materiaal en/of constructiefout, worden gerepareerd
of indien nodig vervangen, dan wel worden vergoed. Fiets
Service Nederland bepaalt zelf of de onderdelen zullen worden
gerepareerd, dan wel vervangen, dan wel vergoed.
4.2 Indien een bepaald onderdeel van de fiets / fitness apparaat
voor garantie in aanmerking komt, dan zal het onderdeel worden
vervangen door een origineel onderdeel of, indien niet leverbaar,
door een minimaal gelijkwaardig alternatief. Een nieuw
onderdeel kan verschillen van originele onderdelen.
bepalen of de eigenaar al dan niet in aanmerking komt voor een
claim onder deze garantievoorwaarden.
5.3 De toegezonden onderdelen dienen schoon te zijn, waarbij
de onderdelen van de fiets / het fitness apparaat die niet onder
de garantievoorwaarden vallen en waarvan geen sprake is
van een constructie- en/of materiaalfout dienen te worden
gedemonteerd. De eigenaar van de fiets / het fitness apparaat
dient bij het aanvragen van garantie de originele aankoopbon
te overleggen bij een officieel door Fiets Service Nederland
geautoriseerde dealer.
5.4 De onderdelen waarbij sprake is van een constructie- en/
of materiaalfout worden na honorering van de garantie niet
geretourneerd aan de eigenaar.
Artikel 6 Aansprakelijkheid
6.1 Een door Fiets Service Nederland gehonoreerde
garantieclaim betekent niet dat Fiets Service Nederland
aansprakelijkheid aanvaard voor eventueel geleden schade. De
aansprakelijkheid van Fiets Service Nederland strekt zich nooit
verder uit dan is omschreven in deze garantievoorwaarden.
Iedere aansprakelijkheid van Fiets Service Nederland voor
gevolgschade wordt uitgesloten.
Artikel 7 Toepasselijk recht
7.1 Op deze garantievoorwaarden is Nederlands recht
van toepassing. Voor het geval enige bepaling in de
garantievoorwaarden nietig dan wel vernietigbaar is, dan laat
dat onverlet dat de overige garantievoorwaarden van toepassing
zijn.
Artikel 5 Indienen van de claim
5.1 Claims onder deze garantievoorwaarden dienen via de
Fiets Service Nederland te worden ingediend. Fiets Service
Nederland bepaalt in samenspraak met Bicycle Industry Group
(BIG) of u al dan niet in aanmerking komt voor garantie. De
beoordeling van de dealer houdt niet in dat uw claim onder deze
garantievoorwaarden wordt toegekend.
5.2 Fiets Service Nederland houdt zich het recht voor om zelf te
Uw servicemelding kan via:
777
777
.,
777
Internet
Servicetelefoon
E-mail*:
http://www.fietsservicenederland.nl/service.html
+31 (0)570 - 606 939
[email protected]
Bereikbaar van maandag tot en met vrijdag van 9.00 tot 12.30 uur
Fax*:
+31 (0)570 - 677 014
Postadres:
Bicycle Industry Group (BIG)
Solingenstraat 49
7421 ZR Deventer, Nederland
777
* O.v.v. naam, adresgegevens, telefoon/mobiel overdag, model/type (6 cijferig artikelnummer op blauwe/rode sticker), gekocht bij, probleemomschrijving, evt. met vermelding van desbetreffend
onderdeel.
GARANTIEBEWIJS KLANT
Om op garantie aanspraak te kunnen maken, verzoeken wij u binnen twee weken na aankoop, te registreren via onze site www.fietsservicenederland.nl.
Indien u niet in de gelegenheid bent om zich on-line te registreren, kunt u ook een kopie van dit formulier, samen met een kopie van de aankoopbon sturen
naar het onderstaande adres.
Overzichtstekening
-6-
Onderdelenlijst
Nr.
Omschrijving
Aantal
Nr.
Omschrijving
Aantal
1
Hoofdframe
1
41
Verstelbare bout
2
2
Voor stabilizering
1
42
Zeskantbout
4
3
Achter stabilizering
1
43
Nylon moer
6
4
R Swing arm
1
44
Sledebout
4
5
L Swing arm
1
45
Sluitingsring
4
6L/R
Pedaal arm (L/R)
1pr.
46
Dopmoer
4
7L/R
Stuur (L/R)
1pr.
47
Nylon moer
2
8L/R
Kettingkast (L/R)
1pr.
48
Veerring
2
9
Ventilator wiel
1
49
Sluitingsveer
2
10
Twee gleufmoer
1
50
Computer
1
11L/R
Voetsteun (L/R)
1pr.
51
Stopper
3
12
Stuurschacht
1
52
Vergrendeling Washer
1
13
Eindkap
4
53
D-vormige sluitingsring
2
14
Handlebar grip
2
54
Twister bord
1
15
Eindcap
6
55
Inbusbout
2
16
Kunststofbus
4
56
Hartslag sensoren
2
17
Knopbout
4
57
Twister bord ondersteuning
1
18
Weerstandsbanden
2
58
Hexagon bout
2
19
Platte ring
10
59
R Pedaal scharnierbout
1
20
Platte ring
4
60
L Pedaal scharnierbout
1
21
Platte ring
2
61
Ring
2
22
Ventilator wiel as
1
62
Kruiskop schroef
2
23
Hexagon bout
4
63
Verticale stuurstang frame
1
24
Ring
1
64
Hartslag kabel
2
25
Centermoer
2
65
Verbindingsbuis
2
26
Sensor kabel
1
66
Inbusbout
2
27
Crank
1
67
Platte ring
2
28
Kettingkast
1
68
Cilinder buis
2
29
Ring
1
69
Bout
2
30
Drie gleufmoer
1
70
Zeskantbout
2
31
Kraag behuizing
2
71
Moer dop
2
32
Kraag bal
2
72
Stuur
1
33
Borgmoer
1
73
Afsluitkap
2
34
Ketting
1
74
Zeskantbout
2
35
Wrijvingsband
1
75
Zeskantbout
2
36
Weerstands spanning-instelknop
1
76
Nylon moer
4
37
Uitbreiding sensordraad
1
77
Platte ring
2
38
Kruiskop tapschroef
4
78
Nylon moer
1
39
Kruiskop tapschroef
2
79
Zeskantbout
1
40
Kruiskopschroef
1
80
Pen
1
81
Hartslag kabel
2
-7-
Montagehandleiding
De meeste van de genoemde montage onderdelen zijn separaat verpakt, maar sommige bouten en moeren zijn vooraf
geïnstalleerd in de onderdelen. Deze dienen verwijderd te worden en opnieuw gemonteerd te worden bij assemblage.
Volg de aangegeven stappen en let goed op de vooraf gemonteerde onderdelen.
Voorbereiding: Voor u het apparaat in elkaar wil zetten, zorg er voor dat u genoeg ruimte heeft; en zorg dat u alle onderdelen
compleet hebt. Het is aan te bevelen om dit apparaat met twee of meer personen in elkaar te zetten om schade te voorkomen.
1. Monteer de voor- en achterstabilisator
Installeer de voor stabilisator (2), achter stabilisator (3) met
het hoofdframe (1) met dopmoer (46), boog sluitingsring
(45) en sledebout (44).
2. Monteer de stuurstang en pedaalstang
Bevestig de Swing arm (4 & 5) met het hoofdframe (1) aan
de stuurschacht (12). Bevestig deze doormiddel van de
inbusbout (55), veerring (49) en D-vormige sluitingsring
(53). Schroef ze dit keer niet helemaal vast.
Maakt daarna de rechter pedaal arm (6L/R) vast aan de
crank (27) met het rechter pedaal scharnierbout (59 & 60),
sluitingsveer (48) en nylon moer (47).
Opmerking: Het pedaal scharnier bout heeft twee kanten:
Links en Rechts. De rechter moet vast gedraaid worden met
de klop mee en de linker precies andersom, tegen de klok in.
3. Monteer de voetsteunen
Schroef de voetsteun (11L/R) aan de pedaalarm (6 L/R) met
de zeskantbout (42) en de moer (43) vast.
-8-
4. Monteer het stuur
Schroef het stuur (7 L/R) vast aan de Swingarm (4 & 5)
met de knopbout (17). Het stuur is verstelbaar in hoogte
doormiddel van de openingen.
5. Monteer de verticale stuurstang
Draai de cilinder buis (68) aan het hoofdframe (1) met knop
bout (17). Verbind sensor kabel (37) met kabel (26) . Draai
vervolgens de verticale stuurstang frame (63) op de cilinder
buis (68) met bout (69) en de zeskantbout (70). Bedek de
zeskantmoer (70) met de moerdop (71).
6. Monteer de computer
Draai de afsluitkap (73) op de verticale stuurstang (63) met
zeskantmoer (75) en nylon moer (76). Sluit vervolgens de
hartslag sensor (64) aan sensor kabel (81). Tot slot bevestig
het stuur (72) aan de afsluitkap (73) met de zeskantbout (74)
en nylon moer (76).
-9-
7. Monteer de twister
Bevestig de twister bord ondersteuning (57) aan de voorzijde van de stabilisator (2) met behulp van zeskantbout
(79), platte ring (77) en nylon moer (78). Wanneer u het
opvouwt, kun u het bevestigen op de voorzijde van de
stabilisator (2) met pen (80).
8. Monteer de sensorkabels
Verbind de hartslag sensor kabel (81) en verlengde sensor
kabel (37) met de kabel van de computer (50), maak hierna
de computer (50) vast op de computer beugel met kruis
schroef (62) en ring (61).
9. Monteer weerstandsbanden
Bevestig de weerstandsbanden (18) met de verbindingsbuis
(65).
- 10 -
Belangrijk!
1. Zorg ervoor dat er altijd één of drie schroefdraad ringen zichtbaar zijn aan het uiteinde van
de moer, dit om de stabiliteit en duurzaamheid van de full body crosstrainer te garanderen.
2. Steek de scharnier bout door de pedaal buis en draai de scharnier bout verticaal om de crank
met de veerring en nylon moer op hetzelfde moment, dit is om een breuk van de schroefdraad te
voorkomen.
Weerstand instellen
De montage van uw full body crosstrainer is nu voltooid, als u de fiets voor de eerste
keer probeert moet u de weerstands spanning instelknop (36) op het laagste niveau
zetten. Tijdens het uitoefenen moet u de weerstands spanning instelknop (36) langzaam aanpassen en instellen op een geschikt niveau voordat u begint met een volledige sessie. Door het aanpassen van de spanning, word de wrijvingsband (35) losser
of strakker. Hoe langer de wrijvingsband word aangepast, hoe minder weerstand u zult
voelen tijdens het trappen. Omgekeerd, hoe korter de wrijvingsband word aangepast,
hoe meer weerstand u zult voelen tijdens het trappen.
- 11 -
Computerhandleiding
SPECIFICATIES:
Functions:
Running Time
00:00-99:59 M:S
Current Speed
The maximum signal can be pickup is 99.
is99.9KM/H/ or mile/H
Trip Distance
0-9999
Pulse Rate
40-240 BPM
CALORIES (CAL)
0.0-999.9 KCAL
Battery type
2 pcs of size 1.5VAA
Operating temperature
0˚C ~ +40˚C (32˚F ~ 104˚F)
Storage temperature
-10˚C ~ +60˚C (14˚F ~ 140˚F)
BELANGRIJKSTE FUNCTIES:
MODE:
SET:
RESET:
Toets voor het selecteren en vastzetten van
een bepaalde functie.
Toets voor het instellen van tijd, afstand en
calorieën (niet in Scan mode).
Toets voor het resetten van alle waarden
naar nul.
FUNCTIES:
SCAN:
TIJD:
SNELHEID:
AFSTAND:
CALORIE:
KM-TELLER:
HARTSLAG:
Om de vier seconden worden de waarden
weergegeven volgens onderstaand schema.
SCAN---TIJD---SNELHEID---AFSTAND--CALORIE---KM-TELLER---HARTSLAG
Druk op MODE totdat de wijzer op TIME
staat. Nu wordt de totale trainingstijd
weergegeven vanaf het begin van de
training.
Druk op MODE totdat de wijzer op SPEED
staat. Voor weergave van de snelheid
tijdens de training.
Druk op MODE totdat de wijzer op
DISTANCE staat.
De afstand afgelegd tijdens de training
wordt weergegeven.
Druk op MODE totdat de wijzer op CALORIE
staat.
Voor weergave van de calorieën die tijdens de training worden verbrand.
Elke afgelegde afstand wordt bijgehouden en getotaliseerd.
Druk op HEALTH MODE en selecteer daarna PULSE.
De hartslagsensor meet het aantal slagen per minuut (SPM).
Let op:
1. Als er 4–5 minuten geen signaal wordt ontvangen, schakelt het LCD-display automatisch uit.
2. Zodra er weer een signaal binnenkomt, schakelt het display automatisch in.
3. Als de weergave van het display niet goed is, moeten de batterijen worden vervangen. Vervang beide batterijen
tegelijkertijd.
4. Plaats de batterijen zoals aangegeven in het batterijvakje.
5. Is de weergave van het display toch nog verstoord, plaats de batterijen dan met de polen in tegenovergestelde richting.
(Let op: Druk niet op de toets terwijl u de batterij plaatst.)
- 12 -
Algemene fitnesstips
Raadpleeg uw huisarts
Voordat u dit fitnessapparaat gaat gebruiken, is het zeer verstandig u eerst uitvoerig te laten onderzoeken door uw
eigen huisarts of specialist. Voor regelmatig oefenen met dit apparaat dient u eerst goedkeuring van uw huisarts te
hebben gekregen. Indien u tijdens het gebruik van dit apparaat klachten krijgt, dient u direct uw huisarts te raadplegen.
Verstandig gebruik c.q. verantwoord gebruik van dit apparaat is van essentieel belang. Zorg dat tijdens het gebruik
van het apparaat geen kinderen in de buurt zijn. Tevens dient het apparaat te worden opgeborgen op een plek waar
geen kinderen bij kunnen komen.
Draag gemakkelijke kleding
Draag altijd gemakkelijke kleding als u gebruik maakt van dit apparaat, waaronder gymschoenen. Draag geen losse
kleding die tijdens gebruik kan scheuren.
Controleer uw apparaat
Wees ervan overtuigd dat voor gebruik alle schroeven en bouten van het apparaat goed zijn vastgedraaid. Regelmatig
onderhoud is zeer belangrijk voor de conditie van het apparaat.
Bepaal uw eigen tempo
De mate van oefenen op dit apparaat is afhankelijk van uw eigen conditie. Als u gedurende enkele jaren niet heeft
getraind of u heeft last van overgewicht is het verstandig om langzaam te beginnen met slechts een paar minuten
per week.
In eerste instantie zult u deze oefeningen maar enkele minuten volhouden maar dit zal binnen 6 tot 8 weken
verbeteren. Raak niet ontmoedigd als dit enkele weken langer duurt. Het is belangrijk uw eigen tempo te bepalen.
Uiteindelijk zult u de oefening langer dan 30 minuten kunnen volhouden. Hoe beter uw conditie wordt, hoe moeilijker
het zal worden om dit niveau vast te houden. Let echter wel op het volgende:
• Raadpleeg uw huisarts voordat u start met uw trainingsprogramma. Laat u door hem rustig adviseren over het
programma met betrekking tot de oefeningen maar ook over uw eetpatroon.
• Start de training rustig en stel uw eisen niet te hoog. Neem naast deze oefeningen extra beweging, bijv. lopen,
zwemmen, dansen en fietsen. Controleer regelmatig uw hartslag. Indien u geen hartslagmeter heeft, kunt u aan
uw huisarts vragen op welke manier u dit het beste kunt doen. Bepaal uw gewenste hartslagniveau. Houd hierbij
rekening met uw leeftijd en conditie.
• Zorg dat u tijdens de oefeningen op dit apparaat voldoende drinkt. U moet zorgen dat uw vochtgehalte op niveau
blijft en uitdroging wordt voorkomen. Hetgeen dat u drinkt, dient op kamertemperatuur te zijn. Drink niet te veel
koude vloeistof.
Controleer uw hartslag
Om uw hartslag te kunnen controleren, moet u eerst weten hoe u deze kunt meten. De gemakkelijkste manier is
om uw vingers op de slagader in uw nek, tussen de spieren en de luchtwegen, te leggen. Tel het aantal kloppingen
gedurende 10 seconden en vermenigvuldig dit aantal met 6. Dit geeft de hartslag per minuut aan.
Oefeningen binnen uw eigen gestelde doel
Hoe hoog of laag dient uw hartslag te zijn gedurende de oefeningen? Uw arts kan u informeren over de richtlijnen
die voor u gelden.
Leeftijd
20 Jaar
25 Jaar
30 Jaar
35 Jaar
40 Jaar
45 Jaar
50 Jaar
55 Jaar
60 Jaar
65 Jaar
70 Jaar
Hartslagniveau 5075%
(slagen per minuut)
100-150
98-146
95-142
93-138
90-135
88-131
85-127
83-123
80-120
78-116
75-113
Maximale
hartslag 100%
200
195
190
185
180
175
170
165
160
155
150
- 13 -
Warming-up – Cooling down
Een succesvolle oefening begint met een warming-up en wordt afgesloten met een cooling down. Doe alle oefeningen twee
tot drie keer per week en neem tussen de oefendagen een rustdag. Binnen enkele maanden kunt u het aantal oefeningen
uitbreiden naar 5 tot 6 keer per week. De warming-up is van essentieel belang voordat u met een oefening begint. Je lichaam
wordt voorbereid om inspanningen te verrichten. Om spierproblemen te voorkomen, dient u na de oefening tevens een
cooling down te doen. Wij raden u aan de volgende warming-up en cooling down te doen.
Hoofdoefeningen
Draai uw hoofd naar rechts en voel de spanning in uw nek. Draai uw kin richting het plafond
en doe hierbij uw mond open. Draai uw hoofd naar rechts en laat uiteindelijk uw hoofd zakken
tot op uw borst. Dit kunt u meerdere malen herhalen.
Schouderoefeningen
Til uw linkerschouder op en vervolgens uw rechterschouder waarbij u tegelijkertijd uw
linkerschouder weer laat zakken.
Strekoefeningen met uw armen
Strek uw linkerarm uit, richting het plafond en vervolgens uw rechterarm, terwijl u uw
linkerarm weer laat zakken. Voel de spanning in uw rechter- en linkerzij. Herhaal dit meerdere
malen.
Dijbeenoefeningen
Plaats 1 hand tegen de muur en reik achter u naar uw voet en til uw rechtervoet omhoog.
Breng uw hiel zo dicht mogelijk bij uw billen.
Binnenkant van dijbeen en benen strekken
Ga op de grond zitten en zet uw voeten tegen elkaar zodat uw knieën naar buiten wijzen. Trek
uw voeten zo dicht mogelijk naar uw liezen. Druk uw knieën voorzichtig naar buiten tegen de
grond. Herhaal dit indien mogelijk 15 keer.
- 14 -
Tenen aanraken
Buig langzaam voorover en probeer met uw handen uw voeten aan te raken. Reik zover
mogelijk en herhaal dit 15 keer.
Hamstrings oefeningen
Ga op de grond zitten en strek uw rechterbeen. Buig uw linkerbeen en zet uw voet tegen uw
rechterbovenbeen. Reik met uw rechterarm naar uw rechtervoet. Doe dit 15 keer en herhaal
dezelfde oefening met uw linkerbeen.
Kuit/achilles oefeningen
Zet beide handen tegen de muur en leun met het gehele lichaam op uw handen. Plaats uw
benen om beurten naar achteren. Het achterste been kunt u hierbij uitrekken. Doe dit voor elk
been 15 keer.
Aerobic oefeningen & gewicht
Aerobic oefeningen
Aerobic oefeningen zorgen voor een goede zuurstofvoorziening aan uw spieren via uw hart en longen: de belangrijkste
spieren van uw lichaam. Het is een essentieel onderdeel van alle oefeningen en dient ook werkelijk in acht te worden
genomen bij elke sportieve activiteit.
Gewichttraining
Aerobicoefeningen kunnen u helpen om het overtollige vetgehalte in uw lichaam te verminderen. Gewichttraining
daarentegen helpt bij de opbouw en versteviging van uw spieren.
Maar denk erom: raadpleeg altijd uw huisarts voordat u met trainen begint.
- 15 -
General safety instructions
In the design and the production of this fitness equipment, much attention has been paid to safety. Nevertheless, you need
at all times to remain conscious of certain safety measures. Make certain that you have carefully read through the whole user
manual prior to your use of the equipment. Keep in mind the following points:
1.
2.
3.
4.
5.
6.
7.
8.
9.
10.
11.
12.
13.
14.
15.
16.
17.
18.
19.
This equipment has not been designed to be used as a toy and must only be used for the purposes described in this
manual. Read the instructions below carefully before using this equipment.
Keep children and animals away from the equipment. Children’s enthusiasm may well lead to incorrect use of the
equipment. If children are allowed to use the equipment, they should only do so under supervision and after receiving
instructions regarding its proper use. Under no circumstances should the equipment be used as a toy.
Always consult with your physician prior to making use of this equipment or any other fitness equipment.
Always wear safe and comfortable clothing when you are using fitness equipment. Preferably, wear sports shoes or
aerobic footwear.
In the event you should feel faint or suffer other discomforts, stop using the equipment. You also need to stop when
you experience pain in or pressure on your joints.
Make certain that no more than one user is occupying the equipment at one time. Place the equipment on a level
surface; the space required is approximately 2 x 1 metres.
Make certain that the equipment has been correctly assembled prior to its use. Ensure that all screws, nuts and bolts
have been fitted correctly and tightened properly. Use only the parts that are recommended by the importer and that
have been delivered with the equipment.
Do not use the equipment if it is damaged or has broken down.
Pay attention to how your body reacts after using the equipment. Dizziness is a sign that you worked out too intensely.
If you feel dizzy, stretch out on the floor and do not try to get back on your feet until the dizziness has disappeared.
Always use the equipment on a level and clean surface. Never use the equipment outdoors or in water.
Avoid that your arms and legs come too close to the moving parts. Do not stuff articles inside the existing openings
in the equipment.
Use this equipment only for the purposes as described in this user manual. Do not use parts that were not recommended
by the manufacturer.
Ascertain that there are no sharp and pointed objects in the immediate vicinity of the equipment.
We advise physically challenged individuals to use this fitness equipment only under the supervision of qualified
instructors.
The equipment must have come to a complete standstill before stepping down.
Use the equipment as laid down in the manual. Misuse of the equipment can lead to physical injuries.
This fitness equipment has been produced in accordance with EN-norm 957-5 class HA. Up to taxable weight : 100
kilogrammes.
This fitness equipment is not suitable for rehabilitation goals.
Excessive and incorrect training may result to injuries and health problems.
- 16 -
Warning
Consult with your physician prior to starting your exercises. A frequent and intensive training programme should first
be approved by your family physician. This is especially important for individuals above 35 years of age or for those with
physical problems. Carefully read through the entire user manual before you start exercising. We are in no wise responsible
for personal injury or physical strains and discomforts that are caused by the use of this equipment and cannot be held liable
in case of their occurrence. Carefully save these instructions. Incorrect or extreme use may lead to personal injury.
Note: the maximum permissible weight on this equipment is 100 kg.
Assembly
This user manual has been put together in order to simplify the assembly of the equipment and at the same time to explain
its correct use. Please make certain to carefully read through this manual. In order to familiarise yourself with the parts of the
equipment, we recommend that you carefully study the general reference drawing prior to starting the assembly and the
use of the equipment.
Place all parts needed for the assembly on the floor in an orderly manner and remove all packing material. Check the list of
parts to verify what items are present. For the actual assembly we make referral to the following pages.
Thank you for your purchase
We thank you for your purchase of this fitness equipment. This equipment will help you in improving your general
conditioning and in developing your muscles in the correct way. In addition, you can now enjoy all of these benefits inside
your own home.
Maintenance and use
Consult your physician before starting the exercises. A frequent and strenuous workout program must be approved by your
physician first.
•
•
•
•
•
•
•
The equipment requires a regular check-up to prevent physical injury. This means that bolts and nuts should be frequently
checked for their proper tightening and that the equipment in general should be checked for cracks and sharp edges
etc.
Defective components must be replaced immediately. If this is not feasible, the equipment must be put out of order until
the required repairs have been made.
NB! Do not smoke or use fire near the equipment, as some of the plastic components are flammable.
Do not use the equipment in front of a burning stove and/or fire place.
Persons suffering from a plastics allergy should consult their physician before using the equipment.
Do not touch any cylinders on the equipment as they become extremely hot during use.
If you wish to dissemble the device, reverse the procedure given in the assembly instructions.
PACKAGING
Environmentally friendly, recyclable materials
• Outer packaging of the cardboard
• Form parts of foamed, CPC-free polystyrene(PS)
• Foils and bag of polyethylene (PE)
• Tension bands of polypropylene (PP)
DISPOSAL
Please undertake environmentally friendly disposal.
For further guidance contact your local authority refuse department.
- 17 -
77
Bicycle Industry Group (BIG) guarantees that the product supplied will work as intended, according to the
conditions given in this warranty.
Name:
Purchase date:
Address:
Model/type:
Post code / Town:
Purchased from:
Telephone number:
Frame number:
Store this section carefully, together with the purchase receipt. This warranty is only valid if you have register on our website, within two weeks of purchase www.
fietsservicnederland.nl. This section must be completed and provided together with the original purchase receipt in the event of repairs being necessary.
Supplementary conditions of guarantee.
Article 1 Guarantee conditions
1.1. Bicycle Industry Group (BIG) guarantees that all Products
to which this guarantee certificate is related are free from faults
in the design and/or material, in accordance with the provisions
of these terms and conditions.
1.2 Bicycle Industry Group (BIG) will issue a guarantee to the
first owner of the Products. With each subsequent owner, the
guarantee issued to the first owner will lapse. Each owner, with
the exception of the first owner, will have to recover any damage
from the seller of the bicycle. The guarantee is not transferable.
1.3 The period of validity of the guarantee, as well as the
expiration of the guarantee, is set out in the following articles.
Article 2 Validity of the guarantee
2.1 The guarantees issued by Bicycle Industry Group (BIG)
are valid for the following periods for the following parts of the
bicycle:
a. Frame 5 years (not applicable to fitness equipment)
b. Other parts: 2 years.
2.2 No guarantee will be issued for parts that are liable to wear,
unless there are any faults in the design and/or material. This
will include, inter alia, tubes, tyres, chains, chain rings, free
wheel, brake pads, sprocket wheel, cables, light fittings, handle
bars, etc.
Article 3 Guarantee exclusions
3.1 The guarantee will explicitly not be valid in the following
cases:
a. If the damage is caused by wear, incorrect assembly and
assembly of non-original parts, as well as any omitted necessary
maintenance and faulty settings of parts of the bicycle / fitness
equipment;
b. If the damage is caused by accidents, misuse, destruction,
incorrect or insufficient maintenance and the incorrect following
of instructions from the user manual, as well as the late or
unprofessional replacement of parts of the bicycle or fitness
equipment;
c. If the damage is caused by abnormal use, which will include,
in any event: use on a competitive level, stunts, jumping,
transport of heavy loads, commercial purposes, bicycle hire
or any other activities which, in the opinion of Bicycle Industry
Group (BIG), are equal to the aforementioned situations and
cases;
d. If the bicycle / the fitness equipment has not been maintained
in accordance with the instructions for use of the accompanying
manual;
e. If the damage is caused by climatological influences, such as
weather-staining of the paintwork and rust formation;
3.2 The costs of transport and (dis-)assembly of the bicycle
from and to Bicycle Industry Group (BIG) are not covered by
the guarantee and will be at the bicycle owner’s expense. This
also applies to any shipping and labour costs arising from the
guarantee claim.
Article 4 Parts covered by guarantee
4.1 Whilst the guarantee is valid, the parts covered by these
guarantee conditions, of which Fiets Service Nederland has
established that they have a fault in the design and/or material,
will be repaired or, if necessary, replaced, or will be reimbursed.
Fiets Service Nederland will decide, at its sole discretion,
whether the parts will be repaired, replaced or reimbursed.
4.2 If a certain part of the bicycle / fitness equipment is covered
by the guarantee, the part will be replaced by an original part or,
if unavailable, by an alternative part that is at least equivalent.
New parts may differ from original parts.
5.2 Fiets Service Nederland reserves the right to decide at its
sole discretion whether or not the owner will be entitled to claim
for compensation under these guarantee conditions
5.3 The parts that are sent must be clean, whilst any parts of
the bicycle / the fitness equipment that are not covered by the
guarantee conditions and which do not have any faults in the
design and/or material must be disassembled. When applying
for a guarantee, the owner of the bicycle / fitness equipment
must submit the original proof of purchase to an official dealer,
authorised by Fiets Service Nederland.
5.4 The parts that have a fault in the design and/or material
will not be returned to the owner after the guarantee has been
honoured.
Article 6 Liability
6.1 A guarantee claim accepted by Fiets Service Nederland
does not imply that Fiets Service Nederland accepts liability for
any damage suffered. The liability of Fiets Service Nederland will
never extend beyond that which is set down in these guarantee
conditions. Any liability on the part of Fiets Service Nederland for
indirect damage is excluded.
Article 7 Applicable law
7.1 These guarantee conditions are subject to Dutch law. If
any provision of these guarantee conditions is null and void
or annullable, it shall not affect the validity of the rest of these
guarantee conditions.
Article 5 Submission of the claim
5.1 Claims under these guarantee conditions must be submitted
through Fiets Service Nederland. Fiets Service Nederland
will decide, in consultation with Bicycle Industry Group (BIG),
whether or not you are entitled to claim for compensation under
the guarantee. The dealer’s assessment does not mean that
your claim under these guarantee conditions will be allowed.
Your service request can be made via:
777
777
.,
777
Internet
http://www.fietsservicenederland.nl/service.html
Servicetelephone +31 (0)570 - 606 939
E-mail*:
[email protected]
Available from Monday to Friday From 9.00 to 12.30 hours
Fax*:
+31 (0)570 - 677 014
Postadres:
Bicycle Industry Group (BIG)
Solingenstraat 49
7421 ZR Deventer, The Netherlands
777
* Please mention name, address, phone/mobielphone, model/type, bought from, problem description, evt. with reference to relevant part.
WARRANTY customer
In order for the warranty to be valid, please register on our website to use the warranty, within two weeks of purchase www.fietsservicnederland.nl. Save the purchase
receipt yourself ot he bicycle/fitness.
General reference drawing
- 19 -
Parts list
NO.
Description
QTY
NO.
1
Mainframe
1
41
Adjustable bolt
2
2
Front stabilizer
1
42
Hexagon bolt
4
3
Rear stabilizer
1
43
Nylon nut
6
4
R Swing bar
1
44
Carriage bolt
4
5
L Swing bar
1
45
Arc washer
4
6L/R
Pedal support (L/R)
1pr.
46
Acorn nut
4
7L/R
Handlebar (L/R)
1pr.
47
Nylon nut
2
8L/R
Chain cover (L/R)
1pr.
48
Spring Washer
2
9
Fan wheel
1
49
Spring Washer
2
10
Two slot nut
1
50
Computer
1
11L/R
Pedal (L/R)
1pr.
51
Stopper
3
12
Handlebar shaft
1
52
Locking washer
1
13
End cap
4
53
D shape washer
2
14
Handlebar grip
2
54
Twister
1
15
End cap
6
55
Allen bolt
2
16
Plastic bushing
4
56
Pulse piece
2
17
Knob bolt
4
57
Twister support
1
18
Rope
2
58
Hexagon bolt
2
19
Alloy bushing
10
59
R Pedal hinge bolt
1
20
Alloy bushing
4
60
L Pedal hinge bolt
1
21
Copper bush
2
61
Washer
2
22
Fan wheel axle
1
62
Cross screw
2
23
Hexagon bolt
4
63
Vertical post
1
24
Washer
1
64
Pulse sensor wire
2
25
Flange nut
2
65
Connecting tube
2
26
Sensor wire
1
66
Allen bolt
2
27
Crank
1
67
Flat washer
2
28
Chain wheel
1
68
Cylindrical tube
2
29
Washer
1
69
Washer
2
30
Three slot nut
1
70
Hex bolt
2
31
Collar housing
2
71
Nut cap
2
32
Collar ball
2
72
Handlebar
1
33
Locking nut
1
73
Fixed cover
2
34
Chain
1
74
Hexagon bolt
2
35
Friction belt
1
75
Hexagon bolt
2
36
Tension adjustment knob
1
76
Nylon nut
4
37
Extension sensor wire
1
77
Flat washer
2
38
Cross tapping screw
4
78
Nylon nut
1
39
Cross tapping screw
2
79
Hexagon bolt
1
40
Cross screw
1
80
Pin
1
81
Pulse sensor wire
2
- 20 -
Description
QTY
Assembly Instructions
Most of the listed assembly hardware has been packaged separately, but some hardware items have been preinstalled in the
identified assembly parts. In these instances, simply remove and reinstall the hardware as assembly is required.
Please reference the individual assembly steps and make note of all preinstalled hardware.
PREPARATION: Before assembling, make sure that you will have enough space around the item; Use the present tooling
for assembling; Before assembling please check whether all needed parts are available. It is strongly recommended this
machine to be assembled by two or more people to avoid possible injury.
1. Install the stabilizers
Install the Front stabilizer (2), Rear stabilizer (3) to the Mainframe (1) with Carriage bolt (44), Arc washer (57) and Acorn
nut (46).
2. Install the Swing Bar
Attach the Swing bar (4 & 5) to the Mainframe (1) with
Handlebar shaft (12), Allen bolt (55) Spring washer (49) and
D shape washer (53). Please do not tighten them this time.
Then fix the Pedal support (6L/R) to the Crank (27) with right
Pedal hinge bolt (59 & 60), spring washer (48) and Nylon nut
(47).
Remark: The pedal hinge bolt has two kinds: Left and right.
The right should be spin in clockwise direction; while the
left should be spin in counterclockwise direction. When you
spin, you could find a best direction in order to spin into the
bolt easily.
3. Install the Pedals
Tighten the Pedal (11 L/R) to the Pedal support (6 L/R) with
Hexagon bolt (42) and Nylon nut (43).
- 21 -
4. Install the Handle bar
Tighten the Handle bar (7 L/R) to the Swing bar (4 & 5) with
Knob bolt (17). You could adjust the height of the Handle
bar with the different holes of it.
5. Install the Frame
Tighten the Cylindrical tube (68) to the Mainframe (1) with
Knob bolt (17). Connect Extension sensor wire (37) well
with Sensor wire (26).Then tighten the Vertical post (63)
to Cylindrical tube (68) with Washer (69) and Hex bolt (70).
Finally cover the Nut cap (71).
6. Install the Covers
Tighten the Fixed cover (73) to Vertical post (63) with
Hexagon bolt (75) and Nylon nut (76).Then Connect the
Pulse sensor wire (64) to Pulse sensor wire (81).Finally insert
the Handlebar (72) to the Fixed cover (73) with Hexagon
bolt (74) and Nylon nut (76).
- 22 -
7. Attach the Twister support
Attach the Twister support (57) to the Front stabilizer (2)
using Hexagon bolt (79), Flat washer (77) and Nylon nut (78).
When you fold it up, you can fix it on the Front stabilizer (2)
with Pin (80).
8. Connect the Pulse sensor wire
Connect the Pulse sensor wire (81) and Extension sensor
wire (37) to the wire from Computer (50),then tighten
Computer (50) to computer bracket with Cross screw (62)
and Washer (61).
9. Attach the Ropes
Attach the Rope (18) to the Connecting tube (65).
- 23 -
IMPORTANT NOTED
1. Make sure keep one to three more circles of screw threads out of Nylon nut at the end of the
pedals hinge bolts, so as to insure the stability and durability of the elliptical bike.
2. Insert the hinge bolt through the pedal tube and turn the hinge bolt vertically to the crank with
spring washer and nylon nut at the same time, for fear that the breakage of screw thread of nylon
nuts and bolts.
Tension adjustment
The assembly of your elliptical is now completed, as you try it for the first time, you should
adjust the tension controller (#36) to the loosest level, as you exercise, you should adjust
the tension controller (#36) to a appropriate level slowly before you begin a full workout.
Through tension adjustment, so you can loosen or tighten the friction belt (#35) that
beneath the flat beam at top center the longer friction belt you adjust, the less resistance
while you pedaling. Reversely, the shorter of friction belt you adjust the more resistance
while you pedaling.
Reversible movement
Remember, your elliptical has REVERSIBLE movement!
Forward pedaling emphasizes your quadriceps muscles (front thighs). While backwards pedaling emphasizes your
hamstrings (back thighs).
- 24 -
Computer Instruction
SPECIFICATIONS:
Functions:
Running Time
00:00-99:59 M:S
Current Speed
The maximum signal can be pickup is 99.
is99.9KM/H/ or mile/H
Trip Distance
0-9999
Pulse Rate
40-240 BPM
CALORIES (CAL)
0.0-999.9 KCAL
Battery type
2 pcs of size 1.5VAA
Operating temperature
0˚C ~ +40˚C (32˚F ~ 104˚F)
Storage temperature
-10˚C ~ +60˚C (14˚F ~ 140˚F)
KEY FUNCTIONS:
MODE:
SET:
RESET:
Push down to select the display window which needs to .
To set the values of time, distance and calories
The key to reset the value to zero by pressing the key.
Note: Press any button of MODE/SET/RESET
To enter the mode of pulse test
FUNCTIONS:
1. SPEED: A displays speed
Display of instantaneous speed.
2. TIME: B displays the exercise time.
1) Count the total time from exercise start to the end, count will stop automatically if no exercise for 3 seconds.
2) Exercise time can be set in advance, when it approaches the preset time ,the computer will alarm 10 seconds.
3. DISTANCE: C displays distance.
1) Count the total distance from exercise start to the end.
2) Exercise distance can be set in advance, when it approaches the preset distance, the computer will alarm 10 seconds.
4. CALORIES: D displays consumed calories.
1) Count the total calories consumed from exercise start to the end.
2) The calories value can be set in advance, when it approaches the preset calorie, the computer will alarm 10 seconds.
5. PULSE: E displays the pulse.
Hold the sensors by your hands to test your pulse per minute.
6. WHEEL PERIMETER:
The wheel perimeter is preset to be Φ60(or can be changed according to different factories).
7. ALARM: The computer will “Beep” when press “MODE” “SET” or “RESET” buttons.
8. AUTO ON/OFF&AUTO START/STOP: Without any signal exercise or operation for 8 minutes, the power will turn off
automatically and all the memory will be clear off.
OPERATION
1. Press “MODE” to choose the display window needs to be preset, a will flash on the left upper corner of the setting window,
the press “SET” to set the alarm timealarm distance or alarm calories. Press “RESET” to clear the value.
2. PULSE RATE: Before measuring your pulse rate, press any button, “P” will change into “0” on E display window, then enter
pulse test mode, please place your palms of your hands on Both of your contact Pads and the monitor will show your current
heart beat rate in beats per minute (BPM) on the LCD after 3~4 seconds.
Remark: During the process at pulse measurement, because of the contact jamming, the measurement value may
be higher than the virtual pulse rate during the first 2 A3 seconds then will return to normal level. The measurement
value can not be regarded as the basis of medical treatment.
- 25 -
General fitness tips
Consult your physian
Before you start using this fitness equipment, it is recommended that you first get a physical examination by your
family physician or by a specialist. Before starting regular exercises on this equipment, you must first get your doctor’s
approval. When you feel discomfort during your training on the equipment, you need to immediately consult your
family physician. Intelligent use, meaning responsible use of this equipment is crucial. Make sure that no children
are near you when you are using this equipment. Moreover, make sure to store the equipment in a safe place away
from children.
Wear comfortable clothing
Always wear comfortable clothing when you are using the equipment, including gym shoes. Do not wear loose
clothing that can tear during use.
Inspect your equipment
Prior to using your equipment, make sure that all nuts and bolts are properly tightened. Regular maintenance is very
important to keep the equipment in good condition.
Set your own pace
The intensity level of your workout on this equipment depends on your own condition. If you have not been in training
for some years or if you are overweight, it is recommended that you start slowly with only a few minutes per week.
At first you will be able to do the exercises for only a few minutes but this will improve within 6 to 8 weeks. Do not let
yourself get discouraged if this takes a few weeks more. It is important for you to set your own pace. In the end you
will be able to keep on exercising for more than 30 minutes. The better your condition, the more difficult it will become
to stay at this level. But be aware of the following:
• Consult with your physician before you start your training programme. Let him/her advise you about the training
programme as well as about your diet.
• Start your training at an easy pace and do not aim too high at first. Aside from this exercise with the equipment,
also engage in extra activities, for instance, jogging, swimming, dancing, and biking. Regularly check your heart
rate. If you do not have a counter, ask your family physician how you can best check your heart rate. Determine
your desired heart rate. Take into consideration your age and condition.
• Make sure that you drink enough when training on this equipment. You need to keep drinking to prevent
dehydration. The liquids you take in must be at room temperature. Limit your intake of cold drinks.
Check your heart rate
To be able to check your heart rate, you first need to know how to measure it. The easiest way is to press your
fingertips against the artery in your neck, between the muscles and the air passages. Count the number of pulses for
10 seconds and multiply by 6. This will give you your heart rate per minute.
Exercise within your own capabilities
What level of heart rate do you have to maintain during your exercises? Ask your physician to give you guidelines
that are relevant for you.
Age
20 Jaar
25 Jaar
30 Jaar
35 Jaar
40 Jaar
45 Jaar
50 Jaar
55 Jaar
60 Jaar
65 Jaar
70 Jaar
Heartbeat level 5075%
(beats per minute)
100-150
98-146
95-142
93-138
90-135
88-131
85-127
83-123
80-120
78-116
75-113
Maximum
heart rate
100%
200
195
190
185
180
175
170
165
160
155
150
- 26 -
Warming-up – Cooling down
A successful exercise starts with a warm-up and is completed with a cool-down. Run through all of the exercises two or three
times a week and take a day off in between the exercise days. After a few months you can extend the number of exercises
to 5 to 6 times a week. The warm-up is of crucial importance before starting your workout. You will be preparing your body
for the effort you are about to exert. In order to prevent muscle problems, you need to cool down after the exercises. We
recommend the following warm-up and cool-down exercises.
Head exercises
Turn your head to the right and feel the tension in your neck. Turn your chin up to the ceiling
while opening your mouth. Turn your head to the right and finally let it drop to your chest.
Repeat this exercise several times.
Shoulder exercises
Raise your left shoulder and then your right shoulder while you are dropping your left shoulder
down again at the same time.
Stretching exercises for your arms
Stretch your left arm towards the ceiling. Then do the same with your right arm while you drop
your left arm down again at the same time. Feel the tension in your right and left sides. Repeat
this several times.
Thigh stretching exercises
Sit on the floor and place your feet together so that your knees are pointing outwards. Pull your
feet as closely as possible against and into your groin area. Carefully push outwards on your
knees towards the floor. If you can, repeat 15 times.
Stretch inner thigh and legs
Place one hand against the wall and reach back with your other hand to lift up your right foot.
Bring your heel as closely as possible against your thigh. Repeat this 15 times, then do the same
with your left foot.
- 27 -
Touching your toes
Slowly bend forward and try to reach your feet with your hands. Stretch down as far as possible
and repeat this 15 times.
Hamstring exercises
Sit on the floor and stretch your right leg. Bend your left leg and place your foot against your
right upper leg. Reach for your right foot with your right arm. Repeat this 15 times and do the
same exercise with your left leg.
Calf/achilles exercises
Place both hands against a wall and lean the weight of your whole body on your hands. Move
your legs to the rear, alternating one with the other. The leg in the rear position will be stretched.
Repeat this for each leg 15 times.
Aerobic exercises & Weights
Aerobic exercises
Aerobic exercises promote a good oxygen supply to your muscles via your heart and lungs, the most important muscles in
your body. It is an essential part of all exercises and needs to be considered when engaging in any sports activity.
Weight training
Aerobic exercises are useful in assisting you to reduce excessive body fat. In contrast, weight training helps you to build up
and firm your muscles.
But one last warning: always consult with your physician before you start your training
- 28 -