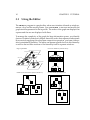
1
Rigi User’s Manual
Version 5.4.4
Kenny Wong
June 30, 1998
This software is provided “as is” and without any express or implied warranties,
including, without limitation, any implied warranties of its merchantability, or fitness for a particular purpose. You bear all risk as to the quality and performance
of this software.
This manual and the software described in it are copyrighted, with all rights reserved.
c 1986–1998 Hausi A. Müller, University of Victoria. All rights reserved.
Hausi A. Müller
Department of Computer Science
University of Victoria
PO Box 3055
Victoria, BC, Canada
V8W 3P6
Tel: (250) 721–7630
Fax: (250) 721–7292
email: [email protected]
ATEX 2"
KW 1998-06-30 L
Contents
1
2
Introduction
1.1
What is Rigi?
1.2
About This Book
1.3
System Requirements
1.4
Acknowledgments
: : : : : : : : : : : : : : : : : : : : : : : : : : : : : : :
: : : : : : : : : : : : : : : : : : : : : : : : : : : : :
2
: : : : : : : : : : : : : : : : : : : : : : : : : : : :
3
: : : : : : : : : : : : : : : : : : : : : : : : : : : : :
5
: : : : : : : : : : : : : : : : : : : : : : : : : : : : : : :
6
: : : : : : : : : : : : : : : : : : : : : : : : : : : : : : : : :
7
Basics
2.2
List Demo
2.3
Ray Demo :
2.4
SQL/DS Demo
: : : : : : : : : : : : : : : : : : : : : : : : : : : : : : : :
: : : : : : : : : : : : : : : : : : : : : : : : : : : : : :
Tutorial
3.1
2
5
Using the Editor
2.1.1
1
: : : : : : : : : : : : : : : : : : : : : : : : : :
Demos
2.1
3
1
7
7
9
Using the Editor
: : : : : : : : : : : : : : : : : : : : : : : : : : : : :
10
: : : : : : : : : : : : : : : : : : : : : : : : : : : : : : :
11
3.1.1
Basics
3.1.2
Traversing the subsystem hierarchy
3.1.3
Object level
: : : : : : : : : : : : : :
13
: : : : : : : : : : : : : : : : : : : : : : : : : : : :
14
iii
CONTENTS
iv
3.1.4
Making selections
3.1.5
Arranging nodes
3.1.6
Identifying subsystems
3.1.7
Traversing the hierarchy
3.1.8
Detailed information
3.1.9
Graph quality
3.1.10 Rigi Views
3.1.11 Scripting
15
: : : : : : : : : : : : : : : : : : : : : : : : :
16
: : : : : : : : : : : : : : : : : : : : :
18
: : : : : : : : : : : : : : : : : : : :
21
: : : : : : : : : : : : : : : : : : : : : :
25
: : : : : : : : : : : : : : : : : : : : : : : : : :
27
: : : : : : : : : : : : : : : : : : : : : : : : : : : :
29
: : : : : : : : : : : : : : : : : : : : : : : : : : : : :
31
3.1.12 Finishing Up
4
: : : : : : : : : : : : : : : : : : : : : : : :
: : : : : : : : : : : : : : : : : : : : : : : : : : :
Handbook
37
4.1
Running the Editor :
4.2
Working with Menus
4.3
36
: : : : : : : : : : : : : : : : : : : : : : : : : : :
38
: : : : : : : : : : : : : : : : : : : : : : : : : :
39
4.2.1
Using the Node menu
4.2.2
Using the Arc menu
Configuring the Editor :
: : : : : : : : : : : : : : : : : : : : : :
40
: : : : : : : : : : : : : : : : : : : : : : :
40
: : : : : : : : : : : : : : : : : : : : : : : : :
41
4.3.1
Rigi configuration parameters
4.3.2
Creating a new configuration file
4.3.3
Modifying a configuration file
4.3.4
Overriding the configuration file
4.3.5
Defining the default domain model
4.3.6
Defining the default database directory
4.3.7
Defining the default text editor
4.3.8
Defining the default web browser
: : : : : : : : : : : : : : : : :
41
: : : : : : : : : : : : : : : :
43
: : : : : : : : : : : : : : : : :
44
: : : : : : : : : : : : : : : :
: : : : : : : : : : : : : :
45
45
: : : : : : : : : : : :
45
: : : : : : : : : : : : : : : : :
46
: : : : : : : : : : : : : : :
46
CONTENTS
4.3.9
v
Defining the number of backing stores
: : : : : : : : : : : :
4.3.10 Defining the default background canvas color
4.3.11 Defining fonts
4.4
4.5
4.6
4.7
4.8
: : : : : : : :
47
: : : : : : : : : : : : : : : : : : : : : : : : : :
48
Working with Domains
: : : : : : : : : : : : : : : : : : : : : : : : :
49
: : : : : : : : : : : : : : : : : : : : : : : : : : :
50
4.4.1
Domain files
4.4.2
Switching the current domain model
Running Scripts
: : : : : : : : : : : : :
52
: : : : : : : : : : : : : : : : : : : : : : : : : : : : :
53
4.5.1
Entering a script command
4.5.2
Retrieving previously entered commands
4.5.3
Loading and running a script file
4.5.4
Listing available commands
4.5.5
Listing global variables
Finishing Up
47
: : : : : : : : : : : : : : : : : : :
54
: : : : : : : : : : :
54
: : : : : : : : : : : : : : : :
55
: : : : : : : : : : : : : : : : : :
56
: : : : : : : : : : : : : : : : : : : : :
57
: : : : : : : : : : : : : : : : : : : : : : : : : : : : : : :
58
: : : : : : : : : : : : : : : : : : : : : : : : : : : : : :
58
: : : : : : : : : : : : : : : : : : : : : : : : : : : : :
59
4.6.1
Exiting
4.6.2
Aborting
Working with Graphs
: : : : : : : : : : : : : : : : : : : : : : : : : :
60
4.7.1
Rigi Standard Format
4.7.2
Saving a graph
4.7.3
Loading a graph
: : : : : : : : : : : : : : : : : : : : : : : : :
62
4.7.4
Clearing a graph
: : : : : : : : : : : : : : : : : : : : : : : : :
63
: : : : : : : : : : : : : : : : : : : : : : : : : : : : : :
64
Window Basics
: : : : : : : : : : : : : : : : : : : : : :
60
: : : : : : : : : : : : : : : : : : : : : : : : : :
62
4.8.1
Window types
4.8.2
Activating a window
: : : : : : : : : : : : : : : : : : : : : : : : : :
: : : : : : : : : : : : : : : : : : : : : :
65
66
CONTENTS
vi
4.9
4.8.3
Raising the active window
4.8.4
Stacking (cascading) the windows
4.8.5
Refreshing a window
4.8.6
Updating a window
4.8.7
Closing the active window
4.8.8
Closing all windows
4.8.9
Bringing up the Settings dialog
Making Selections
: : : : : : : : : : : : : : : : : : :
66
: : : : : : : : : : : : : : :
66
: : : : : : : : : : : : : : : : : : : : : :
67
: : : : : : : : : : : : : : : : : : : : : : :
67
: : : : : : : : : : : : : : : : : : :
68
: : : : : : : : : : : : : : : : : : : : : : :
68
: : : : : : : : : : : : : : : : :
69
: : : : : : : : : : : : : : : : : : : : : : : : : : : :
70
4.9.1
Selecting a node
: : : : : : : : : : : : : : : : : : : : : : : : :
70
4.9.2
Selecting an arc :
: : : : : : : : : : : : : : : : : : : : : : : : :
70
4.9.3
Selecting grouped nodes by dragging
4.9.4
Selecting and deselecting nodes by shift-clicking
4.9.5
Selecting all nodes
4.9.6
Complementing selected nodes
4.9.7
Deselecting a node
4.9.8
Deselecting all nodes
4.9.9
Selecting nodes by name
: : : : : : : : : : : : :
71
: : : : : : :
71
: : : : : : : : : : : : : : : : : : : : : : : :
72
: : : : : : : : : : : : : : : :
72
: : : : : : : : : : : : : : : : : : : : : : : :
73
: : : : : : : : : : : : : : : : : : : : : :
: : : : : : : : : : : : : : : : : : : :
73
74
4.9.10 Selecting nodes by attribute :
: : : : : : : : : : : : : : : : : :
75
4.9.11 Selecting nodes by structure
: : : : : : : : : : : : : : : : : :
76
: : : : : : : : : : : : : : : : : : : : :
77
4.9.12 Selecting nodes by type
4.9.13 Selecting neighboring nodes along outgoing arcs :
: : : : : :
78
4.9.14 Selecting neighboring nodes along incoming arcs
: : : : : :
79
: : : : : : : :
80
4.9.15 Selecting reachable nodes along outgoing arcs
CONTENTS
vii
4.9.16 Selecting reachable nodes along incoming arcs
: : : : : : : :
81
: : : : : : : : : : : : : : : : : : : : : : : : : : :
82
: : : : : : : : : : : : : : : : : : : : : : : : : : : :
82
4.10 Working with Nodes
4.10.1 Node types
4.10.2 Changing current node type
4.10.3 Renaming a node
: : : : : : : : : : : : : : : : : :
83
: : : : : : : : : : : : : : : : : : : : : : : :
83
4.10.4 Changing the type of a node
4.10.5 Editing attributes of a node
: : : : : : : : : : : : : : : : : :
84
: : : : : : : : : : : : : : : : : : :
84
4.10.6 Editing annotation for a node :
: : : : : : : : : : : : : : : : :
4.10.7 Editing the source text for a node
85
: : : : : : : : : : : : : : :
85
4.10.8 Opening a URL for a node
: : : : : : : : : : : : : : : : : : :
87
4.10.9 Changing node type colors
: : : : : : : : : : : : : : : : : : :
88
: : : : : : : : : : : : : : : : : : : : : : : : : : : :
89
: : : : : : : : : : : : : : : : : : : : : : : : : : : : :
89
4.11 Working with Arcs
4.11.1 Arc types
4.11.2 Changing current arc type
: : : : : : : : : : : : : : : : : : :
90
4.11.3 Changing the type of an arc
: : : : : : : : : : : : : : : : : : :
90
4.11.4 Editing attributes of an arc
: : : : : : : : : : : : : : : : : : :
91
4.11.5 Editing annotation for an arc
: : : : : : : : : : : : : : : : : :
91
4.11.6 Opening a URL for an arc
: : : : : : : : : : : : : : : : : : : :
92
4.11.7 Changing arc type colors
: : : : : : : : : : : : : : : : : : : :
92
: : : : : : : : : : : : : : : : : : : : : : : : : : : :
93
4.12 Opening windows
4.12.1 Presenting the children of nodes
: : : : : : : : : : : : : : : :
93
4.12.2 Presenting the parents of nodes
: : : : : : : : : : : : : : : :
94
4.12.3 Presenting the neighbors of nodes
: : : : : : : : : : : : : : :
95
CONTENTS
viii
4.12.4 Presenting selected nodes in a new window
: : : : : : : : :
95
4.12.5 Presenting a projection
: : : : : : : : : : : : : : : : : : : : :
96
4.12.6 Presenting an overview
: : : : : : : : : : : : : : : : : : : : :
97
4.12.7 Presenting a fisheye view
4.13 Editing the Graph
: : : : : : : : : : : : : : : : : : : :
97
: : : : : : : : : : : : : : : : : : : : : : : : : : : :
98
4.13.1 Creating a new node :
: : : : : : : : : : : : : : : : : : : : : :
98
: : : : : : : : : : : : : : : : : : : : : : : :
98
4.13.3 Deleting nodes
: : : : : : : : : : : : : : : : : : : : : : : : : :
99
4.13.4 Deleting an arc
: : : : : : : : : : : : : : : : : : : : : : : : : :
99
4.13.2 Creating a new arc
4.13.5 Collapsing a subsystem
: : : : : : : : : : : : : : : : : : : : :
100
4.13.6 Expanding a subsystem
: : : : : : : : : : : : : : : : : : : : :
101
4.13.7 Cutting a subgraph
: : : : : : : : : : : : : : : : : : : : : : :
102
4.13.8 Copying a subgraph
: : : : : : : : : : : : : : : : : : : : : : :
102
4.13.9 Pasting a subgraph
: : : : : : : : : : : : : : : : : : : : : : :
102
4.13.10 Showing the clipboard
: : : : : : : : : : : : : : : : : : : : :
103
4.13.11 Clearing the clipboard
: : : : : : : : : : : : : : : : : : : : : :
103
: : : : : : : : : : : : : : : : : : : : : : : : : : : : : : :
104
4.14 Using Filters
4.14.1 Hiding names of nodes
: : : : : : : : : : : : : : : : : : : : :
4.14.2 Showing names of nodes
4.14.3 Hiding selected nodes
104
: : : : : : : : : : : : : : : : : : : :
104
: : : : : : : : : : : : : : : : : : : : : :
105
4.14.4 Showing previously hidden nodes
4.14.5 Showing and hiding nodes by type
4.14.6 Showing and hiding arcs by type :
: : : : : : : : : : : : : : :
105
: : : : : : : : : : : : : :
106
: : : : : : : : : : : : : : :
107
CONTENTS
ix
4.14.7 Inheriting filter settings
4.15 Scaling the Focus
: : : : : : : : : : : : : : : : : : : : :
108
: : : : : : : : : : : : : : : : : : : : : : : : : : : : :
109
4.15.1 Fitting nodes within a window
: : : : : : : : : : : : : : : : :
4.15.2 Fitting selected nodes within a window
4.15.3 Zooming in
109
: : : : : : : : : : : :
110
: : : : : : : : : : : : : : : : : : : : : : : : : : : :
110
4.15.4 Zooming out
: : : : : : : : : : : : : : : : : : : : : : : : : : :
: : : : : : : : : : : : : : : : : : : : : : :
111
: : : : : : : : : : : : : : : : : : : : : : : :
112
: : : : : : : : : : : : : : : : : : : : : : : : :
113
: : : : : : : : : : : : : : : : : : : : : : : : : :
113
4.15.5 Restoring the focus
4.15.6 Automatic scaling
4.16 Making Arrangements :
4.16.1 Moving a node
111
4.16.2 Moving several selected nodes
: : : : : : : : : : : : : : : : :
113
4.16.3 Arranging nodes horizontally
: : : : : : : : : : : : : : : : :
114
: : : : : : : : : : : : : : : : : : :
115
: : : : : : : : : : : : : : : : : :
116
4.16.4 Arranging nodes vertically
4.16.5 Arranging nodes into a grid
4.16.6 Arranging all nodes into a grid
: : : : : : : : : : : : : : : : :
116
4.16.7 Arranging reachable nodes along outgoing arcs into a tree
:
117
4.16.8 Arranging reachable nodes along incoming arcs into a tree
:
118
: : : : : : : : : :
119
: : : : : : : : : : : :
119
4.16.11 Moving nodes to a pile
: : : : : : : : : : : : : : : : : : : : :
121
4.16.12 Moving nodes in synch
: : : : : : : : : : : : : : : : : : : : :
121
4.16.9 Arranging all nodes in a Sugiyama layout :
4.16.10 Arranging all nodes in a spring layout :
4.16.13 Moving nodes with constraints
4.17 Viewing Reports
: : : : : : : : : : : : : : : : :
122
: : : : : : : : : : : : : : : : : : : : : : : : : : : : :
123
CONTENTS
x
4.17.1 Reporting numbers of nodes and arcs
4.17.2 Reporting cyclomatic complexity :
: : : : : : : : : : : : :
123
: : : : : : : : : : : : : : :
123
4.17.3 Viewing node neighborhood and dependency information
:
124
: : : : : : : : : : : : : : :
125
: : : : : : : : : : : : : : : : :
126
4.17.4 Reporting subsystem information
4.17.5 Viewing information for an arc
4.17.6 Reporting information for a composite arc
: : : : : : : : : :
127
: : : : : : : : : : : : : : : : : : : : :
128
: : : : : : : : : : : : : : : : : : : : : : : : : : :
130
: : : : : : : : : : : : : : : : : : : : : : : : : :
130
4.17.7 Reporting graph quality
4.18 Working with Views
4.18.1 Saving a view
4.18.2 Loading a view :
: : : : : : : : : : : : : : : : : : : : : : : : :
131
: : : : : : : : : : : : : : : : : : : : : : : :
132
4.19 Using SHriMP Windows
4.19.1 Presenting a SHriMP window
: : : : : : : : : : : : : : : : :
4.19.2 Revealing the children of a node
: : : : : : : : : : : : : : : :
133
: : : : : : : : : : : : : : : : :
134
: : : : : : : : : : : : : : : : : : : : : : : :
134
4.19.3 Eliding the children of a node
4.19.4 Filtering children
4.19.5 Enlarging the size of a node :
: : : : : : : : : : : : : : : : : :
135
: : : : : : : : : : : : : : : : : : :
135
: : : : : : : : : : : : : : : : : : : : : :
136
: : : : : : : : : : : : : : : : : : : : :
136
: : : : : : : : : : : : : : : : : : : : : :
136
: : : : : : : : : : : : : : : : : : : : : : : :
137
4.19.6 Reducing the size of a node
4.19.7 Seeing the node name
4.19.8 Adjusting the step size
4.19.9 Overlapping children
4.19.10 Layout constraints
133
4.19.11 Presenting a Children window
: : : : : : : : : : : : : : : : :
4.19.12 Viewing the annotation for a node
: : : : : : : : : : : : : : :
137
138
CONTENTS
xi
4.19.13 Editing the source text for a node
: : : : : : : : : : : : : : :
138
: : : : : : : : : : : : : : : : : : :
138
: : : : : : : : : : : : : : : : : : : : : : : : : : : :
139
4.19.14 Printing a SHriMP window
4.20 Using the Toolbar
4.20.1 Toolbar Buttons
: : : : : : : : : : : : : : : : : : : : : : : : :
A
139
141
A.1 Directory Structure
A.2 Mouse Actions
: : : : : : : : : : : : : : : : : : : : : : : : : : : :
142
: : : : : : : : : : : : : : : : : : : : : : : : : : : : : :
143
A.3 Keyboard Shortcuts
: : : : : : : : : : : : : : : : : : : : : : : : : : :
144
: : : : : : : : : : : : : : : : : : : : : : : : : : : :
145
A.4.1 File menu
: : : : : : : : : : : : : : : : : : : : : : : : : : : : :
145
A.4.2 Edit menu
: : : : : : : : : : : : : : : : : : : : : : : : : : : : :
145
A.4 Menu Commands
A.4.3 Navigate menu
: : : : : : : : : : : : : : : : : : : : : : : : : :
145
: : : : : : : : : : : : : : : : : : : : : : : : : : :
146
: : : : : : : : : : : : : : : : : : : : : : : : : : : :
146
A.4.4 Select menu
A.4.5 Filter menu
A.4.6 Scale menu :
: : : : : : : : : : : : : : : : : : : : : : : : : : :
146
A.4.7 Layout menu
: : : : : : : : : : : : : : : : : : : : : : : : : : :
146
A.4.8 Report menu
: : : : : : : : : : : : : : : : : : : : : : : : : : :
147
: : : : : : : : : : : : : : : : : : : : : : : : : :
147
: : : : : : : : : : : : : : : : : : : : : : : : : : :
147
: : : : : : : : : : : : : : : : : : : : : : : : : :
147
A.4.12 Help menu
: : : : : : : : : : : : : : : : : : : : : : : : : : : :
147
A.4.13 Node menu
: : : : : : : : : : : : : : : : : : : : : : : : : : : :
148
: : : : : : : : : : : : : : : : : : : : : : : : : : : : :
148
A.4.9 Window menu
A.4.10 Demo menu
A.4.11 Options menu
A.4.14 Arc menu
Chapter 1
Introduction
1.1 What is Rigi?
Rigi is a system for understanding large information spaces such as software programs, documentation, and the World Wide Web. This is done through a reverse
engineering approach that models the system by extracting artifacts from the information space, organizing them into higher level abstractions, and presenting the
model graphically.
The Rigi user interface is a graph editor, called rigiedit, which is used to browse,
analyze, and modify a graph that models a given system. This graph is simplified
by hierarchically clustering related artifacts into subsystems that, in turn, are clustered into larger subsystems.
The choice of components in a subsystem depends on its function, the intended audience, the application area, and the goals of the modeling exercise.
The rigiedit program has built-in operations to assist in program understanding.
The editor can be used to select and group artifacts based on certain modularity
principles such as data abstraction, low coupling among subsystems, and high cohesion within subsystems. Various statistical reports can help with maintenance or
reengineering tasks.
Also, rigiedit is programmable using a scripting language called Tcl. A library of
scripts is supplied for performing common reverse engineering tasks. User-defined
scripts can easily be written for specific needs.
CHAPTER 1. INTRODUCTION
2
Graph models are stored and retrieved by rigiedit. The data is formatted in Rigi
Standard Format (RSF), which is a stream of triplets used to define graph nodes,
arcs, and attributes. Attributes can be used to link to information outside the model,
such as source code, documentation, images, and hypertext.
1.2 About This Book
The Rigi User’s Manual provides setup instructions, a guide to the automated demos, an introductory tutorial, and a definitive, step-by-step handbook of operations that Rigi supports.
☛ Tip: The table of contents and index will help you to quickly locate a task
you want to do.
If you are new to the Rigi system, it is useful to follow the tutorial to learn the basic
operations available and the Rigi approach to software reverse engineering.
▲ Warning:
4 Note:
Ignoring warnings and other important messages can lead to
corrupted data.
Limitations and potentially unexpected behavior are noted in the
manual.
1.3 System Requirements
The graph editor rigiedit runs on the following platforms:
a Sun SPARCstation with SunOS 4.1.x or SunOS 5.4.x (Solaris),
an IBM RISC System 6000 workstation with AIX 4.1.x,
an IBM-compatible Personal Computer with Microsoft Windows 95, Windows
NT 4.0, or Linux 2.x.
On a Unix platform, rigiedit requires X11R5 or greater; rigiedit has the Motif
look and feel, but is not limited to running under the Motif window manager.
1.4. ACKNOWLEDGMENTS
3
You should be somewhat familiar with the appropriate operating system. On Unix,
you should be familiar with the C shell, the X Window System, and the Motif user
interface. Knowledge of the Tcl scripting language is useful if you want to write
custom scripts.
Installation and setup instructions are provided by the README file that accompanies
the software distribution.
1.4 Acknowledgments
The results of the Rigi project would not be possible without the tireless efforts of
several research associates and graduate students over the past decade.
Lynn Baker
Brian Corrie
Greg Kacy
Karl Klashinsky
Johannes Martin
Jim McDaniel
Mary Sanseverino
Craig Sinclair
Peggy Storey
Scott Tilley
Jim Uhl
Jacek Walcowicz
Mike Whitney
Most of all, our deepest thanks go to Hausi Müller for his encouragement and unwaivering support of the Rigi group members over the years.
Kenny Wong
June 1998.
4
CHAPTER 1. INTRODUCTION
Chapter 2
Demos
This chapter is a brief introduction to running the semi-automated demos. These
demos show how Rigi is used for program understanding.
2.1 Using the Editor
The rigiedit program is a graph editor whose user interface is based on windows,
menus, color, and the mouse pointer. You use rigiedit to traverse and modify the
graph model represented in the input file. The nodes of the graph are displayed as
squares and the arcs are displayed with lines.
To manage the complexity of the graph for large information spaces, you identify
clusters of related nodes and collapse them into subsystem nodes. By recursively
applying this subsystem composition operation, you form a subsystem (containment) hierarchy. The editor can present specific levels in this hierarchy as well as
the tree-like structure of the hierarchy itself in separate windows.
CHAPTER 2. DEMOS
6
2.1.1 Basics
When you run rigiedit, you initially see the Rigi Workbench window and an empty
root window.
To run a semi-automatic demo:
1. Choose one of the commands in the Demo menu.
You are reminded that changing domain models clears the graph in memory.
2. Click OK
The demo loads, presenting a message window at each step.
3. Click OK to advance to the next step.
Or click Cancel to stop the demo and return to rigiedit.
To finish your session with Rigi:
1. Choose Exit from the File menu.
An alert appears reminding you that exiting does not save the graph.
2. Click Exit to exit.
2.2. LIST DEMO
7
2.2 List Demo
The List demo is about understanding a small, 200 line C program for linked list
manipulation. The demo covers the basics of rigiedit, including how subsystems
are identified and used to reduce the complexity of understanding programs.
2.3 Ray Demo
The Ray demo is about reverse engineering a 10000 line C program for geometric
rendering. The demo covers the stages of reverse engineering software, including
the complex initial graph of extracted artifacts to the final subsystem hierarchy.
➤
➤
2.4 SQL/DS Demo
The SQL/DS demo is about managing the complexity of a 1.5 million line legacy
software system. This system is an IBM product written in PL/AS. The demo covers the need for scalable and programmable approaches to legacy software understanding.
8
CHAPTER 2. DEMOS
Chapter 3
Tutorial
This tutorial introduces the basics of the Rigi system and illustrates the Rigi software reverse engineering methodology by analyzing a simple list manipulation program.
In this tutorial, you will learn about:
loading graphs,
nodes, arcs, and their types,
traversing the subsystem hierarchy,
overview, children, and parents windows,
making selections,
producing arrangements or layouts,
identifying and collapsing new subsystems,
viewing reports,
measuring graph quality,
saving and loading Rigi views, and
running script commands.
CHAPTER 3. TUTORIAL
10
3.1 Using the Editor
The rigiedit program is a graph editor whose user interface is based on windows,
menus, color, and the mouse pointer. You use rigiedit to traverse and modify the
graph model represented in the input file. The nodes of the graph are displayed as
squares and the arcs are displayed with lines.
To manage the complexity of the graph for large information spaces, you identify
clusters of related nodes and collapse them into nodes that represent subsystems.
By recursively applying this subsystem composition operation, you form a subsystem (containment) hierarchy. The editor can present specific levels in this hierarchy
as well as the tree-like structure of the hierarchy itself in separate windows.
Rigi Graph Model:
Overview Windows (Vertical Slices):
collapse node
composite arc
collapse node
subsystem
level arcs
subsystem
Children/Parent Windows (Horizontal Slices):
Contextual Fish-eye Perspective:
3.1. USING THE EDITOR
11
3.1.1 Basics
When you run rigiedit, you initially see the Rigi Workbench window and an empty
root window.
The Workbench window presents:
a menubar with menus File, Edit, Navigate, Select, Filter, Scale, Layout, Report,
Window, Demo, Options, and Help;
a toolbar with several icon buttons for common operations;
three buttons labeled Domain, Node Type, and Arc Type that bring up three
corresponding palettes;
a button labeled RCL Command;
a command entry field; and
a scrollable command history list.
Most of these items is described at an appropriate point in the tutorial.
The editor opens separate windows to provide multiple, usually editable perspectives
of the graph model. Each of these windows
has a scrollable canvas area, where a particular set of nodes and arcs is presented, and a
message area at the bottom where messages
are displayed.
For example, a window may present an
overview of the subsystem hierarchy or the
children of a parent node.
The initial window titled Root is used to display the parent(s) of the subsystem hierarchy; this window is always present.
CHAPTER 3. TUTORIAL
12
The editor has a notion of a currently active window, where operations are applied.
A mouse click in the canvas of a window causes that window to become active and
display ACTIVE in its title.
4 Note:
On Unix platforms, the active window is unrelated to the pointer focus.
Most of the mouse interaction with rigiedit is through the left mouse button (such
as choosing menu items or clicking buttons); the right mouse button is used only
within a canvas area.
To load the tutorial example:
1. Click the Domain button in the Workbench window.
A Domain palette appears.
2. Pick the c domain from the palette.
You are reminded that loading a domain model clears the graph in memory.
3. Click OK to continue.
A simplified domain model for understanding C language programs is loaded.
This includes a specification of valid node and arc types, attributes, and colors.
4. Choose Load Graph . . . from the File menu.
A File dialog appears, presenting a view of the
current directory contents.
5. Navigate into the list-d directory, select the
file called rsf, and click OK.
You are reminded that loading clears the current graph model in memory.
6. Click OK to load rsf.
A Rigi Standard Format (RSF) file containing
syntactic data representing the implementation of a linked list module (written in C) is
loaded.
The root window displays a single node representing the root of a subsystem
hierarchy.
3.1. USING THE EDITOR
13
3.1.2 Traversing the subsystem hierarchy
The initial node in the root window, named Rigi, represents the root
level node in the layered, hierarchical graph stored in the rsf file.
At times there may be more than one node at the root level, each of
which represents additional hierarchical structures.
To perform an overview of the subsystem hierarchy descending from the Rigi node:
1. Place the pointer over the Rigi node and click the left mouse button on it
to select the node.
Selected nodes are highlighted, that is, shown in a solid color.
2. Choose Overview from the Navigate menu.
A new Overview window appears,
presenting the tree-like structure
below the Rigi node. The Rigi node
is at the top of the tree. An Overview
window presents a vertical “slice”
of the hierarchy. The arcs you see
that span levels in the hierarchy are
known as level arcs. For clarity, the
arcs within a level and the node labels
are filtered in an Overview window.
☛ Tip: Resize this window and place it in a corner of the screen while you
work.
To traverse down the hierarchy by opening nodes:
1. Double-left-click on the Rigi node in the original root window to open the
node and descend to the system level.
A new Children window appears, showing the children of Rigi
in the hierarchy; the parent node, Rigi, is named in the window title. There is one node, named Base, in this particular
example. For more complex software systems, there may be
multiple at this level to, for example, represent several functional components.
CHAPTER 3. TUTORIAL
14
2. Open the Base node to descend to the directory level.
A new Children window appears, showing the children of
Base. Similarly, there is one node though there can be more.
This node, named src, represents the directory which contains
the source code of the list example. For a more complex system, there may be multiple directories containing its code.
3. Open the src System node to descend to the object level.
A new Children window appears, becoming active and showing the children
of src. This level is the lowest one in the current hierarchy; you will later identify subsystems at this level, collapse related nodes, and form an even deeper
hierarchy.
3.1.3 Object level
A Children window typically presents the
structure of a single node, that is, the dependencies among the children of the node. This
portrays part of a level in the hierarchy, in a
kind of horizontal “slice”. The name of the
parent node appears on the title bar.
Arcs or relationships connecting nodes in the
graph are displayed as lines. Both nodes and
arcs can be of various types; they are distinguished with customizable colors.
Arcs are also directed. An arc from source node A to destination
node B is represented as a line from the bottom of node A to the
top of node B. Node A is called a client of node B and node B is
called a supplier of node A. The arc is an outgoing arc of node A
and an incoming arc of node B. A node may have an arc going to
itself, for a recursive relationship. You see this as a line from the
bottom of a node to its top.
At the object level (of a C program), there are typically at least two kinds of nodes:
data types and functions. A data type node, which represents an aggregate structure
3.1. USING THE EDITOR
15
or user-defined type, is displayed as a node of type Data. A function node, which
represents a function or procedure in the source code, is displayed as a node of type
Function. The list example has two Data nodes and twelve Function nodes.
Also, within the object level (of a C program), there are typically at least three types
of arcs: call, data, and composite. A call arc represents a function call from the source
function to the destination function. A data arc represents one of the following:
access to the internal structure of a data type from a function
containment of one data type from within another
reference of one data type from within another
A composite arc is derived from a bundle of one or more non-composite arcs. Arc
types are customizable; more non-composite arc types can be added.
3.1.4 Making selections
Most operations in rigiedit work on a current selection of nodes or arcs in a window.
☛ Tip:
The current selection is highlighted even if it is not within the active
window.
To select and deselect nodes:
Choose All from the Select menu.
All visible nodes in the canvas become selected and highlighted. The
message area indicates the number of
nodes that are selected. As you select
these nodes, you may also see them
highlighted in other windows, such as
the overview window.
Left click over a clear area of the canvas.
CHAPTER 3. TUTORIAL
16
All nodes become deselected. You also could choose None from the Select
menu.
Place the pointer over a clear area of the canvas, press the left mouse button,
drag to form a selection rectangle, and release the mouse button.
All the nodes that are either completely or partly inside the selection rectangle
become selected.
Left click on a node (or arc) that is not selected.
The node (or arc) becomes selected and all the other nodes and arcs become
deselected.
4 Note:
Only one arc can be selected at a time.
While holding down the shift key, left click on a node.
If the node was selected, it is deselected; if the node was not selected, it is
added to the current selection. Any other selected nodes and arc are not affected.
3.1.5 Arranging nodes
Arrangements of nodes are preserved by rigiedit. You can perform automatic
graph layouts and tweak them manually for a more understandable appearance.
To arrange nodes horizontally:
1. Select one or more nodes.
2. Right-click near the bottom of the
canvas.
3. Choose Horizontal from the Layout
menu.
The selected node(s) are arranged horizontally, starting from the point on
the canvas where you clicked, and remain selected.
Similarly, you can choose Vertical or Grid from the Layout menu for other simple
kinds of arrangements.
3.1. USING THE EDITOR
17
To move a group of nodes:
1. Select one or more nodes.
2. Place the pointer over any node in the selected group, hold down the shift
key, press the left mouse button, drag to another area, and release.
The selected node(s) are moved as a group to the area where the mouse button
was released.
You can automatically produce a tree-like arrangement of nodes to, for example,
show a call hierarchy (within part of a level in the subsystem hierarchy).
Such hierarchical arrangements should not be confused with the subsystem hierarchy presented in an Overview window; that is, these arrangements are hierarchies
in appearance only and are not directly represented in the graph model.
To produce a layered, tree-like arrangement:
◆ Choose Sugiyama from the Layout
menu.
The Sugiyama algorithm attempts to
minimize crossings in the layout.
▲ Warning:
If the number of nodes on a level
in the tree becomes too high, the
Sugiyama implementation fails.
☛ Tip:
This hierarchy is in
appearance only and
should not be confused
with the subsystem
hierarchy.
By default, automatic arrangements shift and scale nodes, if necessary, to stay within
the boundaries of the window.
CHAPTER 3. TUTORIAL
18
3.1.6 Identifying subsystems
The object level, as you see it now, lacks explicit structure and is essentially flat. For
complex software systems, with many more nodes and arcs, the resulting visual
clutter can be confusing. However, there is usually some organization.
Abstraction is one way of managing complexity. It is good software engineering
practice to encapsulate a data type and its access functions into a software subsystem, forming an abstract data type.
The rigiedit program provides many ways to help you in identifying subsystems
of related artifacts. These subsystems may, for example, represent high-level software components, personnel assignments, or other application-specific information.
To identify the data types in the system by filtering the Function nodes:
1. Choose Filter by Node Type . . . from the Filter menu.
A Filter by Node Type dialog appears for the active window.
Filters are used to show or hide nodes and arcs of
different types. This dialog presents a choice of
node type filters each of which can be toggled on
to hide or off to show the associated type of node.
2. Toggle on the Function item from the dialog.
Click on the box beside Function.
3. Click Apply.
Nodes representing functions are now filtered (hidden), making it easy to identify and select the data type nodes. (For simple examples, this isn’t necessary.)
4. Move the Data nodes aside in the canvas.
5. Toggle off the Function item from the dialog and click Apply.
Nodes representing functions are shown again.
6. Click Done to dismiss the dialog.
3.1. USING THE EDITOR
19
To identify the access functions of the list abstract data type:
1. Choose By Name . . . from the Select menu.
A Select by Name dialog appears. Selecting by name
may be more useful for very large graphs.
2. Type list and click Select.
The list Data node becomes selected.
3. Click Done to dismiss the dialog.
4. Click the Arc Type button in the Workbench window.
An Arc Type palette appears.
This palette causes certain selection operations to
consider or match only specific arc types (data arcs,
here). The any choice in the palette matches any arc
type.
5. Pick the data item from the Arc Type
palette.
6. Choose Incoming Nodes from the
Select menu.
All neighboring nodes along incoming arcs, that is, clients of list, are
selected, identifying all functions that
access the internal structure of the list
data type (through a data arc).
To create a new subsystem node to represent the list abstract data type:
1. While holding down the shift key, left click the list node.
The list Data node is added to the previously selected group of six Function
nodes.
2. Choose Collapse from the Edit menu.
CHAPTER 3. TUTORIAL
20
A new subsystem node is created
that has all of the previously selected
nodes as its children, thus simplifying
the graph in the active window. The
previously selected nodes are moved
to a lower level in the hierarchy (and
are deselected). The new node is of
type Collapse and becomes selected.
Composite arcs are added to relate
the new node to other nodes in the
window.
☛ Tip: To undo a collapse, choose Expand from the Edit menu for the subsystem node.
3. Right-click on the new subsystem node.
A Node menu appears. You can bring up a Node menu on any node, even if
it is not selected; the available choices apply to that node. Canvas menus in
rigiedit are context sensitive and depend on what node or arc is under the
pointer.
4. Choose Rename from the Node menu, type
ListADT, and press the enter key.
The new subsystem node is renamed to ListADT.
5. Activate the Overview window.
☛ Tip:
Right-clicking on the canvas of the window to activate it does not disturb the
current selection.
6. Choose Update from the Window
menu.
The hierarchy in the Overview window is updated to reflect the newly
created subsystem.
7. Choose To Fit from the Scale menu.
The nodes in the active window are scaled to fit, making the newly added
level in the hierarchy more visible.
3.1. USING THE EDITOR
21
On your own, return to the Children window and identify the four Function clients
of the element Data node. Note that the element data type has a recursive data
dependency and is a client of itself. Collapse the five selected nodes to form another
subsystem node called ElementADT.
Collapse the remaining two nodes into another subsystem and name it Control.
Update the Overview window and move aside the Children window so that you
can find it more easily for operations in the rest of the tutorial.
3.1.7 Traversing the hierarchy
By visually inspecting the subsystem graph, you get a high-level summary of the
major components of the program. The completed subsystem hierarchy is a navigational structure for exploring and documenting the subject software. The hierarchy created for the list example can be explored when trying to understand the list
program.
The simplest traversal technique is to open a node and traverse down in the hierarchy.
◆ Double-left-click on the ListADT subsystem node (or choose Children from
the Navigate menu).
A new Children window appears, showing the access functions and list data
type within the ListADT subsystem.
CHAPTER 3. TUTORIAL
22
You can also traverse up in the hierarchy to see the parent node(s):
1. Select the listinit Function node in the newly opened Children window.
2. Choose Parents from the Navigate menu.
A new Parents window appears, showing the parent of listinit in the hierarchy; the original child node, listinit, is named in the window title.
Close the two windows just opened before proceeding:
◆ Activate each window and choose Close Active from the Window menu.
☛ Tip: You can also close each window through your window manager.
You can produce a projection perspective:
1. Select the ListADT and Control subsystem nodes.
2. Choose Settings from the Options menu.
The Settings dialog appears, allowing you
to change some parameters that influence
various operations provided by rigiedit.
3. Adjust the Projection Depth slider to the
value 1.
The parameter change is immediate.
4. Click Done to dismiss the dialog.
5. Choose Projection from the Navigate menu.
3.1. USING THE EDITOR
23
A new Projection window appears,
containing a union of all nodes that
are exactly one level below the selected nodes. The names of the selected nodes that were projected appear on the title of the Projection window (ListADT/Control).
If the slider value is ,1, the projection depth is infinite and a projection
would display all the nodes in the
subhierarchies rooted at the selected
nodes. Leaf nodes are included in the
projection if the slider value is set too
deep for certain branches of the hierarchy.
4 Note: You cannot directly modify the graph model from within a Projection
window. You can, however, open a node or project a group of nodes
from a Projection window.
To view the hierarchy rooted or starting at the ListADT subsystem node:
1. Select just the ListADT node.
2. Choose Overview from the Navigate menu.
A new Overview window appears, presenting the subhierarchy below the
ListADT node.
CHAPTER 3. TUTORIAL
24
By default, the nodes in an Overview window are initially displayed without labels,
but you can change that.
1. Select all the nodes in the ListADT Overview window.
2. Choose Filter by Selection . . . from the Filter
menu.
A Filter by Selection dialog appears.
3. Click Show Names.
The labels of the selected nodes in the active window
are displayed.
4. Click Done to dismiss the dialog.
Before proceeding, close the Projection window and Overview window just opened.
3.1. USING THE EDITOR
25
3.1.8 Detailed information
Although the construction of a subsystem hierarchy makes the subject software easier to understand, it also hides many low-level details.
To view information on the immediate neighborhood around the ListADT subsystem node as it is presented within a window:
1. Choose View Information from the Node
menu of the ListADT subsystem node.
A textual Information window appears, presenting information about ListADT (in the
window just activated).
This information includes the node’s:
internal node ID,
node type,
incoming and outgoing arcs by arc type, and
neighboring nodes along these arcs (with their node name and type).
Some of this information is dimmed for nodes and arcs not visible in the active
window.
2. Click Done to dismiss the Information window.
An exact interface report is typically used on a subsystem node to provide detailed
dependency information about the nodes within in it (in relation to nodes outside
it).
To produce an exact interface report for the ListADT subsystem:
1. Select the ListADT subsystem node.
2. Choose Exact Interface from the Report menu.
The report appears in a Text editor window; this editor is a separate process
outside the direct control of rigiedit.
CHAPTER 3. TUTORIAL
26
The report includes three kinds of information for the selected subsystem: provisions,
requirements, and internalizations. A provision is a dependency from a node inside
the subsystem to a node outside the subsystem; the internal node provides at least
one object. A requirement is a dependency from a node outside the subsystem to a
node inside the subsystem; the internal node requires at least one object. An internalization is a dependency between two nodes inside the subsystem.
To produce information about any particular arc:
1. Right-click on the arc.
An Arc menu appears. You can bring up an Arc menu on any arc, even if it is
not selected; the available choices apply to that arc.
2. Choose View Information from the Arc menu for the arc.
To produce an exact interface report for the composite arc between the ListADT and
ElementADT subsystems:
1. Select the arc between the ListADT and ElementADT subsystem nodes.
2. Choose Exact Interface from the Report menu.
A record of the lower-level dependencies between the two subsystems appears in a Text editor window. This editor is a separate process outside the
direct control of rigiedit.
3.1. USING THE EDITOR
4 Note:
27
This report only works for composite arcs.
3.1.9 Graph quality
You can produce a graph quality report which evaluates the quality of a selected subsystem according to a set of software modularity measures. Each measure is normalized to a range from 0 to 1. Higher values are “better.”
1. Select the ListADT subsystem node.
2. Choose Graph Quality (C) from the Report menu.
A report of the graph quality appears in a Text editor window. This editor is
a separate process outside the direct control of rigiedit.
CHAPTER 3. TUTORIAL
28
The overall quality is based on the:
partition quality,
control encapsulation quality, and
data encapsulation quality.
The partition quality measure increases as the number of interfaces between nodes
in the subsystem decrease. This is the principle of low coupling in modular design.
The interfaces are classified into high-, medium-, and low-strength interfaces. The
thresholds for this classification can be adjusted using the Low Threshold and High Threshold
sliders in the Settings dialog.
The control encapsulation quality measure increases with the number of control flow
dependencies between nodes inside the subsystem, and decreases with the number
of control flow dependencies from nodes inside the subsystem to nodes outside.
This favors localized control and small interfaces.
The data encapsulation quality measure increases with the number of local references to data types, and decreases with the number of external references to data
types. This favors data encapsulation and object-oriented designs.
3.1. USING THE EDITOR
29
3.1.10 Rigi Views
One way to document the graph is to create, save, and load rigiedit views. A
rigiedit view is a snapshot of the appearance of one or more windows and their
contents at a given point in time. After loading a view, you can still interact with
its windows. Views provide a flexible way to focus attention on important facets
of the subject software. You generally create views after the subsystem hierarchy is
completed.
4 Note:
4 Note:
A view and the underlying graph model on which the view is based
must correspond. If the graph in memory changes, older views may
not work correctly.
Text editor windows and their report contents cannot be saved in a
view.
To save a rigiedit view of all the canvas windows on the screen:
1. Open and arrange the contents of the windows as desired.
Locations of nodes, filter settings, and current selections (anything you see)
are part of the view.
2. Move and resize the windows of your view as desired.
Position, size, and scroll settings are recorded.
3. Choose Save Graph As . . . from the File menu.
A File dialog appears for saving your work. You need to save the graph model
on which a view depends.
4. Type a filename for the graph and click OK to save the graph.
☛ Tip:
A suffix of .rsf is useful for distinguishing graph files.
5. Choose Save View As . . . from the File menu.
A File dialog appears for saving the view.
6. Type a filename for the view in the File dialog and click OK.
☛ Tip:
A suffix of .view is useful for distinguishing view files.
CHAPTER 3. TUTORIAL
30
If necessary, the file suffixes are added automatically.
When loading a rigiedit view, you must ensure that the graph in memory is the
same as the graph on which the view was based.
To load a rigiedit view:
1. Choose Close All from the Window menu.
All rigiedit windows become closed except the root window.
2. Choose Load Graph . . . from the File menu.
A File dialog appears for loading the graph on which the view is based.
3. Select the graph to load, and click OK.
When loading a graph, an alert appears, reminding you that the graph in memory will be cleared.
4. Choose Load View . . . from the File menu.
A File dialog appears for loading the view.
3.1. USING THE EDITOR
31
5. Pick the view to load and click OK.
One or more windows will be opened with the same contents and arrangement as the windows previously saved in the view.
3.1.11 Scripting
You can program the editor by writing scripts using the Rigi Command Library (RCL)
to automate tasks, customize features, and integrate capabilities. There is an RCL
command corresponding to each menu command. These commands (and others)
can be assembled into procedures.
Return to the Children window with the ListADT, ElementADT, and Control subsystem nodes.
For scripting experiments, make a test window of leaf nodes by performing a projection of the subsystems with infinite depth:
1. Select the three subsystem nodes.
2. Choose Settings from the Options
menu.
3. Adjust the Projection Depth slider
to the value ,1.
4. Choose
Projection
from
the
Navigate menu.
A Projection window appears, containing the lowest level nodes in the
subsystem hierarchy; the structure of
the hierarchy is not modified after
producing a projection.
You can produce custom layouts. To enter an RCL command:
1. Place the pointer to the command entry field and click.
CHAPTER 3. TUTORIAL
32
2. Type rcl select type Function.
Press the enter key after typing each script command.
The rcl select type command selects nodes by their type (here, it is Function).
3. Type rcl cursor set 100 10.
The rcl cursor set command moves a cursor to location (x; y ) = (100; 10) on
the canvas. This is equivalent to clicking the mouse at that location (usually
as a prelude for arrangement operations).
4. Type rcl group vertically.
The rcl group vertically command
corresponds to choosing Vertical from
the Layout menu; the selected nodes
are arranged in a vertical line along
the left side of the canvas.
4 Note:
RCL is case sensitive.
As each command is entered, it is put into a scrollable command history list located
below the menubar.
Clicking on a command in the list automatically places it into the command entry
field. Double-clicking on a command in the list runs it right away (and appends
this command to the bottom of the list).
Now, using the current commands in the command history list, retrieve and edit
them as appropriate to lay out the two remaining Data nodes in a vertical line to
the right of the Function nodes.
Using a separate text editor, you can write script files that can be loaded into rigiedit.
For example, type the following script into a file called myscript.rcl in your home
directory. The lines starting with # are comments. Try to figure out what the script
does.
3.1. USING THE EDITOR
33
proc columns {} {
# select all nodes in the active window
rcl_select_all
# for each node that is selected ...
foreach nodeID [rcl_select_get_list] {
# check off its node type as being used
set nodeTypes([rcl_get_node_type $nodeID]) 1
}
# get the number of distinct node types
set numNodeTypes [array size nodeTypes]
if {$numNodeTypes == 0} {
# do nothing if the window has no nodes
return
}
# set horizontal cursor increment and starting point
set xDelta [expr [rcl_win_canvas_width] / $numNodeTypes]
set xPos [expr $xDelta / 2]
# for each node type used ...
foreach nodeType [array names nodeTypes] {
# select all nodes in the active window of that type
rcl_select_type $nodeType
# set the cursor
rcl_cursor_set $xPos 0
# lay out the selected nodes vertically at the cursor
rcl_group_vertically
# step the cursor
incr xPos $xDelta
}
# scale the nodes to fit inside the active window
rcl_scale_to_window
# deselect all nodes in the active window
rcl_select_none
}
This script arranges the nodes in the active window into columns by their node
type.
CHAPTER 3. TUTORIAL
34
To load the myscript.rcl into rigiedit and run the layout algorithm:
1. Type source
/myscript.rcl in the command entry field.
2. Type columns.
3.1. USING THE EDITOR
35
To use script commands to access external tools such as graph layout programs:
1. Type rcl filter arctype data 0 then rcl filter apply 0 arc in the command entry field.
These two commands hide the data arcs in the active window (the Projection
window).
2. Type sugiyama call 0.
The call arcs of the graph in the
current window are presented in
a layered, tree-like form using the
Sugiyama directed graph layout algorithm. The sugiyama command takes
an arc type as the first parameter
and a window number as the second
parameter (zero meaning the current
window). The window number is
shown in the title bar of a window,
following the type.
☛ Tip:
This technique is a quick way of producing call graphs for a program.
CHAPTER 3. TUTORIAL
36
3.1.12 Finishing Up
To finish your session with Rigi:
1. Choose Exit from the File menu.
An alert appears reminding you that exiting does not save
the graph.
2. Click Exit to exit.
Chapter 4
Handbook
CHAPTER 4. HANDBOOK
38
4.1 Running the Editor
The rigiedit graph editor program takes various command-line options. On a
Unix platform, you must be in an X session (preferably with a Motif-compliant window manager). Since rigiedit is an X client, you can run it on a remote host machine and, as usual, have the interaction directed to the display you are using.
rigiedit [-dm domain ] [-env configfile ] [-fd] [-h] [-i scriptfile ] [-poll]
[-s host [:port ]] [-v]
Options for rigiedit:
-dm domain
Specify the default domain model (x4.4.1).
-env configfile
Load the configuration file, configfile, upon startup (x4.3.1).
-fd
Use fast arc drawing, at the expense of accuracy.
-h
Print a terse list of rigiedit options.
-i scriptfile
Load the RCL script file, scriptfile, upon startup (x4.5).
-poll
Run the RCL command rcl poll proc (if defined) once every second.
-s host [:port ]
Specify a host on which the mbus software message bus is running and, optionally, the associated port number it is using. (By default, the port number
is 0.) Connect to this bus.
-v
Specify verbose debugging output.
4.2. WORKING WITH MENUS
39
4.2 Working with Menus
When you run rigiedit, you initially see the Rigi Workbench window and an empty
root window.
The rigiedit menubar has pull-menus File, Edit, Navigate, Select, Filter, Scale,
Layout, Report, Window, Demo, Options, and Help. To pull down these menus,
place the pointer over a menu name, press with the left mouse button, drag to the
desired menu item, and release.
☛ Tip: There are accelerator keys to pull down these menus and choose
items (see xA.3).
For rigiedit windows that display nodes and arcs in a canvas area, there are two
context-sensitive popup menus depending on what object (node or arc) is under
the pointer. For these popup menus in the canvas area, you use the right mouse
button.
CHAPTER 4. HANDBOOK
40
4.2.1 Using the Node menu
There is a Node menu that can be brought up for each node in a window. The title of
each Node menu displays the name of the node; this title is color-coded according
to the type of the node.
To use the Node menu:
1. Place the pointer over a specific node and right-click
to raise the Node menu.
Operations from the Node menu apply to the specified
node and sometimes the subhierarchy rooted at this
node.
2. Move the pointer over a menu item and right-click to
perform the node operation.
4.2.2 Using the Arc menu
There is an Arc menu that can be brought up for each arc in a window. The title of
each Arc menu displays the names of the source and destination nodes of the arc;
this title is color-coded according to the type of the arc.
To use the Arc menu:
1. Place the pointer over a specific arc and right-click to
raise the Arc menu.
Operations from the Arc menu apply to the specified arc.
2. Move the pointer over a menu item and right-click to
perform the arc operation.
4.3. CONFIGURING THE EDITOR
41
4.3 Configuring the Editor
This section describes tasks for customizing the Rigi environment through various
configuration parameters.
4.3.1 Rigi configuration parameters
The rigiedit editor stores its preferences or configuration parameters in a file. It
considers the following locations, in sequence, to find and load this configuration
file:
1. the filename specified in the -env flag to rigiedit,
2. a rigicfg.env file in the current working directory where rigiedit was invoked,
3. a rigicfg.env file in the directory named by the environment variable RIGIUSER,
or
4. a rigicfg.env file in the directory named by the environment variable RIGI.
Table 4.1 lists the standard Rigi configuration parameters, with a short description,
and the default value (if any).
The usual parameters to change are:
RIGIUSER
RIGIDOMAIN
SRCDIR
RIGIURCL
DBDIR
TEXTEDITOR
WEBBROWSER
NUMBACKSTORES
CANVASCOLOR
GRAPHFONT
MESSAGEFONT
TEXTFONT
WORKBENCHFONT
(e.g., to ~)
(x4.3.5)
(x4.10.7)
(x4.5)
(x4.3.6)
(x4.3.7)
(x4.3.8)
(x4.3.9)
(x4.3.10)
(x4.3.11)
(x4.3.11)
(x4.3.11)
(x4.3.11)
CHAPTER 4. HANDBOOK
42
Table 4.1: Rigi Configuration Parameters
Variable
Description
RIGI
installation directory
RIGIUSER
personal home directoryy
personal home directoryz
RIGIBIN
executables directory
RIGILIB
support files directory
RIGIINIT
domains directory
RIGIDOMAIN
default domain subdirectory
ICONDIR
icons directory
SRCDIR
source files directory
RIGIRCL
standard RCL startup script
RIGISTY
standard user interface script
RIGIURCL
personal RCL startup script
RIGIUSTY
personal user interface script
DBDIR
database directory
DBREFDIR
database reference directory
TMPDIR
temporary files directoryy
temporary files directoryz
TEXTEDITOR
text editor format stringy
text editor format stringz
WEBBROWSER
web browser format string
WEBROOT
web root URL
RIGITITLE
title on stdout windowz
ROOTLOCATION
root window position
ROOTFRAMEDIM
window frame dimensions
ROOTWINDOWDIM window internal dimensions
MAXCANVASDIM
canvas dimensions
NUMBACKSTORES number of backing stores
CANVASCOLOR
background canvas color
DEMOFONT
demo messages font?
GRAPHFONT
node label font?
MESSAGEFONT
messages font?
TEXTFONT
text font?
WORKBENCHFONT workbench font?
RIGIDBPORT
mbus port number
RIGIDBHOST
mbus host machine name
y Unix
Default Value
.
$RIGI/bin
$RIGI/Rigi
$RIGI/Rigi/domain
c
$RIGI/Rigi/icons
$RIGI/Rigi/src
$RIGI/Rigi/rcl/rc.rcl
$RIGI/Rigi/rcl/sty/rigi
$RIGI/Rigi/db
$RIGI/Rigi/db
/tmp
$RIGI/Rigi/tmp
xterm -e vi +%d
notepad.exe
netscape -remote openURL(%s)
http://
Rigi Visual Editor - Rigiedit
0 185
529 456
500 400
1284 1024
2
Helvetica, bold, 12 point
Helvetica, medium, 10 point
Helvetica, bold, 12 point
Courier, medium, 10 point
Helvetica, bold, 12 point
0
version. zWindows version. ? Expressed using an X font specification.
4.3. CONFIGURING THE EDITOR
43
4.3.2 Creating a new configuration file
To create a new configuration file:
1. Choose Configuration from the Options menu.
A Configuration dialog appears, showing a list of configuration parameters.
For each parameter, there is a short description, the corresponding environment variable which would override it, and the current value.
2. Choose New from the File menu of the Configuration dialog.
A new configuration is created with default values for the parameters.
3. Choose Save As . . . from the File menu of the dialog.
A File dialog appears.
4. Enter a name for the new configuration file and click OK.
Use the name rigicfg.env so that rigiedit can automatically attempt to find
it.
5. Click Done to dismiss the Configuration dialog.
CHAPTER 4. HANDBOOK
44
4.3.3 Modifying a configuration file
To modify an existing configuration file:
1. Choose Configuration from the Options menu.
A Configuration dialog appears,
showing a list of configuration
parameters.
For each parameter, there is
a short description, the corresponding environment variable
which would override it, and
the current value.
The configuration file being
modified is indicated in the title
bar of the dialog.
2. Pick a parameter from the list by left clicking on it.
3. Click Edit Item to edit the current value for this
parameter.
A dialog window appears, presenting an entry
field.
☛ Tip: You could also double-click on a parameter
from the list to present this dialog.
4. Make the required change and click Done.
Or click Cancel to cancel and return to the Configuration dialog.
Clicking Default retrieves the default value of the selected parameter.
5. Click Done to commit the changes and dismiss the Configuration dialog.
If you made any changes, an alert appears asking whether you want to save
them.
6. Click OK.
Or click Cancel to cancel without changes.
If you clicked OK, you will be reminded to exit and restart rigiedit to see the
changes.
4 Note:
You need to restart rigiedit (with the appropriate configuration file)
to use the changed configuration parameters.
4.3. CONFIGURING THE EDITOR
45
4.3.4 Overriding the configuration file
setenv variable value
There is an environment variable for each configuration parameter (as shown in
Table 4.1). By defining any of these environment variables, you override the corresponding definition in the active configuration file.
Some of these variables may be further overridden or augmented by command-line
arguments to rigiedit (x4.1).
4.3.5 Defining the default domain model
The configuration parameter RIGIDOMAIN specifies the name of the default domain
model to be set when rigiedit is started.
To find the appropriate domain files (x4.4.1), the name specifies a subdirectory within
a directory pointed to by the configuration parameter RIGIINIT.
To change or override these parameters, see x4.3.3 or see x4.3.4.
☛ Tip: The default domain model can also be specified in the -dm commandline option (x4.1) to rigiedit.
4.3.6 Defining the default database directory
The configuration parameter DBDIR specifies the (default) database directory to be
used when loading and saving files such as graphs, views, and annotations. This
parameter is also used to help locate the demos listed in the Demo menu.
To change or override these parameters, see x4.3.3 or see x4.3.4.
☛ Tip: You are also asked to (re)set the database directory when clearing the
graph (x4.7.4); this does not require restarting rigiedit.
4 Note:
Changing the database directory may cause rigiedit to forget where
the demo files are located.
46
CHAPTER 4. HANDBOOK
4.3.7 Defining the default text editor
The configuration parameter TEXTEDITOR specifies the command to launch a text
editor. A %d code in the value string is replaced by a line number. The text editor is
launched as a separate process outside the direct control of rigiedit.
To change or override these parameters, see x4.3.3 or see x4.3.4.
For a non-graphical editor under Unix, you may need to launch the editor indirectly
through the X client xterm. For example, TEXTEDITOR can be set to xterm -e vi +%d
to run vi as your editor.
4.3.8 Defining the default web browser
The configuration parameter WEBBROWSER specifies the command to launch a web
browser. A %s code in the value string is replaced by a Uniform Resource Locator
(URL). The web browser is launched as a separate process outside the direct control
of rigiedit.
To change or override these parameters, see x4.3.3 or see x4.3.4.
4.3. CONFIGURING THE EDITOR
47
4.3.9 Defining the number of backing stores
A backing store is an in-memory pixmap used to accelerate the refresh of window
contents. The configuration parameter NUMBACKSTORES specifies the maximum number of such backing stores. A typical value is 4, subject to memory limits. The
memory needed for each store depends on the canvas height and width (in pixels)
specified by the configuration parameter MAXCANVASDIM.
To change or override these parameters, see x4.3.3 or see x4.3.4.
★ Technical: A backing store is allocated to a canvas window on a first-come
first-served basis, provided that the redraw contents exceed
a certain level of visual complexity. A store is freed for use
whenever a canvas window is closed. A store may be allocated
to an existing window if one was not available at the time the
window was created.
4 Note:
A backing store is never allocated to a SHriMP window.
4.3.10 Defining the default background canvas color
The configuration parameter CANVASCOLOR specifies the background color of canvas windows. Typical values are Black or White. If no value is given (the system
default), rigiedit makes a choice, based on the color map, that leads to the most
efficient color drawing.
To change or override these parameters, see x4.3.3 or see x4.3.4.
4 Note:
The background color of a SHriMP window is not affected by this parameter.
CHAPTER 4. HANDBOOK
48
4.3.11 Defining fonts
The font (typestyle) parameters are typically expressed using an X font specification
with the form:
-foundry -family -weight -slant -width --pixelsize -pointsize -*-*-*-*-*-*
Here are some typical values (not all combinations are possible):
foundry
family
weight
slant
width
pixelsize
pointsize
adobe, misc
fixed, courier, helvetica, times
medium, bold
r
normal
10, 12, 14, 18, 24
100, 120, 140, 160, 180, 240
To view the possible combinations, use the X client xfontsel.
4.4. WORKING WITH DOMAINS
49
4.4 Working with Domains
The rigiedit graph editor can be specialized for particular domains, such as C language programming, LATEX technical writing, and Web exploration.
The handbook uses C as the domain for the sample screen images; however, rigiedit
is not limited to C and most operations work across different domains.
A domain is described by a domain model that determines what node and arc types,
and node and arc attributes are possible in the domain.
This model is a meta-level description of actual, token-level graph data conforming
to the domain (x4.7.1).
CHAPTER 4. HANDBOOK
50
4.4.1 Domain files
Each domain has a set of appropriate node and arc types, and node and arc attributes. These aspects are expressed in a set of five files.
These files are stored in a subdirectory, of the same name as the domain, within a
directory pointed to by the configuration parameter RIGIINIT.
These files are described below.
Riginode declares the names of node types. Each line has the form:
nodeType
☛ Tip: One useful convention is to capitalize node type names.
Rigiarc declares the names of arc types (relating two starting and ending node
types). Each line has the form:
arcType [startNodeType endNodeType]
4 Note:
Rigiattr declares the names of node and/or arc attributes. Each line has the
form:
4 Note:
The node types, if given, do not constrain the declared arc type
to relate only these types of nodes. However, when an arc of
the declared arc type is encountered, the given node types can
be used, if needed, to infer the appropriate types of the starting
and/or ending nodes.
attr Node nodeAttribute
attr Arc arcAttribute
All node types share the same set of possible node attributes;
a node type cannot have a different set of attributes from another node type. This also applies to arc types and arc attributes. (However, nodes and arcs can have differing attribute values from each other.)
Rigicolor determines node and arc colors.
☛ Tip: It is simplest to configure these colors within rigiedit.
Rigircl is a Tcl script to be run when switching to this domain.
Typically, a domain has a Collapse node type (x4.10.1) declared in the Riginode file.
If omitted, this node type is automatically added.
4.4. WORKING WITH DOMAINS
☛ Tip:
51
It is useful to include an Unknown node type that rigiedit can use to
set the (default) types of nodes that are somehow untyped (or yet to
have their types inferred). If included, this node type should appear
as the first entry in the Riginode file.
Also, a domain typically has level and composite arc types (x4.11.1) declared in the
Rigiarc file. If omitted, these arc types are automatically added.
CHAPTER 4. HANDBOOK
52
4.4.2 Switching the current domain model
To switch the current domain model:
1. Click the Domain button in the Workbench window.
A Domain palette appears.
2. Pick the desired domain from the palette.
You are reminded that changing domain models clears the graph in memory.
3. Click OK to continue.
Or click Cancel to cancel.
The loaded domain model includes a specification of the valid node and arc
types, attributes, and the optional script to be run (x4.4.1).
4.5. RUNNING SCRIPTS
53
4.5 Running Scripts
You can program the editor by writing scripts using the Rigi Command Library (RCL)
to automate tasks, customize features, and integrate capabilities. There is an RCL
command corresponding to each menu command.
☛ Tip: For most tasks in the handbook, the corresponding RCL command(s)
are listed at the end of the task description.
These commands (and others) can be assembled into procedures using the Tcl scripting language; this language is described in the book:
John K. Ousterhout, Tcl and the Tk Toolkit, Addison-Wesley, April 1994,
ISBN 0-201-63337-X.
★ Technical: The editor uses Tcl 7.4, Tk 4.0, and Tix 4.1.0.
When rigiedit starts, it loads the system RCL startup script specified by the configuration parameter RIGIRCL.
★ Technical:
This file essentially defines RCL in terms of more primitive
commands (prefixed by double underscores); you can completely redefine RCL if you want.
Then rigiedit loads your personal RCL startup script specified by the configuration parameter RIGIURCL (if defined). Then, if so specified, the script file specified
in the -i command-line option (x4.1) to rigiedit is loaded.
A domain model may also specify a domain-specific script to be run initially whenever the model is loaded (x4.4.1). This script is named Rigircl and is stored in a
subdirectory, of the same name as the domain, within a directory pointed to by the
configuration parameter RIGIINIT.
CHAPTER 4. HANDBOOK
54
4.5.1 Entering a script command
To enter a script command:
1. Place the pointer in the command entry field and click.
The field obtains the keyboard focus; you can now type into it.
2. Type the desired script command.
Press the enter key after typing each command.
4 Note:
RCL is case sensitive.
4.5.2 Retrieving previously entered commands
As each command is entered, it is put into a scrollable command history list located
below the menubar.
Click on a command in the list to automatically place it into the command
entry field.
Double-click on a command in the list to run it immediately.
This command is also appended to the bottom of the list.
4.5. RUNNING SCRIPTS
55
4.5.3 Loading and running a script file
To load a file of script commands:
1. Place the pointer in the command entry field and click.
2. Enter source, space, and the filename of the script file.
The script file is loaded and run.
☛ Tip: Like the C shell, a leading in the filename can be used to refer to a
user home directory.
CHAPTER 4. HANDBOOK
56
4.5.4 Listing available commands
To list the available Tcl procedures or RCL commands:
1. Click the RCL Command: button in the Workbench window.
A Commands dialog appears.
2. Pick the Procedures choice in the dialog.
A list of Tcl commands matching the filter string in
the dialog is presented.
☛ Tip: If the command entry field is non-empty
when you clicked on the RCL Command:
button, the (partial) entry is used as the basis
for filtering items in the list.
3. Type in a filter string and press the enter key to update the list.
The filter string can contain wildcard characters: ‘?’ will match any single
character, and ‘*’ will match a sequence of zero or more characters.
All RCL commands have the same rcl prefix. Some useful filter strings are:
rcl
rcl
rcl
rcl
rcl
open *
win *
node *
arc *
select *
open windows
control windows
node operations
arc operations
select objects
rcl
rcl
rcl
rcl
rcl
filter *
scale *
group *
set *
get *
filter objects
scale nodes
arrange nodes
set values
get values
4. Select a command from the list.
5. If desired, click Show Script to present the argument list and body of the
selected command.
Or double-click a command from the list.
A textual window appears; you can have several such windows at the same
time.
6. If desired, click Enter Command to transfer the selected command to the
command entry field.
7. Click Done to dismiss the dialog.
4.5. RUNNING SCRIPTS
57
4.5.5 Listing global variables
To list the current global Tcl variables:
1. Click the RCL Command: button in the Workbench window.
A Commands dialog appears.
2. Pick the Global Vars choice in the dialog.
A list of global Tcl variables matching the filter
string in the dialog is presented.
3. Type in a new filter string and press the enter key
to update the list.
The filter string can contain wildcard characters: ‘?’
will match any single character, and ‘*’ will match a
sequence of zero or more characters.
4. Select a variable from the list.
5. If desired, click Show Value to present the current value of the variable.
Or double-click a variable from the list.
If the variable is a scalar, then a message appears with its value. If the variable
is an array, then a textual window appears, listing all the individual elements;
you can have several such windows at the same time.
6. Click Done to dismiss these windows or the dialog.
CHAPTER 4. HANDBOOK
58
4.6 Finishing Up
4.6.1 Exiting
To exit rigiedit:
1. Choose Exit from the File menu.
An alert appears, reminding you that exiting does not save
the graph.
2. Click Exit to exit.
Or click Cancel to cancel.
rcl quit
rcl quit no verify
4.6. FINISHING UP
59
4.6.2 Aborting
To abort rigiedit under Unix:
1. Bring the shell window from which you launched rigiedit to the foreground.
If necessary, bring the rigiedit process to the foreground.
2. Type Ctrl-c to stop rigiedit.
★ Technical:
The rigiedit program traps the resulting SIGINT signal.
You will be prompted whether you really want to exit.
Quit rigiedit? [y/n]:
3. Type a y for yes or n for no.
If yes, you will be prompted whether to dump a core file (an image of rigiedit
in memory) for debugging purposes.
Dump a core file? [y/n]:
☛ Tip: You normally do not want to dump a core file.
4. Type y or n.
To abort rigiedit under Windows 95:
◆ Press Ctrl-Alt-Del and select rigiedit as the task to terminate from the provided task list.
CHAPTER 4. HANDBOOK
60
4.7 Working with Graphs
4.7.1 Rigi Standard Format
Rigi Standard Format (RSF) is the main file format for graphs in rigiedit. There
are two major dialects of RSF: unstructured and structured. In general, external
tools, conceptual modelers, and parsers provide unstructured RSF for rigiedit,
and rigiedit saves the graph as structured RSF, including spatial information such
as the subsystem hierarchy.
The following describes unstructured RSF.
An RSF file or stream consists of a sequence of triples, one triple on a line. Blank
lines and comment lines starting with # are allowed. The format for a triple is three
optionally quoted strings; the quotes are useful if the string contains whitespace
characters:
verb subject object
The RSF files contain information such as actual software artifacts (and are described
below). Domain-model files specify the valid verbs for these token-level RSF files
(x4.4).
An RSF triple can represent an arc between two nodes to the graph editor:
arcType startNodeName endNodeName
For example, using a domain model that has Function and Data type nodes interconnected by call and data access arcs, a token-level RSF stream then contains triples
like:
call
call
data
data
...
main
main
main
listcreate
printf
listcreate
FILE
List
As well, an RSF triple can bind values to attributes of nodes:
nodeAttribute nodeName attributeValue
For example, you might note the defining file and line number where the definition
of a function occurs:
4.7. WORKING WITH GRAPHS
file
lineno
...
listcreate
listcreate
61
"list.c"
10
Such information would allow you to write a Tcl procedure that opens a text editor
at the function definition.
A particularly important triple assigns the type of a node:
type nodeName nodeType
For example, to note function names:
type
listcreate
Function
This is sometimes unnecessary. The type of a node can be inferred from the types of
arcs connecting to (from) it if one of these arc types (declared in the domain model)
specifies the ending (starting) node type.
For example, call arcs in the provided C domain model each relate two Function
nodes. Thus, main and listcreate are inferred as Function nodes in this triple:
call
4 Note:
main
listcreate
Binding values to attributes of arcs and naming arcs are not supported in unstructured RSF.
CHAPTER 4. HANDBOOK
62
4.7.2 Saving a graph
To save the graph model in memory to a file:
1. Choose Save Graph As . . .
menu.
A File dialog appears.
from the File
2. Type a filename for the graph.
☛ Tip:
A suffix of .rsf is useful for distinguishing graph files. If no file suffix is specified, .rsf is added automatically.
3. Click OK to save the graph.
Or click Cancel to cancel.
The graph is saved as structured RSF.
4 Note:
To save visual information such as node positions, you need to save
rigiedit views (x4.18.1).
rcl save
4.7.3 Loading a graph
▲ Warning:
When loading a graph, you must ensure that the correct domain model is being used.
To load a file containing a graph into memory:
1. Change to the appropriate domain.
See x4.4.2.
2. Choose Load Graph . . . from the File menu.
A File dialog appears, presenting a view of the
current directory contents.
3. Select the file containing the graph to load.
4. Click OK to load the graph.
Or click Cancel to cancel.
If loading a graph, an alert appears, reminding you that the graph in memory
will be cleared.
4.7. WORKING WITH GRAPHS
63
rcl load
4.7.4 Clearing a graph
To empty or clear the graph model in memory:
1. Choose Initialize from the File menu.
An alert appears, reminding you that initializing does
not save the graph before clearing it.
2. Click Initialize.
A File dialog appears, prompting you to (re)set the database directory used
for loading and saving graph, view, and annotation files.
3. If necessary, specify a database directory, then click OK to clear the graph.
Or click Cancel to cancel.
CHAPTER 4. HANDBOOK
64
4.8 Window Basics
The rigiedit editor opens separate windows to provide multiple, usually editable
perspectives of the graph model. Most of
these windows have a scrollable canvas area,
where a particular set of nodes and arcs is
presented, and a message area at the bottom where informational messages are displayed. For example, a canvas window may
present an overview of the subsystem hierarchy or the children of a parent node.
The initial window titled Root is used to display the parent(s) of the subsystem hierarchy; this window is always present.
The editor has a notion of a currently active window, where operations are applied.
A mouse click in a window causes that window to become active and display
ACTIVE in its title.
4 Note:
On Unix platforms, the active window is unrelated to the pointer focus.
Most of the mouse interaction with rigiedit is through the left mouse button (such
as choosing menu items or clicking buttons); the right mouse button is used only
within a canvas area.
You can use the frame or control gadgets of a window to iconize, maximize, raise,
lower, or delete windows. These operations depend on the window manager or
operating system being used.
4.8. WINDOW BASICS
65
4.8.1 Window types
There are five major types of canvas windows (in decreasing order of flexibility and
consistency):
general
projection,
overview,
scratch (clipboard), and
SHriMP.
Also, there are four types of general canvas windows:
children,
parents,
neighbors, and
selection.
Do not confuse these canvas window types with the other specialized dialogs, alerts,
and windows used in rigiedit.
The title bar of a canvas window indicates its
type, its numeric ID (optional), its label, and
whether it is active (optional).
4 Note:
Text editor windows may be spawned by rigiedit to display report, annotation, or source data; these windows are controlled by processes that are independent of rigiedit and do not respond to actions chosen from the Window menu.
CHAPTER 4. HANDBOOK
66
4.8.2 Activating a window
To make a canvas window the current active window:
◆ Click the left or right mouse button on the canvas of the window.
☛ Tip: Right-clicking does not disturb the current selection.
4.8.3 Raising the active window
To raise the active window:
◆ Choose Raise Active from the Window menu.
The active window is raised above all other canvas windows. Also raised are
all the filter dialogs, attribute dialogs, and Information windows associated
with it.
4.8.4 Stacking (cascading) the windows
To neatly stack the canvas windows:
◆ Choose Cascade from the Window menu.
The canvas windows are stacked (offset slightly), with the active window on
top.
4 Note:
SHriMP windows are not included in the cascade.
4.8. WINDOW BASICS
67
4.8.5 Refreshing a window
To refresh the displayed contents of the active window:
◆ Choose Refresh from the Window menu.
The contents of the active window are redrawn, fixing anything that may have
garbled its display.
rcl refresh
4.8.6 Updating a window
To update the displayed contents of the active window because of a change to the
graph model:
◆ Choose Update from the Window menu.
The active window updates its contents to match the graph model.
4 Note:
You may need to update windows that have been outdated because
of a change to the graph model initiated in another window or by a
script.
rcl update
CHAPTER 4. HANDBOOK
68
4.8.7 Closing the active window
To close the active window:
◆ Choose Close Active from the Window menu.
The active window is closed along with the following other windows:
any related Filter by Node Type dialog,
any related Filter by Arc Type dialog,
any information windows opened on a node in the active window;
any attribute editors opened on a node or arc in the active window.
☛ Tip: You can also close a window through your window manager.
4 Note:
The root window cannot be closed.
rcl close
4.8.8 Closing all windows
To close all windows:
◆ Choose Close All from the Window menu.
All rigiedit windows close except for the root window.
4 Note:
The root window cannot be closed.
rcl close all
4.8. WINDOW BASICS
4.8.9 Bringing up the Settings dialog
To bring up the Settings dialog:
◆ Choose Settings from the Options menu.
The Settings dialog appears, presenting various settings that you can adjust; these settings are described elsewhere in this handbook.
4 Note:
Any changes to these settings are committed immediately.
69
CHAPTER 4. HANDBOOK
70
4.9 Making Selections
You can select nodes, arcs, and subgraphs that are in the active window based on
various criteria. Selected nodes are highlighted in the canvas by being drawn in a
solid color. A selected arc is highlighted by a wider line.
Because of multiple perspectives on the same graph model, the same essential selected node(s) may appear highlighted in separate windows.
4.9.1 Selecting a node
To select a single node:
1. Place the pointer over the node to select and click the left mouse button.
The node becomes selected and all other nodes and arcs become deselected.
4.9.2 Selecting an arc
To select a single arc:
1. Place the pointer over the arc to select and click the left mouse button.
The arc becomes selected and all other nodes and arcs become deselected.
4 Note:
Only one arc can be selected at a time (among all windows).
4.9. MAKING SELECTIONS
71
4.9.3 Selecting grouped nodes by dragging
To select a group of nodes by dragging:
1. Place the pointer over a clear area of the canvas above and to the left of the
group of nodes you want to select.
2. Press the left mouse button and drag down and to the right around the group.
A rectangle appears, enclosing the nodes you want to select.
3. Release the mouse button.
Any nodes that are either completely or partly inside the selection rectangle
become selected.
➤
4.9.4 Selecting and deselecting nodes by shift-clicking
You can select nodes, perhaps in scattered locations within a window, using this
technique.
1. Select a node.
2. Hold down the shift key and continue to select or deselect individual nodes
by clicking the left mouse button.
If the clicked node was selected, it is deselected; if the node was not selected,
it is added to the current selection. Any other selected nodes or arc are not
affected.
CHAPTER 4. HANDBOOK
72
4.9.5 Selecting all nodes
To select all the nodes in the active window:
◆ Choose All from the Select menu. All nodes in the active window are selected.
The accelerator key for this operation is Ctrl-a.
rcl select all
4.9.6 Complementing selected nodes
Sometimes it’s quicker to select what you don’t want and taking the complement.
◆ Choose Complement from the Select menu.
Nodes not selected become selected and nodes already selected become deselected.
➤
rcl select invert
4.9. MAKING SELECTIONS
73
4.9.7 Deselecting a node
To deselect a node:
1. Place the pointer over the selected node to deselect.
2. Hold down the shift key and click the left mouse button.
The clicked node is deselected.
4.9.8 Deselecting all nodes
To deselect all nodes in the active window:
◆ Place the pointer over a clear area of the canvas and click the left mouse
button.
You can also choose None from the Select menu.
All selected nodes in the active window become deselected.
rcl select none
CHAPTER 4. HANDBOOK
74
4.9.9 Selecting nodes by name
Sometimes it’s quicker to select nodes by matching on their names.
To select nodes by matching on their names:
1. Choose By Name . . . from the Select menu.
A Select by Name dialog appears.
2. Enter a search string.
The search string can contain wildcard characters: ‘?’
will match any single character, and ‘*’ will match a
sequence of zero or more characters.
3. Toggle the Search Entire Graph item as required.
Toggle on this item if you want to search for nodes in the whole graph model,
or toggle off this item to search only in the active window.
4. Click Select to start the search.
Nodes with names matching the search string are selected.
A series of searches is possible; if you hold down the shift key while clicking
Select, the matching nodes are added to the current selection (rather than replacing it).
4.9. MAKING SELECTIONS
75
4.9.10 Selecting nodes by attribute
Nodes can be selected according to whether they have a specific value for a particular node attribute. Node attributes are domain specific.
To select nodes by matching on their attributes:
1. Choose By Attribute . . . from the Select menu.
A Select by Attribute dialog appears.
2. Pick a node attribute from the
Node Attribute popup menu of the
dialog.
3. Enter the desired attribute value to match in the Value: entry field.
The value can contain wildcard characters: ‘?’ will match any single character,
and ‘*’ will match a sequence of zero or more characters.
4. Toggle the Search Entire Graph item as required.
Toggle on this item if you want to search for nodes in the whole graph model,
or toggle off this item to search only in the active window.
5. Click Select to start the search.
Nodes with an attribute value matching the specified one are selected.
A series of searches is possible; if you hold down the shift key while clicking
Select, the matching nodes are added to the current selection (rather than replacing it).
CHAPTER 4. HANDBOOK
76
4.9.11 Selecting nodes by structure
Nodes can be selected based on their node type and the arc type, direction, and
number of arcs incident to them.
To select nodes by matching on their incident arc structure in the active window:
1. Choose By Structure . . . from the
Select menu.
A Select by Structure dialog appears.
2. Toggle on the desired set of node types from the Node types popup menu
of the dialog.
The any choice in the popup menu matches any node type.
3. Toggle on the desired set of arc types from the Arc types popup menu of
the dialog.
The any choice in the popup menu matches any arc type.
Since composite arcs may contain (elided) non-composite arcs of the specified arc type, the search may pass through these composite arcs to select the
matching nodes. The composite arc type choice matches only composite arcs.
4 Note:
The arc type set must be non-empty.
4. Select an arc direction from the Direction popup menu.
The in choice specifies incoming, the out choice specifies outgoing, and the
any choice specifies any direction.
5. Enter an arc count in the Count: entry field.
6. Select the type of arithmetic comparison to the arc count from the Comparison
popup menu of the dialog.
The five comparison operators are: lt (less than), le (less than or equal), eq
(equal), ge (greater than or equal), and gt (greater than).
7. Click Select to start the search.
Nodes with the specified node types are selected if the count of the incident
arcs of the specified arc type and direction match according to the comparison
operator.
A series of searches is possible; if you hold down the shift key while clicking
Select, the matching nodes are added to the current selection (rather than replacing it).
4.9. MAKING SELECTIONS
77
4.9.12 Selecting nodes by type
To select nodes by node type:
1. Choose By Structure . . . from the Select menu.
A Select by Structure dialog appears.
2. Toggle on the desired set of node types from the Node types popup menu
of the dialog.
The any choice in the popup menu matches any node type.
3. Enter 0 (zero) as an arc count in the Count: entry field.
4. Select eq from the Comparison popup menu of the dialog.
5. Click Select to start the search.
Nodes with the specified node types are selected in the active window.
A series of searches is possible; if you hold down the shift key while clicking
Select, the matching nodes are added to the current selection (rather than replacing it).
CHAPTER 4. HANDBOOK
78
4.9.13 Selecting neighboring nodes along outgoing arcs
To select neighboring nodes along outgoing arcs:
1. Select one or more source nodes.
2. Pick the appropriate arc type for the outgoing arcs from the Arc Type palette.
The any choice in the palette matches any arc type.
Since composite arcs may contain (elided) non-composite arcs of the specified arc type, the search may pass through these composite arcs to select the
matching nodes. The composite arc type choice matches only composite arcs.
3. Choose Outgoing Nodes from the Select menu.
Neighboring nodes that are connected to any of the source nodes by outgoing
arcs of the specified type become selected.
If you hold down the shift key while choosing the Outgoing menu item, the
neighboring nodes are added to the previously selected source nodes (rather
than replacing them).
➤
4.9. MAKING SELECTIONS
79
4.9.14 Selecting neighboring nodes along incoming arcs
To select neighboring nodes along incoming arcs:
1. Select one or more destination nodes.
2. Pick the appropriate arc type for the incoming arcs from the Arc Type palette.
The any choice in the palette matches any arc type.
Since composite arcs may contain (elided) non-composite arcs of the specified arc type, the search may pass through these composite arcs to select the
matching nodes. The composite arc type choice matches only composite arcs.
3. Choose Incoming Nodes from the Select menu.
Neighboring nodes that are connected to any of the destination nodes by incoming arcs of the specified type become selected.
If you hold down the shift key while choosing the Incoming menu item, the
neighboring nodes are added to the previously selected destination nodes (rather
than replacing them).
➤
CHAPTER 4. HANDBOOK
80
4.9.15 Selecting reachable nodes along outgoing arcs
You can select all the nodes on which a selected group of nodes depends.
To select reachable nodes along outgoing arcs:
1. Select one or more starting nodes.
2. Pick the appropriate arc type for the outgoing arcs from the Arc Type palette.
The any choice in the palette matches any arc type.
Since composite arcs may contain (elided) non-composite arcs of the specified arc type, the search may pass through these composite arcs to select the
matching nodes. The composite arc type choice matches only composite arcs.
3. Choose Forward Tree from the Select menu.
Nodes that are reachable along outgoing arcs of the specified type from the
starting nodes become selected.
The reachable nodes are added to the previously selected starting nodes (rather
than replacing them).
rcl select forward tree
4.9. MAKING SELECTIONS
81
4.9.16 Selecting reachable nodes along incoming arcs
You can select all the nodes which depend on a selected group of nodes.
To select reachable nodes along incoming arcs:
1. Select one or more starting nodes.
2. Pick the appropriate arc type for the incoming arcs from the Arc Type palette.
The any choice in the palette matches any arc type.
Since composite arcs may contain (elided) non-composite arcs of the specified arc type, the search may pass through these composite arcs to select the
matching nodes. The composite arc type choice matches only composite arcs.
3. Choose Reverse Tree from the Select menu.
Nodes that are reachable along incoming arcs of the specified type to the starting nodes become selected.
The reachable nodes are added to the previously selected starting nodes (rather
than replacing them).
rcl select reverse tree
CHAPTER 4. HANDBOOK
82
4.10 Working with Nodes
When working with nodes, you need to select them before applying an operation.
4.10.1 Node types
In a rigiedit operation, you may be required to specify a particular node type
(through the Node Type palette). Most node types are domain-specific; following
is a description of the domain-independent node types that arise when producing
a subsystem containment hierarchy.
Collapse
Nodes of this type are subsystems that contain other nodes and are formed
by collapsing these other nodes.
The Collapse node type is automatically added if not present in the loaded domain
model.
★ Technical:
Multiple types of subsystem nodes are supported through
RCL commands. Essentially, any node type can become the
current subsystem node type. By default, the current subsystem node type is the one named Collapse.
4.10. WORKING WITH NODES
83
4.10.2 Changing current node type
To change the global current node type (used as a parameter in many rigiedit operations):
1. Click the Node Type button in the Workbench window.
A Node Type palette appears.
2. Pick the desired node type from the palette.
Or move the pointer outside this palette to cancel.
This palette causes certain operations to consider only specific node types.
4.10.3 Renaming a node
To rename a node:
1. Choose Rename from the Node menu for the node.
A dialog appears for entering the new name.
2. Type in the new node name and press the enter key
(or click Rename).
Or click Cancel to cancel.
rcl node rename
CHAPTER 4. HANDBOOK
84
4.10.4 Changing the type of a node
To change the node type of a particular node:
1. Choose Set Type from the Node menu for the node.
A palette appears, presenting a choice of node types.
2. Pick a new node type by clicking on the appropriate
choice.
Or move the pointer away to cancel.
4.10.5 Editing attributes of a node
To edit the attributes of a node:
1. Choose Edit Attributes from the Node
menu of the node.
An Attributes dialog appears, listing the
available node attributes and their values.
2. Pick a node attribute from the list and click Edit.
A dialog appears for changing the value of the attribute.
3. Type in the desired value and press the enter key (or click Change).
The new value appears in the Attributes dialog.
4. Click Done to commit the changes and dismiss the dialog.
Or click Cancel to cancel.
4.10. WORKING WITH NODES
85
4.10.6 Editing annotation for a node
Each node can have an annotation file linked to it. This file is specified by the
annotate attribute for the node. The value of this attribute can be modified (x4.10.5).
The annotation files are stored in the directory named in the configuration parameter DBDIR.
To edit the annotation for a node:
◆ Choose Edit Annotation from the Node menu of the node.
A Text editor window appears, after loading the annotation file for the node.
If the annotate attribute is empty, a new filename is created and entered as
the attribute value before loading. The editor is a separate process outside
the direct control of rigiedit.
▲ Warning:
☛ Tip:
The DBDIR parameter must be set to an existing, writeable directory (x4.3.6); otherwise, the annotations will not be saved
properly.
If a node in a SHriMP window is a leaf in the subsystem hierarchy,
you can double-left-click on it to view its annotation.
4.10.7 Editing the source text for a node
Each node can have a text file linked to it (such as source code or documentation).
This file is specified by the file attribute for the node. A line position within the file
is specified by the lineno attribute. The values of these attributes can be modified
(x4.10.5). The source files are stored in the directory named in the configuration
parameter SRCDIR.
If the file attribute is not empty, then to edit the associated text for a node:
◆ Choose Edit Source from the Node menu for the node.
A Text editor window appears, after loading the text file linked to the node.
If the lineno attribute is not empty, then it is used to point the text editor to
that line in the file. The editor is a separate process outside the direct control
of rigiedit.
86
☛ Tip:
CHAPTER 4. HANDBOOK
If a node in a non-SHriMP window is a leaf in the subsystem hierarchy, you can double-left-click on it to edit the associated text file.
4.10. WORKING WITH NODES
87
4.10.8 Opening a URL for a node
Each node can have a Uniform Resource Locator (URL) associated with it. This may
be used to launch a web browser and connect to hypertext pages or the World Wide
Web. This URL is specified by the nodeurl attribute for the node, prepended by
the string in the configuration parameter WEBROOT. The web browser, which must
be running, is named in the configuration parameter WEBBROWSER (x4.3.8).
If the nodeurl attribute is not empty, then to follow the URL for a node:
◆ Choose Open URL from the Node menu for the node.
The web browser is a separate process outside the direct control of rigiedit.
CHAPTER 4. HANDBOOK
88
4.10.9 Changing node type colors
To change the color of a node type:
1. Choose Node Colors from the Options menu.
An Node Colors dialog appears.
2. Pick a node type from the dialog.
3. Adjust the color for the specified node type using the sliders.
All nodes of the given type are immediately
changed to the new color.
The color model used is RGB; a higher value
for a color component adds more of that color.
If necessary, pick other node types and change
their colors.
4 Note: The windows display the new color scheme only as they are redrawn;
you may need to explicitly refresh the windows to see the new colors
(x4.8.5).
4. Click Save to permanently save the node colors to the Rigicolor file of the
current domain.
This step is optional.
5. Click Done to dismiss the dialog.
4 Note:
You cannot change the color of a particular node independently; colors are tied to node types.
4.11. WORKING WITH ARCS
4.11
89
Working with Arcs
Arcs or relationships connecting nodes in the graph are displayed as lines. Arcs can be of various types, as specified in the
domain model; they are distinguished with customizable colors.
An arc is only drawn if both node endpoints are visible in the
window.
Arcs are also directed. An arc from source node A to destination
node B is represented as a line from the bottom of node A to the
top of node B. Node A is called a client of node B and node B is
called a supplier of node A. The arc is an outgoing arc of node A
and an incoming arc of node B. A node may have an arc going to
itself, for a recursive relationship. You see this as a line from the
bottom of a node to its top.
When working with arcs, you need to select them before applying an operation.
4.11.1 Arc types
In a rigiedit operation, you may be required to specify a particular arc type (through
the Arc Type palette) or a set of arc types (through the Arc Type Set popup menu
in the Settings dialog).
Most arc types are domain-specific; following is a description of the domain-independent
arc types that arise when producing a subsystem containment hierarchy.
level
A level arc spans two adjacent levels in a subsystem hierarchy.
composite
A composite arc represents a bundle of one or more arcs of different types.
Subsystem nodes generally have composite arcs incident to them.
The level and composite arc types are automatically added if not present in the loaded
domain model.
CHAPTER 4. HANDBOOK
90
★ Technical:
Multiple types of level and composite arcs are supported
through RCL commands. Essentially, any arc type can become
the current level or composite arc type. By default, the current
level and composite arc types are the ones named, respectively,
level and composite.
4.11.2 Changing current arc type
To change the global current arc type (used as a parameter in many rigiedit operations):
1. Click the Arc Type button in the Workbench window.
An Arc Type palette appears.
2. Pick the desired arc type from the palette.
Or move the pointer outside this palette to cancel.
This palette causes certain operations to consider only specific arc types. The
any choice in the palette matches any arc type.
4.11.3 Changing the type of an arc
To change the arc type of an arc:
1. Choose Set Type from the Arc menu for the arc.
A palette appears, presenting a choice of arc types.
2. Pick a new arc type by clicking on the appropriate
choice.
Or move the pointer away to cancel.
4.11. WORKING WITH ARCS
91
4.11.4 Editing attributes of an arc
To edit the attributes of an arc:
1. Choose Edit Attributes from the Arc
menu of the arc.
An Attributes dialog appears, listing the
available arc attributes and their values.
2. Pick an arc attribute from the list and click Edit.
A dialog appears for changing the value of the attribute.
3. Type in the desired value and press the enter key (or click Change).
The new value appears in the Attributes dialog.
4. Click Done to commit the changes and dismiss the dialog.
Or click Cancel to cancel.
4.11.5 Editing annotation for an arc
Each arc can have an annotation file linked to it. This file is specified by the annotate
attribute for the arc. The value of this attribute can be modified (x4.11.4). The annotation files are stored in the directory named in the configuration parameter DBDIR.
To edit the annotation for an arc:
◆ Choose Edit Annotation from the Arc menu of the arc.
A Text editor window appears, after loading the annotation file for the arc. If
the annotate attribute is empty, a new filename is created and entered as the
attribute value before loading. The editor is a separate process outside the
direct control of rigiedit.
▲ Warning:
The DBDIR parameter must be set to an existing, writeable directory (x4.3.6); otherwise, the annotations will not be saved
properly.
CHAPTER 4. HANDBOOK
92
4.11.6 Opening a URL for an arc
Each arc can have a Uniform Resource Locator (URL) associated with it. This may
be used to launch a web browser and connect to hypertext pages or the World Wide
Web.
This URL is specified by the arcurl attribute for the arc, appended to the
string in the configuration parameter WEBROOT. The web browser, which must be
running, is named in the configuration parameter WEBBROWSER (x4.3.8).
If the arcurl attribute is not empty, then to follow the URL for an arc:
◆ Choose Open URL from the Arc menu for the arc.
The web browser is a separate process outside the direct control of rigiedit.
4.11.7 Changing arc type colors
To change the color of an arc type:
1. Choose Arc Colors from the Options menu.
An Arc Colors dialog appears.
2. Pick an arc type from the dialog.
3. Adjust the color for the specified arc type using the
sliders.
All arcs of the given type are immediately changed
to the new color.
The color model used is RGB; a higher value for a
color component adds more of that color. If necessary, pick other arc types and change their colors.
4 Note: The windows display the new color scheme only as they are redrawn;
you may need to explicitly refresh the windows to see the new colors
(x4.8.5).
4. Click Save to permanently save the arc colors to the Rigicolor file of the
current domain.
This step is optional.
5. Click Done to dismiss the dialog.
4 Note:
You cannot change the color of particular arcs independently; colors
are tied to arc types.
4.12. OPENING WINDOWS
93
4.12 Opening windows
You can open new canvas windows to present other perspectives on the graph. Unless otherwise specified, these windows
allow and preserve arrangements of nodes;
can be saved in reloadable views.
support graph modifying operations such as collapse, expand, cut, copy, paste,
create node, and create arc;
4.12.1 Presenting the children of nodes
To present the children of nodes in a new window:
1. Select one or more nodes.
2. Choose Children from the Navigate menu.
The outgoing level arcs of the selected node(s) are followed one level to obtain
the children nodes.
A new Children window appears, presenting all the children nodes of the selected node(s), with relationships among the children nodes shown by various types of arcs from one child to another.
➤
☛ Tip:
If the node is a non-leaf node in the subsystem hierarchy, you can
double-left-click on it to present the children.
CHAPTER 4. HANDBOOK
94
4.12.2 Presenting the parents of nodes
To present the parents of nodes in a new window:
1. Select one or more nodes.
2. Choose Parents from the Navigate menu.
The incoming level arcs of the selected node(s) are followed one level to obtain
the parent nodes.
A new Parents window appears, presenting all the parent nodes of the selected node(s), with relationships among the parent nodes shown by various
types of arcs from one node to another.
➤
4.12. OPENING WINDOWS
95
4.12.3 Presenting the neighbors of nodes
To present the neighbors of nodes in a new window:
1. Select one or more nodes.
2. Choose Settings from the Options menu.
3. Adjust the Tree Depth slider to specify the distance of the neighboring nodes
from the selected nodes.
If the slider is ,1, the depth is infinite and the full reachability tree would be laid out.
4. Pick the set of arc types to follow from the Arc Set popup menu in the dialog.
5. Click Done to dismiss the dialog.
6. Choose Neighbors from the Navigate menu.
The incoming and outgoing arcs of the types specified by the arc set are followed up to the given distance to obtain the neighboring nodes.
A new Neighbors window appears, presenting all the neighbor nodes of the
selected node(s), with relationships among the neighbor nodes shown by various types of arcs from one node to another.
4.12.4 Presenting selected nodes in a new window
To present selected nodes in a new window:
1. Select one or more nodes.
2. Choose Selection from the Navigate menu.
A new Selection window appears, presenting all the previously selected nodes
and the relationships among them.
CHAPTER 4. HANDBOOK
96
4.12.5 Presenting a projection
You can show the descendants of a selected group of nodes (at a certain depth) by
creating a projection. The descendants are presented in a projection window. To produce a projection:
1. Select one or more nodes to be the roots of the projection.
2. Choose Settings from the Options menu.
A Settings dialog appears.
3. Adjust the Projection Depth slider to the depth you want.
If the slider is ,1, the projection depth is infinite and a projection would display the “leaf” nodes of the hierarchies
rooted at the selected root nodes. If the slider is 0, a projection would display only the selected root nodes.
Otherwise, a projection displays children nodes at the specified depth. Leaf
nodes are included in the projection if the slider value is set too deep for certain branches of the hierarchy.
4. Choose Projection from the Navigate menu.
A new Projection window appears, containing a union of all nodes that are
exactly at the specified depth below the selected nodes. The names of the selected nodes that were projected appear on the title bar of the projection window.
➤
4 Note:
Projection windows do not support graph modifying operations.
4.12. OPENING WINDOWS
97
4.12.6 Presenting an overview
You can view the layered, hierarchical subsystem structure rooted at a node by creating an overview. The hierarchy is presented in an overview window. To produce
an overview:
1. Select a node to be the root of the overview.
2. Choose Overview from the Navigate menu.
A new Overview window appears, presenting the tree-like subsystem structure below the specified root node The root node is at the top of the tree in
the new window. An Overview window presents a vertical “slice” of the hierarchy. The arcs that span levels in the hierarchy are known as level arcs. For
clarity, the arcs within a level and the node labels are filtered in an Overview
window.
➤
☛ Tip: It’s useful to resize this window and place it in a corner of the screen
while you work.
4 Note:
Overview windows do not support graph modifying operations.
4.12.7 Presenting a fisheye view
See x4.19.1.
CHAPTER 4. HANDBOOK
98
4.13 Editing the Graph
4.13.1 Creating a new node
To create a new node:
1. Pick a node type for the new node from the
Node Type palette.
2. Place the pointer at the location where the new node should be added, hold
down the shift key, and double-right-click.
A node, named new, of the specified type is created in the canvas at the given
location. You should give the new node a unique name.
The current selection set is not disturbed.
rcl create node
4.13.2 Creating a new arc
To create a new arc:
1. Pick an arc type for the new arc from the Arc Type
palette.
2. Place the pointer over the starting node, hold down the shift key, and press
the right mouse button.
3. Drag the pointer to the ending node and release the mouse button.
An arc of the specified type is created from the starting node to the ending
node.
The current selection set is not disturbed.
☛ Tip: To create a self arc, when the starting and ending nodes are the same,
drag the pointer to the top of the node and release.
Trying to “create” an already existing arc merely selects the arc.
4.13. EDITING THE GRAPH
4 Note:
99
You cannot directly create level arcs in any window; level arcs are
only created when you collapse nodes into a subsystem.
Only up to one arc is permitted between a given source and destination; multi-arcs are not supported.
rcl create arc
4.13.3 Deleting nodes
To delete nodes:
1. Select one or more nodes to be deleted.
2. Choose Cut from the Edit menu.
The selected nodes and the arcs among them are removed from the active window (and placed on the clipboard). The arcs connecting the nodes to the rest
of the graph are discarded.
4.13.4 Deleting an arc
To delete an arc:
1. Select the arc to be deleted.
2. Choose Cut from the Edit menu.
The selected arc is removed from the active window.
CHAPTER 4. HANDBOOK
100
4.13.5 Collapsing a subsystem
To collapse nodes into a subsystem:
1. Select one or more nodes for the subsystem.
2. Choose Collapse from the Edit menu.
A new subsystem node is created that has all of the selected nodes as its children, thus simplifying the graph in the active window.
➤
The previously selected nodes are moved to a lower level in the hierarchy
(and are deselected). The new node, named collapse, becomes selected; you
should provide a more meaningful name.
rcl collapse
4.13. EDITING THE GRAPH
101
4.13.6 Expanding a subsystem
You can perform the opposite of collapsing a subsystem. To expand a subsystem:
1. Select a subsystem node.
A subsystem node contains other nodes. That is, it is a non-leaf node in the
subsystem (containment) hierarchy.
2. Choose Expand from the Edit menu.
The selected subsystem node is replaced by the nodes it contains.
➤
4 Note:
You can only expand one subsystem at a time with the Expand menu
command.
rcl expand
CHAPTER 4. HANDBOOK
102
4.13.7 Cutting a subgraph
To cut a subgraph:
1. Select one or more nodes of the subgraph to be cut.
2. Choose Cut from the Edit menu.
The selected nodes and the arcs among them are removed from the active window and placed on the clipboard. The arcs connecting the subgraph to the rest
of the graph are discarded.
The accelerator key for this operation is Ctrl-x.
rcl cut
4.13.8 Copying a subgraph
To copy a subgraph:
1. Select one or more nodes of the subgraph to be copied.
2. Choose Copy from the Edit menu.
The selected nodes and the arcs among them are copied to the clipboard.
The accelerator key for this operation is Ctrl-c.
rcl copy
4.13.9 Pasting a subgraph
To paste a subgraph:
◆ Choose Paste from the Edit menu.
The subgraph stored on the clipboard is added to the active window.
The accelerator key for this operation is Ctrl-v.
rcl paste
4.13. EDITING THE GRAPH
103
4.13.10 Showing the clipboard
To show the clipboard:
◆ Choose Show Clipboard from the Edit menu.
A window appears presenting the subgraph stored on the clipboard (the most
recently cut nodes and the arcs among them).
rcl clipboard
4.13.11 Clearing the clipboard
To clear the clipboard:
◆ Choose Clear Clipboard from the Edit menu.
104
CHAPTER 4. HANDBOOK
4.14 Using Filters
You can selectively filter out detail that you wish to hide. Filters do not modify the
graph model. A window may have a different set of filters applied to its contents
than that of another window.
4.14.1 Hiding names of nodes
You can hide the node labels to reduce the visual clutter when there are many nodes.
To hide the names of nodes:
1. Select one or more nodes whose names are to be hidden.
2. Choose By Selection . . . from the Filter menu.
A Filter by Selection dialog appears.
3. Click Hide Names from the dialog.
The node labels for the selected nodes are hidden in
the active window.
4. Click Done to dismiss the dialog.
rcl filter hide name
4.14.2 Showing names of nodes
To show the names of nodes:
1. Select one or more nodes whose names are to be shown.
2. Choose Filter by Selection . . . from the Filter menu.
A Filter by Selection dialog appears.
3. Click Show Names from the dialog.
Node labels for the selected nodes are shown in the
active window.
4. Click Done to dismiss the dialog.
rcl filter show name
4.14. USING FILTERS
4.14.3 Hiding selected nodes
To hide a selected group of nodes:
1. Select one or more nodes to be hidden.
2. Choose Filter by Selection . . . from the Filter menu.
A Filter by Selection dialog appears.
3. Click Hide Selection from the dialog.
The selected nodes and their incident arcs become
hidden in the active window.
4. Click Done to dismiss the dialog.
▲ Warning:
The selected nodes remain selected even after filtering. You
should left click on a clear area of the canvas to make sure the
filtered nodes are deselected.
rcl filter selection
4.14.4 Showing previously hidden nodes
To show nodes previously hidden by Hide Selection:
1. Choose Filter by Selection . . . from the Filter menu.
A Filter by Selection dialog appears.
2. Click Unfilter from the dialog.
All nodes that had been filtered by Hide Selection become visible in the active window, subject to any node
type filters in effect.
3. Click Done to dismiss the dialog.
105
CHAPTER 4. HANDBOOK
106
4.14.5 Showing and hiding nodes by type
To show or hide nodes by their node types in the active window:
1. Choose By Node Type . . . from the Filter menu.
A Filter by Node Type dialog appears.
4 Note:
Settings made in this dialog only affect the window that was active
at the time the dialog was brought up; the ID of the relevant window
appears in the title bar of the dialog.
2. Toggle on the node types to hide or toggle off the node types to show in the
dialog.
3. Click Apply.
Nodes in the active window are hidden or shown according to the chosen
node type filter settings.
4. Click Done to dismiss the dialog.
☛ Tip: Use the Filter by Node Type dialog as a legend to the node types in
the current domain model.
To reveal this dialog if covered by other windows, choose
Raise Active from the Window menu or choose By Node Type . . .
from the Filter menu again.
4.14. USING FILTERS
107
4.14.6 Showing and hiding arcs by type
To show or hide arcs by their arc types in the active window:
1. Choose By Arc Type . . . from the Filter menu.
A Filter by Arc Type dialog appears.
4 Note:
Settings made in this dialog only affect the window that was active at
the time the dialog was brought up; the relevant window appears in
the title bar of the dialog.
2. Toggle on the arc types to hide or toggle off the arc types to show in the
dialog.
3. Click Apply.
Arcs in the active window are hidden or shown according to the chosen arc
type filter settings.
4. Click Done to dismiss the dialog.
☛ Tip: Use the Filter by Arc Type dialog as a legend to the arc types in the
current domain model.
To reveal this dialog if covered by other windows, choose
Raise Active from the Window menu or choose By Arc Type . . .
from the Filter menu again.
CHAPTER 4. HANDBOOK
108
4.14.7 Inheriting filter settings
To inherit the filter settings of the active window when opening new windows:
1. Choose Settings from the Options menu.
A Settings dialog appears.
2. Pick the desired choice from the Filter Inheritance popup menu.
The Inheritance choice passes on the node and arc type
filters of the active window when opening new windows.
3. Click Done to dismiss the dialog.
4 Note:
The filters are only inherited by children, parents, neighbors, and selection type windows.
4.15. SCALING THE FOCUS
109
4.15 Scaling the Focus
You can control how much of the graph structure you want to see in the active window by scaling the nodes.
4.15.1 Fitting nodes within a window
Nodes are drawn to a canvas area that is often larger than the actual boundaries of
the window. You can scale the nodes to fit.
◆ Choose To Fit from the Scale menu.
➤
Nodes in the active window are shifted and scaled, if necessary, to stay within
the boundaries of the window.
rcl scale to window
CHAPTER 4. HANDBOOK
110
4.15.2 Fitting selected nodes within a window
Nodes are drawn to a canvas area that is often larger than the actual boundaries of
the window. You can scale a selected set of nodes to fit.
1. Select one or more nodes to scale.
2. Choose Selection from the Scale menu.
The selected nodes in the active window are shifted and scaled, if necessary,
to stay within the boundaries of the window.
rcl scale selection
4.15.3 Zooming in
To scale nodes larger:
1. Choose Settings from the Options menu.
2. Adjust the Scale Factor slider to a value more than 100
percent (up to 400 percent).
3. Choose By Factor from the Scale menu.
The current sizes of the nodes in the active window are expanded by the specified factor. Some parts of the graph may go beyond the boundaries of the
active window.
➤
4.15. SCALING THE FOCUS
111
4.15.4 Zooming out
To scale nodes smaller:
1. Choose Settings from the Options menu.
2. Adjust the Scale Factor slider to a value less than 100
percent (down to 25 percent).
3. Choose By Factor from the Scale menu.
The current sizes of the nodes in the active window are reduced by the specified factor.
➤
4.15.5 Restoring the focus
To stop scaling of nodes:
◆ Choose Normal Size from the Scale menu.
rcl scale none
112
CHAPTER 4. HANDBOOK
4.15.6 Automatic scaling
To automatically perform a scaling operation after making an automated layout:
1. Choose Settings from the Options menu.
2. Pick the desired choice from the Automatic Scaling popup menu.
The Off choice turns off automatic scaling.
The
Scale to Fit choice resizes all the nodes to fit in the
boundaries of the window. The Scale Selection choice
resizes only the selected nodes to fit in the boundaries.
The Scale by Factor choice resizes nodes according to
the Scale Factor slider. The Normal Size choice sets
nodes to their normal size, 64 pixels square, even if
you may need to scroll to see certain nodes.
4.16. MAKING ARRANGEMENTS
113
4.16 Making Arrangements
The initial layout of nodes in a window is a grid. When arranging nodes, you need
to select them before applying a layout operation.
4.16.1 Moving a node
To move a single node:
◆ Place the pointer over the node, press the left mouse button, drag the node,
and release.
4.16.2 Moving several selected nodes
To move several selected nodes:
1. Select the nodes to be moved.
2. Hold down the shift key, press the left mouse button over a selected node,
drag the nodes, and release.
CHAPTER 4. HANDBOOK
114
4.16.3 Arranging nodes horizontally
To arrange nodes in a horizontal line:
1. Select one or more nodes to be arranged horizontally in a line oriented from
left to right.
2. Right-click on the canvas, where you want the horizontal line to begin.
Right-clicking does not disturb the current selection.
3. Choose Horizontal from the Layout menu.
The selected node(s) are arranged horizontally, starting from the point on the
canvas where you clicked, and remain selected.
➤
rcl group horizontally
4.16. MAKING ARRANGEMENTS
115
4.16.4 Arranging nodes vertically
To arrange nodes in a vertical line:
1. Select one or more nodes to be arranged vertically in a line oriented from
top to bottom.
2. Right-click on the canvas, where you want the vertical line to begin.
Right-clicking does not disturb the current selection.
3. Choose Vertical from the Layout menu.
The selected node(s) are arranged vertically, starting from the point on the
canvas where you clicked, and remain selected.
➤
rcl group vertically
CHAPTER 4. HANDBOOK
116
4.16.5 Arranging nodes into a grid
To arrange nodes in a grid.
1. Select one or more nodes to be arranged into a grid.
2. Right-click on the canvas, where you want the top-left corner of the grid to
begin.
3. Choose Grid from the Layout menu.
The selected node(s) are arranged in a grid, starting from the point on the canvas where you clicked, and remain selected.
rcl group grid
4.16.6 Arranging all nodes into a grid
To arrange all the nodes in the active window into a grid:
1. Choose Grid All from the Layout menu.
The current selection is not disturbed.
rcl grid all
4.16. MAKING ARRANGEMENTS
117
4.16.7 Arranging reachable nodes along outgoing arcs into a tree
You can arrange, into a tree layout, all the nodes on which a selected node depends.
The tree is laid out coming down the active window; the reachable nodes appear
lower than the root.
1. Select the root node for the tree layout.
2. Pick the appropriate arc type for the outgoing arcs from the Arc Type palette.
The any choice in the palette matches any arc type.
Since composite arcs may contain (elided) non-composite arcs of the specified
arc type, the traversal may pass through these composite arcs to build the tree.
The composite arc type choice matches only composite arcs.
3. Choose Settings from the Options menu.
A Settings dialog appears.
4. Adjust the Tree Depth slider to the depth you want.
If the slider is ,1, the depth is infinite and the full outgoing
reachability tree would be laid out.
5. Click Done to dismiss the dialog.
6. Choose Forward Tree from the
Layout menu.
Nodes that are reachable along outgoing arcs of the specified arc type to
the given depth from the selected root
node are arranged into a tree in the active window.
rcl forward tree
CHAPTER 4. HANDBOOK
118
4.16.8 Arranging reachable nodes along incoming arcs into a tree
You can arrange, into a tree layout, all the nodes which depend on a selected node.
The tree is laid out going up the active window; the reachable nodes appear higher
than the root.
1. Select the root node for the tree layout.
2. Pick the appropriate arc type for the incoming arcs from the Arc Type palette.
The any choice in the palette matches any arc type.
Since composite arcs may contain (elided) non-composite arcs of the specified
arc type, the traversal may pass through these composite arcs to build the tree.
The composite arc type choice matches only composite arcs.
3. Choose Settings from the Options menu.
A Settings dialog appears.
4. Adjust the Tree Depth slider to the depth you want.
If the slider is ,1, the depth is infinite and the full incoming
reachability tree would be laid out.
5. Click Done to dismiss the dialog.
6. Choose Reverse Tree from the
Layout menu.
Nodes that are reachable along incoming arcs of the specified arc type
to the given depth from the selected
root node are arranged into a tree in
the active window.
rcl reverse tree
4.16. MAKING ARRANGEMENTS
4.16.9 Arranging all nodes in a Sugiyama layout
To arrange nodes in a Sugiyama layout:
◆ Choose Sugiyama from the Layout
menu.
All nodes in the active window are arranged according to a Sugiyama layout, a layered, tree-like layout that
tries to minimize crossings.
4 Note: The graph in the active
window cannot have
cycles.
▲ Warning:
★ Technical:
If the number of nodes in the tree is too great, or the hierarchy
is too deep, or you run out of virtual memory, the Sugiyama
implementation fails.
An external program called gel-sugiyama is used to implement this layout.
4.16.10 Arranging all nodes in a spring layout
To arrange nodes in a spring layout:
◆ Choose Spring from the Layout
menu.
All nodes in the active window are
arranged according to a spring layout. In this layout, arcs are modeled
as springs so that highly connected
nodes tend to pull each other together
and more isolated nodes tend to push
each other apart.
4 Note: The graph in the active
window must be connected.
119
120
★ Technical:
CHAPTER 4. HANDBOOK
An external program called gel-spring is used to implement
this layout.
4.16. MAKING ARRANGEMENTS
121
4.16.11 Moving nodes to a pile
To manage a lot of nodes, you can pile them on top of each other.
1. Choose Settings from the Options menu.
A Settings dialog appears.
2. Adjust the Grid Size slider to value 0.
3. Click Done to dismiss the dialog.
4. Select one or more nodes to be moved to a pile.
5. Right-click on the canvas, where you want the pile to be located.
6. Choose Grid from the Layout menu.
The selected nodes are moved to a single pile.
4.16.12 Moving nodes in synch
Because of multiple perspectives on the same graph model, the same essential node(s)
may appear multiple times but in separate windows. You can have mouse-based
dragging of such node(s) occur only within the active window or in all windows.
1. Choose Settings from the Options menu.
A Settings dialog appears.
2. Pick the desired choice from the Node Movement popup menu.
The Synchronously choice causes synchronous node
movement in all windows. That is, dragging a node
causes relative movement in all windows that display
this node. The Independently choice causes individual
movements.
3. Click Done to dismiss the dialog.
4. Drag the node(s) as desired.
CHAPTER 4. HANDBOOK
122
4.16.13 Moving nodes with constraints
You can have mouse-based dragging of nodes be constrained horizontally, vertically, or not at all.
1. Choose Settings from the Options menu.
A Settings dialog appears.
2. Pick the desired choice from the Constraint Type popup menu.
The Horizontal choice causes node movement to be only vertical; the Vertical choice causes node movement to be only
horizontal; the None choice allows free movement.
3. Click Done to dismiss the dialog.
4. Drag the node(s) as desired.
4.17. VIEWING REPORTS
123
4.17 Viewing Reports
4.17.1 Reporting numbers of nodes and arcs
To report the number of nodes and arcs in the active window:
◆ Choose Window Statistics from the Report menu.
The report appears in a Text editor window with numbers of nodes and arcs
broken down by the various types and whether they are visible or filtered;
this editor is a separate process outside the direct control of rigiedit.
4.17.2 Reporting cyclomatic complexity
The McCabe cyclomatic complexity V (G) of a control flow graph measures the maximum number of linearly independent paths through it. The complexity typically
increases because of branch points.
To compute the cyclomatic complexity:
◆ Choose Cyclomatic Complexity from the Report menu.
A report appears with the value of V (G)
If e is the number of arcs, n is the number of nodes, and p is the number of connected
components, then V (G) = e , n + 2p.
CHAPTER 4. HANDBOOK
124
4.17.3 Viewing node neighborhood and dependency information
To view information on the immediate neighborhood around a node as it is presented within a window:
1. Choose View Information from the Node menu of the node.
A detailed Information window appears, presenting information about the
node (in the window just activated).
This information includes the node’s:
internal node ID,
node type,
incoming and outgoing arcs by arc type, and
neighboring nodes along these arcs (with their node name and type).
Some of this information is dimmed for nodes and arcs not visible in the active
window.
Some of this information may be dimmed for any of several reasons:
an arc is filtered,
an arc relates a node that is filtered,
an arc relates a node that is not in the window,
a node is filtered,
a node is not in the window.
In short, information is dimmed for any node or arc not visible in the active
window.
2. Click Done to dismiss the Information window.
4.17. VIEWING REPORTS
125
4.17.4 Reporting subsystem information
You can produce an exact interface report of the dependencies to, from, and within
a selected group of nodes.
1. Select one or more nodes.
2. Choose Exact Interface from the Report menu.
The report appears in a Text editor window; this editor is a separate process
outside the direct control of rigiedit.
The report includes three kinds of information for each selected subsystem: provisions,
requirements, and internalizations. A provision is a dependency from a node inside
the subsystem to a node outside the subsystem; the internal node provides at least
one object. A requirement is a dependency from a node outside the subsystem to a
node inside the subsystem; the internal node requires at least one object. An internalization is a dependency between two nodes inside the subsystem.
CHAPTER 4. HANDBOOK
126
4.17.5 Viewing information for an arc
To view information on an arc:
1. Choose View Information from the Arc menu of the arc.
A textual Information window appears, presenting information about the arc
(in the window just activated).
This information includes the arc’s:
internal arc ID,
source and destination nodes (with their name), and
constituent arcs if the arc is composite.
2. Click Done to dismiss the Information window.
4.17. VIEWING REPORTS
127
4.17.6 Reporting information for a composite arc
You can produce an exact interface report for a composite arc between two nodes. A
composite arc may represent one or more arcs of different types between nodes at
lower levels in the hierarchy.
1. Select a composite arc.
2. Choose Exact Interface from the Report menu.
The report appears in a Text editor window; this editor is a separate process
outside the direct control of rigiedit.
CHAPTER 4. HANDBOOK
128
4.17.7 Reporting graph quality
You can produce a graph quality report which evaluates the quality of a selected subsystem according to a set of software modularity measures. Each measure is normalized to a range from 0 to 1. Higher values are “better.”
The overall quality is based on the:
partition quality,
control encapsulation quality, and
data encapsulation quality.
The partition quality measure increases as the number of interfaces between nodes
in the subsystem decrease. This is the principle of low coupling in modular design.
The interfaces are classified into high-, medium-, and low-strength interfaces. The
thresholds for this division can be adjusted.
The control encapsulation quality measure increases with the number of control flow
dependencies between nodes inside the subsystem, and decreases with the number
of control flow dependencies from nodes inside the subsystem to nodes outside.
This favors localized control and small interfaces.
The data encapsulation quality measure increases with the number of local references to data types, and decreases with the number of external references to data
types. This favors data encapsulation and object-oriented designs.
4.17. VIEWING REPORTS
129
To produce a graph quality report:
1. Choose Settings from the Options menu.
A Settings dialog appears.
2. Adjust the High Threshold slider to set the threshold for high-strength interfaces.
A composite arc is a high-strength interface if the number
of dependencies it represents is greater than this threshold.
3. Adjust the Low Threshold slider to set the threshold for low-strength interfaces.
A composite arc is a low-strength interface if the number
of dependencies it represents is lower than this threshold.
4 Note: The parameter changes are immediate.
4. If desired, click Done to dismiss the dialog.
5. Select one or more nodes.
6. Choose Graph Quality (C) from the Report menu.
The report appears in a Text editor window; this editor is a separate process
outside the direct control of rigiedit.
The summary averages the individual measures for the selected subsystems.
4 Note:
The graph quality report only works for the provided simplified C
domain model.
CHAPTER 4. HANDBOOK
130
4.18 Working with Views
One way to document the graph is to create, save, and load rigiedit views. A
rigiedit view is a snapshot of the layout of one or more windows and their contents at a given point in time. A view records visual perspectives on a graph, including appearances such as node positions. After loading a view, you can still interact
with its windows. Views provide a flexible way to focus attention on important
facets of the subject software.
4 Note:
4 Note:
A view and the underlying graph model on which the view is based
must correspond. If the graph in memory changes, older views may
not work correctly.
Text editor windows and their report contents, SHriMP windows,
and informational windows, cannot be saved in a view.
4.18.1 Saving a view
To save a rigiedit view of the canvas windows on the screen:
1. Open and arrange the contents of the windows as desired.
Locations of nodes, filter settings, and current selections (anything you see)
are part of the view.
2. Move and resize the windows of your view as desired.
Position, size, and scroll settings are recorded.
3. Save the graph on which the view depends.
See x4.7.2.
This ensures that the view to be saved corresponds to the right graph model.
4. Choose Save View As . . . from the File menu.
4.18. WORKING WITH VIEWS
A File dialog appears for saving the view.
5. Type a filename for the view.
☛ Tip:
A suffix of .view is useful for distinguishing view files. If no file suffix is specified,
.view is added automatically.
6. Click OK to save the view.
Or click Cancel to cancel.
rcl save view
4.18.2 Loading a view
▲ Warning:
When loading a rigiedit view, you must ensure that the
graph in memory is the same as the graph on which the view
was based.
To load a rigiedit view:
1. Choose Close All from the Window menu.
All rigiedit windows become closed except the root window.
2. Load the graph on which the view depends.
See x4.7.3.
3. Choose Load View . . . from the File menu.
A File dialog appears for loading the view.
4. Select the view to load and click OK.
Or click Cancel to cancel.
rcl load view
131
CHAPTER 4. HANDBOOK
132
4.19 Using SHriMP Windows
SHriMP (Simple Hierarchical Multi-Perspective) windows show the subsystem hierarchy through the nesting of boxes that represent nodes.
()
You progressively reveal what a subsystem contains by opening its box, showing its
children inside. Several boxes can be opened to show global, contextual information while exploring the details in a particular subsystem. The boxes can be moved
around and individually enlarged or reduced. This section describes the specific
operations supported in a SHriMP window.
4 Note:
Manual arrangements are allowed, but not preserved. You cannot
save a SHriMP window as part of a rigiedit view. A SHriMP window does not support selections or graph modifying operations.
4.19. USING SHRIMP WINDOWS
133
4.19.1 Presenting a SHriMP window
To open a SHriMP window of the hierarchy rooted at a node:
◆ Choose Open SHriMP View from the Node menu for the node.
A SHriMP window appears, presenting the root node in a closed state and the
name of the node on the title bar.
☛ Tip: Enlarge the root node to full size for more working room (x4.19.5).
4 Note:
Only one SHriMP window can be displayed at a time.
4.19.2 Revealing the children of a node
To open a closed, non-leaf node to reveal its children:
◆ Double-left-click on the non-leaf node.
The node is opened, showing its children uniformly sized in a grid layout.
Visually, the node looks sunken.
➤
CHAPTER 4. HANDBOOK
134
4.19.3 Eliding the children of a node
To close an opened, non-leaf node to elide its children:
◆ Double-left-click on the non-leaf node.
The node is closed. Visually, the node looks raised.
4.19.4 Filtering children
To filter children nodes in a particular opened, non-leaf node by type:
1. Choose Node Settings . . . from the Node menu for node.
A SHriMP Node Settings dialog appears.
2. Toggle on the node types to hide or toggle off the node types to show in the
dialog.
Children nodes within the non-leaf node are hidden or shown according to
the chosen node type filter settings. Filtering is immediate.
3. Click Done to dismiss the dialog.
4.19. USING SHRIMP WINDOWS
135
4.19.5 Enlarging the size of a node
To enlarge the size of a node:
◆ Hold down the control key and press the left mouse button on the node until the desired size then release.
The node is enlarged (along with its children if opened). This may reduce the
size of sibling nodes (and their children) to provide room.
➤
4.19.6 Reducing the size of a node
To reduce the size of a node:
◆ Hold down the control and shift keys and press the left mouse button on
the node until the desired size then release.
The node is reduced (along with its children if opened). This may enlarge the
size of sibling nodes (and their children).
CHAPTER 4. HANDBOOK
136
4.19.7 Seeing the node name
If a node is too small, its name is automatically hidden.
To see the name of the node:
◆ Move the pointer over the node.
4.19.8 Adjusting the step size
The step size for the enlargement and reduction of nodes can be adjusted.
To adjust the step size:
1. Choose SHriMP Settings from the Options menu.
A SHriMP Settings dialog appears.
2. Adjust the Scaling Increment slider to the desired
value (in pixels).
3. Click Done to dismiss the dialog.
4.19.9 Overlapping children
To allow or disallow the overlapping of children nodes in a particular opened, nonleaf node:
1. Choose Node Settings . . . from the Node menu for the node.
A SHriMP Node Settings dialog appears.
2. Click on the desired choice from the Overlapping Children part of the dialog.
3. Click Done to dismiss the dialog.
4.19. USING SHRIMP WINDOWS
137
4.19.10 Layout constraints
To set layout constraints for the children nodes in a particular opened, non-leaf node:
1. Choose Node Settings . . . from the Node menu for the node.
A SHriMP Node Settings dialog appears.
2. Click the desired choice from the Layout Constraint part of the dialog.
The None choice means no constraints; the
Proximity choice preserves proximity relationships
among nodes when sizing; the Orthogonality
choice preserves orthogonality relationships.
3. Click Done to dismiss the dialog.
4.19.11 Presenting a Children window
To open a Children window on a particular opened, non-leaf node:
◆ Choose Open Rigi View from the Node menu for the node.
A Children window appears.
CHAPTER 4. HANDBOOK
138
4.19.12 Viewing the annotation for a node
To view the annotation file linked to a leaf node:
◆ Double-left-click on the leaf node.
If there is an annotation file linked to the node, a Text editor window appears
with its contents.
See also x4.10.6.
4.19.13 Editing the source text for a node
To edit the source file linked to a leaf node:
◆ Choose Open Source Text from the Node menu for the node.
If there is a source file linked to the node, a Text editor window appears with
its contents.
See also x4.10.7.
4.19.14 Printing a SHriMP window
To save the contents of a SHriMP window as PostScript:
1. Choose SHriMP Settings from the Options menu.
A SHriMP Settings dialog appears.
2. Enter a filename for the PostScript file.
☛ Tip: Like the C shell, a leading in the filename can be used to refer to a user
home directory.
3. Click Take Snapshot to generate the file.
The generated file contains an image of the SHriMP
window contents, without the frame.
4. Click Done to dismiss the dialog.
4.20. USING THE TOOLBAR
139
4.20 Using the Toolbar
4.20.1 Toolbar Buttons
The icon buttons on the toolbar are shortcuts for common operations from the menubar.
From left to right, these operations are:
Cut from the Edit menu
Copy from the Edit menu
Paste from the Edit menu
To Fit from the Scale menu
Selection from the Scale menu
Grid from the Layout menu
Horizontal from the Layout menu
Vertical from the Layout menu
Forward Tree from the Layout menu
Reverse Tree from the Layout menu
(x4.13.7)
(x4.13.8)
(x4.13.9)
(x4.15.1)
(x4.15.2)
(x4.16.5)
(x4.16.3)
(x4.16.4)
(x4.16.7)
(x4.16.8)
140
CHAPTER 4. HANDBOOK
Appendix A
APPENDIX A.
142
A.1 Directory Structure
This section outlines the main parts of the distribution directory structure.
Rigi/
db/
icons/
rcl/
tmp/
database directory
SQL/DS demo files
list demo files
ray demo files
domain directory
simple C domain files
cparse C domain files
PL/AS domain files
toolbar icons
Rigi Command Library
temporary files (Windows only)
sun4-sunos4/
rs6000-aix4/
ix86-linux2/
executables (SPARC SunOS only)
executables (RS/6000 AIX only)
executables (Intel Linux only)
tcl7.4/
tk4.0/
tix4.1/
Tcl 7.4 library files
Tk 4.0 library files
Tix 4.1.0 library files
cparse/
rcl/
util/
parser documentation HTML pages
RCL documentation HTML pages
utilities HTML pages
arixi-d/
list-d/
ray-d/
domain/
c/
cparse/
plas/
bin/
lib/
doc/
A.2. MOUSE ACTIONS
143
A.2 Mouse Actions
This section lists the mouse actions in a canvas window.
single
..
.
..
.
..
.
..
.
..
.
..
.
..
.
left
..
.
..
.
..
.
..
.
click
..
.
..
.
canvas
deselects all
node
selects node
arc
selects arc
drag canvas
..
.
node
draws selection rectangle
right
..
.
..
.
click
..
.
..
.
canvas
activates window
node
brings up node menu
double left
shift single left
..
..
..
.
.
.
..
..
.
.
right
..
.
double right
click
click
arc
node
node
brings up arc menu
opens node
extends selection
drag
node
moves nodes
drag
node
creates arc
click
canvas
creates node
moves node
x4.9.8
x4.9.1
x4.9.2
x4.9.3
x4.16.1
x4.8.2
x4.2.1
x4.2.2
x4.10.7, x4.12.1
x4.9.4
x4.16.2
x4.13.2
x4.13.1
APPENDIX A.
144
A.3 Keyboard Shortcuts
This section lists the main accelerator keys.
Ctrl-a
Ctrl-x
Ctrl-c
Ctrl-v
All from the Select menu
Cut from the Edit menu
Copy from the Edit menu
Paste from the Edit menu
x4.9.5
x4.13.7
x4.13.8
x4.13.9
Alt-f
Alt-e
Alt-n
Alt-s
Alt-i
Alt-c
Alt-l
Alt-r
Alt-w
Alt-d
Alt-o
Alt-h
Bring up the File menu
Bring up the Edit menu
Bring up the Navigate menu
Bring up the Select menu
Bring up the Filter menu
Bring up the Scale menu
Bring up the Layout menu
Bring up the Report menu
Bring up the Window menu
Bring up the Demo menu
Bring up the Options menu
Bring up the Help menu
xA.4.1
xA.4.2
xA.4.3
xA.4.4
xA.4.5
xA.4.6
xA.4.7
xA.4.8
xA.4.9
xA.4.10
xA.4.11
xA.4.12
Tab
Enter
Step focus through dialog items
Click dialog item in focus
Scroll left
Scroll right
Scroll up
Scroll down
!
"
#
Each item in a menu has an associated key that appears underlined. After bringing
up a menu from the menubar, choose an item by pressing its associated key. For
example, the Exit command can be invoked by pressing Alt-f then x. For ease of
typing, the Alt key may be held down through the entire shortcut combination; to
exit, press Alt-f Alt-x (denoted Alt-f-x).
A.4. MENU COMMANDS
145
A.4 Menu Commands
This section lists the provided menu commands and the relevant subsections describing them. The underlined characters are used in keyboard shortcuts (see xA.3).
A.4.1 File menu
Load Graph
Save Graph As . . .
Load View
Save View As . . .
Initialize
Exit
x4.7.3
x4.7.2
x4.18.2
x4.18.1
x4.7.4
x4.6.1
A.4.2 Edit menu
Cut
Copy
Paste
Collapse
Expand
Show Clipboard
Clear Clipboard
x4.13.7
x4.13.8
x4.13.9
x4.13.5
x4.13.6
x4.13.10
x4.13.11
A.4.3 Navigate menu
Children
Parents
Neighbors
Selection
Projection
Overview
x4.12.1
x4.12.2
x4.12.3
x4.12.4
x4.12.5
x4.12.6
APPENDIX A.
146
A.4.4 Select menu
All
None
Complement
Outgoing Nodes
Incoming Nodes
Forward Tree
Reverse Tree
By Attribute . . .
By Structure . . .
By Name . . .
x4.9.5
x4.9.8
x4.9.6
x4.9.13
x4.9.14
x4.9.15
x4.9.16
x4.9.10
x4.9.11
x4.9.9
A.4.5 Filter menu
By Node Type . . .
By Arc Type . . .
By Selection . . .
x4.14.5
x4.14.6
x4.14.1, x4.14.2, x4.14.3, x4.14.4
A.4.6 Scale menu
To Fit
Selection
By Factor
Normal Size
x4.15.1
x4.15.2
x4.15.3, x4.15.4
x4.15.5
A.4.7 Layout menu
Grid All
Grid
Horizontal
Vertical
Forward Tree
Reverse Tree
Spring
Sugiyama
x4.16.6
x4.16.5, x4.16.11,
x4.16.3
x4.16.4
x4.16.7
x4.16.8
x4.16.10
x4.16.9
A.4. MENU COMMANDS
A.4.8 Report menu
Window Statistics
Graph Quality (C)
Exact Interface
Cyclomatic Complexity
x4.17.1
x4.17.7
x4.17.4, x4.17.6
x4.17.2
A.4.9 Window menu
Raise Active
Cascade
Refresh
Update
Close Active
Close All
x4.8.3
x4.8.4
x4.8.5
x4.8.6
x4.8.7
x4.8.8
A.4.10 Demo menu
List Demo (C)
Ray Demo (C)
SQL Demo (PLAS)
x2.2
x2.3
x2.4
A.4.11 Options menu
Settings
SHriMP Settings
Node Colors
Arc Colors
Configuration
x4.8.9
x4.19.8
x4.10.9
x4.11.7
x4.3.2, x4.3.3
A.4.12 Help menu
About Rigi 5.4.4
147
APPENDIX A.
148
A.4.13 Node menu
View Information
Edit Attributes
Edit Annotation
Edit Source
Rename
Set Type
Open SHriMP View
Open Rigi View
Open URL
x4.17.3
x4.10.5
x4.10.6
x4.10.7
x4.10.3
x4.10.4
x4.19.1
x4.19.11
x4.10.8
A.4.14 Arc menu
View Information
Edit Attributes
Edit Annotation
Set Type
Open URL
x4.17.5
x4.11.4
x4.11.5
x4.11.3
x4.11.6
Index
.rsf suffix, 29, 62
.view suffix, 29, 131
directed, 76, 89
editing annotation for, 91
editing attributes of, 91
getting information about, 26, 126
hiding by type, 35, 107
opening a URL for, 92
selecting an, 16, 70
types of, 89–90
working with, 89–92
Arc menu, 26, 40
Arc Type button, 11, 19, 90
arc type set, 89
arranging, 16–17, 113–122
all nodes into a grid, 116
nodes horizontally, 16, 114
nodes into a forward tree, 117
nodes into a grid, 116
nodes into a reverse tree, 118
nodes vertically, 32, 115
spring layout, 119–120
Sugiyama layout, 17, 35, 119
attribute
adding an, 50
annotate for a node, 85
annotate for an arc, 91
arcurl, 92
binding a value to, 60
editing for a node, 84
editing for an arc, 91
file, 60, 85
lineno, 60, 85
nodeurl, 87
automatic scaling, 17, 112
aborting the editor
under Unix, 59
under Windows 95, 59
abstract data type, 18
access functions of, 19
identification of, 18–19
activating a window, 12, 64, 66
active window, 11, 15, 64
associated dialogs, 68
closing the, 22, 68
filter dialog for, 18, 68, 106
raising the, 66
refreshing the, 67
updating the, 20, 67
analysis, see opening and reporting
annotation
annotate arc attribute, 91
annotate node attribute, 85
defining location of files, 85, 91
editing for a node, 85
editing for an arc, 91
viewing for a node, 138
arc
adding a type of, 50
annotate attribute of, 91
arcurl attribute, 92
changing the global type, 90
changing the type of, 90
color of, 50, 92
creating an, 98–99
cutting a, 102
deleting an, 99
backing store, 47
149
150
call arc
in an RSF stream, 60
inferring functions of, 61
type, 15, 60
call graph
producing a, 35
canvas
backing store of, 47
color of, 42, 47
cursor location in, 32
dimensions of, 42, 47
menus in, 20, 39
reset scaling in, 111
right-clicking on, 20
window, 65
window limitations, 93
zooming in, 110
zooming out, 111
CANVASCOLOR, 41, 42, 47
cascading windows, 66
change analysis, see exact interface
changing a configuration, 44
Children window, 14, 65, 93
double-clicking to open, 21
filter inheritance by, 108
opening a, 13–14, 21, 93, 137
clearing
a graph, 63
the clipboard, 103
client node, 14, 89
identification of, 19
clipboard, 65
clearing the, 103
showing the, 103
closing
all windows, 68
the active window, 22, 68
cluster, see subsystem
Collapse node
added automatically, 82
multiple types of, 82
type, 82
INDEX
collapsing a subsystem, 19–20, 100
color
in Arc menu, 40
in Node menu, 40
of arc types, 50, 92
of canvas background, 42, 47
of node types, 50, 88
columns, 32–34
command
button, 11, 56, 57
entering a, 11, 31–32, 54, 56
history, 11, 32, 54
line, 11, 31, 54
listing available, 56
retrieving a previous, 11, 32, 54
running a periodic, 38
composite arc
added automatically, 89
dependencies in, see exact interface
formation of, 20
matching within, 76, 78–81, 117, 118
multiple types of, 90
type, 15, 51, 89
conceptual modeling, see domain
configuration
changing a, 44
commonly changed parameters, 41
creating a new, 43
default canvas color of, 47
default database directory of, 45
default domain of, 45
default text editor of, 46
default web browser of, 46
fonts in, 48
number of backing stores of, 47
overriding a parameter in, 45
parameters, 41
connected graph, 119
constraint type, 122
control encapsulation, see graph quality
copying a subgraph, 102
coupling, 1, 28, 128
INDEX
151
creating
editing the graph, 98–103
a new configuration, 43
editor, 1
a node, 98
aborting the, 59
a subsystem, 19–20, 100
command-line options of, 38
an arc, 98–99
configuring the, 41–48
customization, see configuration and script
exiting the, 36, 58
cutting a subgraph, 102
preferences of, see configuration
cycles in a graph, 119
running the, 38
cyclomatic complexity, see reporting
enlarging a SHriMP node, 135
exact interface
data arc
internalization information, 26, 125
filtering, 35
of a composite arc, 26–27, 127
in an RSF stream, 60
of a subsystem, 25–26, 125
recursive, 21
provision information, 26, 125
type, 15, 60
requirement information, 26, 125
data encapsulation, see graph quality
exiting the editor, 36, 58
Data node
expanding a subsystem, 101
type, 14, 60
data type, 14
file format, see Rigi Standard Format
access to, 15
filter inheritance, 108
containment of, 15
filtering, 104–108, see hiding and showing
encapsulation quality of, 128
finishing, 36, 58–59
recursive dependencies in, 21
fisheye view, see SHriMP window
reference to, 15
fonts, see configuration
relationships of, see data arc
function, 14
call, see call arc
DBDIR, 41, 42, 45, 85, 91
containing file of, 60
DBREFDIR, 42
deleting
line number location of, 60
a node, 99
name of, 60, 61
a subgraph, 102
Function node
an arc, 99
in an RSF stream, 60
type, 15, 60
DEMOFONT, 42
deselecting
gel-spring, 120
a node, 73
gel-sugiyama, 119
all nodes, 15, 73
graph
directory structure, 142
clearing a, 63
domain
connected, 119
defining the default, 45
cycles in, 119
files for modeling, 50–51
editing the, 98–103
switching the current, 12, 52
layout of, see arranging
working with, 49–52
loading a, 12, 62–63
Domain button, 11, 12, 52
152
saving a, 62
visualization of, 10, 14, 89
working with, 60–63
graph quality, 27–28, 128–129
control encapsulation measure, 28,
128
data encapsulation measure, 28, 128
partition measure, 28, 128
GRAPHFONT, 41, 42
grid size, 121
hiding
arcs by type, 35, 107
children in a SHriMP window, 134
names of nodes, 104
nodes by type, 18, 106
selected nodes, 105
high threshold, 28, 128, 129
high-strength interface, 129
ICONDIR, 42
impact analysis, see exact interface
infinite projection, 31, 96
initializing, see clearing
internalization, see exact interface
keyboard shortcuts, 144–145
for copying, 102
for cutting, 102
for pasting, 102
for selecting all, 72
layout, see arranging
layout constraints, 137
level arc
added automatically, 89
incoming, 94
limitations on, 99
multiple types of, 90
outgoing, 93
type, 13, 51, 89, 97
linking
annotation, see annotation
INDEX
source text, see source text
web page, see Uniform Resource Locator
loading
a graph, 12, 62–63
a script, 34, 55
a view, 30–31, 131
low threshold, 28, 128, 129
low-strength interface, 129
matching, see selecting
MAXCANVASDIM, 42, 47
McCabe complexity, see reporting
menu
bar, 39
commands, 145–148
for a node, 40
for an arc, 40
working with, 39–40
MESSAGEFONT, 41, 42
metrics, see reporting
modeling, see domain
mountain in Switzerland, see Rigi
mouse actions, 143
moving
a node, 113
nodes in synch, 121
nodes into a pile, 121
nodes with constraints, 122
several nodes, 17, 113
Neighbors window, 65, 95
filter inheritance by, 108
opening a, 95
netscape, 42
node
adding a type of, 50
annotate attribute of, 85
arranging all into a grid, 116
arranging horizontally, 16, 114
arranging into a grid, 116
arranging into a tree, 117–118
arranging vertically, 32, 115
INDEX
changing the global type, 83
changing the type of, 84
color of, 50, 88
copying a, 102
creating a, 98
cutting a, 102
deleting a, 99
deselecting a, 73
deselecting all, 15, 73
editing annotation for, 85
editing source text for, 85–86, 138
editing the attributes of, 84
enlarging a SHriMP, 135
file attribute, 60, 85
getting information about, 25, 124
hiding by type, 18, 106
hiding name of, 104
hiding selected, 105
inferring type of, 61
lineno attribute, 60, 85
movement, 121
moving a, 113
moving in synch, 121
moving into a pile, 121
moving several, 17, 113
moving with constraints, 122, 137
nodeurl attribute, 87
opening a URL for, 87
pasting a, 102
enlarging a SHriMP, 135
renaming a, 20, 83
scaling to fit, 109–110
selecting a, 16, 70
selecting all, 15, 72
selecting by attribute value, 75
selecting by dragging, 16, 71
selecting by name, 19, 74
selecting by shift-clicking, 16, 71
selecting by structure, 76
selecting by type, 32, 77
selecting complement, 72
153
selecting incoming neighbors, 19,
79
selecting incoming reachable, 81
selecting outgoing neighbors, 78
selecting outgoing reachable, 80
showing name of, 24, 104, 136
showing previously hidden, 105
SHriMP, see SHriMP window
spring layout of, 119–120
Sugiyama layout of, 119
types of, 82
viewing annotation for, 138
working with, 82–88
Node menu, 20, 40
Node Type button, 11, 83
notepad.exe, 42
NUMBACKSTORES, 41, 42, 47
opening, 93–97
a Children window, 13–14, 21, 93
a Neighbors window, 95
a Parents window, 22, 94
a Projection window, 22–23, 96
a Selection window, 95
a SHriMP window, 133
an Overview window, 13, 23, 97
overlapping children, 136
overriding a configuration parameter,
45
Overview window, 65, 97
hidden aspects of, 13, 97
limitations of, 97
opening an, 13, 23, 97
updating of, 20, 67
Parents window, 65, 94
filter inheritance by, 108
opening a, 22, 94
partition, see graph quality
pasting a subgraph, 102
pattern matching, see selecting
periodic, 38
INDEX
154
platforms supported, 2
pointer focus, 12, 64
polling, 38
PostScript, 138
preferences, see configuration
projection depth, 22, 23, 31, 96
Projection window, 22, 65, 96
infinite, 31
limitations of, 23, 96
opening a, 22–23, 96
provision, see exact interface
querying, see selecting
raising the active window, 66
rc.rcl, 42
RCL, see Rigi Command Library
RCL Command, 11, 56, 57
rcl clipboard, 103
rcl close, 68
rcl close all, 68
rcl collapse, 100
rcl copy, 102
rcl create arc, 99
rcl create node, 98
rcl cursor set, 32, 33
rcl cut, 102
rcl expand, 101
rcl filter apply, 35
rcl filter arctype, 35
rcl filter hide name, 104
rcl filter selection, 105
rcl filter show name, 104
rcl forward tree, 117
rcl get node type, 33
rcl grid all, 116
rcl group grid, 116
rcl group horizontally, 114
rcl group vertically, 32, 33, 115
rcl load, 63
rcl load view, 131
rcl node rename, 83
rcl paste, 102
rcl poll proc, 38
rcl quit, 58
rcl quit no verify, 58
rcl refresh, 67
rcl reverse tree, 118
rcl save, 62
rcl save view, 131
rcl scale none, 111
rcl scale selection, 110
rcl scale to window, 33, 109
rcl select all, 33, 72
rcl select forward tree, 80
rcl select get list, 33
rcl select invert, 72
rcl select none, 33, 73
rcl select reverse tree, 81
rcl select type, 32, 33
rcl update, 67
rcl win canvas width, 33
README, 3
enlarging a SHriMP node, 135
refreshing the active window, 67
renaming a node, 20, 83
reporting, 123–129
arc information, 26, 126
composite arc information, 26–27,
127
cyclomatic complexity, 123
graph quality, 27–28, 128–129
McCabe complexity, 123
node information, 25, 124
numbers of arcs, 123
numbers of nodes, 123
subsystem information, 25–26, 125
requirement, see exact interface
reverse engineering, 1, 7, 9
RIGI, 41, 42
Rigi, 1–2
Rigi Command Library
redefining primitives of, 53
scripting with, see script
INDEX
Rigi Standard Format, 12, 60–61
dialects of, 60
limitations with, 61
structured, 60
unstructured, 60
Rigiarc, 50
composite arc type in, 51
level arc type in, 51
Rigiattr, 50
RIGIBIN, 42
rigicfg.env, 41, 43
Rigicolor, 50, 88, 92
RIGIDBHOST, 42
RIGIDBPORT, 42
RIGIDOMAIN, 41, 42, 45
rigiedit, see editor
RIGIINIT, 42, 45, 50, 53
RIGILIB, 42
Riginode, 50
Collapse node type in, 50
Unknown node type in, 51
RIGIRCL, 42, 53
Rigircl, 50, 53
RIGISTY, 42
RIGITITLE, 42
RIGIURCL, 41, 42, 53
RIGIUSER, 41, 42
RIGIUSTY, 42
root, see subsystem hierarchy
root window, see window
ROOTFRAMEDIM, 42
ROOTLOCATION, 42
ROOTWINDOWDIM, 42
RSF, see Rigi Standard Format
running
a command, 54
a script, see script
the editor, 38
saving
a graph, 62
a view, 29–30, 130–131
155
arc type colors, 92
node type colors, 88
scale factor, 110–112
scaling, 109–112
automatic, 112
nodes to fit, 109
reset, 111
selected nodes to fit, 110
scaling increment, 136
script, 31–35, 53–57
columns example, 32–34
loading a, 34, 55
running on domain switch, 50, 53
running on startup, 38, 53
using Tcl, 53
searching, see selecting
selecting, 15–16, 70–81
a node, 16, 70
after filtering, 105
all nodes, 15, 72
an arc, 16, 70
complement nodes, 72
incoming neighbor nodes, 19, 79
incoming reachable nodes, 81
nodes by attribute value, 75
nodes by dragging, 16, 71
nodes by name, 19, 74
nodes by shift-clicking, 16, 71
nodes by structure, 76
nodes by type, 32, 77
outgoing neighbor nodes, 78
outgoing reachable nodes, 80
Selection window, 65, 95
filter inheritance by, 108
opening a, 95
setenv, 45
Settings dialog, 69
showing
arcs by type, 107
available commands, 56
children in a SHriMP window, 133
global Tcl variables, 57
INDEX
156
names of nodes, 24, 104, 136
nodes by type, 18, 106
previously hidden nodes, 105
script body, 56
the clipboard, 103
SHriMP window, 132–138
adjusting step size of, 136
constraining children in, 137
editing source text, 138
hiding children in, 134
opening a, 133
opening a Children window for, 137
overlapping children in, 136
printing a, 138
showing children in, 133
viewing annotation, 138
SIGINT, 59
slice, 13, 14, 97
source, 34, 55
source text
defining location of files, 85
editing for a node, 85–86, 138
file attribute, 60, 85
lineno attribute, 60, 85
spring layout, see arranging
SRCDIR, 41, 42, 85
stacking windows, 66
structure definition, see data type
structured RSF, see Rigi Standard Format
subgraph
copying a, 102
cutting a, 102
deleting a, 102
pasting a, 102
subsystem, 1, 5, 10
creating a, 19–20, 100
dependencies of, see exact interface
expanding a, 101
identification of, 7, 18–21
metrics on, see graph quality
multiple types of, 82
uses for, 1, 18
subsystem hierarchy, 5, 10
confusion with, 17
double-click on leaf, 85, 86
double-click on non-leaf, 93
overview of, see Overview window
projection of, see Projection window
root of, 12, 13
traversing in, 13–14, 21–24
windows on, see window types
sugiyama, 35
Sugiyama layout, see arranging
supplier node, 14, 89
switching domain model, 12, 52
text editor
defining the default, 46
Text editor window, 25–27, 29, 85,
91, 123, 125, 127, 129, 138
TEXTEDITOR, 41, 42, 46
TEXTFONT, 41, 42
TMPDIR, 42
toolbar icons, 139
tree depth, 95, 117, 118
Uniform Resource Locator
arcurl attribute, 92
defining the root page, 87, 92
nodeurl attribute, 87
opening for a node, 87
opening for an arc, 92
unstructured RSF, see Rigi Standard Format
updating the active window, 20, 67
URL, see Uniform Resource Locator
vi, 42, 46
view
and graph model, 29, 130
limitations of, 130
loading a, 30–31, 131
saving a, 29–30, 130–131
working with, 29–31, 130–131
warning, 2, 17, 62, 85, 91, 105, 119, 131
INDEX
web browser
defining the default, 46
WEBBROWSER, 41, 42, 46, 87, 92
WEBROOT, 42, 87, 92
window
activating a, 12, 64, 66
active, see active window
basics, 64–69
canvas area in, 11, 64
cascading, 66
closing all, 68
externally controlled, 65
message area in, 11, 64
opening a, see opening
root, 6, 11, 13, 30, 39
stacking, 66
title of, 11–14, 22, 23, 35, 42, 64, 65,
96, 106, 107, 133
types of, 65
Workbench window, 6, 11, 39
WORKBENCHFONT, 41, 42
X font specification, 48
xfontsel, 48
xterm, 42, 46
zooming
in, 110
out, 111
157