1
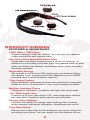
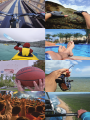
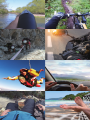
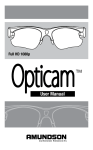
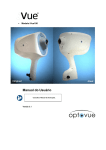
PRODUCT MANUAL
TABLE OF CONTENTS
+ What’s in the Box.....................................................1
+ Product Overview......................................................2
+ Basic Operation........................................................3
+ Setup.........................................................................3
+ Playback...................................................................5
+ Changing Lenses......................................................5
+ Technical Specifications...........................................6
+ Troubleshooting........................................................7
+ Safety and Warning...................................................7
+ 1-Year Warranty..........................................................8
WHAT’S IN THE BOX
+ Horizon 1080P Camera Glasses
+ Dark Tint & Clear Lenses
+ Hard Case
+ Soft Pouch
+ Cleaning Cloth
+ USB Cable
+ Wall Charger
+ User Manual
+ 1-Year Warranty
1
PRODUCT OVERVIEW
FEATURES & ADVANTAGES
1080P 30fps | 720P 60fps
Shoot amazingly clear HD videos. You can set your desired
video resolutions and frames rates.
One-Touch Recording With Audio Alert
Easily start and stop recording with a touch of a button. In
addition to a recording indicator light, the glasses beep to alert
when recording has started, and beeps again when recording
has been stopped.
Removable Storage
We include an 8GB micro SD card to get you started. When
you require more memory, the iVUE supports up to a 32GB
card (we recommend at least a class 6).
Time Lapse Feature
When enabled, time lapse pictures are saved into a separate
folder for every 10 seconds of video that is being recorded. Weather Resistant Frame
Designed to withstand conditions like light rain and sweat. 135° Wide Angle Lens
Capture all of your view with a 135° wide angle lens without
any distortion. Great for action sports and activities.
Change Video Settings
Includes the ability to change video settings like contrast,
white balance, exposure, saturation, sharpness and more!
Time/Date Stamp
Stamp each video with the time/date so you know when the
recording took place. You can easily turn this feature off too.
2
BASIC OPERATION
Charging
Before using your iVUE, it is recommended that you fully
charge it using the supplied charging cable. For peak
performance, charge the battery for a full 3-4 hours. Please do not charge longer than 12 hours.
• You can charge the glasses with the included AC Adapter
or through a computers USB port.
• Charging indicator light is located directly above the mini
usb charging port.
• Computer: Red/yellow light illuminates while charging.
Green light when fully charged.
• Wall Outlet: Red light while charging. No lights illuminated
when fully charged.
• Make sure glasses are turned off while charging
• For best results, only use the provided charging cable.
• If unused for long periods of time, make sure to charge
your iVUE fully before using it again.
Recording
• The record button is located on the right temple.
• Press and hold the button until you hear the glasses beep
four times, to alert that recording has started.
• While recording, the recording indicator light will flash blue.
• To stop recording, push and hold the button until you hear
a long beep.
• Each time you start/stop recording a new video file is
created. NOTE: to limit video size, the glasses will
automatically save a video file every 25 minutes.
• NOTE: Make sure SD card is inserted before recording.
Auto Shutoff
If the battery is low or there is no free memory, the device
will save the current file and beep as it powers down.
Reset
There is a reset button located directly above the USB port
of the glasses. Use a tip of a pen (or other fine tip object) to
press the button in fully. This will reset your iVUE’s back to
the manufacturer default. Also, if the glasses malfunction
or are no longer recognized by a computer, try resetting.
SETUP
Turn On/Off The Time/Date Display
1. Connect your iVUE’s to the computer while turned off (With
SD Card Inserted). 2. Open “Setting.txt” from the root folder of the glasses.
3. First change “UPDATE:N” to “UPDATE:Y” then refer to line
item “RTCDisplay”. Set to “0” to turn off time stamp or set
to “1” to turn on time stamp.
Setting Current Time/Date
1. Connect your iVUE’s to the computer while turned off (with
SD Card inserted).
3
2. The iVUE’s will automatically connect to your computer as
a removable drive. 3. Open Notepad (Windows) or TextEdit (Mac) and create a
new text file.
4. Input the local true time according to the following form For example: The present time is: 09:08:07, October 6th,
2014, so the input would be: 2014 10 06 09 08 07 (spaces
are required between each set of numbers)
5. Save the new document as “settime.txt” in the root folder of
the device. Make sure it is a plain text file.
Change Video Settings
Connect the iVUE’s to the computer via USB (with SD card
inserted). Next, locate and open the file “Setting.txt”. First
change the line that reads ”UPDATE:N” to UPDATE:Y” or
your settings will not be saved after you change them. Make
your changes and then save the file and disconnect the
glasses. The next time you record a video, your new settings
will take effect.
Manufacturer Default Settings
EV:6
AudioVol:1
AWB:0
LIGHTFREQ:1
CTST:100
RTCDisplay:0
SAT:100
VideoSwitch:0
SHARPNESS:100
TimeLapse:0
QUALITY:0
BuzzerAlert:2
Settings Explained
• Exposure (EV): 1-21
Adjust exposure down in bright/sunny conditions. Adjust
exposure up in dark/cloudy conditions.
• White Balance (AWB): 0-4
Changes the white balance and is used for color correction.
0=Auto, 1=Daylight, 2=Cloudy, 3=Tungsten Filament,
4=Incandescent
• Contrast (CTST): 1-100
Increase or decrease the degree of difference between tones.
• Saturation (SAT): 1-100
Increase or decrease the vibrance of colors.
• Sharpness (SHARPNESS): 1-100
Increase or decrease the sharpness.
• Quality (QUALITY): 0-2
Change the video quality. 0=High, 1=Middle, 2=Low
• Light Frequency: (LIGHTFREQ): 0-1
0=60Hz, 1=50Hz
• Time Stamp Display (RTCDisplay): 0-1
0=Off, 1=On
• Audio (AudioEnable): 0-1
0=Mute, 1=On
4
• Video Mode (VideoSwitch): 0-1
0=1080P, 1=720P
• Time Lapse (TimeLapse): 0-1
0=Off, 60-1200=Number of frames per hour.
• Buzzer Alert (BuzzerAlert): 0-3
0=Off, 1=High, 2=Middle, 3=Low
PLAYBACK
Method 1 - Connecting iVUE’s to Computer
1. Connect the device to the computer while turned off, the
glasses will beep 4 times.
2. The glasses will mount as a drive on your computer 3. Open the drive; locate and open the “DCIM” folder.
4. Video files can be transferred onto your computer by copying
and pasting or dragging and dropping the files into selected
folders on your computer.
5. Double click to open a selected video with your default player.
(QuickTime users, make sure the latest version is installed.)
NOTE: If you have trouble getting video to play. We HIGHLY
recommend downloading VLC Player in order to playback the
videos on your computer.
Method 2 - Remove SD Card
1. Remove SD card from glasses
2. Insert SD card into card reader (purchase separately)
3. Open drive on your computer and follow steps 4 & 5 (above)
CHANGING LENSES
Removing
Hold the temple of the end you are removing with one hand, and
gently pull the lens down and away from the temple, then down
and away from the nose bridge.
5
Inserting
Hold the temple of the end you are inserting with one hand,
and gently insert the lens in beginning on the side next to the
nose bridge, then finish by pushing in the other end.
TECHNICAL SPECIFICATIONS
Dimensions
153mm*43mm*47mm (folded)
Physical Weight
68g
Video Resolution
1920x1080P@30FPS
1280x720P@60FPS
Pixels
5 Mega
Video Format
Mov/H.264
Field of View
135° Wide Angle Lens
Audio
Stereo
Power Consumption
<1.5W
Power Adapter
Mini USB
Power Supply
550mAh Lithium Polymer Battery LIB
Storage Memory
Supports Max 32GB SD Card
Battery Life
~1 hour
Operating Temperature
32º - 104º Fahrenheit
Storage Temperature
0º - 150º Fahrenheit
Operating System
Mac & Windows (plug-n-play)
6
TROUBLESHOOTING
Symptom
Won’t Start
Recording
Shutting off
Automatically
Computer Won’t
Recognize
Possible Reason
Solution
Dead Battery
Recharge Battery
Device is Frozen
Hit Reset Button
Low Battery
Recharge Battery
Memory Full
Clear Off Memory
Card
Glasses Are Turned
on When You
Plug Them into a
Computer
Make Sure Glasses
Are Turned Off When
You Plug Them In.
USB Cable is
Defective
Get a Replacement
Cable
USB Drivers Aren’t
Running Properly
Reset/Reboot
Computer
Device is Frozen
Hit Reset Button
Glasses Won’t
Respond/Record
Glasses Software
Needs Reboot
Hit Reset Button
Video Won’t
Playback on
Computer
No Video Playback
Program Will Work
Download VLC
Player. We recommend this above all
playback programs.
SAFETY AND WARNING
Application
Abide strictly to relevant regulations
and laws. This product should not
be used for any illegal purposes.
The user is fully responsible for its
operational use.
File security
This product is not a professional
storage device. It does not guarantee
the integrity and security of saved
files. Please back up your important
documents on the computer or other
storage device.
Proper use of eyewear
Warning: This eyewear is not
designed to protect the wearer from
injury in the event of impact with hard
objects. Sunglasses must not be used
for night driving. To avoid damage
to optical devices do not expose the
camera directly to strong light, such
as the sun or strong artificial light
sources. Sunglasses are not recommended for industrial protection.
Battery
Do not attempt to remove the battery.
(Note: Battery disposal must be in
accordance with local environmental
regulations. See “RECYCLING” below.) If the recording function has not
been used for lengthy period, charge
it fully before using.
7
WARNING:
Do not attempt to dismantle the device. Any attempt to alter or repair the
unit, except by the original manufacturer or an Authorized Service Facility,
will void the limited warranty.
WARNING:
Don’t expose to excess moisture.
Although the device is water resistant
design, operation can be affected in
excessively humid environments – it is
not completely waterproof.
Recycling
Please contact your local corporate
office for recycling/disposal information for this product. Do not dispose
with household waste.
Cleaning
Avoid using it in excessively dusty
environments. Use a normal lens
cleaning cloth to clean the lens.
Operating temperature:
32-104°F. To extend the unit’s lifespan
it is best used at room temperature.
Other matters
Do not use it close to magnetic or
high electric currents.
1-YEAR WARRANTY
The limited warranty set forth below is provided by iVUE
Camera with respect to ALL iVUE Camera brand products
purchased. The iVUE Camera brand products purchased
with this limited warranty are the only products which this
limited warranty provided by iVUE Camera apply. Any iVUE
Camera brand product, when delivered to you in new condition
in its original packaging, is warranted against material defects
and workmanship for a period of one year from the date of
original purchase. Defective units returned to iVUE Camera
and proven to be defective upon inspection will be replaced
with a unit that has similar or more advanced features as our
technology progresses. This limited warranty covers all defects
encountered in normal use of ANY iVUE Camera brand product
and does not apply in the following circumstances:
A. Loss of or damage due to abuse, mishandling, improper
packaging by you, alteration, accident, electrical current
fluctuations, failure to follow operating, maintenance or
environmental instructions prescribed in the user manual or
services performed by an unauthorized iVUE Camera dealer.
Additionally, water damage, sand/dust/corrosion damage,
damage due to impact, scratches, abrasions or damage to
the housing, or other accidental damage to any other
accessories that has been determined to have resulted from
misuse, abuse or failure to operate the units as set forth in the
operating instructions.
B. Use of any parts, accessories, or supplies other than those
sold by an authorized iVUE Camera dealer in conjunction with
any iVUE Camera brand.
Questions, Comments or Concerns? Please email us at
[email protected] or call us at 208.392.1169
8