1
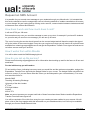
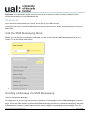
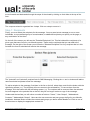
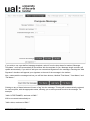
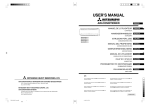
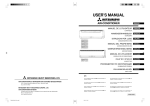
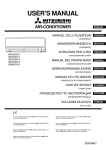
SMS Messaging User Manual
Table of Contents
Request an SMS Account.............................................................................................................. 2
How does it work and how much does it cost? .................................................................................... 2
How it works from within Moodle .......................................................................................................... 2
How do you set up the service?............................................................................................................. 2
What we do .............................................................................................................................................. 3
Add the SMS Messaging Block..................................................................................................... 3
Sending a Message via SMS Messaging ..................................................................................... 3
Step 1: Recipients ................................................................................................................................... 4
Step 2: Compose Message ..................................................................................................................... 5
Unicode Messages .................................................................................................................................................... 7
Step 3: Message Options........................................................................................................................ 7
Unicode Messaging Options ..................................................................................................................................... 7
Scheduling ................................................................................................................................................................. 8
ConnectTxt account .................................................................................................................................................. 8
Step 4: Review & Send ........................................................................................................................... 8
Further Support: ............................................................................................................................ 9
Teaching and Learning Exchange
Page 1 of 9
Request an SMS Account
It is possible for you to send a text message to your students through your Moodle site. It is intended that
this service should be used in emergencies such as informing students of sudden cancellations of lectures
or room change. We are hoping that by offering such a service, communication between students and staff
will become more efficient and effective.
How does it work and how much does it cost?
It will cost £7.50 per 100 texts
But remember every user you send the message to uses up one text, for example if you have 25 students
on your site and you send out one message, you will use up 25 texts.
The cost of running the service should come from the course budget and will therefore need to be signed
off by the holder of the course budget. Every time you require more texts you will need to fill out both forms
available from [email protected] and get the Expenditure Transfer Form signed off and sent to
us before we can credit your account.
How it works from within Moodle
You will be able to add the SMS Messaging block.
How do you set up the service?
Please email [email protected] for information about setting up and for the forms to fill out and
send back..
For the initial set-up you will need to:
Fill out both the forms, indicating how many texts you would like and the total amount payable, and get the
Expenditure Transfer Form signed by the budget holder for your course. The budget holder may differ from
course to course, (if you are unsure who this is then you should speak to your course director). You must
then send the forms to:
Moodle SMS
Teaching & Learning Exchange
University of the Arts London
6th Floor
272 High Holborn
London
WC1V 7EY
Note: we cannot process your request until both of these forms have been filled out and the Expenditure
Transfer Form has been signed off.
You will be required to fill out this form every time you need more texts credited to your account. We will
place a link to the form together with this information on your Blackboard site, but it will only be available
through your Control Panel/External Links.
Teaching and Learning Exchange
Page 2 of 9
Important: You will need to make sure you have all your students’ mobile numbers included in their
personal information on your Blackboard site.
What we do
Once we have received both your forms, we will set up your SMS service.
As long as there are no technical difficulties we can set up the service within 10 working days of receiving
both forms.
Add the SMS Messaging Block
Before you can send text messages via Moodle you will need to add the SMS Messaging block to your
course. To do this follow these steps:
1.
2.
Sending a Message via SMS Messaging
Click on Compose a Message.
This page will run you through the process of sending out a message from the SMS Messaging compose
page. Given the wide number of options that SMS Messaging provides for outbound messaging, this page
is designed as a wizard, to easily section off the various stages of composing a new message. You can
Teaching and Learning Exchange
Page 3 of 9
move forwards and backwards through the steps of the wizard by clicking on their titles at the top of the
form.
The compose wizard is organised into 4 steps. Click on a step to zoom to it
Step 1: Recipients
Firstly, you must select the recipients for the message. You may send a text message to one or more
individuals, to a pre-defined group of users/contacts, to additional recipients you specify on the page, or
any combination of the three.
On the left of the screen you will see the "Potential Recipients" list. This list holds all the recipients (of a
given type) that were found in your Moodle system. These are the recipients that you can add to the
message. On the right of the screen you will see the "Selected Recipients" list. Any recipient that is in this
list when the form is submitted will receive the message.
The "potential" and "selected" recipient lists for SMS Messaging. Clicking the >> and << buttons will add or
remove selected recipients to/from the message.
To add a recipient to the message, find them in the list on the left, select them, and click the button with the
right-facing arrows (>>). The recipient will move across to the selected list. To remove them from the
message, click the button with the left-facing arrows (<<). The recipient will be removed from the selected
list, and reappear in the potential list on the left; they will no longer receive a copy of the message.
Underneath the two lists you will notice a number of buttons: "Users", "User Groups", "Addressbook
Contacts", "Addressbook Groups". Users are the user accounts and user groups defined in your Moodle
installation. Address Books contain the contacts and groups you define within MoodleTxt. Click on one of
these buttons to display the appropriate contact list.
Teaching and Learning Exchange
Page 4 of 9
Clicking on one of these buttons displays the appropriate contacts in the "Potential Recipients" list
(To select more than one contact from a list, hold down CTRL on Windows/Linux, or the Apple/cloverleaf
key on a Mac, and click on each contact. You can also select a group of sequential contacts by clicking on
the first contact, then holding the SHIFT key and selecting a contact further up/down the list. This will select
every contact in a range.)
Finally, if you wish to add recipients to the message that are not already stored within Moodle or SMS
Messaging, you can use the "Add Additional Contact" form, which you will find underneath the recipient lists
at the bottom of the slide. Enter the contact's first name, last name and phone number in the appropriate
boxes, and click the “Add Contact” button. The new contact will be added to the “Selected Recipients” list
on the right of the page.
Any contacts you added from the “Additional Recipients” form will be destroyed when removed from the
"Selected Recipients" list.
Once you are satisfied with your recipient selections, click on "Step 2" in the navigation bar at the top, and
you'll be taken to the Compose Message screen.
Step 2: Compose Message
On this slide of the wizard, you will compose the actual message that is to be sent out to course
participants. You can utilise pre-saved templates for sending out commonly used messages/notices, or
write the message free-hand. You can also customise the message by merging in the recipient's name, and
sign it with your own custom signature.
Inside the large textbox marked "Message", please type your intended text message. As you type, you
should see the number of characters you have used displayed directly above the message box, along with
the number of individual SMS messages your text will be broken into.
Teaching and Learning Exchange
Page 5 of 9
If you wish to use a pre-defined message template, select it from the drop-down list marked “Message
Templates”, and it will automatically fill the textbox with the template for you. Message length counters will
update automatically. If you wish to add your own customised signature to the message, checking the "Add
Signature" checkbox will append your signature to the end of the message in the textbox.
Also, underneath the message text box you will find three buttons, labelled "First Name," "Last Name," and
"Full Name."
Clicking on any of these buttons will insert a "tag" into the message. This tag will be automatically replaced,
for each recipient, with the appropriate name, allowing you to add a personal touch to the message. For
example:
"Hello %FIRSTNAME%, welcome to DMU."
Will be converted automatically to:
"Hello Jaime, welcome to DMU."
Teaching and Learning Exchange
Page 6 of 9
Unicode Messages
If you use any characters that do not fit within the standard GSM alphabet used by SMS messages, then
these will be sent as Unicode messages. This does not affect message delivery in any way, but it does
reduce the number of characters allowed per message from 160 to 70. MoodleTxt checks your text
automatically as you type, and if you use characters that require a Unicode message, then a warning
message will be displayed below the textbox. The "characters per message" field will also change to 70 to
reflect this, and "characters/messages used" will be recalculated according to the new message length.
Step 3: Message Options
This step of the wizard allows you to schedule a message to be delivered at a later date, along with any
other options that relate to message delivery.
UAL username
Unicode Messaging Options
Firstly, if your message contains unicode message characters, as detailed above, you can opt to disable
these characters in the outgoing message. If you decide to suppress these characters in the message, they
may appear garbled on the recipient's phone (though the rest of the message should appear OK).
Teaching and Learning Exchange
Page 7 of 9
However, doing so will restore the 160 character length of the message, and remove the restriction to 70
characters that unicode messages normally have.
To suppress unicode characters, select "Restrict message to GSM character set only" in the first option set,
under the heading "Unicode Messaging Options".
Scheduling
To schedule your message for delivery at a later point, first you need to select the "Schedule to send later"
option under the "Scheduling" heading. Once you have done this, select a time and date using the combo
boxes provided. The date and time you enter is according to your own timezone on your Moodle user
account; this will be converted automatically by SMS Messaging to Universal Time before sending.
ConnectTxt account
Select your ConnectTxt account username. This will have the same name as your course. Make sure you
select the correct course account name.
Step 4: Review & Send
The final step of the wizard exists simply to allow you to review all the details of the message in one place,
prior to it being sent. The recipients of the message are displayed, along with the message text, how many
characters and messages per recipient will be used, and any unicode warnings that are relevant. Once you
are happy with the information displayed on this last screen, click the "Send Message" button at the bottom
to send the message to ConnectTxt.
Teaching and Learning Exchange
Page 8 of 9
Further Support:
Additional support is on hand should you require help when getting started with Moodle.
Email: [email protected]
This work by Teaching and Learning Exchange is licensed under a Creative Commons
Attribution-NonCommercial-ShareAlike 3.0 Unported License.
Teaching and Learning Exchange
Page 9 of 9