1
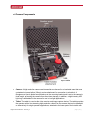
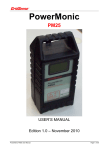
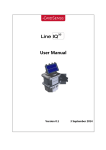
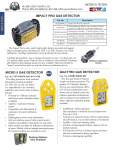
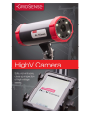
HighV Camera User’s Manual
Table of Contents
Section
Page
Table of Contents .............................................................................................................................................1
1 General Information ................................................................................................................................. 2
1.1
Introduction ...................................................................................................................................... 2
1.2
Warranty .......................................................................................................................................... 2
1.3
Applications...................................................................................................................................... 2
1.4
Approach Limits ............................................................................................................................... 2
1.5
Safety ................................................................................................................................................3
1.6
Camera Components ........................................................................................................................ 4
2 Using the HighV Camera .......................................................................................................................... 6
2.1
Assembly .......................................................................................................................................... 6
2.2
Operation ..........................................................................................................................................7
2.3
Camera Battery Removal for Charging or Replacement ..................................................................10
2.4
Battery Charging for Camera ........................................................................................................... 11
2.5
Battery Charger LED Status ............................................................................................................. 11
3 Troubleshooting ......................................................................................................................................12
3.1
Tablet does not find camera ............................................................................................................12
3.2
Tablet is stuck in “negotiating connection” mode ............................................................................12
4 Specifications .......................................................................................................................................... 13
All trademarks are the property of their respective owners.
HighV Camera Manual – Version 3.0
page 1 of 13
1 General Information
1.1 Introduction
Thank you for purchasing the HighV Camera! This manual has been written to help you
familiarize yourself quickly and easily with the full range of features and applications that this
product has to offer.
The HighV Camera uses a shielded, high resolution wireless camera providing the user with a
tool to conduct close up inspections of energized equipment up to 500kV phase to phase.
The camera is installed on a hotstick and guided from the ground or bucket truck surveying
energized lines or equipment. A live image is transmitted wirelessly back to an Android®
tablet running the GridSense HighV Camera App. The tablet can be attached to the user end
of the hotstick, or alternatively hand held by supporting personnel.
The live image streaming from the camera can be captured by the touch of a button within the
tablet App. The images are stored to an SD card within the tablet for further inspection or use
in a report.
1.2 Warranty
The HighV Inspection Camera is covered by a 1 year manufacturer’s warranty from the
shipping date. Please contact GridSense in order to make a warranty claim.
Please inspect this new product for any damage. Report any defects to your supplier or
GridSense directly.
1.3 Applications
The camera can be used for inspecting equipment on up to 500kV transformers. The camera
can be used on insulated cables and circuits up to 500kV phase to phase. On a 500kV phase
to phase uninsulated conductor with high corona the camera must be 18” from the conductor
to avoid loss of communication with the camera. No damage will occur to the camera if
communication is lost or if it comes in contact with the conductor, but the camera may need to
be reset to reinitiate communication to the android pad. The camera has been subjected to
fields as high as 930kV phase to phase to verify its integrity in a high voltage circuit.
1.4 Approach Limits
The HighV Camera is manufactured for safe use on energized equipment up to and including
500kV phase to phase. Users must observe hotstick manufacturer’s ratings and
standard approach limits when using the HighV Camera. The HighV Camera offers NO
user protection if the minimum approach distance is encroached. We advise that users
add an additional 300mm/1’ clearance to the standard hotstick approach limits at all times
when mounting the screen to the hotstick.
HighV Camera Manual – Version 3.0
page 2 of 13
1.5 Safety
•
•
•
Rating: The HighV Camera is rated for use on energized equipment up to 500kV
phase to phase. At no time should it be used around or come into contact with higher
voltages.
Inspecting Energized Equipment: When using the camera to inspect energized
equipment, the operator must adhere to all safety requirements and ratings of all
equipment including (but not limited to) the hotstick, bucket truck, approved
clearances, approach limits and work practice standards set by the local electric utility.
Touch Probe Rod: When operating the HighV Camera, the touch probe MUST be
installed and used at all times. This rod not only ensures the optimum focused distance
for viewing equipment, but also protects the lens, lens cover and LED lights from
impact damage.
If you are not an employee of an electric utility, or approved contractor, please contact your
local electric utility for safety training near energized equipment. Before using the HighV
Camera, GridSense recommends that the user becomes familiar with OSHA Standard
1910.269 App B: Working on Exposed Energized Parts.
HighV Camera Manual – Version 3.0
page 3 of 13
1.6 Camera Components
•
•
Camera: A high resolution camera and transmitter are housed in an insulated case that uses
a standard universal spline (32mm) sunrise attachment for connection to a hotstick. A
fiberglass rod (touch probe wand) attaches to the mounting bracket and is set to the camera’s
focal length, protecting the camera from direct lens damage. In addition, a high intensity LED
light ring is embedded in the camera for use in low light applications.
Tablet: The tablet is used as the video receiver and image capture device. The tablet provides
the operator with a live streaming high-resolution video from the camera that can be handheld
or alternatively for single operator applications, attached to the lower part of the hotstick with
HighV Camera Manual – Version 3.0
page 4 of 13
•
•
the supplied bracket. The “snapshot” button within the tablet App records images directly onto
the tablet. The tablet includes a rechargeable lithium ion battery pack that provides 7 hours
continuous use from full charge.
Battery Chargers: The HighV Camera and tablet are supplied with individual charging
devices. This includes charging at 100 - 240V @ 50/60Hz. Also included in the kit is a DC
Inverter to provide in-vehicle charging of the tablet and the HighV Camera battery pack.
Carry Case: For safe transport, the camera comes in a fully protective, watertight, hard cover
case.
HighV Camera Manual – Version 3.0
page 5 of 13
2
Using the HighV Camera
2.1 Assembly
Camera
1. Remove camera and touch probe
2. Insert touch probe into hole in mounting
bracket
3. Mount camera to sunrise attachment on hotstick and tighten butterfly nut firmly
Tablet
1. Remove the tablet and hotstick attachment from case
2. Attach bracket to hotstick
3. Insert tablet into mount
HighV Camera Manual – Version 3.0
page 6 of 13
2.2 Operation
Powering the Devices
•
To Power Camera On/Off: Press the power button located on the battery module.
•
To Power Tablet On/Off: Press the power button on the top of the tablet.PL
HighV Camera Manual – Version 3.0
page 7 of 13
•
To begin using the HighV Camera, start the HighV Application from the tablet.
HighV Camera Manual – Version 3.0
page 8 of 13
Recording Images:
1. Press the snapshot button for a still image or the record button for video.
HighV Camera Manual – Version 3.0
page 9 of 13
2. After capturing images or videos, they can be viewed by pressing the soft menu key and then
pressing the browse button.
2.3 Camera Battery Removal for Charging or Replacement
1. Rotate battery module counter-clockwise
2. Gently pull battery out from the camera housing
HighV Camera Manual – Version 3.0
page 10 of 13
2.4 Battery Charging for Camera
1.
2.
3.
4.
5.
Remove quick change battery module from camera (as shown on previous page)
Plug supplied charger into wall outlet
Connect the charger lead to the charge socket on the battery module
Switch on the Battery Module
Check status light on the charger for charge status
2.5 Battery Charger LED Status
Solid Red (Charging)
Solid green (Charging complete)
HighV Camera Manual – Version 3.0
page 11 of 13
3 Troubleshooting
3.1 Tablet does not find camera
1. Check that the camera is turned on and that the LED’s are illuminated
2. Re-scan for camera
3.2 Tablet is stuck in “negotiating connection” mode
1. Restart the HighV Camera App
a. If the problem persists:
i. Power the camera on/off
ii. Verify that camera battery is charged
HighV Camera Manual – Version 3.0
page 12 of 13
4 Specifications
HighV Camera Technical Specifications
•
•
•
•
•
Phase to phase rating: 500kV
Typical kit includes:
o Wireless inspection camera
o 7” Android tablet
o Rugged case with mounting attachments
o Camera and receiver AC chargers
o Camera and receiver car chargers
Hot stick mount: Universal Sunrise fitting
Transmission frequency: 2.4 GHz band license-free WiFi, Compliant to FCC, C Tick and CE
standards
Transmission range: Up to 50 ft (15m) line of site
Display and image capture
•
•
•
•
•
•
•
•
•
•
•
•
Imaging sensor: 1/4” Sony Super HAD CCD - 400 line resolution
Camera power: DC 12V +- 10% (3.6W)
Camera Frequency: PAL 50Hz
Camera resolution: 720 lines / 576 lines
Video output: 1.0Vp-p 75ohm VBS
Noise ratio: >60dB
Zoom: 10x
Focus control: Auto
Aperture control: Auto
Control format: On-screen menu / RS-485
Tablet size: 7”
Image recording format: JPEG, AVI
Power
•
•
•
•
Battery: Lithium ion rechargeable battery packs
Camera battery performance: 2 hours (without LED illumination)
Tablet battery performance: 7 hours
Camera Battery charging: 6 hours
Construction
•
•
•
•
•
•
Camera Dimensions: 98 x 62 x 57mm
Housing material: Polymer resin
Housing dielectric strength: > 25kV/mm
Operating temperature: -10° C to +50° C
Working humidity: 0% – 96%
Enclosure Rating: NEMA4/IP65
HighV Camera Manual – Version 3.0
page 13 of 13