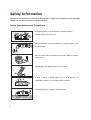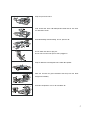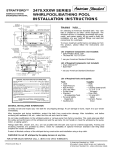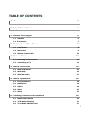
1
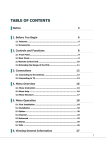
TABLE OF CONTENTS Notice 3 Safety Information 4 1. Before You Begin 6 1.1 Features 1.2 A ccessories 2. Controls and Functions 6 7 8 2.1 Front Panel 8 2.2 Rear Panel 9 2.3 Remote Contr ol Unit 3. Connections 10 12 3.1 Connecting to the Antenna 12 3.2 13 Connecti ng to TV 4. Menu Overv ie w 16 4.1 Menu Instr ucti on 16 4.2 Menu Help 16 4.3 Menu Str ucture 17 5. Menu Operation 18 5.1 First Installation 18 5.2 Installation 18 5.3 Option 20 5.6 Reset 25 5.7 Status 25 6. Viewing Genera l Information 26 6.1 Banner Infor mation 26 6.2 TV & Radio changing 27 6.3 TV or Radio Channel Lists 27 1 6.4 A UD Button 31 6.5 MODE Button 32 6.6 TTX Button 33 6.7 SUB Button 33 6.8 MHEG-5 EP G (Freeview G uide) 34 A dditional Information 2 36 A.1 Troubleshooti ng 36 A.2 Technical Speci ficati ons 38 A.3 40 Glossary of Terms Notice Read thi s manu al carefully and mak e su re you under st and th e provided in struction s. For your safety, check what th e r esult each action w ill be. Warnings, Cautions and Note s Throughout he whole m anu al, pay sp ecial attent ion to the follow ing mark s that indic at e hazardou s situ ation s. Caution Indicates a situation w hi ch, i f not avoided, coul d damage the equipment or apparatus . Warnings Indicates a hazardous situation whi ch, i f not avoided, could result i n s erious i njury. Note Indicates addi ti onal information to the user to make the us er aware of possibl e probl ems and information of any im portance to help the user to understand, to us e and to maintain the i ns tallation. 3 Safety Information This digit al t err estri al r ec eiver h as been m anufactur ed to comply with internation al safety stand ard s. Please r ead the following saf ety prec aution s carefully. Safety Instructions and Precautions Av oid placing heav y things and blocking v entilation passa ge. (Passage bl ocking can ca use f ire) Av oid scrubbing the surf ace with Benzene or V olatile gasoline. C olor can be damage d. Leav e the pow er and the antenna off f or the ling absence or during thunder storm . Av oid dropping and dam aging Remote C ontrol Unit. If there is smoke or burning smell, turn off & un-plug the set immediately. C ontact y our local repair center for adv ice. Av oid placing the set on slippery and sla nt surf ace. 4 Keep aw ay f rom the w ater. C lear off the dust. Dust or M etallic particles inside the set can cause f ire and electric shock. Av oid dissembling and assembling. Do not open the set. Do not snatch the cable to plug out. Do not mov e the set w hile pow er cord is plugged in. Keep the distance f rom Magnetic item s and A udio Speaker. Place the set with the good v entilation and aw ay from the direct sunli ght and humidity. Av oid the tem perature of ov er 30C and below 5C. 5 1. Before You Begin 1.1 Features MPEG-2 Video(MP @ML), MPEG-1 Audio Lay er 1, Lay er 2, H.264/AVC, HE-AAC, AC3(Dolby Digital) High Definition Digital Tuner with Loop-through W ide Symbol Rat e 8Mbp s & Fr equen cy Input 474~858MHz S/PDIF AC3 audio Vector Font and 256 color GUI (G raphi c User Interfac e) Multi-languag e menu Variabl e asp ect ratio with full scr een, Centre Cut, Lett er Bo x Telet ext and Subtitle support ed(VBI & OSD) Installation by Easy Setup Guid e Favorite Channel and P ar ental Lock Function USB2.0 port or RS 232C port for upgrading system software O TA supported HDMI (High Definition Multimedi a Interfac e) suppo rted MHEG-5 (V1.06 NZ profil e): Access to a fr ee 8-d ay Freeview EPG and ability to acc ess inter active TV content 6 1.2 Accessories HDMI cable Component Cable (Red, Green, Blu e RCA connector s) Composit e Cable( Yellow- Vid eo, W hite/Red –L/R audio ) Operating in struction (this Manu al) Remote Control AAA dry cell batteries x 2 7 2. Controls and Functions 2.1 Front Panel ① ② ③ Item ④ Description 1 . Power Button Turns the receiv er O n/Off. 2 . CH Up/Down Buttons C hanges channel s in operation mode (▲ /▼ ) 3 . Di spl ay Show s channel number and indicate operating status. In STAND BY mode, the display show s local tim e. 4 . USB por t 8 USB Host port f or the firmw are upgrade is be hind panel 2.2 Rear Panel ① ② ④ ③ ⑤ ⑧ ⑥ ⑦ Item ⑪ ⑫ ⑨ ⑩ Description 1 . A NT IN C onnect A ntenna In cable. 2 . LOOP OUT Loop O ut is pass-through conne ctor for A ntenna IN 3 . H DM I OUT C onnect to an HDMI input of TV or PC monitor. 1080i, 720p, 576p, 576i resolution supported. 4 . VCR SCA RT C onnect to a SCART to VCR 5 . TV SCART C onnect to a SCART to TV 6 . S/PDIF Digital A udio output f or conne ction to an amplifier. 7 . RS-23 2C C onnects to another HT3000 or a PC serial port. 8 . CVBS O UT Use this to conne ct a composite v ideo cable (CV BS-Yellow ). Standard Definition only (576i resolution). 9 . A udi o OUT C onnect L/R (White, Red) analo g audio cable s to y our TV or amplif ier. 10 . YPbPr OUT Use these j acks to conne ct Y/Pb/Pr (Green, Blue, Red) component ca bles to a compone nt v ideo input on your TV. (576p and 576i resolution only supported due to copy protection spe cification). 11 . Power Lead 90~240V AC (A uto-selectable), 50~60Hz. 12 . Power Swi tch Turn pow er to the unit on/of f. 9 2.3 Remote Control Unit All receiver features can b e controlled with the r emot e controller. Button Description 1 . POWER Turns the receiv er O n/Off. 2 . M UT E Turns the sound on/of f. 3 . TV/VCR Sw itches betw een TV and VC R mode w hen connecting TV and VCR by Scart 4 . NUM ERIC Buttons ( ~ Selects channels or use as an alphabetic ) sear ch key in the sorted channel lists. 5. Show s the channel list 6. Turns on Radio mode 6 . M ENU Display s /Exits the main menu and Exits to main menu f rom the sub-menu 7 . EPG Show s MHEG Electronic Program Guide (EPG) - The F reeview Guide. 8.i Show s the C hannel inf ormation bar and exte nde d program inform ation 9 . EXIT Goes back on Menu level, C ancel an O peration, or Exit f rom menu C onfirms the choice s and/ or sele cts the 10 . OK highlighted m enu item. While w atching TV or listening to Radio, press the button to display the channel list. 11 . ◀ /▶ ( / Mov es left/right or change settings in ) menu & EPG 12 . ▲ /▼ ( 13 . VOL +/- / ) Mov es up/dow n in menu & EPG C hanges the v olume lev el in view ing mode. 14 . CHL +/- 10 C hanges channel s in v iew ing mode. 15 . Color button ( Mov es in MHEG EPG Menu ) 16 . FAV Selects f rom the group of f av orite channels. 17 . RCL Rev erts to the previous channel 18 . T EXT O perates MHEG f unctions w hen Service is av ailable 19 . Puts STB in Standby mode. Press repeatedly to adj ust in 30 minutes increme nts. 20 . AUD Selects A udio, Teletext, Subtitle Langua ge 21 . MODE Select A udio, V ideo Mode and V ideo F ormat (1080i 720p, 576p, 576i) 22 . TTX Show s Teletext 23 . SUB Show s DVB Subtitle 11 3. Connections 3.1 Connecting to the Antenna <Ma king A ntenna connections> 1. 2. Connect the ant enn a c able (75 oh m co-axi al) to th e SIGNAL IN connector. For passing th e antenn a signal through to another devic e (such as a VCR and your TV), connect an appropri at e 75 oh m co- axi al c able fro m the Loop Out connector of HT3000 (Th e Loop Out connection will pass the ant enna sign al through to your device- even wh en HT3000 i s in Standby mod e (or Tu rn off at the switch) 12 3.2 Connecting to TV <Connecting to PC mon itor or digital TV that has an HDMI input port> 1. 2. Connect HT3000’s HDMI jack to an HDMI jack on your monitor or TV. Set the video output mod e to 1080i or 720p or 576p by using ‘Resolution’ in Mode on RCU For the best ac cess to HD progr amming at th e high est available r esolution, use this connection m ethod. 13 <Connecting to digital TV that supports HD resolution (1080i,720p576p) using YPbPr port> 1. Connect the HT3000 YPbPr out jacks to a set of matching YPbPr in jack s on your TV. The Audio L/R out jack s can al so b e connect ed to matching jack s on your TV or you can use The digital audio Out (See Connecting to A/V rec eiver (Dolby Digital Amplif ier) section, pag e??. out and audio L/R out to YPbPr in and audio L/R in of TV. 2. S et the video output mod e to 576p or 576i by using ‘Resolution’ in Mode on RCU For contents copy protection, YPbPr can support 576p and 576i video output only. 14 <Connecting to A/V receiver (Dolby digital amplifier)> 1. 2. Connect HT3000 Optical Digital Audio Out to an Optical Digital Audio Input on A/V rec eiver. Set HT3000 Audio out mode to ‘Dolby Digital’. (See pag e 20) 15 4. Menu Overview 4.1 Menu Instruction Press the MENU button to display the menu. You can select the sub menu u sing ▲ /▼ /◀/▶ button. The selected sub m enu b ecomes highlight ed. button. When you have selected the sub menu you want, press When you want to return to the pr evious m enu, press button. When you want to return to the live scr een, press th e Menu button. 4.2 Menu Help In the m enu, short information is di splayed at th e bottom of the scr een. : Using ▲ /▼ button. : Using ◀/▶button. : Using button. : Moves in MHEG EPG Menu : Using button. : Numerical button 16 4.3 Menu Structure In the m enu, short information is di splayed at th e bottom of the scr een. Installation Antenna : S elect th e Antenn a power setting s. Auto Scan : Search the all ch annel s auto matically without sp ecifying par am et ers. Manual Sc an : S earch the ch ann el s manu ally by specifying parameter s. Region Sc an: S earch the ch ann el s by sp ecifying the tran smitt er to which the end user’s antenna is point ed to. Option TV Output : Select th e video or audio output. Langu ag e : Sel ect th e display langu ag e, audio languag e, and subtitl e l anguag e. Parental Control : Change th e password and sel ect th e cen so r ship classification OSD Display : Setting OSD display time and tran sp ar ency. Channel Reservation : Reserving chann els you want to turn on STB at your desired tim e. Delete : Del ete the ch ann els such as Favorite, TV/Radio CAS, etc. Advanced OTA : Upgrade the rec eiver into th e lat est softwar e version. S/W Upload : Tran sfer the softwar e from r eceiver to rec eiver or PC. USB Transfer : Transfer the sy stem software between receiver and USB driv e. Reset Reset Factory Def ault : Restor e the rec eiver to the d efault values. Status Inform ation : Check the version of STB. 17 5. Menu Operation 5.1 First Installation You can in st all th e receiver u sing First In stall ation for your convenience. ‘First In stall ation' allow you to set your rec eiver u sing si mple procedure. 1. Sel ect the d esir ed langu ag e u sing the ▲ /▼ 2. button. Press the sc anning. button to conf irm and begin 5.2 Installation 1. Press the Menu button to display the main menu. 5.2.1 Antenna 1. Select Antenna Power type using th e ◀/▶ button. You can sel ect Antenn a Power value as O ff normally or if the antenn a need s power suppli ed from r eceiver, you can select Antenn a Power valu e as O n. Off is the def ault value in thi s option. If you a mast er dh ead amplifier or distribution amplifi er, you should not enabl e thi s option. 18 5.2.2 Region Scan 1. Seelect th e region wher e u ser’s are now liviing by using ◀ /▶ ▲ /▼ buttons. button to start the region sc an. 2. Press the 5.2.3 Auto Scan 1. The l eft window shows TV ch ann els and the right window shows Radio chann els during th e sc anning process. White chann el n am es are n ew chann el s downloaded to your rec eiver. Gray chann el n am es ar e alr eady existing ch ann els. 1. Choose Auto Scan menu and press button to begin scan ning You can press Exit at any time to stop scanning. A pop-up menu appear s. If you allow the complete sc an, the sam e pop-up menu app ear s. To save the upd at ed chann els, select 'Yes'. 2. 3. 4. 5.2.4 Manual Scan 1. Set the d esir ed valu es ( see th e below) to sc an. Use the nu meric keys (0- 9) and ◀ /▶ ▲ /▼ buttons. 2. Press the button to start the m anual sc an. Channel : The target ch ann el numb er for th e m anu al scan. Frequen cy : The tran smitt er fr equ ency of the chann el 19 Transmitt er frequ encies and other ch ann el det ails for your ar ea can b e found on-line, or phoning your TV station. 5.3 Option 5.3.1 T V Output Setup 1. Select the d esired TV output option s with the ▲/▼ /◀/▶ button. Press the button to save your chosen setting s and exit the di alogu e. 2. SCART : Select your TV type.(RGB, S-VIDEO, CVBS). If you select RGB, th e compon ent out w ill be disabl ed. TV Screen : Select the scr een format of your TV. (Full scr een, LetterBo x, Centre Cut) Dolby Digital(DD) : If en abled ( and th e ch annel h as DD audio), it will automatic ally be sel ected as th e def ault soundtrack. Digital audio : If enabled- and you are u sing th e optical S /PDIF connector- you can li sten to 5.1 ch ann el Dolby audio (if broad cast ) through an AC-3 decoder (your home th eatre amplif i er). S electing PCM will limit this to 2. 1 ch ann el audio. 5.3.2 Language 1. Select the l angu age option s u sing th e ▲/▼/◀/▶ button. 2. Press the button to save your chosen langu ag e. Display : Change th e langu ag e u sed for th e OSD and Menu s. Audio 1-2 : Choose th e preferred audio langu age for bro adc ast. Subtitle 1- 2 : Choose the preferr ed subtitle langu age. 20 5.3.3 Parental Control You can block acc ess to particular ch annels by ag e l evel. The u ser s need to ent er a password in ord er to watch blocked chann el. To chang e the p assword, press th e ◀/▶ button, a dialog will open. Use the nu meric button s(0-9) to type in the new password. You will be prompt ed to reconf irm your password. Type it in a second time. 1. 2. 3. 4. Set the d esir ed rating level with ◀/▶ buttons. 5. Press the OK button to save and exit. Understanding Parental Rating - (No Block) : All channel s can b e view ed. PG (Par ental guid an anc e) : Chann el s are blocked und er th e ag e of 8. P (Pre school): Channel s ar e blocked under the ag e of 2. C (Children’s) : Chann el s are blocked under th e ag e of 4. G (Gen er al) : Channel s ar e blocked under th e ag e of 6. M (Matur e audience) : Channel s ar e blocked under the age of 13. MA 15+ (Matu re adult audien ce) : Channel s ar e blocked und er the ag e of 15. AV 15+ (Audult audi enc e , strong violenc e) : Channels ar e blocked under the age of 17. R (Restrict ed ) : Channel s are blocked und er the ag e of 18. You have to ent er p assword to watch the ch ann els w hich is blocked by the ag e level. 5.3.4 OSD Display 1. Choose th e desird option s with the ▲/▼ /◀/▶ button. 2. Press the button to save your setting and exit the dialog. 21 Bann er display time : Bann er will r emain on scr een for the selected time.(1~9 sec s). Screen Sav er : Th e Screen S aver function prot ect s when li st ening to a Radio ch annel. You can choo se from th e following options : Di sable, 5, 10, 20, 30, 60, 120 Minutes. OSD Mixweight : Sel ect the O SD tran sp arency level. (Low, Middle, High). Telet ext Mixweight : S el ect the Tel et ext tran sp ar ency level. (Low , Middle, High). 5.4 C hannel 5.4.1 Reservation You can reserve a Channel to b e watch ed at your desired time. In thi s mode, you can reserv e chann els up to 8. 1. Press the Green button to add a reservation. 2. Use the ▲/▼ /◀/▶ buttons to n aviugate through 3. the field s, and adjust valu es for your reservation. You can also u se th e numeri c keys (0-9) to directly type in time valu es. Press the button to complete your reservation. Once : A single timer event Weekdays : Occur s at th e same time on Monday to Frinday Weekends : Occur s at the same time on S aturday to Sunday Weekly : A timer event occur s at the same time each week. Daily : A timer event occur s at the same time every day 5.4.2 Delete You can d el ete ch ann el s by “Mode” (Chann el / Favorite) and by “Option”(TV, Radio etc). 1. Select th e del ete mod e or option with the ▲ /▼ / ◀/▶ button. Press the button to make the del etion and exit the dialog. 2. 22 5.5 A dvanced 5.5.1 OTA 1. You can upgr ad e the l at est software. Th e r ec eiver check s wheth er the n ew S/W is r eleased when you view channel s or select thi s OTA menu. If th e new version i s d et ected, th e receiv er will be r ebooted automatic ally and th e dow nload scr een will appear. 5.5.2 S/W Upload 1. Connect the receiv er to anoth er rec eiver or PC 2. 3. through RS-232 cabl e. Turn the power off, and then on, for the target unit. The SW tran sfer st atu s is shown in real-ti me. 5.5.3 USB Transfer You can tran sfer the sy stem softwar e (f irmw are) betw een HT3000 and a US B drive(“memory stick” or HDD.) Connect the USB devic e to a r ect angular Ho st port on the front ( undern eath the front p anel at th e right-hand ed side) of HT3000. Select the sourc e and targ et (US B to STB or STB to USB) with the ▲/▼/◀ /▶ button. 1. 2. 23 3. Select “Yes” to begin d at a tran sf er. The w arning dialog shown below will rem ain on scr eem during th e update. 4. HT3000 will reboot automatic ally once th e firmwar e has been upd ated. 5. W hen you next open this m enu, new f irmware detail should be show n in the low er section of screen. DO NOT DISCO NNECT THE USB CABLE / DEVICE UNTIL THE TRANSFER IS CO MPLETED! 24 5.6 Reset 5.6.1 Reset Factory Default 1. To perform a full factory reset to d efault valu e, simply press OK button. The confirmat ion window show n in the i mag e will app ear. If you select 'Yes', the HT3000 will be r eset to defualt f actory values. 2. 5.7 Status 5.7.1 Information You can ch eck sy st em infor mation such as; Model ID, Hardwar e ver sion and Software ver sion in this dialog. 25 6. Viewing General Information 6.1 Banner Information TV or Radio channel SD or HD transmission Channel place and name Show the signal quality Show the signal strength Ev ent nam e Tim e table for act ual event 1. Press the INFO button to display the chann el Inform ation bar for a few second s. Th e di splay duration is set in th e OSD Displ ay MENU. * The output resolution i s also shown on the top l eft corner of the screen. To view extend progr am information: 1. Press the INFO button (while chann el inform ation bar is visible) to display the ext ended progr am information. Th e inform ation bar rem ain s onscreen when ext end infor mation b ar is show n. Press the ◀/▶ button to view further prgor am information p age. Press the E XIT or INFO button, information to hide the information bar and extend ed program information.. 2. 3. 26 Dat e / Time Resoultion Tel et ext Subtitle Audio Lock Scrambled Dolby Parental protection 6.2 TV & Radio changing Press the TV/Rad button to switch betw een TV and Rad io chann el s 6.3 TV or Radio Channel Lists TV Ty pe (TV or Radio) TV Ty pe (TV or Radio) Group Status Gr oup Delete Loc k Rename View Prov ider Name Sort 27 6.3.1 Displaying and Using the channel list 1. Press the OK button or Channel list button to show the chan nel li st. Press the ▲/▼ button to move the selection curso r up and down the ch annel li st. Press the OK button to choose / watch th e highlighted ch annel. 2. 3. 4. Press the E XIT button to clo se th e ch annel li st window. 1. To choose a ch ann el with the numeri c buttons 2. Somply press the ‘3’ button to watch chann el 3, or ‘1’ and ‘0’ (in quick su cession ) to select ch annel 10. 1. If you want to go Alphabetic move, you must chang e the ch ann el list to the sort ed statu s. To become th e so rted st atu s, press th e A-Z button on the chan nel li st. Press the nu m eric button. Then Alphab etic P ad will appear. You can sel ect the Alphab et u sing th e num eric key(1-9)/▲ /▼ /◀/▶ button. Press the button. If the sel ect ed ch annel by user input-l etter not exi st s, ther e will be any change. 2. 3. 4. 28 6.3.2 Understanding and Using Mode Commands The icon s shown at th e bottom of the chann el list provide acc ess to a nu mber of “mod es”. Modes ar e u sed to perform p articular types of oper ation s in the op en window. 1. Press ◀/▶ button to select th e d esired mode. 2. The selected mode icon i s highlight ed, and th e active mod e n ame is show n on the lab el to the right of the icons. View mod e is auto mat ically selected w hen you open the ch ann el li st. 3. 6.3.2.1 Delete Mode 1. Select the Delete mode(Trash ) icon with the ◀/▶ button. Select chann el you want to del ete with th e ▲ /▼ button. Press the OK button, and a tick will be shown to the right of the ch ann el name. Press the E XIT button to del ete the ch ann el, and 2. 3. 4. exit th e dialog. 6.3.2.2 Rename Mode 1. Select the Ren ame mode (R) icon with the the ◀/ ▶ button. 2. Select the ch ann el you want to rename with the ▲ /▼ button, and press the O K button. And small name editing window will be displayed. Choose each letter of the n ew chann el name with the ▲/▼/◀ /▶ buttons. Press the OK button to ent er each l etter. After ren aming, press the “Don e” icon (see b elow ) 3. 4. 5. 6. Press the E XIT button to leave th e dialog. 29 To chang e the Favorit e group name. Press the d esir ed group. 1. 2. Change the n ame of group as p er th e in struction s above. <Rename W indow Icon Meaning s> : Move focus to the left : Move focus to the right : Close keyboard window : Change to low-case lett ers : Change to upper-case l etter s : Save & Exit (“Don e” icon ) 6.3.2.3 Lock Mode 1. Select Lock mod e(Padlo ck) icon with the the ◀/▶ button. Select the ch ann el that you want to lock w ith ▲ /▼ buttons, and press the OK button. Set the p assword. A Lock icon will appear on th e left of the Chann el name. This c an b e cancell ed by pressing th e OK button. 2. 3. 4. Press the E XIT button to save and exit. 6.3.2.4 Favorite Mode (Creating Favorites) 1. Select the Favorite mode (Two people) icon with the ◀/▶ button. 2. Press the OK button, and a sm all Favorite W indow will appear to the righ t of the chann el list. Choose th e group numb er with the ▲ /▼ buttons, and conf irm by pressing the OK button. To canc el th e conf irmation, press th e OK button again. Use the▲ /▼ buttons to choo se, and press th e OK button to add them to the Favorite group.. Press OK agai n if you accident ally ass a ch ann el to a group. Press the E XIT button (twice) to sav e and exit. 3. 4. 5. 30 6.4 AUD Button Press AUD Button while watching TV or li st ening to Radio to launch a small pop-up window. You can sel ect from th e following sub-m enu s in thi s window. Audio Languag e Teletext Langu ag e Subtitle Langu age 6.4.1 Audio Language 1. Select the 'Audio' sub-menu with the ◀/▶ button. 2. Press the ▲/▼ button to sel ect a langu ag e. 3. Press the OK button to chang e the audio langu ag e. 6.4.2 T eletext Language 1. Select the 'Telet ext' sub-menu w ith th e ◀/▶ button or press “TTX” button on RCU. Press the ▲/▼ button to sel ect a langu ag e. 2. 3. Press the OK button. 4. You can view Teletext in the cho sen l anguag e -if available. 6.4.3 Subtitle Language 1. Select the 'Subtitl e' sub-menu with the ◀/▶ button or press “SUB” button on RCU. 2. Press the ▲/▼ button to sel ect a langu ag e. 3. Press the OK button. 4. If the select ed l anguag e is unav ailabl e, subtitl es ar e not shown. 31 6.5 MODE Button Press MODE Button while watching TV or listening to Radio to launch a small pop-up window. You can select fro m the following sub -menu s in this w indow . Audio Mode Video Mode Video Form at 6.5.1 Audio Mode 1. Select the 'Audio Mode' sub- menu with the ◀/▶ buttons. Press the ▲/▼ button to set th e output directionyou’re your TV sp eaker s. (STE REO , LEFT, RIGHT, JOINT) Press the OK button to save and exit. This option is only applic able to th e HT3000 an alog audio output jacks. It h as no impact on the digit al audio output. 2. 3. 4. 6.5.2 Video Mode 1. Select the 'Vid eo Mode' sub- menu with the ◀/▶ button. 2. Press the ▲/▼ button to set th e scr een for mat (Full Screen, Letter Box, Centr e TV) 3. Press the OK button to save and exit. 6.5.3 Video Format 1. Select the 'Video form at' sub- menu with th e ◀/▶ 2. 3. 32 button. Press th e ▲ /▼ button to set th e video format (576i-All, 576p-All, 720p-HDM I only, 1080i -HDMI only) Press th e OK button to save and exit. 6.6 TTX Button Ref er to 6. 4. 2 Teletext Langu ag e 6.7 SUB Button Ref er to 6. 4. 3 Subtitle langu age 33 6.8 MHEG-5 EPG (Freeview Guide) Press the EPG button to access El ectronic Progr amme Guid e (EPG) - Th e Fr eeview Guide. The Freeview Guid e i s very simpl e to use and en ables you to view 8 day s of programme listing s on all Freeview ch annels. It also contain s a Now/Next screen that show s what is on now and next for each chann el. W hen new ch annel s are add ed to the Fr eeview servic e they will auto matically app ear on the Freeview Guide. Time interv als ar e arr anged in a row and Chann el li st s are shown in a colu mn. 6.8.1 Navigating MHEG-5 EPG (Freeview Guide) 1. Press the EPG button to ac cess EPG 'Loading...' is shown on the scr een whil e Freeview Guid e is b eing download ed. 2. The curr ent d ay’s progr am mes for th e chann el you were watching i s disp layed. Th e programme you were watching app ear s in the top right corn er along with a description, p arent al rating and captioning information for th e highlighted programm e (on th e low er right below the ¼ scr een video w indow ). Press the ▲/▼ button to navigat e th e chann el’s program me li sting for the curr ent d ay. As scrol ling, a synopsi s of highlight ed programme, p aren tal r ating and captioning inform ation ar e displ ayed. 3. After scrolling dow n to past midnight, the n ext day’s listing is disp layed and aftr er scrolling up to p ast midnight, the pr eviou s day’s listing is displayed 4. Press the ◀/▶ button to navigat e b etween Freeview chann el s. The cu rr ent chann el li sting i s displayed next ‘Chnl’. 34 - Press th e num eric button of desired ch ann el numb er to move dir ectly to that ch annel. - button to go to the previous day’s listing or press Press listing for th e curr ent chann el. button to go to the next day’ s 5. Press the OK button to view a highlighted 6. program me. Press the E XIT button to exit Freeview Guide and retun to the progr amme that EPG was lo ad ed. 6.8.2 What’s On Now/Next page 1. Press the EPG button again on Freeview Guid e (th e current d ay’s progr am me) to view ‘W hat’s On Now/Next’ th at di splay s what’ s on now and next on all Freeview ch annel s. 2. Press the ▲/▼ button navig ate through ch ann el or press the nu meric button of desir ed ch annel number to move directly to that chann el. Press the OK button to view a highlighted program me. Press the E XIT button to exit EPG and retun to the program me that you wer e watching. Press the EPG button again to r eturn to the cu rr ent day’s li sting pag e for the higlight ed ch ann el. 3. 4. 5. The RED button will launch any avail abl e MHEG- 5 int eractive application when avail abl e. The TEXT button w ill launch the MHEG-5 Digitext applic ation when available. 35 Additional Information A.1 Troubleshooting Ther e are m any factors that c an c au se r ec eiver probl em s. Please take a look at the troubl eshooting table below. Do not open the unit as thi s may cau se damag e to the HT3000, your property or yourself. Problem Sol uti on T he front panel doesn’t The pow er cord is not plugged di spl ay any m essage. in or the unit is turned off. C heck that the pow er cable is plugged in to the socket and that the pow er sw itch is on. A lso che ck the pow er sw itch on the back of the HT3000. No pi ctur e or sound. Poor (or Wrong) conne ction of the HT3000 A udio/Video output s to the TV. Ensure that appropriate conne ctors are use d, and are corre ctly connecte d. Incorrect antenna connection. C onnect the antenna cable corre ctly. No or Bad signal m essage is display ed. C heck other dev ices conne cted betw een antenna and HT3000, or adj ust the antenna position. A udio muting. Press the MUTE button to unmute the sound. A lso check amp or TV volume (and input) settings – if applicable. TV Pow er is of f. Turn on the TV. Wrong TV input. Select he correct TV input. HT3000 can’t receiv e a signal. C heck antenna cable to ensure firm conne ction. Replace if nece ssary. Incorrect v alues f or som e tuner parameters. Set the correct tuner v alues. Refer to the installation menu section of this manual. A ntenna is inappropriate f or digital TV reception. Replace the ante nna. A ntenna is underpow ered. Turn on the A ntenna Pow er setting in the HT3000 m enu. A dd an antenna pow er booster. A ntenna is receiving non-TV signal s from w ireless dev ices etc. Reduce the pow er being supplied to the antenna. A dj ust (or replace) the antenna. A ntenna is damaged. Replace the ante nna. No pi ctur e or sound. No or bad signal. 36 Cause T he remote contr oll er doesn’t work. The batteries of the remote controller are not inserte d corre ctly, or are exhausted. C heck if batteries are correctly inserted. Replace batteries, if necessary. Poor pictur e or audi o quali ty. Low antenna pow er or signal loss in cabling. A dd an antenna bo oster or turn on A ntenna Pow er in HT3000 menus. C heck v ideo cables, and repla ce if nece ssary. Broadca sting f ault. Wait until the broadcaster remedies the f ault, or electrical storm etc. has passed. Low antenna pow er or signal A dd an antenna bo oster or turn on loss in cabling. A ntenna Pow er in HT3000 menus. Some channels m ay require a Replace a ntenna. Some channel s are not found when scanning. dif ferent ty pe of antenna (UHF/VHF ) Some issues may be resolved w ith a f irmw are upgrade. Use of the latest firmw are version is advisable. Please see page 23. 37 A.2 Technical Specifications 1. Tuner & De modulator Parameter Speci fications Input Connector 1 X IEC 169-2, female Loop thr ough Connector 1 X IEC 169-2, male Input Signal Fr equency VHF 177.5~226. 5 Mhz, UHF 470~860MHz Input Signal Level -90~-20dBm Input im pedance 75 O hms nominal IF Center Fr equency 36M hz IF Bandwi dth 7/8MHz Waveform OFDM Transmission mode 2K FF T, 8K F FT Constellations QPSK, 16QAM, 64QAM Code rate 1/2, 2/3, 3/4, 5/6, 7/8 Guar ds intervals 1/4, 1/8, 1/16, 1/32 FEC decoder Reed-solomon V iterbi Decoder, for 16 parity by tes Block lengths 204 by te MCPC and SCPC Supported 2. MPEG Paramenter Speci fications Transpor t Str eam MPEG-2 ISO/IEC 13818 Transport Stream Specification Video MPEG-2 MP@ML, H.264/AVC A udi o MPEG-1/2 A udio Lay er 1, 2, AC 3(Dolby Digital) Video bit r ate 1.5`15 M bps A ctive pixel 1920x1080i, 1280x720p, 720x576p, 720x576i A spect ratio 4:3 or 16:9 A udi o Mode Stereo, Dual channel, Joint stereo, Mono A udi o Sampli ng frequency 32 kHz, 44. 1 kHz, 48 kHz 38 3. Connector Port Video Speci fications 2 Scarts f or TV, VC R RCA (V IDEO ) C omponent (YPbPr) HDMI A udi o RCA (A udio L, R) SPDIF Ser ial Port RS232C D-sub male type USB2.0 F ront : Host x 1ea 4. Power Supply Parameter Speci fications Input Voltage 90~260VAC (SMPS) Power consum pti on O peration : 27W Standby : 8W Protection Separate internal fuse Lighting prote ction Lighting prote ction 5. Environmental Parameter Speci fications Oper ati ng tem per atur e 0 ~ 45 C Stor age -10 C ~ +50 C Stor age humi dity range 5 ~ 90% Rh Non condensing Oper ati ng humidi ty r ange 10 ~ 85% Rh Non condensing Weight 1.2Kg Dim ension(H x W x D) 55m m x 280mm x 233mm 39 A.3 Glossary of Terms EPG Electronic Progr amme Guide. Software th at en ables viewer s to n avigate easily among the l arg e sel ection of chann el s provided by the digital t echnology and choo se th e service th ey desir e. FEC Forward Error Correction. Correction of faulty bits in th e r eceiv ed signal. Parental control A feature th at allows p ar ents to lock program s th at they con sider unsuitable for their childr en. A locked chann el or program c an only be unlocked with the password. PIN code Per sonal Identif ic ation Numb er. A four-digit code that i s u sed for locking/unlocking chann el s and programs, as in the p arental cont rol feature. RS 232 Serial com munic ation stand ard d ata port. 40