1
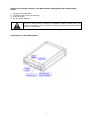
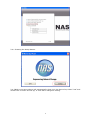
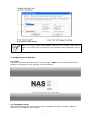
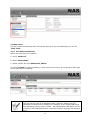
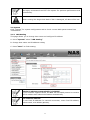
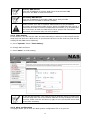
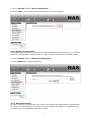
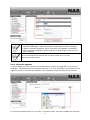
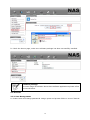
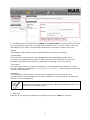
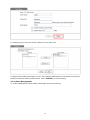
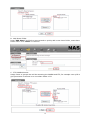
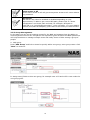
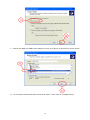
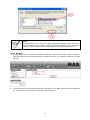
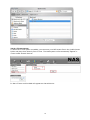
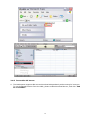
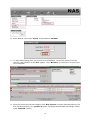
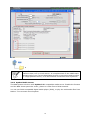
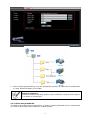
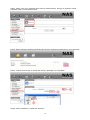
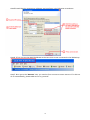
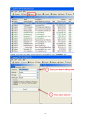
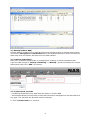
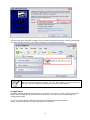
One Bay Gigabit
NAS
User’s Manual
Revision : V010203
Date : 2010/08/30
For firmware version : G5S604100026702
1
INDEX
1. Hardware Installation ……………………………………………………………………..P4
2. NAS system Connection ……………………………………………………………………P5
3. Configuring from Web GUI …………………………………………………………….……….P8
3.1 Login ………………………………………………………………………………………..…..P8
3.2 Language setting …………………………………………………………………………...P8
3.3 Disk Tools ………………………………………………………………………………….…P9
3.4 System ………………………………………………………………………………….……..P9
3.5 Account ………………………………………………………………………………….…….P15
3.6 Server .………………………………………………………………………………………..P19
3.7 Backup (NAS to NAS) ………………………………………………………………..…..P35
3.8 Log Files …………………………………………………………………………..………….P36
4. Mapping a Net Disk ………..……………………………………………………………………P37
5. UPnP Setup ……………………………………………………………………………………P38
6. Q&A ………………………………………………………………………………………………P41
2
Conventions
Caution
This symbol is used to remind user to pay attention to important
descriptions regarding usage and maintenance or additional important
information relate to this NAS system.
Note
This symbol is used to provide user with useful information that can make
procedure such as configuration easier to accomplish.
Safety instructions
Before starting, take a few minutes to read this manual. Read all of
instructions and save this manual for later reference.
Protect the NAS System from being bumped or dropped. Do not place the
NAS on an unstable cart, stand, or table. It may fall, causing serious
damage to the product.
Do not place the NAS System near or over a radiator or other heat source.
Do not use the NAS System near water.
Gaps and openings in the fount/back panel are provided for ventilation.
Never block or cover these openings, because the NAS System may
overheat and become unreliable in operation. Don’t place NAS System on
a bed, sofa, rug, or other similar surface.
The appliance must be grounded. The NAS System is equipped with a
3-wire grounded type of power cord. This power cord will only fit into a
grounded type of power outlet.
If an extension cord or a power center is used with the NAS System,
make sure that the total current consumption of all products plugged into
the wall outlet does not exceed the ampere rating.
Do not place the NAS System where the cord will be Walked on.
Unplug the power cord from the wall outlet before cleaning. Keep the
NAS System dry. Do not use liquid cleaners, aerosol cleaners, or a wet
cloth. Use a damp cloth for cleaning.
Users should not remove the back panel of the NAS System. Except as
specifically explained in this User Manual, do not attempt to service the
NAS System by yourself. Opening or removing the back panel may
expose you to dangerous voltages.
3
Check your package content, your NAS system package should contain below
items.
1.
2.
3.
4.
Single Bay Gigabit NAS
CD-ROM (Setup Utility & software)
Ethernet cable
AC-DC Power adapter
If any of these items is missing or damaged, please contact with your
vendor immediately. If any of them is missing or damaged, please contact
with your local dealer.
Components of the NAS system
4
1. Hardware Installation
5
Rebound type power switch is used to protect the operation system.
Power on – require 2-3 minute booting up NAS system.
Power off – require 2 minute shutting down NAS system.
Alternatively, the device can also be turned off from web GUI.
2. NAS system Connection
Please check your network environment and select the appropriate installation method
before installing the NAS.
2.1 Connect to Network for Office /Home
Connect the NAS and PC to the same hub/ switch/ router.
6
2.2 Connect to PC for individual system
Connect the NAS directly to your PC by a network cable.
2.3 Configuring NAS System
Enable to configure NAS system, open web browser and enter the IP address and then use
the web configuration for further setup. To find out the IP address from the LCD display of
your NAS once it is connected to the network or use the NAS Setup Utility included in the
CD-ROM.
2.4 NAS Setup Utility
Insert NAS system CD-Rom in to your computer, and run “Setup utility”.
7
2.4.1 Pressing the Setup button.
2.4.2 NAS in the same subnet will automatically show up in the device list, Select “nas” and
double click to enter GUI set up, or click OK to change IP setting.
8
Make sure NAS system has probably connect to the network and search
again. You might have to configure your firewall or even temporarily turn it
off.
3. Configuring from Web GUI
3.1 Login
Input the Username and Password in the login page, “admin” is the default Username &
Password. Changing security privilege is recommended.
3.2 Language setting
Change the language for entire web interface, available in English, Germany, Spanish,
France French, Japanese and Chinese.
9
3.3 Disk Tools
You can create the following disk volumes by clicking on the corresponding icon on the
“Disk Tools”.
3.3.1 One HDD installations
When one hard disk unit installed:
A. Go to “Disk tool”
B. Select “Basic Mode”
C. Select system file from EXT2,EXT3, FAT32.
D. Press “Format” to start formatting, it may require some time; do not perform other jobs
during hard drive formatting.
Single Disk Volume
Each disk will be used as a standalone disk. However, admin can only
managing first disk been formatted. For example, if you format HDD1 first
than managing priority goes to HDD1. But still another HDD space can be
recognize in the LAN development. User can browse it through “My Network
Place”.
10
We highly recommend use EXT3 file system for optimum performance and
functionality.
When running the Single Disk Mode if disk is damaged, all data will be lost.
3.4 System
Click “System” for system configuration and to check current NAS system status from
“Information”.
3.4.1 LAN Setting
This page allows you to change host name and configure IP address.
A. Go to “System” select “LAN Setting”
B. Change Host name and IP address setting
C. Press “Save” to finish setting.
Obtain IP address automatically (via DHCP)
If your network supports DHCP, the NAS will use DHCP protocol to retrieve
the IP address and related information automatically.
Use static IP address
To use fixed IP address for network connection, enter fixed IP address,
subnet mask, and default gateway.
11
Primary DNS Server:
Enter the IP address of primary DNS server that provides DNS
service for the NAS in external network.
Secondary DNS Server:
Enter the IP address of secondary DNS server that provides
DNS service for the NAS in external network.
Please contact your ISP or network administrator for the IP address
of primary and secondary DNS servers. When the NAS plays the role as a
terminal and needs to perform independent connection, e.g. BT download,
you must enter at least one DNS server IP for proper URL connection.
Otherwise, the function may not work properly.
3.4.2 Time Setting
In this section, you can set the date and time manually or select your time zone from the
drop down list and use a NTP server to synchronize the time via the internet (First will be
setting IP and DNS Server Address).
A. Go to “System” select “Time Setting”
B. Change date and time.
C. Press “Save” to finish setting.
To use the NTP function, you need to enter a valid NTP server or select one
from the drop down list. If the default address at time.windows.com does
not work, find a new one and then try again or turn off the NTP server and
set the time manually.
3.4.3 Save configuration
This page allows you to save the NAS system configuration file in to your PC.
12
A. Go to “System” select “Save Configuration”
B. Press “Save” to save the server configuration in to your computer..
3.4.4 Restore Configuration
This page allows you to restore a previously saved configuration file from your PC, to restore
the server configuration, select the file you wish to restore and click the "Restore" button.
A. Go to “System” select “Restore Configuration”
B. Press “Restore” to begin restoration.
3.4.5 Email Notification
In case of warning or malfunction, an e-mail will be sent to the administrator automatically.
To be able to send notification e-mails, you must configure the Mail Server.(SMTP server)
and enter the e-mail address you wish to receive.
13
Messages types
- Password Messages: When Administrator password has been changed.
- Update Firmware Messages: When Firmware has updated successfully.
- Disk Full status Messages: When HDD fail or HDD usage is over 90% of
entire capacity
It is recommended to send a test e-mail to make sure you can
Receive the alert mails.
3.4.6 Firmware Upgrade
A. In this page, you can check the current firmware version and upgrade if a new one is
available. Download the new firmware and store in on your computer, then browse for the
*.gz file, select it and start the upgrade. The upgrade process will take 20-30 minutes.
B. Connect the NAS directly to your PC by a network cable, than start update the firmware,
14
it will speed up the firmware update process also reduce the update failure.
Never turn off your unit during the firmware upgrade procedure. This may
damage your device! If for any reasons (e.g. power supply failure during
firmware update) the procedure fails, you may not be able to operate your
device any more.
Please contact your dealer for latest Firmware update info.
3.4.7 Install Software
NAS System allow user to install/uninstall additional software application, click on the
“Download now” and checking for the latest software package list, make sure your Giga NAS
has internet assess ability, and go to System/ install software, and click “Download Now”.
Below is the demonstration on how to install software package into NAS system.
A. Either insert NAS system CD-Rom in to your computer, or download it from the website:
http://www.embeded-systems.net
B. Go to “System” and select “install software”, click “browse” to select the package
source.
C. Select software package and click “install” to begin install.
15
D. Check the Server page, make sure software package has been successfully installed.
Software package
For more usage information about these software applications please refers
to manual below.
3.5 Account
3.5.1 User Management
A. Create users and change passwords. Assign quota and private folder to users if desired.
16
B. The NAS system has created the “admin” and “guest-share” by default and 128 users
can be created at maximum (including system default users). You can create a new user
according to your needs. The following information is required to create a new user:
-admin
Administrator has access to system administration and cannot be deleted.
-Guest-Share
This is a built-in user and will not be displayed on User Management page. When
you use a non-registered user name to login, the server will recognize the user as a
guest and will allow limited access. A guest does not belong to any user group.
-User name
The user name must not exceed 20 characters, except double-byte characters, such as
Chinese, Japanese, and Korean or " / \ [ ] : ; | = , + * ? < > ` ' also numerical number can
not use as first character.
-Password
The password is case-sensitive and can be 16 characters long at maximum. It is
recommended to use a password of at least 6 characters. You can perform the following
actions for user management:
Double-byte characters, such as Chinese, Japanese, and Korean can be use
to carat in the subsidiary folder.
C. Add User
Add user by giving name, password, and usage quota. Click “Next” to continue.
17
D. Assign group to the new users if desired. Than click next.
E. Assign share folder permission to user, for example public folder is now allow user q123 to
perform read only task to public folder. Click “Confirm” to finish setting.
3.5.2 Share Management
A. Create SAMBA/FTP shares folder and assign users to accessing.
18
B. Add Share Folder
Press “Add Share” and link to setup wizard to quickly add a new share folder, enter share
folder name. Click “Next” to continue.
C. FTP/ SAMBA Access
Assign users or groups who will be accessing the SAMBA and FTP, for example user q123 is
give permission to access in to new share folder c123.
19
Grant access to All
Select Grant access to all will give anonymous access to all users without
any password.
NFS Server
NFS Server can either be enabled or disabled depending on your
requirements. To able to get correct NFS path, please refer to “Share
management” and check path enclosed, for example: NFS path is
“192.168.1.11:/mnt/ide4/guest-share” , then 192.168.1.11 is your NAS IP
address /mnt/Ide4 is NAS path, guest-share is the folder you wish to share.
3.5.3 Group Management
In this page you can see all existing groups for the NAS and manage them by adding or
removing them from the list. Groups are not required to grant access to the NAS system but
will help the admin to manage multiple users and easily share a folder among a group of
people.
A. Add group
Press “Add Group” and link to wizard to quickly add a new group, enter group name. Click
“Next” to continue.
B. Assign users/ folder to this new group, for example user z123 and x123 is now under the
new group g123.
20
C. Modifying Groups
Select the group from the existing groups list and modify the members by pressing the
“Members” button for further settings. Once done, press the “Save” button to apply the
new settings.
D. Removing Groups
To remove a group, select it from the existing groups list and then press the “Delete Group”
button.
3.6 Server
3.6.1 File Server
In this Page, user can configure all the settings related to the DHCP, FTP, NFS and printer
server.
A. Windows Setting (SAMBA)
In this section, you can change the workgroup that the NAS belongs to and modify its
description. The IP for the WINS Server (Windows Internet Name Server) can be left blank
unless this is required for your network.
B. FTP Server Setting
This service can be enabled or disabled. When enabled, the default FTP port number will be
set to 21 but you can change that if required.
FTP Character set: By default, this is set to English (CP437). If your file names include
characters from another language, change the encoding here and select your language from
the drop down list.
C. NFS Server Setting
NFS Server can either be enabled or disabled depending on your requirements. To able to get
correct NFS path, please refer to “Share management” and check path enclosed, for example:
NFS path is “192.168.1.11:/mnt/ide4/guest-share” Than 192.168.1.11 is your NAS IP
address /mnt/Ide4 is NAS path, guest-share is the folder you wish to share.
21
D. Guest Access Setting
Guess Access Setting allows you to enable sharing to for guest and with quota size limitation.
3.6.2 DHCP Server
In this page, you are able to set up the DHCP server. In general, there is already a DHCP
server on the local network, so you don’t need to enable this but if required, enable it and
configure the addresses. Once you have set everything up, press the “Save” button to start
the DHCP server and save the settings.
3.6.3 Printer Server
The NAS support most of major brand of printers, user can share printer resource from the
network. Simply follow the steps below:
A. Power on and connect your USB printer in to your NAS.
B. Browse the Web UI and see whether the printer has been detect the by the NAS. (For
example Epson printer has been detected)
22
C. Install your Printer driver in to your computer, (for example. if Epson PL-6200L Printer is
connected to the NAS, you must install PL-6200L driver in to the computer which going to
perform the print job. After driver installation please click “Start” → “Setting” →
“Printer and Faxes” → “Add a printer”→ “Next”.
D. Select “A network printer or printer attached to another computer”, and then click
“Next”.
E. Select “Browse for a printer” than Click “Next”.
23
F. Search the NAS and USB Printer attached, then click “Next” to browse the printer driver.
G. Go to Printer wizard and select the printer driver. Click “OK” to complete setup.
24
Note:
The NAS Printer server does not support GDI/Host-based printers. For some
Multi Function Printers (MFP), scanning functions might not be functional
probably. Please contact Printer Manufacture for detail specifications.
3.6.4 Bonjour
A. In this page user can enable or disable the Bonjour service. By default, this is enabled,
offering easy access to the login page. In addition to that, you can also enable the iTunes
service.
B. For easy access to the web configuration interface on the Mac, a shortcut to the NAS will
be available in the bookmarks collection under Bonjour.
25
3.6.4.1 iTunes server
A. When the iTunes option is enabled, you can store your MP3 music files in the /public/music
folder and play them directly from iTunes. The NAS system will automatically appear in
iTunes under shared devices.
B. Start iTunes and the NAS will appear as shared device.
26
3.6.5 Torrentflux BT Server
A. The NAS system supports Bit-torrent download independently without using PC resource.
To use download function form the NAS, please enable download Server, and click ”link
to Torrentflux”.
27
B. Enter default user name “mysql” and password “123456”
C. To start downloading files, you will have to download a .torrent file (seed) from the
internet, and upload it to the NAS system. Click “Browser” to select the .torrent file in
your computer.
D. Once the torrent file has been added, Click “Run Torrent“ to enter download setting, The
files will be stored in your /public/tf folder. To update downloaded percentage simply
press “Refresh” button.
28
TorrentFlux is an open source bit torrent client for Linux, Unix & BSD
platforms that runs on a web server. It is implemented on the LAMP stack.
Managing all of your Torrent downloads through a convenient web interface
on a high powered server, on a fast network connection from anywhere!
3.6.6 Syabas Media Server
The NAS System is built-in with Syabas DLNA compatible media server. Enable this function
and the NAS shares particular music, photos or video files to DLNA network.
You can use DLNA compatible digital media player (DMA), to play the multimedia files from
NAS on TV or acoustic sound system.
29
A. To able use Media Server, please enable this function and click the “link to Syabas” to
enter the configuration page of Media Server.
User can also enter the http://NAS IP:8088/ to enter UPnP Media Server
configuration page.
B. Click “setting” to Media Server configuration page and configure the following settings.
(1) Language: Select the display language.
(2) Content Locations: Select the share folder on the NAS to be shared to DMP.
(3) The default folder is “media” which under “public” folder. You can add more than one
share folder. Click “Save” to save the settings.
30
C. After configuring the settings, you can upload mp3, photos, or video files to media folder
or other specified folders on the NAS.
Internet explorer 7
In order to achieve best play quality of your media file, using internet explorer
7 or above is recommend.
3.6.7 ML Donkey & SANCHO
The NAS system also supports ML Donkey, e-donkey (eMule) download server, below shows
you how to download it and installed in to NAS system.
31
Setp1. Make sure your Giga NAS has internet assess ability, and go to System/ install
software/ than click download now.
Step2. Select software and download the ML Donkey package and Sancho to your computer.
Step3. Follow below steps to install ML Donkey package into Giga NAS.
Step4. After installation, enable ML Donkey. .
32
Step5.Install Sancho monitoring software and configure it by following procedures.
Step6. If you can see the NAS IP address at the top you are now connected to the MLDonkey.
Step7. Now go to the 'Servers' tab, you need to first connect to some servers. If it did not
do it automatically, please add server by yourself.
33
Step8. You may now start some searches and add to your 'Transfer' list.
34
Step9. Enable Bit torrent server, Sancho can also support Bit torrent download. Simply
enable Bit torrent option and upload the torrent seed.
Step 10. Setting up for remote control, you can use control download job at anyplace. Go to
Tools->Preference->All, add your IP address at the back of existing IP address, and click
OK to finish setup.
Step11. If you reach this step successfully, Congratulations! You've just turned your NAS
into eMule/eDonkey/Bit torrent downloader! You may shut down your PCs at any time for the
same purpose.
35
3.7 Backup (NAS to NAS)
Remote backup enables you to duplicate files from the NAS system to another NAS system.
The files are encrypted and compressed before the duplicate process in order to secure the
data away from the hacker also save time for data transfer.
3.7.1 Backup Scheduling
Make sure a network share folder is created before creating a remote replication task.
Login the NAS and go to “backup scheduling” in “Backup”, specify IP address for remote
NAS system than click “Add” to continue.
3.7.2 Select back up mode
- Full Backup duplicates every data from the folder to remote NAS.
- Incremental backup will only back up files that have been changed since the last backup of
any type. This provides the quickest means of backup.
A. Click “List the folder” to continue.
36
B. Select a source folder and click select to continue.
C. Assign a time schedule for your backup jobs. Click “Add” to finish setup.
3.7.3 Scheduling Task
This page shows the existing backup task, and 5 backup task can be created at maximum.
3.8 Log Files
This page includes all the log files of your NAS. You can find logs for the SAMBA, FTP and
DHCP server as well as system and administration logs.
37
4. Mapping a Net Disk
4.1 For easy access, we recommend mapping the storage as network drive.
Step1. Double click on My Computer, go to the Tools menu and select “Map Network Drive…
4.2 Follow the setup wizard and fill in the path to your NAS system. Alternatively, you can
also browse for the shares by clicking on the Browse button and locating the folder that way.
38
4.3 Once the drive has been mapped, you are able to find and access it under My Computer.
This link will still be there even after rebooting your Operating System.
For quick and temporary access, you can also simply go to My Network
Places, view the workgroup computers and select NAS system.
5. UPnP Setup
The NAS system supports UPnP function, to access the device on a PC, go to My Network
Places and the NAS will be listed as an UPnP device. You can select it and access the
configuration page.
5.1 Go to control panel/ Adding new device/ Windows Components Wizard.
Select “Networking Service” than click Next to continues.
39
40
5.2 Select “Universal Plug and Play” than Click “OK” to start setup.
5.3 Go to “My network place to search NAS system.
41
6. Q&A
Q: Why can’t I access to the NAS setup page?
A: Please connect the NAS directly to your computer via RJ45 port. Open your web browser
and key in the default IP address 192.168.1.1 Then type “admin” for both Account name and
password to enter the NAS setup page.
Q: Why Can’t I perform RAID function under FAT32 format.
A: FAT32 format doesn’t support RAID functions, to perform RAID functions please use EXT2
or EXT3 format.
Q: Some of the functions and manual are not available!
A: Many of the functions require a hard drive to be installed. Make sure you have at least one
HDD installed and formatted in EXT2 or EXT3.
Q: I lost my password, what do I do?
A: Press the reset button and hold it for 5 seconds to reset the device to its default settings.
The default login is admin/admin. Be aware that resetting the device will erase all user and
group accounts plus some other settings.
Q: When install two HDD without performing RAID setting, and creating a
Share-Folder, Why NAS can only to create Folder an the second Disk
(/mnt/ide3/sharefolder) and not on the first Disk (/mnt/ide1/sharefolder)
A: The NAS GUI Software is design to managing RAID 1 or 0 functions, if user wants to use
two separate HDD in the NAS, share management will recognize only the first formatting
disk.
For example, if user format Ide1 HDD first than managing priority goes to Ide1. But still
another HDD space can be recognize in the LAN development. User can browse it through
“My Network place”
Q: Why can’t I create/share folders in SMB or FTP server with a non-English
language?
A: To avoid languages support issue, you are suggested to create/share folders with
English characters only.
Q: Why can’t I upload the files via LAN connection or got disconnected
A1: Please make sure the networking is connected properly and you have the access right
(read & write) for the folders.
A2: Please make sure you have enough bandwidth for uploading large files. A complicate
network environment such as too many workgroups or too many layers of network can result
in network disconnection.
Q: How to reset the NAS
A: Please press the reset button for 5 seconds and the NAS will start to reset to factory
default setting.
Q: How can I reduce the noise of the NAS??
A: Make sure the hard drive/case/fan are properly screwed without interference and put the
foot stickers on the case.
Q: Why WinXP can not enter SMB folder with password via the NAS?
A: Please update WinXP to SP2 or above. After update, please make sure if you have installed
Norton Internet Security. If you do, please check with Norton service center.
Q: What is The NAS default login name and password?
A: The default Login name: admin , default password: admin.
42
Q: How do I access to my NAS via the Internet ?
A: If your NAS is using a public IP, please perform the following steps.
1. Enter the management web base of NAS and go to the FTP Server page to enable FTP
Status.
2. Create User account and limits of authority.
3. Open Microsoft Internet Explorer or other FTP software, and enter NAS IP address in the
address field (ftp://NAS IP).
Q: Why FTP can not link to the NAS or show link time out when using IE?
A: Due to IE FTP do not compatible with Router, suggest user to use FTP software to start
with. If you would like to use IE FTP to link the NAS, please refer to following steps.
1. Please open port 21 and 20 on Router and link to NAS.
2. Open IE > Tool > Internet Options
3. Don't tick "Enable folder view for FTP site" and click "OK"
Q: What is the maximum user for FTP/Samba/server?
A: 1. FTP Server: Maximum is able to create 32 users accounts,
8 users account connect at the same time, and maximum 16 folders shared by one account).
2. Samba Server: Share Level Access (maximum 16 folders shared by root).
Q: What can DHCP do as well with the NAS?
A: You can setup your NAS as a DHCP server when it is no any other DHCP Server exist in
your LAN, otherwise, the NAS will automatically turn off its DHCP server function and become
a DHCP client of existing DHCP Server. For example, if you have installed a router with
built-in (activate) DHCP Server, the NAS will automatically setup itself as DHCP client.
Q: What is the protocol of network file sharing system using by the NAS?
A: The NAS has the built-in Samba Server for file sharing, it is using SMB (Server Message
Block) protocol to integrate TCP/IP, NETBUEI and IPX/SPX protocol. In other words, if the
client PC that can support TCP/IP, NETBUEI or IPX/SPX, it will be compatible with the NAS.
You can also use the built-in FTP Server for file sharing with Internet client.
Q: Why My USB Printer can not be detected by the NAS Printer server?
A: The NAS Printer server does not support GDI/Host-based printers. For some Multi
Function Printers (MFP); scanning functions might not be functional probably. Please contact
Printer Manufacture for detail Specifications.
Q: What is the default name for log in to Torrentflux BT server?
A: The default user name is “mysql” and password is “123456”.
43