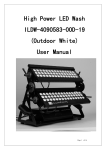
1
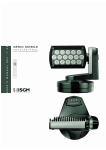
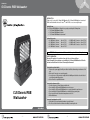
CLS Manuals
CLS Manuals
CLS Dennis RGB Wallwasher
CLS Atmosphere LED-panel
Introduction
Thank you for choosing the CLS Dennis RGB Wallwasher. The CLS Dennis RGB Wallwasher is an universal
DMX controlled luminaire that uses 49 Luxeon® I and III LED’s to create an even light-output
Included Items
The CLS Dennis RGB Wallwasher is shipped in one package containing the following items:
• 1 CLS Dennis RGB Wallwasher fixture
• 2 CLS Dennis RGB Wallwasher Bracket
• 1 CLS Dennis RGB Wallwasher User manual
Optional Accessories
• CLS DMX cable 0.8 meters
• CLS DMX cable 1.5 meters
• CLS DMX cable 3.0 meters
• CLS DMX cable 5.0 meters Art. nr. 911200
Art. nr. 911201
Art. nr. 911203
Art. nr. 911205
• CLS DMX cable 10.0 meters Art. nr. 911206
• CLS DMX cable 15.0 meters Art. nr. 911207
• CLS DMX cable 20.0 meters Art. nr. 911209
ATTENTION: It is important to read this manual before you install or use this product.
SAFETY INFORMATION
Warning! This product is for professional use only. It is not for household use.
Read this manual before powering up or installing the CLS Dennis RGB Wallwasher. Follow the
instructions listed below and observe all warnings in this manual.
Protection from electric shock
• Disconnect the power supply from AC power before installation, dismounting or maintenance of the unit.
• Make sure all connectors are connected properly.
• Use only a source of AC power that complies with local building and electrical codes and has both overload and ground fault protection.
• Refer all service to a qualified technician.
Protection from burns and fire
• Provide a clearance of at least 50mm around the unit.
• Do not install the CLS Dennis RGB Wallwasher near a heat source.
• Do not install the CLS Dennis RGB Wallwasher in a corrosive, flammable or explosive area.
• Do not modify the CLS Dennis RGB Wallwasher, or install other than genuine parts.
• Do not operate the unit if the ambient temperature exceeds 50°C.
• Well ventilated area.
CLS Dennis RGB
Wallwasher
Protection from injury due to falls
• Verify that all covers and mounting hardware is securely fastened.
• Block access below the work area whenever installing or removing the unit.
version 1.3 May 08
-1-
www.cls-led.com
-2-
www.cls-led.com
CLS Dennis RGB Wallwasher
Main Features LED’s
CLS Dennis RGB Wallwasher uses three types of Luxeon® LED’s (Red, Green and Blue).
• 7 Blue Luxeon® III LED’s.
• 18 Green Luxeon® III LED’s.
• 24 Red Luxeon® I LED’s.
Lenses
Each Luxeon® LED is fitted with a 25° high efficiency lens.
Functions:
• RGB colour mixing.
• Linear dimmer.
• Adjustable strobe effects.
• Preset (on Macro) colour and rainbow effects.
• Settings via on-board microcomputer viewable on the unit’s display.
• Display “flip” function (rotates text 180°).
• Adjustable display brightness.
• Elapsed time meter for each colour channel (Red, Green and Blue).
• General fixture operating time meter.
• Panel with LED display and three buttons
Control signals
• DMX 512 input signal.
• Stand-alone operation with built-in programs.
• Day to day control of the on-board programs on a weekly basis.
• Stand-alone operation of systems with up to 30 fixtures, via Master – Slave.
INSTALLATION
Mounting the fixture
CLS Dennis RGB Wallwasher is controllable with a DMX 512 signal according to the USITT DMX 512/1990.
Cables for DMX connection are fitted with standard XLR 3-Pin connectors.
Installation and positioning
CLS Dennis RGB Wallwasher can be permanently mounted, in the case of fixed installations, by means of
the four holes on it’s base. The distance between the holes is 340 mm on the front and 195 mm on the
side.
The required movement is fixed by means of the screws on the head support. The hex keys for fixing PAN
and TILT are supplied with the fixture and are (respectively) 8 mm and 3 mm keys.
-3-
!
Addressing the fixture
Push the “UP” button.
“A***” will appear on the display, showing that the fixture is addressed to DMX channel ***.
ATTENTION!
NG If the flashing message NO SIGNAL or SIGNAL ERROR
I
RN
A
W
appears, this means that the fixture is not receiving a DMX
signal or is receiving an incorrect signal.
To change the DMX address:
• Press the UP key. The message A*** will appear.
• Press Enter and “***” will begin to flash.
• Use the UP and Down keys to choose the required address channel.
• Press Enter again to confirm.
!
CLS Dennis RGB Wallwasher requires 8 DMX channels for control of all it’s functions.
ATTENTION!
NG Do not use more than 32 fixtures on one DMX line! Should it be
I
RN
A
W
necessary to connect a larger number of fixtures, there must be
used a splitter/buffer for each 32 fixtures, to ensure that the signal
quality remains unchanged.
Operation
Controlling the fixture via DMX
The following table shows the control channels of the CLS Dennis RGB Wallwasher.
Channel DMX
Function
Description
Ch 1
Shutter/Strobe
Shutter and strobe functions are adjustble and random Pulse Functions
Ch 2
Dimmer
Luminous itensity control
Ch 3
Red
Continuous Red saturation control 0-100%
Ch 4
Green
Continuous Green saturation control 0-100%
Ch 5
Blue
Continuous Blue saturation control 0-100%
Ch 6
CTC
Continuous colour temperature control
Ch 7
Macro
Macro functions
Ch 8
Mod_Colore
White balance control
-4-
www.cls-led.com
CLS Dennis RGB Wallwasher
Strobe/Shutter Channel Ch 1
DMX Value
Mean Value
Function
0-7
Shutter closed
8 - 15
Shutter open
16 - 151
Linear Strobe frequency adjustment from 1 to 20 hz
152 - 159
Pulse open effect, low speed
160 - 167
Pulse open effect, medium speed
168 - 175
Pulse open effect, high speed
176 - 183
Pulce close effect, low speed
184 - 191
Pulse close effect, medium speed
192 - 199
Pulse close effect, high speed
200 - 207
Random strobe effect, low speed
208 - 215
Random strobe effect, medium speed
216 - 223
Random strobe effect, high speed
224 - 255
Shutter open
Dimmer Channel Ch 2
DMX Value
Mean Value
0 - 255
Function
Linear intensity adjustment 0 - 100%
Red Channel Ch 3
DMX Value
Mean Value
0 - 255
Function
Linear Red adjustment 0 - 100%
Green Channel Ch 4
DMX Value
Mean Value
0 - 255
Function
Linear Green adjustment 0 - 100%
Blue Channel Ch 5
DMX Value
Mean Value
0 - 255
Function
Linear Blue adjustment 0 - 100%
CTC Channel Ch 6
DMX Value
Mean Value
0 - 19
10
20 - 255
138
Function
OFF
From Cold + 2000 K° compared to balanced white or not
-5-
Macro Channel Ch 7
DMX Value
Mean Value
0-7
4
8 - 15
12
16 - 23
20
24 - 31
28
32 - 39
36
40 - 47
44
48 - 55
52
56 - 63
60
64 - 70
86
71
71
72 - 79
76
80 - 87
84
88 - 95
92
96 - 103
100
104 - 111
108
112 - 119
116
120 - 136
128
Function
NO MACRO
MACRO 1 Rainbow Slow - Stand Time 5 sec
MACRO 2 Rainbow Medium - Stand Time 5 sec
MACRO 3 Rainbow Fast - Stand Time 5 sec
MACRO 4 Rainbow Slow - NO Stand Time
MACRO 5 Rainbow Medium - NO Stand Time
MACRO 6 Rainbow Fast - NO Stand Time
MACRO 7 Rainbow Very Slow - NO Stand Time
MACRO 8 Random Colour Show
Store Colour_mode enable
MACRO 9 Ranom Colour Medium
MACRO 10 Random Colour Fast
Future
Future
Future
Future
Future
Colour Mode Channel Ch 8
DMX Value
Mean Value
Function
0 - 63
32
White balance disabled (Full Colour)
64 - 189
127
White balance enabled (Balanced)
190 - 250
220
White balance disabled (Full Colour)
251 - 255
253
Store a new white balance
Colour temperature
The CTC channel allows to adjust CLS Dennis RGB Wallwasher’s colour temperature. It acts in a range around
the white balance or Full Colour.
Shutter/Strobe
The Shutter/Strobe channel allows an endless number of shutter effects to be achieved. As well as the
adjustable frequency strobe effect (from 1 Hz to 20 Hz), it’s possible to create Random-Strobe effects at three
different speeds (Low – Medium – High). CLS Dennis RGB Wallwasher is also fitted with a Pulse Open and
Close effect for each of the three different speeds (Low – Medium – High).
-6-
www.cls-led.com
CLS Dennis RGB Wallwasher
4.1 Menus
Control panel
The control panel is needed to access CLS Dennis RGB Wallwasher’s settings and programming functions.
UP/DOWN KEYS: Used to scroll through the menu items. Once the required menu has been selected, these
keys are used to choose the available parameters.
ENTER KEY: Confirms access to the selected menu and any parameters changed in it.
Addressing
This menu gives access to fixture addressing functions. (See Installation – Addressing Chapter)
1.
2.
3.
4.
Use the UP/DOWN keys to find the “A****” menu.
Press “Enter” to confirm the choice. The text on the display will begin to flash.
Use the UP/DOWN keys to select the required start channel.
Press “Enter” to confirm the choice.
Colour Balance
This menu gives access to the setting of CLS Dennis RGB Wallwasher’s white balance. If its necessary to work
with a fixed colour temperature, this menu must be used.
1.
2.
3. 4.
5.
6.
Use the UP/DOWN keys to find the “BALANC” menu.
Press “Enter” for approx. 6 seconds.
“Rblnc” will appear on the display and the CLS Dennis RGB Wallwasher will switch on at the old white balance values.
Press “Enter” again and “***” will begin to flash.
Use the UP/DOWN keys to adjust the new maximum value required for the Red channel.
Press “Enter” to confirm the choice.
7. Use the “UP” key to select “Gblnc”.
8. Press “Enter” again and “***” will begin to flash.
9. Use the UP/DOWN keys to adjust the new maximum value required for the Green channel.
10. Press “Enter” to confirm the choice.
11. Use the “UP” key to select “Bblnc”.
12. Press “Enter” again and “***” will begin to flash.
13. Use the UP/DOWN keys to adjust the new maximum value required for the Blue channel.
14. Press “Enter” to confirm the choice.
15. Press “Enter” for approx. 6 seconds to exit the “BALANC” menu.
-7-
Elapsed time meter
This menu gives access to the display of running time of the single channels (Red, Green and Blue). It is
also possible to reset the elapsed time meter when the LED matrix is replaced. The “L_h” menu gives
access to the display of the fixture’s total operating time and can not be reset.
1. Use the UP/DOWN keys to find the “R_h” menu to display the operating time of all the Red LED’s.
Resetting the Elapsed Time Meter
1. hold the ENTER key pressed down for approx. 6 seconds, until “R_h” flashes.
2. Use the UP/DOWN keys to find set the elapsed time meter at zero.
3. Press “ENTER” to confirm.
Use the same procedure for “G_h” (Green) and “B_h” (Blue).
Display brightness
Operators can select one of the brightness’s available for the CLS Dennis RGB Wallwasher. To adjust
display brightness, proceed as follows:
1.
2.
3.
4.
Use the UP/DOWN keys to find the “Bright” menu.
Press “Enter” to confirm the choice. The text on the display will begin to flash.
Use the UP/DOWN keys to select the required option from those available.
Press “Enter” to confirm the changes.
4.2 Flip display
When the fixture is suspended “upside down” from a structure, the operator can turn the text on the
display through 180°, thus enabling the menus available to be easily read. To change the reading angle,
proceed as follows:
1.
2.
3.
4.
Use the UP/DOWN keys to find the “Dspfli” menu.
Press “Enter” to confirm the choice. The text on the display will begin to flash.
Use the UP/DOWN keys to select the required option.
Press “Enter” to confirm the changes.
4.3 Time
It is important to set CLS Dennis RGB Wallwasher’s on-board clock if it has to be used later in
Stand-alone mode.
1.
2.
3.
4.
5.
6. 7.
Use the UP/DOWN keys to find the “TIME” menu.
Hold the “Enter” key pressed down for approx. 6 seconds. The display shows “YEAR”.
Press “Enter” to change the year.
Use the UP/DOWN keys to select the current year.
Press “Enter” to save.
Use the “UP” key to select the “M/D”.
Press “Enter” to change the month.
-8-
www.cls-led.com
CLS Dennis RGB Wallwasher
8. Use the UP/DOWN keys to select the current month.
9. Press “Enter” to change the day.
10. Use the UP/DOWN keys to select the current day.
11. Press “Enter” to save.
12. Use the “UP” key to select the “H:M”.
13. Press “Enter” to change the hour.
14. Use the UP/DOWN keys to select the current hour.
15. Press “Enter” to change the minutes.
16. Use the UP/DOWN keys to select the current minutes.
17. Press “Enter” to save.
18. Use the “UP” key to select the “WEEK”.
19. Press “Enter” to change the day of the week.
20. Use the UP/DOWN keys to select the current day of the week.
21. Press “Enter” to save.
22. Hold the “Enter” key pressed down for approx. 6 seconds to exit the time-menu.
4.4 Factory settings
With this function you can get back to factory settings.
1. 2. 3. 4. Use the UP/DOWN keys to find the “FACT” menu.
Press “Enter” to confirm the choice. The text on the display will begin to flash.
Use the UP/DOWN keys to select ”SET”.
Press “Enter” to set the default parameters.
Resetting default parameters
This enables to reset the parameter values immediately before the FACT operation. In other words, if the
default parameters have been set by mistake, this operation allows to revert to the values set as saved
previously.
1.
2.
3.
4.
Use the UP/DOWN keys to find the “Prev” menu.
Press “Enter” and hold it down for a few seconds to confirm the choice. The text on the display will begin to flash.
Use the UP/DOWN keys to select ”SET”.
Press “Enter” to accept this.
Test functions
Using the test menu, it is possible to test the correct operation of the channels that control the CLS Dennis
RGB Wallwasher.
1.
2.
3.
4.
5.
6.
Head temperature
The TEMPERATURE menu is used to view the current temperature of the CLS Dennis RGB Wallwasher’s
head. In some critical heat conditions, it is very important to know the temperature of the CLS Dennis RGB
Wallwasher, as a self-protection system of the LED’s cuts overall power when CLS Dennis RGB Wallwasher
is required to work at excessively high temperatures.
1.
2.
3.
4.
Use the UP/DOWN keys to find the “TEMPE” menu.
Press “Enter” and the current temperature will be immediately displayed.
Using the UP/DOWN keys, it’s possible to display the temperature in degrees Centigrade or Fahrenheit
Press “Enter” to exit the TEMPE menu.
Configuring a Master
When a system with several interconnected fixtures has to be used in Stand-alone mode, there has to be
one MASTER fixture, able to control the other fixtures, via appropriate on-board programming.
1.
2.
3.
4.
Use the UP/DOWN keys to find the “MASTR” menu.
Press “Enter” and the displayed text will immediately begin to flash.
Use the UP/DOWN keys to choose ON or OFF status.
Press “Enter” to exit the MASTER menu.
Configuring Slaves
When a system with several interconnected fixtures has to be used in Stand-alone mode, there has to be
one MASTER fixture, whereas each of the fixtures controlled by it must be individually configured with its
own SLAVE number. In the event of the same ID being used for several fixtures, they will not be able to be
controlled individually by the MASTER program.
1.
2.
3.
4.
-9-
Use the UP/DOWN keys to find the “TEST” menu.
Press “Enter” and hold it down for a few seconds to confirm the choice.
Use the UP/DOWN keys to select the physical channel to be tested.
(ALL - SHUTT - DIMMR - RED - GREEN - BLUE - CTC).
Press “Enter” and the selected text will begin to flash, running a test routine on the chosen channel.
Press “Enter” again to exit the routine being run and choose another channels to be tested.
Keep “Enter” pressed down for a few seconds if you wish to exit the TEST menu.
Use the UP/DOWN keys to find the “SLAVID” menu.
Press “Enter” and the displayed text will immediately begin to flash.
Use the UP/DOWN keys to choose the required ID (from 1 to 29).
Press “Enter” to exit the SLAVEID menu and confirm.
- 10 -
www.cls-led.com
CLS Dennis RGB Wallwasher
Enabling – Disabling the Scheduler
The Scheduler allows to organize and run the fully automatic playback of a series of Events on a weekly
basis, including the preset programs on the MASTER fixture. The Scheduler is enabled as follows:
1. 2. 3. 4. Use the UP/DOWN keys to find the “SCHED.” menu.
Press “Enter” and the displayed text will immediately begin to flash.
Use the UP/DOWN keys to choose ON or OFF status.
Press “Enter” to exit the SCHED. menu and confirm.
Internal program playback
Each fixture can be programmed with 5 Programs of 10 scenes each. The programs are enabled using the
PGRUN menu
Step 3 - Choosing the fixture number
1. Use the “UP” key to select the “FIXT.” menu.
2. Press “Enter” and “****” will begin to flash.
3.
4.
Use the UP/DOWN keys to choose:
• ”ALL” if the scene to be created involves all fixtures (MASTER + SLAVES).
• ”MSTR” if the scene to be created involves just the Master fixture.
• ”ODD” if the scene to be created involves the odd-numbered fixtures.
• ”EVEN” if the scene to be created involves the even numbered fixtures.
• “SLV1” - “SLV29” if the scene to be created must have each slave fixture with its own channel status, chosen individually.
Press “Enter” to exit the FIXT. menu and confirm.
Use the UP/DOWN keys to find the “PGRUN” menu.
Press “Enter” and the displayed text will immediately begin to flash.
Use the UP/DOWN keys to choose the required programs from 1 to 5, or OFF to stop the playback of a current program.
Press “Enter” to exit the PGRUN menu and confirm.
Step 4 - Shutter
1. Use the “UP” key to pass to the “SHUTT” menu.
2. Press “Enter” and “***” will begin to flash.
3. Use the UP/DOWN keys to choose the required value of the shutter channel for the current scene.
4. Press “Enter” to exit the SHUTT menu and confirm.
5. STAND-ALONE PROGRAMMING
Programming CLS Dennis RGB Wallwasher
Make certain that the fixture is not receiving a DMX 512 signal and configure CLS Dennis RGB Wallwasher as
a “MASTER” (see “Master Configuration“ in the previous chapter).
Step 5 - Dimmer
1. Use the “UP” key to pass to the “DIMER” menu.
2. Press “Enter” and “***” will begin to flash.
3. Use the UP/DOWN keys to choose the required value of the dimmer channel for the current scene.
4. Press “Enter” to exit the DIMER menu and confirm.
1.
2.
3.
4.
Follow the steps as described for the programming:
Step 1 - Choosing the program number
1. Use the UP/DOWN keys to find the “PGSET” menu.
2. Press “Enter” for a few seconds, until the following appears: “PROG.”
3. If it is necessary to create a program other than number 1, press “Enter” again and “*” will begin to flash.
4. Use the UP/DOWN keys to choose the required program number from 1 to 5, then Press “Enter” to exit the PROG. menu and confirm.
Step 2 - Choosing The Scene Number
1. Use the “UP” key to select the “SCENE” menu.
2. If it is necessary to create a program other than number 1, press “Enter” again and “**” will begin to flash.
3. Use the UP/DOWN keys to choose the required scene number from 1 to 5, then Press “Enter” to exit the SCENE menu and confirm.
- 11 -
Step 6 - Red
1. Use the “UP” key to pass to the “R=***” menu.
2. Press “Enter” and “***” will begin to flash.
3. Use the UP/DOWN keys to choose the required value of the Red channel for the current scene.
4. Press “Enter” to exit the R=*** menu and confirm.
Step 7 - Green
1 Use the “UP” key to pass to the “G=***” menu.
2. Press “Enter” and “***” will begin to flash.
3. Use the UP/DOWN keys to choose the required value of the Green channel for the current scene.
4. Press “Enter” to exit the G=*** menu and confirm.
Step 8 - Blue
1. Use the “UP” key to pass to the “B=***” menu.
2. Press “Enter” and “***” will begin to flash.
3. Use the UP/DOWN keys to choose the required value of the Blue channel for the current scene.
4. Press “Enter” to exit the B=*** menu and confirm.
- 12 -
www.cls-led.com
CLS Dennis RGB Wallwasher
Step 9 - Macro
In the program, it is possible to use scenes with effects pre-programmed in the Macro channel. Wherever
Macros are used, all the colour channel settings will be ignored.
1.
2.
3.
4.
Use the “UP” key to pass to the “MAC” menu.
Press “Enter” and “***” will begin to flash.
Use the UP/DOWN keys to choose the required Macro value for the current scene.
Press “Enter” to exit the MAC menu and confirm.
Step 10 - Scene Time
Each scene in a program can be run with the required times. There are two types of scene times:
Total scene time (STIME), expressed in hours, minutes and seconds.
Scene fade time (FTIME), expressed in hours, minutes and seconds.
The scene time is the total time occupied by the scene in the program, whereas fade time is the time
taken by the scene’s channel status to reach the appropriate level.
1.
2.
3.
4.
Use the “UP” key to select the “FD_H” menu.
Press “Enter” and “**” will begin to flash.
Use the UP/DOWN keys to choose the number of hours of the current scene’s fade time.
Press “Enter” to exit the “FD_H” menu and confirm.
1.
2.
3.
4.
Use the “UP” key to select the “FD_M” menu.
Press “Enter” and “**” will begin to flash.
Use the UP/DOWN keys to choose the number of minutes of the current scene’s fade time.
Press “Enter” to exit the “FD_M” menu and confirm.
1.
2.
3.
4.
Use the “UP” key to pass to the “FD_S” menu.
Press “Enter” and “**” will begin to flash.
Use the UP/DOWN keys to choose the number of seconds of the current scene’s fade time.
Press “Enter” to exit the “FD_S” menu and confirm.
!
G ATTENTION!
IN
N
AR
W
The STIME menu gives access to the adjustment of the total scene time. The time can be configured in
hours, minutes and seconds.
1.
2.
3.
4.
Use the “UP” key to select the “TM_H” menu.
Press “Enter” and “**” will begin to flash.
Use the UP/DOWN keys to choose the number of hours the current scene has to last.
Press “Enter” to exit the “TM_H” menu and confirm.
1.
2.
3.
4.
Use the “UP” key to select the “TM_M” menu.
Press “Enter” and “**” will begin to flash.
Use the UP/DOWN keys to choose the number of minutes the current scene has to last.
Press “Enter” to exit the “TM_M” menu and confirm.
1.
2.
3.
4.
Use the “UP” key to select the “TM_S” menu.
Press “Enter” and “**” will begin to flash.
Use the UP/DOWN keys to choose the number of seconds the current scene has to last.
Press “Enter” to exit the “TM_S” menu and confirm.
Step 10 - Fade time
The FTIME menu gives access to the adjustment of the scene fade time. The time can be configured in
hours, minutes and seconds.
- 13 -
The program does not display the scene if the scene time is ZERO. If
the scene time is less than the fade time, the scene will not reach its
value, but will be cut along the fade time when the scene time finishes.
Step 11 - Enabling scenes
Enabling a scene decides if the scene will be run or not when the program is run. The SCNRUN menu is
also useful when it is necessary to temporarily eliminate the playback of some scenes in a program without
cancelling them.
1.
2.
3.
4.
Use the “UP” key to pass to the “SCRUN” menu.
Press “Enter” and “***” will begin to flash.
Use the UP/DOWN keys to choose ON to enable the scene, or OFF if it has not to be run.
Press “Enter” to exit the SCRUN menu and confirm.
Repeat the above steps to program other scenes on the CLS Dennis RGB Wallwasher. Once programming is
finished, keep “Enter” pressed down for approx. 6 seconds in order to exit the PROGRAMMER menu.
Step 12 - program play
To start a program, access the PGRUN menu.
1.
2.
3.
4.
Use the UP/DOWN keys to find the “PGRUN” menu.
Press “Enter” and the displayed text will immediately begin to flash.
Use the UP/DOWN keys to choose the required programs from 1 to 5, or OFF to stop playing
the current program.
Press “Enter” to exit the PGRN menu and confirm.
- 14 -
www.cls-led.com
CLS Dennis RGB Wallwasher
!
THE EVENT SCHEDULER
Scheduler is a menu that allows to organize a series of 48 events over a period of a week and which is
repeated week after week. Each event can control the day and time of the start and finish of one of the ten
programs already prepared on board the CLS Dennis RGB Wallwasher, in order to automate playback, without
the need for any external operators.
G
IN
N
AR
W
ATTENTION!
Before proceeding with the programming of the Scheduler,
it is important to set the current date and time (See Chap.
Menu - paragraph: Days of the week and time)
Step 1 - Choosing the event number
1. Use the UP/DOWN keys to find the “SCHEDL” menu.
2. Press “Enter” for a few seconds, until the following appears: “EVENT”.
3. If it is necessary to create a event other than number 1, press “Enter” again and “**” will begin to flash.
4. Use the UP/DOWN keys to choose the required event, from 1 to 48, then Press “Enter” to exit the EVENT menu and confirm.
Step 2 - Choosing the program number
1. Use the “UP” key to pass to the “PROG.” menu.
2. Press “Enter” and “*” will begin to flash.
3. Use the UP/DOWN keys to choose the required program number (from 1 to 5) to be controlled by scheduler.
4. Press “Enter” to exit the PROG. menu and confirm.
Step 3 - Choosing the day
1. Use the “UP” key to pass to the “DAY” menu.
2. Press “Enter” and “***” will begin to flash.
3. Use the UP/DOWN keys to choose the day of the week which the event must begin. The days of the week are expressed as follows:
• ALL Every day
• TUE Tuesday
• THU Thursday
• SAT Saturday
• MON Monday
• WED Wednesday
• FRI Friday
• SUN Sunday
4. Press “Enter” to exit the DAY menu and confirm.
Step 4 - Start Time
START TIME is used to configure: the hour, minutes and seconds in which an event containing
a previously prepared program will start.
1.
2.
3.
4.
5.
6.
Use the “UP” key to select the “START” menu.
Press “Enter” and “**”:** will begin to flash.
Use the UP/DOWN keys to choose the hour when the program has to start (from 0 to 23).
Press “Enter” to select the minutes.
Use the UP/DOWN keys to choose the minutes when the program has to start (from 0 to 59).
Press “Enter” to exit the “START” menu and confirm.
- 15 -
Step 5 - End time
END TIME is used to configure: the hour, minutes and seconds in which an event containing a previously
prepared program will end.
1. Use the “UP” key to select the “END” menu.
2. Press “Enter” and “**”:** will begin to flash.
3. Use the UP/DOWN keys to choose the hour at which the program has to end (from 0 to 23).
4. Press “Enter” to select the minutes.
5. Use the UP/DOWN keys to choose the minutes at which the program has to end (from 0 to 59).
6. Press “Enter” to exit the “END” menu and confirm.
Step 6 - Enabling an event
1. Use the “UP” key to select the “ENABLE” menu.
2. Press “Enter” and “***” will begin to flash.
3. Use the UP/DOWN keys to choose ON to enable the event, or OFF if it is to be disabled.
4. Press “Enter” to exit the “ENABLE” menu and confirm.
Repeat the above steps to program other events on the CLS Dennis RGB Wallwasher. Once programming is
finished, keep “Enter” pressed down for approx. 6 seconds in order to exit the SCHEDL menu.
Step 7 - Enabling the scheduler
To start the scheduler and all its “Actions”, it is necessary to enter the SCHED. menu.
1. Use the UP/DOWN keys to find the “SCHED.” menu.
2. Press “Enter” and “***” will immediately begin to flash.
3. Use the UP/DOWN keys to choose ON or OFF, according to requirements.
4. Press “Enter” to exit the SCHED. menu and confirm.
TECHNICAL SPECIFICATIONS
The head can be moved in relation to the base:
PAN +/- 45° and TILT -75° / +15° can be locked in the desired position.
Voltage:
Power consumption:
LEDs:
IP rating:
Measurements:
Weight: Shipping weight:
200~240 VAC
160 VA max.
24 x red, 18 x green and 7 x blue LEDs
IP65
410 x 427 x 232 mm (w x h x d)
13,5 kg
18,2 kg
2007 CLS-LED BV. All rights reserved. Information subject to change without notice, CLS-LED BV and all affiliated companies
disclaim liability for injury, damage direct or indirect loss, consequential or economic loss or any other loss occasioned by the
use of, inability to use or reliance on the information contained in this manual. No part of this manual may be reproduced,
in any form or by any means, without permission in writing from CLS-LED BV. Other legal information can be found in our
General conditions to be found on the back of your CLS-LED BV invoice or on our website www.cls-led.com/Conditions
- 16 -
www.cls-led.com