1
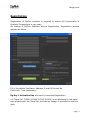
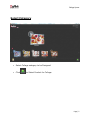
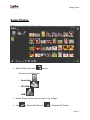
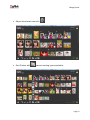
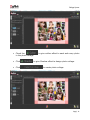
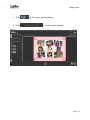
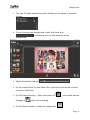
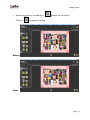
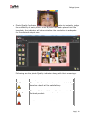
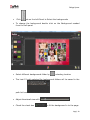
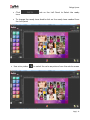
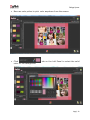
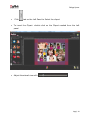
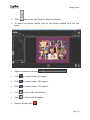
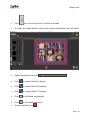
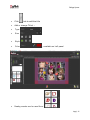
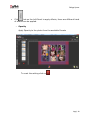
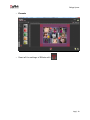
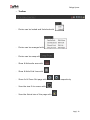
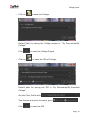
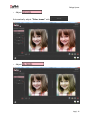
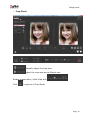
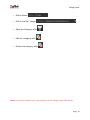
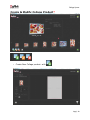
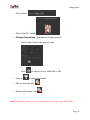
Collage Xpress User Manual Page | 1 Collage Xpress Index Sr.No. Topics 1 Registration 2 Select Category 3 Select Product 4 Select Photos 5 Design Collage 6 Edit Photo 7 Create & Modify Collage Category* 8 Create & Modify Collage Product* 9 Support Note: Functionality marked with * are available only for Collage Xpress PRO Version Page | 2 Collage Xpress Registration Registration of DgFlick products is required to ensure full functionality of Products. Registration is very easy. On startup of DgFlick Software without Registration; Registration window appears as below. Fill in the details like Name, Address, E-mail & Contact No. Fields with * are compulsory. Dg Key & Activation Key are must to complete Registration. • If 'Serial No' (XXXXX-XXXXX-XXXXX-XXXXX) is not displayed in left panel then please enter the 'Serial No' provided by vendor or provided on the box pack. Page | 3 Collage Xpress • Click on button to generate 'DgKey'. • Get the 'Activation Key' by SMS / Online / Phone SMS (Service Available only in India) Type "DgFlick XXXXX-XXXXX-XXXXX-XXXXX" (XXXXX-XXXXX-XXXXX-XXXXX is 'DgKey' displayed in the left panel), Send it to 567678. Activation key will be received by SMS. Online To register online visit: http://www.dgflick.com/product registration.aspx Phone Call at 022-6775 7575 and provide the 'DgKey' to support executive. DgFlick support will provide the 'Activation Key' • After receiving the 'Activation Key', fill it in the form and click on button to activate the product. Page | 4 Collage Xpress Select Category • Select Collage category to be Designed • Click to Select Product for Collage. Page | 5 Collage Xpress Select Product • Select Collage product to be Designed Click to go on previous window. Click to Select Photos Page | 6 Collage Xpress Select Photos Select Photo path with button Choose the photos from o Hard disk: o CD/DVD: o USB: . Select Photos which can be used in the collage Use to Select all Photos & to Deselect all Photos Page | 7 Collage Xpress Adjust thumbnail size with Sort Photos with various sorting types available. Page | 8 Collage Xpress o Sort by Date o Sort by Modified Time o Sort by Name o Sort by Selection o Sort by Size o Sort by Type o Sort by Orientation o Invert Sorting Order Rotate photo with Edit photos with Selected photos will appear as Click on After Selecting Photos click to reset the selection of photos. to go to Design window Page | 9 Collage Xpress Design Collage Click tab on the Left Panel to Design collage. Adjust maximum angle. Click to design photo collage in minimum or to create photo collage. Page | 10 Collage Xpress Check the in the photo collage. Click Click to give outline effect to each and every photo to give Shadow effect to design photo collage. to create photo collage. Page | 11 Collage Xpress Click Click to give colorize effect to design photo collage. to create photo collage. Page | 12 Collage Xpress Click Click to Expand design photo collage. to create photo collage. Page | 13 Collage Xpress Click Click to Fit design photo collage. to create photo collage. Page | 14 Collage Xpress Click to crop the design photo collage. Click Use Generate collage button to create photo collage. to create an instant collage. Page | 15 Collage Xpress Click tab on the Left Panel to open the Selected photos folder Select the photo to be changed on the page & double click on the photo needed from the Left panel Before After Select photos from different folder by clicking on location. and selecting Page | 16 Collage Xpress The Last 15 path selected for photo folders will be saved in the path list box. To set the photo as background, check the check box. background. and double click on the photo to set as Adjust thumbnail size with For On-board Zoom-In and Zoom-Out, move the scroll wheel of scroll mouse on the Photo. For On-board Panning – Move the cursor on changes to . , the mouse pointer , now click and drag. For On-Board rotation -rotate the image with . Page | 17 Collage Xpress Select two photos, a swap icon Click on appears on the photo to swap the photo Before After Page | 18 Collage Xpress Photo Quality Indicator helps to instantly judge the suitability of each photo. Once a photo has been placed into the template, the indicator will show whether the resolution is adequate for the desired output size. Following are the photo Quality indicator along with their meanings. Color Description Yellow The quality does not meet requirements totally; however result will be satisfactory. Orange There will be visible quality losses in the finished product. Red The photo is not at all suitable. Page | 19 Collage Xpress Click tab on the Left Panel to Select the backgrounds To change the background double click on the Background needed from the Left panel Select different backgrounds folder by The Last 15 path selected for background folders will be saved in the selecting location path list box Adjust thumbnail size with Check the check box to fit the background in to the page. Page | 20 Collage Xpress Click tone To change the ready tone double click on the ready tone needed from the Left panel Use color picker tab on the Left Panel to Select the ready to select the color anywhere from the whole screen Page | 21 Collage Xpress Now use color picker to pick color anywhere from the screen. Click color for the background tab on the Left Panel to select the solid Page | 22 Collage Xpress Now select any solid color & click on Ok button to apply the color on the background. Page | 23 Collage Xpress Click tab on the Left Panel to Select the clipart To insert the Clipart panel double click on the Clipart needed from the Left Adjust thumbnail size with Page | 24 Collage Xpress Click tab on the Left Panel to Select the border To insert the border double click on the border needed from the Left panel Adjust thumbnail size with Click to rotate border 90 degree. Click to rotate border 180 degree. Click to rotate border 270 degree. Click to flip border horizontally. Click to flip border vertically. Remove border with Page | 25 Collage Xpress Click tab on the Left Panel to Select the Mask To insert the mask double click on the mask needed from the Left panel Adjust thumbnail size with Click to rotate Mask 90 degree. Click to rotate Mask 180 degree. Click to rotate Mask 270 degree. Click to flip Mask horizontally. Click to flip Mask vertically. To remove Mask use Page | 26 Collage Xpress Click Add or change Title’s : Type Size Style Color tab to add the title , available on Left panel Ready presets can be used from Page | 27 Collage Xpress Click tab on the Left Panel to apply effects, there are different kinds of effects can be applied. o Opacity Apply Opacity to the photo from the available Presets To reset the setting click on Page | 28 Collage Xpress o Shadow Apply Shadow to the photo from the available Presets. To reset the setting click on o Outline Apply Outline to the photo from the available Presets To reset the setting click on Page | 29 Collage Xpress o Presets o Reset all the settings of Effects with Page | 30 Collage Xpress o Guidelines Collage Xpress offers innumerable Guide Lines for accurate composing. The Guide Lines are horizontal and vertical lines intersecting the Ruler and aiding in designing. Any number of Guide Lines can be drawn by the user. - Click on the Ruler to Insert the guidelines - Drag and use the Guidelines on the canvas Page | 31 Collage Xpress o Toolbar - Photos can be locked and Unlocked with - Photos can be arranged with - Photos can be swap with - Show & Hide safe area with - Show & Hide Grid lines with - Zoom In & Zoom Out page with - View the size fit to screen with - View the Actual size of the page with , respectively Page | 32 Collage Xpress o Click on to save the Collage. Default Path for saving the Collage project is “ My Documents/My Collage” Click o Click on to save the Collage Project to save the JPG of Collage. Default path for saving the JPG is “My Documents/My Exported Collage” Set the Color Profile with Two formats are given to export jpg in Click , to save the JPG Page | 33 Collage Xpress Edit Photo Edit Photos to adjust its Brightness, Contrast or Color tones. o Adjust Automatically adjust “Brightness-Contrast-Gamma” with Page | 34 Collage Xpress o Adjust Automatically adjust “Color tones” with o Adjust Page | 35 Collage Xpress o Crop Photo Manually adjust the crop area Adjust the crop area as per Output size Rotate image before / after Crop with Click to get out of Crop Mode. Page | 36 Collage Xpress o Rotate/Flip Photo o Rotate Counter Clockwise with o Rotate Clockwise with o Rotate counter clockwise & clockwise manually with o Flip Horizontal with o Flip Vertical with o Click o Click o Click to get out of Rotation Mode to overwrite the changes on the existing image to save the image with a different name Page | 37 Collage Xpress Create & Modify Collage Category* o Create New Collage Category with Page | 38 Collage Xpress o Define Name o Define the Ref. Image o Save the Category with o Edit the category with o Delete the category with Note: Functionality marked with * are available only for Collage Xpress PRO Version Page | 39 Collage Xpress Create & Modify Collage Product* o Create New Collage product with Page | 40 Collage Xpress o Define Name o Define the Ref. Image o Collage Dimensions: Settings for Collage product - Define Page Size & safe area of page - - Click o Click on to specify mirror effect ON or OFF to save the product. o Edit the Product with o Delete the Product with Note: Functionality marked with * are available only for Collage Xpress PRO Version Page | 41 Collage Xpress Support For additional technical support, please contact DgFlick support at •Email: [email protected] •Call @ +91 22 6775 7575 DgFlick Solutions Pvt. Ltd. 203 / 204, Shreeji Arcade, M. G. Road, Borivali (East) Mumbai 400066 India. Email: [email protected] Tel.:+91 22 6775 7575 Fax:+91 22 6775 7576 022-6775-7575 www.dgflick.com Page | 42