1
Notice about the law and the standard
This equipment has been tested and found to comply with the limits for a Class B digital device, pursuant to part 15 of the FCC Rules.
These limits are designed to provide reasonable protection against harmful interference in a residential installation. This equipment
generates, uses and can radiate radio frequency energy and, if not installed and used in accordance with the instructions, may cause
harmful interference to radio communications. However, there is no guarantee that interference will not occur in a particular
installation. If this equipment does cause harmful interference to radio or television reception, which can be determined by turning
the equipment off and on, the user is encouraged to try to correct the interference by one or more of the following measures:
•
•
•
•
Reorient or relocate the receiving antenna.
Increase the separation between the equipment and receiver.
Connect the equipment into an outlet on a circuit different from that to which the receiver is connected.
Consult the dealer or an experienced radio / TV technician for help.
This Class B digital apparatus complies with Canadian ICES-003.
Cet appareil numérique de la classe B est conforme à la norme NMB-003 du Canada.
Copyright © 2006 RISO KAGAKU CORPORATION
i
Preface
Welcome to the world of this product!
This machine is a high-speed scanner. Various functions like the copying of originals or the monitoring of the printer can be used by
operating them on the large touch panel display.
About This Manual
Notes
1)
2)
3)
4)
5)
No part of this book may be reproduced without permission.
For improvement of the product, this manual is subject to change without prior notice.
Note that RISO is not liable for any influence caused by use of this manual or this unit.
For the operation and safety precautions of the printer and printer driver, refer to the User Manual supplied with the printer.
For the operating and setting procedures of the touch panel display, refer to the Help of the touch panel display.
Trademark Acknowledgments
All product names and company names written in this manual are trademarks or registered trademarks of their respective companies.
ii
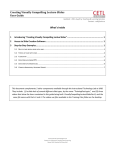
How to Read This Manual
Notation of Explanation of Operation
The following symbols are used in this manual for description of functions, operation, and notes.
and
are cautions for safety. Be sure to read these items before using this machine.
iii
Contents
Notice about the law and the standard . . . . . . . . . . . . . . . . . . . . . . . . . . . . . . . . . . . . . . i
Preface . . . . . . . . . . . . . . . . . . . . . . . . . . . . . . . . . . . . . . . . . . . . . . . . . . . . . . . . . . . . . . ii
How to Read This Manual . . . . . . . . . . . . . . . . . . . . . . . . . . . . . . . . . . . . . . . . . . . . . . iii
Notation of Explanation of Operation . . . . . . . . . . . . . . . . . . . . . . . . . . . . . . . . . . . . . . . . . . . . . . . iii
Contents . . . . . . . . . . . . . . . . . . . . . . . . . . . . . . . . . . . . . . . . . . . . . . . . . . . . . . . . . . . . iv
Safety Precautions . . . . . . . . . . . . . . . . . . . . . . . . . . . . . . . . . . . . . . . . . . . . . . . . . . . . vi
Warning Symbols . . . . . . . . . . . . . . . . . . . . . . . . . . . . . . . . . . . . . . . . . . . . . . . . . . . . . . . . . . . . . . vi
Location for Installation . . . . . . . . . . . . . . . . . . . . . . . . . . . . . . . . . . . . . . . . . . . . . . . . . . . . . . . . . . vi
Power Connection . . . . . . . . . . . . . . . . . . . . . . . . . . . . . . . . . . . . . . . . . . . . . . . . . . . . . . . . . . . . . vii
Handling . . . . . . . . . . . . . . . . . . . . . . . . . . . . . . . . . . . . . . . . . . . . . . . . . . . . . . . . . . . . . . . . . . . . . vii
Before Starting to Use . . . . . . . . . . . . . . . . . . . . . . . . . . . . . . . . . . . . . . . . . . . . . . . . viii
Location for Installation . . . . . . . . . . . . . . . . . . . . . . . . . . . . . . . . . . . . . . . . . . . . . . . . . . . . . . . . . viii
Operation Environment . . . . . . . . . . . . . . . . . . . . . . . . . . . . . . . . . . . . . . . . . . . . . . . . . . . . . . . . . viii
Precautions about originals that can be scanned . . . . . . . . . . . . . . . . . . . . . . . . . . . . . . . . . . . . . . ix
Dimensions . . . . . . . . . . . . . . . . . . . . . . . . . . . . . . . . . . . . . . . . . . . . . . . . . . . . . . . . . . . . . . . . . . . xi
Handling of This Machine . . . . . . . . . . . . . . . . . . . . . . . . . . . . . . . . . . . . . . . . . . . . . . . . . . . . . . . . xi
Materials Not to Be Printed . . . . . . . . . . . . . . . . . . . . . . . . . . . . . . . . . . . . . . . . . . . . . . . . . . . . . . . xi
Power Connection . . . . . . . . . . . . . . . . . . . . . . . . . . . . . . . . . . . . . . . . . . . . . . . . . . . . . . . . . . . . . xi
About connectors . . . . . . . . . . . . . . . . . . . . . . . . . . . . . . . . . . . . . . . . . . . . . . . . . . . . . . . . . . . . . . xi
Function and Name of Each Part . . . . . . . . . . . . . . . . . . . . . . . . . . . . . . . . . . . . . . . . . xii
Displaying the Scanner Configuration Screen . . . . . . . . . . . . . . . . . . . . . . . . . . . . . . . . . . . . . . . xiv
Chapter1 Scanner Operation . . . . . . . . . . . . . . . . . . . . . . 1-1
Place the Original . . . . . . . . . . . . . . . . . . . . . . . . . . . . . . . . . . . . . . . . . . . . . . . . . . . . 1-2
Place an Original into the ADF . . . . . . . . . . . . . . . . . . . . . . . . . . . . . . . . . . . . . . . . . . . . . . . . . . . 1-2
Placing an Original on the Platen Glass (Stage Glass) . . . . . . . . . . . . . . . . . . . . . . . . . . . . . . . . 1-3
Place the original and Scan . . . . . . . . . . . . . . . . . . . . . . . . . . . . . . . . . . . . . . . . . . . . 1-4
Loading the Print Paper . . . . . . . . . . . . . . . . . . . . . . . . . . . . . . . . . . . . . . . . . . . . . . . . . . . . . . . . 1-5
Save the scanned original images in [Storage] . . . . . . . . . . . . . . . . . . . . . . . . . . . . . . . . . . . . . . 1-6
Call up the data from [Storage] and Output . . . . . . . . . . . . . . . . . . . . . . . . . . . . . . . . . . . . . . . . . 1-7
Scanner functions . . . . . . . . . . . . . . . . . . . . . . . . . . . . . . . . . . . . . . . . . . . . . . . . . . . . 1-8
[Main setting] Tab . . . . . . . . . . . . . . . . . . . . . . . . . . . . . . . . . . . . . . . . . . . . . . . . . . . . . . . . . . . . . 1-9
[Layout] Tab . . . . . . . . . . . . . . . . . . . . . . . . . . . . . . . . . . . . . . . . . . . . . . . . . . . . . . . . . . . . . . . . 1-11
[Image processing] Tab . . . . . . . . . . . . . . . . . . . . . . . . . . . . . . . . . . . . . . . . . . . . . . . . . . . . . . . 1-13
[Extensions] Tab . . . . . . . . . . . . . . . . . . . . . . . . . . . . . . . . . . . . . . . . . . . . . . . . . . . . . . . . . . . . . 1-15
Specifying the Login Owner Name and Password . . . . . . . . . . . . . . . . . . . . . . . . . . 1-18
Setting Method . . . . . . . . . . . . . . . . . . . . . . . . . . . . . . . . . . . . . . . . . . . . . . . . . . . . . . . . . . . . . . 1-18
Monitor the printer's operation status
iv
. . . . . . . . . . . . . . . . . . . . . . . . . . . . . . . . . . . 1-20
Chapter2 Additional touch panel functions . . . . . . . . . 2-1
Touch Panel Display Screen . . . . . . . . . . . . . . . . . . . . . . . . . . . . . . . . . . . . . . . . . . . . 2-2
Monitoring Screen . . . . . . . . . . . . . . . . . . . . . . . . . . . . . . . . . . . . . . . . . . . . . . . . . . . . 2-3
Job Manager Screen . . . . . . . . . . . . . . . . . . . . . . . . . . . . . . . . . . . . . . . . . . . . . . . . . . 2-4
Other Screens . . . . . . . . . . . . . . . . . . . . . . . . . . . . . . . . . . . . . . . . . . . . . . . . . . . . . . . 2-5
Configuration Screen . . . . . . . . . . . . . . . . . . . . . . . . . . . . . . . . . . . . . . . . . . . . . . . . . . . . . . . . . . 2-5
Help Screen . . . . . . . . . . . . . . . . . . . . . . . . . . . . . . . . . . . . . . . . . . . . . . . . . . . . . . . . . . . . . . . . . 2-5
Web Screen . . . . . . . . . . . . . . . . . . . . . . . . . . . . . . . . . . . . . . . . . . . . . . . . . . . . . . . . . . . . . . . . . 2-5
Chapter3 Appendix . . . . . . . . . . . . . . . . . . . . . . . . . . . . . 3-1
Troubleshooting . . . . . . . . . . . . . . . . . . . . . . . . . . . . . . . . . . . . . . . . . . . . . . . . . . . . . 3-2
Jammed Original . . . . . . . . . . . . . . . . . . . . . . . . . . . . . . . . . . . . . . . . . . . . . . . . . . . . . . . . . . . . . 3-2
When an Error Occurs . . . . . . . . . . . . . . . . . . . . . . . . . . . . . . . . . . . . . . . . . . . . . . . . . . . . . . . . . 3-2
Cleaning . . . . . . . . . . . . . . . . . . . . . . . . . . . . . . . . . . . . . . . . . . . . . . . . . . . . . . . . . . . 3-4
Platen Glass (Stage Glass) and Original Pad . . . . . . . . . . . . . . . . . . . . . . . . . . . . . . . . . . . . . . . 3-4
Specifications . . . . . . . . . . . . . . . . . . . . . . . . . . . . . . . . . . . . . . . . . . . . . . . . . . . . . . . 3-5
v
Safety Precautions
This section describes the items that should be followed for safe use of this machine. Be sure to read this section.
Warning Symbols
To use the machine properly and to prevent human injury and damage to properties, the following warning symbols are used.
Read the meaning of the symbols to understand and then read this manual.
Indicates that incorrect handling by ignoring this symbol may cause death or serious
human injury.
Indicates that incorrect handling by ignoring this symbol may cause human injury or
damage to properties.
Example of icons
The
symbol indicates a prohibited action. A concrete prohibited action is drawn in the symbol or
near the symbol. (The left figure shows prohibition of disassembly.)
The
symbol indicates a forced action or an instruction. A concrete instruction is drawn in the symbol. (The left figure shows an instruction to remove the power plug from the electrical outlet.)
Location for Installation
! CAUTION
! Place the machine on a flat or stable surface.
Otherwise, the machine might be inclined or fall down, resulting in human injury.
! Do not install the machine in a location where it will be exposed to vibration from other machines or which
is unstable. Otherwise, the machine may drop or fall and injure someone.
! Do not place the machine in a dusty or humid location.
Otherwise, a fire or an electric shock might occur.
! Do not place the machine in a location that is subject to water leak or water splashes. If water enters the
unit, a fire or an electric shock might occur.
vi
Power Connection
! WARNING
! Install the machine near the wall socket to avoid using an extension cord between the machine and the wall
socket. If an extension cord is absolutely required, do not use longer than 5m (15ft). Otherwise, a fire or an
electric shock might occur.
! Do not damage or rebuild the power cord. Placing a heavy object on the cord or pulling or bending
forcibly the cord may damage the cord, resulting in a fire or an electric shock.
! The power cord supplied with this product can be used only for this machine. Do not use it for
another electric product. A fire or an electric shock might occur.
! Do not plug or unplug the power cord if your hands are wet. Otherwise, an electric shock might occur.
! CAUTION
! Do not pull the power cord when unplugging it. Otherwise, it could become damaged and a fire or an
electric shock might occur. Be sure securely to hold on to the plug before unpluging it.
! If the machine is not used for a long time, for example due to consecutive holidays, unplug the power cord
from the electrical outlet for safety.
! Pull out the power plug from the electrical outlet more than once a year and clean the prongs of the plug
and their surroundings. Dust collected on these areas can result in fire.
Handling
! WARNING
! Do not place water containers or metallic objects on the machine. If water drips inside the machine or a
metallic object drops inside it, a fire or an electric shock might occur.
! Do not place any bare fire source such as candle on the unit.
! Do not insert or drop any metallic material or flammable substances into the machine through any opening.
A fire or an electric shock might occur.
! Do not remove the covers. Otherwise, you might be electrically shocked by the high-voltage part inside.
! Do not disassemble or rebuild the machine by yourself. Otherwise, a fire or an electric shock might
occur.
! If the unit emits excessive heat, smokes or foul odor, immediately turn off the power, unplug the
electrical (power) cord and contact your service representative because a fire or an electric shock
might occur.
! If something drops inside the unit, immediately turn off the main power switch, unplug the
electrical (power) cord and contact your service representative. if you continue using it, a fire or an
electric shock might occur.
! CAUTION
! When moving the machine, contact your service representative. If you try to move the machine by force,
the machine might turn over, resulting in human injury.
vii
Before Starting to Use
This section explains precautions you have to observe when using the machine.
Location for Installation
! The location for installation is determined based on consultation with the customer at the time of delivery.
! Contact your service representative before moving the machine.
! Avoid installing the machine in the locations listed below. Failure to observe this precaution may lead to machine failure or
human injury.
•
•
•
•
•
•
Locations that are subject to sudden temperature change.
Extremely hot and humid locations or cold and dry locations
Heated locations or locations to exposed to direct cold air, direct hot air, or direct radiant heat
Badly ventilated locations
Dusty locations
Locations that are subject to frequent vibration
Operation Environment
! Install the machine in a location of which the levelness meets the following conditions.
Front to rear: 3 mm (1/8") or less
Side to side: 3 mm (1/8") or less
! Appropriate environment conditions are shown below.
Temperature range: 15°C - 30°C (59°F to 86°F)
Humidity range: 40% - 70%(noncondensing)
viii
Precautions about originals that can be scanned
!
Using unacceptable originals can cause problems such as paper jams and deteriorated scan quality.
Scan sizes
The maximum scanning size is 303 mm x 432 mm (1115/16" x 17"). Margins as specified in "4.10 Print Area" in the printer menu
settings are added to scanned images. The edges will not be printed if the original is larger than the print paper. To print the
complete original, adjust the magnification in the [Reproduction size] item in the scanner functions on the touch panel.
When placing originals on the auto document feeder
" Original Sizes that can be loaded on the auto document feeder
Simplex: 100 mm x 148 mm (postcard) (315/16" x 513/16") - 297 mm x 420 mm (A3) (1111/16" x 169/16") / 280 mm x 432 mm
(ledger) (11" x 17")
Duplex: 128 mm x 182 mm (B6) (5" x 73/16") - 297 mm x 420 mm (A3) (1111/16" x 169/16") / 280 mm x 432 mm (ledger) (11"
x 17")
" Original paper weight
52 g/m2 - 128 g/m2 (13.8-lb bond - 34.1-lb bond)
" Number of pages that can be loaded on the auto feeder
Original paper type
Maximum number of pages/maximum loading height for originals
Paper size
Paper weight
Smaller than B4
(Legal)
80 g/m2 (21.3-lb bond) or less Up to 100 pages
B4 (Legal) or
larger
81 g/m2 (21.6-lb bond) or
more
Loading height maximum: 15 mm (0.59") or less
Special paper (*)
Approximately 40 pages/maximum loading height 6mm (0.24") or
less
80 g/m2 (21.3-lb bond) or less Up to 60 pages
81 g/m2 (21.6-lb bond) or
more
Loading height maximum: 9 mm (0.35”) or less
Special paper (*)
Approximately 24 pages/maximum loading height 3.5mm (0.14") or
less
ix
* "Special paper refers to the following originals. These papers can be scanned, but if loaded on the auto document feeder may
cause paper jamming and deteriorated printing quality.
•
•
•
•
•
•
•
Paper coated on either side, such as art paper or specially coated paper.
Thermal paper for facsimile machines and word processors.
Paper with surface protrusions or dents.
Paper on which correction fluid has been used.
Paper recently removed from the package but not yet riffled.
Paper recently photocopied.
Postcards
!
Do not mix paper of different sizes.
" Paper types that cannot be loaded on the auto document feeder
The following types of paper cannot be loaded on the auto document feeder. These originals must be placed manually on the
Platen Glass (Stage Glass).
•
•
•
•
•
•
•
Paper that has been patched by, or attached to another paper.
Highly wrinkled, curled, or folded paper.
Paper with residual glue, or holes.
Torn or uneven ended paper.
OHP film, tracing paper and other paper with low opacity.
Very thin paper (less than 52 g/m2 {14-lb bond})
Very thick paper (128 g/m2 {34.4-lb bond} or heavier)
When putting originals directly on the Platen Glass (Stage Glass)
" Original sizes that can be put on the Platen Glass (Stage Glass).
100 mm x 148 mm (postcard) (315/16" x 513/16") - 297 mm x 420 mm (A3) (1111/16" x 169/16") / 280 mm x 432 mm (ledger)
(11" x 17")
" Total maximum weight of the original
10kg (22.05lb)
" Original height (to scan a page in a booklet)
Less than 50 mm (2") above the Platen Glass (Stage Glass) surface.
!
• Thoroughly straighten wrinkled, curled, or bent originals so they lie flat on the Platen Glass (Stage glass)
surface.
Areas not flat on the Platen Glass (Stage Glass) may be scanned as black.
• Originals with ink or correction fluid must be completely dry before being placed on the Platen Glass (Stage
Glass) otherwise the Platen Glass (Stage Glass) may become smeared causing unclear scans.
In order to scan originals clearly
• Use originals with smooth surfaces such as photographs or printed material.
• When scanning OHP sheets, putting a white page behind the original produces cleaner scans.
• When scanning thinner paper, images on the back side of the paper may appear on the front. This may be prevented by putting a black paper
behind the original.
• Originals with 5-point or larger font are recommended.
x
Dimensions
A location where the Original Cover can be opened is required.
The dimensions are expressed in mm (inch).
Handling of This Machine
! Do not turn the Power Switch to OFF or unplug the electrical cord during operation.
! Do not move this machine.
! The machine has precision parts and moving parts internally. Do not handle the machine in any way that is not described in this
manual.
! Do not place heavy objects on or apply shocks to this machine.
! Be sure to open and close the Original Cover gently.
! Be sure to wait 10 seconds or more when turning the Power Switch of this machine to OFF, then to ON again.
Materials Not to Be Printed
Do not use the machine in any manner which violates the law or infringes on established copyrights, even when making copies
for personal use. Consult your local authorities for further details. In general, use discretion and common sense.
Power Connection
! Connect the power plug securely to the electrical outlet to avoid improper connection.
! Install the machine near the electrical outlet.
! Use only the power cord supplied by the seller of the scanner, or use a cord that is earthed, not longer than 4.5m (1773/16"),
rated not less than the controller is rated, and authorized by the state or region where it is used.
About connectors
The allowable voltage for all input/output connectors is 5V.
xi
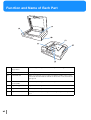
Function and Name of Each Part
xii
(1)
Platen Glass
(Stage Glass)
Place the original image face down and align it with the upper-left arrow.
(2)
Power Switch
Turns the power of the scanner on or off.
(3)
Power Indicator
Blinks green when the power is turned on (during standby). The scanner
can be used when the indicator remains on. If an error occurs, the indicator
lights up red.
(4)
Automatic Document
Feeder (ADF)
Automatically sends up to 100 sheets of originals.
(5)
Original Stopper
Stops the scanned original.
(6)
Original Guide
Slide to adjust the original width.
(7)
Original Unit Lever
If an original becomes jammed, pull this lever up and open the original unit
cover.
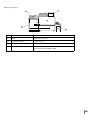
" Setup Example
(1)
Scanner
Scanner housing
(2)
Stand
Holds scanner housing
(3)
Touch Panel Display
Operates scanner
(4)
Printer
For details, refer to User’s Manual for Printer Main Body
(5)
Printer Controller
RISO Controller HC3R-5000
RISO Controller PS7R-5000 or 9000
xiii
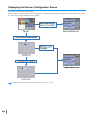
Displaying the Scanner Configuration Screen
Operate the scanner using the touch panel.
The procedure for displaying the scanner configuration screen may differ depending on whether the owner name is registered or
the owner name and password have been specified.
For details about entering the owner name and password, refer to #p.1-18 .
xiv
Chapter1 Scanner Operation
This chapter describes methods and functions used in operating the scanner.
1-1
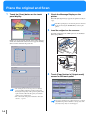
Place the Original
This section describes how to load an original into the ADF and place an original on the Platen Glass (Stage Glass).
Place an Original into the ADF
The ADF allows up to 100 sheets of the original to be scanned continuously.
1
Open the Original Guides wider than
the original to be scanned.
4
Specify the scan settings on the
touch panel display.
“Scanner functions.”#p.1-8
2
Load the original to be scanned face
up.
Load the original in the centre of the ADF.
If loading multiple-page originals, load the first
sheet of the original on top.
3
1-2
Adjust the Original Guides to the
width of the original.
Placing an Original on the Platen Glass (Stage Glass)
Open the Original Cover and place one sheet of an original on the Platen Glass (Stage Glass).
1
Open the Original Cover.
1
2
Place the original to be scanned face
down, aligning its corner with the
glass's upper left arrow.
3
Close the cover.
4
Specify the scan settings on the
touch panel display.
“Scanner Functions.”#p.1-8
1-3
Place the original and Scan
1
Touch the [Scan] button on the touch
panel display.
2
Check the Message Display on the
printer.
When the [Ready] message appears, the printer is ready to
copy.
The Message Display is off when the printer is in standby mode. Pressing the WAKE-UP key wakes up the
printer.
3
Load the original on the scanner.
Load the original into the ADF or place it on the Platen
Glass (Stage Glass).
If there are any previously entered owner names and passwords, the owner name selection screen appears showing.
Select a name and enter the password.
4
Touch [Copy] button in [Output mode]
screen on the touch panel.
• The touch panel is off, in sleep mode or without
power if nothing is displayed on the touch panel.
Pressing the Sleep Key on the operation panel wakes
up the machine. When the Sleep Key is not lit the
printer's power is turned off.
• The owner name and password must be entered in
advance. #p.1-18
Use [Copy and Storage] to print out and save scanned
originals in the printer controller as storage data. The
[Security Code] entry screen will appear.
1-4
5
Enter the details of the functions you
want to use.
6
Enter the number of copies using the
numeric keypad on the touch panel display.
7
Touch the [Start] button on the touch
panel display.
8
Remove the copied paper.
For details about each function, refer to #p.1-8.
Press the Stack Guide Open Button, the Stack Guides is
spread to allow easy removal of prints.
1
• When printing envelopes or thick paper, use the Standard feed tray. In the [Feed paper tray] press the
[manual] button and select the standard feed tray.
"Loading the Print Paper" #p.1-5
• Specify the conditions for scanning when storing
scanned images using the [Storage] function.
Loading the Print Paper
The Paper Feed Tray and the Standard Feed Tray accept different paper types.
The printer assigns a different colour profile per paper type. Match the paper loaded on each try with the corresponding paper setting on the printer menu.
Select [Envelope] as the paper type to print on envelopes.
Paper to be printed
Paper type setting
Loadable tray
Standard paper
Standard
High-Quality 1
High-Quality 2
Standard Feed Tray
Paper Feed Tray 1
Paper Feed Tray 2
Card
Card
Card-IJ
Standard Feed Tray
Official Postcard
Card
Card-IJ
Standard Feed Tray
Envelope
Envelope
Standard Feed Tray
1-5
For details, refer to "User’s Manual for Printer Main Body."
Save the scanned original images in [Storage]
1
Execute steps 1 to 3 on page #p.1-4.
2
Touch [Storage] button in [Output
mode] on the touch panel.
3
Enter the security code.
Security codes can have up to 8 digits. If entering a
security code is not desired merely touch the [OK]
button.
Touching the [Copy & Storage] button saves and
prints the scanned original images simultaneously.
4
Set the details for the function to be
used.
For details about each function, refer to #p.1-8.
5
1-6
Touch the [Start] button on the touch
panel.
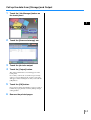
Call up the data from [Storage] and Output
1
Touch the [Job Manager] button on
the touch panel.
1
2
Touch the [Scan and storage] tab.
3
Touch the job to be output.
4
Touch the [Output] button.
The output confirmation screen will appear on the
touch panel.
If a security code for the saved file was previously
entered, a screen asking for the security code again
will appear. After entering the security code touch the
[OK] button.
5
Touch the [OK] button.
If you want to change the number of pages to print or
to limit the pages printed, touch the [Change output
setting] button.
6
Remove the printed pages.
1-7
Scanner functions
The scanner functions screen consist of the [Main setting], [Layout], [Image processing], and [Extensions] screens. The screens can
be switched by touching the tabs. The functions can be specified and the configuration screens can be displayed by touching the buttons on the screen.
Not only can the scanned data be printed, but it can also be stored (saved) in the printer controller.
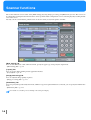
[Main setting] Tab
You can switch between colour and monochrome, specify the paper type, and specify the output mode.
“[Main setting] Tab” #p.1-9
[Layout] Tab
You can specify duplex printing and the pagination method.
“[Layout] Tab” #p.1-11
[Image processing] Tab
You can adjust the image quality of photos.
“[Image processing] Tab” #p.1-13
[Extensions] Tab
You can specify Job separation, Ejection mode, and Proof copy. If an optional finisher is connected, you can specify the finisher functions.
“[Extensions] Tab” #p.1-15
For details of each setting, refer to the Help of the touch panel display.
1-8
[Main setting] Tab
You can switch between colour and monochrome, specify the paper type, and specify the output mode.
1
Setting items
Description
Settings
Paper feed tray
Selects whether to automatically or manually select the paper feed tray of
the printer. The current setting is displayed under the button.
Auto (initial setting)
Manual
Reproduction size
Scans by enlarging or reducing the original. The current setting is displayed under the button.
100% (initial setting)
Standard/Zoom
Original image
Selects the mode for scanning an original. The optimum colour management is performed according to the selected mode.
Line and photo (initial setting)
Line (text)
Photo
Colour mode
Selects whether to print in colour or monochrome.
To print in colour, the original must be in colour.
Colour (initial setting)
Monochrome
Scanning level
Specifies the density for scanning an original.
Light
Standard (initial setting)
Dark
Output mode
Selects whether to copy or store the data after scanning an original. If
[Copy & Storage] or [Storage] is selected, the [Storage] Screen is displayed. The password specified here must be input to recall the data from
the [Scan and storage] tab in [Job manager].
Copy (initial setting)
Copy & Storage
Storage
1-9
Specifying the Original and Image Type to Be Scanned
The original image and image setting of the optimum scanner may vary depending on the type of the original to be scanned. Scan using the optimum original image and image setting according to the original.
Scan original type
Original
image
Tips
Manuscript
Line (text)
The contrast of [Gamma control] is specified as high.
If [Edge enhancement] in [Image detail setting] on the [Image processing]
tab is specified as high, the outline of characters will be clearer.
Photos
Photo
If [Moire elimination] in [Image detail setting] on the [Image processing]
tab is specified, the generation of moirés will be decreased.
To place a dot screen on a photo, specify the settings in [Screening] on the
[Image processing] tab.
Colour copies and newspapers or
originals printed using the HC
series and the RISO Printer
(RISOGRAPH).
Line (text)
You can specify so that the base colour of the original is not printed in
[Base colour level] – [Image detail setting] on the [Image processing] tab.
Cutout originals such as pamphlets Line and
photo
1-10
By moving in [Line cognition] – [Image detail setting] on the [Image
processing] tab to the left, you can check only the characters with a clear
outline as a character. If is moved to the right, the outline is checked
and processed as a non-clear character like a photo.
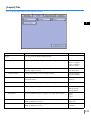
[Layout] Tab
You can specify duplex printing and the pagination method.
1
Setting items
Description
Duplex
You can specify the duplex printing method.
Settings
Original -> Output
Prints a simplex or duplex original in simplex or duplex.
Simplex -> Simplex
Simplex -> Duplex
Duplex -> Simplex
Duplex -> Duplex
Original
Specifies whether the original opens left-right or top-bottom when
scanning a duplex original.
Bind, L-R
Bind, Top-bottom
Duplex printing
Specifies the binding position for duplex printing.
Long edge binding
Short edge binding
Original orientation
Specifies the orientation of the original loaded into the ADF or placed
on the Platen Glass.
Portrait
Landscape
Pagination
You can print multiple pages on a single sheet of paper.
Pagination
Selects the pagination type.
OFF (initial setting)
Multi-up (Single)
Multi-up (Plural)
Pages/sheet
Selects the number of pages to paginate on a single sheet of paper.
2 pages
4 pages
8 pages
Arrange order
Specifies landscape as the order of arrangement on the page when
[Multi-up (Plural)] is selected.
Left to right
Right to left
Page order
Specifies whether to arrange the pages vertically or horizontally when
[Multi-up (Plural)] is selected.
Vertical
Horizontal
1-11
Original orientation
Booklet
1-12
Specifies the orientation of the original loaded into the ADF or placed
on the Platen Glass.
Portrait
Landscape (initial setting)
Paginates and prints multiple pages onto two sides to obtain a booklet
by centre binding. Specify to process as a booklet.
Booklet
Selects the type of booklet to be created. If an optional finisher is con- Pagination only
nected, you can select [Fold-half] or [Fold-half and staple].
Fold-half
Fold-half and staple
Original
Selects the type of the original to be made into a booklet.
Single
Bind, L-R
Bind, Top-bottom
Arrange order
Selects whether the pages are opened from the left or right when a
booklet is created.
Left to right
Right to left
Separate books
When making a booklet of 16 sheets (61 pages) or more, the Separate OFF
books setting is required. If [Auto] is selected when [Fold-half and sta- Auto
Specify sheet No
ple] is selected, the printouts are folded in half every 15 sheets (60
pages). When [Fold-half] is selected, the printouts are folded in half
every 5 sheets (20 pages).
Original orientation
Specifies the orientation of the original loaded into the ADF or placed
on the Platen Glass.
Portrait
Landscape
Centre margin
You can add a centre margin in the centre of a page to avoid not being
able to see a print on a fold when making a booklet. Specifies the distance from the centre of the page.
When [Auto reduction] is touched, any image that is not included in the
image area due to the margin width will be automatically reduced so
that the image is included in the image area of the paper.
0 to 50mm
Original orientation
Specifies the orientation of the original loaded into the ADF or placed
on the Platen Glass (Stage Glass).
Portrait
Landscape (initial setting)
Register initial values
Registers the default values when the scanner configuration screen is
started. Select the conditions to be registered, and then touch the [OK]
button.
Set as initial V
Initialize
Do not apply
[Image processing] Tab
You can adjust the print quality of images such as photos.
1
Setting items
Description
Settings
Image quality
Specifies the quality (resolution) of an image.
Standard (initial setting)
Fine
Screening
The halftone processing method can be selected. When [Line (text)] in
[Original image] on the [Main setting] tab is specified, [Dot screen]
cannot be selected.
Error diffusion (initial
setting)
Dot screen 70 lpi
Dot screen 100 lpi
Image detail setting
You can change the setting value types for Line cognition, Edge
enhancement, Moire elimination, and Base colour level in 7 stages.
Line cognition
Specifies whether to recognize the text and photos as text in order to
separate the area of the text and photos when scanning an original. The
smaller the value, only the text is recognized as text. The larger the
value, it is recognized as text even if it appears more like a photo.
Edge enhancement
Filters to enhance the edge of the part that was recognized as text.
Performs a lighter filtering when the value is small and a heaver filtering when the value is large.
Moire elimination
Filters to eliminate the moire from the part that was recognized as a
photo.
Performs a lighter filtering when the value is small and a heaver filtering when the value is large.
Base colour level
Specifies the cutoff level of the base colour so that the base colour of
the original is not printed.
The smaller the value, the smaller the level (not easy to erase the base
colour), and the larger the value, the larger the cutoff level.
Auto
Determines the setting values automatically according to the settings in
Original image, Colour mode, and Screening.
1-13
Gamma control
Each gamma value for red, green, blue, cyan, magenta, yellow, and
black can be adjusted in 7 stages. The smaller the value, the lighter the
colour, and the larger the value, the darker the colour.4
Register initial values
Registers the default values when the scanner configuration screen is
started. Select the conditions to be registered, and then touch the [OK]
button.
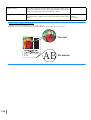
Gamma Control and Image Detail Settings
In Gamma control, the colour balance of a photo can be adjusted.
The boundaries of the characters and background will be clearer by enhancing the edge of the characters.
1-14
Set as initial V
Initialize
Do not apply
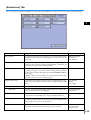
[Extensions] Tab
You can specify Job separation and Ejection mode. If an optional finisher is connected, you can specify the finisher functions.
1
Setting items
Description
Settings
Job separation
Specifies the timing that the separated pages are inserted. When print- OFF (initial setting)
ing multiple pages, inserts the separated pages per job or per copy and Between jobs
page break.
Every division
Printer collate
Specifies whether to perform [Non Collate] or [Collate] printing. When
the button can be selected, performs collated printing, and when it cannot be selected, performs non collated printing.
Proof copy
When printing an original with multiple pages, you can check the print
by printing one page or one set first. After checking and if no problem
is found, you can start the print job by pressing the PRINT/PAUSE key
on the printer.
If [Printer collate] is set to [Collate], one set is printed. If [Non collate]
is specified, the proof copy is printed per page.
Register initial values
Registers the default values when the scanner configuration screen is
started. Select the conditions to be registered, and then touch the [OK]
button.
Paper receiving tray (*)
Specify items related to the Paper receiving tray.
Set as initial V
Initialize
Do not apply
Output tray
Select the tray that the printed pages will be output onto. Choose the
stack tray if printing more than 500 pages.
Auto (initial setting)
Stacking Tray
Offset dischrg
When using the stack tray for output, specify the offset output function
to separate the sets by sliding each set of pages slightly sideways.
OFF (initial setting)
ON
Cover sheet (*)
Front cover
Adds a front cover sheet or back cover sheet to the main pages of a print
job. The Cover Sheet Tray is located at the top left of the finisher. The
Interposer Tray is a paper tray on the printer.
Specifies the tray in which the front cover sheets are loaded. The front
cover sheets are inserted before the first page of the original.
No
Cover Sheet Tray
Interposer Tray
1-15
Back cover
Specifies the tray in which the back cover sheets are loaded. The back
cover sheets are inserted after the last page of the original.
No
Cover Sheet Tray
Interposer Tray
Original orientation
Specifies the orientation of the original loaded into the ADF or placed
on the Platen Glass.
Portrait
Landscape
Booklet (*)
Booklet
Selects the type of booklet to be created. If an optional finisher is con- Pagination only
nected, you can select [Fold-half] or [Fold-half and staple].
Fold-half
Fold-half and staple
Original
Selects the type of the original to be made into a booklet.
Single
Bind, L-R
Bind, Top-bottom
Arrange order
Selects whether the pages are opened from the left or right when a
booklet is created.
Left to right
Right to left
Separate books
When making a booklet of 16 sheets (61 pages) or more, the Separate OFF
books setting is required. If [Auto] is selected when [Fold-half and sta- Auto
Specify sheet No
ple] is selected, the printouts are folded in half every 15 sheets (60
pages). When [Fold-half] is selected, the printouts are folded in half
every 5 sheets (20 pages).
Original orientation
Specifies the orientation of the original loaded into the ADF or placed
on the Platen Glass.
Portrait
Landscape
Centre margin
You can add a centre margin in the centre of a page to avoid not being
able to see a print on a fold when making a booklet. Specifies the distance from the centre of the page.
When [Auto reduction] is touched, any image that is not included in the
image area due to the margin width will be automatically reduced so
that the image is included in the image area of the paper.
0 to 50mm (0" to 2")
Stapler/Punching (*)
Specifies whether to staple or punch holes at the position designated in
the [Stapler].
Binding
Specifies the staple or punch position.
No
Left
Right
Upper
Stapler
Selects the stapling position.
OFF
Left 1 POS
Right 1 POS
2 posi
Punching
Selects the number of hole punches.
OFF
2 holes
4 holes (or 3 holes)
Binding margin
A binding margin can be added so that the printed area is not covered
with staples or holes punches.
When [Auto reduction] is touched, any image that is not included in the
image area due to the margin width will be automatically reduced so
that the image is included in the image area of the paper.
0 to 50mm (0" to 2")
Original orientation
Specifies the orientation of the original loaded into the ADF or placed
on the Platen Glass.
Portrait
Landscape (initial setting)
Paper folding (*)
1-16
Paginates and prints multiple pages onto two sides to obtain a booklet
by centre binding. Specify to process as a booklet.
Folds and outputs the paper in 2 fold.
Paper folding
Selects the type of paper folding.
OFF
Fold-half
Fold direction
If [Fold-half] is selected, selects whether to fold the printed surface
internally or externally.
Print in
Print out
Original orientation
Specifies the orientation of the original loaded into the ADF or placed
on the Platen Glass (Stage Glass).
Portrait
Landscape
* These items are only displayed when the optional HC finisher is connected.
1
1-17
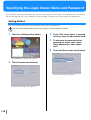
Specifying the Login Owner Name and Password
By selecting the owner name and entering a password when specifying the scanner settings, you can limit the users of the scanner.
The flow for displaying the scanner configuration screen may differ according to the security settings of the administrator.
Setting Method
You can specify the owner name and password using the procedure described below.
!
1
Only the administrator should perform these settings. A password must be entered.
Touch the [Configuration] button.
3
Touch [The “owner name” is required
when you login.] to add a check mark.
4
To also enter the password when
selecting the owner name, touch
[Enter password] to add a check
mark.
5
Touch the [Owner name entry] button.
The administrator's password is required.
2
Touch [Scanner environment].
[Owner name entry] screen appears.
[Scanner environment] screen appears.
1-18
6
Touch the [Add] button.
9
Touch the [OK] button.
1
[Owner name entry/ addition] screen appears.
To change the current owner name and password,
touch the owner name button you want to change,
and then touch the [Edit] button.
7
This completes specifying the owner name and password settings.
Enter the owner name and password,
and then touch the [OK] button.
Touch the [Input] button of the item you want to enter,
and then enter the item using the keyboard on the
screen.
[Owner name entry] screen reappears.
8
Touch the [Back] button.
[Scanner environment] screen reappears.
1-19
Monitor the printer's operation status
You can review the printer's job history. The job history can be stored as a file on a personal computer. Review the number of pages
output by each owner by using the owner name assignment function.
#“HC5500 Series User’s Manual for Console.”
1-20
1
On a computer, display the [Monitoring]
screen of the RISO console.
2
Click the [Custom setting] button.
3
Click the [Account record] button.
4
After checking the information, close
the Web browser.
Chapter2 Additional touch panel
functions
This chapter describes the touch panel's additional functions outside of operating the scanner.
2-1
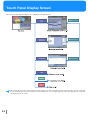
Touch Panel Display Screen
The screens of the touch panel display are configured as described below.
When setting the owner name and password from [Configuration] – [Scanner environment] on the touch panel display, the owner name must
be selected and the password entered when the scanner configuration screen is displayed. For the owner name and password, consult with
the administrator of the scanner
2-2
Monitoring Screen
You can check the current operation status of the printer, the information of the paper loaded in the trays, and the ink and paper
remaining quantity.
2
[Status] Tab
The status of the current printer operation and the status of consumables are displayed by icons and messages.
[About..] Tab
You can check the printer controller and printer settings.
[Consumables volume] Tab
Displays the remaining quantity of the consumables.
2-3
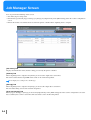
Job Manager Screen
You can perform the following on this screen:
• Check the job processing status
• Print the data specified in [Copy & Storage] or [Storage] in [Output mode] on the [Main setting] tab on the scanner configuration
screen.
• Print archived data or stored data that is stored in the printer controller when outputting from a computer.
[Job status] Tab
Displays the information of the job that is being processed by the printer controller.
[Archive] Tab
When outputting from a computer and [Archive] is selected, the output data is stored here.
The archived data that developed RIP and is stored can be checked and printed.
Not displayed according to the controller type.
[Storage] Tab
When outputting from a computer and [Storage] is selected, the output data is stored here.
The stored data being stored can be checked and printed.
[Scan and storage] Tab
When [Copy & Storage] or [Storage] is selected in [Output mode] on the [Main setting] tab of the scanner configuration screen, the
data scanned by the scanner is stored here. The stored data can be checked and printed.
2-4
Other Screens
Configuration Screen
Specifies the scanner and touch panel display environment settings. These are administrator functions.
You can specify the touch panel display calibration, the login password, and whether to use the scanner functions.
For details, refer to the Help of the touch panel display.
Help Screen
2
Describes each setting item of the scanner function.
Web Screen
Accesses an exclusive Web page.
The [Web] button has been specified at the factory so that it is not displayed. To display the [Web] button on the top screen, touch the
[Configuration] button on the top screen, and then touch [Use WEB access function] on the [Web access environment] screen to select
the setting.
2-5
2-6
Chapter3 Appendix
This chapter describes the measures for handling jammed originals and errors, and daily care.
3-1
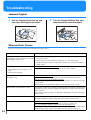
Troubleshooting
Jammed Original
1
Pull the Original Unit Lever up, and
then open the original unit cover.
2
Turn the Original Release Dial, and
then remove the jammed original.
When an Error Occurs
If an error occurs in the scanner, the Power Indicator lights up red.
Problem
Cause and Action
Even when the Power Switch on the touch
• Check that the electrical plug of the touch panel display is inserted properly into
panel display is turned to ON, there is nothan electrical outlet.
ing displayed on the screen.
• Check that the touch panel display and printer are connected properly.
• Check that the Power Switch of the printer and that of the touch panel display are
turned to ON.
• The image is corrupted.
• The detailed parts of the image are not
clear.
• The image is distorted.
Does the scanner vibrate during a scan?
Make sure that the scanner does not vibrate and rescan the original.
Only numerous dots are printed, but the cor- Has the original been loaded?
Load the original into the ADF or place it on the Platen Glass (Stage Glass).
rect image is not.
Has the proper side of the original been loaded?
When placing an original on the Platen Glass (Stage Glass), face the side you want
to scan down.
When loading an original into the ADF, face the side you want to scan up.
3-2
The back side of an original is copied.
For originals on thin paper, the image on the back side of an original or from stacked
originals may appear. Scan the original with a black sheet of paper on the back side
of the original.
Also, when scanning newspapers or magazines, adjust [Base colour level] in [Image
detail setting].
Moires are generated.
Surface treated printed material may be subject to moire effect. Selecting [Moire
elimination] in [Image detail setting] reduces the amount of moire effect.
Irregularities and spots are on the image.
Is the Platen Glass (Stage Glass) dirty?
Clean the Platen Glass (Stage Glass) before placing the original on it.
Are you scanning by firmly pressing down on the Original Cover?
If the Original Cover is firmly pressed down during a scan, the original will stick to
the Platen Glass (Stage Glass), which will result in irregularities and spots.
Problem
Cause and Action
The printed colour and the colour of the
original are different.
Is the output mode specified correctly?
Specify the settings in [Gamma control] and [Image detail setting] according to the
type and usage of the original.
Is the paper type of the paper that is loaded in the tray (or Standard Feed Tray) specified correctly?
Select the correct paper type in [Paper Type] from the menu setting of the printer.
Text originals cannot be printed clearly
Is the original set diagonally?
If the original is set diagonally, the character recognition rate will decrease. When
placing the original on the Platen Glass (Stage Glass), be sure to slowly close the
Original Cover so that the original does not move.
Is the text on the original clear?
Depending on the condition of the text on the original the character recognition rate
can change.
The character recognition rate decreases when using the originals described below.
•
•
•
•
•
•
•
3
Originals that have been copied multiple times.
Originals that have been received as a fax
Originals that have narrow character and line spaces
Originals on which the text has ruled lines or underlines
Originals that have a font size of 5 points or less
Originals that have creases or wrinkles
Bound part of a book
3-3
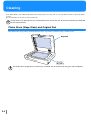
Cleaning
If the White Roller of the ADF and the Platen Glass (Stage Glass) have dust, ink, or correcting fluid on them, the printouts will be
stained.
It is recommended to clean the scanner periodically.
!
Do not perform any procedure that is not described in this manual. Be sure to contact your dealer (or authorized
service representative).
Platen Glass (Stage Glass) and Original Pad
If the Platen Glass (Stage Glass) and Original Pad are dirty, wipe them several times using a suitable cleaner.
!
3-4
The Platen Glass (Stage Glass) can be easily scratched. Do not scratch or hit the glass with hard objects.
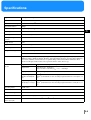
Specifications
Type
Desktop colour image scanner with Automatic Document Feeder
Scanner Mode
Colour and monochrome
Maximum Scan Range
303mm x 432mm (1115/16" x 17")
Optical Resolution
600dpi
Auto Feeder Speed
Page scan speed: 20 ppm or more
First Page Print Time
20 seconds or less
Scan Speed
66.144 mm/sec (standard)
Analog-to-Digital Conversion
8 bit
Image Sensor
CCD
Light Source
White xenon lamp
Colour Separation
RGB colour sensor
Image Processing Mode
Line (text), Line and photo, Photo
3
Standard, Fine
Function
Reproduction size, Output mode (Copy, Copy & Storage, Storage), Duplex printing, Pagination
(Multi-up (Single), Multi-up (Plural), Booklet), Optional finisher functions, Screening (Error diffusion,
Dot screen), Gamma control, Character recognition, Edge enhancement, Moire elimination, Base
colour level, Register initial values, Job separation, Printer collate, Proof copy
Automatic Document
Feeder
Type
Original transfer (can perform duplex scanning with switchback system)
Original size
Front: Postcard - A3/Ledger
Back: 182 mm × 128 mm (73/16" x 5") - A3/Ledger
Paper quality
52g/m2 - 128g/m2 (13.8-lb bond - 34.1-lb bond)
Original capacity:
80g/m2 (21.3-lb bond) or less: 100 pages or less
Smaller than B4(Led- 81g/m2 (21.6-lb bond) or more: Loading height maximum is 15 mm (0.59") or
ger)
less
Original capacity:
80g/m2 (21.3-lb bond) or less: 60 pages or less
B4 (Ledger) or larger 81g/m2 (21.6-lb bond) or more:Loading height maximum is 9 mm (0.35") or
less
Operating Noise
68 dB or less
Power Source
100 - 127V/200 - 240V~, 1.0/0.6A, 50/60Hz
Power Consumption
100 V: 100 W or less, 200 V: 120 W or less
Weight
Approximately 27 kg (59.52 lb)
Dimensions
(W) x (D) x (H)
642mm x 551mm x 247.5mm (255/16" x 2111/16" x 93/4")
3-5
033-52517-100
3-6