1
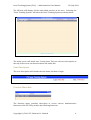
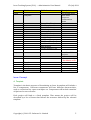
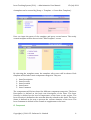
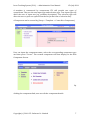
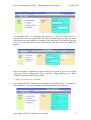
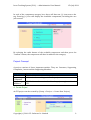
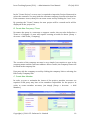
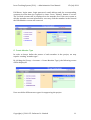
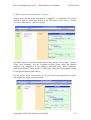
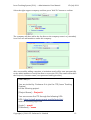
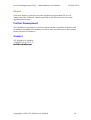
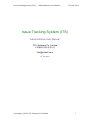
Issue Tracking System (V1.0) -‐-‐ Administrative User Manual 15th July 2011 Issue Tracking System (ITS) Administrative User Manual CCL Software Co. Limited 小精靈軟件設計有限公司 [email protected] 15th July 2011 Copyright (c) 2011 CCL Software Co. Limited 1 Issue Tracking System (V1.0) -‐-‐ Administrative User Manual 15th July 2011 Introduction Issue Tracking is a very important task of modern project management process. For tons of outstanding issues in company projects, it is very challenging for the project managers to update or to report the project progress within a very short time. Being a project leader, having an updated project issue list is critical. Traditional way of handling the outstanding issues is to put them into a single spreadsheet (e.g. Excel) and then maintained the issues' status by project manager himself. The drawback is that the project manager may spend lots of time to discuss with the involved members and update the issues one by one which is extremely time and resource consuming. The ITS (Issue Tracking System) developed by CCL Software Co. Limited is a web-‐based project management tool that can help the companies to consolidate all the outstanding issues from various project parties as well as to provide a common platform to the project members to update the issue status. The configurable issue template can fit for various project nature, project manager style as well as to fit for various company process flow. Features • • • Extremely Reliable Cloud server with unlimited storage Web Interface for 1. Login/Logout 2. Create self-‐defined Issue template 3. Add, Edit Company, Members, Template, Project 4. Search Issues 5. Report generation to reports in excel format Report Generation and download to PC terminal automatically Operations The CCLSoft Integrated Service Portal login page is as below: Copyright (c) 2011 CCL Software Co. Limited 2 Issue Tracking System (V1.0) -‐-‐ Administrative User Manual 15th July 2011 Administrators are required to login to the system with the correct user name and password. After successfully login to the ISPortal, the main screen will come out as below: Copyright (c) 2011 CCL Software Co. Limited 3 Issue Tracking System (V1.0) -‐-‐ Administrative User Manual 15th July 2011 The ISPortal will display all the subscribed services of the user. Selecting the "Issue Tracking System" will enter the Issue Tracking System as shown below. The main screen will divide into 3 main parts. They are the user description at the top of the screen, the function menu bar under this. User Description The user description will include the user name, the date of login. Function Menu Bar The function menu provides short-‐keys to access various administrative functions of the ITS. They include the following functions: Copyright (c) 2011 CCL Software Co. Limited 4 Issue Tracking System (V1.0) -‐-‐ Administrative User Manual Function Setup Sub-‐function Template Project Project Account *Issue ISPortal Show Issue Add Issue Modify Issue 15th July 2011 2-‐Sub-‐function Description ITS System Setup Basic Issue Structure configuration menu Create New Template Edit Template Create New Component Edit Component Create New Project Edit Project Add Team/Company Edit Team/Company Add Member Edit Member Create Member Type List all available projects * User mode only * Not Admin mode Return to ISPortal Issue Concept A. Template Template is the basic structure of formulating an Issue. A template will include a list of components. Different components will have different characteristics, such as a selection list, a pure text input...etc. Components will include a number of Options for user selection. Each project will bind to a fixed template. That means the project will be described by a list of Issues that follows the structure defined by the selected template. Copyright (c) 2011 CCL Software Co. Limited 5 Issue Tracking System (V1.0) -‐-‐ Administrative User Manual 15th July 2011 A template can be created by (Setup -‐> Template -‐> Create New Template). User can input the name of the template and press create button. The newly created template will be shown in the "Edit Template" screen. By selecting the template name, the template edit screen will be shown. Each template will include 5 main component categories. They are: 1. Issue Description 2. Issue Severity 3. Issue Location 4. Issue Status 5. Issue Comment The components will fit into these five different component categories. The Issue Description is defined as the basic text description of the issue. The Issue Severity is defined as the level of importance of the Issue to the project. The Issue Location is defined as the area that directly related to this Issue. The Issue Status is defined as the way to present the current situation of the issue. The Issue Comment is defined as the remark or supplement to the issue. B. Component Copyright (c) 2011 CCL Software Co. Limited 6 Issue Tracking System (V1.0) -‐-‐ Administrative User Manual 15th July 2011 A template is constructed by components. ITS will provide two types of components. They are the text input type and selection type. Text input type will allow the user to input text (e.g. problem description). The selection type will allow the user to pick one option from the list (in the form of selection list). A Component can be created by (Setup -‐> Template -‐> Create New Component). User can input the component name, select the corresponding component type and then press "Create". The created component will then display on the Edit Component Screen. By clicking the component link, user can edit the component details. Copyright (c) 2011 CCL Software Co. Limited 7 Issue Tracking System (V1.0) -‐-‐ Administrative User Manual 15th July 2011 As explained before, a component can either be a pure text input box or a selection list. User can specify that. For pure text input type, just click the radio button and enter the number of columns of the input field. For Selection list type, user can select the selection type radio button, and then enter the number of options. Once the number of options has been entered, user need to type in the option value (e.g. Priority Component, totally 3 options -‐-‐ High, Medium, Low). Press "submit" button to confirm the changes. C. Add Component into Template The component can be added to the template by pressing (Setup -‐> Template -‐> Edit Template). Select the template in the template list (e.g. template_1). Copyright (c) 2011 CCL Software Co. Limited 8 Issue Tracking System (V1.0) -‐-‐ Administrative User Manual 15th July 2011 In each of the component category box, there will have an (+) icon next to the tag. Pressing (+) icon will display the available components, including the one just created. By selecting the radio button of the available component and then press the "confirm" button, the component will then be added to the category. Project Concept A project consists of three important entities. They are Customer, Supporting Companies / teams and the Supporting Members. Entity Description Customer The owner or customer of the project Supporting All Parties that working on the same project Companies Supporting All Members who are involved in the project registered in the Members ITS A. Create Project An ITS project can be created by (Setup -‐> Project -‐> Create New Project). Copyright (c) 2011 CCL Software Co. Limited 9 Issue Tracking System (V1.0) -‐-‐ Administrative User Manual 15th July 2011 In the "Create Project" screen, user is required to input the Project Name and to select the customer. You may pick the customer company from the selection list. If the customer is new, then you can create a new one by clicking the "new" icon. By pressing the "Create" button, the new project will be created and it will be displayed on the project list. B. Create New Company / Team No matter the party is a customer or support vendor, they are also defined as a Team or a Company. So user will require creating accounts for them. (Setup -‐> Account -‐> Add Team / Company). The creation of the company account is very simple. Just require to type in the company name and the reference address. Once created, the company name will be listed in the company list. User may edit the company record by clicking the company link or selecting the Edit Team/ Company link. C. Create New Member In order to post or maintain the issues of the project, member accounts are required. Each party may have a few members responsible for the project. In order to create member accounts, just simply (Setup -‐> Account -‐> Add Member). Copyright (c) 2011 CCL Software Co. Limited 10 Issue Tracking System (V1.0) -‐-‐ Administrative User Manual 15th July 2011 Full Name, Login name, Login password, email address and the corresponding company account data are required to enter. Press "Submit" button to create. The created account will be displayed on the member list. If the user wants to edit the member account information, user may click the member in the list and the Edit Member screen will come out D. Create Member Type In order to better define the nature of each member in the project, we may require creating "member type". By clicking the (Setup -‐> Account -‐> Create Member Type), the following screen will be displayed. User can define different user types for supporting the project. Copyright (c) 2011 CCL Software Co. Limited 11 Issue Tracking System (V1.0) -‐-‐ Administrative User Manual 15th July 2011 E. Add Companies and Members to Project Project must include some members or companies. A reasonable ITS system should be able to define this. Below is the ITS project setup screen. (Setup-‐ >Project-‐>Edit Project -‐>[Select Project]) The Edit Project screen will include 3 parts. They are the "Project Info", "Project Team" and Template". For the Template section, please select the desired template (e.g. template_1 as an example) and then press "Select Template" button to confirm (* Note: need to do this once, otherwise the template setting for the project will not take effect). For the Project Team section, there is a (+) icon next to the label. Press (+) icon will trigger the support team selection. Copyright (c) 2011 CCL Software Co. Limited 12 Issue Tracking System (V1.0) -‐-‐ Administrative User Manual 15th July 2011 Select the right support company and then press "Add To" button to confirm. The company will then add to the list. Next to the company name is a (+member) icon. User can add members under this company. After successfully adding a member, a invitation email will be sent automatically to the added member to notify him how to access the ITS. (The email will include the Project A, Customer name, user password and login name.) Dear Mary Li, You are invited by Customer A to join the ITS (Issue Tracking System) for the following project: [Project Name] -- Project A You can access the ITS through the following URL: URL: https://cclsoft.secure.omnis.com/its/login.html with the following login info [Login] -- maryli [Password] -- xxxxx Copyright (c) 2011 CCL Software Co. Limited 13 Issue Tracking System (V1.0) -‐-‐ Administrative User Manual 15th July 2011 ISPortal If the user wants to switch to use other applications other than ITS, he can simply select the "ISPortal" option to go back to the ISPortal screen for other applications selection. Further Development ITS is flexible to customize for various customer needs. A number of features will be added to strengthen the usability. For those who are interested to this system, please feel free to contact us. Contact CCL Software Co. Limited 小精靈軟件設計有限公司 [email protected] Copyright (c) 2011 CCL Software Co. Limited 14