1
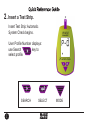
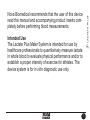
Quick Reference Guide ...........................................................1
Intended Use .........................................................................4
Symbols .................................................................................7
Warnings, Cautions, and Notes .............................................8
Introduction ............................................................................9
The Lactate Plus Meter ......................................................9
Overview ..........................................................................13
Meter, Supplies, Transport Case ......................................14
Environmental ..................................................................15
Setup ...................................................................................16
Set the Time .....................................................................16
Set Date Format ...............................................................19
Beeper On or Off ..............................................................22
End of Setup ....................................................................23
Testing: Blood and Quality Control Solutions ......................24
Testing a Quality Control Solution ....................................25
i
Testing a Blood Sample ...................................................27
Data Review ........................................................................32
Data Review .....................................................................32
Manually Reviewing Stored Test or Control Results ........32
Battery Replacement ........................................................34
Cleaning and Care ...........................................................35
Error Messages ...................................................................36
Codes ...............................................................................36
Appendix .............................................................................37
Specifications ...................................................................37
Performance Characteristics ............................................39
Accuracy ..........................................................................40
Precision ..........................................................................41
Instructional Notes ...........................................................43
Warranty ...........................................................................47
ii
Quick Reference Guide
1. Prepare the lancet.
a. Simply twist off the lancet
cap: Hold the lancet body and
twist off the lancet cap until you
feel it separate from the device.
b. Do not pull, just twist the
lancet cap. Dispose of the cap
in a suitable container.
NOTE: This device is single-use.
The needle retracts immediately
after sampling. This leaves
the device safe for immediate
disposal into a sharps container.
1
Quick Reference Guide
2. Insert a Test Strip.
Insert Test Strip: Automatic
System Check begins.
User Profile Number displays:
use Search
key to
select profile.
SEARCH
2
SELECT
MODE
3.
Quick Reference Guide
Prepare the Puncture Site.
c. The best puncture sites are on
the middle or ring finger. Clean the
finger tip thoroughly with soap and
water. Then dry thoroughly.
d. Place the auto-Lancet against
the pad of the finger, press the
release button, remove the device
from the finger.
e. Wait a few seconds for a blood
drop to form. Wipe off the first drop
with a clean tissue. Squeeze the
finger to form a second drop of
blood. Do not squeeze vigorously.
3
Quick Reference Guide
4. Add Blood to Test Strip.
When the second blood drop
appears, touch the end of the
test strip to the blood drop until
the well of test strip is full and
the meter beeps.
The on-screen Blood Drop
flashes on and off repeatedly
until sufficient blood has been
added to the test strip.
The Lactate result is available
on-screen in 13 seconds.
4
Nova Biomedical recommends that the user of this device
read this manual and accompanying product inserts completely before performing blood measurements.
Intended Use
The Lactate Plus Meter System is intended for use by
healthcare professionals to quantitatively measure lactate
in whole blood to evaluate physical performance and/or to
establish a proper intensity of exercise for athletes. The
device system is for in vitro diagnostic use only.
5
6
Symbols
The following are symbols that are used in this manual, on
insert sheets, and on the Lactate Plus Meter.
In vitro diagnostic medical
device
Catalog number
Fulfills requirements of
Directive 98/79 EC (IVDD)
Temperature limitation
Caution, consult accompanying
documents
Upper Limit of Temperature
Consult instructions for use
Manufactured by
Biological risk
7
Warnings, Cautions, and Notes
NOTES provide important or helpful operating information.
CAUTIONS provide information that is important for instrument protection.
WARNINGS provide information that is important for user
protection or about risk for inaccurate results.
8
Introduction
The Lactate Plus Meter
WARNING: Blood samples and blood products are
potential sources of hepatitis and other infectious
agents. Handle all blood products with care. Wear
gloves when performing measurements on another
person. Items that are used to measure lactate, i.e., test
strips, lancets, and alcohol swabs, must be disposed of in
accordance to local regulations to avoid risk to anyone.
WARNING: Please keep the Lactate Plus Meter and its
accessories out of reach of small children to prevent accidents through improper handling and to avoid the risk of
small parts being swallowed.
9
Introduction
Lactate Plus
Test Strip
LCD Display
Select
Button
Search Button
Mode
Button
Lactate Plus Meter
10
Introduction
The Lactate Plus Meter is a hand-held testing device that
measures lactate (Lac) in whole blood. The test strip is
touched to a drop of blood to initiate the test process.
• A simple one-step process provides a blood lactate
result.
• Test result is available in 13 seconds.
• There is memory for one common user’s set of test
results (20):
Nine specific users’ set of test results (10 each);
Two sets of Quality Control (QC) results (10 each)
• The unit is powered by a battery that can perform for
approximately 600 tests.
11
Introduction
User Profile Number
Beeper ON Indicator
User Profile ICON
Quality Control
Indicator
Lactate Test Result
(in mmol/l)
Test Result in
Memory Indicator
Low Battery
Indicator
Average Test Result
Blood or Control
Drop Indicator
AM or PM Indicator
Date/Day Hour/Minute
Lactate Plus Meter Screen
12
Introduction
CAUTION: The meter should be handled with care. Dropping,
rough handling, etc. may damage the meter. Also, protect
the meter from moisture, prolonged direct sunlight, and high
temperatures.
Overview
To perform a test, the operator simply inserts a test strip;
places a drop of sample onto the test strip; and obtains a
lactate test result in 13 seconds. The test result is automatically stored into the meter’s memory. The operator can
recall, delete, and review test data resident in the meter,
including the average for each control and user profile’s
results.
13
Introduction
Meter, Supplies, Transport Case
The Nova Lactate Plus Meter (40828) comes in a soft carrying case that includes:
1. Lactate Plus Meter with Battery
2. Instructions for Use Manual
3. Quick Reference Guide
See Page 39 for a listing of supplies and accessories.
14
Introduction
Environmental
• The storage temperature range for the Meter:
-13°F to 115°F (-25°C to 46°C)
• The storage temperature range for the Test Strips and Control
Solutions: room temperature - 15°-30°C/59-86°F
• The meter operational temperature range for Lactate:
41°F to 113°F (5°C to 45°C)
• The relative humidity range: 10% to 90% non-condensing
15
Setup
Set the Time
button for longer than 3 seconds. The
• Press the MODE
meter if in Sleep Mode wakes up and enters the SETUP
Mode.
• View the hour (flashing) format: either 12 Hr or 24 Hr by
button to toggle between the
pressing the SEARCH
2 time format options available.
button to choose the Hour For• Press the SELECT
mat.
• The meter displays the current time or the default time:
12:00 AM or 0:00 (hours).
• Press the SEARCH
button to progress from 1AM to
12PM (for 12 Hr Clock) or 0 to 23 (for 24 Hr Clock). The
hour digits will be flashing until selected.
16
Setup
• Press the SELECT
button to select the displayed
Hour choice.
• Next set the minutes. Press the SEARCH
button to
progress from 00 to 59 minutes. The minute digits will be
flashing until selected.
button to select the displayed
• Press the SELECT
Minutes choice.
17
Setup
1a. Select 12 Hour, then select
hour with AM/PM.
1b. Or Select 24 Hour, then
select hour.
18
2. Select minutes.
Setup
Set Date Format
• After the time has been set up, set date format is next. The
display is 12-31 2004 or 31.12 2004.
• You can choose to have the date as DD.MM or MM-DD.
These digits will be flashing until selected. Press the
button to toggle between DD.MM or MMSEARCH
DD.
button to select the displayed
• Press the SELECT
Date Format choice.
button to display years from
• Press the SEARCH
2004 to 2099. The year numbers will be flashing. Displays
current date/time or default (1-01 2004).
button to select the displayed
• Press the SELECT
Year choice.
19
•
•
•
•
•
20
Setup
The date is displayed as selected in the date format: either
DD.MM or MM-DD.
button to progress through the 12
Press the SEARCH
months (1 to 12). The 2 month numbers will be flashing.
button to select the displayed
Press the SELECT
Month choice.
Lastly, press the SEARCH
button to progress through
the days of a month: 1 to 31. The 2 day numbers will be
flashing.
Press the SELECT
button to select the displayed
Day choice.
Setup
3. Select Date format:
MM-DD or DD.MM.
4. Select Year with
Search button.
5. Select Month.
6. Select Day.
21
Setup
Beeper On or Off
• Next is the Beeper on or off. Press the SEARCH
button to toggle between ON and OFF (flashing).
button to select the displayed ON
• Press the SELECT
or OFF choice.
7. Select Beeper ON or Beeper OFF.
22
Setup
End of Setup
• The screen displays END.
button for 1.5 seconds to save the
• Press the MODE
setup configuration.
• The meter will power down. The new settings will be applied once the meter is powered back up.
8. End of Setup
23
Testing: Blood and Quality Control Solutions
NOTE: Before running a blood or quality control test, check
that the expiration date of the test strips and control solution
has not elapsed. (See product insert sheets for details.)
The control solution test results should fall within the range
of results printed on the label of the control solution. You
should run a control solution test:
• Before using your Nova Lactate Plus Meter for the first
time and at least once a week thereafter
• Each time you open a new box of Nova Lactate Test Strips
• If you leave the Nova Lactate Test Strip vial cap open
for an extended period of time
• If you drop your Nova Lactate Plus Meter
• If your results are higher or lower than expected
User should follow the appropriate Federal, State, and Local
Guide Lines concerning the running of external quality controls.
24
Testing: Blood and Quality Control Solutions
Testing a Quality Control Solution
1. Grasp a test strip with logo side up and gold
side down. Then insert the gold end into the
meter. (See Meter figure.)
2. Identify the sample as a control; use the
SEARCH
button to find the desired
control level: CrL 1 or CrL 2.
3. Shake the control solution well before each use. Discard
the first drop.
4. Place a drop of control solution from the
bottle at the end of the test strip until the solution is drawn into the well of the test strip.
NOTE: The on-screen Control Drop flashes on and off
repeatedly until sufficient control solution has been added
to the test strip.
25
5.
6.
7.
8.
26
Testing: Blood and Quality Control Solutions
A Lactate quality control test result is available onscreen in 13 seconds.
The result is automatically stored into memory.
If this result is not needed, press the SELECT
button for 2 seconds to go to dELEtE (flashes) mode (while
the test strip is still in place).
again to confirm deletion or press
Press SELECT
SEARCH
to stop deletion and exit the delete
mode.
Testing: Blood and Quality Control Solutions
Testing a Blood Sample
NOTE: The hands should be warm and relaxed. Obtain
blood sample from a finger.
1. Check that the expiration date of the test strips has not
elapsed.
2. Wash hands with water then dry thoroughly. Alternatively,
use alcohol pads to clean area 3 times; dry thoroughly
after each cleaning.
3. Grasp a test strip. Insert the gold end into the meter.
4. Select a profile number; use the SEARCH
button
to find the Profile Number (P0 to P9).
NOTE: Cleaning of the puncture site is important. Sweat left
on the fingers may cause falsely high lactate test results.
27
Testing: Blood and Quality Control Solutions
5. Holding hand downward, massage finger with thumb
toward tip to stimulate blood flow.
6. Use the lancet to puncture the finger.
7. Wipe off the first drop with a clean tissue. The first drop
may be contaminated.
8. Squeeze the finger to form a second drop of blood. To
avoid collection of interstitial fluid as well as blood, do
not squeeze vigorously
9. When the second blood drop appears, touch the end
of the test strip to the blood drop until
the well of test strip is full and the meter
beeps.
NOTE: The on-screen Blood Drop flashes on
and off repeatedly until sufficient blood has been added to the
test strip.
28
Testing: Blood and Quality Control Solutions
10. If subject has to immediately return to exercise and
puncture site is still bleeding, apply light pressure with
a cotton pad or tissue until the bleeding stops or cover
with a bandage.
11. The Lactate result is available on-screen in 13 seconds.
12. The result is automatically stored into memory.
but13. If the result is not needed, press the SELECT
ton for 2 seconds to go to dELEtE (flashes) mode (while
the test strip is still in place).
14. Press SELECT
again to confirm deletion or press
SEARCH
to stop deletion and exit the delete
mode.
29
Testing: Blood and Quality Control Solutions
WARNING: Once a disposable item, i.e., lancet, test
strip, alcohol swab, etc., has been used, it is considered contaminated. Dispose of all contaminated materials in accordance with local regulations. Equipment
such as lancets and tissues must be used only once
and then disposed of even when repeated measurements are being made on the same subject.
Reference
Graeme Maw, Simon Locke, David Cowley, and Patricia Witt. 2000. Blood Sampling and Sampling
Techniques. In Physiological Tests for Elite Athletes. ed. Christopher John Gore, PhD. 91-92.
Champaign, IL. Human Kinetics.
30
Testing: Blood and Quality Control Solutions
Profile Number
Lactate Result
Date
Time
Lactate Plus Meter with Display Results
31
Data Review
Data Review
NOTE: If a test strip is inserted while in the Data Review
mode, the meter immediately switches to test mode. If you
then exit the test mode, the meter screen goes blank- the
meter does not return to the Data Review mode.
Manually Reviewing Stored Test or Control Results
button for 2
1. With the meter off, press the MODE
seconds. (To turn the meter off, press the MODE
button for 1.5 seconds.)
2. The most recent test result in the last user’s profile is
displayed.
button to scroll back through
3. Use the SEARCH
the user’s test results.
32
4. Press the MODE
button to advance to the user
profile (P0 to P9) or control level (*1 or *2) that you want
to review.
button to review the test
5. Press the SEARCH
results for the selected user or the control level.
33
Basic Upkeep
Battery Replacement
The meter is powered by a single
3V coin cell battery, 2450. Replace
the battery as follows:
1. Remove the back battery cover
on the meter.
2. Remove the battery and replace with a new one with the
+ side facing up.
3. Replace the battery cover.
4. Go to set up, and reset the
time and date.
Low Battery
Replacing Battery
34
Basic Upkeep
Cleaning and Care
If necessary, clean the Lactate Plus Meter with a clean cloth
dampened with water. Keep liquids from entering the test
strip port or the Search, Enter, and Mode buttons.
CAUTION: Do Not attempt to open the Lactate Plus Meter
to make any repairs. Your warranty and all claims will be
void! Only Nova Biomedical authorized service personnel
can repair the meter. Call Nova Biomedical or an authorized dealer if the meter needs to be repaired or checked.
35
Error Messages
Codes
Code Alerts
E-0
Software error detected
E-1
Hardware error detected
E-2
Meter temperature is outside
of the range for testing
E-3
Defective or previously used
test strip is detected
E-4
A short sample (control
solution or blood) is identified
LO or If test results are outside of the
HI
measuring range of the meter
Battery level is low
36
Action
Perform the test again. If you get the
same error, call Nova Technical Support.
Perform the test again. If you get the
same error, call Nova Technical Support.
Move the meter to an area
where the temperature is acceptable
(41°-113°F), allow meter to adjust to the
temperature. Repeat testing.
Repeat test with a new
test strip.
Repeat test with a new test
strip and adequate sample.
Repeat test. If you get the
same result, consult your physician.
Replace the battery
Appendix
Specifications
Tests Measured
Lactate Methodology
Lactate Test Results
Sample Type
Lactate Test Range
Test Time
Test Strip Volumes
Battery Life (nominal)
Data Output Port
Data Output Cable (optional)
Blood Lactate
Lactate oxidase biosensor
mmol/l (Plasma values)
Whole blood
0.3 to 25.0 mmol/l
13 seconds
0.6 µl
600 Tests
Serial
37
Appendix
Operating Ranges:
Temperature Lactate
Humidity
Weight
Size
41° to 113°F (5° to 45°C)
10% to 90% relative humidity
2.65 oz (75 g)
3.6x2.3x0.9 in
(91.4x58.4x22.9 mm)
On-board data storage files:
1 common file for 20 tests
9 additional user files for 10 tests each
2 control files, 10 tests each
38
Appendix
Accessories:
Vial of Test Strips (25) (REF 40813)
Lactate Plus Control Solution, Level 1 (REF 40815)
Lactate Plus Control Solution, Level 2 (REF 40814)
PC Data Communication (upload) Cable (REF 41235)
Soft Carrying Case (41266)
Battery (DL2450) (REF 41221)
Performance Characteristics
The test result range for Nova Lactate Plus Meter is 0.3 to 25.0
mmol/l for Lactate.
39
Appendix
Accuracy
Accuracy of the Lactate Plus Meter system was assayed at clinical
sites by comparing lactate results obtained by Lactate Plus Meter
vs YSI Reference method from subjects at clinical sites. Blood
lactate measurements obtained from Nova Lactate Plus Meter
were compared with the same subjects’ results from the YSI, a
laboratory reference method. The latter results were plasma-derived values from a blood sample measured on a YSI 2300 Stat
Plus Analyzer.
•
Number of Samples: 210
•
Slope: 0.968
•
Correlation Coefficient (r): 0.997
•
y-intercept: 0.165 mmol/l
•
Range tested: 0.5 - 12.4 mmol/l
These results indicate that Nova Lactate Plus Meter compared well
with the laboratory reference method.
40
Appendix
Precision
Precision of Nova Lactate Plus Meter was measured with both venous blood samples and control solution in laboratory. The results
are shown below:
Lactate Level
Lactate Mean (mmol/l)
20 measurements
1
2
3
4
5
1.6
6.5
10.8
18.1
22.1
CV%
3.6
1.9
1.6
2.7
3.2
S.D. (mmol/l)
0.06
0.12
0.17
0.49
0.7
41
Appendix
References
1.
2.
3.
4.
Clark, L.C. Jr, Noyes, L.K., Grooms, T.A., Moore, M.S.1984. Rapid
Micromeasurement of Lactate in Whole Blood: Critical Care Medicine.
Vol. 12 pp 481-464.
Hirano, K., Yamato, N., Kunimoto, K., and Ohwa, M. 2001. Novel
Electron Transfer mediators Based on Dichloroindophenol Derivatives
for Lactate Oxidase: Journal Electroanalytical Chemistry. Vol. 510 pp
149-152.
Shimoje, N., Naka, K., Uenoyama, H., Hamamoto, K., Yoshioka, K.,
and Kiyoshi, O. 1993. Electrochemical Assay System with Single-use
Electrode Strip for Measuring Lactate in Whole Blood: Clinical Chemistry. Vol. 39 pp 2312-2314.
Sprules, S.D., Hart, J.P., Wring, S.A., and Pittson, R. 1995. A Reagentless, Disposable, Biosensor for Lactic Acid based on a Screenprinted Carbon Electrode Containing Meldola’s Blue and Coated with
Lactate Dehydrogenase, NAD+ and Cellulose Acetate: Anal. Chim.
Acta. Vol 304 pp 17-24.
42
Appendix
Instructional Notes
1. Inserting a test strip overrides all other modes.
2. There is no “All segments Screen” in Upload mode.
3. When in Upload mode, no other meter functions are available, and there is no response by meter to button
presses.
4. The meter times out in 5 minutes in Upload mode.
5. Inserting a test strip overrides any mode except Upload
mode.
6. If in setup mode when the test strip is inserted, the meter saves all values entered up to that point and immediately switches to test mode. Upon exiting test mode the
meter screen goes blank and does not return to setup
mode.
43
Appendix
7. If in Data Review mode when the test strip is inserted,
the meter immediately switches to test mode. Upon exiting test mode the meter screen goes blank and does not
return to Data Review mode.
8. Battery low icon is displayed in every mode except setup.
9. Once battery level goes below the threshold that triggers the “low battery” warning, it continues to give the
warning until the meter becomes unusable due to low
battery.
10. A failed control solution does NOT lock the user out of
the meter.
11. Beeps that are not disabled when ‘BEEP’ is set to OFF:
The ‘quick triple beep’ warning for HI or LO errors and
Error codes E0 to E4.
44
Appendix
12. The Meter responses to the pressing and the holding of keys:
SEARCH key
- The Meter responds immediately after the
SEARCH key is pressed.
- In cases where the SEARCH key moves forward
through a series of stored test result screens or
increments a value, hold down the SEARCH key
to speed up screen change process.
MODE key
- When the MODE key is pressed < 1.5 seconds to
advance to the next function, the meter advances
to next screen immediately when key pressed.
- While meter is in sleep mode (OFF), pressing the
MODE button < 1.5 seconds wakes up the meter
and enters data review mode.
45
Appendix
- While meter is in sleep mode (OFF), pressing the
MODE button > 3.0 seconds wakes up the meter
and enters setup mode.
- While meter is awake (ON), pressing the MODE
button > 1.5 seconds manually turns off the meter
(sleep mode).
- While meter is in DATA REVIEW, pressing the
MODE < 1.5 seconds puts into “Avg” screen of the
next user.
13. With No Activity, Time-out will occur in
1 Minute for all screens
4 Minutes during analysis
2 Minutes after the completion of analysis
5 Minutes when upload connector inserted
46
Appendix
Warranty
Subject to the exclusions and upon the conditions specified below, Nova Biomedical or the authorized Nova Biomedical distributor warrants that he will
correct free of all charges including labor, either by repair, or at his election,
by replacement, any part of an instrument which fails within one (1) year
from date of shipment because of defective material or workmanship. This
warranty does not include normal wear from use and excludes: (A) Service
or parts required for repair of damage caused by accident, neglect, misuse,
altering the Nova equipment, unfavorable environmental conditions, electric
current fluctuations, work performed by any party other than an authorized
Nova representative or any force of nature; (B) Work which, in the sole and
exclusive opinion of Nova, is impractical to perform because of location,
alterations in the Nova equipment or connection of the Nova equipment to
any other device; (C) Specification changes; (D) Service required to parts in
the system contacted or otherwise affected by expendables or reagents not
manufactured by Nova which cause shortened life, erratic behavior, damage
or poor analytical performance; (E) Service required because of problems,
which, in the sole and exclusive opinion of Nova, have been caused by
any unauthorized third party; or (F) Instrument refurbishing for cosmetic
47
Appendix
purposes. All parts replaced under the original warranty will be warranted
only until the end of the original instrument warranty. All requests for warranty replacement must be received by Nova or their authorized distributor
within thirty (30) days after the component failure. Nova Biomedical reserves
the right to change, alter, modify or improve any of its instruments without
any obligation to make corresponding changes to any instrument previously
sold or shipped. All service will be rendered during Nova’s principal hours of
operation. Contact Nova for specific information.
The following exceptions apply:
•
Consumable items, including the test strips and quality control
solutions are warranted to be free of defects at time of initial use. The
item must be placed into service prior to the expiration date printed on
the packaging. All defects must be promptly reported to Nova Biomedical in writing.
•
Freight is paid by the customer.
This warranty is invalid under the following conditions:
1. The date printed on the package label has been exceeded.
2. Non-Nova Biomedical reagents or controls are used, as follows:
Nova Biomedical will not be responsible for any warranty on Lactate
48
Plus Meter if used in conjunction with and are adversely affected by
reagents, controls, or other material not manufactured by Nova but
which contact or affect such parts. Reagent or quality control solution
formulations not manufactured by Nova Biomedical may contain acids,
concentrated salt solutions, and artificial preservatives that have been
shown to cause problems such as erratic analytical results or inaccurate meter performance.
THE FOREGOING OBLIGATIONS ARE IN LIEU OF ALL OTHER OBLIGATIONS AND LIABILITIES INCLUDING NEGLIGENCE AND ALL WARRANTIES, OF MERCHANTABILITY OR OTHERWISE, EXPRESSED OR IMPLIED
IN FACT BY LAW AND STATE OUR ENTIRE AND EXCLUSIVE LIABILITY
AND BUYER’S EXCLUSIVE REMEDY FOR ANY CLAIM OF DAMAGES IN
CONNECTION WITH THE SALE OR FURNISHING OF GOODS OR PARTS,
THEIR DESIGN, SUITABILITY FOR USE, INSTALLATION OR OPERATION.
NOVA BIOMEDICAL WILL IN NO EVENT BE LIABLE FOR ANY SPECIAL OR
CONSEQUENTIAL DAMAGES WHATSOEVER, AND OUR LIABILITY UNDER
NO CIRCUMSTANCES WILL EXCEED THE CONTRACT PRICE FOR THE
GOODS FOR WHICH THE LIABILITY IS CLAIMED.
49
50
Nova Biomedical
200 Prospect Street
Waltham, MA 02454-9141
U.S.A.
Telephone: 1-800-350-5024
1-781-894-0800
Fax:
1-781-894-5915
Web:
www.novalactate.com
U.S. Patent Nos. 6,258,229, 6,287,451, and 6,837,976
(Additional Foreign Patents apply)
Made in the USA by Nova Biomedical Corporation
Copyright 2006 Nova Biomedical Corporation
41293B
01.2007