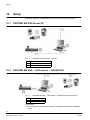
1
SISTORE MX NVS
Application Software For
Network-Based Video
Recording
Installation Manual
V2.80
Building Technologies
Fire Safety & Security Products
Liefermöglichkeiten und technische Änderungen vorbehalten.
Data and design subject to change without notice. / Supply subject to availability.
© 2009 Copyright by
Siemens Building Technologies
Wir behalten uns alle Rechte an diesem Dokument und an dem in ihm dargestellten Gegenstand vor. Der Empfänger anerkennt diese
Rechte und wird dieses Dokument nicht ohne unsere vorgängige schriftliche Ermächtigung ganz oder teilweise Dritten zugänglich machen
oder außerhalb des Zweckes verwenden, zu dem es ihm übergeben worden ist.
We reserve all rights in this document and in the subject thereof. By acceptance of the document the recipient acknowledges these rights
and undertakes not to publish the document nor the subject thereof in full or in part, nor to make them available to any third party without our
prior express written authorization, nor to use it for any purpose other than for which it was delivered to him
About this document
This document contains information on the installation, configuration and setup of
SISTORE MX NVS. For more detailed information on configuration please refer to
the Configuration Manual. For information on operation please refer to the User
Manual.
Trademarks
SISTORE is a trademark of Fire & Security Products GmbH & Co. oHG.
Microsoft is a registered trademark and Windows a trademark of Microsoft
Corporation.
All other product or company names mentioned in this document are trademarks or
registered trademarks of their respective owners and are used only for purposes of
identification or description.
Contacting us
If you have questions or suggestions regarding the product or this documentation,
please contact our Customer Support Center.
Intranet:
E-Mail:
Tel.:
http:/intranet.sbt.siemens.com/fs/CSC
0H
[email protected]
1H
+49 89 9221 8000
Training courses
Siemens Fire & Security Products provides training courses for all products.
Contents
1
1.1
1.2
1.2.1
1.2.2
1.2.3
1.2.4
Safety ....................................................................................................... 5
Target readers........................................................................................... 5
Work safety information ............................................................................ 5
Handling .................................................................................................... 5
Transport................................................................................................... 5
Storage...................................................................................................... 5
Service and maintenance ......................................................................... 6
2
Package contents.................................................................................... 6
3
Details for ordering ................................................................................. 6
4
4.1
4.2
System requirements ............................................................................. 7
SISTORE MX NVS (server) ...................................................................... 7
SISTORE RemoteView (client) ................................................................. 8
5
5.1
5.2
5.3
Software description .............................................................................. 9
SISTORE MX NVS (server) ...................................................................... 9
SISTORE RemoteView (client) ................................................................. 9
General information on LAN cameras....................................................... 9
6
6.1
6.2
6.3
6.4
6.5
6.5.1
6.5.2
Installation ............................................................................................. 11
Installing SISTORE MX NVS .................................................................. 11
Subsequently installing a hardware driver .............................................. 15
Installing RemoteView on a client PC ..................................................... 17
Removing SISTORE MX NVS ................................................................ 21
Updating SISTORE MX NVS and RemoteView software....................... 22
From version 2.5x to version 2.80........................................................... 22
From version 2.6x and higher to version 2.80 ........................................ 22
7
7.1
7.2
7.3
7.4
7.4.1
7.4.2
7.5
7.6
7.7
7.8
7.9
Configuration......................................................................................... 23
Starting the software ............................................................................... 23
Login ....................................................................................................... 23
Show last users to log on........................................................................ 24
Change password ................................................................................... 24
Changing the password using the menu item New password................ 24
Changing the password using the menu item User management.......... 24
Select language ...................................................................................... 25
Resolution and file format ....................................................................... 26
Set date and time of client PC ................................................................ 27
Get time of Client PC from an NTP Server ............................................. 28
Further information.................................................................................. 28
8
Software update .................................................................................... 29
9
Writing to CD/DVD................................................................................. 29
3H
4H
5H
6H
7H
8H
9H
10H
1H
12H
13H
14H
15H
16H
17H
18H
19H
20H
21H
2H
23H
24H
25H
26H
27H
28H
29H
30H
31H
32H
3H
34H
35H
36H
37H
38H
39H
40H
3
Siemens Building Technologies
Fire Safety & Security Products
03.2009
10
10.1
10.2
10.3
10.5
10.5.1
10.5.2
10.6
10.7
10.8
Setup ......................................................................................................30
SISTORE MX NVS Server PC ................................................................30
SISTORE MX NVS – LAN camera – CKA4810/20.................................30
SISTORE MX NVS (server) – SISTORE RemoteView (client) –
CKA4810/20 ............................................................................................31
Multimedia Control Panel – SISTORE MX NVS (server) – SISTORE
RemoteView (client) ................................................................................33
Activating alarm connection from Siemens LAN cameras CCIx1345..... 40
Matching IP ports ....................................................................................40
Configuring a LAN camera......................................................................41
SISTORE MX NVS – SISTORE RemoteView – multi-server mode ....... 44
SISTORE MX NVS – MX Multi Channel Box RCI 0601 and CDM ......... 45
SISTORE MX NVS – Miniter interface and Miniter reader .....................46
11
11.1
11.1.1
11.1.2
11.2
11.2.1
11.2.2
11.2.3
11.3
11.3.1
11.3.2
11.4
USB input/output modules...................................................................47
Technical data of the USB input/output modules.................................... 48
Technical data of the USB input module.................................................48
Technical data of the USB output module ..............................................48
Connecting USB input/output modules ...................................................48
Connecting USB input module USBOPT08 ............................................48
Connecting USB output module USBREL8 ............................................49
Connecting USB input and output module USBOPTOREL16 ................50
Module addressing..................................................................................52
Modules with 8 inputs/outputs.................................................................52
Modules with 16 inputs/outputs...............................................................52
Configuring USB input/output modules................................................... 52
41H
42H
43H
4H
10.4
45H
46H
47H
48H
49H
50H
51H
52H
53H
54H
5H
56H
57H
58H
59H
60H
61H
62H
63H
4
Siemens Building Technologies
Fire Safety & Security Products
03.2009
Safety
1
Safety
1.1
Target readers
The instructions in this document are designed for the following target readers:
1.2
Target readers
Qualification
Activity
Condition of the
product
Operational startup
personnel
Has working knowledge Puts the product into
of computers.
operation for the first
Training on the product time, or changes the
existing configuration.
is recommended.
The product is not yet
installed and
configured.
End user
Has working knowledge Performs the
of computers.
procedures for proper
Instruction by technical operation of the
specialists is necessary. product.
The product is not yet
installed and
configured.
Work safety information
z Read the general safety precautions before installing the software.
z Keep this document for reference.
z Always pass this document on together with the device.
1.2.1
Handling
Damage due to improper handling
z Protect the CD from scratching.
z To clean the CD use a soft dry cloth.
1.2.2
Transport
Damage during transport
z Always transport the CD in the case it originally came in.
1.2.3
Storage
Damage due to improper storage
z Always store the CD in its protective case.
z Keep the CD in an environment with a relative humidity of 10 – 90 %.
z Keep the CD between -5 and +55 °C.
z Do not store the CD in excessively dusty places.
z Do not keep the CD close to sources of magnetic radiation.
z Protect the CD from moisture.
z Protect the CD from direct sunlight.
5
Siemens Building Technologies
Fire Safety & Security Products
03.2009
Package contents
1.2.4
Service and maintenance
Data loss after update
z Make sure to backup all data before updating the system.
2
Package contents
z CD with SISTORE MX NVS software
z SISTORE MX NVS Configuration Manual and User Manual on CD
z SISTORE MX NVS Installation Manual
z Supplement Getting Started in six languages
z USB dongle for software licence with 4, 9, 16, 32 or 64 LAN cameras
Dongle 4
Operation of 4 LAN cameras
Dongle 9
Operation of 9 LAN cameras
Dongle 16
Operation of 16 LAN cameras
Dongle 32
Operation of 32 LAN cameras
Dongle 64
Operation of 64 LAN cameras
If no USB dongle is installed, the software only runs in demo mode. In demo mode you can configure
and evaluate only one LAN camera.
3
Details for ordering
Type
Order No.
Designation
SISTORE MX NVS 4
S24245-P5099-A1
Open IP software for 4 IP cameras
SISTORE MX NVS 9
S24245-P5099-A2
Open IP software for 9 IP cameras
SISTORE MX NVS 16
S24245-P5099-A3
Open IP software for 16 IP cameras
SISTORE MX NVS 32
S24245-P5099-A4
Open IP software for 32 IP cameras
SISTORE MX NVS 64
S24245-P5099-A5
Open IP software for 64 IP cameras
Accessories, not included in delivery!
Type
Order No.
Designation
USBOPTO8
2GF4811-8CH
USB input module - 8 channels with optocoupler function
USBREL8
2GF4811-8CG
USB output module - 8 channels with relay function
USBOPTOREL16
2GF4811-8CJ
USB input and output modules with 16 optocoupler inputs and
16 relay outputs
CKA4820
2GF2400-8EC
PTZ control unit with joystick
MX Multi-Channel Box (CDM, S24245-F5092-A1 For connection of cash dispensers or cash box systems
POS, Data)
Further accessories can be found in the Internet: www.buildingtechnologies.siemens.com > Products
& Systems > Electronic Security > Catalogue Downloads.
2H
6
Siemens Building Technologies
Fire Safety & Security Products
03.2009
System requirements
4
System requirements
4.1
SISTORE MX NVS (server)
z Operating system Windows XP SP2 or higher, or Windows Vista
z Pentium IV 2.6 GHz or higher (max. 16 cameras)
z Pentium IV 3.0 GHz or higher, or rather Core 2 Duo / Quattro 2.6 GHz or higher
(up to 64 cameras)
z Min. 1 GB RAM, max. 2 GB with Windows XP
z Min. 1 GB RAM, max. 4 GB with Windows Vista
z S-VGA graphics card, 1024 x 768, 16-bit colour depth, graphics memory 64 MB
or higher
z The graphics card driver must fully support Direct X functionality V9.0C or higher
z Hard disk capacity 120 GB or higher
z System partition 10 GB or more
z CD/DVD burner
z MF2 keyboard, mouse
z Network connection
z Min. 2 USB ports (2.0)
z Internet Explorer 6.x or higher
z Monitor with min. 17-inch screen
z Display resolution 1024 x 768 pixel or higher
z Optional: Laser printer or inkjet printer
Some AMD processors do not support the tamper detection function. The corresponding buttons will
be disabled in the software.
For the Bank mode or Cash dispenser function the hard disk must at least have 2 data partitions.
7
Siemens Building Technologies
Fire Safety & Security Products
03.2009
System requirements
4.2
SISTORE RemoteView (client)
z Operating system Windows XP SP2 or higher, or Windows Vista
z Pentium IV 2.6 GHz or higher (max. 16 cameras)
z Pentium IV 3.0 GHz or higher (up to 36 cameras)
z Min. 1 GB RAM, max. 2 GB RAM with Windows XP
z Min. 1 GB RAM, max. 4 GB with Windows Vista
z S-VGA graphics card, 1024 x 768 or 1280 x 1024, 16-bit colour depth,
graphics memory 64 MB or higher
z The graphics card driver must fully support Direct X functionality V9.0C or higher
z CD-ROM drive
z MF2 keyboard, mouse
z Network connection
z Min. 2 USB ports (2.0)
z Internet Explorer 6.x or higher
z Monitor with min. 17-inch screen
z Display resolution 1024 x 768 or higher
z Optional: Laser printer or inkjet printer
z Optional: CD/DVD burner
8
Siemens Building Technologies
Fire Safety & Security Products
03.2009
Software description
5
Software description
SISTORE MX NVS consists of a scalable client-server architecture. The SISTORE
MX NVS servers and the SISTORE RemoteView clients are distributed in the
network and enable the design and configuration of small to large video monitoring
systems.
5.1
SISTORE MX NVS (server)
Each server supports the administration, recording and playback of up to 64 LAN
cameras. For larger systems, multi-server configurations are supported. It is
possible to connect LAN cameras from Siemens as well as from third parties to the
server. See Section 5.3 General information on LAN cameras.
64H
5.2
65H
SISTORE RemoteView (client)
SISTORE RemoteView is a client application which can be installed independent of
the other software components. In this version SISTORE RemoteView, SISTORE
Player and the Software Codec are installed. SISTORE RemoteView is only used
for the evaluation of video data.
5.3
General information on LAN cameras
Be aware of the following when using LAN cameras:
z Multiple users can access LAN cameras simultaneously. Simultaneous access
by multiple users lowers the frame rate.
z Settings made by a user on a LAN camera, such as modifying the image
parameters via a browser, have system-wide effects.
SISTORE MX NVS supports the following LAN cameras:
Arecont
Vision 1300, Vision 2100, Vision 3100, Vision 3130 Day,
Vision 3130 Night
Axis
205, 206/W, 206M, 207MW, 209FD, 210, 211, 211M, 212 PTZ,
213 PTZ, 215 PTZ, 216FD, 216MFD, 221, 223M, 225FD, 231D+,
232D+, 233D, 240Q, 241Q, 241S, Generic HTTP Interface V1.0,
VAPIX Interface
CBC
MP2A, MP3DN Day, MP3DN Night
Convision
VISTABOX 6XX
Dallmeier
DF3000 IP
Digilan
TV7214
Eneo
ENC-1003L
IQ invision
IQ501, IQ510, IQ511, IQ603, IQ 752, IQ753, IQ755
JVC
VN-C10U; VN-C30U, VN-C625U, VN-C655U
Lumenera
LE175C, LE275C, LE375C
9
Siemens Building Technologies
Fire Safety & Security Products
03.2009
Software description
Mobotix
D12 one or two cameras, M1 Models, M10 Models, M10D-Night,
M12 Models, M12D-Night, M22M
Panasonic
KX-HCM-280, WV-NF284, WV-NM100/G, WV-NP1000, WV-NP244E,
WV-NP472, WV-NS202, WV-NS320, WV-NW470, WV-NW960
Pixord
205
Samsung
SNC-L200
Siemens
CCIC1410, CCIS1337-LP, CCIX1345, CFVA-IP, CVVA-IP,
CFMC1315 LP, CCID1410, CCMC1315 LP, TELSCAN WEB Server
Sony
Generic HTTP interface, SNC-CS11, SNC-CS3P, SNC-DF40P,
SNC-M1/W, SNC-M3/W, SNC-P1, SNC-P5, SNC-RZ25P,
SNC-RZ30P/2, SNC-RZ50P, SNC-Z20P, SNT-V704
Toshiba
IK-WB21A
VINWP1
2051
Vivotek
MJPEG Models, PZ6122, VS2402, IP7138
Depending on the functional scope of the LAN camera, many operating elements
of the LAN cameras tab may be disabled.
Altogether a maximum of 64 LAN cameras can be connected.
Access to LAN cameras takes place with significantly greater latency. The reason
for this is the greater communication load between the SISTORE MX NVS and a
LAN camera. Besides the LAN cameras, the network also has an effect on the
latency.
The operation of the system can be slow if all connections for LAN cameras (64)
are used.
To keep the processor load below 90 %, we recommend setting the resolution of LAN cameras low
(CIF format). The image quality should be set to approximately 70 %. The following rule applies: The
higher the performance of the server PC, the higher the image quality and the lower the processor
load. See Section 4 System requirements.
6H
67H
Exact specifications for the image quality and the required hard drive capacity are
not possible with LAN cameras, since each LAN camera has different quality levels
and interprets specifications differently.
10
Siemens Building Technologies
Fire Safety & Security Products
03.2009
Installation
6
Installation
6.1
Installing SISTORE MX NVS
Prerequisites:
z The user must be logged in to Windows at least as a main user or rather as an
admin user. This applies to the first-time installation of the software as well as to
a subsequent driver update.
z For the system requirements please refer to Section 4: System requirements.
68H
1.
Place the CD in the appropriate drive of your PC.
2.
Start SISTORE_MX_NVS_280.exe.
69H
The installation program will start automatically when the CD is inserted if your operating system has
the appropriate configuration.
3.
Select a language.
4.
Click OK.
11
Siemens Building Technologies
Fire Safety & Security Products
03.2009
Installation
Î
5.
Î
The following window will appear:
Click Next.
The following dialog box opens:
6.
Select a destination folder.
7.
Click Next.
12
Siemens Building Technologies
Fire Safety & Security Products
03.2009
Installation
Î
8.
The following dialog box opens:
Select the desired software component (see Section 5 Software description).
70H
71H
More information on user-defined installation can be found in Section 6.2 Subsequently installing a
hardware driver.
72H
9.
Î
73H
Click Next.
The following dialog box opens:
10. Enter the name of the program folder and click Next.
Î
The following window will appear:
13
Siemens Building Technologies
Fire Safety & Security Products
03.2009
Installation
11. Close all programs and click OK.
Î
The desired components will now be installed.
12. Click Next.
Î
The following window will appear:
13. Confirm with Yes.
Î
The following dialog box opens:
14. Click Finish.
Î
The computer will be restarted.
15. After restarting your PC, connect a USB dongle to the USB port.
See Section 2: Package contents.
74H
75H
16. Follow the instructions of the InstallShield Wizard until the dongle driver is
installed correctly.
17. Restart SISTORE MX NVS.
14
Siemens Building Technologies
Fire Safety & Security Products
03.2009
Installation
6.2
Subsequently installing a hardware driver
Prerequisites:
z The user must be logged in to Windows at least as a main user or rather as an
admin user. This applies to the first-time installation of the software as well as to
a subsequent driver update.
z For the system requirements please refer to Section 4: System requirements.
76H
1.
Place the CD in the appropriate drive of your PC.
2.
Start SISTORE_MX_NVS_280.exe.
7H
The installation program will start automatically when the CD is inserted if your operating system has
the appropriate configuration.
Î
The following window will appear:
3.
Select the option Modify.
4.
Click Next.
15
Siemens Building Technologies
Fire Safety & Security Products
03.2009
Installation
Î
The following dialog box opens:
Hardware driver
Function
CKA4810 / CKA4820 Activation of a CKA control panel
Hardware watchdog
Activation of an additional module in the PC (type PWDOG1 from Quancom)
USB IO
Activation of inputs and outputs via USB modules
WIBU dongle
Licence dongle for 4, 9, 16, 32 or 64 LAN cameras
5.
Select CKA4810 / CKA4820 or Hardware Watchdog.
6.
Click Next.
Î
7.
The following dialog box opens:
Click Finish.
16
Siemens Building Technologies
Fire Safety & Security Products
03.2009
Installation
Î
The computer will be restarted.
Î
When the computer is restarted, the symbol for CKA will appear in the task
bar.
1
8.
6.3
CKA symbol
Restart SISTORE MX NVS RemoteView.
Installing RemoteView on a client PC
Prerequisite:
z The user must be logged in to Windows at least as a main user or rather as an
admin user. This applies to the first-time installation of the software as well as to
a subsequent update.
z For the system requirements please refer to Section 4: System requirements.
78H
79H
1.
You can either use a CD drive or copy the software supplied onto a memory
stick.
2.
Launch the file SISTORE_MX_ RemoteView_280.exe.
The installation program will start automatically when the CD is inserted if your operating system has
the appropriate configuration.
Fig. 1
Setup language
3.
Select a language.
4.
Click OK.
17
Siemens Building Technologies
Fire Safety & Security Products
03.2009
Installation
Î
The following dialog box opens:
Fig. 2
5.
Î
InstallShield Wizard
Click Next.
The following dialog box opens:
Fig. 3
"Choose Destination Location" dialog
6.
Do not change the destination folder.
7.
Click Next.
18
Siemens Building Technologies
Fire Safety & Security Products
03.2009
Installation
Î
The following dialog box opens:
Fig. 4
"Setup type" dialog
8.
Select the setup type RemoteView.
9.
Click Next.
Î
The following dialog box opens:
Fig. 5
"Select program folder" dialog
10. Do not change the SISTORE MX REMOTEVIEW program folder.
11. Click Next.
19
Siemens Building Technologies
Fire Safety & Security Products
03.2009
Installation
Î
The following window will appear:
12. Close all programs and click OK.
Î
The installation will now be carried out.
Î
Wait until the window InstallShield Wizard Complete appears:
Fig. 6
"InstallShield Wizard Complete" dialog
13. Click Finish.
Î
SISTORE RemoteView has been installed.
20
Siemens Building Technologies
Fire Safety & Security Products
03.2009
Installation
6.4
Removing SISTORE MX NVS
1.
Start SISTORE_MX_NVS_280.exe.
Î
The following window will appear:
1.
Select the option Remove.
2.
Click Next.
Î
This automatically takes you to the end of the program.
If the CEVIS or Siemens directory still exists after uninstalling the program, it has to be deleted
manually.
21
Siemens Building Technologies
Fire Safety & Security Products
03.2009
Installation
6.5
Updating SISTORE MX NVS and RemoteView software
6.5.1
From version 2.5x to version 2.80
If you upgrade to a newer version of the program, the parameters of the previous version will be saved
automatically.
1.
Start either SISTORE_MX_NVS_280.exe or
SISTORE_MX_ RemoteView_280.exe.
2.
Answer Next and/or Finish in the subsequent dialogs.
3.
Confirm that you want to delete the old version.
Î
6.5.2
The new version will now be installed.
4.
If necessary, delete the old \CEVIS or \SIEMENS directory manually.
5.
Select Start > Programme > SISTORE MX NVS or Start > Programs >
SISTORE RemoteView to start the desired program.
From version 2.6x and higher to version 2.80
1.
Start either SISTORE_MX_NVS_280.exe or
SISTORE_MX_ RemoteView_280.exe.
2.
Answer Next and/or Finish in the subsequent dialogs.
Î
The new version is now installed.
22
Siemens Building Technologies
Fire Safety & Security Products
03.2009
Configuration
7
Configuration
7.1
Starting the software
1.
Double-click on the desktop shortcut SISTORE MX NVS.
– OR –
Select the directory SISTORE MX NVS in the Windows start menu.
7.2
Login
1.
Choose Login from the File menu.
2.
Click on the Login button
Î
3.
in the toolbar.
The following dialog box will appear:
Enter the following in the login dialog:
User name
Enter the user name created for you by the administrator. The entry is casesensitive.
(Default in the delivery configuration: user name = Administrator)
Password
Enter the password created for you by the administrator. The password is
displayed as asterisks (***). The entry is case-sensitive.
(Default in the delivery configuration: password = Administrator)
4.
Confirm with OK.
We advice to change the administrator‘s password. The user name “Administrator“ cannot be deleted.
23
Siemens Building Technologies
Fire Safety & Security Products
03.2009
Configuration
7.3
Show last users to log on
1.
Î
7.4
Click on the arrow in the Login button
.
The last five users to log on will be displayed.
Change password
There are two options for changing the password:
z By selecting the menu item New password
z By selecting the menu item User management
7.4.1
Changing the password using the menu item New password
1.
Select New password in the File menu.
2.
Enter the current password in the appropriate field for the Old password.
3.
Enter the new password in the fields New password and Confirm
password.
The password should be at least eight characters long.
4.
7.4.2
Confirm with OK.
Changing the password using the menu item User management
Prerequisite:
z You need the authorisation Configuration.
1.
Î
Select Configuration from the Administration menu.
The Configuration dialog appears.
2.
Select the User management tab.
3.
Enter the new password in the fields Password and Confirm password.
The password should be at least 8 characters long.
4.
Confirm with OK.
24
Siemens Building Technologies
Fire Safety & Security Products
03.2009
Configuration
7.5
Select language
1.
Select the menu sequence Administration > Configuration.
Î
The Configuration dialog box will appear.
2.
Select the System tab.
3.
Select the desired language.
– OR –
Select Automatic and the application starts in the language set as the
regional language in the operating system.
4.
Click OK.
5.
Restart SISTORE MX NVS.
Î
The language has been changed.
z To have the Windows dialogs (e.g. Print, Save AS…) displayed in another language, you must
additionally change the language of the operating system in the Control Panel.
z To change the date and time format, make the desired settings in the Regional Options in the
Control Panel.
25
Siemens Building Technologies
Fire Safety & Security Products
03.2009
Configuration
7.6
Resolution and file format
The files stored by SISTORE MX NVS have the extension .K26 or .AVI depending
on the system parameterization. These settings are made in the Recording
section in the System tab of the Configuration dialog.
Files with the extension .K26 are encrypted image files in AVI-similar format. They
can be evaluated only with the SISTORE Player. To create these files, select the
System tab in the Configuration dialog and tick the checkbox Encrypt video files
in the Recording section.
Fig. 7
"Encrypt video files" checkbox
AVI files can be handled with the Media Player of Windows provided that the
operating system provides an appropriate codec.
The resolution of the images stored in these files is dependent on the operating
characteristics of the individual cameras and the settings made.
The resolution of the transmitted images can be configured individually for each
camera.
26
Siemens Building Technologies
Fire Safety & Security Products
03.2009
Configuration
7.7
Set date and time of client PC
Adjust the time of your PC to the time zone where your PC is run, e.g. GMT +
01:00 Amsterdam, Berlin, Bern, Rome, Stockholm, Vienna.
You can set these parameters in the dialog box that you open via the Start menu:
Start > Settings > Control Panel > Date and Time:
Fig. 8
Open Date/Time dialog box from the Start menu
27
Siemens Building Technologies
Fire Safety & Security Products
03.2009
Configuration
7.8
Get time of Client PC from an NTP Server
An NTP Server always provides the current time. The time of your PC will be
updated continuously with the time from the NTP Server . This is a periodic
synchronization mode, i.e. the time is updated at regular intervals. In order to get
the time from an NTP Server the IP address of the NTP Server must be specified.
1.
Open the command prompt of your PC via the Windows Start menu.
2.
Enter the following command:
net time /setsntp:xxx.xx.xx.xxx
3.
Enter the IP address of the NTP Server for xxx.xx.xx.xxx.
Fig. 9
4.
Command prompt window
Restart your PC or enter the following command in the command prompt of
your PC:
net stop w32time
net start w32time
The IP address of an appropriate server can be found in the Internet or you can contact your system
administrator.
7.9
Further information
For more information on the SISTORE MX NVS V2.80 software (and the WebView
version), please refer to the online help or to the relevant document on the
software CD.
28
Siemens Building Technologies
Fire Safety & Security Products
03.2009
Software update
8
Software update
Should it be necessary to reinstall or repair the SISTORE MX NVS software,
please proceed as follows:
1.
Follow the description in Section 6.2 Subsequently installing a hardware
driver.
2.
Select the option Update.
80H
Î
9
81H
This will have the effect of re-installing every files that have been installed
during the first installation. It should be noted that existing files may be
overwritten in this procedure! The files containing the configuration settings,
the user management data, and the recorded sequences will not be
overwritten.
Writing to CD/DVD
Prerequisite:
z In order to backup data on CD/DVD, the burner software Nero V6.x must be
installed on the NVS PC.
The functions Double Layer and/or Light Scribe are available only if the following conditions are met:
z A suitable burner is available.
z The burner software Nero Version 6.6.4.x or higher or Version 7.x is installed.
The software has been tested successfully using the following external USB
burners (combined CD/DVD burners):
– Plextor PX-740UF
– LiteOn SOHW-1673 SX-02
– LG GSA-2164D-R
Suitable data media are all standard CD-R, CD-RW, DVD±R, DVD±RW.
The data medium need not be formatted additionally.
29
Siemens Building Technologies
Fire Safety & Security Products
03.2009
Setup
10
Setup
Examples of system configurations can be found in the following chapters.
10.1
SISTORE MX NVS Server PC
Fig. 10
10.2
SISTORE MX NVS system overview
1
Max. 64 LAN cameras or IP domes
2
MX NVS server PC
3
CKA4810/20 (optional)
SISTORE MX NVS – LAN camera – CKA4810/20
Fig. 11
SISTORE MX NVS – LAN camera – CKA4810/20 system overview
1
CKA4810/20
2
MX NVS server
3
Max. 64 LAN cameras
Prerequisite:
z The CKA driver is installed (see Section 6.2 Subsequently installing a hardware
82H
83H
driver).
30
Siemens Building Technologies
Fire Safety & Security Products
03.2009
Setup
1.
Connect the CKA4810 / 4820 control panel (COM1A port) to the MX NVS
server (COM1/COM2).
2.
Configure COM1A on the control panel as an RS232 interface. For more
information please refer to the respective instruction manual for control panel
CKA4810 / CKA4820.
3.
Start the SISTORE MX NVS software.
4.
Switch to configuration mode.
5.
Mark the checkbox CCTV keyboard on the System tab.
6.
Click Apply.
The setting will be saved.
The interface for the control panel is now activated.
Î
Î
Connections
Signal
MX NVS Server
CKA4810 / CKA4820
SISTORE RemoteView
9-pin Sub-D connector
GND
5
5
RXD
3
2
TXD
2
3
Interface configuration CKA4810 / CKA4820
z Protocol: SIMATRIX RS232 or SIEMENS IVM
z Baud rate: 9600
z Parity: none
10.3
SISTORE MX NVS (server) – SISTORE RemoteView (client) –
CKA4810/20
Fig. 12
SISTORE MX NVS – SISTORE RemoteView – CKA4820 system
overview
1
CKA4810/20
2
Client PC with RemoteView
3
MX NVS server
4
Max. 64 LAN cameras
Prerequisite:
z The CKA driver is installed (see Section 6.2 Subsequently installing a hardware
84H
85H
driver).
31
Siemens Building Technologies
Fire Safety & Security Products
03.2009
Setup
1.
Connect the CKA4810/CKA4820 control panel (COM1A port) to the client PC
(COM1/COM2).
2.
Configure COM1A on the control panel as an RS232 interface. For more
information please refer to the respective instruction manual for control panel
CKA4810 / CKA4820.
3.
Start the SISTORE MX NVS RemoteView software.
4.
Switch to RemoteView configuration mode.
5.
Mark the checkbox CCTV keyboard on the System tab.
6.
Click Apply.
The setting will be saved.
The interface for the control panel is now activated.
Î
Î
Connections
Signal
Client PC
CKA4810 / CKA4820
SISTORE RemoteView
9-pin Sub-D connector
GND
5
5
RXD
3
2
TXD
2
3
Interface configuration CKA4810 / CKA4820
z Protocol: SIMATRIX RS232 or SIEMENS IVM
z Baud rate: 9600
z Parity: none
32
Siemens Building Technologies
Fire Safety & Security Products
03.2009
Setup
10.4
Multimedia Control Panel – SISTORE MX NVS (server) –
SISTORE RemoteView (client)
Fig. 13
SISTORE MX RemoteView – Multimedia Control Panel system overview
1
Multimedia Control Panel
2
Client PC with RemoteView
3
MX NVS server
The Multimedia Control Panel (ShuttlePRO2) is not a product of Siemens Building Technologies Fire
& Security Products GmbH & Co. oHG. It can be ordered from Contour Design Ltd.
(www.contourdesign.com) (product name: ShuttlePRO2).
Siemens Building Technologies Fire & Security Products GmbH & Co. oHG can not guarantee faultfree operation of the Multimedia Control Panels and does not provide any support. In case of problems
with the product, please contact the manufacturer (www.contourdesign.com).
Installing the Multimedia control panel
1.
2.
3.
Connect the Multimedia Control Panel to a USB port.
Place the CD in the CD/DVD drive.
If the CD does not automatically start, double click the file Autorun.exe.
33
Siemens Building Technologies
Fire Safety & Security Products
03.2009
Setup
Î
The following dialog box opens:
Î
Click on INSTALL DRIVER.
The following dialog box opens:
4.
5.
Click LAUNCH SETUP.
34
Siemens Building Technologies
Fire Safety & Security Products
03.2009
Setup
Î
The following dialog box opens:
Î
Click Next.
The following dialog box opens:
6.
7.
Mark the checkbox Yes, I agree with all the terms of this license
agreement.
8.
Click Next.
35
Siemens Building Technologies
Fire Safety & Security Products
03.2009
Setup
Î
9.
The following dialog box opens:
Click Next to install the software in the default directory.
Î The following dialog box opens:
10. Click Next.
Î The software will be installed.
36
Siemens Building Technologies
Fire Safety & Security Products
03.2009
Setup
Î
After successful installation the following dialog box opens:
11. Mark the checkbox Open the Contour Control Panel.
12. Click Finish.
Î The software has been installed.
Î The Contour Shuttle Device Configuration dialog box opens
(see Fig. 14).
86H
37
Siemens Building Technologies
Fire Safety & Security Products
03.2009
Setup
Configuring the Multimedia Control Panel
Fig. 14
1.
Î
2.
Contour Shuttle Device Configuration dialog box
Click Options.
The following context menu opens:
Select Import settings.
38
Siemens Building Technologies
Fire Safety & Security Products
03.2009
Setup
Î
The following dialog box opens:
3.
Navigate to the directory where SISTORE MX NVS is installed.
4.
Open the file SISTORE MX.pref or SISTORE MX RemoteView.pref.
5.
Click Apply.
6.
If you also want to use the Multimedia Control Panel with the SISTORE
Player, repeat steps 1 to 5 and import the file SISTOREPlayer.pref.
7.
Î
Click OK.
The Multimedia Control Panel is ready for operation.
39
Siemens Building Technologies
Fire Safety & Security Products
03.2009
Setup
10.5
Activating alarm connection from Siemens LAN cameras
CCIx1345
Prerequisites:
z The Siemens LAN camera is installed. Please also refer to the installation
manual for the camera.
z The recording mode for the appropriate LAN trigger input has been configured in
SISTORE MX NVS.
z A registry entry for LAN trigger inputs is available. Further information on this
can be found in the Configuration Manual.
10.5.1
Matching IP ports
SISTORE MX NVS supports up to 32 LAN trigger inputs (alarm inputs 101 to 132
in the Alarm input tab). These inputs can be addressed via the IP-HTTP port
13801 and the IP-SMTP port 13802.
The IP port of the LAN camera and the IP port of the SISTORE MX NVS application software must be
identical.
1.
Start the SISTORE MX NVS application software. See Sections 7.1 Starting
the software and 7.2 Login.
87H
89H
2.
Switch to configuration mode.
3.
Select the Network tab.
Fig. 15
4.
8H
90H
Network trigger data for Siemens CCIX1345 LAN camera
Enter the IP-HTTP/TCP port and the IP-SMTP port of the LAN camera in the
LAN trigger group field.
40
Siemens Building Technologies
Fire Safety & Security Products
03.2009
Setup
10.5.2 Configuring a LAN camera
1.
Open the Internet Explorer.
2.
Enter the IP address of the Siemens LAN camera in the Address field of the
Internet Explorer.
The default IP address of the Siemens LAN camera can be found on a label on the top of the device.
The IP address of the device can be changed subsequently. Please refer to the user manual for the
camera.
3.
Press the Enter key.
4.
Answer Yes in the Security alert which opens.
Î
The following dialog box opens.
Fig. 16
Camera login dialog
5.
Enter admin in the User Name field.
6.
Enter admin in the Password field.
7.
Click Login.
Î
The device homepage will be opened.
Fig. 17
Device homepage
1
Language selection box
2
Main menus
3
Live image display area
4
Streaming information
41
Siemens Building Technologies
Fire Safety & Security Products
03.2009
Setup
8.
Î
Select the menu sequence Basic configuration > Configure alarm.
The alarm configuration dialog opens.
Fig. 18
9.
Alarm configuration
Mark the checkbox Activity Detection under Mail if you want to be notified
when a motion is detected by a LAN camera.
10. Mark the checkbox Input Alarm Trigger under Mail if you want to be notified
when an alarm is triggered by a LAN camera.
11. Click Save.
Î
The settings have been saved.
12. Select the menu sequence Basic configuration > E-mail settings.
42
Siemens Building Technologies
Fire Safety & Security Products
03.2009
Setup
Î
The E-mail configuration dialog opens:
Fig. 19
Email configuration
13. Enter an e-mail address for each of the events (e.g. alarm triggered) you want
to be notified of by e-mail in the text fields under Send Email at (see Fig. 18
and Fig. 19).
91H
92H
The e-mail addresses must contain the text assigned to the alarm input as defined in the SISTORE
MX NVS application software, e.g. TRIGGER[XY][email protected]. Further information on this can be
found in the SISTORE MX NVS Configuration Manual. [XY] represents the desired LAN trigger input.
Enter a figure between 01 and 32 instead of [XY].
14. Enter an e-mail address in the Mail From text field.
15. Enter the IP address of the SISTORE MX in the SMTP IP Address field.
16. Click Save.
Î
The settings have been saved.
17. Click Log Out on the device homepage.
Î
The alarm connection is now activated.
43
Siemens Building Technologies
Fire Safety & Security Products
03.2009
Setup
10.6
SISTORE MX NVS – SISTORE RemoteView – multi-server mode
Fig. 20
SISTORE MX NVS – SISTORE RemoteView system overview
1
Max. 64 LAN cameras/IP domes per server
2
Max. 16 client PCs per server
3
Max. 10 MX NVS servers per client
44
Siemens Building Technologies
Fire Safety & Security Products
03.2009
Setup
10.7
SISTORE MX NVS – MX Multi Channel Box RCI 0601 and CDM
Fig. 21
A
MX NVS Multi-Channel Box RCI 0601 and CDM system overview
Cable (9-pin), plug-plug
2-3, 3-2
1.
Connect the MX Multi-Channel Box to the SISTORE MX NVS server PC
(COM1/COM2).
For this you require the converter 485SD9R (B&B Electronics). Plug the
RS232 end of the converter onto the COM port of the SISTORE MX NVS
server.
2.
Connect the cash dispensers to the RCI0601. Information on this can be
found in the user manual for the MX Multi-Channel Box RCI 0601.
3.
Start the SISTORE MX NVS software.
4.
Switch to configuration mode.
5.
Select the System tab.
6.
Mark the checkbox Bank mode.
7.
Terminate the SISTORE MX NVS software and restart it.
8.
Switch to configuration mode and mark the checkbox Cash dispenser.
9.
Configure cash dispenser mode. Further information on this can be found in
the SISTORE MX NVS Configuration Manual.
10. Restart the PC.
Î
The SISTORE MX NVS software will be restarted (automatically or using the
start icon on the PC desktop). The GAA handler module is also started during
this process (see task bar).
45
Siemens Building Technologies
Fire Safety & Security Products
03.2009
Setup
10.8
SISTORE MX NVS – Miniter interface and Miniter reader
Fig. 22
A
Miniter interface and Miniter reader system overview
Cable (9-pin), plug-socket
1-1
1.
Connect the Miniter interface to the SISTORE MX NVS server PC
(COM1/COM2). For this you require a 9-pin 1:1 cable with plug and socket.
2.
Start the SISTORE MX NVS software.
3.
Switch to configuration mode.
4.
Select the System tab.
5.
Mark the checkbox Bank mode.
6.
Terminate the SISTORE MX NVS software and restart it.
7.
Switch to configuration mode and mark the checkbox Cash dispenser.
8.
Configure cash dispenser mode. Further information on this can be found in
the SISTORE MX NVS Configuration Manual.
9.
Restart the PC.
Î
The SISTORE MX NVS software will be restarted (automatically or using the
start icon on the PC desktop). The GAA handler module is also started during
this process (see task bar).
46
Siemens Building Technologies
Fire Safety & Security Products
03.2009
USB input/output modules
11
USB input/output modules
USB input/output modules are available as accessories. See Section 3 Details for
ordering.
93H
94H
95H
An additional power supply is not required. The modules are supplied over a USB interface.
USB input/output modules
z USBOPT08 (input module)
z USBREL8 (output module)
z USBOPTOREL16 (input and output module)
USBOPT08
USBREL8
You can connect up to four modules of the same type. See Section 11.2:
Connecting USB input/output modules.
96H
97H
Each module has eight inputs or outputs. With four modules, a max. number of
32 inputs/outputs can be achieved.
When using more than two modules, we recommend connecting a USB splitter (hub) between the PC
and the modules.
USBOPTOREL16
You can connect up to 16 modules of this type. Each module has 16 optocoupler
inputs and 16 relay outputs.
It is not possible to combine USBOPTO8 or USBREL8 with USBOPTOREL16 modules.
47
Siemens Building Technologies
Fire Safety & Security Products
03.2009
USB input/output modules
11.1
Technical data of the USB input/output modules
11.1.1
Technical data of the USB input module
11.1.2
11.2
System bus
USB
Module address
can be set between 0-3 using jumpers (up to 4 modules of the same
type can be connected simultaneously)
Inputs
8, optically isolated (5 – 30 V)
Input current
max. 10 mA
LEDs
initialization, status of input signals
Connections
pluggable screw terminals
CE
yes
Operating temperature
0 to 70 °C
Power supply
via USB
Technical data of the USB output module
System bus
USB
Module address
can be set between 0-3 using jumpers (up to 4 modules of the same
type can be connected simultaneously)
Outputs
8 DIL relays (max. 15 W/1 A)
Switchable voltage
30 V
LEDs
initialization, status of relays
Connections
pluggable screw terminals
CE
yes
Operating temperature
0 to 70 °C
Relay switching time
1 ms (incl. bounce)
Connecting USB input/output modules
The modules can either be installed in a cabinet or as desk-top units on a PC.
11.2.1
Connecting USB input module USBOPT08
1.
Connect the module via a plug-type terminal strip.
2.
Assign the module address. See Section 11.3: Module addressing.
3.
Connect the module to the USB interface.
Î
98H
9H
The operating system detects the USB modules and automatically activates
the drivers.
In case a message is displayed, click OK until all dialog boxes are closed.
Î
The new hardware will be displayed as a QuickInfo.
Î
Each input is assigned an LED indicating the current status.
48
Siemens Building Technologies
Fire Safety & Security Products
03.2009
USB input/output modules
1
2
3
+ – + – + – + – + – + – + – + –
5
Fig. 23
4
USB input module
1
Module addressing
2
Configuration status LED
3
USB port
4
Input status LED
5
Inputs
+
5 ... 30V
USB Input Module
Fig. 24
-
Connection of USB input module
Connect the cables (+/-) as shown in Fig. 24.
10H
11.2.2
Connecting USB output module USBREL8
1.
Connect the module via a plug-type terminal strip.
2.
Assign the module address. See Section 11.3: Module addressing.
3.
Connect the module to the USB interface.
Î
10H
102H
The operating system detects the USB modules and automatically activates
the drivers.
In case a message is displayed, click OK until all dialog boxes are closed.
Î
The new hardware will be displayed as a QuickInfo.
Î
Each output is assigned an LED indicating the current status.
49
Siemens Building Technologies
Fire Safety & Security Products
03.2009
USB input/output modules
2
1
3
4
5
Fig. 25
USB output module
1
Relay outputs
2
Output status LED
3
Module addressing
4
Configuration status LED
5
USB port
The cables can be connected in any way as the outputs are no-voltage connections.
max. 30V
USB Output Module
Fig. 26
11.2.3
Connection of USB output module
Connecting USB input and output module USBOPTOREL16
1.
Connect the module via a plug-type terminal strip.
2.
Assign the module address. See Section 11.3: Module addressing.
3.
Connect the module to the USB interface.
Î
103H
104H
The operating system detects the USB modules and automatically activates
the drivers.
In case a message is displayed, click OK until all dialog boxes are closed.
Î
The new hardware will be displayed as a QuickInfo.
Î
Each input/output is assigned an LED indicating the current status.
50
Siemens Building Technologies
Fire Safety & Security Products
03.2009
USB input/output modules
Fig. 27
USB input and output module
1, 2
Relay/optocoupler outputs
3
0V
4
12 V
5
JP1 power supply USB/external
6
USB port
7
DIP1
8, 9
Optocoupler input
Connect the input cables (+/-) as printed on the input/output module. The output cables can be
connected in any way as the outputs are no-voltage connections.
The jumper JP1 must connect pin 2 to pin 3 (USB).
+
5 ... 30V
USB Input Module
Fig. 28
-
Connection of USB input module
max. 30V
USB Output Module
Fig. 29
Connection of USB output module
51
Siemens Building Technologies
Fire Safety & Security Products
03.2009
USB input/output modules
11.3
Module addressing
11.3.1
Modules with 8 inputs/outputs
Addressing is done using the module address.
Assign the module addresses using the jumpers. See Section 11.2:
Connecting USB input/output modules.
1.
105H
106H
Module address 0
Module address 1
Module address 2
Module address 3
11.3.2
Modules with 16 inputs/outputs
Addressing is done using the module address.
Assign the module addresses using the DIP switches.
SW1
11.4
SW2
SW3
SW4
Module
address
On
On
On
On
0
Off
On
On
On
1
On
Off
On
On
2
Off
Off
On
On
3
On
On
Off
On
4
Off
On
Off
On
5
6
On
Off
Off
On
Off
Off
Off
On
7
On
On
On
Off
8
Off
On
On
Off
9
On
Off
On
Off
10
Off
Off
On
Off
11
On
On
Off
Off
12
Off
On
Off
Off
13
On
Off
Off
Off
14
Off
Off
Off
Off
15
Configuring USB input/output modules
The configuration of input/output modules is described in the SISTORE MX NVS
Configuration Manual, Section Configuring alarm inputs and Configuring alarm
outputs.
Digital inputs are not available with the current version of SISTORE MX NVS (March 2007).
52
Siemens Building Technologies
Fire Safety & Security Products
03.2009
Issued by
Siemens Building Technologies
Fire & Security Products GmbH & Co. oHG
D-76181 Karlsruhe
www.buildingtechnologies.siemens.com
Document No.
A6V10072823
Edition
23.03.2009
© 2009 Copyright by
Siemens Building Technologies
Data and design subject to change without notice.
Supply subject to availability.
Printed in the Federal Republic of Germany
on environment-friendly chlorine-free paper.