1
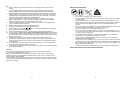
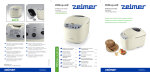
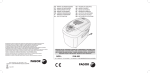
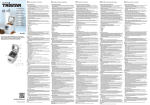
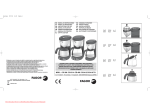
BM-4585
NL
UK
FR
DE
ES
IT
PT
SE
TR
Gebruikershandleiding
User manual
Manuel d'utilisation
Bedienungsanleitung
Manual de usuario
Manuale utente
Manual de utilizador
Användarhandbok
Kullanım kılavuzu
HR
NO
BG
HU
CZ
PL
RO
EL
Korisnički priručnik
Brukermanual
Потребителски наръчник
Kézikönyv
Uživatelská příručka
Instrukcja obsługi
Manual de utilizare
Εγχειρίδιο χρήστη
Onderdelenbeschrijving | Parts description | Description des pièces | Teile
Beschreibung | Descripción de las partes | Parti descrizione | Descrição das pecas|
Delar beskrivning | Dijelovi opis | Deler beskrivelse | Части описание | Részek leírása |
Části popis | Opis części | Piese descriere | Περιγραφή µερώ| Parçalar açıklaması
1
Deksel
Lid
Couvercle
Deckel
Tapa
Coperchio
Tampa
Lock
Poklopac
Lokk
Капак
Fedő
Víko
Pokrywa
Capac
Καπάκι
Kapak
2
Kijkglas
View window
Hublot de contrôle visuel
Sichtfenster
Ventana trasera
Finestra vista
Vidro de observação
Tittfönster
Prozor
Påsynsvindu
Прозорче за наблюдение
Betekintő ablak
Průhled
Okienko
Geam de examinare
Παράθυρο ελέγχου
Görüş penceresi
1
3
Bakblik
Bread pan
Moule à pain
Brotschüssel
Bandeja para pan
Stampo
Tabuleiro do pão
Brödpann
Posuda za kruh
Brødpanne
Съд за хляба
Sütőedény
Nádoba na chléb
Misa do chleba
Recipient pâine
Κάδος ψωµιού
Ekmek tavası
4
Behuizing
Housing
Boîtier
Gehäuse
Carcasa
Alloggiamento
Estrutura exterior
Hölje
Kućište
Hus
Тяло на уреда
Burkolat
Kryt
Obudowa
Carcasă
Περίβληµα
Gövde
5
Bedieningspaneel
Control panel
Panneau de commande
Bedienfeld
Panel de control
Pannello di controllo
Painel de controlo
Kontrollpanel
Upravljačka ploča
Kontrollpanel
Контролен панел
Vezérlőpult
Ovládací panel
Panel sterujący
Panoul de comandă
Ταµπλό ελέγχου
Kontrol paneli
6
Maatbeker
Measuring cup
Gobelet doseur
Messbecher
Taza medidora
Recipiente di misurazione
Copo de medição
Måttkopp
Posuda za doziranje
Målekopp
Мерителна чашка
Mérőpohár
Odměrka
Kubek do odmierzania
Cană pentru măsurare
∆οσοµετρητής
Ölçüm kabı
7
Maatlepel
Measuring spoon
Cuilleron doseur
Messlöffel
Cuchara medidora
Cucchiaio di misurazione
Colher de medição
Måttsked
Žlica za doziranje
Måleskje
Мерителна лъжичка
Mérőkanál
Odměrná lžíce
Łyżka do odmierzania
Lingură de măsurare
Κουτάλι µέτρησης
Ölçüm kaşığı
8
Haak
Hook
Poignée
Verriegelung
Gancho
Gancio
Gancho
Krok
Kuka
Krok
Кука
Akasztóhorog
Hák
Haczyk
Cârlig
Γάντζος
Askı
9
Kneedhaak
Kneading blade
Pétrin
Knetmesser
Cuchilla de amasado
Spatola per impastare
Lâmina de amassar
Knådblad
Lopatica za miješanje
Elteblad
Бъркалка за тестото
Keverőlapát
Hnětací drát
Mieszadło
Paletă de frământat
Λεπίδα ζυµώµατος
Hamur yoğurma bıçağı
2
NL
Bediening en onderhoud
Verwijder alle verpakkingen van het apparaat.
Controleer of alle onderdelen zijn meegeleverd en uit de verpakking zijn verwijderd.
Controleer of de spanning van het apparaat overeenkomt met de netspanning van uw huis.
Voltage 220V-240V 50Hz. Sluit het apparaat altijd aan op een geaard stopcontact.
Eerste gebruik
Maak de broodbakmachine, het bakblik en de kneedhaak schoon met een vochtige doek.
Het bakblik en de kneedhaak zijn bedekt met een anti-aanbaklaag, daarom mag u deze
onderdelen nooit schoonmaken met schoonmaakmiddelen, een afwasborstel of een
schuurspons.
Plaats het apparaat op een vlakke stabiele ondergrond.
Zodra u de machine voor het eerst op de netspanning aansluit, hoort u een geluidssignaal en
op de display van het bedieningspaneel verschijnt “1 3:00”, de pijltjes staan op “2.0LB” en
“MEDIUM”, dit zijn de standaard instellingen.
Lees voordat u het apparaat gebruikt de gehele gebruiksaanwijzing en de
veiligheidsvoorschriften.
Bij het eerste gebruik kan het zijn dat het apparaat gaat roken of een geur geeft, dit is normaal.
Het bedieningspaneel
Start/Stop
Met deze knop start of stopt u een programma.
Start: Om een programma te start, drukt u de toets in en u zult een kort geluidssignaal horen.
De dubbele punt tussen de tijd in het display zal gaan knipperen en en het apparaat gaat de
tijd nu aftellen en werkt het gekozen programma af.
Stop: Om een programma te beëindigen, drukt u de knop voor ongeveer 3 seconden in totdat
u een geluissignaal hoort. Het geluidssignaal bevestigt dat u het programma heeft uitgezet.
Indien u het verkeerde programma heeft gekozen, kunt u dit wijzigen door de stopknop een
aantal seconden ingedrukt te houden. U kunt daarna de machine opnieuw instellen met het
juiste programma.
Menu
Deze toets gebruikt u om het juiste programma te selecteren.
Elke keer als u op deze knop drukt, hoort u een geluissignaal en verandert het
programmanummer.
De broodbakmachine heeft 12 progrommamogelijkheden.
Programma 1: normaal (Basic)
Dit is het meest gebruikte programma voor het maken van wit brood.
Programma 2: Frans (French)
De kneedtijd en rijstijd is langer dan bij het normale programma. Dit programma is niet
geschikt voor bakrecepten waaraan boter, margarine of melk moet worden toegevoegd.
Programma 3: Volkoren (Whole wheat)
Dit is het meest geschikte programma voor het maken van zware broden zoals volkoren en
meergranen brood. Het brood zal over het algemeen wat kleiner zijn als een wit brood, omdat
het meel zwaarder is.
Programma 4: Vlug (Quick)
Dit is een programma voor als u een keer binnen een korte tijd een wit brood wilt hebben. Door
3
Operation and maintenance
Remove all packaging of the device.
Make sure all components are included and the package removed
Check if the voltage of the appliance corresponds to the main voltage of your home.
Rated voltage : AC220-240V 50Hz. Always connect the appliance to a grounded outlet.
UK
First use
Clean the bread maker, the bread pan and the kneading blade with a damp cloth. For cleaning
the bread pan and the kneading blade do not use any sharp or abrasive agents for the
consideration of protecting the non-stick coating. Place the unit on a flat stable surface.
As soon as the bread maker is plugged into power supply, a beep will be heard and “1 3:00”
will be displayed. But the colon between the “3” and “00” don’t flash constantly. And “1” is the
default program. The arrows point to “2.0LB” and “MEDIUM” as they are default
settings.Before doing this you have to read the entire manual and safetyinstructions.
At the first use the device indicates some smoke or odor, this is normal.
The control panel
Start/stop
The button is used for starting and stopping the selected baking program.
To start a program, press the START/STOP button once. A short beep will be heard, the
indicator will light up, and the two dots in the time display begin to flash and the program starts.
Any other button is inactivated except the START/STOP button after a program has begun.
To stop the program, press the START/STOP button for approx. 3 seconds, then a beep will
be heard, it means that the program has been switched off. This feature will help to prevent
any unintentional disruption to the operation of program.
Menu
The MENU button is used to set different programs. Each time it is pressed (accompanied by a
short beep) the program will vary. Press the button discontinuously, the 12 menus will be
cycled to show on the LCD display. Select your desired program. The functions of 12 menus
will be explained below.
Program 1: Basic
For white and mixed breads, it mainly consist of wheat flour or rye flour.
Program 2: French
For light breads made from fine flour. Normally the bread is fluffy and has a crispy crust. This is
not suitable for baking recipes requiring butter, margarine or milk.
Program 3: Whole Wheat
For breads with heavy varieties of flour that require a longer phase of kneading and rising (for
example, whole wheat flour and rye flour). The bread will be more compact and heavy
Program 4: Quick
Kneading, rise and baking loaf within the time less than basic bread. But the bread baked on
this setting is usually smaller with a dense texture.
Baking program 5: Sweet
For breads with additives such as fruit juices, grated coconut, raisins, dry fruits, chocolate or
added sugar. Due to a longer phase of rising the bread will be light and airy.
Program 6: Ultra fast-I
Kneading, rise and baking 1.5LB loaf in a shortest time. Usually the bread made is smaller and
rougher than that made with Quick program.
Program 7: Ultra fast-II
The same as Program 6, but applicable for 2.0LB loaf.
8
Program 8: Dough
Kneading and rise, but without baking. Remove the dough and use for making bread rolls,
pizza, steamed bread, etc.
Program 9: Jam
Boiling jams and marmalades.
Program 10: Cake
Kneading, rise and baking, but rise with soda or baking powder.
Program 11: Sandwich
Kneading, rise and baking sandwich. For baking light texture bread with a thinner crust.
Program 12: Bake
For additional baking of breads that are too light or not baked through. In this program there is
no kneading or raising.
Color
With the button you can select light, medium or dark color for the crust. This button is not
applicable for the following program: CAKE, SANDWICH, BAKE, DOUGH and JAM.
Loaf size
Select the weight (1.5LB, 2.0LB). Press the LOAF SIZE button to choose your desired gross
weight, see the mark beneath it for reference.
This button is only applicable for the following program: BASIC, FRENCH, WHOLE WHEAT,
SWEET and SANDWICH.
or ”)
DELAY (“
If you want the appliance do not start working immediately you can use this button to set the
delay time.
You must decide how long it will be before your bread is ready by pressing the “
or ”.
Please note the delay time should include the baking time of program. That is, at the
completion of delay time, there is hot bread can be serviced. At first the program and degree of
browning must be selected, then pressing “
or ”to increase or decrease the delay time at
the increment of 10 minutes. The maximum delay is 13 hours.
Example: Now it is 8:30p.m, if you would like your bread to be ready in the next morning at 7
o’clock, i.e. in 10 hours and 30 minutes. Select your menu, color, loaf size then press the
“
or ”to add the time until 10:30 appears on the LCD. Then press the START/STOP
button to activate this delay program and the indicator will light up. You can see the dot flashed
and LCD will count down to show the remaining time. You will get fresh bread at 7:00 in the
morning, if you don’t want to take out the bread immediately, the keeping warm time of 1hour
starts.
KEEP WARM
Bread can be automatically kept warm for 1 hour after baking. During keeping warm, if you
would like to take the bread out, switch the program off by pressing the START/STOP button.
9
Use
1. Place the bread pan in position, and then turn it clockwise until they click in correct
position.
2. Fix the kneading blade onto the drive shaft. It is recommended to fill hole with heatresisting margarine prior to place the kneading blade to avoid the dough sticking the
kneading blade, also this would make the kneading blade be removed from bread easily.
3. Place ingredients into the bread pan. Please keep to the order mentioned in the recipe.
Usually the water or liquid substance should be put firstly, then add sugar, salt and flour,
always add yeast or baking powder as the last ingredient.
Note: the quantities of flour and raising agent that may be used refer to the recipe.
4. Make a small indentation on the top of flour with finger, add yeast into the indentation,
make sure it does not come into contact with the liquid or salt.
5. Close the lid gently and plug the power cord into a wall outlet. Press the MENU button
until your desired program is selected.
6. Press the COLOR button to select the desired crust color.
7. Press the LOAF SIZE button to select the desired size.
8.
9.
10.
11.
12.
13.
Set the delay time by pressing
or button. This step may be skipped if you want the
bread maker to start working immediately.
Press the START/STOP button once to start working, and the indicator will light up.
For the program of Basic, French, Whole wheat, Sandwich and cake beeps sound will
be heard during operation. This is to prompt you to add ingredients. Open the Lid and put
in some ingredients. It is possible that steam will escape through the vent in the lid during
baking. This is normal.
Once the process has been completed, ten beeps will be heard. You can press
START/STOP button for approx. 3 seconds to stop the process and take out the bread.
Open the Lid and while using oven mitts, turn the bread pan in anti-clockwise and take
out the bread pan.
Let the bread pan cool down before removing the bread. Then use non-stick spatula to
gently loosen the sides of the bread from the pan.
Turn bread pan upside down onto a wire cooling rack or clean cooking surface and gently
shake until bread falls out.
IMPORTANT SAFEGUARDS
•
•
•
•
•
•
•
•
•
•
•
•
Read all instructions before use.
Do not touch hot surfaces. Use handles or knobs.
To protect against electric shock, do not immerse cord, plug or appliance in water or
any other liquid.
Unplug from outlet when not in use and before cleaning. Allow the device to cool
before putting on or taking off parts. Do not operate any appliance with a damaged
cord or plug or after the appliance malfunctions, or has been damaged in any
manner.
The use of accessory attachments not recommended by the appliance manufacturer
may cause injuries and invalidate any warranty you may have.
Do not use outdoors, or on or near direct heat sources
Do not let cord hang over edge of table or counter, or touch hot surfaces or come
into contact with the hot parts or allow the product to be situated underneath or close
to curtains, window coverings etc.
This appliance is for household use only and only for the purpose it is made for.
The appliance must be placed on a stable, level surface.
This appliance is an attended appliance, and as such should never be left ON or
whilst hot without adult supervision.
This appliance is not intended for use by persons (including children) with reduced
physical,sensory or mental capabilities,or lack of experience and knowledge,unless
they have been given supervision or instruction concerning use of the appliance by a
person responsible for their safety.
Children should be supervised to ensure that they do not play with the appliance.
SAVE THESE INSTRUCTIONS FOR FUTURE REFERENCE
Cleaning
Disconnect the machine from the power outlet and let it cool down before cleaning.
You should clean the device after each use.
Wipe the inside and outside of the bread pan with damp clothes, do not use any sharp or
abrasive agents for the consideration of protecting the non-stick coating. The pan must be
dried completely before installing.
Gently wipe the outer surface of the housing with a wet cloth. Do not use any abrasive cleaner
for cleaning, as this would degrade the high polish of the surface. Never immerse the housing
into water for cleaning.
10
11
Guidelines for protection of the environment
This appliance should not be put into the domestic garbage at the end of its
useful life, but must be disposed of at a central point for recycling of electric
and electronic domestic appliances. This symbol on appliance, instruction
manual and packaging puts your attention to this important issue. The
materials used in this appliance can be recycled. By recycling used domestic
appliances you contribute an important push to the protection of our
environment. Ask your local authorities for information regarding the point of
recollection
Packaging
The packaging is 100% recyclable, return the packaging separated.
Product
This device is equipped with a mark according to European Directive 2002/96/EC.
On Waste Electrical and Electronic Equipment (WEEE). By ensuring that the product correctly
as waste is processed, it helps you may have adverse consequences for the environment and
human health.
EC declaration of conformity
This device is designed, manufactured and marketed in accordance with the safety objectives
of the Low Voltage Directive "No 2006/95/EC, the protection requirements of the EMC
Directive 2004/108/EC "Electromagnetic Compatibility" and the requirement of Directive
93/68/EEC.
FR
Fonctionnement et maintenance
Retirez tous les éléments d'emballage de l'appareil.
Assurez-vous d'être en possession de tous les composants et d'avoir retiré tous les
emballages.
Vérifiez que la tension de l'appareil corresponde à la tension d'alimentation de votre habitation.
Tension évaluée : CA220-240V 50Hz. Veillez à toujours brancher votre appareil à une prise
reliée à la terre.
Première utilisation
Nettoyez la machine à pain, le moule à pain et le pétrin avec un tissu humide. Pour le
nettoyage du moule à pain et du pétrin, n'utilisez pas de produits corrosifs ou abrasifs afin de
protéger le revêtement anti-adhésif de ces éléments. Placez l'appareil sur une surface plane et
stable.
Dès que l'appareil est branché sur le secteur, vous entendrez un bip, et “1 3:00” s'affichera.
Les deux points entre le “3” et “00” ne clignotent pas en permanence. “1” est le programme par
défaut. Les flèches indiquent “1,00Kg” et “MOYEN”, la configuration par défaut. Avant d'utiliser
l'appareil, il est impératif de lire le mode d'emploi et les consignes de sécurité.
Il est normal que lors de la première utilisation, votre appareil émette de la fumée ou une
odeur.
Le panneau de commande
Marche/Arrêt
Ce bouton sert à mettre en marche et à arrêter le programme de cuisson que vous avez choisi.
Pour mettre un programme en marche, appuyez une fois sur le bouton Marche/Arrêt. Vous
entendrez un bip bref, le témoin lumineux s'allumera, les deux points de la minuterie se
mettront à clignoter, et le programme commencera. Après le début du programme, tous les
boutons seront désactivés à l'exception du bouton Marche/Arrêt.
Pour arrêter un programme, appuyez sur le bouton Marche/Arrêt pendant environ 3 secondes.
Vous entendrez alors un bip, signifiant que le programme a été arrêté. Cette caractéristique
permet d'éviter toute interruption involontaire du programme en cours.
Menu
Vous pouvez définir différents programmes grâce au bouton MENU. Le programme varie à
chaque fois que vous appuyez sur ce bouton (vous entendrez alors un bip à chaque pression).
Appuyez sur le bouton de façon discontinue, les 12 programmes défileront alors sur l'écran
d'affichage LCD de l'appareil. Choisissez le programme désiré. Les fonctions des 12
programmes sont expliquées ci-dessous.
Programme 1 : Normal
Pour les pains blancs et bis essentiellement composés de farine de blé ou de farine de seigle.
Programme 2 : Français
Pour les pains légers faits à partir de farine finement moulue. Votre pain sera alors moelleux et
la croûte croustillante. Ce programme ne convient pas à la cuisson des recettes à base de
beurre, de margarine ou de lait.
Programme 3 : Blé entier
Pour les pains faits de variétés de farine lourde qui nécessitent une phase de pétrissage et de
levage plus longue (par exemple, la farine de seigle ou de blé complet). Le pain sera plus
dense et lourd.
12
13