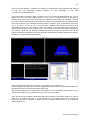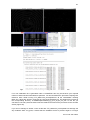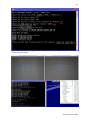
1
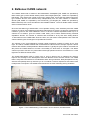
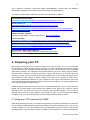
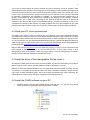
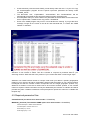
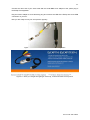
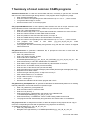
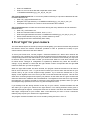
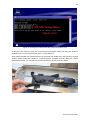
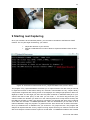
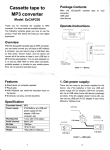
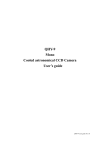
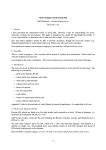
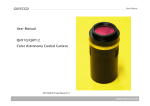
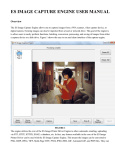
CAMS Cameras for All sky Meteor Surveillance Manual for the CAMS BeNeLux network Edition July 2015 by Paul Roggemans 2. Introduction CAMS stands for "Cameras for All sky Meteor Surveillance" and was set up by the team of Peter Jenniskens and Pete Gural to validate minor meteor showers. The project was funded by NASA’s Planetary Astronomy program in July 2008. In first instance two CAMS platforms were planned with 20 camera’s each, installed at Fremont Peak Observatory and Lick Observatory, both in California USA. Solving all the software challenges required a lot of effort and a first test video took place in 2009 during the Lyrid Shower maximum. The first digital video recording proved to process the data too slowly for a night of data before the next night arrived. This was solved by the implementation of a new Video Management System in May 2010. The system installed at Fremont Peak Observatory proved to function well as tested in August 2010. While the formal installation at Lick Observatory took a bit of delay, a third 20 camera station was agreed to be installed at Mountain View. The first light for CAMS took place on 11 November 2010 when Pete Gural had the processing and coincidence software ready. With only 22 of the 40 camera’s operational at only two sites of the three sites planned, 15 orbits were obtained while until then only 11 accurate orbits were known for the date corresponding to solar longitude 222°. Peter Jenniskens determined his goal : “To obtain at least 100 precise orbits per degree of solar longitude in three years of CAMS operation.” Step by step Pete Gural improved and completed the CAMS software like the recalibration tool, the orbital element part, etc. during the first months of 2011. On 23 April 2011 the third station at Lick Observatory was finally operational. The Mountain View station moved to Lodi in May 2011. In June 2011 Pete Gural was ready with his one-camera version of CAMS for testing. This would allow amateurs to join into the CAMS project. Dave Samuels was the first to start operating one Watec 902 H2 Ultimate camera as first Single Camera CAMS station on 15 August 2011. Two of the CAMS units from Lodi were moved to Europe and observed the Draconid outburst of 8 October 2011 successfully. The Draconids observing project involved some Dutch amateurs who became the first European amateurs to get some experience as CAMS operators. After the successful Draconids observations, Peter Jenniskens stayed a few weeks in the Netherlands and operated four cameras on five nights 21-27 October 2011 from two stations with Carl Johannink at Gronau (Germany). A talk on CAMS by Peter Jenniskens at the annual meteor observers day in Heesch, the Netherlands, triggered a lot of interest among Belgian and Dutch amateurs. Also the impressive results obtained the week before put more amateurs to dream about Single CAMS in the BeNeLux. Meanwhile Dave Samuels contributed on average 20 trajectories per night with his single CAMS to the main CAMS stations in California. As the CAMS project produced thousands of accurate meteor orbits, it proved most successful to meet its target to confirm the minor meteor streams listed in the IAU Working list of Meteor Showers. Several minor showers were confirmed and documented in a number of papers published in the Journal of the IMO. End 2011 the total harvest in orbits by CAMS was 39.500 orbits, with as top night 13-14 December 2011 when all 60 cameras of the 3 stations + one single CAMS camera were operational and yielded as many as 1.586 meteors. At the end of 2014 the CAMS project had collected 232.000 orbits. Two stations had been installed in New Zealand and some local single CAMS networks had been started. Although started much later than the Sonotaco Network, CAMS totalled significant more orbits in three years of time than Sonotaco or any other video network. How to start with CAMS? 3. 2. BeNeLux CAMS network The network started with 4 stations in the Netherlands. Oostkapelle (OK, CAMS 331 operated by Klaas Jobse) got a perfect double station partner with Ooltgensplaat (OP, CAMS 341 operated by Piet Neels). They did the first couple of test runs in March 2012. It were the first stations using PAL type cameras and the first network setup independently from the main network in California. Gronau (GN, CAMS 311 operated by Carl Johannink) got Hengelo (HL, CAMS 321 operated by Martin Breukers) with a less favorable but still suitable baseline. The first double station meteors were recorded in March 2012. Once the first stations got started after a lot of problem solving, more amateurs joined the CAMS network. End 2012, Koen Miskotte and Robert Haas had joined, having 10 camera’s operational at 6 stations, good for 873 orbits obtained in 2012. In 2013 the network expanded further up to 31 cameras at 14 stations, good for another 5.685 orbits, part of which obtained during Perseids expeditions abroad. The number of cameras had increased to 38 by end 2014 adding another 11.288 meteors to the CAMS totals. End June 2015, the year total of orbits passed 5.000 while the camera network got at a strength of 45 operational camera’s. The capacity of the current BeNeLux network yields impressive numbers of orbits at any clear night. The rather unstable weather that characterizes the North West of Europe requires a dense network with sufficient overlap between different stations. Typically the poor weather circumstances still permit the CAMS stations to function successfully on about 50% of all nights. The Watec camera’s proved to function very well under intense light pollution and even a Full Moon on a clear night will not affect the results much. The CAMS participants meet in person once a year to discuss how to optimize the network, improve the coverage of the atmosphere above the Benelux and to discuss results. The CAMS team is a dynamic team with a lot of enthusiasm and a strong motivation. New participants are very welcome and perhaps we may welcome you in our network. Previous experience with meteor work is helpful but not required. The feedback and results are the most rewarding among amateurs! Figure 1: The CAMS meeting 12 November 2014 in Heesch, the Netherlands. How to start with CAMS? 4. 3. What do you need? The Benelux CAMS network is operated by volunteers without any external funding. All participants bought their required equipment at their own expense which may also explain the strong motivation to make good use of the invested budget in the CAMS equipment. Contrary to most other video networks, the Benelux CAMS network uses the same hardware for all currently 45 operated cameras. This is on purpose to exclude any bias in the data caused by technical artefacts or side effects caused by some mixture of totally different optics, camera’s or frame grabbers. In more recent times experiments with cheaper camera’s yield satisfying results, but also the newest cameras in the network are still identical to the recommended CAMS hardware. The CAMS are all equipped with Pentax 12mm f/1.2 lenses and have a rather small FOV of about 22.5 x 29.9 degrees. Such small FOV yields more accurate astrometry measurements compared to wide angle optics. The Watec 902 H2 Ultimate camera's compensate the number of recorded meteors in such small FOV by the high light sensitivity. The number of meteors that these CAMS register on average is such that statistical significant datasets can be recorded. The system can function with partial cloudy sky, under a moonlit sky and is still highly effective under severe light polluted skies. When working with single CAMS it is most important to optimize the intersections of the camera's FOV at the meteor producing layers in the upper atmosphere in order to obtain the optimal number of multiple-station meteors. Another important factor is the geometry station 1 - meteor - station 2. A too short baseline between two CAMS stations provides a too small parallax to enable a sufficient accurate triangulation. A too large baseline on the contrary reduces the probability to record the same meteor from very different distances and produces relative large error margins on the positional measurements of the meteor trajectory. Figure 2: The projection of camera fields 383 and 348 at 90 km elevation with a meteor trail. The direction of each single camera is chosen in such a way that an optimal volume of the atmosphere between 80 and 120 km elevation is monitored by two or more camera’s. Note that the intersection surface becomes larger for 100 km or higher. How to start with CAMS? 5. With CAMS video observations we work within the same particle range as the traditional visual observers: from very bright meteors untill the faintest +5 meteors. While passing clouds, light pollution or moon interference will force the visual observer to quit , CAMS still produces a lot of results during many nights that are of no use for visual observations. Until now CAMS is not used to determine hourly rates, mass distribution indexes or meteor flux, but it provides highly accurate positions of meteor tracks at the sky, trajectory positions in the atmosphere that allow calibration for radio echo techniques, light curves and last but not least accurate orbital data. To map radiant positions and to track radiant drift, the accuracy of CAMS cannot be achieved by visual plotting work. The fact that the CAMS networks function most of the nights 24/24 and 7/7 worldwide makes it highly likely that any unexpected or theoretical predicted outburst can be successfully observed by CAMS which offers an unambiguously meteor stream association based on orbital data. The only aspect that might refrain amateurs from taking part in this project is the cost of the equipment required. The costs for a single camera for someone who has a suitable PC available require about 600 Euro, which is indeed a significant investment. However a regularly operated camera will easily capture over 7000 meteors of which over 3000 will help to obtain an accurate orbit in about 3 years of time. The cost efficiency of this system is less than 10 cent for each meteor and about 20 cents for an orbit, which is much cheaper than what still photography required (cameras and films) and also much less time consuming than the old traditional meteor photography. The current technology caused a revolution in the progress of meteor astronomy. Compared to the extreme expensive Super Schmidt Camera project, which results have determined our knowledge about meteor showers during about 50 years, todays video technology provides access to amateurs to compete with the legendary Super Schmidt Camera’s and do much better. For any amateurs seeking some useful kind of activity to make a real personal contribution to science, video meteor observing offers a unique possibility for a reasonable budget. Table 1 summarizes the items necessary for a single camera set-up. Table 1: Required equipment and prices in Euro (according to recent purchases) Watec 902H Ultimate Pentax 12mm f/1.2 C-CS Mount adapter Ez-Cap Framegrabber CCTV video cable BNC-cinch adapter Adapter 12V (be sure to buy one of good quality) Total costs in Euro If not available yet a PC with recent multi core processor If the cameras are installed outdoors, security camera housing 360 118 2 35 20 2 13 550 600 50 Most participants from Belgium, Germany and the Netherlands ordered all material online. Except for the EzCap Video grabber, the material can be bought from different suppliers, but as far as known the following offers proved to be the best buy as all other suppliers were significant more expensive. If you are new to this we recommend to discuss your plans for a purchase with participants who already operate camera’s and who may advise on some options. There are many types of Watecs, lenses, cables, plugs, etc. Be sure to order the right items. In case of doubts, check with a friend. So far suppliers in the Netherlands or France proved to be very expensive. Ordering for two or more cameras at once will save money on the shipping fees. In principle you can order all items How to start with CAMS? 6. from 4 different companies: Techport24 (Watec 902H2Ultimate), vd-shop (lens and adapter), EZCAP (frame grabber) and Conrad (cable, power supply and BNC-adaptor). The existing CAMS stations ordered in general from the following 4 suppliers: camera WAT 902 H2 Ultimate http://www.techport24.com/Watec-CCD-Kameras/SW-Kameras:::3_14.html Pentax 12mm f/1.2 http://www.vd-shop.de/120mm-cmount-objektiv-h1212b-p-381.html C-CS-Mount-Adapter-LC http://www.vd-shop.de/5mm-adapter-zwischenring-zur-aufnahme-von-cmount-objektivencsmount-kamer-p-131.html EZCAP 116 Video Grabber: 116 EzCAPTURE USB 2.0 Video Capture Device http://www.ezcap.tv CCTV video cable: http://www.conrad.de/ce/de/product/752331/sygonix-Verlaengerungskabel-Video-Kombikabel10-m-43522Q-Ausfuehrung-1x-BNC-1x-DC-IN-1x-BNC-1x-DC-OUT/0801019?ref=list. Adapter 12V http://www.conrad.de/ce/de/product/512798/VOLTCRAFT-FPPS-12-18W-SteckernetzteilSteckernetzgeraet-Festspannungs-Schaltnetzteil-12V-1500mA-18Watt/SHOP_AREA_17455?promotionareaSearchDetail=005 Cinch-stekker - BNC-adapter BNC-bus https://www.conrad.nl/nl/cinch-stekker-bnc-adapter-bnc-bus-1-stuks741108.html?queryFromSuggest=true 4. Preparing your PC We strongly recommend to use a recent PC with a multi core processor i-5 or i-7. Any older types of processor may handle a single camera, but when 2 or more cameras are connected to a single PC, the capacity of the available CPU will determine if your PC can deal with the CPU consuming reprocessing routines. One frequently encountered problem are the so called ‘dropped frames’, with other words, while the camera is assumed to capture 255 frames in a single bin-file at 25 frames per second, one or more frames aren’t processed but lost. The most obvious reason for this is the insufficient CPU capacity. If several cameras are connected to a single PC, make sure to have enough independent USB ports on your computer as also a poor USB connection can be the reason why dropped frames occurred. Always check the power supply: if your power adaptor drops out, it will also generate dropped frames. CAMS will produce a bin file every 10,2 seconds, containing 255 frames. If one or more frames are getting lost for some reason, this will affect the reliability of the data for any meteor in frames affected as such and yield less meteors for trajectory and orbit determination. If the number of dropped frames runs into many hundreds or thousands per night, you are strongly recommended to upgrade your PC or at least to identify the cause of the problem in order to solve it.. 4.1 Keep your CPU reserved for CAMS While all CAMS programs run in the DOS prompt window, all versions of Windows can be used, but the reliability of MS Windows as system has indeed a very poor reputation. Even if you run only a single program as a user, the software producers made plenty of active routines to maintain the operating system, some of these routines run hidden in the background. For instance Windows is How to start with CAMS? 7. very much concerned about its frequent updates and will continuously check for updates, make downloads and install updates in the background. Default settings of many software packages tend to load the programs when the PC is started and this way consume CPU even without any use by the PC owner. As a consequence, at some moments your PC will have much of its CPU saturated by automatic maintenance and upgrades of software. To avoid unfortunate interferences it is strongly recommended to block all checking, uploading and installing of any software, including Windows itself. This is quite time consuming as the software producers made it as difficult as possible for the users to alter anything of the default settings. Check the functioning of your PC on unsolicited CPU usage by idle routines or unused programs that run in the background: your Task manager may help to locate how the CPU of your PC is being eaten by unnecessary procedures. 4.2 Keep your PC clock synchronized The quality of the clocks in a PC is in general very poor. Windows can be set to adjust this clock via time references on internet. Since PC clocks tend to deviate during the capture sessions of CAMS, the Benelux Cams network uses the freeware Dimension4 to check and adjust the PC clock every 15, 10 or 5 minutes. You can find and download Dimension4 from internet and adapt the settings in order to keep your PC clock within some 0.01’s of a second. Dimension4 can be downloaded from the following URL: http://www.thinkman.com/dimension4/download.htm. With the web service http://time.is you can check the accuracy of your PC clock. Remember that Earth speeds at about 30 km/s on its orbit around the Sun. A poor timing causes a poor determination of the exact position, while a too large scatter on the recording timings of meteors will also ruin the automatic detection of simultaneous event. 4.3 Install the driver of the framegrabber EzCap under c: The Benelux CAMS network uses EzCap as frame grabber, the device is delivered by the producer with its driver on a DVD. Make sure this software is properly installed on your PC. Attention: in previous CAMS publications you may read about EasyCap instead of EzCap. We use only EzCap, no EasyCap as the latter proved to be totally unreliable. EasyCap is illegal Chinese copy work of totally worthless quality. Since the market got floaded with cheap EasyCap, the original producer was forced to change its original product name into EzCap. 4.4 Install the CAMS software on your PC Create a directory with the name CAMS directly under the root c:\ of your PC. Copy all the CAMS programs and parameter files directly under c:\CAMS. How to start with CAMS? 8. Create a directory with the name CAMS_clouds directly under the root c:\ of your PC. Copy the Cloudmitigation program and the specific reprocess parameter file directly under c:\CAMS_clouds. The directories “Cal”, “Capturedfiles”, “ArchivedFiles” and “ConfirmedFiles” will be automatically generated the first time associated programs are being used. Use Notepad to add your camera data in the parameter file Camerasites.txt and make sure this is copied under c:\CAMS. and a copy under c:\CAMS\Cal. Some of the CAMS program may not run if some dll-files are missing. If you get that error message, Google for the name of the dll file and download this, or contact the CAMS network co-ordinator. Figure 3: A most important parameter file CameraSites.txt which needs manual completion whenever a new camera is added. This file is needed to compute all positional data for your observing location. Determine the exact position of your camera with GPS or with Google maps. Attention! Your CAMS camera number is a unique code to link your data to a specific geographical position of your camera. All further computations assume that the position of your camera remains unchanged and that the camera number corresponds with one single geographic position only. Whenever a situation occurs that a camera has to be moved to another position, a new camera number is required. Camera numbers can only be attributed by the network co-ordinator and will be provided only after a reliable commitment of the participant to operate the camera in a reliable and frequent way. 4.5 Required parameter files: CameraSites.txt (see above to be stored under C:/CAMS/Cal) W902H2U_12mm.txt (The standard CAMS optics to be stored under C:/CAMS/Cal) Camera description = Watec 902 H2 Ultimate Lens description = Pentax 12mm f/1.2 Frame rate (Hz) = 25.00 Focal length (mm) = 12.0 How to start with CAMS? 9. Focal ratio = 1.2 Pixel pitch H (um) = 9.92 Pixel pitch V (um) = 9.92 Spectral response B = 0.20 Spectral response V = 0.80 Spectral response R = 0.80 Spectral response I = 0.20 Vignetting coef (deg/pix) = 0.095 Gamma = 1.0 Note 1: Spectral responses for flux to be re-normalized to unity sum Note 2: Pixel pitch is the effective pixel dimension in micrometers on the focal plane after digitization in the computer. Note 3: Vignetting is cos(vig_coef * pixel_distance_from_center)^4 W902H2U_8mm.txt (If you use a 8mm f/1.4 lens, as recommended for the zenith, to be stored under C:/CAMS/Cal) Camera description = Watec 902 H2 Ultimate Lens description = Pentax 8mm f/1.4 Frame rate (Hz) = 25.00 Focal length (mm) = 8.0 Focal ratio = 1.4 Pixel pitch H (um) = 9.92 Pixel pitch V (um) = 9.92 Spectral response B = 0.20 Spectral response V = 0.80 Spectral response R = 0.80 Spectral response I = 0.20 Vignetting coef (deg/pix) = 0.100 Gamma = 1.0 Note 1: Spectral responses for flux to be re-normalized to unity sum Note 2: Pixel pitch is the effective pixel dimension in micrometers on the focal plane after digitization in the computer. Note 3: Vignetting is cos(vig_coef * pixel_distance_from_center)^4 STARS8TH_VBVRI.txt (The star catalogue required for the calibration (astrometry), to be stored under C:/CAMS/). ReprocessParameters.txt. (For the detection, to be stored under C:/CAMS/. Check if you got the right version! Note that FTP_CloudMitigation.exe requires a slightly different version and therefore must be stored in a separate directory). Max number of detects per image pair = 32 Max number of tracks per FF file = 256 Max number of frames to save away from peak = 100 Hough rho max spacing to be a duplicate (pixels) = 10.0 Hough phi max spacing to be a duplicate (deg) = 10.0 Maximum time difference to be same meteor (sec) = 1.5 Maximum centroid spacing for crossing (pixels) = 3.0 Std dev factor of intensity to cut off track = 4.0 Minimum count of intensity to cut off track = 100 Interleaved 0-no, 1-odd/even, 2-even/odd = 2 Do not process if Moon within FOV & fraction lit >= 2.0 FTP compress SP for faster reprocess 0-no, 1-yes = 1 How to start with CAMS? 10. FrameGrabConfig.txt (to be stored under C:/CAMS/) Desired frame rate in integer fps (-1 use default) = 25 Desired number of rows (-1 use default) = 480 Desired number of cols (-1 use default) = 640 Connection type see below (-1 use default) = 0 Video format see below (-1 use default) = 1 Flip red and blue BGR use 1, for std RGB use 0 = 0 Flip image upside-down use 1, else 0 = 1 --------------------------------------------------------------Connection types: VI_COMPOSITE 0 VI_S_VIDEO 1 VI_TUNER 2 VI_USB 3 VI_1394 4 --------------------------------------------------------------Video Formats: VI_NTSC_M 0 VI_PAL_B 1 VI_PAL_D 2 VI_PAL_G 3 VI_PAL_H 4 VI_PAL_I 5 VI_PAL_M 6 VI_PAL_N 7 VI_PAL_NC 8 VI_SECAM_B 9 VI_SECAM_D 10 VI_SECAM_G 11 VI_SECAM_H 12 VI_SECAM_K 13 VI_SECAM_K1 14 VI_SECAM_L 15 VI_NTSC_M_J 16 VI_NTSC_433 17 LASTSETTINGS.txt (to be stored under C:/CAMS/ Change the Longitude and Latitude to match your site's coordinates.) LeapSeconds.txt (to be stored under C:/CAMS/) IMOcalendar.txt (for the possible shower association during FTP_Confirmation.exe, to be stored under C:/CAMS/) How to start with CAMS? 11. 5. Preparing your camera We recommend to prepare your camera and setup during daylight hours. If all required material were correctly ordered, you should have the following items available: 1. 2. 3. 4. 5. 6. 7. 8. 9. 10. Watec 902H Ultimate Pentax 12mm f/1.2 C-CS Mount adapter Ez-Cap Framegrabber CCTV video cable BNC-cinch adapter Adapter 12V (be sure to buy one of good quality) A mount and protection for use outdoors, if applicable (optional) A timer if you wish to run your set up automatically (optional) An auto iris, if you want to protect your Watec against direct sunlight (not shown) Figure 4: A visual overview of all the items required. How to start with CAMS? 12. 5.1 First step: Prepare the Pentax 12mm f/1.2 lens Figure 5: Preparing the lens. Loosen or remove the small screws (A) on the diaphragm ring and on the focus ring (normally 3 screws on each ring). Remove one of these small screws (A) on each ring and replace it by the larger adjusting screws (B), delivered together with the lens (Figure 5). Fix the diaphragm at 1.2 and make sure that the focus ring rotates smoothly nearby “ ∞”. Connect the C-CS Mount adapter on the Watec 902H Ultimate camera and place the lens on the adapter. Put the complete device on a photo tripod or any other stable carrier. Pay attention that the camera should be kept well fixed and protected for slight vibrations. 5.2 Second step: Set the switches on the Watec 902H BLC (Back Light Controll): 1 and 2 ON, 3 OFF. This setting sets the backlight to the full chip and not just a portion of it (Figure 6). Figure 6 and 7: the Back Light Control setting and the shutter speed. How to start with CAMS? 13. Shutter speed, to 8. Attention: The best thing to use is a plastic screwdriver. Using a metal screwdriver for these settings can easily damage the main board inside the camera. Be careful with any metal screwdriver! AGC (automatic gain control) at LO. In the online manual for single CAMS you may find recommendations to use MGC (manual gain control) and to use the screw at MGC to adjust from L to H to obtain slightly more stars for calibration and to detect more meteors. However the procedure is rather difficult as the right balance between more gain and background noise is not much different from what the AGC at LO produces. GAMMA: OFF. The higher the gamma setting, the higher the noise. In addition, the higher the gamma setting, the lower the number of brightness levels, which is not good for getting accurate photometry measurements. Figure 8 and 9: AGC setting and Gamma setting. 5.3 Third step: connect the cables Connect your video cable to the Watec 902H Ultimate, as well as the power plug from the 12V power adapter. Figure 10: connection of video cable and power supply. How to start with CAMS? 14. Connect the other end of your video cable with the small NBC-cinch adaptor to the yellow plug of the EzCap Framegrabber. Plug the Power Adaptor to some electricity plug and connect the USB of the EzCap into some USB connection on your PC. Now you are ready to test your set up at the night sky. Figure 10: connection of the video cable to the Framegrabber. Figure 11: when you bought the right type of EzCap, it should look like in this picture. How to start with CAMS? 15. 6 Summary of the CAMS procedures For any beginner the many different programs that come with the CAMS software may be a bit confusing. To distinguish between “.exe”-files and “bat.”-files, make sure that your Windows Explorer shows the filenames correctly with the file extension (see settings of your file manager). Next select the appropriate procedure according to what you need to do, choose the right program and double click it to start the program. Which parameters you may have to enter for each program is listed under section 7 and has been explained in detail in further sections. For people who consult the Single CAMS manual by Dave Samuel, be aware that the instructions valid for the USA are not all valid for Europe (http://cams.seti.org/SingleCAMSmanual.pdf). Auto CAMS has been reconfigured for Europe by Steve Rau and if you are interested in Auto CAMS we strongly recommend to contact Steve. What are you going to do? If you use your camera first time: Run CameraLiveViewer.exe to focus and to aim your camera in the right direction. If you use a PC with limited CPU capacity: Run FTP_CaptureAndDetect.exe with archive flag = -1 (nodetect) After the observations run FTP_MeteorCal.exe on a selected bin file Run FTP_Reprocess.exe Run FTP_Confirmation.exe Mail your FTPdetectinfo-file and the applied calibration files to the network coordinator If you use a PC with high CPU capacity for a first night: Run FTP_CaptureAndDetect.exe with archive flag = 2 (move) After the observations run FTP_MeteorCal.exe on a selected bin file to obtain a temporary calibration file. Run FTP_MeteorCalAutoUpdate.exe to obtained the best calibration file possible. Run FTP_CaptureAndDetect.exe After the observations run FTP_MeteorCalAutoUpdate.exe to obtain a new calibration file valid for the observing night. Run FTP_ApplyCal2DetectInfo.exe Run FTP_Confirmation.exe Mail your FTPdetectinfo-file and the applied calibration files to the network coordinator If you use a PC with high CPU capacity on routine night: Run FTP_CaptureAndDetect.exe with archive flag = 2 (move) After the observations run FTP_MeteorCalAutoUpdate.exe to obtain a new calibration file valid for the observing night. Run FTP_ApplyCal2DetectInfo.exe Run FTP_Confirmation.exe Mail your FTPdetectinfo-file and the applied calibration files to the network coordinator How to start with CAMS? 16. 7 Summary of most common CAMS programs CameraLiveViewer.exe: to view the camera field real-time, necessary to get the lens focussed and to aim the camera at the right aiming direction. This program doesn’t register any image. Start CameraLiveViewer.exe Enter the number corresponding to the USB connection (0 or 1 or 2 or …) of the camera You get the video image on screen Press two times ‘Ctrl P’ to end the program FTP_CaptureAndDetect.exe: to start capturing video frames at a rate of 25 per second in 10,2 second duration bin-files of 255 frames each. Make sure you have the version of 2013. Start FTP_CaptureAndDetect.exe Enter the archive flag: enter -1 to capture without detection, otherwise 2 to move FF-files Enter the camera number for which data will be recorded Enter the position of the Sun below the horizon, most put -8. Enter the CAMS directory location. Recommended to use always c: Enter the number corresponding to the USB connection (0 or 1 or 2 or …) of the camera The program will create a new folder “yyyy_mm_dd_hh_mm_ss” under C:\CAMS\CapturedFiles The program will end automatically and generate a log file with the number of dropped frames at the end. FTP_MeteorCal.exe: to generate a calibration file, in principle the first time or each time the camera has been moved somehow. Start FTP_MeteorCal.exe Enter your camera number: eg 388 Select a bin-file for calibration C:\CAMS\CapturedFiles\yyyy_mm_dd_hh_mm_ss\FF388_yyyy_mm_dd_hh_mm_ss… .bin Select the directory to store the calibrationfile C:\CAMS\CAL Enter field of view in degrees: recommended any value betwee 32° and 40° Enter the R.A. of the field of view (consult star atlas) Enter the decl. of the field of view (consult star atlas) Select the same stars in the left rectangle (camera field) and the right rectangle (star map) Repeat this for at least 6 stars Confirm the right match by Enter, or skip to the next by ‘F’ After sufficient stars hit ‘C’ to calculate Purge outliers until O-C <1 by typing 1 If O-C < 1 then type 0 Generate the calibration file and close program with ‘Ctrl P’ FTP_MeteorCal_AutoUpdate.exe: to generate a calibration file automatically based on an existing manually obtained or some older Cal-file of a previous night. Start FTP_MeteorCal_AutoUpdate.exe Enter minimal number of reference stars Enter for O-C (arcmin) : 1 Select the directory ‘CapturedFiles’ that needs a new calibration file: ‘C:\CAMS\CapturedFiles\yyyy_mm_dd_hh_mm_ss\’ Select the directory ‘C:\CAMS\CAL’ where a valid existing calfile can be found The program will end automatically and generate a new Cal file under ‘C:\CAMS\CAL’ FTP_Reprocess.exe: to analyse the bin files, to detect all suspect moving objects and to copy or move the corresponding bin-files with suspected moving objects to the directory ‘C:\CAMS\ArchivedFiles\yyyy_mm_dd_hh_mm_ss\’. Start FTP_Reprocess.exe Navigate to the right directory ‘C:\CAMS\CapturedFiles\yyyy_mm_dd_hh_mm_ss\’ How to start with CAMS? 17. Select ‘C:\CAMS\Cal’ Select ‘2’ to move all bin-files with suspected motion under ‘C:\CAMS\ArchivedFiles\yyyy_mm_dd_hh_mm_ss\’ FTP_ApplyCal2Detectinfo.exe: to correct the positions referring to a previous calibration file with the latest calibration file. Start FTP_ApplyCal2Detectinfo.exe Navigate to the right directory ‘C:\CAMS\ArchivedFiles\yyyy_mm_dd_hh_mm_ss\’ This takes only fractions of a second. Close the window when finished. FTP_Confirmation.exe: to select the real meteors among the many detections and to delete the false detections. Start FTP_Confirmation.exe Enter the minimal number of frames, enter 1, 2 or 3 Select the right Detectinfo file under ‘C:\CAMS\ArchivedFiles\yyyy_mm_dd_hh_mm_ss\’ Remove false detections by any key, confirm meteors by ‘Enter’ The program will close automatically when ready 8 First ‘light’ for your camera The most delicate aspect of the set-up is beyond doubt getting your camera focused and pointed at the direction which the network coordinator provided in order to optimize the overlap of your camera with the camera’s at the other stations. To focus your Pentax lens, use the program “CameraLiveViewer.exe”. When other cameras are connected to your computer, the screen will list all Capture Devices found and ask you to select the corresponding number of the USB at which your camera is connected. The first time you may have to discover with try and error which number you should enter. Best is to note which number goes for which device. Changes in configuration or updates by Windows may cause this number to change, so pay attention to check that the right camera number corresponds with the right USB number at each time you use the program. When the right USB number has been entered, the program CameraLiveViewer.exe will show a field of view of about 30° x 22°. To get the lens focussed you need to watch the star field on your monitor and try to get it at the sharpest image possible. Try to locate the faintest star on your display. At the slightest move out of focus you will not see this faintest star anymore. This can be a rather time consuming aspect and requires your patience as the better the lens gets focussed the easier the astrometric calibration will work afterwards. The slightest touch at the focus ring will alter the sharpness, so carefully proceed to achieve the most sharp image possible. When you get at the sharpest image possible, fix the focus ring with the adaption screw. If you already know the aiming direction at the sky for your camera, CameraLiveViewer.exe will also allow you to point your camera at the right direction. Your aiming direction will be given in azimuth and height in degrees. Lookup with some tool on internet with which star field the azimuth and height corresponds for your location. With a star atlas and your lens in focus it should be relatively easy to point your camera in the right direction. The program CameraLiveViewer.exe can be closed by hitting two times ‘<Ctrl> P’. How to start with CAMS? 18. Figure 12: Screenshot of the window with CameraLiveViewer.exe. At this point your camera is ready to be moved at its final position. Make sure that your camera is installed at the very exact position like given in CameraSites.txt. Some people operate their camera without any protection from inside, like in the opening of a Velux window. Others install their camera in a special outdoors protection housing. With your camera tested and focussed, you may place it into some protection housing as shown below: Figure 13: Outdoors the camera can be built in a standard camera housing used for surveillance. How to start with CAMS? 19. Figures 14 and 15: an example of a simple indoors installation and an outdoors set up. 9 Starting real Capturing Once your camera is at its final fixed position, you can start to contribute to the Benelux CAMS network. The very first night of observing, you need to: Adjust the direction of your camera; Sample a calibration file in order to allow to Capture and Detect from the first night. Figure 16: Screenshot of the window of FTP_CaptureAndDetect.exe (version 2013). The program FTP_CaptureAndDetect.exe allows you to capture frames at a rate of 25 per second in respective bin-files of 255 frames during 10,2 seconds. These binfiles are very compact binary compressed image files each having a size of 1,2 Megabyte. An average night produces about 3-5 Gigabyte of data. The first night you don’t have the plate constants or calibration data yet for your camera and field of view (FoV). In that case you can enter ‘-1’ as archive flag and then your camera number, the duration you wish to run the camera (make sure to stop before sunrise) and the USB port number on which your camera is connected. This program will store many hundreds of bin files into the folder ‘c:\CAMS\CapturedFiles’. After the observations you will have to do a manual calibration using the program FTP_MeteorCal.exe. We’ll look at this in detail a bit further. Once you obtained such a calibration file, you should run FTP_Reprocess.exe. This program will analyse all captured bin-files for any suspect moving objects that may be meteors. Each bin-file with some suspect movement will be copied or moved under ‘c:\CAMS\ArchivedFiles’ and a textfile How to start with CAMS? 20. FTPdetectinfo_... .txt will be generated with all data about positions etc. for the moving objects that were detected, calibrated with the earlier obtained astrometry file or so called ‘Cal’ file. Unfortunately FTP_Reprocess.exe is the most CPU consuming routine in the loop and to reprocess the data for a single camera and a single night your PC may be running for a couple of hours. Therefore it is recommended to take advantage of the night time and have your PC do the reprocessing during the capturing session. Figure 17: Screenshot of the program FTP_MeteorCal.exe. To achieve this from the very first night, the trick is to runthe old program FTP_Capture.exe for as little as 0.01 hour, which corresponds to 36 seconds of capturing which produce exact 3 bin files. You can also do this with FTP_CaptureAndDetect.exe, pressing two times ‘Ctrl-P’ after 36 seconds. One such bin file is enough to run FTP_MeteorCal.exe and to obtain a first valid calibration or Cal-file. Starting FTP_MeteorCal.exe you will be asked to enter your camera number to be calibrated. Next the Field of View width is asked: this is ~ 29°-30°, but we enter 32° or 35° to have a little bit margin (some take even 40°). Next the right ascension and declination of the field of view are asked. The star field shown in the upper left rectangle should help you to estimate this quite accurately with a Star Atlas. For those not familiar with practical astronomical observations this may be sometimes difficult to recognize the constellations and star field shown. Anyhow try to give this centre of view in R.A. and declination with ± 2° of accuracy. If you are not familiar with the constellations, ask a friend amateur astronomer for help with this. Once the field of view has been entered the corresponding star field will appear in the upper right rectangle. The CAMS software includes a txt file STARS8TH_VBVRI.txt which is a complete star catalogue with positions and brightness of 77.327 stars up to visual magnitude of +8,5. On basis of this list of stars the CAMS software shows the star map corresponding to the region around the center of the field of view which you have entered. In the next step you’ll apply some steps to do astrometry, or with other words, to determine the plate constants of your camera field. The result of this astrometry will allow you to compute precise positions of any unknown object relative to the known star positions, taking into account the optical parameters of your camera lenses. While a pixel of your Watec camera corresponds to ~1,3’ (arc minute), the aim is to approach an accuracy in all computed positions of 1’ (arc minute). How to start with CAMS? 21. If the orientation of the two star fields doesn’t match, you may have to rotate the star map a bit to recognize the star field, especially for camera fields near the celestial poles. You have the following control functions with your keyboard: Figure 18: Functions during calibration. The procedure to follow is quite simple. You point the cursor at a star in the field of view of your camera (rectangle at left) and you click on the corresponding star in the star map at right. You confirm to match the stars by hitting ‘Enter’ (Return). Repeat this for 6 stars and then the program has a temporary solution to be able to suggest matching star positions in the camera field of view at left and the star map at right. When you are sure the suggested stars are identical in both rectangles, then confirm with ‘Enter’. Be careful! The suggested stars are not always correctly identified by the program. If the suggested stars do not match, skip to the next suggestion by hitting ‘F’ on your keyboard. Especially for high declinations the temporary solution may point to very wrong positions. Further some artefacts of the Watec camera may produce bright (hot) pixels that are erroneously associated to a star by the program. Pay attention not to confirm erroneous suggestions of the program, especially for your first ~30-40 stars as the less stars included in the temporary solution, the greater the effect of a complete mismatch. If this happens and you see the computed star matching goes nuts, best is to start again from the beginning. Once you have carefully identified ~50-60 stars, you may keep the ‘Enter’ button pressed till the counter stands at 150 or more stars. Once you have 150 or even 200 stars selected, you should have sufficient reference stars. Then you can calculate by hitting ‘c’ on your keyboard. The program will show you the resulting accuracy Mean O-C (Observed-Calculated) in arcminutes for the total number of stars used and ask if you wish to remove outliers to improve the accuracy of the astrometric solution further. You type ‘1’ (yes) until the Mean O-C gets < 1 arc minute, e.g. Number of calstars used = 40 0.949523 0.417211 Mean O-C = 0.950 +- 0.417 arcmin Do another calibration outlier purge (1=Yes,0=No) When the desired accuracy is achieved you reply ‘0’ (no) to the question to remove more outliers and confirm to accept to obtained solution by ‘Ctrl P’. At that point you generate a calibration file, or so called ‘Cal-file’ under the directory ‘C:\CAMS\Cal’. This file will allow to compute accurate positions for all unidentified moving objects detected in the captured bin files. How to start with CAMS? 22. Figure 19: example of a calibration or ‘cal’ file, note the mentioning of Az end h for the plate centre. The Cal-file mentions the azimuth and height of the centre of view and allows you to adjust the pointing of your camera at the correct azimut and elevation as provided by the network coordinator in order to optimize the overlap of your camera with others in the atmosphere where the meteors appear. If you see in your first Cal file that the aiming direction of your camera isn’t satisfactory, then adjust its direction to approach the desired position and resume the procedure described above. Depending on your skills to estimate the required correction in azimuth and elevation, you may have to repeat the procedure a number of times to achieve the desired aiming direction. The manual calibration program depends on your visual abilities to confirm the star associations correctly which is not always easy. Therefore it is useful to try to obtain even a better calibration file by using the program FTP_MeteorCal_AutoUpdate.exe. This program requires the availability of a valid Cal file for your camera, either obtained with FTP_MeteorCal.exe if it is your first capturing night, or from a previous night if you are working night after night with a fixed camera. How to start with CAMS? 23. Even for a small sample of 3 bin-files, the program FTP_MeteorCal_AutoUpdate.exe will manage to find the best astrometric solution possible. To take advantage of this, start FTP_MeteorCal_AutoUpdate.exe. Enter the number of reference stars you wish to use. For a perfect transparent dark sky you can require 200 stars. For most ordinary nights in a city, 150 is a realistic number to be used. In polluted areas, with a lot of cirrus in the sky or for cameras pointed below 45° elevation, 120 may be a more recommended number. For the Benelux network 100 reference stars is considered to be about the minimum to get sufficient accurate positions. However, poor circumstances may force you to go down as low as 80 or even 60 stars. Although this should be avoided when circumstances allow for more reference stars, the principle is to have better some positions for detected meteors than to have nothing at all. In the end the Coincidence procedure managed by the network coordinator will identify simultaneous meteors between all reported data and the numeric results for the trajectory and orbit calculation will decide if the data is sufficient accurate to be used, or too poor and therefore rejected. Figure 20: Screenshot of the start with program FTP_MeteorCal_AutoUpdate.exe. At the question ‘Enter desired O-C (arcmin) to cull outliers:’ you should put ‘1’. Next the program will ask you to select the appropriate folder under ‘c:\CAMS\CapturedFiles’ for the night for which you need a new Cal file (Figure 20). Next you must select the Cal folder where the program can find an existing valid Cal file for your camera (one obtained by FTP_MeteorCal.exe or from a previous night). Then you will see the program selecting bin-files and compute the astrometric solution for each of these. This procedure may take up to one minute for a long winter night, but by running this procedure you can be confident to obtain the best possible calibration file for your observing session (Figure 21). How to start with CAMS? 24. Figure 21: Screenshot of the program FTP_MeteorCal_AutoUpdate.exe while running. Figure 22: Screenshot of AutoCalUpdate.log and the obtained O-C values. If no new calibration file is generated under ‘C:\CAMS\Cal’ this may be because your required number of stars has been estimated too optimistic. You should resume the procedure requiring less reference stars. While running FTP_MeteorCal_AutoUpdate.exe all the intermediate resulting Mean O-C values are stored in a list with as name AutoCalUpdate.log. This logging file is stored in the corresponding directory ‘C:\CAMS\CapturedFiles\yyyy_mm_dd_hh_mm_ss\’. In this file you can find for how many stars the best result was obtained and resume the procedure for this number of files (Figure 22). If you do not manage to obtain a new cal-file with FTP_MeteorCal_AutoUpdate.exe although the sky conditions were very good, it means that the available Cal file of previous night is no longer How to start with CAMS? 25. valid for the camera position. This happens when the camera was pushed, exposed to vibrations or slightly moved since the previous Cal file was obtained. In that case you must resume the entire procedure with FTP_MeteorCal.exe. If you have chosen to run only FTP_Capture.exe for the night, then you have to run FTP_Reprocess.exe after you obtained the cal file in order to detect all suspect moving objects with their precise positions. This is a very time consuming procedure and therefore we recommend to use rather FTP_CaptureAndDetect.exe, unless the CPU of your computer is insufficient to manage the job during the capturing itself. After FTP_Reprocess.exe you will have to browse all the bin-files with suspect moving objects using a confirmation program in order to select only the data for real meteors. 10 Starting routine video observing nights When a valid calibration file exists and your camera is installed at a very stable fixed position, you can start running FTP_CaptureAndDetect.exe each night. This program will record bin files under ‘C:\CAMS\CapturedFiles’ and in real time analyse the binfiles to detect suspect moving objects (Reprocess). All suspected bin-files are copied or moved under directory ‘C:\CAMS\ArchivedFiles’ and will need a visual verification by the camera operator to distinguish between meteors and ‘false detections’. In general less than 10% of all detections concern real meteors. Planes, birds, insects and clouds generate false detections. With unstable weather circumstances and quickly passing clouds the number of false positives can amount to many thousands of detections. In such case a large part of these false detections can be cleaned up by the FTP_CloudMitigation.exe program under ‘C:\CAMS-clouds’ with its own deviant Reprocess parameters (reason why this program must be run in a distinct different directory). Once you start routine video observing with CAMS, you start the program FTP_CaptureAndDetect.exe. In first instance you must choose the way to archive bin files in which moving objects were detected. Most people choose to move the bin files under ‘C:\CAMS\ArchivedFiles’ (option 2) to save disk space, others prefer to copy the bin files under ‘C:\CAMS\ArchivedFiles’ (option 1). You enter the camera number for which the FTP_CaptureAndDetect.exe is started. The old version of this program asks for the total duration of the capture & detect session (attention decimal hours with a decimal point). In a newer version you can enter the position of the Sun at which the program must start and end. Most observers put -8°. Both old and new version end automatically and both create a logging file capture_stats.log where the number of dropped frames is mentioned at the bottom of the file. We recommend to check the number of dropped frames to verify if your setup functions correctly and your CPU can manage the job. Older computers may fail to combine the capture and the CPU demanding Detect (Reprocess) procedure. If you see that large numbers of dropped frames are reported in capture_stats.log in a systematic way, your data risks to become unreliable as some meteor data may be affected by the dropped frames and become unusable for any trajectory or orbit computation. In such case there is no other solution than to run FTP_Capture.exe or FTP_CaptureAndDetect.exe (option -1 = nodetect) at night and run FTP_Reprocess.exe during the day. On the longer term it is recommended to consider the purchase of a new more powerful computer for CAMS. How to start with CAMS? 26. Figure 23: Screenshot of the old FTP_CaptureAndDetect.exe version where the duration must be entered in decimal hours. Figure 24: Screenshot of the new FTP_CaptureAndDetect.exe version where the position of the Sun below the horizon must be entered. When operating 2, 4 or more cameras, and if your PC has sufficient capacity, some variants of this program are very handy: FTP_CaptureTwoAndDetect.exe and FTP_CaptureFourAndDetect.exe. As these programs optimize the use of a number of program routines, running FTP_CaptureTwoAndDetect.exe consumes significant less CPU than to run two times FTP_CaptureAndDetect.exe in parallel. How to start with CAMS? 27. Figure 25: Screenshot of FTP_CaptureTwoAndDetect.exe. Here the position of the Sun below the horizon must be entered. Figure 26: Screenshot of FTP_CaptureTwoAndDetect.exe when starting to capture. How to start with CAMS? 28. Figure 27: Screenshot of FTP_CaptureTwoAndDetect.exe (left) combined with FTP_CaptureAndDetect.exe (right) to operate three cameras on a single computer. In the center bottom you see the Dimension4 console for clock synchronization. 11 After a routine night of CaptureAndDetect After a routine observing night four steps must be done: Create a new cal-file valid for the night (and this for each camera) (< 1 minute of work) Run FTP_ApplyCal2Detectinfo.exe for each camera (< 1 second of work) (In case too many clouds occurred, clean up with FTP_CloudMitigation.exe) Select the real meteor detection among the many detection using FTP_confirmation.exe Mail the final DetectInfo.txt and associated Cal file to the network coordinator Figure 27: Screenshot of FTP_ApplyCal2Detectinfo.exe. How to create a cal-file using FTP_MeteorCal_AutoUpdate.exe has been described above. How to start with CAMS? 29. Running FTP_ApplyCal2Detectinfo.exe asks only to select which DetectInfo.txt file has to be corrected by the new cal-file. Therefore select the appropriate ‘C:\CAMS\ArchivedFiles\yyyy_mm_dd_hh_mm_ss\’. This program will be done in just fractions of a second and create a new file for FTPdetectinfo_388_yyyy_mm_dd.txt as FTPdetectinfo_388_yyyy_mm_ddC.txt with the corrected positional data valid for the Cal-file mentioned above each meteor data. Always checked the FTPdetectinfo file has been properly corrected and has a ‘C’ at the end of its filename. Figure 28: Screenshot of a FTPdetectinfo If too many clouds occurred the number of false detections can run in the thousands or ten thousands. In that case it is recommended to reduce the number of false detections due to clouds with the use of the FTP_CloudMitigation.exe program under ‘c:\CAMS-clouds’ with its own deviant Reprocess parameters (reason why this program must be run in a distinct different directory). Also this program takes only fractions of a second and requires only to select the appropriate directory ‘C:\CAMS\ArchivedFiles\yyyy_mm_dd_hh_mm_ss\’. It will create a new file for FTPdetectinfo_388_yyyy_mm_ddC.txt as FTPdetectinfo_388_yyyy_mm_ddCM.txt, indicating that it has been treated by FTP_CloudMitigation.exe, just adding ‘M’ at the end of the filename. How to start with CAMS? 30. As our Detectinfo file contains a lot of other moving objects, in order to keep the further processing of the data manageable, all false detections must be removed visually by the camera operator. This is the most time consuming aspect of CAMS for the camera operator and may require few up to 10 minutes of time to do. To select the real meteors among the many detections we use the program FTP_Confirmation.exe. When you start FTP_Confirmation.exe the program asks for the minimum number of frames. Here we put 1, but a value like 2 or 3 is fine too. Next the program will ask you to select the Detectinfo file in the directory ‘C:\CAMS\ArchivedFiles\yyyy_mm_dd_hh_mm_ss\’. Make sure that you confirm the right detectfile, corrected by the latest calibration file (‘C’ at the end of the file name) and if cloudmitigation was applied the version with ‘M’ at the end of the filename. A FTPdetectinfo file can combine one or more cameras, the name of this file has as structure: FTPdetectinfo_0999099909990999_yyyy_mm-ddC.txt (with 999 the camera numbers, in this case 4 different cameras). Figure 29: Screenshot of FTP_Confirmation.exe when started. Next five windows are opened on your screen: Top left: a video fragment of the detection or track with two parallel lines marking the suspect moving object Top right: a stacked image of all 255 frames of the binfile showing the accumulated illuminated pixels and thus everything recorded during the 10,2 seconds duration of the bin file captured. This view allows to verify at once if there was a single or more events detected. Bottom left: available functions and active radiant list with the expected direction of motion for meteors from any active meteor shower. Bottom centre: the details about the event being analysed. During confirmation you have the following functions available: Enter (Return) : Confirm detection as a meteor Backspace : Step back one track F, f, or + : Forward skip to the next bin file with detections H, h : Hundred tracks skipped ahead Any other key : Skip to next track How to start with CAMS? 31. Figure 30: Screenshot of FTP_Confirmation.exe when running, showing a typical false detection caused by a plane. Most detections will prove to be due to planes (especially near airports), clouds, birds or insects. Meteors may be very faint, barely visible on the screen, hence it is strongly recommended to work in a dark room or at least with sufficient contrast on your screen. Small screens of laptops aren’t very suitable for this kind of visual confirmation work. When clouds generated large numbers of detections the F-key may help to proceed faster while looking mainly at the top right window with the stacked image of the entire binfile. Figure 31: Screenshot of FTP_Confirmation.exe when running, showing a real meteor trail. How to start with CAMS? 32. Figure 32: Screenshot of FTP_Confirmation.exe when running, showing how birds appear to cause false detections. Planes can be easily distinguished, but birds that reflect some city light may look very similar to a meteor appearance. In case of doubt if the detection looks very likely a meteor, it is recommended to confirm this as a meteor. Later the coincidence procedure on the entire network dataset will match only real meteors for trajectory and orbit calculations. When all detections have been verified, the confirmed binfiles are copied under the directory ‘C:\CAMS\ConfirmedFiles\yyyy_mm_dd_hh_mm_ss\’ with as final result a infodetectfile with the data for the as meteor confirmed detections. Running the calibration routine and the confirmation after a night of video observing may require as little as 5 — 10 minutes of your time for a single camera, running 3 or 4 camera’s at once may require 10 — 20 minutes. The data should been reported by mail as soon as possible to the Benelux network operator. As the network coordinator receives data from many stations and in order to administer all these mails efficiently the reporting format is kept as simple and straightforward as possible: If you operate more than one camera using different computers or different FTPCaptureandDetect routines in parallel, then copy and paste the different confirmed Infodetect-files into a single file using Notepad or any simple text editor. Adapt the total number of meteors at the top of the textfile, copy all detectinfo into a single text file and rename this file with the all camera numbers covered in the file name. E.g. combining FTPdetectinfo_0383_2014_12_06C.txt, FTPdetectinfo_0384_2014_12_06C.txt and FTPdetectinfo_0388_2014_12_06C.txt, becomes FTPdetectinfo_038303840388_2014_12_06C.txt. Send this final summarized FTPdetectinfo file together with the latest applied calibration files to the Benelux CAMS network coordinator. The Benelux CAMS network holds a solid reputation having all participating camera operators transferring their data within 24 hours to the network co-ordinator. Some manage even to report within hours after the observing night. The discipline of all participants is rewarded with a frequent and detailed feedback from the network operator. How to start with CAMS? 33. 12 Alternative programs for CAMS In recent times CMN (Croatian Meteor Network) made a user friendly tool available to view the contents of the bin-files, to generate pictures of the captured meteors and also to do the confirmation of the FTPdetectinfo files. To download and for the user manual, please visit http://cmn.rgn.hr/downloads/downloads.html#binviewer. The program is very straight forward. To get started you select any directory with bin files, the list of available bin files will appear at left, selecting any of these bin-files will generate the corresponding image at right. You can choose between different types of views of the image and you can save the image as BMP or JPG. One of the most interesting functions is the CAMS confirmation, contrary to the original CAMS confirmation routine, CMN-binviewer allows you to go back and forth among all tracks, using Page Up and Page Down. To confirm a meteor you hit enter. All validated detections are marked by distinct colours and when finished you have get a summary with the number of confirmations. The produced confirmed FTPDetectinfo file s completely compatible with the CAMS format. Figure 33: Screenshot of CMN binviewer after selecting a folder with FF-files. How to start with CAMS? 34. Figure 34: Screenshot of CMN binviewer starting confirmation. Figure 35: Screenshot of CMN binviewer doing confirmation with a typical false detection caused by a plane. How to start with CAMS? 35. Figure 35: Screenshot of CMN binviewer running confirmation with a real meteor track. 13 Results and feedback for all participants Most CAMS stations function on each clear night, even partial clear nights, with moonlight or any severe weather. Some people have organized themselves in such a way that they can continue their cameras even from some holiday resort abroad, using remote access and Auto-Cams. To monitor the meteor activity on a continuous bases it is indeed important to cover as many nights as possible and in spite of the rather unfavourable climate in the Netherlands, most participants manage to capture meteors in about 50% of all nights or even more. With a continuous flow of data it is important that no backlog is generated in order to keep the co-ordination workable. As the network expanded, the amount of data increases as well as the exposure to potential delays due to postponing habits to report the nightly data. Until now most of the data is being reported within 24 hours with only few delays due to circumstances preventing participants from processing their CAMS data. All participants receive an overview, about once a week with the latest update of reported data, showing which stations could work and how many orbits were obtained for the current month. This overview allows to check if all the mails with reported data effectively reached the network coordinator. This weekly overview encourages anyone who got behind to get back in line with the other CAMS stations to report the missing data (Figure 36). How to start with CAMS? 36. Figure 36: Screenshot of a weekly update of all nights reported to all CAMS participants. Figure 37: Screenshot of a monthly listing with details for all multiple station meteors. Few days after the end of each month a list with all the multiple station meteors is sent to each participant, which allows to check which meteors were double station and with who (Figure 37). With this list an updated overview is provided with the number orbits obtained for each calendar date (Figure 38). The table with the accumulated number of orbits since 2012 (Figure 39) clearly proves that CAMS Benelux is well on the way to achieve the initial target of Peter Jenniskens: : “To obtain at least 100 precise orbits per degree of solar longitude in three years of CAMS operation.” Although we will take a bit longer than 3 years. Finally the network coordinator circulates results from the Coincidence procedure for peculiar meteors. The graphical display shows the light curves as derived from the different cameras, the How to start with CAMS? 37. beginning- and ending height with the length of the meteor as well as the projected ground track in geographical coordinates. Any deviant timing will show up as a shift on the projected trails (Figure 40). Figure 38: Screenshot of a monthly update of the year overview with total number of orbits. Figure 39: Screenshot of the overview with total numbers of orbit obtained since 2012. Figure 40: Screenshot of an individual 5-multanious meteor captured by 7 cameras. How to start with CAMS? 38. 14 How to connect with efficient overlap to the BNL-CAMS Network? In order to obtain orbits the atmospheric trajectory of the meteor must be determined by triangulation. The position of the camera as a point, and the meteor trail as a line, together define a plane. The position of the trail can be derived from the intersection of at least two such planes each defined by the position of the camera and the trail. The efficiency of the CAMS network depends on how much much volume of the atmosphere can be monitored from different positions at meteor producing layers between 80 and 120 km height in the atmosphere. As single CAMS works with seperately pointed cameras, it is most important to optimize the overlap between the cameras pointed at a selection region of the atmosphere. The network coordinator can propose you some possible aiming directions. You may attempt yourself to check if there exist already some region in the atmosphere where you can connect to the network. Use the CAMS Pointing Tool of Dave samuels to check out for your observing position: http://davesamuels.com/cams/camspointing/scripts/latlong.html. On this page you will find plenty of usefull calculation tools. The current (31 July 2015) overview of operational cameras is documented below: Figure 41: Participating CAMS stations (July 2015). How to start with CAMS? 39. 14.1 Gronau (D) Operator: Carl Johannink (Netwerk coordinator) Position: Longitude = 52,21415° N, Latitude = 7,01507° E, height = 0,050 km. Available cameras: CAMS 311 = Az. 336° H 51° CAMS 312 = Az. 238° H 57° CAMS 313 = Az. 203° H 57° CAMS 314 = Az. 5° H 55° CAMS 315 = Az. 233° H 42° CAMS 316 = Az. 213° H 41° Figure 42: Camerafields Gronau projected at 90 km height (position 2 August 2015). How to start with CAMS? 40. 14.2 Hengelo (Nl) Operator: Martin Breukers (Assistant Netwerk coordinator) Position: Longitude = 52,26372° N, Latitude = 6,78685° E, height = 0,020 km. Available cameras: CAMS 321 = Az. 188° H 41° CAMS 322 = Az. 302° H 49° CAMS 323 = Az. 261° H 51° CAMS 324 = Az. 249° H 40° CAMS 325 = Az. 11° H 57° Figure 43: Camerafields Hengelo projected at 90 km height (position July 2015). How to start with CAMS? 41. 14.3 Oostkapelle (Nl) Operator: Klaas Jobse Position: Longitude = 51,57192° N, Latitude = 3,53767° E, height = 0,004 km. Available cameras: CAMS 331 = Az. 359° H 60° CAMS 332 = Az. 41° H 49° CAMS 337 = Az. 92° H 56° CAMS 338 = Az. 252° H 49° Figure 44: Camerafields Oostkapelle projected at 90 km height (position July 2015). How to start with CAMS? 42. 14.4 Ooltgenplaat (Nl) Operator: Piet Neels Position: Longitude = 51,68300° N, Latitude = 4,35116° E, height = 0,003 km. Available cameras: CAMS 341 = Az. 0° H 60° CAMS 342 = Az. 308° H 52° CAMS 343 = Az. 314° H 56° CAMS 344 = Az. 90° H 58° Figure 45: Camerafields Ooltgenplaat projected at 90 km height (position July 2015). How to start with CAMS? 43. 14.5 Heesch (Nl) Operator: Erwin Van Ballegooy Position: Longitude = 51,72769° N, Latitude = 5,54019° E, height = 0,015 km. Available cameras: CAMS 347 = Az. 121° H 43° CAMS 348 = Az. 171° H 44° Figure 46: Camerafields Heesch projected at 90 km height (position July 2015). How to start with CAMS? 44. 14.6 Ermelo (Nl) Operator: Koen Miskotte Position: Longitude = 52,28971° N, Latitude = 5,61236° E, height = 0,016 km. Available cameras: CAMS 351 = Az. 140° H 56° CAMS 352 = Az. 63° H 46° Figure 47: Camerafields Ermelo projected at 90 km height (position July 2015). How to start with CAMS? 45. 14.7 Lieshout (Nl) Operator: Paul Lindsey Position: Longitude = 51,51039° N, Latitude = 5,58228° E, height = 0,016 km. Available cameras: CAMS 356 = Az. 355° H 55° CAMS 357 = Az. 298° H 44° Figure 48: Camerafields Lieshout projected at 90 km height (position July 2015). How to start with CAMS? 46. 14.8 Alphen a/d Rijn (Nl) Operator: Robert Haas Position: Longitude = 52,15336° N, Latitude = 4,67175° E, height = 0,002 km. Available cameras: CAMS 360 = Az. 306° H 52° CAMS 361 = Az. 40° H 48° CAMS 362 = Az. 14° H 56° CAMS 363 = Az. 101° H 49° CAMS 364 = Az. 279° H 54° CAMS 365 = Az. 166° H 61° Figure 49: Camerafields Alphen a/d Rijn projected at 90 km height (position July 2015). How to start with CAMS? 47. 14.9 Leiden (Nl) Operator: Hans Betlem Position: Longitude = 52,18389° N, Latitude = 4,50028° E, height = -0,004 km. Available cameras: CAMS 371 = Az. 149° H 33° CAMS 372 = Az. 112° H 39° CAMS 373 = Az. 172° H 52° Figure 50: Camerafields Leiden projected at 90 km height (position July 2015). How to start with CAMS? 48. 14.10 Utrecht (Nl) Operator: Felix Bettonvil Position: Longitude = 52,09395° N, Latitude = 5,12507° E, height = 0,005 km. Available cameras: CAMS 376 = Az. 34° H 53° CAMS 377 = Az. 351° H 55° Figure 51: Camerafields Utrecht projected at 90 km height (position July 2015). How to start with CAMS? 49. 14.11 Wilderen (B) Operator: Jean-Marie Biets Position: Longitude = 50,82047° N, Latitude = 5,13903° E, height = 0,050 km. Available cameras: CAMS 381 = Az. 10° H 49° CAMS 382 = Az. 332° H 44° Figure 52: Camerafields Wilderen projected at 90 km height (position July 2015). How to start with CAMS? 50. 14.12 Mechelen (B) Operator: Paul Roggemans Position: Longitude = 51,00936° N, Latitude = 4,48154° E, height = 0,012 km. Available cameras: CAMS 383 = Az. 95° H 44° CAMS 384 = Az. 58° H 41° CAMS 388 = Az. 22° H 41° CAMS 389 = Az. 345° H 40° Operator: Luc Gobin Position: Longitude = 51,01215° N, Latitude = 4,48226° E, height = 0,017 km. Available cameras: CAMS 390 = Az. 290° H 34° Figure 53: Camerafields Mechelen projected at 90 km height (position July 2015). How to start with CAMS? 51. 14.13 Zillebeke (B) Operator: Steve Rau Position: Longitude = 50,81722° N, Latitude = 2,91267° E, height = 0,049 km. Available cameras: CAMS 385 = Az. 330° H 51° Figure 54: Camerafields Zillebeke projected at 90 km height (position July 2015). How to start with CAMS? 52. 14.14 Langemark (B) Operator: Franky Dubois Position: Longitude = 50,91497° N, Latitude = 2,92569° E, height = 0,015 km. Available cameras: CAMS 386 = Az. 318° H 51° Figure 55: Camerafields Langemark projected at 90 km height (position July 2015). How to start with CAMS? 53. 15. More about CAMS Some basic background information has been marked with (!) and is strongly recommended to read. 15.1 Technical background CAMS 385 website: http://www.astrolab.be/cams/. The CAMS website: http://cams.seti.org/. (!) Single CAMS Manual (by Dave Samuels).(!) Bettonvil F., Johannink C. and Breukers M. (2014). “CAMS BeNeLux”. In: Proceedings of the International Meteor Conference, Giron, France, 18-21 September 2014 Eds.: Rault, J.L.; Roggemans, P. International Meteor Organization, ISBN 978-2-87355-028-8, pp. 55– 58. Gural P. (2011). “The California All-sky Meteor Surveillance (CAMS) System”. In: Proceedings of the International Meteor Conference, Armagh, Northern Ireland, 16-19 September, 2010 Eds.: Asher, D.J.; Christou, A.A.; Atreya, P.; and Barentsen, G. International Meteor Organization, ISBN 2978-2-87355-022-6, pp. 28–31. (!) Gural P. (2012). “A new method of meteor trajectory determination applied to multiple unsynchronized video cameras”. In: Proceedings of the International Meteor Conference, Sibiu, Romania, 15-18 September, 2011 Eds.: Gyssens, M.; and Roggemans, P. International Meteor Organization, ISBN 2978-2-87355-023-3, p. 56. Gural P. (2013). “A meteor propagation model based on fitting the differential equations of meteor motion”. In: Proceedings of the International Meteor Conference, La Palma, Canary Islands, Spain, 20-23 September 2012 Eds.: Gyssens, M.; Roggemans, P. International Meteor Organization, ISBN 978-2-87355-024-4, pp. 130–132. Gural P. (2014). “Offbeat and wacky projects using a video meteor camera”. In: Proceedings of the International Meteor Conference, Giron, France, 18-21 September 2014 Eds.: Rault, J.-L.; Roggemans, P. International Meteor Organization, ISBN 978-287355-028-8, pp. 44–48. Gural P., Jenniskens P. (2014). “Development of the CAMS Spectrograph (CAMSS)”. In: Proceedings of the International Meteor Conference, Poznan, Poland, 22-25 August 2013. Eds.: Gyssens, M.; Roggemans, P.; Zoladek, P. International Meteor Organization, ISBN 978-2-87355-025-7, pp. 13–17. Roggemans P., Betlem H., Bettonvil F., Biets J.-M., Breukers M., Haas R., Jobse K., Johannink C., Langbroek M., Miskotte K., Neels P., Nijland J. and ter Kuile C. (2014). “The Benelux CAMS Network---status July 2013”. In: Proceedings of the International Meteor Conference, Poznan, Poland, 22-25 August 2013. Eds.: Gyssens, M.; Roggemans, P.; Zoladek, P. International Meteor Organization, ISBN 978-2-87355-025-7, pp. 173–175. Samuels D., Wray J., Gural P.S., and Jenniskens P. (2014). “Performance of new low-cost 1/3" security cameras for meteor surveillance”. In: Proceedings of the International Meteor Conference, Giron, France, 18-21 September 2014 Eds.: Rault, J.-L.; Roggemans, P. International Meteor Organization, ISBN 978-2-87355-028-8, pp. 66–73. 15.2 CAMS results Holman D. and Jenniskens P. (2012). “Confirmation of the July Gamma Draconids (GDR, IAU #184)”. WGN, Journal of the I.M.O., 40, 36–41. Holman D. and Jenniskens P. (2012). “Confirmation of the Northern Delta Aquariids (NDA, IAU #26) and the Northern June Aquilids (NZC, IAU #164)”. WGN, Journal of the I.M.O., 40, 166–170. Holman D. and Jenniskens P. (2013). “Discovery of the Upsilon Andromedids (UAN, IAU #507)”. WGN, Journal of the I.M.O., 41, 43–47. How to start with CAMS? 54. Jenniskens P., Gural P.S., Grigsby B., Dynneson L., Koop M. and Holman D. (2011). "CAMS: Cameras for Allsky Meteor Surveillance to validate minor meteor showers". Icarus, 216, 40–61. (!) Jenniskens P. and Gural P.S. (2011). "Discovery of the February Eta Draconids (FED, IAU#427): the dust trail of a potentially hazardous long-period comet". WGN, Journal of the I.M.O., 39, 93–97. Jenniskens P. (2012). “New Meteor Showers Discovered”. S&T, 20–25. (!) Jenniskens P., Duckworth H. and Grigsby B. (2012). “Daytime Arietids and Marsden Sunskirters (ARI, IAU #171)”. WGN, Journal of the I.M.O., 40, 98–100. Jenniskens P., Gural P. S. and Holman D. (2013). “The established meteor showers as seen in video meteoroid orbit surveys”. In: Proceedings of the International Meteor Conference, La Palma, Canary Islands, 20-23 September 2012, Gyssens M., Roggemans P., eds., International Meteor Organization, pp. 38–43. Jenniskens P. and Haberman B. (2013). “``Thatcher's Ghost'': Confirmation of the nu Cygnids (NCY, IAU #409)”. WGN, Journal of the I.M.O., 41, 75–76. Jenniskens P., Gural P. and Berdeu A. (2014). “CAMSS: A spectroscopic survey of meteoroid elemental abundances”. The Meteoroids 2013, Proceedings of the Astronomical Conference held at A.M. University, Poznan, Poland, Aug. 26-30, 2013, Eds.: T.J. Jopek, F.J.M. Rietmeijer, J. Watanabe, I.P. Williams, A.M. University Press, 2014, p. 117–124. Johannink C. (2013). “Results for a CAMS double-station video observation Meterik – Gronau”. WGN, Journal of the I.M.O., 41, 14–21. Johannink C. (2013). “Results of the CAMS project in 2012”. WGN, Journal of the I.M.O., 41, 184–189. Johannink C. (2013). “Eta Aquariids outburst 2013 observed by CAMS”. WGN, Journal of the I.M.O., 41, 199–200. Phillips M., Jenniskens P. and Grigsby B. (2011). “Confirmation of the April Rho Cygnids (ARC, IAU#348)”. WGN, Journal of the IMO, 39, 131–136. Rudawska R., Jenniskens P. (2014). “New meteor showers identifed in the CAMS and SonotaCo meteoroid orbit surveys”. In: The Meteoroids 2013, Proceedings of the Astronomical Conference held at A.M. University, Poznan, Poland, Aug. 26-30, 2013, Eds.: T.J. Jopek, F.J.M. Rietmeijer, J. Watanabe, I.P. Williams, A.M. University Press, 2014, p. 217–224. Steakley K. and Jenniskens P. (2013). “Discovery of the February epsilon Virginids (FEV, IAU #506)”. WGN, Journal of the I.M.O., 41, 109–111. How to start with CAMS?