1
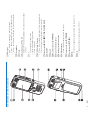
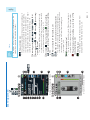
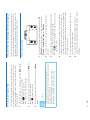
3 30 59 English Deutsch Nederlands www.philips.com/dictation Register your product and get support at Español Français Italiano 143 115 87 DPM8500 DPM8100 DPM8000 Recording Record settings Create a new recording Add to or overwrite a recording Playback 4 Use your recorder Connect the docking station Install the recorder Insert and eject the memory card Charge the battery Charge using the docking station Charge using the USB cable Power on/off Initial installation process Set the language Set the date and time Power-save mode 14 14 14 14 15 14 11 11 11 12 12 12 12 13 13 13 13 11 7 7 8 9 10 Product highlights What's in the box Overview of the recorder Start-up screen Overview of the docking station 3 Get started 7 5 5 5 5 6 6 6 6 6 5 2 Your digital dictation recorder Safety instructions Rechargeable battery Memory cards Hearing protection Legal restrictions on recording Recycling About this user manual Model-specific features and diagrams Symbols used 1 Important Table of contents Use the menu Menu list File menu Delete file Delete section Priority high / normal Lock /EOL Index set / clear 6 Settings EN 3 23 23 24 24 24 24 24 24 23 18 18 19 19 19 19 20 20 20 21 21 21 22 22 22 22 22 18 5 Use more of your recorder Voice-activated recording Index marks Assign keywords (author ID and work type) Assign an author name Assign a work type Instructions File lock and priority Hands-free recording and transcription Hands-free recording Hands-free transcription Use Philips SpeechExec software Advanced configuration Download recordings to the computer Use the barcode scanner (DPM8500 only) Add barcode information to a file Display barcode information Overwrite barcode information 15 15 16 16 16 16 16 17 Selecting a file Playback a recording Adjusting playback speed Quick search Delete Delete a file Delete part of a file Delete all files English 4 EN 8 Technical data Display device information Memory formatting Updating the firmware Troubleshooting 7 Service Author, Work type Delete all File information Record menu Profile Line-in Record notification beep Edit mode Encryption Voice activation Display menu Brightness Backlight Appearance Record lamp Language Device menu Beep Acoustic feedback Power save Date & time Slide switch Auto backspace Device information Format card USB charge USB audio Hands-free mode Diagnosis file Reset settings Noise reduction 30 28 28 28 29 28 24 24 24 24 24 25 25 25 25 25 26 26 26 26 26 26 26 26 26 26 26 26 26 27 27 27 27 27 27 27 27 Important If the battery is mishandled, it can burst, cause a fire or even chemical burns. Observe the following cautions. • Do not disassemble. • Do not crush and do not expose the battery pack to any shock or force such as hammering, dropping or stepping on it. • Do not short circuit and do not allow metal objects to come into contact with the battery terminals. • Do not expose to high temperature above 60°C (140°F). • Do not incinerate or dispose of in fire. • Do not handle damaged or leaking batteries. • Charge the battery only in the recorder. • Keep the battery out of the reach of small children. • Keep the battery dry. Rechargeable battery • Protect the device from rain or water to prevent a short circuit. • Do not expose the device to excessive heat caused by placing it on a heating device or in direct sunlight. • Protect the cables from damage by being trapped, particularly at the plugs and where cables exit the housing. • Back up your data and recordings. The manufacturer’s warranty does not cover loss of data resulting from user actions. • Do not perform any maintenance operations that are not described in this user manual. Do not disassemble the device into its component parts to carry out repairs. The device may only be repaired in authorized service centers. Safety instructions Do not make any adjustments and modifications that are not described in this manual. Follow all safety instructions to ensure proper operation of the device. The manufacturer assumes no liability for damages resulting from non-compliance with the safety instructions. 1 EN 5 Observe the following guidelines when using headphones: • Set the volume to a moderate level and do not use headphones to listen for excessively long periods of time. • Be particularly careful to avoid adjusting the volume to a level that your hearing cannot deal with. • Do not turn the volume up so high that you cannot hear what is going on around you. Hearing protection • The devices operates with SD/SDHC memory cards (DPM8000) or microSD memory cards (DPM8500) up to 32 GB in capacity. • Philips uses approved industry standards for memory cards, but some brands may not be fully compatible with your device. Using an incompatible memory card may damage your device or the memory card and can corrupt data stored on the card. • Formatting a memory card erases all data on the card. Before formatting the memory card, make backup copies of all important data stored on the card. The manufacturer’s warranty does not cover loss of data resulting from user actions. • Formatting the memory card on a computer may cause incompatibilities with your device. Format the memory card only on the device. Memory cards • Only Philips rechargeable Li-ion batteries ACC8100 (and no others) can be charged in the device. Replace only with the same or equivalent type. • Remove the battery from the device if it will not be used for an extended period of time. The device can be damaged by leaking batteries. • Do not remove the battery from the device while it is recording. If you do this, data may be damaged or lost. Device malfunctions may also occur. • Batteries contain substances that may pollute the environment. Used batteries and rechargeable batteries should be disposed of at an official collection point. English This user manual describes a number of models of the device product range. Please note that some features are only available on certain models. • The use of the device's recording function is subject to the legal restrictions that may apply in your country. You should also respect the privacy and personal rights of the third parties if you record talks or lectures. • In certain countries you may be legally required to inform the person you are conversing with on the telephone that you are recording the conversation, or that the recording of telephone conversations is illegal. Please check if the use of such data is legal in your country prior to recording telephone calls. 6 EN When the crossed-out wheeled bin symbol is attached to a product it means that the product is covered by the European Directive 2002/96/EC. Please inform yourself about the local separate collection system for electrical and electronic products. Please act according to your local rules and do not dispose of your old products with your normal household waste. Correct disposal of your old product helps to prevent potential negative consequences for the environment and human health. Recycling Model-specific features and diagrams Legal restrictions on recording • This symbol warns of danger to persons. Bodily injury or damage could be caused by improper handling. Warning • This symbol warns of damage to the device and possible data loss. Damage can be caused by improper handling. Caution • This symbol indicates notices which you must observe when handling or operating the device. Note • This symbol identifies information that helps you to use your device more efficiently and simply. Tip Symbols used You can find a quick overview of your device in the following pages. For detailed description, see the following chapters of this user manual. Read this user manual carefully. About this user manual • In potentially dangerous situations you must be very careful, or temporarily discontinue use. • Do not use headphones while operating a motorized vehicle, cycling, or skateboarding, etc. You could be a hazard to yourself and other road users, and possibly be breaking the law. Your digital dictation recorder • 3D Mic for best audio quality and accurate speech-recognition results • Built-in motion sensor for automatic microphone selection • Ergonomic slide switch for efficient single-handed operation • Robust stainless steel casing for extra durability • Large color display and clear user interface for easy, intuitive operation • Docking station for fast battery charging and hands-free recording • Light and motion sensors for extended battery life • Remote management support for time-saving deployment and maintenance • Classic mode for clear and easy-to-use operation Product highlights We are delighted that you have chosen a Philips device. Visit our website for comprehensive support such as user manuals, software downloads, warranty information and more: www . philips . com / dictaton. 2 Memory card (pre-installed) Deutsch Nederlands Español Français Quick start guide 3 30 57 English www.philips.com/dictation Italiano Software DVD (DPM8000 ) Pouch Register your product and get support at Docking station Recorder What's in the box 138 111 84 DPM8500 DPM8300 DPM8200 DPM8100 DPM8000 EN Battery (preinstalled) USB cable 7 English 8 EN Overview of the recorder q EAR • Headphone socket (stereo jack plug, 3.5mm) p MIC • External microphone socket (stereo jack plug, 3.5mm) o Fast forward (FWD/A) n Memory card slot (DPM8000) m USB connector • Micro USB connection for the computer l Docking station connector k Open the battery cover j Barcode scanner (DPM8500) i Speaker h ON/OFF g Slide switch (G REC, F STOP, C PLAY, B REW) f EOL/File lock, Priority • Mark a file as finished and protect it from being deleted • Prioritized urgent recordings during transcription e +/– • File navigation in stop mode • Volume control during playback • Menu navigation d Function keys F1, F2, F3 • Select the function displayed on the screen directly above the key c Screen b Microphones a LED light • Red – device is recording in overwrite mode • Green – device is recording in insert or append mode • Yellow – data is being transferred to/from the computer Display in the classic mode Display in the advanced mode Start-up screen SP, MP3, PCM Battery charge level • The bars indicate the battery level. When the recorder is charged, the bars keep scrolling until charging completes. g i EN EOL/File lock • The recording is marked finished and protected from being deleted. Æ File lock and priority, p. 20. 9 h The priority level of the recording is set to ‘high’ (Æ File lock and priority, p. 20) A foot switch is connected to the docking station • The recorder can be used for hands-free recording and transcription by connecting the optional Philips foot switch to the docking station. Æ Hands-free recording and transcription, p. 20. File is encrypted (Æ Encryption, p. 25) f e d Edit mode: Overwrite recording, Insert recording, Append recording (Æ Add to or overwrite a recording, p. 14) c Recording rdingg profile: Dictate, Meeting, Speech recognition, Personal • The recording profile presets recording parameters such as recording quality and file format, microphone sensibility and the microphone mode. Æ Profile, p. 24. QP, Voice activation is on • When voice-activated recording is enabled, recording will start when you begin speaking. When you stop speaking, the recorder will automatically pause recording after three seconds of silence, and resume only when you begin speaking again. Æ Voice-activated recording, p. 18. b Recording quality: a • The position of the symbols may vary, depending on the model, the mode and the selected functions. Note English 10 EN v Current file number/Total number of files u File name t Current recording/playback time s File length r Position indicator of current playback/recording q Instruction indicator (Æ Instructions, p. 19) p Index mark indicator (Æ Index marks, p. 18) o Keyword area • One or more keywords, such as the author’s name, can be assigned to every recording. Keywords can be used to identify recordings and automatic file routing. Æ Assign keywords (author ID and work type), p. 19. n Level meter indicator m Current function of the function key F1, F2, F3 l Sensitivity level indicator for voice-activated recording (Æ Voice-activated recording, p. 18) k Slide switch indicator j Microphone mode: Directional mode, 360 degree mode • The microphone mode is preset by the selected recording profile to suit the recording conditions.Æ Profile, p. 24. • The microphone mode can be controlled by the integrated motion sensor. The motion sensor senses when the device is placed on the desk or held in the hand and sets the microphone mode accordingly. f Power supply connector • Connect an optional power supply e Foot switch connector • Connect the Philips foot control LFH2210 (optional) for hands-free dictation and transcription. Æ Hands-free recording and transcription, p. 20. d USB connector • Micro USB connection for the computer c Download indicator light b Charge indicator light a Docking station connector Overview of the docking station Caution Get started The battery is pre-installed in the recorder. Pull the battery tape off from the battery door before charging. • Charge the battery for 3 hours before first use. Note Install the recorder of the docking station. 1 Plug the USB connector into a USB port on your computer. 2 Insert the micro USB plug into the USB port on the rear side Connect the docking station • Ensure you have read the safety instructions before you connect and install your recorder. Æ Safety instructions, p. 5. 3 DPM8000 DPM8500 snapping mechanism unlocks and the card is ejected. EN 11 4 To remove the card press the memory card slightly until the in place. 3 Push the memory card in the memory card slot until it locks down (toward front of the device). 2 Insert a memory card with the gold-colored contacts facing (DPM8000) or remove the battery cover and the battery (DPM8500). 1 Locate the memory card slot on the top of the recorder To insert and eject a memory card: The devices operates with a SD/SDHC memory card (DPM8000) or a microSD memory card (DPM8500) and supports cards with storage capacities of up to 32 GB. Your recorder is packaged with a memory card already inserted and formatted. Insert and eject the memory card English 12 EN • Do not remove the memory card while recording is in progress. Data may be damaged or lost. • Philips uses approved industry standards for memory cards, but some brands may not be fully compatible with your device. Using an incompatible memory card may damage your device or the memory card and can corrupt data stored on the card. • When a new, unformatted memory card or a memory card that was formatted by another device is inserted, the recorder will display a prompt to format the memory card. • Formatting a memory card erases all data on the card. Before formatting the memory card, make backup copies of all important data stored on the card. The manufacturer’s warranty does not cover loss of data resulting from user actions. • Formatting the memory card on a computer may cause incompatibilities with your device. Format the memory card only on the device. • Recording and formatting is not possible if the memory card is in read-only mode (locked). Notes • The recorder switches itself off automatically if no key is pressed within a pre-set period of time (Æ Power-save mode, p. 13). Note The Digital Pocket Memo is turned on and off by sliding the ON/OFF switch. When using it for the first time, you will be prompted to set the language, date and time. Power on/off 1 Plug the USB connector into a USB port on your computer. 2 Insert the micro USB plug into the USB port on the recorder. Charge using the USB cable 2 Your recorder is now ready to use. • Charge the battery for 3 hours before first use. • The computer must be turned on when charging the battery. • The device may become warm when the battery is being charged. • The maximum battery capacity will only be reached after several charging/discharging cycles. Notes X The recorder starts charging. 1 Place the recorder in the docking station. Charge using the docking station Charge the battery • You can change the language, date and time at any time using the settings menu (Æ Settings, p. 23). Tip X The recorder is now ready to function. 5 Press F2 (OK) to confirm the date and time. change the value of the hour and minute settings and AM or PM (if a 12-hour clock is selected). 4 Press + / – to select a 12-hour or 24-hour clock, and to tings to the correct time. 1 Press + / – -to change the value for the year, month or day. 2 Press F3 (Next) to advance to the next entry. 3 After setting the day, press F3 (Next) to advance the set- After selecting the language, the recorder will prompt you to set the current date and time. Set the date and time 1 Press + / – to select your language. 2 Press F2 (OK) to confirm. When using the recorder for the first time, you will be prompted to set the language. EN • You can change the length of time before the recorder will enter into power-save mode. Æ Power save, p. 26. Tip 13 By default, the recorder will enter power-save mode after 5 minutes of inactivity. Lift up the recorder or press any button to reactivate it. The initial installation process starts when first using the device or possibly if there has been a long interruption to the power supply. The date and time entered are saved with each recording as the recording time. Set the language Power-save mode Initial installation process English Note Use your recorder 14 EN • Do not remove the battery from the device while it is recording. Data may be damaged or lost or malfunctions may occur. Caution The recorder can be used for hands-free recording by connecting the optional Philips foot switch to the docking station. Æ Hands-free recording, p. 20. When voice-activated recording is enabled, recording will start when you begin speaking. When you stop speaking, the recorder will automatically pause recording after three seconds of silence, and resume only when you begin speaking again. Æ Voice-activated recording, p. 18. Set the required recording profile before you start a recording session. The recording profile presets recording parameters such as recording quality and file format, microphone sensitivity and the microphone mode to suit the recording conditions. Æ Profile, p. 24. Record settings Recording • You can customize the settings and behavior of your device (Æ Settings, p. 23.) • The descriptions in this chapter are based on the default settings. 4 Notes • Append mode: add additional recording after existing ingg in a file. recording X The symbol is displayed in the information bar at the top of the screen when in append mode and the LED lights in red while recording. • Insert mode: insert additional recording without overwriting existing recording in a file. 2 Set the required editing mode (Æ Edit mode, p. 25). select Record > Edit mode. 1 While the recorder is in stop mode, press F2 (Menu) and You can edit an existing recording by overwriting a part of it or inserting additional recording. Add to or overwrite a recording • Press F1 (Index) during recording or playback to insert an index mark (Æ Index marks, p. 18). • Press and hold F3 (Instr) during recording to record an instruction (Æ Instructions, p. 19). • If the recording time exceeds the available capacity, recording stops and a message is displayed. You can not make any more recordings. Delete the recordings which you no longer require, replace the memory card, or connect the device to a computer and transfer the files to your computer. position. 3 To stop recording, move the slide switch to the F STOP source and move the slide switch to the G REC position. X The LED lights in red in overwrite or append mode or green in insert mode while recording. 1 Press F3 (New) to create a new recording. 2 To start recording, point the microphone toward the sound Create a new recording Note • When you edit, the recording quality of the original recording is used. • The Insert recording mode is not available when the recording format is MP3 or PCM. position. 6 To stop recording, move the slide switch to the F STOP source and move the slide switch to the G REC position. X The LED lights in red in overwrite or append mode or green in insert mode while recording. 5 To start recording, point the microphone toward the sound rewind to the position where the insertion should be made. 4 When using the insert or overwrite mode, play, forward or be made. 3 Press + / – to select the file into which the insertion should X The symbol is displayed in the information bar at the top of the screen when in insert mode and the LED lights in green while recording. • Overwrite mode: overwrite a previous recording starting from any point within the file. X No symbol is displayed in the information bar at the top of the screen when in overwrite mode and the LED lights in red while recording. EN playback. X Playback is paused at the current position. The device returns to stop mode. 3 Press + / – to adjust the volume. 4 Move the slide switch to the F STOP position to stop playback. X The LED will light green. 2 Move the slide switch to the C PLAY position to start to play and locate the beginning of the recording. 15 1 While the device is in stop mode, press + / – to select the file Playback a recording • If the file contains index marks or recorded instructions, press + / – to jump to the previous or the next index mark or instruction. X The index number is displayed for one second. Note X The position indicator jumps to the start of a file. X The position indicator jumps to the end of the previous file. 2 Press – while the device is in stop mode. X The position indicator jumps to the end of a file. X The position indicator jumps to the start of the next file. 1 Press + while the device is in stop mode. Selecting a file Playback English 16 EN • Playback sound during quick search can be activated or deactivated. This allows you to listen to the recording while forwarding or rewinding. (Æ Acoustic feedback, p. 26). Tip • If the file contains index marks or recorded instructions, scanning backward or forward stops for 1 second at the index mark or instruction. Note stopped X to scan forward in the current file at a fast speed. 2 Press and hold FWD during playback or when the device is back or when the device is stopped X to scan backward in the current file at a fast speed. 1 Move the slide switch to the B REW position during play- You can scan backward or forward in the current file at a fast speed. This allows to find a specific part of the recording. Quick search confirm the deletion of the marked section. 5 While the recorder is in stop mode, press F2 (Delete) to end of the section to be deleted. X The section to be deleted is marked in red. 3 While the recorder is in stop mode, press F3 (Mark). 4 Using the play, forward or rewind functions, navigate to the beginning of the section to be deleted. 2 Using the play, forward or rewind functions, navigate to the select File > Delete section. 1 While the recorder is in stop mode, press F2 (Menu) and Delete part of a file X The file is deleted. Sequential file numbers are reassigned automatically. 2 Press F2 (Menu) and select File > Delete file. 3 Press F2 (OK) to confirm the deletion. file to be deleted. 1 While the recorder is in stop mode, press + / – to select the Delete a file • Deleted files can not be recovered. • Files that are marked finished and locked (EOL) cannot be deleted. Unlock it by pressing the EOL button. • Make sure that the memory card is not set to read-only (locked). Notes You can delete individual files from the device, part of a file or delete all files simultaneously. 1 Press F3 (Speed) repeatedly during playback to toggle between faster, slower and normal playback speed. X Playback speed becomes faster (+30 %) and the D icon will be displayed. X Playback speed becomes slower (-25 %) and the icon will be displayed. X Playback returns to normal speed and the C icon will be displayed. Delete Adjusting playback speed X All files are deleted. 2 Press F2 (OK) to confirm the deletion. select File > Delete all. 1 While the recorder is in stop mode, press F2 (Menu) and Delete all files EN 17 English Use more of your recorder 18 EN position. 4 To stop recording, move the slide switch to the F STOP threshold. 3 Press + / – during recording to adjust the voice-activation source and move the slide switch to the G REC position. X The devices switches to standby mode. Recording will start when you begin speaking (or the sound level is above the voice-activation threshold). X When you stop speaking (or the sound level drops below the voice-activation threshold), the device will automatically pause recording after three seconds and the LED flashes. 2 To start recording, point the microphone toward the sound menu (Æ Settings, p. 23). X When activated, the symbol is displayed in the information bar at the top of the screen. 1 Activate the voice-activated recording feature in the settings When voice-activated recording is enabled, recording will start when you begin speaking. When you stop speaking, the device will automatically pause recording after three seconds of silence, and resume only when you begin speaking again. Use the voiceactivation threshold to set the volume at which the device should begin recording. Voice-activated recording 5 the index mark to be deleted. While the recorder is in stop mode, press F2 (Menu) and select File > Index clear. 3 To delete an index mark, play, fast forward or fast rewind to stop mode (Æ Selecting a file, p. 15). 2 To locate an index mark, press + / – while the recorder is in or playback. X The index number is displayed for one second. X Up to 32 index marks can be set per file. 1 To add an index mark, press F1 (Index) during recording Index marks can be used to mark certain points in a recording as points of reference. Index marks recording. 2 Press + / – to select a work type. 3 Press F2 (OK) to assign the selected work type to the X a list of work types is displayed. 1 While the recorder is in stop mode, press F1 (Work type) Assign a work type recording. 2 Press + / – to select an author name. 3 Press F2 (OK) to assign the selected author name to the select File > Author. X a list of author names is displayed. 1 While the recorder is in stop mode, press F2 (Menu) and Assign an author name • Keywords must first be set up with Philips SpeechExec software. Æ Advanced configuration, p. 21. • By default, the keyword category Author with the keywords ‘DPM8000/DPM8500’ and ‘- - -’ (empty) and the category Work type with the keywords ‘Memo’, ‘Letter’, ‘Fax’ and ‘Report’ are available. Note One or more keywords, such as the author’s name or a work type, can be assigned to every recording. Keywords can be used to identify recordings and automatic file routing in Philips SpeechExec software. Assign keywords (author ID and work type) EN • Instructions can only be recorded when the recording format is DSS/DSS Pro. Note of a recording (Æ Delete part of a file, p. 16). 19 3 To delete an instruction, follow the steps for deleting a part stop mode (Æ Selecting a file, p. 15). 2 To locate an instructions, press + / – while the recorder is in recording. X The instruction is displayed as a blue line on the file position bar. 1 To record an instruction, press and hold F3 (Instr) during Spoken instructions are recorded comments by the author that are directed to the person transcribing the recording. They usually contain information which is relevant to the recording but does not have to be typed out. Instructions English Notes 20 EN • Philips SpeechExec software can be configured to download only those files from the device to the computer that are marked finished. • Locked files are deleted when the memory card is formatted or the delete-all-files function is used. button. 3 To make changes to the file, unlock it by pressing the EOL 2 To assign priority status to the recording, press the EOL button again within half a second. X The symbol is displayed. to lock the file and mark it as finished. X The symbol is displayed. X A new, empty recording is created. H G C rewind. When rewinding reaches the desired position, release the pedal. 6 Press and hold the left pedal of the foot switch for fast continue recording, repeat step 4. 5 To stop recording, press the left pedal of the foot switch. To standby mode. To start recording, press the right pedal of the foot switch. For short pauses, press the right pedal of the foot switch again. To continue recording, press the right pedal of the foot switch again. 4 Press the middle pedal of the foot switch to enter record- and place the recorder in the docking station. X The symbol is displayed in the information bar at the top of the screen. 3 Connect the foot switch to the back of the docking station position. 2 Set the switch on the underside of the foot swich to the T (Menu) while the recorder is in stop mode and select Device > Hands-free mode > Dictate. 1 To activate the hands-free recording feature, press F2 F B Hands-free recording The device can be used for hands-free recording and transcription by connecting the optional Philips foot switch LFH2210 to the docking station. In this operating mode, you can control the recording and playback functions with the foot switch. Use the file lock function to prevent important files from being accidentally deleted and mark them as finished. With the priority-setting option, urgent recordings can be prioritized during transcription. 1 While the recorder is in stop mode, press the EOL button Hands-free recording and transcription File lock and priority A C starting and stopping playback depends on the setting of the playback switch on the underside of the foot control: • N (Neutral) position: Press and hold the right pedal for playback. When the pedal is released, playback is stopped. • T (Toggle) position: Press and release the right pedal to start continuous playback. Press the right pedal again to stop playback. 5 Press the right pedal to start playback.The behavior for 4 Press and hold the middle pedal to fast forward. When forwarding reaches the desired position, release the pedal. reaches the desired position, release the pedal. 3 Press and hold the left pedal for fast rewind. When rewinding docking station and place the recorder in the docking station. X The symbol is displayed in the information bar at the top of the screen. 2 Connect the optional Philips foot switch to the back of the (Menu) while the recorder is in stop mode and select Device > Hands-free mode > Transcribe. 1 To activate the hands-free transcription feature, press F2 B Hands-free transcription ing to finish/lock (EOL) the current recording and create a new file. 8 Double click the left pedal of the foot switch during record- switch to start playback. Press the right pedal of the foot control again to stop playback. 7 When recording is stopped, press the right pedal of the foot EN • When the recorder is connected to the computer for the first time, Windows detects the new hardware and automatically installs the required drivers. When the installation is complete, Windows may prompt you to restart the computer. Note transfer of the new settings to the recorder. 21 4 Click the Finish button to close the wizard and confirm the follow the on-screen instructions to customize the recorder. 3 Click the Start Wizard… button to open the wizard and General settings on the menu bar and select DPM/DT Configuration > DPM Wizard from the list on the left panel. 2 Start Philips SpeechExec Pro software and click Settings > or the docking station. 1 Connect the recorder to the computer using the USB cable Philips SpeechExec software provides a wizard that guides users through the configurations and settings of the device. The wizard assists in configuring time format, sound feedback, voice-activated recording, display appearance, recording profiles, keywords, and file download to the computer. Advanced configuration • For detailed information about SpeechExec software, refer to the SpeechExec help. Note Philips SpeechExec software (Windows version only) can be used for advanced configuration of the recorder, automatic download, conversion and routing of files. Use Philips SpeechExec software English 22 EN • How and which files are downloaded after the recorder is connected to a computer can be configured in the settings menu of Philips SpeechExec software or with the configuration wizard. Note loaded automatically to the computer and moved to the Finished dictations folder of the work list. 4 By default, the recordings on the recorder will be down- or the docking station. 1 Make a recording with the recorder. 2 Start Philips SpeechExec Pro software. 3 Connect the recorder to the computer using the USB cable Use Philips SpeechExec software for automatic download, conversion, and routing of files. With USB mass storage support, the recorder is automatically displayed as an external drive when it is connected to the computer. It can then be accessed easily with any program as a regular drive. Download recordings to the computer to overwrite the old barcode information. X The device returns to the stop mode. 2 Press F2 (OK) to confirm the new barcode information and scan the barcode. X When a barcode is recognized, the device will beep and the old and the new barcode information is displayed. 1 While the recorder is in stop mode, press F1 (Scan) and Overwrite barcode information select File > File information. 1 While the recorder is in stop mode, press F2 (Menu) and To display previously recorded barcode information: Display barcode information X The device returns to the stop mode. 2 Press F2 (OK) to confirm the barcode input. scan the barcode. X When a barcode is recognized, the device will beep and the barcode information is displayed. 1 While the recorder is in stop mode, press F1 (Scan) and Add barcode information to a file The barcode module allows barcode scanning from a distance of up to 25 cm (10 inches) and supports barcode information with up to 30 digits. Use the barcode scanner (DPM8500 only) Settings Record File Profile Line-in Delete file Delete section Priority high / normal Lock / EOL Index set / clear Author Work type Delete all File information Menu list • Some settings, such as defining keywords, file encryption or device lock, are available only through Philips SpeechExec software. Æ Advanced configuration, p. 21. Note a sub menu without changing a setting. 4 Press + / – to select a function. 5 Press F2 (OK) to confirm a selection or F1 (Back) to exit exit the menu. 2 Press + / – to select the next/previous menu item. 3 Press F3 (Enter) to enter a sub menu. Press F1 (Back) to open the menu. 1 Press F2 (Menu) while the recorder is in stop mode to Use the menu 6 Device Display Beep Acoustic feedback Power save Date & time Slide switch Auto backspace Device information Format card USB charge USB audio Hands-free mode Diagnosis file Reset settings Noise reduction Brightness Backlight Appearance Record lamp Language Record notification beep Edit mode (Encryption) Voice activation EN 23 English 24 EN Delete all files simultaneously from the device. Æ Delete all files, p. 17. Delete all One or more keywords, such as the author’s name or a work type, can be assigned to every recording. Keywords can be used to identify recordings and automatic file routing in Philips SpeechExec software. Æ Assign keywords (author ID and work type), p. 19. Author, Work type Index marks can be used to mark certain points in a recording as points of reference. Æ Index marks, p. 18. Index set / clear Use the file lock function to prevent important files from being accidentally deleted and mark them as finished. Æ File lock and priority, p. 20. Lock /EOL With the priority-setting option, urgent recordings can be prioritized during transcription. You can select High (the symbol is displayed) or Normal. The default value is Normal. Æ File lock and priority, p. 20. Priority high / normal Delete part of a file. Æ Delete part of a file, p. 16. Delete section The recording profile presets recording parameters such as recording quality and file format, microphone sensibility and the microphone mode to suit the recording conditions. The profile’s symbol is displayed in the information bar at the top of the screen. • Personal: customize all settings. » Recording quality: set the file format and the quality of the recording (bit rate). The higher the recording quality the bigger the file and the less recordings you can create. › DSS SP: .dss, mono, 13.7 kbit/s › DSS QP: .ds2, mono, 28 kbit/s › MP3 Stereo: .mp3, stereo, 192 kbit/s › PCM Voice: .wav, mono, 353 kbit/s › PCM Stereo: .wav, stereo, 705 kbit/s » Microphone sensitivity: adjust the recording sensitivity to avoid recording background noises and to adapt to the recording environment. › Meeting: high sensitivity › Dictate: medium sensitivity › Private: low sensitivity » Microphone mode: the microphone mode can be controlled by the integrated motion sensor. The motion sensor senses when the device is placed on the desk or held in the hand and sets the microphone mode accordingly. › Directional: focus on the right microphone and filter sounds from the side. › 360 degrees: records sounds in all directions. • Meeting: optimized for the recording of multiple sound sources, such as meetings and conferences with a small num- Profile Record menu Display information about the current file, such as file number, file name, assigned keywords, barcode information, recording date and time. Delete file Delete individual files from the device. Æ Delete a file, p. 16. File information File menu You can edit an existing recording by overwriting a part of it or inserting additional recording. Æ Add to or overwrite a recording, p. 14. Edit mode Enable/disable a beep tone indicating recording is about to begin. Record notification beep If you connect an external microphone to the device, the recording source will switch automatically and the device’s microphones will be turned off. Set the line-in option depending on the external source: • Off: connect an external mono or stereo microphone • On: connect an amplified recording source (e.g. a stereo system) Line-in • All recording profiles can be customized with Philips SpeechExec software. Æ Advanced configuration, p. 21. Note ber of people (Recording quality: MP3 Stereo, Microphone sensitivity: Meeting (high), Microphone mode in hand: 360 degrees, Microphone mode on desk: 360 degrees). de • Dictate: optimized setting for the recording of a sound source close to the device (Recording quality: DSS QP, Microphone sensitivity: Dictate (medium), Microphone mode in hand: ha Directional, Microphone mode on desk: 360 degrees). • Speech recognition: optimized for subsequent editing using speech recognition software (Recording quality: DSS QP, Microphone sensitivity: Private (low), Microphone mode in hand: Directional, Microphone mode on desk: 360 degrees). EN 25 When voice-activated recording is enabled, recording will start when you begin speaking. When you stop speaking, the device will automatically pause recording after three seconds of silence, and resume only when you begin speaking again. Æ Voice-activated recording, p. 18. Voice activation The device itself can be assigned a PIN code to protect against unauthorized use or file playback. • Encryption must be set up with Philips SpeechExec software. Æ Advanced configuration, p. 21. • Encrpytion is only supported for files in DSS Pro format. • When encryptionis activated, the symbol is displayed in the information bar at the top of the screen. • Encrpyted files can only be played with Philips SpeechExec software. Note Recordings can be encrypted in real time using the Advanced Encryption Standard (AES or Rijndael Algorithm) with a key length of 256 bits. AES provides a very high degree of security and has been approved in the USA for the most highly classified government information. Encryption English Enable/disable key and signal tones. Adjust the brightness of the display. The brightness level of the display will affect how quickly the device consumes battery power. 26 EN Set the language for the device’s user interface: English, Deutsch, Français, Español, Italiano. Æ Set the language, p. 13 Language Enable/disable the LED light. Record lamp Select a display mode: Advanced (default), Classic. Æ Startup screen, p. 9. Appearance Set the length of time the device waits before turning off the display’s backlight: • Auto: adjusts the brightness of the display automatically and turns off the display’s backlight after 8 seconds. • 8 sec (default) • 20 sec • On Backlight Beep Brightness Move the slide switch briefly to the B REW position to jump back the configured number of seconds in the recording: Off (default), 1 sec, 2 sec, 3 sec, 4 sec. Auto backspace You can customize the functionality of the slide switch. By default, the slide switch is set to International. Position InternaPhilips Philips German tional classic* 1 B B B 2 C/G C/G F/H 3 C F/H F/H C/G 4 B A A A * EOL and REC STANDBY buttons switch functionality. Slide switch The date and time entered are saved with each recording as the recording time. Æ Set the date and time, p. 13 Date & time Set the length of time before the recorder will enter into powersave mode: 1 min, 5 min (default), 10 min, 15 min, Off. Æ Power-save mode, p. 13. Power save Allows you to listen to the recording while forwarding or rewinding. Æ Quick search, p. 16. Acoustic feedback Device menu Display menu Save a diagnosis file for error analysis and a file with all device configuration settings on the memory card. Diagnosis file The recorder can be used for hands-free recording and transcription by connecting the optional Philips foot switch LFH2210 to the docking station. In this operating mode, you can control the recording and playback functions with the foot switch. Æ Hands-free recording and transcription, p. 20. Hands-free mode When set to On, the device can be used as audio output device for the computer when it is connected via the USB cable. USB audio Change the charging behavior of the device. If the USB port of your computer does not supply enough power capacity (500 mA), charging may not be successful. Set the USB charge option to Slow [100 mA] or Off and use an (optional) power supply. • Fast [500 mA] (default) • Slow [100 mA] • Off USB charge Deletes all recordings and files saved on the device. Æ Memory formatting, p. 28. Format card Reset your settings to the factory default values. Display information about the device, such serial number, model number and firmware version. Æ Display device information, p. 28. EN 27 Turn on the noise reduction function for better playback quality. Noise reduction reduce the background noise and improves the intelligibility of quieter voices. Noise reduction Reset settings Device information English Service 28 EN • Press F1 (Back) to cancel the operation. Tip formatting. 2 Press F3 (Enter), then press F2 (OK) to confirm the Device > Format card. 1 In stop mode (start-up screen), press F2 (Menu) and select • Formatting the memory deletes all recordings and files saved on the device. Caution Memory formatting 2 Press F1 (Back) to return to the stop mode. Device > Device information. X General device information is displayed: serial number, model number, firmware version of the device. 1 In stop mode (start-up screen), press F2 (Menu) and select Display device information Do not perform any maintenance operations that are not described in this user manual. Do not disassemble the device into its component parts to carry out repairs. The device may only be repaired in authorised service centers. 7 • Firmware updates can be performed automatically via Philips SpeechExec software. Æ Use Philips SpeechExec software, p. 21. Tip • Wait until the firmware update is complete before calling up other device functions. Failure to properly update the firmware may result in the device malfunctioning. Caution X The firmware is automatically updated. This may take a few minutes. 4 Disconnect the device from the computer. device. 3 Copy the new firmware file to the root directory of the website www.philips.com/dictation onto your computer. 2 Download the firmware update for your model from the the docking station. 1 Connect the device to the computer using the USB cable or • The battery should be fully charged to prevent the power supply being interrupted during the update. Caution It is possible that a newer version (an “update”) of the firmware has been released since you purchased the device. In this case you can easily update your device to the latest version. Your device is controlled by an internal program called firmware. As a part of ongoing product maintenance, the firmware is upgraded and errors are corrected. Updating the firmware • No recordings are saved in the device. • Remove the battery and insert it again. • Headphones are connected to the device. X Unplug the headphones. • The volume is at the lowest setting. X Adjust the volume level. • There is no memory card in the device. X Insert a memory card into the device. Æ Insert and eject the memory card, p. 11 • Memory card is not formatted correctly. X Format the memory card in the device. Æ Memory formatting, p. 28 • The the available memory space for recording is full. X Delete some files or move them to an external device. • The file is locked. X Unlock the file. Æ File lock and priority, p. 20 • The memory card is locked. X Unlock the memory card. • The headphones are incorrectly connected. X Check the headphone connection. • The volume is at the lowest setting. The device does not playback recordings The device does not respond I cannot hear anything from the speaker Recording does not start I cannot hear anything from the headphones 29 • Battery is empty. X Recharge the battery. • The device is turned off. X Turn the power on. Æ Power on/off, p. 12. • The device is in power-save mode. X Lift up the recorder or press any button to reactivate it. The device does not turn on EN Possible cause/solution Problem Troubleshooting English Technical data 30 EN Audio recording • Recording format: DSS/DSS Pro (Digital Speech Standard), MP3, PCM • Built-in microphone: 1 directional microphone, 1 microphone for 360 degree recording • Recording modes: DSS QP (.ds2/mono), DSS SP (.dss/mono), MP3 (.mp3/stereo), PCM Voice (.wav/mono), PCM Stereo (.wav/stereo) • Bit rate: 13.7 kbit/s (DSS SP), 28 kbit/s (DSS QP), 192 kbit/s (MP3), 353 kbit/s (PCM Voice), 705 kbit/s (PCM Stereo) • Recording time (4 GB memory card): 700 hours (SP), 350 hours (QP), 50 hours (MP3), 27 hours (PCM Voice), 13 hours (PCM Stereo) • Sample rate: 44.1 kHz (MP3), 22.05 kHz (PCM), 16 kHz (DSS QP), 12 kHz (DSS SP) Storage media • Exchangeable memory card • Memory card types: SD/SDHC (DPM8000, DPM8200), micro SD/SDHC (DPM8500), up to 32 GB • Mass storage class compliant Display • Type: color TFT • Diagonal screen size: 2.4 inches / 6.1 cm • Resolution: 320 x 240 pixels Connectivity • Headphones: 3.5 mm • Microphone: 3.5 mm • USB: high-speed USB 2.0 • Docking connector • Memory card slot 8 Specifications • Product dimensions (W × D × H): 53 × 123 × 15 mm / 2.1 × 4.8 × 0.6 inches • Weight: 117 g / 4.1 oz including battery Operation conditions • Temperature: 5° – 45° C / 41° – 113° F • Humidity: 10 % – 90 %, non-condensing Green Specifications • Compliant to 2002/95/EC (RoHS) • Lead-free soldered product Barcode scanner (DPM8500) • Compatible bar codes: UPC-A, UPC-E, EAN-8, EAN-13, Code 128, GS1-128, ISBT 128, Code 39, Interleaved 2 of 5, Inverse 1D, GS1 DataBar, Matrix 2 of 5 • Scan engine: CCD-based, single line Security • Real time file encryption • Encryption standard: Advanced Encryption Standard (AES or Rijndael Algorithm) with 256 bits • Device lock with pin code Power • Battery type: Philips rechargeable Li-ion battery ACC8100 • Battery lifetime: up to 23 hours of recording (DSS Pro mode), up to 200 hours standby • Charging time (full charge): 3 hours Sound • Speaker type: built-in round dynamic speaker • Speaker diameter: 28 mm • Speaker output power: 200 mW Declaration of conformity Model number: DPM8000, DPM8200, DPM8500 Trade name: Philips Pocket Memo digital recorder Responsible party: Speech Processing Solutions USA Inc Address: One Deerfield Centre, 13560 Morris Road, Suite 1400, Alpharetta, GA 30004, USA Telephone number: 888-260-6261 Website: www.philips.com/dictation Avis Canadien Cet appareil numérique de la classe B respecte toutes les exigences du règlement sur le matériel brouilleur du Canada. Canadian notice This Class B digital apparatus meets all requirements of the Canadian interference-causing equipment regulations. Cables Connections to this device must be made with shielded cables with metallic RFI/EMI connector hoods to maintain compliance with FCC rules and regulations. Modifications The FCC requires the user to be notified that any changes or modifications made to this device that are not expressly approved by the manufacturer may void the user’s authority to operate the equipment. This equipment has been tested and found to comply with the limits for a Class B digital device, pursuant to part 15 of the FCC rules. These limits are designed to provide reasonable protection against harmful interference in a residential installation. Federal Communications Commission notice This user manual is a document with no contractual nature. We accept no liability for changes, mistakes or printing errors. MPEG Layer-3 audio coding technology licensed from Fraunhofer IIS and Thomson Licensing. Neither Speech Processing Solutions GmbH nor its affiliates shall be liable to the purchaser of this product or third parties with respect to claims for damages, losses, costs or expenses incurred by purchaser or third parties as a result of an accident, misuse or abuse of this product or unauthorized modifications, repair, modification of the product or failure to meet the operating and maintenance instructions provided by the manufacturer. Declaration of conformity Speech Processing Solutions GmbH hereby declares that the devices DPM8000, DPM8200, DPM8500 fully comply with the basic requirements and other relevant provisions of directives 2006/95/EC, 2004/108/EC and 2009/125/EC. A complete declaration of conformity for this product is available at www . philips . com / dictation. The conformity with the relevant EU directives is confirmed by the CE mark. CE Declaration of Conformity This device complies with Part 15 of the FCC rules. Operation is subject to the following two conditions: 1) This device may not cause harmful interference. 2)This device must accept any interference received, including interference that may cause undesired operation. f DPM8000, DPM8200, DPM8500 Tested to comply with FCC standards FOR HOME OR OFFICE USE Specifications are subject to change without notice. © 2013 Speech Processing Solutions GmbH. All rights reserved. Philips and the Philips’ shield emblem are registered trademarks of Koninklijke Philips Electronics N.V. and are used by Speech Processing Solutions GmbH under license from Koninklijke Philips Electronics N.V. All trademarks are the property of their respective owners. Document version 1.0, 2013/03/07. Document number 5103 109 9758.1