1
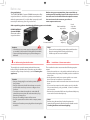
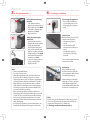
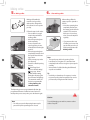
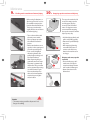
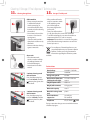
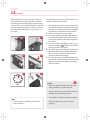
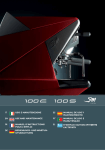
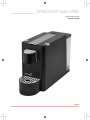
ESPRESSOTORIA® System CAPINO
Coffee capsule machine
Instruction manual
English
Troubleshooting
Problems and their remedies
Repairs to your machine may only be carried out at the service centre. Unprofessional repairs and use of non-original
replacement parts can be dangerous for the user.
In case of unprofessional repairs, no liability will be accepted for resultant damage and the guarantee is invalidated.
If this troubleshooting guide does not help you solve your
problem, please contact the service centre or go online at
www.espressotoria.com
Important: pull out the power plug immediately in case
of faults, defects or possible damage to the machine after
a fall.
Problem
No coffee output or
insufficient output
Possible cause
water tank empty
defective pump
capsule not (completely) perforated
operating lever open
scale built up in the machine
No coffee output
water tank not properly in place
defective pump
Cold coffee
heating system defective
Pump sounds very loud water tank empty
water tank not properly in place
Water drips continuously machine /piping blocked with lime
out of dispensing head
deposits
Occasional drops drip
empty capsules have remained in the
out of dispensing head
boiler unit
Coffee tastes sour
machine not flushed out enough after
descaling
capsule has passed expiration date
The amount of water
water tank empty
programmed per cup is
program changed
not correct
water quantity dosage not programmable
electronic malfunctioning
Dispensing button
flashes red very quickly
Dispensing button
lights up in green
no malfunctioning. The machine is in
energy saving mode
The machine stops
dispensing
water tank empty
defective pump
the used capsules tray is full
capsule stuck inside
machine is exposed to cold temperature for prolonged time, the heating
function is disabled for safety reasons.
The lever can not be
lowered
Dispensing button
flashes green very
quickly
Remedy
fill the water tank
contact the service centre
use a new capsule/contact the service centre
close lever completely
descale the machine
insert water tank correctly
contact the service centre
contact the service centre
fill the water tank
insert water tank correctly
descale the machine
eject the capsule (occasional drops are normal,
it is not a defect)
flush out the machine again
use a new capsule
fill the water tank
reprogram
contact the service centre (for safety reason,
dispensing stops after 30 seconds)
switch off the machine, wait for 20 minutes
and restart it. If the problem persists, contact
the service centre
press one of the dispensing buttons
fill tank with fresh water
contact the service centre
empty the used capsule tray
remove the used capsule
switch off machine, wait until it reaches room
temperature and restart. If the problem persists, contact the service center.
Safety instructions
Please take time to read these safety precautions carefully before connecting your machine to the power supply.
It is essential to follow them and the operating instructions.
− Never cover the appliance during operation.
– First read this entire operating manual.
− Keep children away from the appliance during operation.
− To avoid damage, only use capsules designed for this
– Only use the appliance in dry rooms.
system with this machine.
– Danger of tripping! Do not let the power cable hang
− Danger of electric shock! Never immerse the appliance
down.
in water or any other liquid.
− Pull out the power plug and allow the appliance to cool
– Connect only to a properly grounded power point
down completely before cleaning and or maintenance.
(230 V) protected by at least a 10 A fuse.
− To prevent frost damage, do not store the appliance at
– To make sure that the appliance is switched off, switch
temperatures below 5º C (e.g. in caravans).
the power point off and remove the plug from the
− To prevent damage, never use replacement parts or acpower point.
cessories not recommended by the manufacturer.
− Never clamp or run the power cable over sharp corners
− This appliance can be used by children aged from 8 years
or edges.
and above if they have been given supervision or instruc− Danger of electric shock! Damaged power cables may
tion concerning use of the appliance in a safe way and if
only be replaced at the customer service centre.
they understand the hazards involved. Cleaning and user
− Danger of electric shock! Never touch the power plug/
maintenance shall not be made by children unless they
socket/cable or the appliance with damp or wet hands.
are older than 8 and supervised. Keep the appliance and
– Danger of electric shock! Never unplug by pulling the
its cord out of reach of children aged less than 8 years.
power cable out of the power point or machine, always
− Appliances can be used by persons with reduced physiturn off the machine and power point before removing
cal, sensory or mental capabilities or lack of experience
the power plug.
and knowledge if they have been given supervision or
− If you need an extension cable, make sure it is suitable
instruction concerning use of the appliance in a safe
for your appliance (3-pole grounded, 1.5 mm² conducway and understand the hazards involved. Children
tor cross-section), and lay the cable to avoid tripping.
shall not play with the appliance.
− We recommend connecting the appliance via an FI
− Children should be supervised to ensure that they do
circuit-breaker. Consult an electrician or other electrical
not play with the appliance.
specialist if in doubt.
− This appliance is intended to be used in household and
− Danger of scalding! Never move the appliance during
similar applications such as:
operation!
− Never operate the appliance without water.
· staff kitchen areas in shops, offices or other working
− Danger of burning! Never touch very hot parts of the
environments;
appliance (e.g. brew unit during operations).
· farm houses;
− Danger of scalding! Do not touch the water jets.
· by clients in hotels, motels and other residential type
− Danger of scalding! Do not move the operating lever
environments;
when the appliance is still under pressure making coffee.
· bed and breakfast environments.
– Choose a dry, stable and level support surface for the
– Do not use the appliance in case of:
appliance, not immediately underneath the power point,
· faulty operation.
and at least 60 cm away from the washbasin and taps.
· damaged power cable.
− Never place the appliance on flammable/fusible sur· after falling or other damage.
faces or equipment.
– In such case the appliance must be checked and
− Never place the appliance or power cable on or nearer
repaired by an authorised customer service centre in
than 50 cm to hot surfaces or open flames.
order to avoid hazard.
– Always pull out the power plug, in accordance with
these safety instructions, before:
Intended utilization
· relocating the appliance.
The ESPRESSOTORIA® System CAPINO Automatic coffee
· cleaning or maintenance.
capsule machine is designed only to make espressos and
coffee.
· long periods of disuse.
Before use
Congratulations!
This ESPRESSOTORIA® System CAPINO Automatic coffee
capsule machine is a first-class product, manufactured
with the greatest care. If you look after it properly it will
reward you with many years of good service.
Before using your new machine, please read this operating manual carefully, keep it safe and pass it on to
the next user. For further information please contact
the service and sales centre or go online at
www.espressotoria.com.
After unpacking, please check that the following parts are included:
Perforated drip
tray cover
ESPRESSOTORIA®
System CAPINO
Automatic coffee
capsule machine
1x water tank lid
Caution
t $IFDLUIBUZPVSQPXFSTVQQMZWPMUBHFJTUIFTBNF
as marked on the machine rating plate (220-240 V).
t %FTUSPZBMMUIFQMBTUJDCBHTUPQSFWFOUEBOHFSUP
children!
Used
capsules
container
Two-piece
drip tray
Note
t 5IFSFDBOCFSFNBJOJOHXBUFSJOUIFUBOLGSPNUIF
function testing before leaving the factory.
t $PòFFDBQTVMFTBSFOPUJODMVEFE
1. Before using for the first time
2.
Thoroughly rinse out the water tank with hot water
before using for the first time. Clean the capsule coffee
machine using a damp cloth only (see 11. Cleaning the
appliance).
The machine location must meet the following requirements:
t 1MBDFUIFNBDIJOFPOBESZTUBCMFBOEMFWFMTVSGBDFOPU
directly under the power point. Only use the machine in
a dry room.
t /FWFSQMBDFUIFNBDIJOFPSQPXFSDBCMFPOPSOFBSFS
than 50 cm to hot surfaces or open flames.
t /FWFSQMBDFUIFNBDIJOFOFBSFSUIBODNUPUIFXBTI
basin.
t *GZPVOFFEBOFYUFOTJPODBCMFNBLFTVSFJUJTTVJUBCMF
for your machine (3-pole grounded, 1.5 mm² conductor
cross-section).
t 3FNPWFUIFQSPUFDUJWFGPJMGSPNUIFQFSGPSBUFEESJQUSBZ
cover and insert it in the drip tray.
Caution
t %BOHFSPGUSJQQJOH%POPUMFUUIFQPXFSDBCMF
hang down.
t %BOHFSPGFMFDUSJDTIPDL/FWFSDMBNQPSSVOUIF
power cable over sharp corners or edges or hot
surfaces.
t 5PNBLFTVSFUIBUUIFNBDIJOFJTTXJUDIFEPò
switch the power point off and remove the plug
from the power point.
t %BOHFSPGTDBMEJOHCFXBSFPGIPUXBUFS
t %POPUPQFSBUFUIFNBDIJOFXJUIBOFNQUZXBUFS
tank.
t "MXBZTQVMMPVUUIFQPXFSQMVHCFGPSFDMFBOJOHUIF
machine.
Installation / Power connection
Note
Before using the machine for the first time the
internal piping must be flushed out (for details see: 9.
Flushing machine and internal piping).
Overview
1
4
5
6
2
7
3
1
2
3
4
5
6
7
8
9
10
11
Water tank lid
Water tank
Main power switch
Operating lever
to load the capsules
Dispensing button
small cup, coffee/hot water
Dispensing button
large cup, coffee/hot water
Dispensing head
for coffee and hot water
Perforated drip tray cover
Upper drip tray
Lower drip tray
with capsule container
Capsule container
for used capsules
8
11
9
10
Starting up
3. Filling the water tank
Filling without removing
the tank
t 5VSOPòUIFNBDIJOF
t 3FNPWFUIFXBUFSUBOLMJE
t 'JMMUIFUBOLVQUPUIFMAX
mark with cold water (the
maximum is 1 litre).
t 3FQMBDFUIFMJE
Filling by removing the
water tank
t 4XJUDIPòUIFNBDIJOF
t 3FNPWFUIFXBUFSUBOLMJE
t -JGUVQUIFXBUFSUBOL
holding it by the special
grip (on the outside) and
remove it pulling upwards.
t 'JMMUIFUBOLVQUPUIFMAX
mark with cold water (the
maximum is 1 litre).
t -PXFSUIFXBUFSUBOLJOUP
place, pushing firmly.
t 3FQMBDFUIFMJE
Note
t /FWFSVTFEJTUJMMFEXBUFS
t 6TFPOMZDPMEUBQXBUFS
t "GUFSöMMJOHUIFXBUFSUBOLBOECFGPSFUIFOFYU
time that coffee is dispensed, press one of the
dispensing buttons, until you obtain a regular flow
of water from the dispenser (without the capsule).
t 8BUFSXIJDIIBTCFFOTPGUFOFEXJUIBDPNNFScially available water filter can be used. Damages
caused by wrong handling of the water filter are
not covered by the guarantee.
t *GUIFXBUFSUBOLJTFNQUZXIJMFUIFNBDIJOFJT
dispensing coffee, the pump will make a very loud
sound. This does not indicate any malfunctioning.
Press one of the dispensing buttons to stop the
dispensing of the coffee and the pump is immediately deactivated.
t *GOPEJTQFOTJOHCVUUPOJTQSFTTFEUIFQVNQJTBVtomatically deactivated after approx. 30 seconds.
4. Starting up / Preheating
Connecting the appliance
t $POOFDUUIFNBDIJOFUP
a grounded power point
by plugging in the power
plug.
Switching on
Before turning on the power
switch, make sure that:
t UIFPQFSBUJOHMFWFSJT
closed.
t UIFXBUFSUBOLJTGVMM
t UIFXBUFSUBOLJTöSNMZJO
place.
t UIFESJQUSBZXJUIUIF
container is completely
inserted.
Turn on the machine with the
main power switch.
Preheating
After switching on the
machine the two coffee dispensing buttons flash in blue
to indicate heating up.
When heating up is finished
(after approx. 1 min.), the two
coffee dispensing buttons
remain illuminated in blue. The
machine is now ready to use.
Note
Before using for the first time and after long periods
of non-use (for example, vacations) the internal piping must be flushed out. For details see:
9. Flushing machine and internal piping
Making coffee
5. Making coffee
6. After making coffee
Making coffee with this
machine is only possible
with capsules designed for
this system. Use one capsule
per cup.
Follow the steps in this order:
t Be sure there is enough
water in the tank before
making coffee.
t Move the operating lever
back completely.
t Insert a capsule in the
capsule opening. It automatically falls into the right
position.
t Move the operating lever
completely forward to load
the capsule into the brewing position.
t Place an empty cup under
the dispenser.
t Press the coffee dispensing
buttons:
Small cup: 50 ml
(Espresso default setting)
-BSHFDVQNM
(Coffee default setting)
During the dispensing the
chosen button will light up.
The automatic switch-off
device is programmable
(8. Programming the
amount of water).
After making coffee the
empty capsule is ejected as
follows:
t Move the operating lever
completely back to eject
the empty capsule into the
container. The container
holds up to 10 used capsules. It must be emptied
regularly.
t If you want another cup
of coffee, just insert a new
capsule and press the coffee dispensing button (5.
Making coffee).
Note
t 5IFDBQTVMFNBZTUJDLJOUIFPQFOJOHJGJUIBT
been there for a long time. If so, move the lever
completely back and close it again to eject capsule
correctly.
t 7BSJPVTLJOETPGDPòFFJODMVEJOHEFDBòFJOBUFE
capsules are available.
Tip
t 6TFUIJDLQSFIFBUFEDVQTGPSFTQSFTTPTJOPSEFS
to prevent cooling down too quickly. Cups can be
pre-heated by rinsing them with hot water.
The dispensing process stops automatically when the
programmed amount of coffee has been reached. To
interrupt the process at any time, press the button again.
Caution
Note
t 'PSTBGFUZSFBTPOTUIFEJTQFOTJOHCVUUPONBZCF
pressed only if the operating lever is closed.
To avoid damaging your machine, never use other
makes of capsule.
Energy saving mode / Programming the amount of water
7. Energy saving mode
8.
Programming the amount of water
You can program the amount
of water for the two coffee
dispensing buttons:
t Hold down the button
for 3 seconds to be
programmed (for example
for an espresso) until it
starts to flash blue rapidly.
The dispensing cycle commences.
t 0ODFUIFEFTJSFEBNPVOU
in the cup has been
obtained, press the button
again. The dispensing
process stops, the amount
of water is programmed
and both buttons light up.
If the machine is not being
used, after 5 minutes the energy saving mode is activated
and the absorbed power falls
to 0.5 Watt. The energy saving
mode is indicated by the
«small cup» dispensing button
lighting up in green.
To use the machine press one
of the dispensing buttons.
The machine is ready to
dispense coffee as soon as
the buttons are steadily lit up
in blue.
If the machine is not used for
an extended period of time
(for example, during vacations), ensure the machine
is switched off, empty the
water tank, turn the power
point off and then pull the
power plug out of the power
point.
Programmable quantity
of coffee (the same for both
buttons):
small cup (min. 30 ml to
max. 220 ml)
large cup (min. 30 ml to
max. 220 ml)
Switch to long ready mode
Switch off the machine and
close the metal handle. Then
switch on the machine again
while pressing the «large
cup»
button. Keep the
button pressed until it glows
blue. The machine will stay
ready now for max. 4 hours.
After 4 hours, the machine
returns to Energy Safe Mode
automatically.
To return to the normal energy saving mode, switch the
machine off and then switch
it on again while pressing
the «small cup»
button.
Keep it pressed until it glows
blue.
3 sec.
To return to the default quantities, press both dispensing
buttons simultaneously for
3 seconds until they both
glow blue.
The default quantities are:
Small cup, 50 ml
-BSHFDVQNM
Maintenance
9. Flushing out the machine and internal piping 10. Emptying capsule container and drip tray
Before using for first time, or
after long periods of non-use
(for example vacations), the
machine must be flushed out.
This short procedure thoroughly flushes out and cleans
the internal piping.
t5VSOPOUIFNBDIJOFXJUI
the main power switch.
t1MBDFBOFNQUZDVQVOEFS
the coffee/hot water dispenser.
t.BLFTVSFUIBUUIFSFBSFOP
capsules in the opening and
close the operating lever.
t1SFTTPOFPGUIFMJHIUFE
dispensing buttons (the
pump begins working and
the water circulates).
t"GUFSEJTQFOTJOHUIFQSPgrammed amount of water
the pump is automatically
deactivated. This procedure
can be repeated by pressing
one of the buttons again.
Also note that the procedure can be interrupted at
any time by pressing the
chosen button.
Caution
t 5IFXBUFSDPNJOHPVUPGUIFEJTQFOTFSJTIPU
Danger of scalding!
The capsule container holds
around 10 empty capsules
and the upper drip tray
around 150 ml of residual
water. For hygiene reasons
we recommend emptying
the capsule container and the
drip tray every day.
t Hold the drip tray firmly and
pull it out by lifting gently.
t Remove the perforated drip
tray cover.
t"GUFSFNQUZJOHDMFBOJOH
reassemble the pieces in
reverse order and insert
them in the machine as far
as they go.
Drip tray and cover, capsule
container
t$MFBOUIFESJQUSBZQFSGPrated cover and capsule
container with tepid water
and household detergent.
t/FWFSDMFBOUIFNJOUIF
dishwasher!
Cleaning / Storage / Final disposal / Technical data
11. Cleaning the appliance
9 sec.
6 sec.
12. Storage / Final disposal
Coffee machine
t"MXBZTFOTVSFUIFNBDIJOF
is switched off and pull
out the power plug, in
accordance with the safety
instructions, before cleaning
the machine.
tNever immerse the machine
in water or clean it under
running water.
t$MFBOUIFNBDIJOFXJUIB
damp cloth and allow to dry
afterwards.
t/FWFSVTFBCSBTJWFDMFBOJOH
agents or materials.
t *GUIFNBDIJOFXJMMOPUCF
used for some time, switch
it off, switch the power
point off and pull out
the power plug from the
power point.
t 4UPSFZPVSDPòFFNBDIJOF
in a dry, dust-free place out of reach of children.
t 5PBWPJEGSPTUEBNBHFEPOPUTUPSFUIFNBDIJOFBU
temperatures below 5 °C (such as caravans).
t Important: If the machine is not used for a long time,
please follow the cleaning instructions set out in this
manual prior to use.
Accessories
t$MFBOUIFXBUFSUBOL
capsule container and drip
tray with tepid water and
household detergent.
t/FWFSDMFBOJUJOUIFEJTIwasher!
available.
3-minutes cleaning mode
with cold water
Press both dispensing buttons for 9 Seconds, until the
button glows green, then
release them.
3-minutes cleaning mode
with hot water
Press both dispensing buttons for 6 Seconds, until the
button glows blue, then
release them.
Do not dispose of electrical appliances as unsorted municipal waste, use separate collection
facilities. Contact your local government for
information regarding the collection systems
Technical data
Rated voltage
220-240 V~ 50/60 Hz
Rated power
1000 Watt
Energy saving mode
0.5 Watt
Basic machine dimensions
(with depth and height)
125 x 381 x 242 mm
approx.
Length of power cable
max. 1 m
Weight (without water)
3.8 kg approx.
Water tank capacity
max. 1 l
Materials housing/ water
tank
plastic
Radio interference
suppression
according to
EU standards
Compliance
CE, GS / RoHS /
5608
Design or execution changes are reserved in the interest
of technical progress.
Descale
13. Descale
Drinking water varies according to region. The lime particles in hard drinking water are deposited as residues in
the machine and can block the piping and cause damage.
To prevent this, be sure to descale the machine at the very
least after making 300 to 400 cups of coffee or in any case
if the output falls significantly or, in any case after one or
two months.
1
2
3
4
5
6
5 min.
Descale the machine correctly to prevent damage. So it is
essential to follow these instructions:
1. Recommendations: purchase commercially available
descaler (descaling liquid), and dilute it following the
instructions set out by the particular descaling liquid
manufacturer; pour the mixture in the water tank.
2. Make sure the capsule container is empty.
3. Place a large bowl under the dispensing head to collect the descaling liquid and lime residues and turn
on the power switch (the coffee dispensing displays
flash in blue).
4. As soon as the dispensing displays remain on, press
the dispensing button
(small cup). Wait until the
dispensing operation is complete.
5. Turn off the machine with the power switch for about
five minutes and let the descaling fluid take effect.
Then turn on the power switch again and repeat
points 4 & 5 until the tank is empty.
6. Rinse the water tank well and refill with water. Place
the tank back inside the machine and press the coffee
dispensing button. Press the button again until the
water tank is empty.
Caution
t /FWFSDMFBOUIFNBDIJOFXJUIWJOFHBS5IJTDBVTFT
damage and makes your coffee taste bad!
t %BNBHFDBVTFECZJODPSSFDUEFTDBMJOHPSGBJMVSFUP
descale is not covered by the guarantee.
Note
t %FTDBMFSTNVTUCFVTFEGPMMPXJOHUIFNBOVGBDturer‘s instructions!
t 5IFTFMJRVJETBSFTDBMEJOHIPU%BOHFSPGTDBMEJOH
t 'PMMPXUIFTBGFUZJOTUSVDUJPOTJOUIFEFTDBMFS
packaging.
N 5608
IMPORTED BY:
CANTARELLA BROS PTY LTD
ABN 68 000 095 607
118 WETHERILL ST,
SILVERWATER NSW 2128
AUSTRALIA
PHONE: (612) 9748 0299
VITTORIA FOOD & BEVERAGE PTY LIMITED
OS 422 9999
162 GRAFTON ROAD
GRAFTON, AUCKLAND 1001
NEW ZEALAND
PHONE: (649) 984 5677
V2.4-EN-13.08