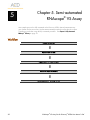
1
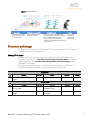
USER MANUAL
RNAscope® VS Assay
For DISCOVERY™ ULTRA
RED
Document Number 320521
For Research Use Only (RUO)
Rev. Date 20150318
For Research Use Only (RUO).
Trademarks
RNAscope® is a registered trademarks of Advanced Cell Diagnostics, Inc. VENTANA and DISCOVERY are trademarks of Roche.
All other trademarks belong to their respective owners.
Citing RNAscope® VS in Publications
When describing a procedure for publication using this product, please refer to it as the RNAscope® VS Assay and cite: Wang F,
Flanagan J, Su N, Wang L-C, Bui S, Nielson A, Wu X, Vo H-T, Ma X-J and Luo Y. RNAscope®: A Novel In Situ RNA Analysis
Platform for Formalin-Fixed Paraffin-Embedded Tissues. J. Mol. Diagnostics, 2012, 14:22–29.
Disclaimers
Advanced Cell Diagnostics, Inc. reserves the right to change its products and services at any time to incorporate technological
developments. This manual is subject to change without notice.
Although this manual has been prepared with every precaution to ensure accuracy, Advanced Cell Diagnostics, Inc. assumes no
liability for any errors, omissions, or for any damages resulting from the use of this information.
Copyright
© 2015. Advanced Cell Diagnostics, Inc. All rights reserved.
Contents
Chapter 1. Product Information ........................................................ 6
About this guide ............................................................................................ 6
Product description ........................................................................................ 6
Background............................................................................................... 6
Overview .................................................................................................. 6
Kit contents and storage ................................................................................. 7
RNAscope® VS Probes ............................................................................... 7
RNAscope® Control Slides .......................................................................... 8
RNAscope® VS Reagents ............................................................................ 8
Required materials from Ventana™ Medical Systems ........................................ 9
Equipment and buffers ............................................................................. 10
User-supplied materials ............................................................................ 10
Chapter 2. Before You Begin ......................................................... 11
Important procedural guidelines ................................................................... 11
Chapter 3. Prepare and Pretreat Samples ........................................ 12
Prepare FFPE sections .................................................................................. 12
Materials required ................................................................................... 12
Fix the sample ......................................................................................... 12
Dehydrate, embed, and cut the sample ..................................................... 12
Chapter 4. Fully Automated RNAscope® VS Assay ........................... 14
Workflow ................................................................................................... 14
Prepare the materials ................................................................................... 15
Materials required ................................................................................... 15
Prepare the instrument ............................................................................. 15
Dilute bulk reagents ................................................................................. 15
Register new reagents .............................................................................. 15
Prepare instrument reagents ..................................................................... 15
Prepare detergent .................................................................................... 16
Prepare mounting reagents....................................................................... 16
Create an instrument protocol ................................................................... 16
Print the labels ......................................................................................... 18
Run the RNAscope® VS Assay ...................................................................... 18
Materials required ................................................................................... 18
Loading the reagents ............................................................................... 18
Start the run ............................................................................................ 18
Complete the run ..................................................................................... 19
Wash the slides ....................................................................................... 19
RNAscope® VS Assay for the Discovery® ULTRA User Manual - Red
3
Mount the samples ................................................................................... 19
Chapter 5. Semi-automated RNAscope® VS Assay ........................... 20
Workflow ................................................................................................... 20
Prepare the materials ................................................................................... 21
Materials required ................................................................................... 21
Prepare the instrument ............................................................................. 21
Dilute bulk reagents ................................................................................. 21
Register new reagents .............................................................................. 21
Prepare instrument reagents ..................................................................... 21
Prepare detergent .................................................................................... 22
Prepare deparaffinization reagents ........................................................... 22
Prepare mounting reagents....................................................................... 22
Prepare 1X Pretreat 2 .............................................................................. 22
Create an instrument protocol ................................................................... 22
Print the labels ......................................................................................... 24
Manually pretreat the samples ...................................................................... 25
Materials required ................................................................................... 25
Bake the slides ......................................................................................... 25
Deparaffinize FFPE sections ...................................................................... 25
Pretreat the slides..................................................................................... 26
Run the RNAscope® VS Assay ...................................................................... 27
Materials required ................................................................................... 27
Loading the reagents ............................................................................... 27
Start the run ............................................................................................ 27
Complete the run ..................................................................................... 27
Wash the slides ....................................................................................... 28
Mount the samples ................................................................................... 28
Recommended Guidelines ............................................................................ 29
Chapter 6. Evaluate the results ....................................................... 30
Scoring guidelines ....................................................................................... 30
Quantitative Image Analysis ..................................................................... 30
Troubleshooting........................................................................................... 31
Control example .......................................................................................... 31
Appendix A. Maintain the Instrument.............................................. 32
Flush the instrument ..................................................................................... 32
Purge and prime the system with clean distilled water ................................. 32
Purge and prime the system with fresh reagents ......................................... 33
Appendix B. Calibrate the Instrument .............................................. 36
Calibrate the temperature of the instrument ................................................... 36
Materials required ................................................................................... 36
Procedure ............................................................................................... 36
4
RNAscope® VS Assay for the Discovery® ULTRA User Manual - Red
Appendix C. Safety...................................................................... 39
Chemical safety ........................................................................................... 39
Biological hazard safety .............................................................................. 39
Documentation and support .......................................................... 41
Obtaining MSDSs........................................................................................ 41
Obtaining support ....................................................................................... 41
Contact information ..................................................................................... 41
Limited product warranty ............................................................................. 41
RNAscope® VS Assay for the Discovery® ULTRA User Manual - Red
5
Chapter 1. Product Information
1
Before using this product, read and understand the information in Appendix C. Safety on
page 39 in this document.
IMPORTANT!
We recommend reading the entire user manual before beginning any protocols.
About this guide
This user manual provides two versions of the RNAscope® VS Assay:
•
Chapter 4. Fully Automated RNAscope® VS Assay starting on page 14.
•
Chapter 5. Semi-automated RNAscope® VS Assay starting on page 20.
Product description
Background
The RNAscope® Assays use a novel and proprietary method of in situ hybridization (ISH) to
visualize single RNA molecules per cell in formalin-fixed, paraffin-embedded (FFPE) tissue mounted
on slides. The assays are based on Advanced Cell Diagnostic’s patented signal amplification
and background suppression technology, and can detect RNA molecules in archival samples and
partially degraded specimens. The RNAscope® VS Assay allows users to automate the highly
sensitive RNAscope® Assay using the Ventana™ DISCOVERY™ ULTRA systems.
Overview
The RNAscope® VS Assay procedure is illustrated in Figure 1 on page 6 and can be completed
on the instrument in ~8–10 hours. Starting with properly prepared samples, sections are first
pretreated, and then RNA-specific probes are hybridized to target RNA. The signal is amplified
using multiple steps, followed by hybridization to horseradish peroxidase (HRP)- or alkaline
phosphatase (AP)-labeled probes and detection using a chromogenic substrate. Each single RNA
transcript appears as a distinct dot of chromogen precipitate visible using a common bright-field
microscope.
6
RNAscope® VS Assay for the Discovery® ULTRA User Manual - Red
Figure 1 Procedure overview
1: Tissue section
2: Hybridize to target RNA
Start with properly prepared
sections and pretreat to allow
access to target RNA.
Hybridize gene-specific probe
pairs to the target mRNA.
3: Amplify signal
4: Image
Probes are hybridized to a cascade of signal
amplification molecules, culminating in binding of
HRP- or AP-labeled probes. The 2.0 Assay
enhances signal further with additional
amplification steps. Add DAB or Fast Red substrate
to detect target RNA.
Visualize target
RNA using a
standard bright
field microscope.
Kit contents and storage
The RNAscope® VS Assay requires the RNAscope® VS Probes and the RNAscope® VS Reagents,
available from Advanced Cell Diagnostics.
RNAscope® VS Probes
The RNAscope® VS Probes consist of the user-specified Target Probe and the Positive and
Negative Control Probes. Visit www.acdbio.com/products/target-probes/search-product to find a genespecific Target Probe. Visit www.acdbio.com/products/targetprobes/controls-housekeeping to order
appropriate Control Probes.
Each probe is sufficient for staining ~30 standard slides. The probes have a shelf life of six
months from the shipment date when stored as indicated in the following table:
Target Probes
Reagent
RNAscope® VS Target Probe – [species]
– [gene]
Cat. No.
Various
Content
Probe targeting specific RNA
Quantity
7 mL x 1 bottle
Storage
4°C
Control Probes
Reagent
Cat. No.
Content
Quantity
Storage
RNAscope® VS Positive Control Probe –
[species] – PPIB
Various
Probe targeting common
housekeeping gene
7 mL x 1 bottle
4°C
RNAscope® VS Negative Control Probe
– DapB
310043
Probe targeting bacterial
gene dapB
7 mL x 1 bottle
4°C
RNAscope® VS Assay for the Discovery® ULTRA User Manual - Red
7
RNAscope® Control Slides
The RNAscope® Control Slides (Cat. No. 310045 for Human control slide, Hela; Catalog No.
310023 for Mouse control slide, 3T3) contain FFPE cell pellets sectioned and mounted on slides.
The control slides can be used for assay control with the RNAscope Positive Control Probe and
RNAscope Negative Control Probes. The slides have a shelf life of 6 months from the shipment
date when stored at 2–8°C with dessicants.
RNAscope® VS Reagents
The RNAscope® VS Reagents contain all the reagents needed to run the RNAscope® assay on the
Ventana Discovery ULTRA, except for the RNA-specific probes. The contents of the RNAscope® VS
Reagents consist of the RNAscope® VS Reagent Kit–-RED (Cat. No. 320610), the RNAscope® VS
Accessory Kit (Cat. No. 320630), and the RNAscope® Pretreat 2 Pack (Cat. No. 320043). The
kits provide enough reagents to stain ~60 standard slides.
The reagents have a shelf life of six months from the shipment date when stored as indicated in
the following table:
RNAscope® VS Reagent Kit–RED (Cat. No. 320610)
Reagent
Quantity
Storage
VS Pretreat A–Red — Protease A
14 mL x 1 bottle
4°C
VS Pretreat B–Red — Protease B
14 mL x 1 bottle
4°C
VS Amp 1–Red
14 mL x 1 bottle
4°C
VS Amp 2–Red
14 mL x 1 bottle
4°C
VS Amp 3–Red
14 mL x 1 bottle
4°C
VS Amp 4–Red
14 mL x 1 bottle
4°C
VS Amp 5–Red
14 mL x 1 bottle
4°C
VS Amp 6–Red
14 mL x 1 bottle
4°C
14 mL x 1 bottle
4°C
VS Amp 7–Red
RNAscope VS Accessory Kit (Cat. No. 320630)
®
Reagent
Quantity
Storage
VS Hematoxylin — RTU
7 mL x 1 bottle
4°C
VS Bluing Reagent — RTU
7 mL x 1 bottle
4°C
RNAscope® VS Pretreat 2 Pack (Cat. No. 320043)
Reagent
10X Pretreat 2 (antigen retrieval solution)
Quantity
70 mL x 4 bottles
Storage
Room temperature
(20–25°C)
IMPORTANT!
Do not substitute the reagent components of the RNAscope® VS Reagent Kit with those
of other RNAscope® Reagent Kits, even those having the same name.
8
RNAscope® VS Assay for the Discovery® ULTRA User Manual - Red
Required materials from Ventana™ Medical Systems
The RNAscope® VS Assay requires specific materials and equipment available only from
Ventana™ Medical Systems.
Probe Dispensers (Cat. No. 960-761 to 960-780)
Component
Probes 1–20 dispensers — fill dispensers with RNAscope® VS Probes. Use
up to 20 probes at a time.
Storage
Room temperature (20–25°C)
mRNA Pretreatment Kit (Cat. No. 760-223)
Component
Storage
mRNA Pretreat A dispenser — fill dispenser with Pretreat A
Room temperature (20–25°C)
mRNA Pretreat B dispenser — fill dispenser with Pretreat B
Room temperature (20–25°C)
mRNA Probe Amplification Kit (Cat. No. 760-222)
Component
Storage
mRNA Amp 1 dispenser — fill dispenser with Amp 1
Room temperature (20–25°C)
mRNA Amp 2 dispenser — fill dispenser with Amp 2
Room temperature (20–25°C)
mRNA Amp 3 dispenser — fill dispenser with Amp 3
Room temperature (20–25°C)
mRNA Amp 4 dispenser — fill dispenser with Amp 4
Room temperature (20–25°C)
mRNA Amp 5 dispenser — fill dispenser with Amp 5
Room temperature (20–25°C)
mRNA Amp 6 dispenser — fill dispenser with Amp 6
Room temperature (20–25°C)
mRNA Amp 7 dispenser — fill dispenser with Amp 7
Room temperature (20–25°C)
mRNA Red Detection Kit (Cat. No. 760-234)
Component
Storage
mRNA Inhibitor-prefilled
4°C
mRNA Activator dispenser-prefilled
4°C
mRNA Napthol dispenser-prefilled
4°C
mRNA Fast Red dispenser-prefilled
4°C
Generic dispensers (Cat. No. 771-741 and 771-742)
Component
Storage
Counterstain 1 dispenser — fill dispenser with Hematoxylin
Room temperature (20–25°C)
Counterstain 2 dispenser — fill dispenser with bluing reagent
Room temperature (20–25°C)
mRNA Red, Amplification & Pretreatment PTO Kit (Cat. No. 760-235)
Component
Storage
mRNA Red Detection Kit (Cat. No. 760-234)
4°C
mRNA Red Amplification Kit (Cat. No. 760-236)
Room temperature (20–25°C)
mRNA Red Pretreatment Kit (Cat. No. 760-237)
Room temperature (20–25°C)
RNAscope® VS Assay for the Discovery® ULTRA User Manual - Red
9
Equipment and buffers
Component
Cat. No.
DISCOVERY™ ULTRA — automated slide stainer
N750-DISU-FS
EZPrep Buffer
950-100
LCS Buffer
650-010
RiboWash Buffer
760-105
RiboCC Buffer — used for automated cell conditioning (CC2)
760-107
Reaction Buffer
950-300
DISCOVERY 1X SSC Wash (in Option Bottle)
950-210
™
User-supplied materials
IMPORTANT!
Do not substitute other materials for the SuperFrost® Plus Slides listed in the following
table.
Description
Supplier
Cat. No.
SuperFrost® Plus Slides (required)
Fisher Scientific
12-550-15
100% ethanol (EtOH)
American Master Tech Scientific/MLS*
ALREAGAL
Xylene
Fisher Scientific/MLS
X3P-1GAL
10% neutral-buffered formalin (NBF)
MLS
—
Paraffin wax
MLS
—
1X PBS
MLS
—
Microtome
MLS
—
Drying oven, capable of holding temperature at 60
+/- 1°C
MLS
—
Water bath or incubator, capable of holding
temperature at 40 +/- 1°C
MLS
—
EcoMount
Biocare
EM897L
Tissue-Tek Vertical 24 Slide Rack
American Master Tech Scientific/MLS
LWSRA24
Tissue-Tek Staining Dish (3 required)
American Master Tech Scientific/MLS
LWT4457EA
Tissue-Tek® Clearing Agent Dish, xylene resistant (3
required)
American Master Tech Scientific/MLS
Cover Glass 24 x 50 mm
Fisher Scientific/MLS
12--545-F
Distilled water
MLS
—
Dawn detergent
MLS
—
Fume hood
MLS
—
Glass beaker (1 or 2 L)
MLS
—
Hot plate
Fisher Scientific/MLS
11-300-49SHP
®
®
LWT4456EA
* Major Laboratory Supplier in North America. For other regions, please check Catalog Numbers with your local lab supplier.
10
RNAscope® VS Assay for the Discovery® ULTRA User Manual - Red
2
Chapter 2. Before You Begin
Prior to running the RNAscope® VS Assay on your samples for the first time, we recommend that
you:
• Be familiar with the Ventana™ DISCOVERY™ ULTRA system. Refer to the Ventana™ System User
Manual.
• View the video demonstrations available at www.acdbio.com/technical-support/online-trainingvideos.
• Run the assay on FFPE RNAscope® Control Slides (Cat. No. 310045 for Human control slide,
Hela; Catalog No. 310023 for Mouse control slide, 3T3) using the Positive and Negative
Control Probes.
Important procedural guidelines
• Start with properly fixed and prepared sections. Refer to Chapter 3. Prepare and Pretreat Samples
on page 12 for preparation of FFPE slides. For preparation of other sample types, contact
[email protected].
• Follow the recommended pretreatment conditions for your sample. Refer to Recommended
Guidelines on page 28 for pretreatment conditions and to the technical notes available at
www.acdbio.com/technical-support/downloads/technical-doc/category/tech-notes.
• Regularly maintain and clean your automated staining instrument.
• Always run positive and negative control probes on your sample to assess sample RNA quality
and optimal permeabilization.
• Do not substitute required materials. Assay has been validated with these materials only.
• Follow the protocol exactly for best results.
• Do not let your sections dry out during the procedure.
• Use good laboratory practices and follow all necessary safety procedures. Refer to Appendix C.
Safety on page 39 for more information.
RNAscope® VS Assay for the Discovery® ULTRA User Manual - Red
11
Chapter 3. Prepare and Pretreat
Samples
3
Formalin-fixed, paraffin-embedded (FFPE) sample preparation and pretreatment are described in
the following protocols.
IMPORTANT!
We highly recommend following these guidelines. We cannot guarantee assay results
with other preparation methods.
For samples treated differently from the following protocol, please see the sample pretreatment
optimization procedure described in Recommended Guidelines on page 28 and technical notes
available at www.acdbio.com/technical-support/downloads/technical-doc/category/tech-notes.
Prepare FFPE sections
Materials required
• 10% neutral buffered formalin (NBF)
• 1X PBS
• Paraffin wax
• 100% ethanol (EtOH)
• Xylene
• Microtome
• Water bath
• SuperFrost® Plus slides
Fix the sample
1. Immediately following dissection, fix tissue in 10% NBF for 16–32 HRS at ROOM TEMPERATURE
(RT). Fixation time will vary depending on tissue type and size.
CAUTION! Handle biological specimens appropriately.
IMPORTANT!
Fixation for <16 HRS or >32 HRS will impair the performance of the RNAscope® Assay.
Dehydrate, embed, and cut the sample
IMPORTANT! Use fresh reagents.
1. Wash sample with 1X PBS.
2. Dehydrate sample using a standard ethanol series, followed by xylene.
3. Embed sample in paraffin using standard procedures.
Note:
Embedded samples may be stored at RT for years.
4. Trim paraffin blocks as needed, and cut embedded tissue into 5 +/- 1 µm sections using a
microtome.
12
RNAscope® VS Assay for the Discovery® ULTRA User Manual - Red
5. Place paraffin ribbon in a 40–45°C water bath, and mount sections on SUPERFROST® PLUS
SLIDES.
IMPORTANT!
Do not mount more than one section per slide. Place sections in the center of the slide.
6. Air dry slides OVERNIGHT at RT.
OPTIONAL STOPPING POINT. Use sectioned tissue within 3 months. Store sections with
dessicants at RT.
RNAscope® VS Assay for the Discovery® ULTRA User Manual - Red
13
Chapter 4. Fully Automated
RNAscope® VS Assay
4
IMPORTANT!
We strongly recommend you run the FFPE RNAscope® Control Slides
(Cat. No. 310045 or Cat. No. 310023) using the positive and negative control probes along with
your samples in every run.
Workflow
Prepare the materials
Run the RNASCOPE® VS Assay ~10 hours
14
RNAscope® VS Assay for the Discovery® ULTRA User Manual - Red
Prepare the materials
Materials can be prepared ahead of time, unless otherwise stated.
Materials required
Materials provided by Advanced Cell
Diagnostics
• VS Target Probe
• VS Positive Control Probe
• VS Negative Control Probe
Materials provided by Ventana™
Medical Systems
Other materials and equipment
• DISCOVERY™ ULTRA — automated • Distilled water
slide stainer
• Dawn detergent
• EZPrep Buffer
• Fume hood
• VS Pretreat A-Red
• LCS Buffer
• Xylene
• VS Pretreat B-Red
• RiboWash Buffer
• Tissue-Tek® Staining Dish (1)
• VS Amp 1-Red
• CC1 and RiboCC Buffers (used for
automated cell conditioning)
• VS Amp 2-Red
• Reaction Buffer
• VS Amp 3-Red
• DISCOVERY 1X SSC (Option
Bottle)
™
• VS Amp 4-Red
• VS Amp 5-Red
• Probe dispensers
• VS Amp 6-Red
• mRNA Pretreatment Kit
• VS Amp 7-Red
• Tissue-Tek® Clearing Agent Dish,
xylene-resistant (1)
• Tissue-Tek® Vertical 24 Slide
Rack
• EcoMount
• Cover Glass, 24 mm x 50 mm
• mRNA Probe Amplification Kit
• VS Hematoxylin
• mRNA Red Detection Kit
• VS Bluing reagent
• Generic dispensers
Prepare the instrument
If the instrument has not been used for ≥1 week, follow the guidelines for instrument maintenance
in Appendix A. Maintain the Instrument on page 32.
Dilute bulk reagents
Prepare EZPrep, RiboWash, Reaction Buffer, and SSC (optional) by diluting them 1:10 with
distilled water.
Register new reagents
Reagent dispensers come with appropriate barcode labels and registration buttons for dispensing
RNAscope® VS Reagents. Use the wand that comes with the instrument to register new reagent
kits. Refer to the Ventana™ System User Manual for details.
Prepare instrument reagents
1. For AMP 1 to AMP 7, transfer the entire volume of each RNAscope® VS FFPE Reagent Kit
component into the correspondingly labeled dispenser.
2. Transfer the rest of the RNAscope® VS Reagents to the correspondingly labeled dispensers.
IMPORTANT!
Avoid cross contamination between reagents.
3. Follow the dispenser product insert instructions to properly prime and handle the dispensers.
4. Press the dispenser caps down tightly.
Note:
Store tightly capped dispensers at 4°C when not in use.
RNAscope® VS Assay for the Discovery® ULTRA User Manual - Red
15
5. Check solution levels: EZprep, RiboWash, Reaction Buffer, and 0.1X SSC (optional wash).
Refill if they are less than half full. To run a full tray of 30 slides, fully fill the RiboWash
Buffer container.
6. For RiboCC or CC1, the optimal volume is approximately 25% of the container capacity.
Refill to this level if the volume in the container falls below 10% capacity.
IMPORTANT!
Use reagents that have not expired.
7. Empty the waste bottle if needed.
Prepare detergent
1. Prepare 200 mL of diluted Dawn detergent by adding 4–5 mL Dawn detergent to 200 mL
distilled water in a container with a cap.
2. Mix well by inverting the container 4–5 times.
3. Add diluted detergent to a Tissue-Tek® Staining Dish.
Note:
Store diluted detergent at RT.
Prepare mounting reagents
• In a fume hood, fill a clearing agent dish with ~200 mL fresh xylene.
Note:
Ensure all containers remain covered.
Create an instrument protocol
1. Open the NexES software and click on the Protocol button.
2. Click on Create/Edit Protocols, go to the Procedure drop down menu and select mRNA Red
Discovery ULTRA 2.0.
3.
16
Main protocol steps appear as shown:
RNAscope® VS Assay for the Discovery® ULTRA User Manual - Red
4. After selecting the main protocol steps, drop down menus become available. select the
appropriate protocol steps by clicking on the associated check boxes as shown:
IMPORTANT!
Optimal temperatures for the Amp 1 and Amp 3 hybridization steps
(Hybridization #2 and Hybridization #4) may vary depending on your instrument. To optimize
temperatures, follow the procedure in Appendix B. Calibrate the Instrument on page 36.
5. Select the appropriate assay conditions from the drop down menus according to the
following table:
Tissue Type
Cell Conditioning (CC) Solution
CC Temp.
Time per Cycle
Cycle No.
Brain
CC1
100°C
12 MIN
1 cycle
Cell pellet
CC1
100°C
12 MIN
1 cycle
Colon
CC1
100°C
12 MIN
2–3 cycles
Heart
CC1
100°C
12 MIN
1 cycle
Intestine
CC1
100°C
12 MIN
2–3 cycles
Kidney
CC1
100°C
12 MIN
1 cycle
Liver
CC1
100°C
12 MIN
3 cycles
Lung
RiboCC
100°C
12 MIN
2–3 cycles
Prostate
CC1
100°C
12 MIN
1 cycle
Spleen
RiboCC
100°C
12 MIN
1 cycle
Tonsil
CC1
87°C
12 MIN
1 cycle
6. Click Save as, then select a protocol number from the drop down menu and choose a
protocol name for each probe. Click Save.
7. Click Close to go back to the main screen.
RNAscope® VS Assay for the Discovery® ULTRA User Manual - Red
17
8. Assign probe number from the list to each probe of interest. For each probe selected,
assign a protocol.
Print the labels
1. Select the Print Label icon from the upper right corner of the home page screen.
2. Select your preferred template or create new template. To create a new template, refer to
the Ventana™ System User Manual for details.
3. Click on Protocol.
4. Select the protocol you created for the RNAscope® VS Assay and click on the Add button.
When the protocols for all of the slides have been assigned, click on Close/Print.
5. Fill in the template for each slide. Select Print when completed.
6. Proceed to the following procedure Loading the reagents.
Run the RNAscope® VS Assay
Materials required
• Prepared slides
• Prepared instrument reagents
• Prepared detergent
• Prepared mounting materials
• Tissue-Tek® Vertical 24 Slide Rack
• EcoMount
• Cover Glass, 24 mm x 50 mm
Loading the reagents
1. Remove the nozzle caps from the filled dispensers and place each cap on the post located
on the back of the dispenser.
2. If needed, remove any air bubbles at the nozzle tips by squeezing out one drop of
reagent.
3. Load dispensers onto the reagent racks.
4. Remove the yellow locking ring from the dispensers in the prefilled mRNA RED Detection
Kit. Refer to the instructions provided by Ventana™ Medical Systems.
5. Load the reagent racks onto the reagent carousel.
Start the run
1. Click the Ready button.
2. Load each slide onto a heater pad with the label facing away from you. Ensure that the
slides sit securely on the pads.
18
RNAscope® VS Assay for the Discovery® ULTRA User Manual - Red
IMPORTANT!
Prior to loading the slides, ensure heater pads are completely dry. Wipe off
any solution using laboratory tissue paper.
3. Click the Running button. Automated assay will finish in ~8 HRS.
IMPORTANT!
Before leaving the instrument unattended, ensure all reagents and slides are
successfully registered and the instrument is running.
Complete the run
1. After the run is complete, place nozzle caps back on the dispensers.
2. Store reagent racks at 4°C until next use.
Wash the slides
1. Submerge a Tissue-Tek® Slide Rack into the Tissue-Tek® Staining Dish containing 200 mL
diluted detergent.
2. Open the instrument slide tray and unload slides.
3. Decant solutoin on the slides into the slide tray, then immediately load slides into the TissueTek® Slide Rack submerged in detergent.
4. Rinse oil off the slides by moving the slide rack up and down in the dish 10 times.
5. Replace the detergent with distilled water and rinse slides by moving the slide rack up and
down 10 times.
6. Repeat Step 5 three to five times.
Mount the samples
1. Remove the slide rack from the staining dish and dry slides in a 60°C dry oven for 15 MIN.
IMPORTANT!
The Red substrate is alcohol sensitive. Do not dehydrate the slides in alcohol.
2. Cool the slides for 5 MIN at RT.
3. Briefly dip one slide into into fresh pure xylene and immediately place 1–2 drops of
EcoMount on the slide before the xylene dries.
IMPORTANT!
Use the EcoMount mounting medium only.
4. Carefully place 24 mm x 50 mm coverslip over the tissue section. Avoid trapping air
bubbles.
5. Repeat steps 2 and 3 for each slide.
6. Air dry slides for 5 MIN.
7. Proceed to Chapter 6. Evaluate the results on page 30.
RNAscope® VS Assay for the Discovery® ULTRA User Manual - Red
19
5
Chapter 5. Semi-automated
RNAscope® VS Assay
Most sample types can be fully automated on the Discovery ULTRA. Manual pretreatment may
give a better result in some cases. Use the semi-automated procedure for tissues that do not have
a satisfactory result when using the fully automated procedure. See Chapter 4. Fully Automated
RNAscope® VS Assay on page 14.
Workflow
Prepare the materials
Bake the slides 30 MIN
Deparaffinize FFPE tissue ~20 MIN
Pretreat the slides ~20–45 MIN
Run the RNASCOPE® VS Assay ~8 HRS
20
RNAscope® VS Assay for the Discovery® ULTRA User Manual - Red
Prepare the materials
Materials can be prepared ahead of time or while baking the slides, unless otherwise stated. See
Bake the slides on page 25.
Materials required
Materials provided by Advanced Cell
Diagnostics
• VS Target Probe
Materials provided by Ventana™
Medical Systems
Other materials and equipment
• VS Negative Control Probe
• DISCOVERY™ ULTRA — automated • Distilled water
slide stainer
• Glass beaker (1 or 2 L)
• EZPrep Buffer
• Hot plate
• 10X Pretreat 2
• LCS Buffer
• VS Pretreat A-Red
• RiboWash Buffer
• VS Pretreat B-Red
• Reaction Buffer
• VS Amp 1-Red
• VS Amp 2-Red
• DISCOVERY™ 1X SSC (Option
Bottle)
• VS Amp 3-Red
• Probe dispensers
• VS Amp 4-Red
• mRNA Pretreatment Kit
• VS Amp 5-Red
• mRNA Probe Amplification Kit
• VS Amp 6-Red
• mRNA Red Detection Kit
• Tissue-Tek® Vertical 24 Slide
Rack
• VS Amp 7-Red
• Generic dispensers
• EcoMount
• VS Positive Control Probe
• Dawn detergent
• Fume hood
• Xylene
• 100% ethanol (EtOH)
• Tissue-Tek® Staining Dish (3)
• Tissue-Tek® Clearing Agent Dish,
xylene-resistant (3)
• Cover Glass, 24 mm x 50 mm
• VS Hematoxylin
• VS Bluing reagent
Prepare the instrument
If the instrument has not been used for ≥1 week, follow the guidelines for instrument maintenance
in Appendix A. Maintain the Instrument on page 32.
Dilute bulk reagents
Prepare EZPrep, RiboWash, Reaction Buffer, and SSC (optional) by diluting them 1:10 with
distilled water.
Register new reagents
Reagent dispensers come with appropriate barcode labels and registration buttons for dispensing
RNAscope® VS Reagents. Use the wand that comes with the instrument to register new reagent
kits. Refer to the Ventana™ System User Manual for details.
Prepare instrument reagents
Register new reagent kits using the wand that comes with the instrument.
1. In reverse order from AMP 7 to AMP 1, transfer the entire volume of each RNAscope® VS
FFPE Reagent Kit component into the correspondingly labeled dispenser.
2. Transfer the rest of the RNAscope® VS Reagents to the correspondingly labeled dispensers.
IMPORTANT!
Avoid cross contamination between reagents.
3. Follow the dispenser product insert instructions to properly prime and handle the dispensers.
RNAscope® VS Assay for the Discovery® ULTRA User Manual - Red
21
4. Press the dispenser caps down tightly.
Note: Store tightly capped dispensers at 4°C when not in use.
5. Check solution levels: EZPrep, RiboWash, Reaction, LCS Buffer, and 1X SSC. Refill if they
are less than half full.
IMPORTANT!
Use reagents that have not expired.
6. Empty the waste bottle if needed.
Prepare detergent
1. Prepare 200 mL of diluted Dawn detergent by adding 4–5 mL Dawn detergent to 200 mL
distilled water in a container with a cap.
2. Mix well by inverting the container 4–5 times.
3. Add diluted detergent to a Tissue-Tek® Staining Dish.
Note: Store diluted detergent at RT.
Prepare deparaffinization reagents
•
In a fume hood, fill two clearing agent dishes with ~200 mL fresh xylene.
•
In a fume hood, fill two staining dishes with ~200 mL fresh 100% EtOH.
Note: Ensure all containers remain covered.
Prepare mounting reagents
•
In a fume hood, fill a clearing agent dish with ~200 mL fresh xylene.
Note:
Ensure all containers remain covered.
Prepare 1X Pretreat 2
Prepare 1X PRETREAT 2 while FFPE slides are baking at 60°C, or the following day if you choose
the optional stopping point on page 13. 1X Pretreat 2 is used in manual cell conditioning (CC).
1. Prepare 700 mL of fresh 1X Pretreat 2 by adding 630 mL distilled water to 1 bottle (70 mL)
10X Pretreat 2 solution in the beaker.
2. Mix well and cover the beaker with foil.
Create an instrument protocol
1. Open the NexES software and click on the Protocol button.
2. Click on Create/Edit Protocols, go to the Procedure drop down menu and select mRNA Red
Discovery ULTRA 2.0.
3. Main protocol steps appear as shown:
22
RNAscope® VS Assay for the Discovery® ULTRA User Manual - Red
4. After selecting the main protocol steps, drop down menus become available. Select the
appropriate protocol steps by clicking on the associated check boxes as shown:
IMPORTANT!
Optimal temperatures for the Amp 1 and Amp 3 hybridization steps
(Hybridization #2 and Hybridization #4) may vary depending on your instrument. To optimize
temperatures, follow the procedure in Appendix B. Calibrate the Instrument on page 36.
5. Select the appropriate assay conditions from the drop down menus according to the
following table:
Tissue type
Pretreatment #2 (Pretreat A)
Pretreatment #3 (Pretreat B)
Brain and spinal cord
12 MIN
12 MIN
Breast cancer
12 MIN
12 MIN
Cell lines
12 MIN
12 MIN
Colon
12 MIN
12 MIN
GI tract
12 MIN
12 MIN
RNAscope® VS Assay for the Discovery® ULTRA User Manual - Red
23
Tissue type
Pretreatment #2 (Pretreat A)
Pretreatment #3 (Pretreat B)
Head and neck cancer
12 MIN
12 MIN
Heart
12 MIN
12 MIN
Kidney
12 MIN
12 MIN
Liver
12 MIN
12 MIN
Lung
12 MIN
12 MIN
Lymphoma
8 MIN
8 MIN
Placenta
12 MIN
12 MIN
Prostate
12 MIN
12 MIN
Skin
12 MIN
12 MIN
Stomach
12 MIN
12 MIN
Thymus
8 MIN
8 MIN
Tonsil
8 MIN
8 MIN
Xenograft derived from cell
lines
12 MIN
12 MIN
Xenograft derived from
primary tumor
12 MIN
12 MIN
6. Click Save As, then select a protocol number from the drop down menu and choose a
protocol name for each probe. Click Save.
7. Click Close to go back to the main screen.
8. Assign a probe number from the list to each probe of interest. For each probe selected,
assign a protocol.
Print the labels
1. Select the Print Label icon from the bottom of the home page screen.
2. Select your preferred template or create a new template. To create a new template, refer to
the Ventana™ System User Manual for details.
3. Select the protocol you created for the RNAscope® VS Assay.
4. Click on Protocol to add and print the label.
24
RNAscope® VS Assay for the Discovery® ULTRA User Manual - Red
Manually pretreat the samples
Materials required
Materials provided by the RNAscope® VS
Reagents
• 10X Pretreat 2
Other materials and equipment
• Drying oven
• FFPE slides
• Tissue-Tek® Vertical 24 Slide Rack
• Tissue-Tek® Staining Dish
• Distilled water
• Prepared deparaffinization materials
• Glass beaker (1 or 2 L)
• Hot plate
Bake the slides
1. Bake slides in a dry oven for 30 MIN at 60°C.
OPTIONAL STOPPING POINT Use immediately or store at RT with dessicants for ≤1 week.
Prolonged storage may degrade sample RNA.
2. If you continue, prepare the materials for the following protocols while the slides are
baking: Deparaffinize FFPE sections in the next section, Pretreat the slides on page 26, and
Run the RNAscope® VS Assay on page 27. See Prepare the materials on page 21.
Deparaffinize FFPE sections
IMPORTANT!
If you have not done so already, create a protocol for your instrument and print slide
labels during this procedure. See pages 22–24.
1. Place slides in a Tissue-Tek® Slide Rack and submerge in the first xylene-containing clearing
agent dish in the fume hood.
2. Incubate the slides in xylene for 5 MIN at RT. Agitate the slides by occasionally lifting the
slide rack up and down in the clearing agent dish.
3. Remove the slide rack from the first xylene-containing dish and immediately place in the
second xylene-containing clearing agent dish in the fume hood.
4. Repeat Step 2.
5. Remove the slide rack from the second xylene-containing dish and immediately place in the
staining dish containing 100% EtOH.
6. Incubate the slides in 100% EtOH for 1 MIN at RT with agitation.
7. Repeat Step 6 with fresh 100% EtOH.
8. Remove the slides from the rack, and place on absorbent paper with the section face-up.
Air dry for 5 MIN at RT.
9. While slides are drying, place printed labels on the slides.
IMPORTANT!
Labels must be in place prior to the next section.
10. Insert the slides into a Tissue-Tek® Slide Rack and proceed to the next section.
RNAscope® VS Assay for the Discovery® ULTRA User Manual - Red
25
Pretreat the slides
Begin heating 1X Pretreat 2 while FFPE slides are baking at 60°C or during the previous section.
IMPORTANT!
Do not boil 1X Pretreat 2 more than 30 MIN before use.
1. Heat 1X Pretreat 2 to 98–104°C:
a. Place the beaker containing 1X Pretreat 2 on the hot plate. Cover the beaker with foil
and turn the hot plate on high for 10–15 MIN.
b. Once 1X Pretreat 2 reaches a slow boil (98–104°C), turn the hot plate to a lower setting
to maintain the correct temperature. Check the temperature with a thermometer.
2. With a pair of forceps very slowly submerge the slide rack containing the slides into the
boiling 1X Pretreat 2 solution. Cover the beaker with foil and boil the slides for the amount
of time specified in the following table:
Tissue type
Treatment time
Brain and spinal cord
15 MIN
Breast cancer
15 MIN
Cell lines
10 MIN
Colon
15 MIN
GI tract
15 MIN
Head and neck cancer
15 MIN
Heart
15 MIN
Kidney
15 MIN
Liver
30 MIN
Lung
15 MIN
Lymphoma
10 MIN
Placenta
15 MIN
Prostate
15 MIN
Skin
15 MIN
Stomach
15 MIN
Thymus
10 MIN
Tonsil
10 MIN
Xenograft derived from cell lines
7 MIN
Xenograft derived from primary tumor
15 MIN
3. Use the forceps to immediately transfer the hot slide rack from the 1X Pretreat 2 to a
staining dish containing distilled water. Do not let the slides cool in Pretreat 2.
4. Wash slides 3–5 TIMES by moving the Tissue-Tek® Slide Rack up and down in the distilled
water.
5. Repeat Step 4 with fresh distilled water.
6. Directly proceed to Loading the reagents on page 27.
26
RNAscope® VS Assay for the Discovery® ULTRA User Manual - Red
Run the RNAscope® VS Assay
Materials required
• Prepared slides
• Prepared instrument reagents
• Prepared detergent
• Distilled water
• Prepared mounting materials
• Tissue-Tek® Vertical 24 Slide Rack
• EcoMount
• Cover Glass, 24 mm x 50 mm
Loading the reagents
1. Remove the nozzle caps of the filled dispensers and place them on their holders.
2. If needed, remove any air bubbles at the nozzle tips by squeezing out one drop of
reagent.
3. Load dispensers onto the reagent racks.
4. Remove the yellow locking ring from the dispensers in the prefilled mRNA RED Detection
Kit. Refer to the instructions provided by Ventana™ Medical Systems.
5. Load the reagent racks onto the reagent carousel.
Start the run
1. Click the Ready button.
2. Load each slide onto a heater pad with the label facing away from you. Ensure that the
slides sit securely on the pads.
IMPORTANT!
Prior to loading the slides, ensure heater pads are completely dry. Wipe off
any solution using laboratory tissue paper.
3. Click the Running button. Automated assay will finish in ~8 HRS.
IMPORTANT!
Before leaving the instrument unattended, ensure all reagents and slides are
successfully registered and the instrument is running.
Complete the run
1. After the run is complete, place nozzle caps back on the dispensers.
2. Store reagent racks at 4°C until next use.
RNAscope® VS Assay for the Discovery® ULTRA User Manual - Red
27
Wash the slides
1. Submerge a Tissue-Tek® Slide Rack into the Tissue-Tek® Staining Dish containing 200 mL
diluted detergent.
2. Open the instrument slide tray and unload slides.
3. Decant solutoin on the slides into the slide tray, then immediately load slides into the TissueTek® Slide Rack submerged in detergent.
4. Rinse oil off the slides by moving the slide rack up and down in the dish 10 times.
5. Replace the detergent with distilled water and rinse slides by moving the slide rack up and
down 10 times.
6. Repeat Step 5 three to five times.
Mount the samples
1. Remove the slide rack from the staining dish and dry slides in a 60°C dry oven for 15 MIN.
IMPORTANT!
The Red substrate is alcohol sensitive. Do not dehydrate the slides in alcohol.
2. Cool the slides for 5 MIN at RT.
3. Briefly dip one slide into into fresh pure xylene and immediately place 1–2 drops of
EcoMount on the slide before the xylene dries.
IMPORTANT!
Use the EcoMount mounting medium only.
4. Carefully place 24 mm x 50 mm coverslip over the tissue section. Avoid trapping air
bubbles.
5. Repeat steps 2 and 3 for each slide.
6. Air dry slides for 5 MIN.
7. Proceed to Chapter 6. Evaluate the results on page 30.
28
RNAscope® VS Assay for the Discovery® ULTRA User Manual - Red
Recommended Guidelines
We highly recommend following the guidelines for Cell Conditioning (Pretreat 2), Pretreatment #2
(Pretreat A), and Pretreatment #3 (Pretreat B) conditions for:
• Any new or previously untested FFPE tissue types.
• Samples prepared differently than the protocol in Chapter 3. Prepare and Pretreat Samples on
page 12.
1. Stain six representative slides using the positive and negative control probes according to
the following table:
Slide No.
Probe
Manual Cell
Conditioning
Pretreatment #2
Pretreatment #3
1
Positive control
10 MIN
12 MIN
12 MIN
2
Negative control
10 MIN
12 MIN
12 MIN
3
Positive control
15 MIN
12 MIN
12 MIN
4
Negative control
15 MIN
12 MIN
12 MIN
5
Positive control
30 MIN
12 MIN
12 MIN
6
Negative control
30 MIN
12 MIN
12 MIN
2. Evaluate staining and tissue morphology as in Chapter 6. Evaluate the results on page 30,
and determine which pretreatment condition yielded the highest positive control signal and
lowest negative control signal. Positive control signal should have a staining score of 3 or
higher, and the negative control signal should be 0.
3. Use the optimized pretreatment conditions to run the assay with the target probe.
4. If none of the conditions are satisfactory, contact technical support at [email protected].
RNAscope® VS Assay for the Discovery® ULTRA User Manual - Red
29
6
Chapter 6. Evaluate the results
Examine tissue sections under a standard bright field microscope at 20–40X magnification:
•
Assess tissue and cell morphology.
•
Assess positive control signal strength. Positive control signal should be visible as punctate dots
within cell nuclei at 20–40X magnification.
•
Assess negative control background. One dot to every 10 cells displaying background
staining per 20X microscope field is acceptable.
•
Evaluate target probe signal using the scoring guidelines in the next section.
Scoring guidelines
The RNAscope® Assay enables a semi-quantitative scoring guideline utilizing the estimated
number of punctate dots present within each cell boundary.
An example of how to develop such a guideline for semi-quantitative assessment of RNAscope®
staining intensity is presented below for a gene with expression level varying between 1 to > 10
copies per cell.
Note: If your gene expression level is higher or lower than this range, you may need to scale the
criteria accordingly.
Categorize staining into five grades: 0, 1+, 2+, 3+ and 4+ according to the following table:
Staining
score
Microscope objective scoring*
0
No staining or less than 1 dot/cell (40X magnification)
1
1–3 dots/cell (visible at 20–40X magnification)
2
4–10 dots/cell. No or very few dot clusters (visible at 20–40X magnification)
3
>10 dots/cell. Less than 10% positive cells have dot clusters (visible at 20X magnification)
4
>10 dots/cell. More than 10% positive cells have dot clusters (visible at 20X magnification)
* Discount cells with artificially high nuclear background staining.
Quantitative Image Analysis
RNAscope® Spot Studio Software is designed for pathologists with no prior training in image
analysis. This intuitive software allows users to get statistical results with complete information of
cell-count/region and number of spots/cell. Simply load any image, select a region of interest,
define settings and run analysis, followed by a quality control review before results are exported.
Further information is available on our website at www.acdbio.com.
30
RNAscope® VS Assay for the Discovery® ULTRA User Manual - Red
Troubleshooting
For troubleshooting information, please contact technical support at [email protected].
Control example
If the assay is successful, the staining should look like the following images:
Figure 2 RNAscope® VS Assay detection of HPV E6/E7 mRNA in cervical cancer FFPE tissue.
RNAscope® VS Assay for the Discovery® ULTRA User Manual - Red
31
Appendix A. Maintain the
Instrument
A
If you have not used your DISCOVERY™ instrument for one week or longer, bacterial growth
and/or salt crystallization may partially clog the valves that dispense bulk reagents possibly
affecting assay performance.
Check all buffer containers for any visible signs of bacterial growth. Disinfect the containers with
Lysol IC if necessary, rinse well with distilled water, and refill with fresh, unexpired buffers.
Note: We recommend decontaminating the instrument and buffer containers every three months.
Flush the instrument
If you have used the instrument to run assays other than the RNAscope® Assay, we recommend
peforming this procedure prior to running the RNAscope® Assay.
Purge and prime the system with clean distilled water
Purge and prime the system with clean distilled water several times to remove debris and bacterial
growth:
1. Remove all the bulk reagent containers from the instrument.
2. Connect the yellow tubing manifold usually used for quarterly decontamination to the
instrument.
3. Place the open end of the tubing manifold into a bottle containing 4 L of distilled water.
Ensure that the tubing end touches the bottom of the bottle.
Note:
Refill the bottle with distilled water as needed.
4. Click on the Red Maintenance button.
5. Click on Function Tests on the main screen.
6. Double click on Test - Purge All ULTRA:
32
RNAscope® VS Assay for the Discovery® ULTRA User Manual - Red
You will hear a warning sound and see an error message stating that the pressue is
Note:
too low. This is normal. Click on Sign off to turn off the warning sound.
7. Repeat Steps 4—6 four more times.
8. Click on the Red Maintenance button.
9. Click Function Tests on the main screen.
10. Double click on Test - Prime ULTRA:
11. Repeat Steps 8—10 four more times.
Purge and prime the system with fresh reagents
1. Unplug the yellow tubing manifold, and then load the bulk reagent containers containing
fresh buffers back on the instrument.
2. Click on the Red Maintenance button.
RNAscope® VS Assay for the Discovery® ULTRA User Manual - Red
33
3. Click Function Tests on the main screen.
4. Double click on Test - Purge All ULTRA:
5.
Repeat Steps 2—4 once.
6. Click on the Red Maintenance button.
7. Click Function Tests on the main screen.
8. Double click on Test - Prime ULTRA.
34
RNAscope® VS Assay for the Discovery® ULTRA User Manual - Red
9. Repeat Steps 6—8 once.
RNAscope® VS Assay for the Discovery® ULTRA User Manual - Red
35
Appendix B. Calibrate the
Instrument
B
Heating capabilities may vary between instruments and could impact assay results. To maximize
assay performance, we recommend performing the following protocol prior to running the
RNAscope® Assay for the first time on an instrument.
Calibrate the temperature of the instrument
Run an RNAscope® VS Assay to test three sets of temperatures for the Amp 1 (Hybridization #2)
and Amp 3 (Hybridization #4) steps. Follow the instructions in Chapter 4. Fully Automated RNAscope®
VS Assay on page 14.
Temperatures tested:
• 49°C (Amp 1)/49°C (Amp 3)
• 51°C (Amp 1)/51°C (Amp 3)
• 53°C (Amp 1)/53°C (Amp 3)
Materials required
• RNAscope® Control Slides – Cat. No. 310045 for Human control slide, Hela
or Catalog No. 310023 for Mouse control slide, 3T3 (6 slides total)
• VS Positive Control Probe – [species] – PPIB
• VS Negative Control Probe – DapB
• All other reagents required to run the RNAscope® VS Assay
Procedure
1. Prepare six control slides to test the three temperature sets. Run each temperature set using
the Positive and Negative Control Probes.
2. Prepare the instrument and reagents as described in Chapter 4. Fully Automated RNAscope® VS
Assay.
3. See Create an instrument protocol on page16 to create three sets of protocols. Each set
should contain two protocols to run the Positive and Negative Control Probes. Use the
provided screenshots as a guide:
36
RNAscope® VS Assay for the Discovery® ULTRA User Manual - Red
Protocol set 1
Protocol set 2
Protocol set 3
4. Run the assay as described in Run the RNAscope® VS Assay on page 18.
5. Using the images on page Error! Bookmark not defined. as references, determine the
optimal temperatures for the Amp 1 and 3 hybridization steps.
RNAscope® VS Assay for the Discovery® ULTRA User Manual - Red
37
6. Adjust the Target Probe hybridization temperature to match the same scale as the
hybridization temperatures for the Amp1 and Amp 3 steps. For example, if the optimal
temperature is 51°C, lower the Target Probe hybridization temperature to 41°C instead of
43°C. See the following example:
38
RNAscope® VS Assay for the Discovery® ULTRA User Manual - Red
C
Appendix C. Safety
Chemical safety
WARNING! GENERAL CHEMICAL HANDLING. To minimize hazards, ensure
laboratory personnel read and practice the general safety guidelines for chemical
usage, storage, and waste provided below, and consult the relevant SDS for specific
precautions and instructions:
• Read and understand the Material Safety Data Sheets (MSDSs) provided by the chemical
manufacturer before you store, handle, or work with any chemicals or hazardous materials. To
obtain MSDSs, see Documentation and support in this document.
• Minimize contact with chemicals. Wear appropriate personal protective equipment when
handling chemicals (for example, safety glasses, gloves, or protective clothing).
• Minimize the inhalation of chemicals. Do not leave chemical containers open. Use only with
adequate ventilation (for example, fume hood).
• Characterize (by analysis if necessary) the waste generated by the particular applications,
reagents, and substrates used in your laboratory.
• Ensure that the waste is stored, transferred, transported, and disposed of according to all
local, state/provincial, and/or national regulations.
• IMPORTANT! Radioactive or biohazardous materials may require special handling, and
disposal limitations may apply.
Biological hazard safety
WARNING! BIOHAZARD. Biological samples such as tissues, body fluids,
infectious agents, and blood of humans and other animals have the potential to
transmit infectious diseases. Follow all applicable local, state/provincial, and/or
national regulations. Wear appropriate protective equipment, which includes but is not
limited to: protective eyewear, face shield, clothing/lab coat, and gloves. All work
should be conducted in properly equipped facilities using the appropriate safety
equipment (for example, physical containment devices). Individuals should be trained
according to applicable regulatory and company/institution requirements before
working with potentially infectious materials. Read and follow the applicable
guidelines and/or regulatory requirements in the following:
In the U.S.:
• U.S. Department of Health and Human Services guidelines published in Biosafety in
Microbiological and Biomedical Laboratories found at: www.cdc.gov/biosafety
• Occupational Safety and Health Standards, Bloodborne Pathogens (29 CFR§1910.1030),
found at: www.access.gpo.gov/nara/cfr/waisidx_01/%2029cfr1910a_01.html
RNAscope® VS Assay for the Discovery® ULTRA User Manual - Red
39
• Your company’s/institution’s Biosafety Program protocols for working with/handling
potentially infectious materials.
• Additional information about biohazard guidelines is available at: www.cdc.gov.
In the EU:
• Check local guidelines and legislation on biohazard and biosafety precaution and refer to the
best practices published in the World Health Organization (WHO) Laboratory Biosafety
Manual, third edition, found at:
www.who.int/csr/resources/publications/biosafety/who_cds_csr_lyo_2004_11/en/
• Information about the Registration, Evaluation, Authorisation and Restriction of Chemicals
(REACH) can be found at:
eur-lex.europa.eu/LexUriServ/LexUriServ.do?uri=OJ:L:2010:133:0001:0043:EN:PDF
40
RNAscope® VS Assay for the Discovery® ULTRA User Manual - Red
Documentation and support
Obtaining MSDSs
Material Safety Data Sheets (MSDSs) are available at: www.acdbio.com/product_literature.html. For
the MSDSs of chemicals not distributed by Advanced Cell Diagnostics, contact the chemical
manufacturer.
Obtaining support
For the latest services and support information, go to: www.acdbio.com/product_literature.html
At the website, you can:
•
Access telephone and fax numbers to contact Technical Support and Sales facilities.
•
Search through frequently asked questions (FAQs).
•
Submit a question directly to Technical Support.
•
Search for user documents, MSDSs, application notes, citations, training videos, and other
product support documents.
•
Find out information about customer training events.
Contact information
Advanced Cell Diagnostics, Inc.
3960 Point Eden Way
Hayward, CA 94545
Toll Free: 1-877-576-3636
Direct: 1-510-576-8800
Fax: 1-510-576-8801
Information: [email protected]
Orders: [email protected]
Support Email: [email protected]
Limited product warranty
Advanced Cell Diagnostics, Inc. and/or its affiliate(s) warrant their products as set forth in the
ACD General Terms and Conditions of Sale found on the ADC website at
www.acdbio.com/product_literature.html. If you have any questions, please contact Advanced Cell
Diagnostics at www.acdbio.com/about/contact.
RNAscope® VS Assay for the Discovery® ULTRA User Manual - Red
41
Headquarters
3960 Point Eden Way Hayward, CA 94545
For support, email [email protected].
www.acdbio.com
Phone 1-510-576-8800
Toll Free 1-877-576-3636